

Watch The How-to Video
The process of managing classes transferred from your Classter system to MS Teams is similar to the creation process described earlier in the previous section.
You will find all your Classter Classes in the Teams tab on MS Teams (Figure 22).

Figure 22
- You will notice all your classes displayed on this page and ready for use.
- You can click the class to open it and start editing it.
- You can click on the button with three dots to view options regarding the class (Figure 23).
 Figure 23
Once you click on the class, you will be transferred to the class/team page (Figure 24).

Figure 24
- On this page, you see all the available tabs for the class. Tabs include Posts, Files, Class Notebook, Assignments, Grades and Meeting Notes (If you have had a meeting).
- The use of the tabs is the same as described in the Create Class section of the manual.
Manage Team – Option
Click on the Manage Team option (Figure 23). You will see the following pop-up window (Figure 25).

Figure 25
Members Tab (Figure 25):
- You can see here the members tab in team management.
- You can see the members of this team/class.
- Click on the Add Members button to add new members.

Figure 26
Pending Requests Tab (Figure 26):
- On this tab, you will be able to see and accept members who have sent requests to join the team/class.

Figure 27
Channels Tab (Figure 27):
- In this tab, you can view all existing channels/sessions included in this Class.
- Click on add channel to add a new channel session.
- Each channel/session can be configured or edited differently from the class.

Figure 28
Settings Tab/Member Permissions (Figure 28):
- You can choose a different theme for the class by clicking the change theme. You can change the icon representing this class.
- The member’s permission options help you set up the permissions you would like to give or remove from your students. This will free or restrict the actions students can take in this class.
- Allow members to create and update channels is unchecked and recommended being so since the members are students. If checked, it would allow members/students to create/update new channels/sessions.
- Allow members to create private channels, this option is unchecked, since the members are students. If checked, it would allow members/students to create new private channels/sessions.
- Allow members to delete and restore channels, this option is unchecked, and it is recommended to be so since members are students. If the option was checked, it would allow members/students to delete or restore channel/sessions.
- Allow members to add and remove apps, this option is unchecked, and it is recommended to be so since members are students. If the option was checked, it would allow members/students to add or remove apps from the class.
- Allow members to upload custom apps, this option is unchecked, and it is recommended to be so since members are students. If the option is checked, it would allow members/students to upload custom apps to the class.
- Allow members to create, update, and remove tabs, this option is unchecked, and it is recommended to be so since members are students. If the option is checked, it would allow members/students to create, upload and remove tabs to/from the class.
- Allow members to create, update, and remove connectors, this option is unchecked, and it is recommended to be so since members are students. If the option is checked, it would allow members/students to create, upload and remove connectors from/to the class.
- Owners can delete all messages, this option is checked and recommended being so. If this option is unchecked, the owner of this class would not be able to delete any messages/posts appearing in the class post section or feed.
- Give members the option to delete their messages, this option is checked in order to allow students to remove/delete any messages they post in the post tab of the class. If this option is unchecked, students would be unable to do so.
- Give members the option to edit their messages, this option is checked in order to allow students to edit any messages they post in the post tab of the class. If this option is unchecked, students would be unable to do so.

Figure 29
Settings Tab/@Mentions (Figure 29):
- Mentions are used when posting comments or messages in the posts tab. They help to send messages to the entire class/team or to the entire channel/session, e.g. @Team or @Channel.
- Show members the option to @team or @[team name] (this will send a notification to everyone on the team). If this option is checked, then students will be able to use this mention, to send messages or notifications to the entire class. If it is unchecked, this will not be possible.
- Give members the option to @channel or @[channel name]. This will notify everyone who’s shown the mentioned channel in their channel lists. If this option is checked, then students will be able to use this mention, to send messages or notifications to the entire channel or selected channel. If it is unchecked, this will not be possible.
Settings Tab/Team Code (Figure 29):
- Here, you can generate a unique code for students to be able to join this class directly. The code generated is for members only. Click on the generate button to create the unique code.
Settings Tab/Fun Stuff (Figure 29):
- The fun stuff includes the use of emoji’s, GIF’s and Memes in messaging and posting of this class.
- Stickers and memes, enable stickers and memes. This option if checked would allow students to use stickers and memes in posts and messages in the class post tab or chats etc. If unchecked, they will not be able to too.
- Custom Memes, allow memes to be uploaded. This option if checked would allow students to use custom-made memes in posts and messages in the class post tab or chats etc. If unchecked, they will not be able to too.

Figure 30
Analytics Tab (Figure 30):
- You can view a summary of the class activity.
- View Active Users and Roles.
- View Activity chart.

Figure 31
Apps Tab (Figure 31):
- This section contains the apps you are currently using in the class, e.g. forms (Assignments or quizzes portal), OneNote etc.
- You can delete an app by clicking on the X button next to each app.
- You can add additional apps by clicking on the More apps button.
- If you click on the more apps button, you will be transferred to the following page (Figure 32).

Figure 32
Add Channel (Session) – Option
Once you click on the add channel option (Figure 33), you will see the following pop-up window (Figure 34).

Figure 33

Figure 34
Create a Channel/Session (Figure 34):
- Enter a name for the channel/session, e.g. the date of the session or topic.
- Enter a description of the session in the description text box.
- Choose the privacy settings from the dropdown list, e.g. Standard – Accessible to everyone on the Team/Class.
- Click on the automatically show this channel/session in everyone’s channel list. If you do not, it will remain hidden.
Add Member – Option
By clicking on the add member button from class options, you can add students or teachers to the class (Figure 36).

Figure 35

Figure 36
Add Students to Class (Figure 36):
- Write a letter or two of the name you are looking for, and you will see a list of students.
- Select the students you want to add by clicking on the names on the list.
- Click on the Add button to add selected students.
- All students on the list have been imported from your institution’s Classter account.
- Once you are done adding students, click on the Teacher tab to go to the add teachers’ section of the pop-up window (Figure 37).

Figure 37
Add Students to Class (Figure 37):
- Write a letter or two of the name you are looking for, and you will see a list of teachers.
- Select the teachers you want to add by clicking on the names on the list.
- Click on the Add button to add selected teachers.
- All teachers on the list have been imported from your institution’s Classter account.
- Once you are done adding teachers, click on the close button to close the window.
Edit Team/Class – Option
Once you have clicked on the edit team/class option from the class menu (Figure 38), you will see the following pop-up window (Figure 39).
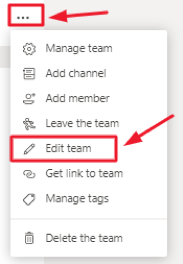
Figure 38

Figure 39
Add Students to Class (Figure 39):
- On this pop-up window, you can edit the name of the class.
- Choose the level of education and the subject.
- Based on the choice of subject, you will see avatars/pictures that will represent this class in the teams lists.
- Click on the update button to apply changes.