Introduction
With the entity _Subjects_ in Classter, we refer to the subject/course, considering the content, such as ‘mathematics’, ‘physics’, ‘introduction to databases’, etc.
The Subjects are connected to _Grades_ and _Streams_.
In K-12 Schools, language centers, and training centers, the connection to Grades and Streams is usually unique. In Higher Education, we may have a connection to multiple Grades and the Stream may be just the default one, since the same subject can be used in multiple curricula (this means that the same subject used in multiple curricula must be created only once in the list of subjects if you need co-teaching).
Moreover, in the list of subjects, we create thesis, internships, qualifications, special entries & services. This is based on the field ‘Type’. (Other types’ functionalities, instead of subjects, are described in the relevant manuals).
_Subjects_, are finally connected under _Groups_ and enrolled to _Teachers_, _Students_.
In this manual, we will go through all options and actions in the subjects list, as well as options, actions, and fields in the subject card.
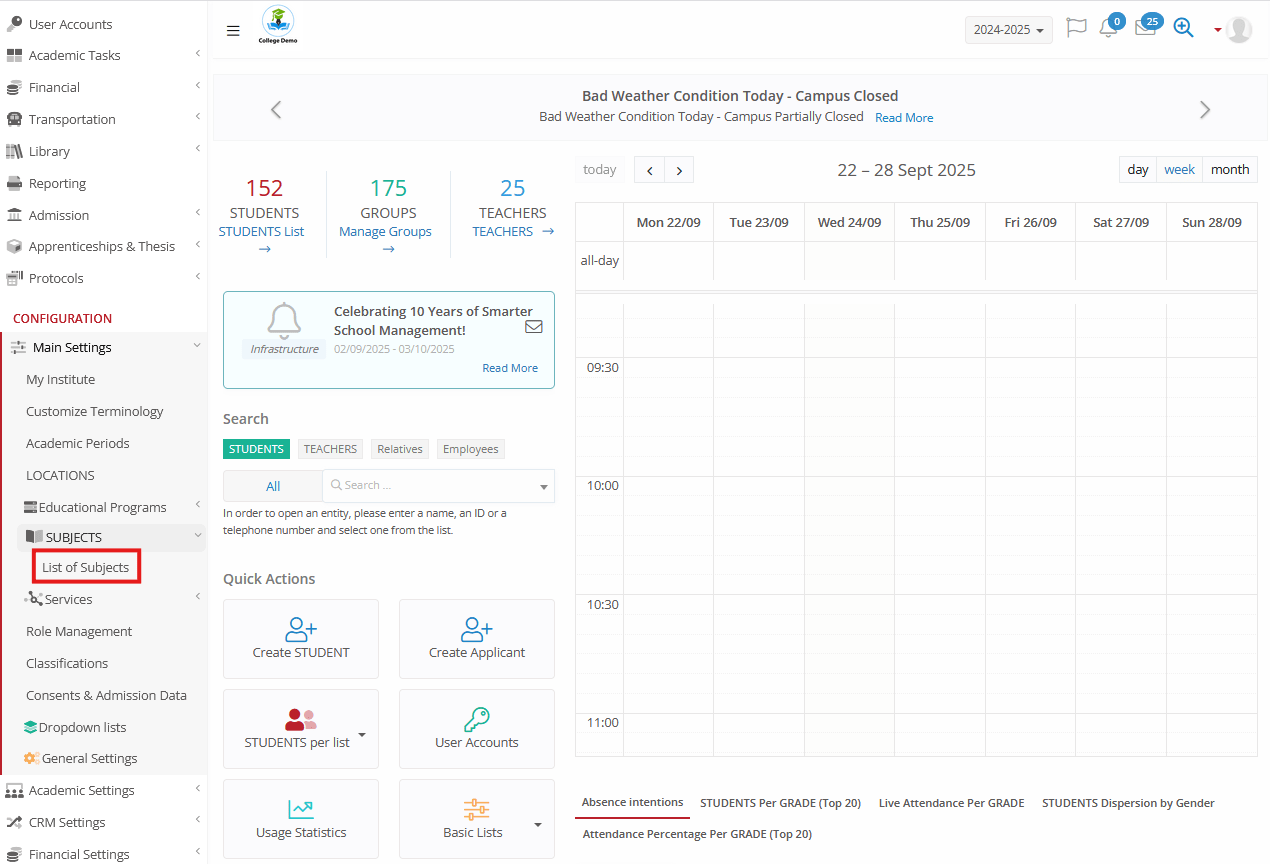
Path: Configuration > Main Settings > _Subjects_
Subject Card (Create/Edit)
When you click Create New or Edit a Subject, the _Subject_ form opens with multiple TABS:
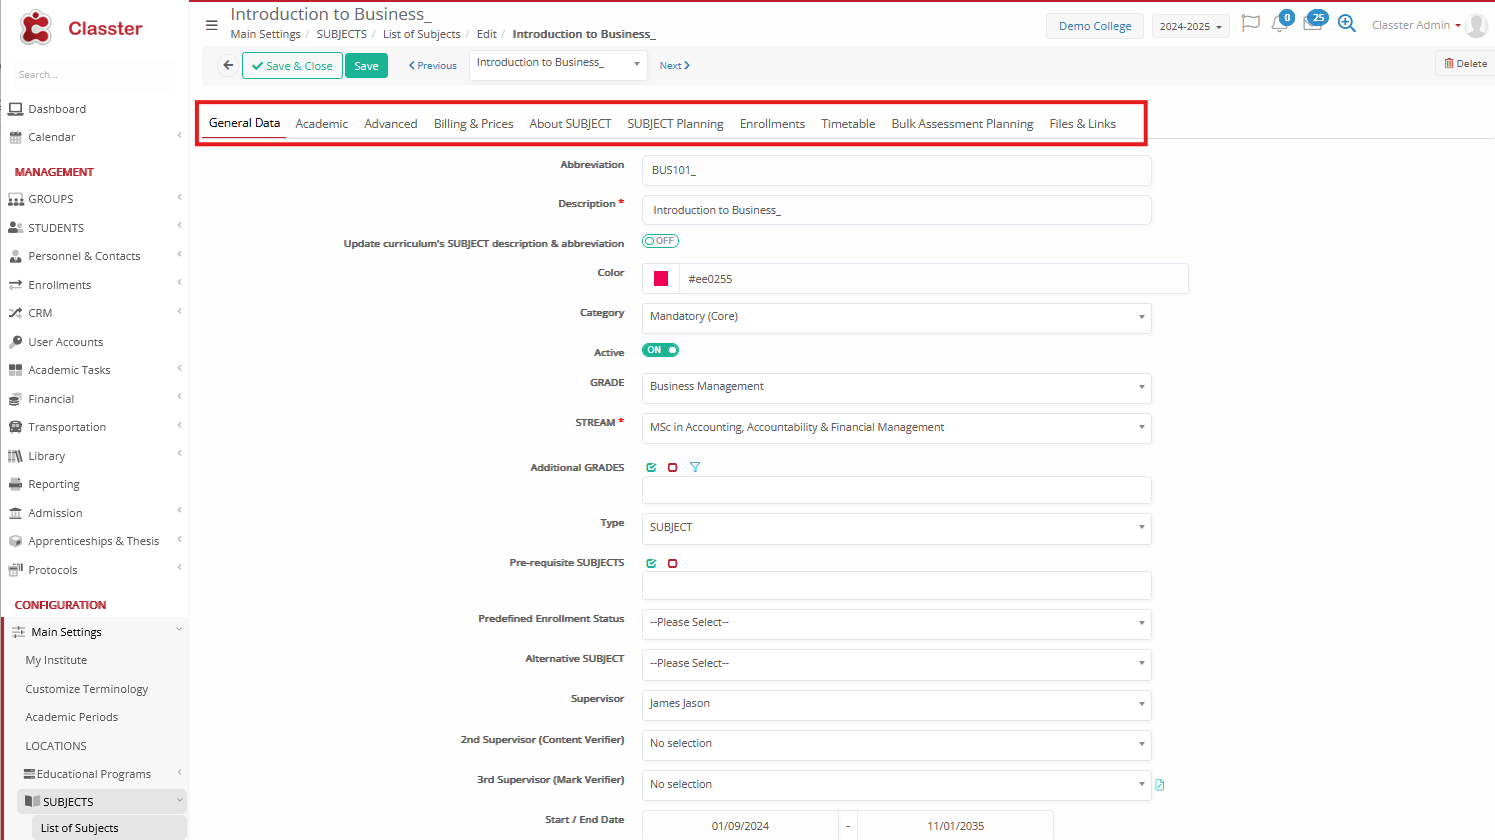
*When you click Create New, only the General Data tab is available until you first save.
- Complete at least the required fields and click Save.
- After saving, all other tabs will unlock and become available for configuration.
When editing an existing subject, all tabs are already accessible.
TABS and Fields in details
- General Data Tab (basic subject data and properties)
- Academic Tab (academic default settings and limits)
- Advanced Tab (admission, statistics, quiz, reports, external integrations & scientific fields properties)
- Billing & Prices Tab (default billing properties such as price list, billing plan)
- About _Subject_Tab_ (extra subject data such as title translated per language, subject URL, photo, extra rich text information & online enrollments info)
- _Subject_ Planning Tab (custom schedule subject plan, with chapters, content data, etc.)
- Enrollments Tab (subject connections to groups, students, teachers, etc)
- Timetable Tab (view of subject general timetable, per timetable category, etc.)
- Bulk Assessment Planning Tab (bulk assessment creation for the subject, with bulk copy to all connected groups, etc.)
- Files & Links Tab (subject uploaded files or URLs, organized per categories which can be customized)
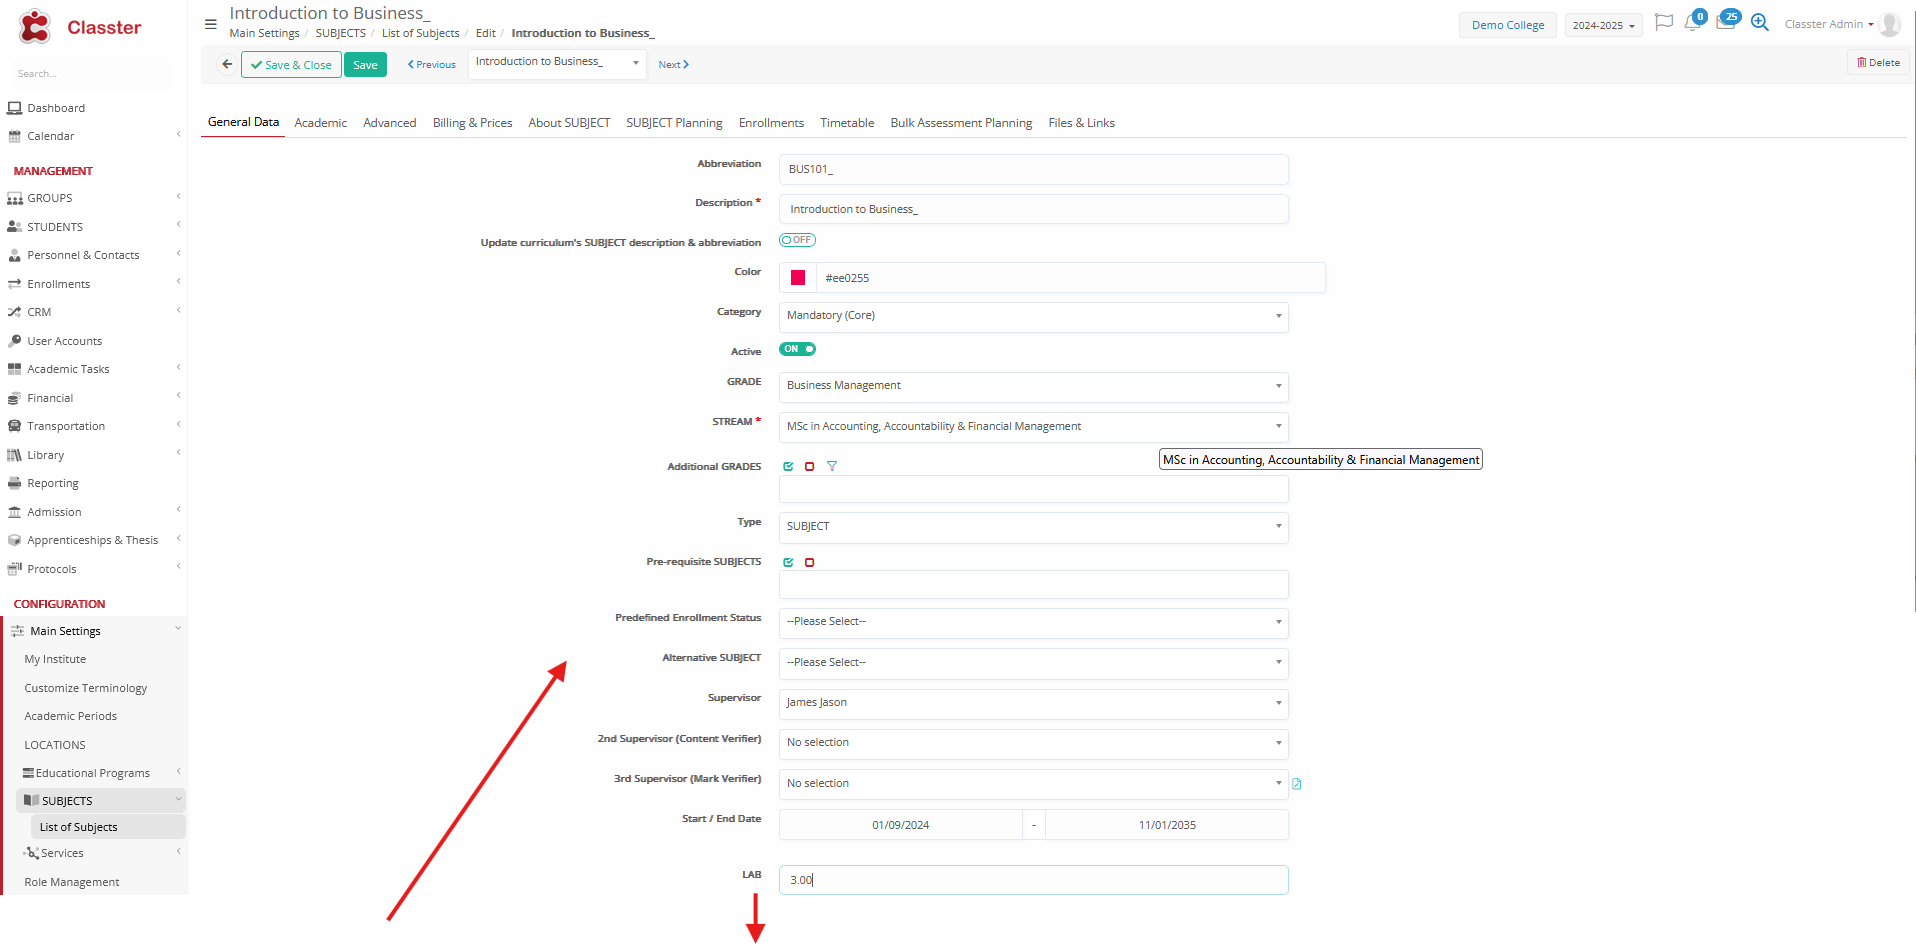
General Data
Core fields of the subject:
- Abbreviation → Short subject description/code (e.g., ‘EN1’).
- Description* → Full subject name (e.g., ‘English 1’)
- Update curriculum’s _Subject_ description & abbreviation → Toggle to sync subject’s abbreviation & description with the curricula the subject is already connected to. (used in case of editing existing subjects, connected to curricula)
- Color → Assign a color, which can be used in various lists with subjects in the system, to identify easily. (e.g., in the list of subjects, or timetable)
- Category → Subject category (e.g., Mandatory, Optional, Elective). This is a customized field. You can edit the values from the path CONFIGURATION > Main Settings > Dropdown Lists > Type: System & Dropdown list: _Subject_ Category
- Active → Toggle to enable or disable the subject in the current academic period.
- _Grade_ * → Main _Grade_ assigned to the subject. (in K-12 mode, this is usually one to one, whereas in HE mode, the connection may be one (subject) to multiple (grades/programs) – in this case, we just select one grade/program as the ‘default’ one here, and the additional ones are added in the ‘Additional _Grades_’ field described below)
! In Higher Education mode, this field is just informative. The actual final connection and usage of the subject is defined through the Curricula.
! In K-12 mode, there is still the possibility to enroll students from other Grades’ groups-subjects if needed.
- _Stream_ * → Main _Stream_ assigned to the subject. (In K-12 mode, this is usually one-to-one, whereas in HE mode, the connection may be one (subject) to multiple (streams) – in this case, we just select one stream as the ‘default’ one, and we can still use the subject within any curriculum)
! In Higher Education mode, this field is just informative. The actual final connection and usage of the subject is defined through the Curricula.
! In K-12 mode, there is still the possibility to enroll students from other Streams’ groups-subjects if needed.
- Additional _Grades _→ If the subject is connected to multiple grades/programs, after you select the default one at the ‘_Grade_’ field, you add the rest here.
- Type → The subject type (pre-defined options from the system, not customized)
_Subject_: The default type, which defines the entity as ‘subject’ (the functionality described in the current manual)
_Thesis_: Subject entity is also used in the Thesis module. This option is used for Thesis subjects. For more details about the thesis, please refer to the corresponding manual.
_Internship_: Subject entity is also used in the Internship module. This option is used for Internship subjects. For more details about the Internships, please refer to the corresponding manual.
Qualification: The subject entity is also used in the Admission module. This option is used for standard Qualifications (e.g., SSC&P results) used in admissions-entry requirements (& qualification points). For more details about the Internships, please refer to the corresponding manual.
Special Entries: The subject entity is also used in the Admission module. This option is used for special/custom Qualifications (e.g., Interviews) used in admissions-entry requirements (& qualification points). For more details about the Internships, please refer to the corresponding manual.
Service: Subject entity is also used in the Services/activities. This option is used and connected to services when we need to have descriptive marking on the service/activity. For more details about the Internships, please refer to the corresponding manual.
- Pre-requisite _Subjects_ → Subjects that must have been passed already, in order to enroll in the current one.
! In Higher Education mode, this field is just informative and used as a pre-defined option. The actual final prerequisites are defined through the Curricula.
- Predefined Enrollment Status → Default enrollment status for new _Students_. (A general setting is used for the default enrollment status as well, but this option can overwrite the setting, e.g., in case of specific subjects where a workflow, review, payment, etc., must be completed before enrollment)
- Alternative _Subject_ → Define an alternative subject, replacement, etc. Used in enrollments and promotion/graduation calculations. If an alternative subject is passed, then the criterion of passing the current one is met as well.
! In Higher Education mode, this field is just informative and used as a pre-defined option. The actual final alternatives are configured through the Curricula.
- Supervisor → ‘Supervisor’ special functionality – user must exist as a ‘Teacher’ entity in the system. The Supervisor Teacher can access data of the current subject from any group. (The default teacher access is based on his/her allocations to groups-subjects. The supervisor does not require any allocations, but his/her access is open to any group related to the subject he/she supervises. Also, some actions can be set only for supervisors. Relevant settings are required: CONFIGURATION > General Settings > Basic Customization > Supervisors Configuration & CONFIGURATION > General Settings > _Teachers_ Portal Rights.)
- 2nd Supervisor (Content Verifier) → ‘Assessments Workflow’ special functionality – user must exist as ‘Teacher’ entity in the system. Content verifier, verifies the content of the assessments/assignments (from any teacher-group of the subject). With the assessments workflow enabled, content verification is required before publishing the assessment to the students. Relevant settings are required: CONFIGURATION > Academic Settings > Marking Settings > General Settings > Assessments/Assignments > Assessment Workflow). For more information, please refer to the corresponding manual.
- 3rd Supervisor (Mark Verifier) → ‘Assessments Workflow’ special functionality – user must exist as a ‘Teacher’ entity in the system. Mark verifier verifies the initial marks of the assessments/assignments submitted by the teacher (from any teacher-group of the subject). With the assessments workflow enabled, mark verification is required before finalizing the marks and publishing them to the students. Relevant settings are required: CONFIGURATION >Academic Settings > Marking Settings > General Settings > Assessments/Assignments > Assessment Workflow. For more information, please refer to the corresponding manual.
- Start Date / End Date → Start and End Date of the subject in the current academic period.
- LAB / LAB2 Hours → Planned subject Lab hours per week. Can be used as a limitation during the timetable creation (per group-subject).
- Hours per Week → Planned teaching hours per week. Can be used as a limitation during the timetable creation (per group-subject).
- Number of Weeks → Planned teaching number of weeks.
- Academic Credits → Credits / ECTS. Can be used in reporting-calculations. In HE mode, this is the default ‘weight’ of the subject for the final marks’ calculations.
- Academic Credits 2 → Secondary credits/ECTS, if applicable. Can be used in reporting-calculations. In HE mode, this can be used as ‘weight’ of the subject for the final marks’ calculations (alternatively from the credits 1), or as informative data (e.g., for extra certifications with different credits than the default ones).
- External ID → Identifier for integrations with external systems.
- Comments → Notes or additional details in free text.
- Last Changed User → User who last modified the subject.
- Last Changed Date → Date of the last modification.
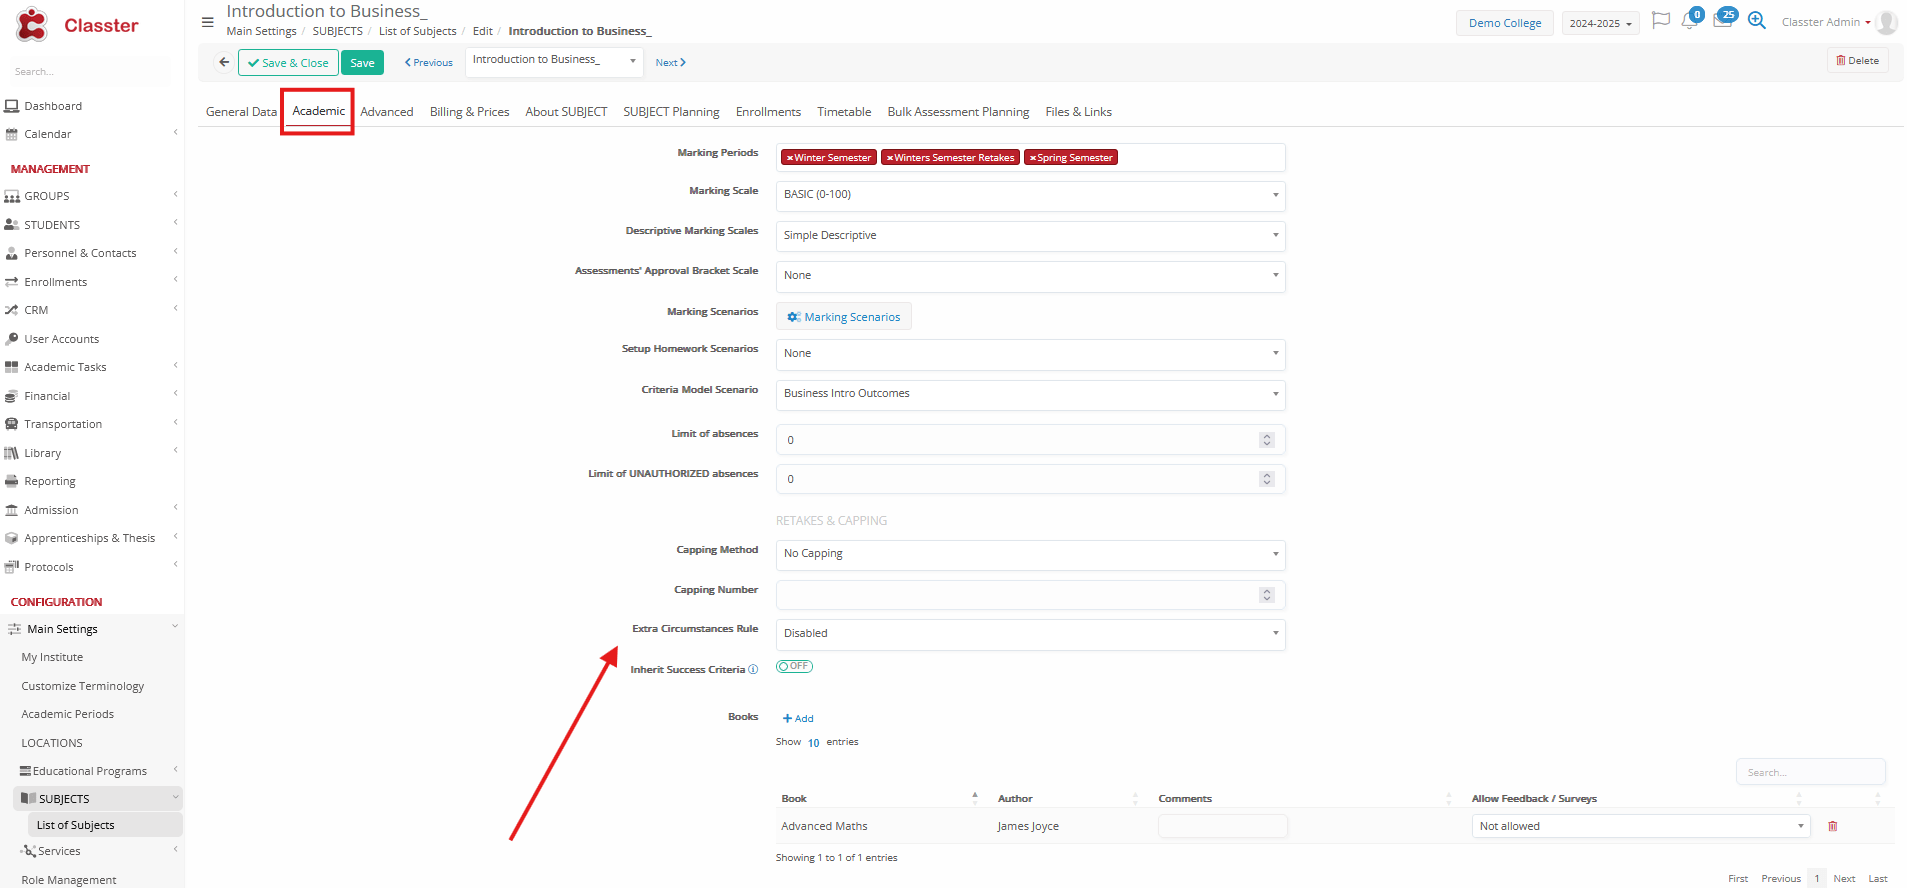
Academic
The Academic Tab defines marking, absences, retakes, and other academic rules or default properties for the subject.
Fields available in Academic
- Marking Periods → Marking periods connected to the subject, used for any marking purpose, in gradebook, assessments, etc. (e.g., ‘1st Trimester’ / ‘Semester’ / Quarter / Final Exams, etc.). List of Marking Periods configured from CONFIGURATION > Academic Settings > Marking Settings > Marking Periods.
- Marking Scale → Default subject numeric marking range (e.g., ‘0–100’). Used in Gradebook, Assessments, etc. A different or a custom marking range can still be configured if needed, in the assessment types or in the gradebook marking scenario criteria. List of marking ranges configured from CONFIGURATION > Academic Settings > Marking Settings > Marking Ranges(with the property ‘descriptive’ disabled).
- Descriptive Marking Scales → Default descriptive/non-numeric marking range (e.g., ‘Excellent’, ‘Good’, ‘Satisfactory’). used in the Descriptive Marking. A custom descriptive marking range can still be configured if needed, in the descriptive marking scenario criteria. List of marking ranges configured from CONFIGURATION > Academic Settings > Marking Settings > Marking Ranges(with the property ‘descriptive’ enabled).
- Assessments’ Approval Bracket Scale → Used in Assessments Workflow functionality. During mark approval by the mark verifier, the selected marking range defines the maximum differences allowed for auto-approval between the initial teacher marks and the mark verifier marks. The numeric marking ranges are configured from CONFIGURATION > Academic Settings > Marking Settings > Marking Ranges (with the property ‘descriptive’ disabled). In the range, we define the individual allowed ranges (e.g., Marking Range ‘0-100’ -> where in details we have: 95-100, 90-95, 85-90, etc.).
- Marking Scenarios → Default subject numeric marking scenario (Gradebook). With pre-configured marking criteria, with their own weight, calculation type (average based on weights, sum, etc.), connected to assessments for automated average, etc. Marking scenarios are configured from CONFIGURATION > Academic Settings > Marking Settings > Marking Scenarios.
- Set up Homework Scenarios → Default subject Homework scenario. With pre-configured homework categories, available for teachers to enter homework in. Homework scenarios are configured from CONFIGURATION > Academic Settings > Sessions & Homework > Homework Scenarios.
- Criteria Model Scenario → Used in Assessments. A numeric marking scenario, with pre-configured marking criteria, which will be available for the Teachers to select for marking assessments. The ‘Assessment Type’ must have the assessment properties related to “Outcomes” configured.
Marking scenarios are configured from CONFIGURATION > Academic Settings > Marking Settings > Marking Scenarios.
- Limit of Absences → Maximum allowed absences for the subject, in total (authorized & unauthorized). Used in results calculations to determine whether the subject is passed. Special subject status can be set, as failed due to absences.
*Limit can be either in total number or in percentage, based on the setting: CONFIGURATION > Academic Settings > Attendance Settings > Attendance Settings > General Settings > Limits Controls > Use Absence Limit in Percentage (Limit based on projected hours).
- Limit of Unauthorized Absences → Maximum allowed -unauthorized only- absences for the subject used in results calculations, to determine whether the subject has passed. Special subject status can be set, as failed due to absences.
*Limit can be either in total number or in percentage, based on the setting: CONFIGURATION > Academic Settings > Attendance Settings > Attendance Settings > General Settings > Limits Controls > Use Absence Limit in Percentage (Limit based on projected hours).
Retakes & Capping (HE only)
Retakes & Capping → Define capping rules for retakes. In both marking period subject retakes and synoptic retakes, you can set a maximum limit for the marks. Either in the final mark or the marking criteria marks.
Capping Method
- Subject capping / Final mark: When the marking period type is ‘retake’, and the final mark is higher than the capping limit, then the final mark is set to the mark limit.
- Marking criteria capping: When the marking period type is ‘retake’ and the marking criteria mark is higher than the capping limit, then the marking criteria mark is set to the capping limit, unless the marking criteria mark (success) is inherited from the previous period.
- Capping Number → The maximum limit, in comparison to the above settings. Numerical cap (e.g., 50, 60).
Retakes & Capping example: Capping method is enabled with subject capping, and the capping number is set to 60. Retake the actual/initial mark of the student is 80 (higher than the limit). Since 80 > 60, then the final mark is set/replaced with 60. If the initial mark is lower than the limit, then no change is made.
- Extra Circumstances Rule → Apply exceptions for special conditions that will skip the capping (e.g., illness, approved absence).
- Inherit Success Criteria → Toggle. If enabled, Classter retrieves a criteria mark from previous periods: if a qualification mark is set, it’s used when the criteria mark is higher; if not, the mark is retrieved when the criteria mark exceeds the subject pass mark.
Books Section
Library Module. Connect books to the _Subject_, used in Book Lending based on subjects’ enrollments.
- Add: Click to connect a new book to the subject. The book must already exist in the list of books. MANAGEMENT > Library > Book List
Added books:
- The system will automatically inherit the Book title (e.g., Advanced Maths) and the Author(s) (e.g., James Joyce).
- Comments can be added here – informative, shown during book lending (e.g., Recommended chapters: 1–3)
- Allow Feedback / Surveys → Toggle to enable _Student_ feedback on the book. (Quiz module)
Used in Curricula (HE only)
- Displays which programs or curricula include this _Subject_ (e.g., BSc Business Management 2020, BSc Business Management 2021).
Advanced
The Advanced Tab contains specialized configuration options for classifications, reporting, and external integrations.
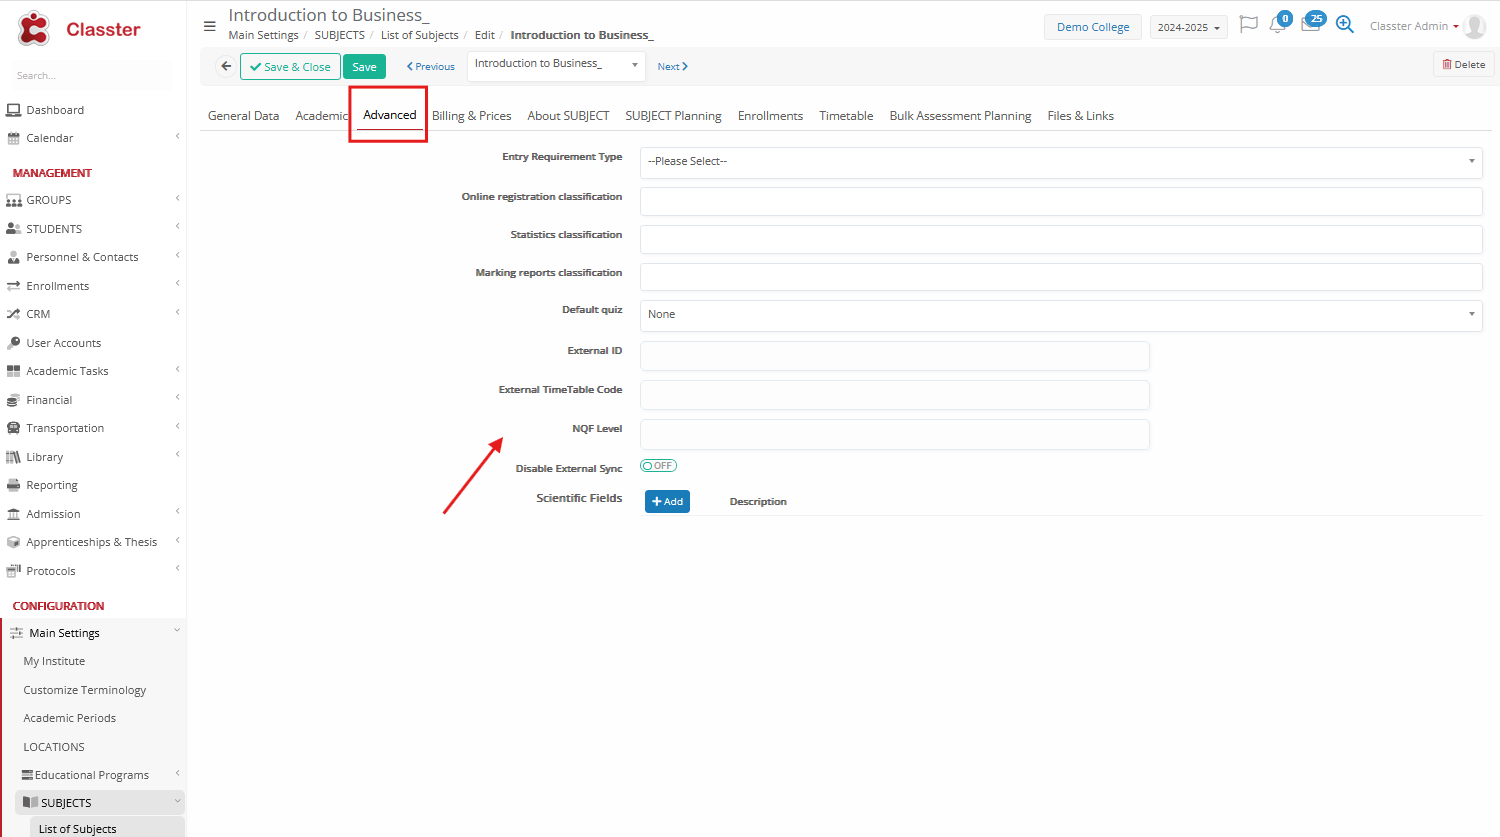
Fields available in Advanced
- Entry Requirement Type → Used in admission entry qualifications, with special functionality and standard systemic options.
- Online Registration Classification → Classification used in online enrollment workflows (e.g., Core Subject, Elective Subject).
The classifications must already exist in CONFIGURATION > Main Settings > Classifications.
- Statistics Classification → Category used for statistical reporting (e.g., STEM, Humanities).
The classifications must already exist in CONFIGURATION > Main Settings > Classifications.
- Marking Reports Classification → Define how the subject is grouped in the tables/layout in official marking reports (e.g., Undergraduate Core, High School Mandatory).
The classifications must already exist in CONFIGURATION > Main Settings > Classifications.
- Default Quiz → Assign a predefined quiz linked to the subject (e.g., MBA Questionnaire). Used in quizzes distribution based on enrollments, per subject.
- External ID → Subject identifier for migrations with external systems. E.g., the unique subject ID in the previous system or in an integrated system such as Moodle, for easier migrations. Please note that this is not the actual integration ID used in enabled integrations – these connections can be found through the integration settings.
- External Timetable Code → Subject identifier for migrations or imports from external timetable systems (e.g., 152637 or TT-MATH-01).
- NQF Level → Define the National Qualification Framework level (e.g., Level 4, Level 6). Informative field in free text.
- Disable External Sync → Toggle to prevent the subject from being synchronized with external systems (enabled integrations). By default, when a relevant integration is enabled, then based on the users’ enrollments, all subjects are synced through synchronizations. This is to exclude only specific subjects from these actions.
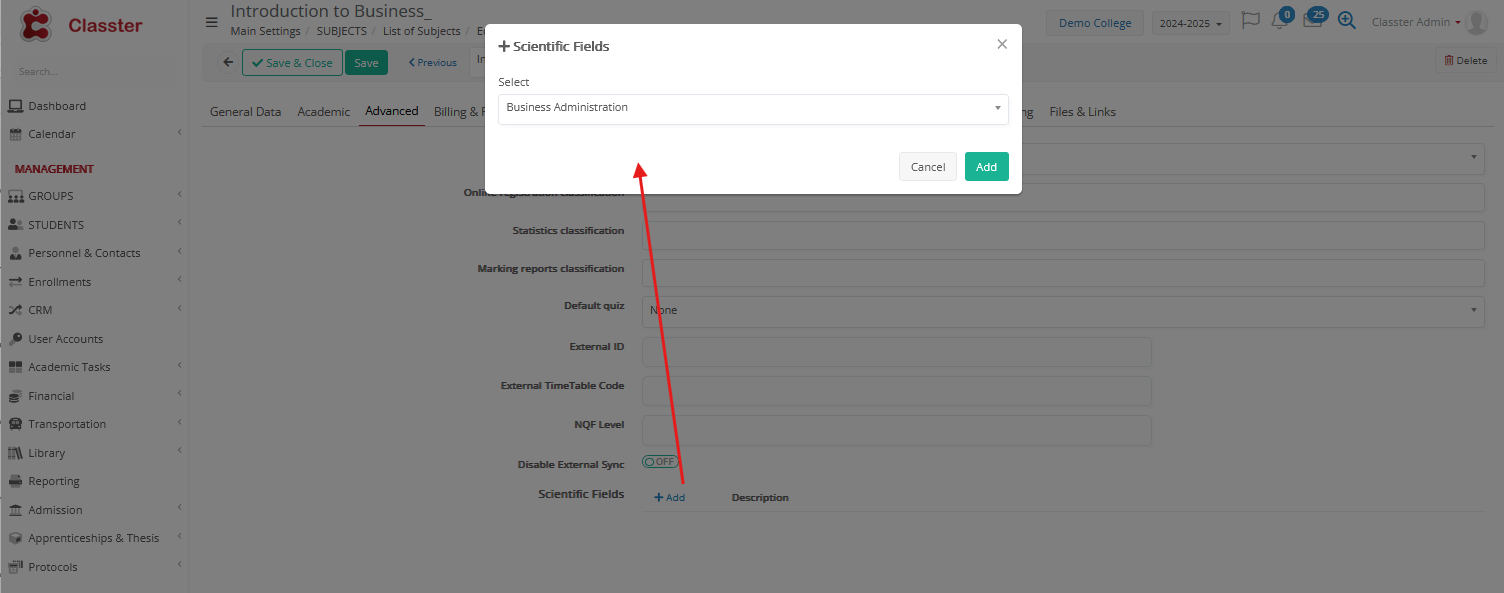
- Scientific Fields → Assign the _Subject_ to one or more scientific domains for classification and reporting purposes (e.g., Social Sciences, Engineering, Health Sciences). This helps group subjects under broader academic or scientific categories.
Scientific Fields must already exist in CONFIGURATION > Main Settings > Dropdown Lists > Type: System & Dropdown Lists: Scientific Fields.
Billing & Prices
The Billing & Prices Tab defines if the subject is billable and default prices, billing methods, taxes, installment plans, etc.
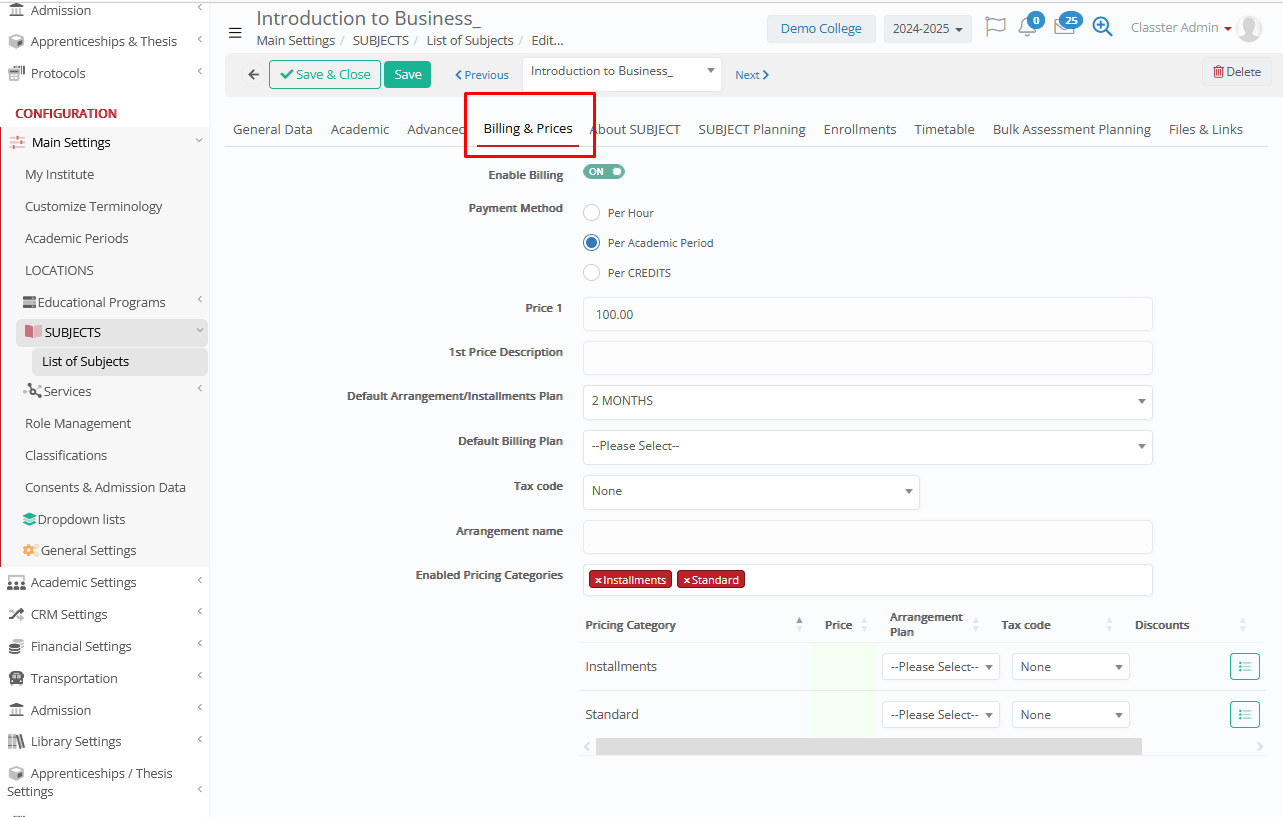
Fields available in Billing & Prices
- Enable Billing → Toggle to activate billing for this subject. If enabled, then the system, upon enrollment in the Subject, will search for default prices and billing properties in order to create an arrangement command for the student.
Relevant and general settings in Financial Settings may affect this functionality, such as the Student Status enabled for arrangement creation.
- Payment Method → Define how the default price is calculated (in connection with the next field “Price” or the prices in the “Enabled Pricing Categories” below).
If the student is connected to any of the Pricing Categories, then the price is taken from there; the next field, Price, will be used.:
- Per Hour: Based on the subject hours (multiply the price by the number of hours).
At K-12 mode: Hours are defined at Subject General Data Tab -> “Hours per week” field.
At HE mode: Hours are defined within each Curriculum > Subject Edit > “Total Hours” field
- Per Academic Period: Takes the price given in the next field “Price” or the “Enabled Pricing Categories”.
- Per Credits: Based on the subject credits/ECTS (multiply the price by the number of credits).
At K-12 mode: Credits are defined at Subject General Data Tab -> “Academic _Credits_” field.
At HE mode: Credits are defined within each Curriculum > Subject Edit > “_Credits_ 1” field
- Price 1 → Default price for everyone (based on previous property)
- 1st Price Description → Label for Price 1 (e.g., “Standard Tuition Fee”) used in reporting.
- Default Arrangement / Installments Plan → Preselected installment or payment arrangement (e.g., downpayment or 6 equal installments).
Arrangement Plans must be pre-configured at CONFIGURATION > Financial Settings > Dropdown Lists > Arrangement Plan. Pre-payments, number of installments, and due dates, amounts/percentages are defined within the plan’s configuration.
- Tax Code (if applicable) → Apply the relevant tax code for pricing and billing (e.g., VAT 20%). If taxation is not used in your configuration, this field may be ignored.
Setting CONFIGURATION > Financial Settings > Price Lists, Fees and Taxes Tab > Fees & Taxes > “Use tax” is a prerequisite.
Please note that if the above setting is enabled for _Subjects_, and there is a Tax Code set as Default, the system will still calculate taxes. If you wish to exclude a service in this case, you can create a Tax code with 0% taxes.
Tax Codes must be pre-configured at CONFIGURATION > Financial Settings > Dropdown Lists > Tax Codes.
- Arrangement Name → Optional custom title for the Arrangement, used in payer views and reporting (e.g., transaction reports).
Otherwise, the default description is taken from the subject title.
- Enabled Pricing Categories → Pricing categories are used for common default pricing categorizations, such as ‘EU’ – ‘Non-EU’ default prices, or ‘Downpayment’ – ‘Installments’ prices, or other special/custom categorizations which may change the starting price.
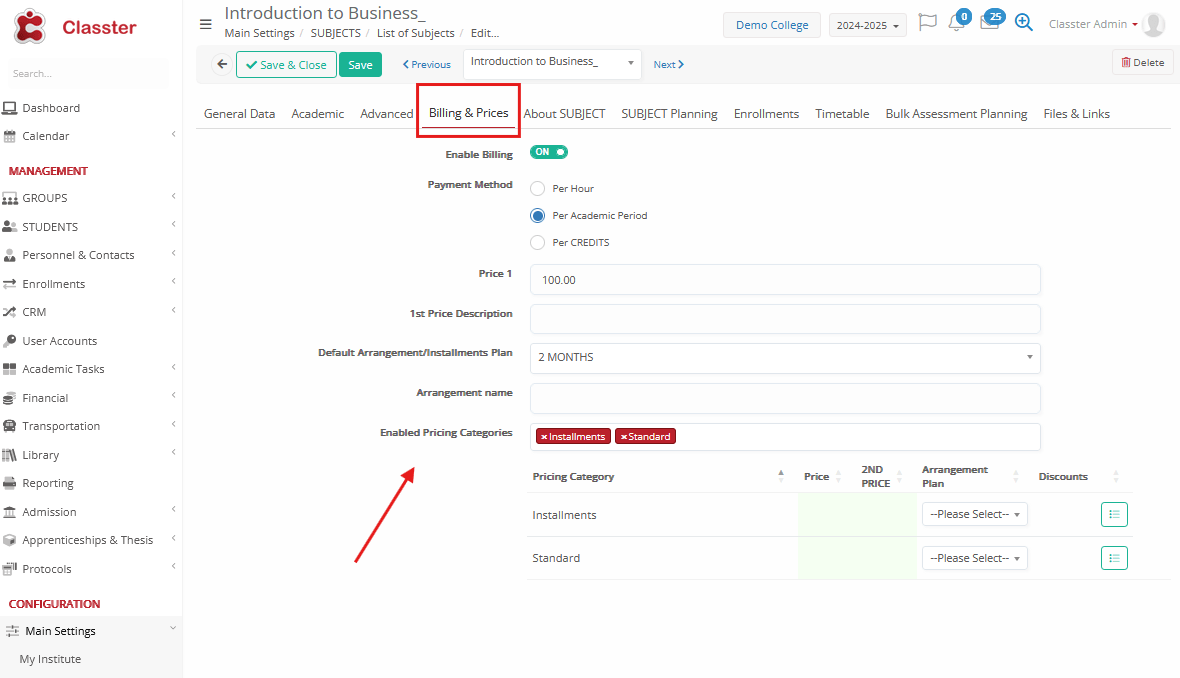
For each pricing category, you can set different:
- Price / 2nd Price (2nd price used in special/custom cases)
- Arrangement/Installment Plan
- Tax Code
- Discounts
Enable pricing categories from CONFIGURATION > Financial Settings > Price Lists, Fees and Taxes Tab > Price List Configuration Section > ‘Use Pricing Categories’ & ‘Enable Pricing Category for the following Entities’ settings
Pricing Categories must be pre-configured at CONFIGURATION > Financial Settings > Dropdown Lists > Pricing Categories.
Example of Pricing Categories default setup
|
Pricing Category |
Price |
2nd Price |
Arrangement Plan |
Discounts |
|
Standard/Full-payment |
€200 |
€180 |
One-off payment |
None |
|
Installments |
€200 |
€190 |
4 monthly payments |
5% sibling |
|
€0 |
— |
N/A |
100% grant |
*Discounts setup:
Enabled discounts may be used as:
- Automatically applied discounts to students with the relevant pricing category
- Available discounts for the users to select upon arrangement creation. For back-office users or students/agents upon admission (if financial are open in admission).
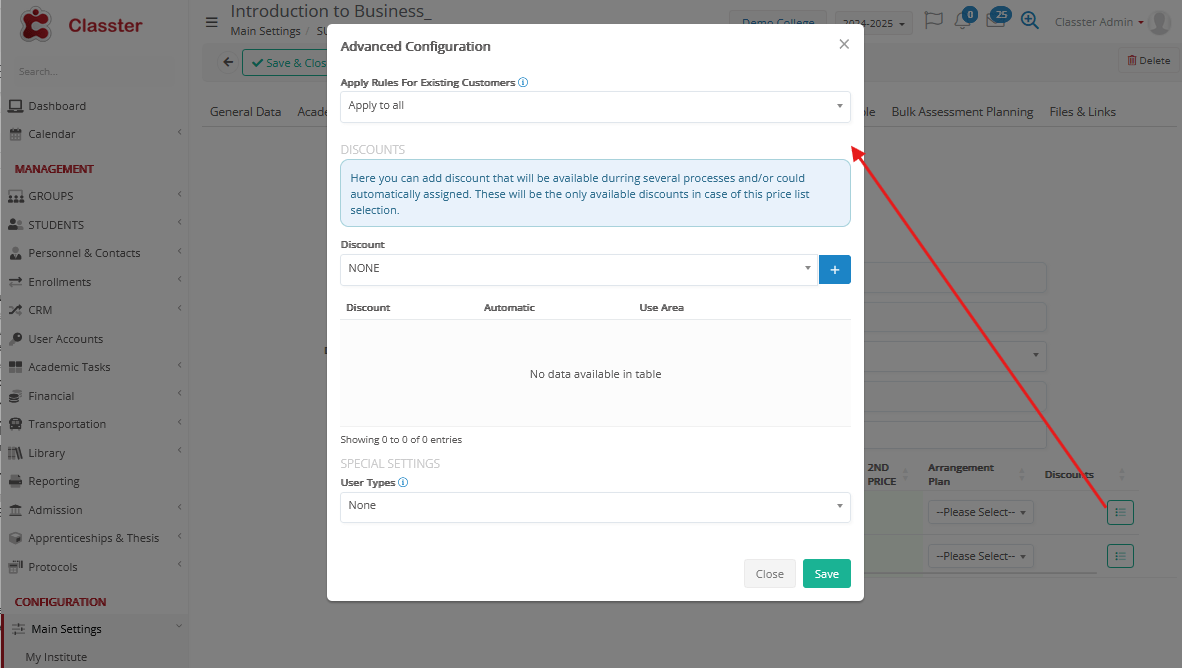
- Apply Rules for Existing Customers → Define if discounts should apply to:
All (both currently existing students in the system, or new ones),
Existing Customers (only currently existing students in the system)
New Customers (only new students from now on).
- Discounts Table → Add the default discount(s) under this price list.

Select the Discount(s) and click on the Add button ( + )
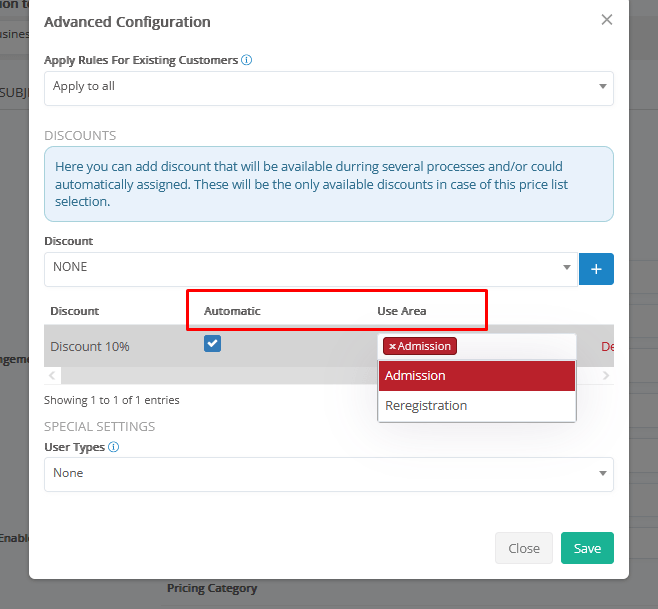
- Automatic: Whether the discount will be automatically applied or an available option for the users.
- Use Area: Whether the discount will be applied upon Admission – new applications OR Reregistration to new periods.
- Special Settings → User Types → Special feature, applying only to Private Sessions.
Special private sessions price list based on the number of students and the number of sessions per specific date range (e.g., per month). Used in the private sessions billing (students) and teacher cost calculations, connected to this subject.
About Subject
The About Subject Tab stores general descriptive information and presentation details for the _Subject_. This information is often used in portals, catalogs, or online enrollment views.

Sections and Fields
Translatable info about the Subject. Info can be added, translated into various languages, and presented accordingly in reports or student/parent portals.
Basic Data Tab
- Language: (Current user language selected by default). Can enter all info per language, so they will be displayed according to the users’ language at their Portals.
- Title: Title of the subject (e.g., Introduction to Business).
- Short Description: Brief subject description (e.g., Overview of basic business concepts and terminology).
- URL / WordPress URL → External or institutional link to more information.
About Tab
- Free text field → Used to add a detailed description or overview of the _Subject_ (e.g., learning objectives, outcomes, syllabus summary).
*All above info is displayed at the Students’/Parents’ and Teachers’ Portal > My Subjects > view or edit subject.
Online Enrollments Info Tab
- Free text field → Extra information shown to Students/Parents during online self-enrollment to subjects (e.g., prerequisites, admission notes). Presented as info (i) at the subject.
Subject Planning
The Subject Planning Tab is used to organize the subject’s teaching plan into weeks, units, topics, or any other desired structure. Each entry represents a planning item (e.g., a lesson, topic, or subtopic) that can be scheduled, tracked, and linked with learning resources.
The subject planning units can be used/connected to teaching Sessions later on, by Teachers/Back-office, so they will be visible to the Students/Parents when they open the Session details.
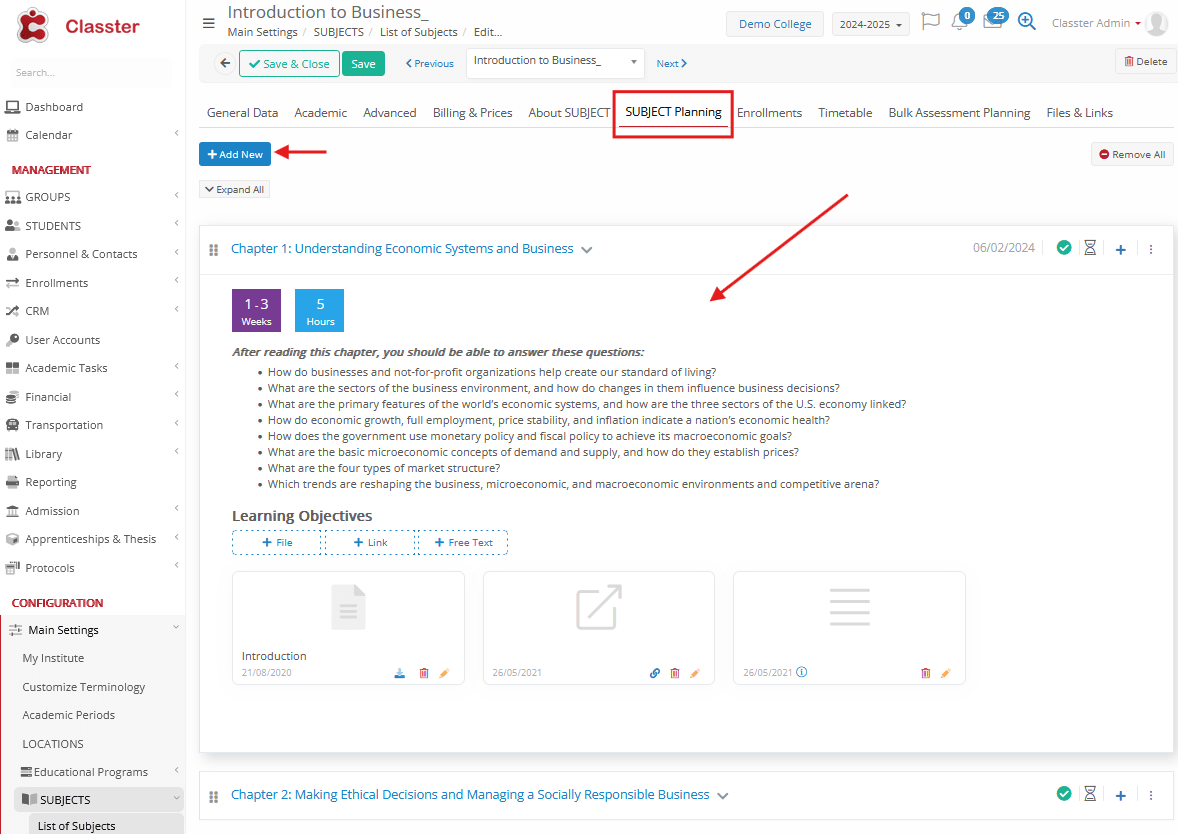
Fields when adding or editing a new planning item:
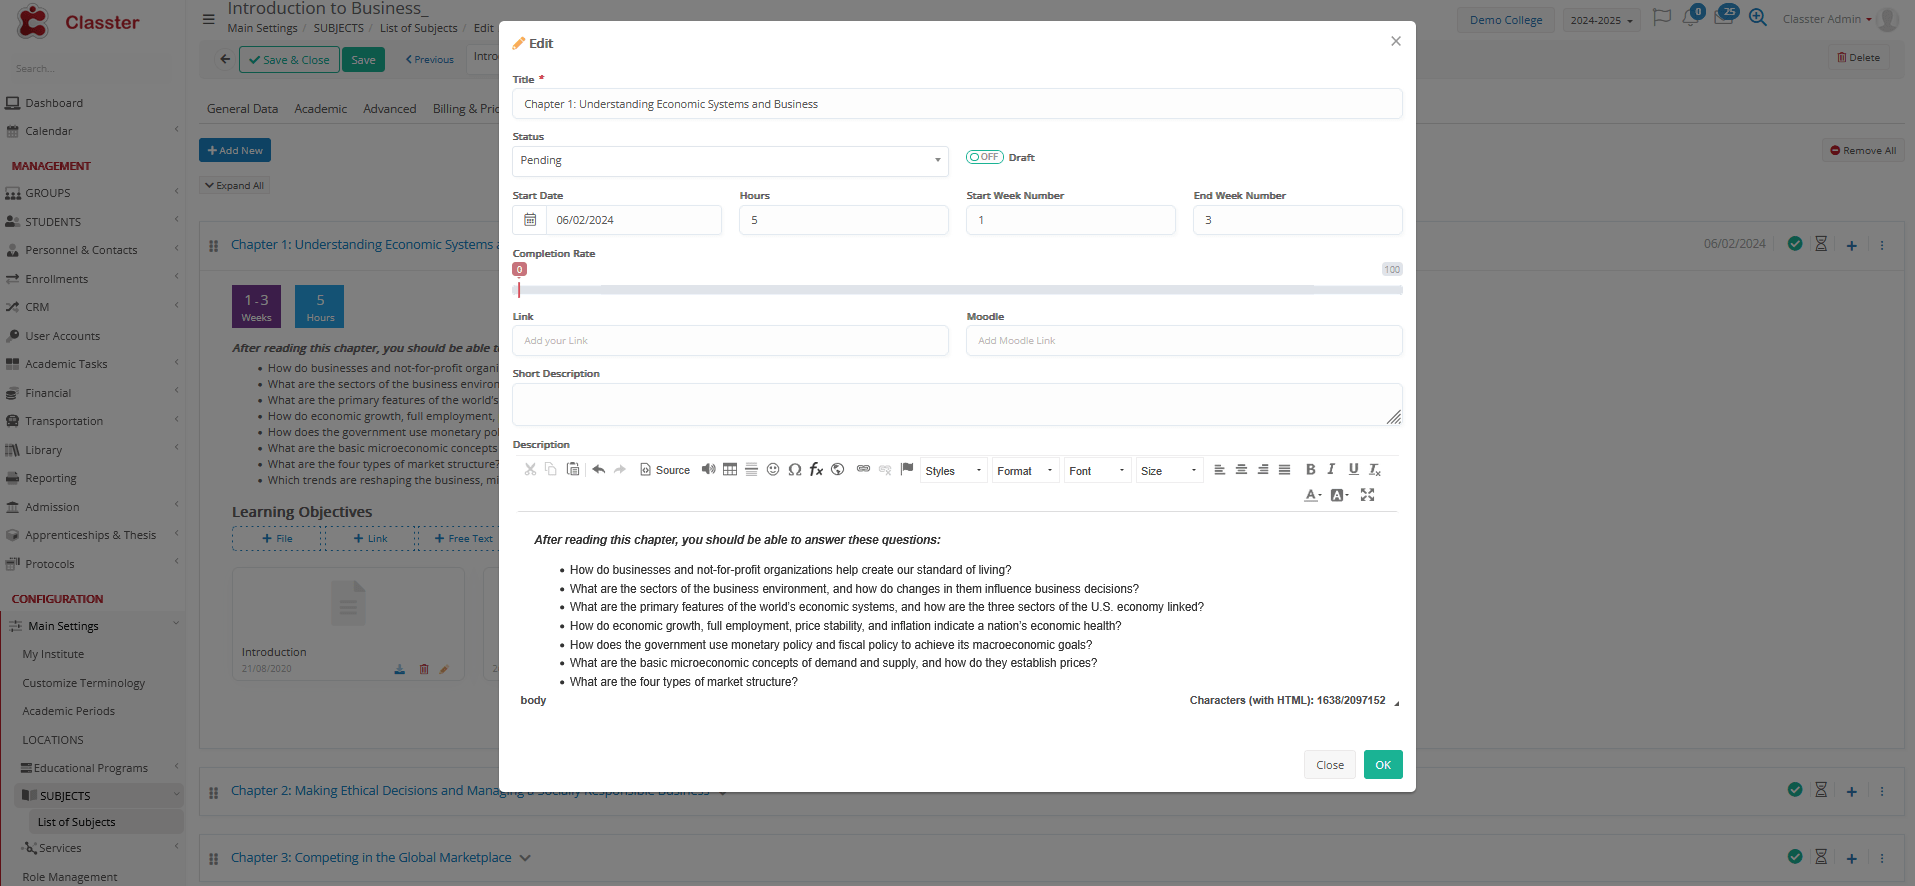
- Title: Name of the planning item (e.g., Week 1 or Unit 1).
- Status: Current state of the planning item (Draft, In Progress, Completed).
- Start Date: Planned starting date (e.g., 01/09/2025).
- End Date: Planned ending date (e.g., 07/09/2025).
- Hours: Planned duration in hours (e.g., 3).
- Start Week Number: Number of the academic week when the item in planned to begin (e.g., Week 1).
(Weeks, as week 1,2,3 etc., are set at the Academic Periods configuration and are based on the start-end dates)
- End Week Number: Number of the academic week when the item is planned to end (e.g., Week 2).
- Completion Rate: Progress indicator (e.g., 80%). Informative. Can be edited manually.
- Link: An external resource link for the item (e.g., https://example.com/reading-material).
- Moodle: A Moodle link to connect the planning item with Moodle resources/activities.
- Short Description: Brief description (e.g., Overview of introductory business concepts).
- Description: Detailed explanation or syllabus notes for the planning item.
- Learning Objectives: Add Files, Links, or Free-text info, regarding the subject goals. Visible or Hidden from Students/Parents, based on relevant property, and options to be shown only at Homework, Sessions, or Generally.
Enrollments
The Enrollments Tab provides an overview of how the _Subject_ is connected to:
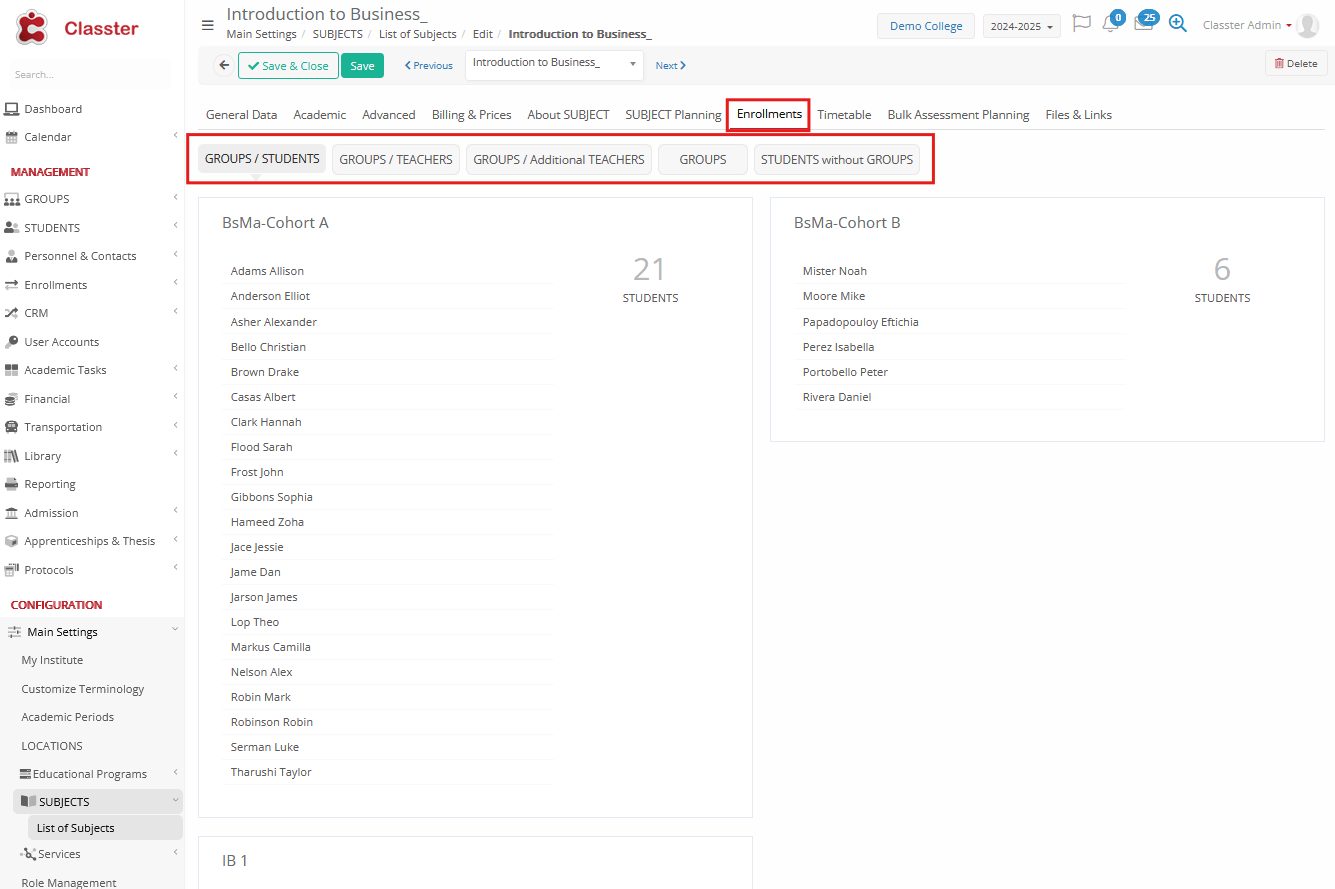
Sections available in Enrollments:
- Groups / Students: Displays the current Student enrollments per Group, at the selected subject. (informative, not editable)
- Groups / Teachers: Displays the current Teacher allocations per Group, at the selected subject. (informative, not editable)
- Groups / Additional Teachers: Shows additional teachers linked to the subject, er group. (informative, not editable)
- Groups: The current connections of the Subject, to Groups. (Clickable – redirects to _Group_ form, for editing if needed)
- Students without Groups: Displays _students_ who are enrolled in the _Subject_ with no group assigned. Subject enrollment without group. (informative, not editable. Cases can be edited from the Student card > Enrollments Tab.
Timetable
The Timetable Tab includes:
- Restrictions/Constraints applying to the Timetable scheduling
- Shows the scheduled Timetable of the Subject (informative, not editable)
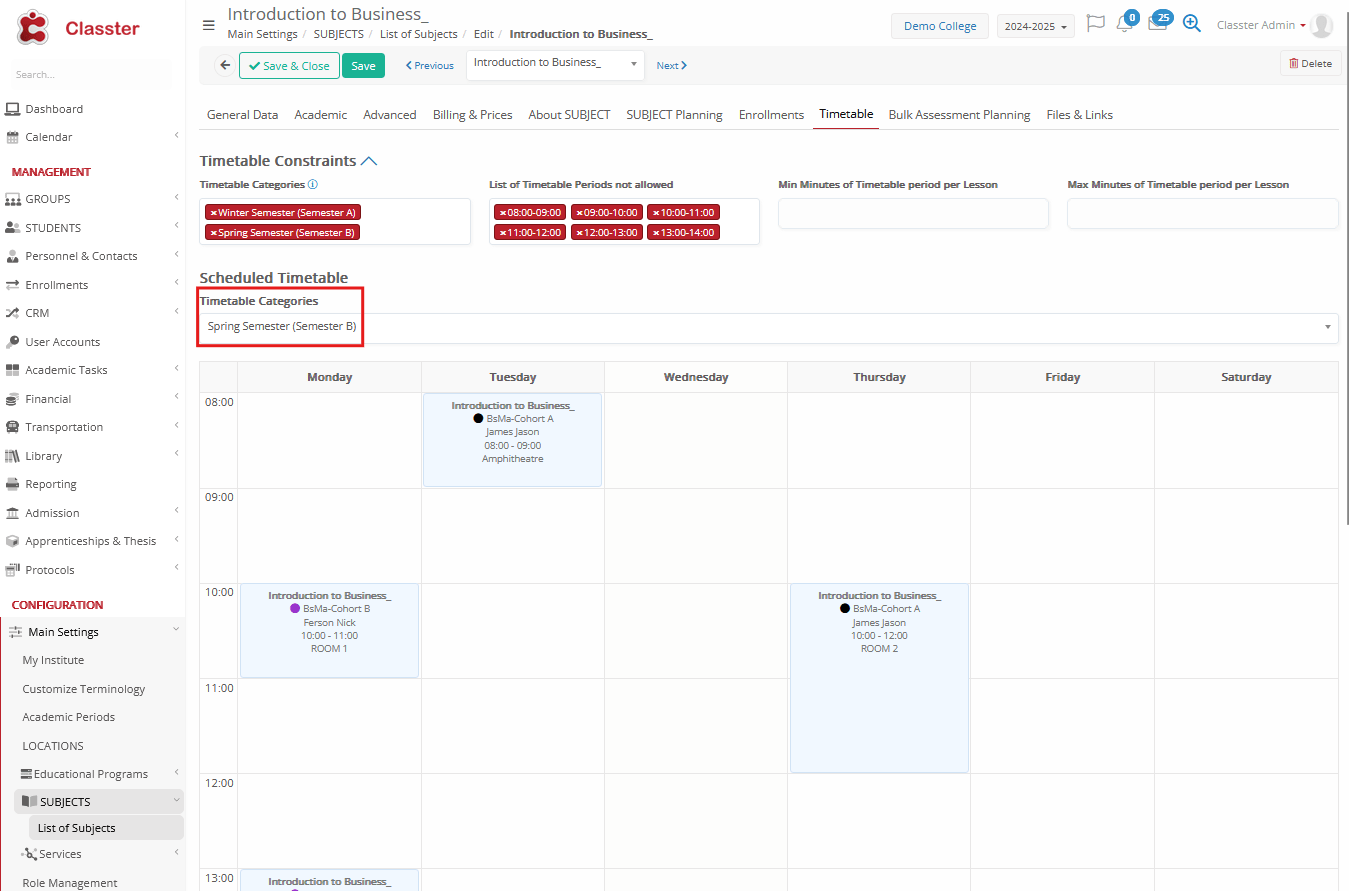
Timetable Constraints → Overall scheduling restrictions applied to this subject.
! Important info:
- If fields are empty -> this means that there is no restriction.
- Constraints are only used at the general Timetable (not sessions)
Constraints explanation:
- Timetable Categories: Assign specific timetable categories for scheduling (e.g., Semester A, Morning, Afternoon).
Timetable categories must exist at CONFIGURATION > Academic Settings > Timetable > Timetable Categories
- List of Timetable Periods Not Allowed → Block specific periods from being used at Timetable (e.g., exclude 8:00 am – 9:00 am from Maths).
Timetable periods must exist at CONFIGURATION > Academic Settings > Timetable > Timetable Periods
- Min Minutes of Timetable Period per Lesson → Define the minimum lesson duration (e.g., 45 minutes).
- Max Minutes of Timetable Period per Lesson → Define the maximum lesson duration (e.g., 90 minutes).
Scheduled Timetable
- Displays existing timetable entries already allocated to this subject. (Informational overview.)
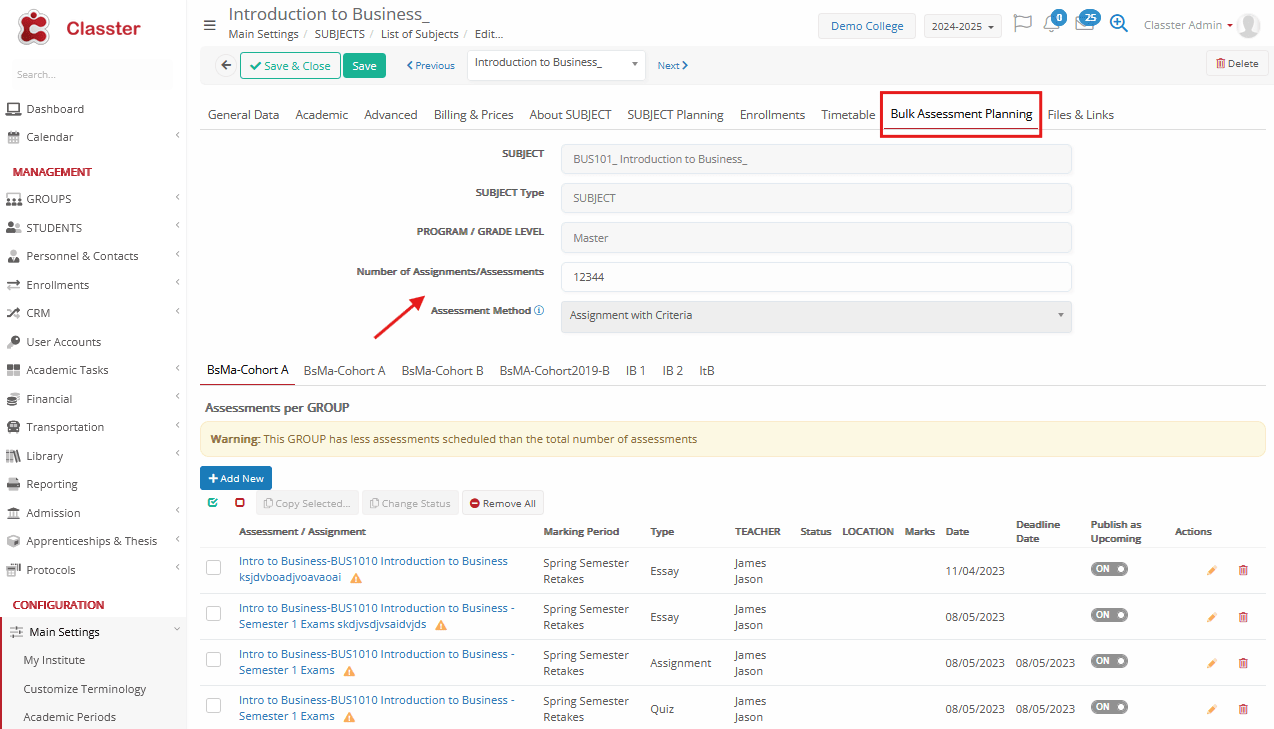
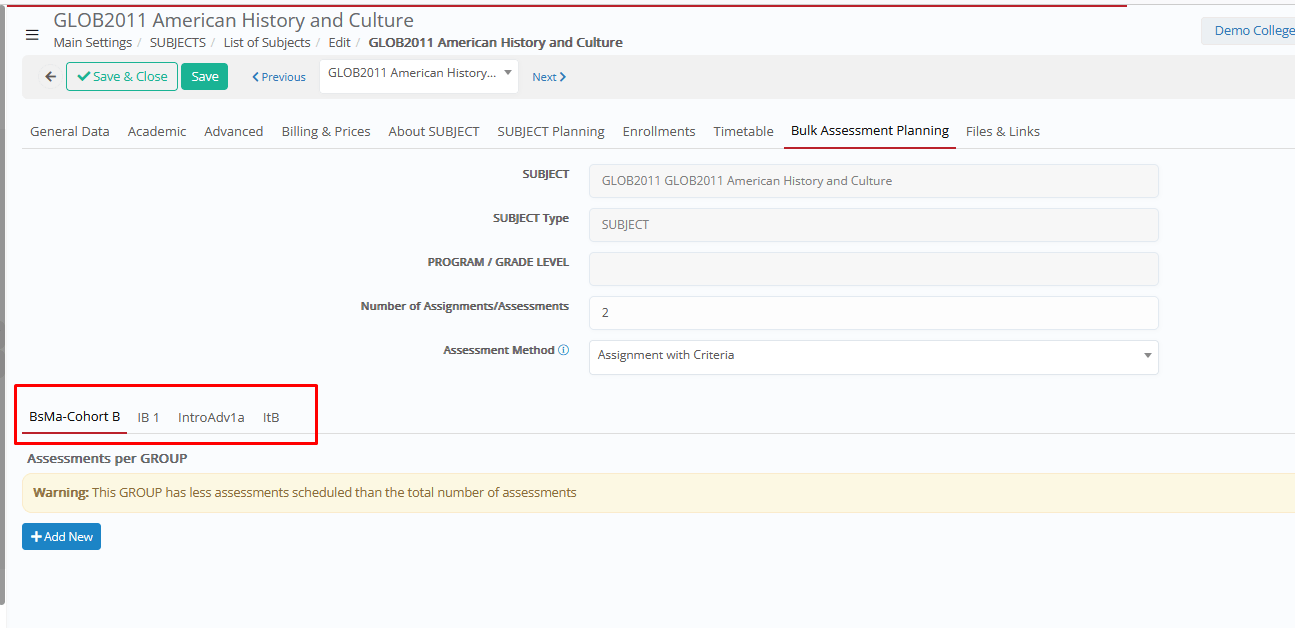
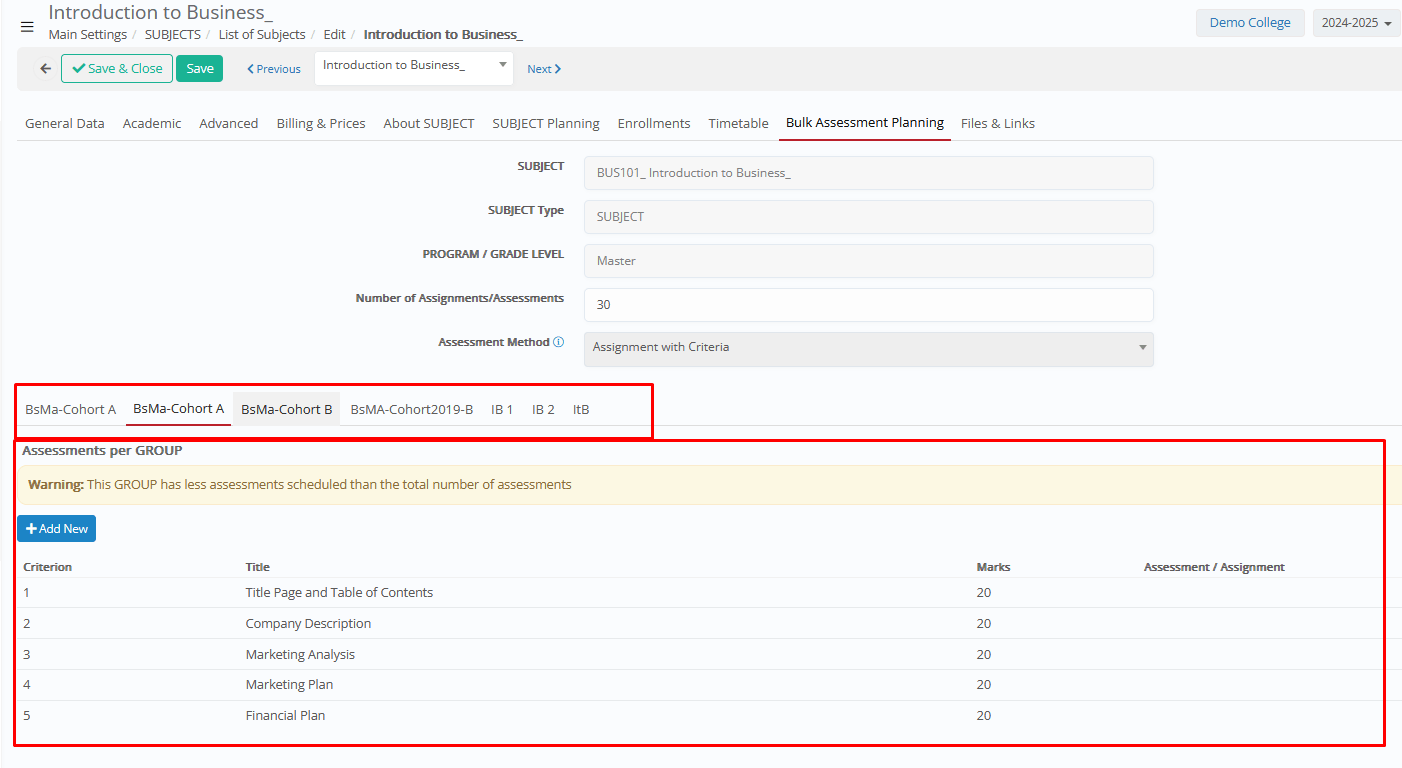
Bulk Assessment Planning
The Bulk Assessment Planning Tab is used to bulk-create assessments for all groups connected to the subject. Specific rules, such as the number of assessments expected and marking methods, can be applied. The process starts by creating the assessment/exam for one of the groups and then copying it to the others, with an automated teacher connection based on allocations.
Fields & Settings
Informative Fields:
- Subject: Read only. Subject Abbr + Subject Title
- Subject Type: Ready only. The subject category. (Subject Form > General Data Tab > “Category” field (described at relevant section within the manual)
- _Grade Level_: Read only. The _Grade Level_ of the _Grade_ of the Subject. (_Grade_Form > General Data Tab > “_Grade Level_.” (customized optional field – part of the Main Entitiesof the system)
Editable Fields:
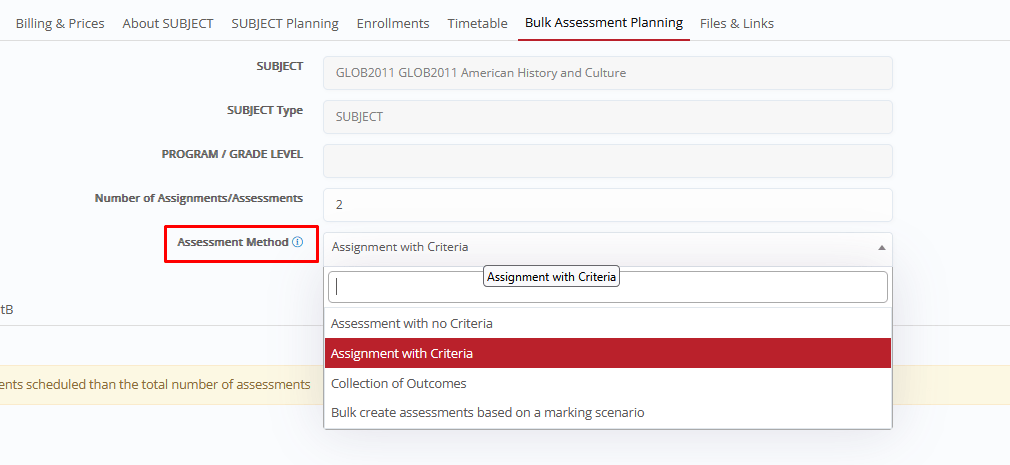
- Number of Assignments/Assessments: Number of expected assessments (e.g., 3 exams per semester).
- Assessment Method:
Assessment with no Criteria
Only the final mark submitted.
- Assignment with Criteria
Marking criteria/outcomes are defined during creation.
- Collection of Outcomes
Marking criteria/outcomes are defined at the next step, after creation (usually by _Teachers_)
- Bulk Create Assessments Based on Marking Scenario
If a default Criteria Model Scenario is set, then the assessments will inherit the included criteria and their properties.
The above are standard types by the system. Based on the Assessment Method, the relevant ‘Assessment Types’ will be given upon creation (e.g. Assessment types with outcomes)
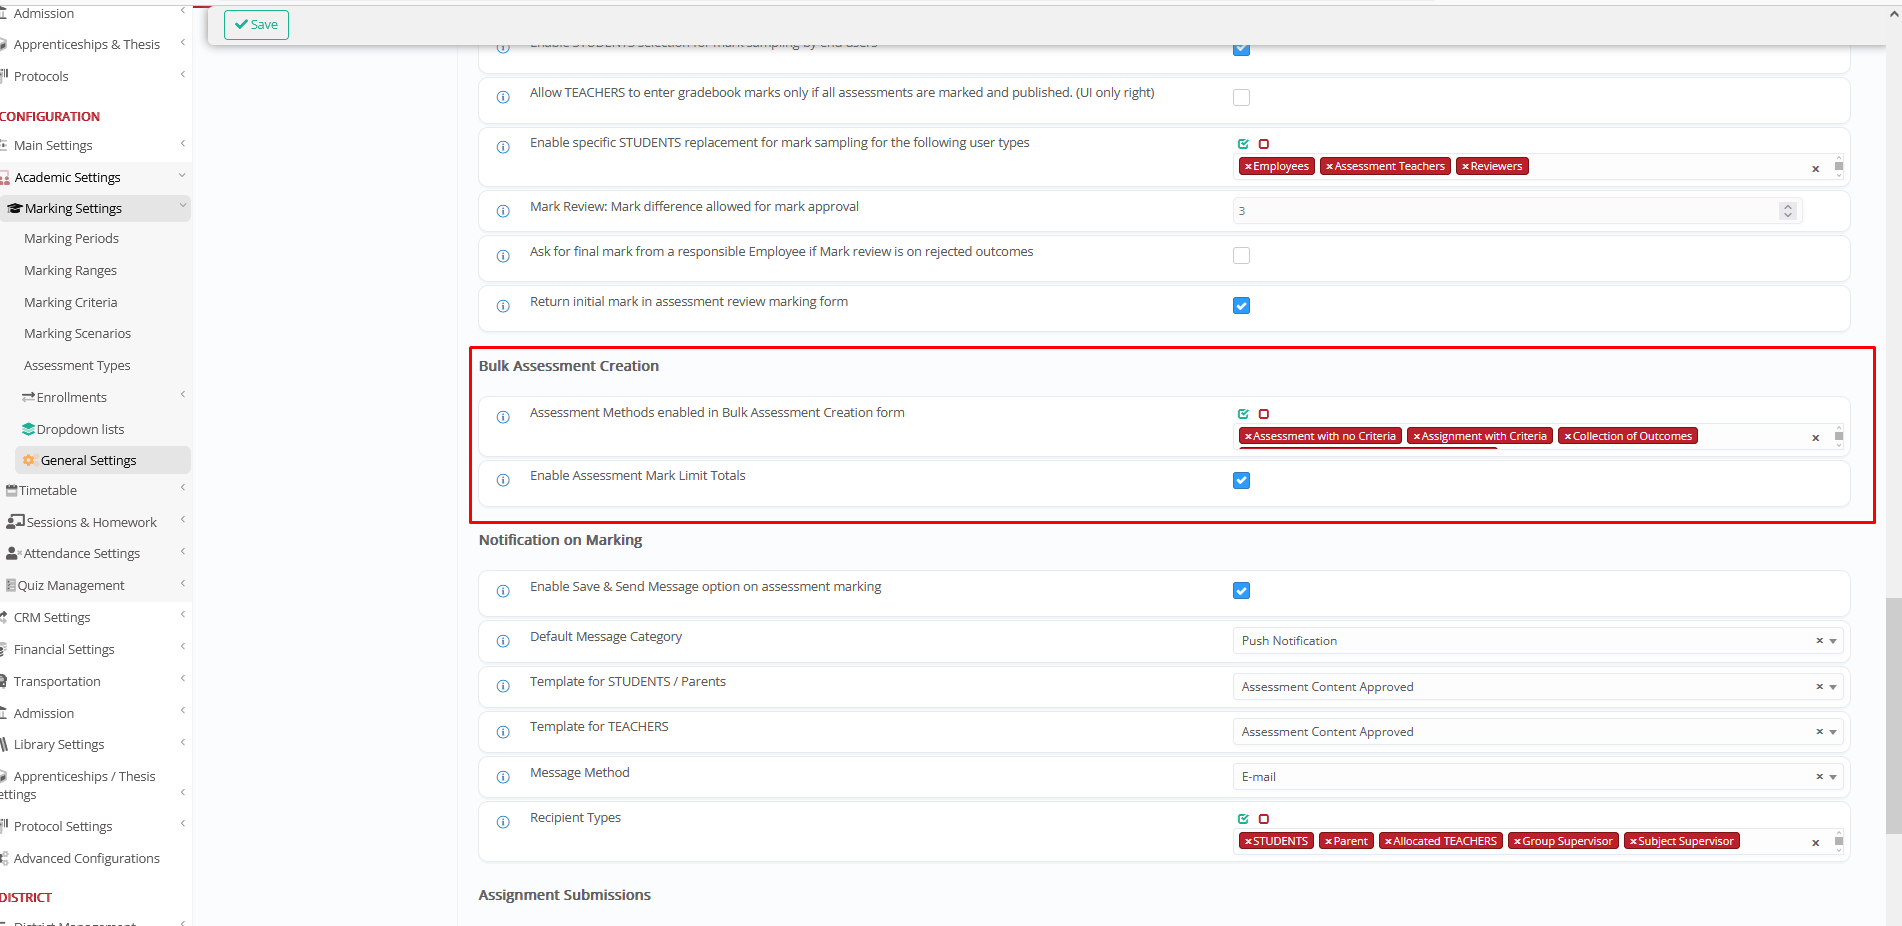
*Available Assessment Methods must be pre-configured at CONFIGURATION > Academic Settings > Marking Settings > General Settings > Assessments/Assignments > ‘Bulk Assessment Creation’ section > “Assessment Methods enabled in Bulk Assessment Creation form” setting
Assessment Types are configured from CONFIGURATION > Academic Settings > Marking Settings > Assessment Types
Relevant Settings
Bulk Assessment Creation general settings:
CONFIGURATION > Academic Settings > Marking Settings > General Settings > Assessments/Assignments > ‘Bulk Assessment Creation’ section
Assessment Outcomes/Criteria settings (optional, if needed):
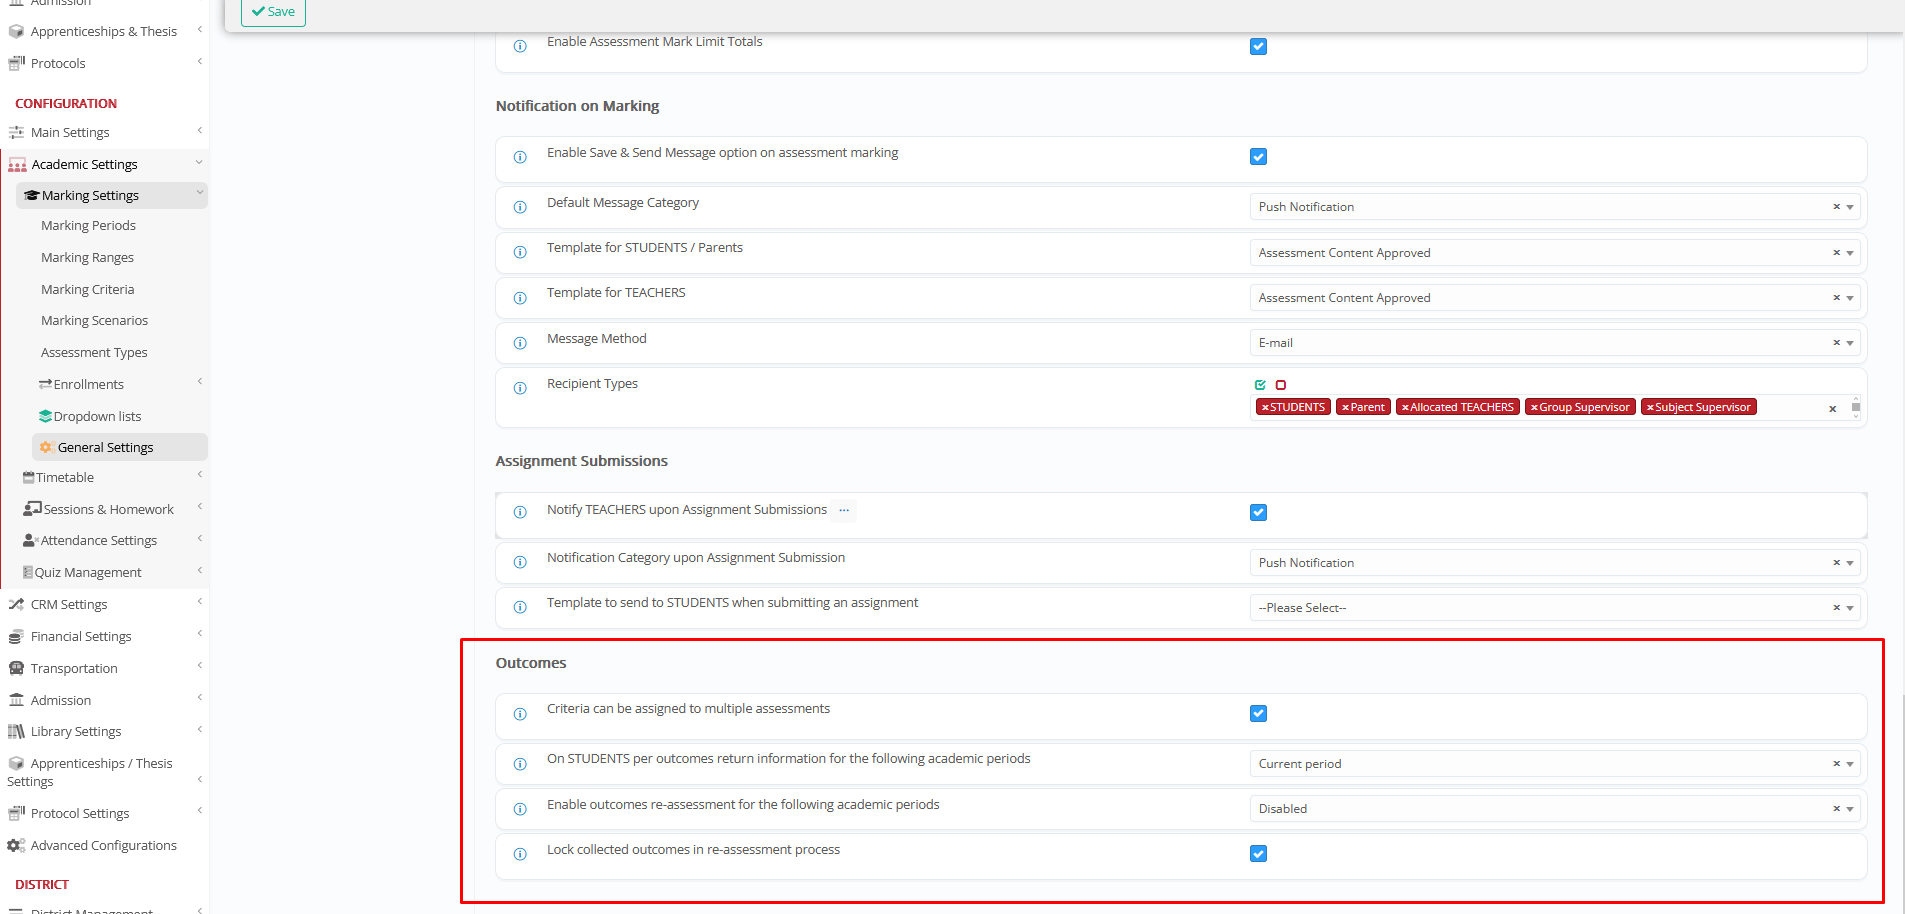
CONFIGURATION > Academic Settings > Marking Settings > General Settings > Assessments/Assignments > ‘Outcomes’ section
Warnings (Setup)
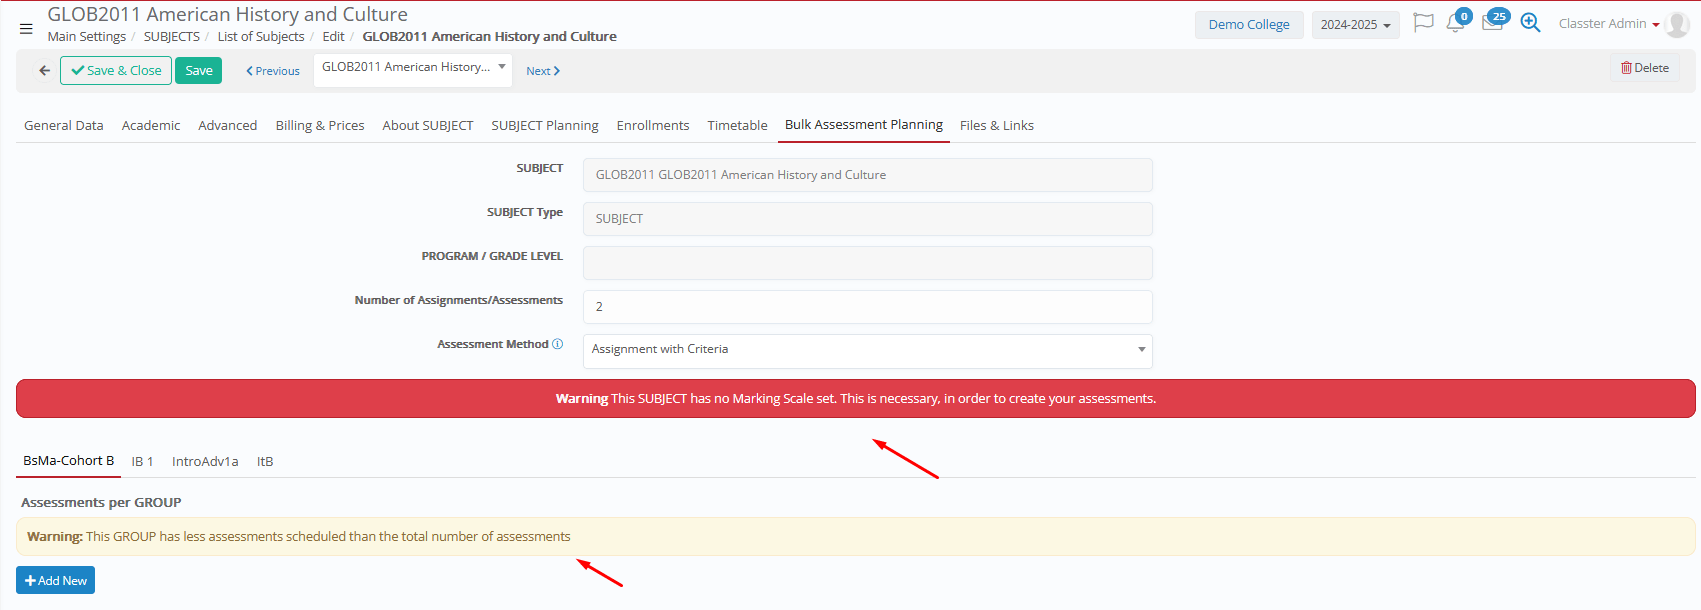
Warning 1: This _Subject_ has no Marking Scale set. How to address → Default Marking Scale/Range is defined at _Subject_ Form > Academic Tab > Marking Scale.
Warning 2: This _Group_ has fewer assessments scheduled than the total number of assessments. How to address → This is a message warning about the field “Number of Assignments/Assessments” expected (above).
Create New
Below, the system will present separate Tabs for each _Group_ connected to the _Subject_:
Create New Assessment
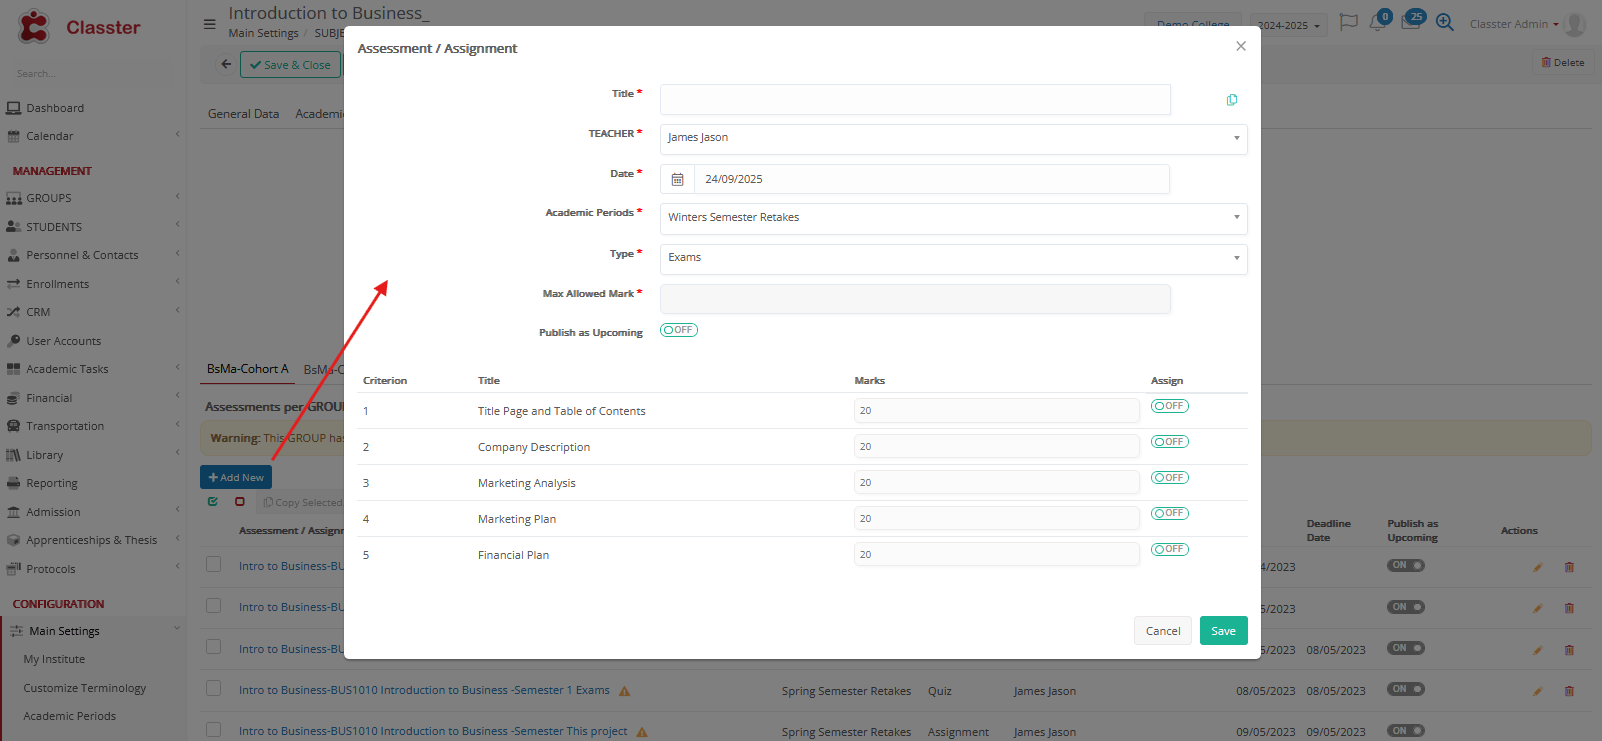
Please note that the Section with the outcomes will appear only in the case of Assessment Method: Assignment with Criteria.
Click on Add New option from any _Group_ Tab. Based on _Group_ Planning → Option to align assessment setup with group-level planning already defined.
- Title → Name of the assessment (e.g., Midterm Exam).
- Teacher → Responsible _Teacher_ (based on allocations)
- Date → Scheduled date
- Marking Periods → Linked marking period (e.g., Semester 1).
- Type → Type of assessment (e.g., Exam, Project, Quiz).
- Max Allowed Mark → Maximum possible score (e.g., 100 or 20, based on marking structure).
- Publish as Upcoming → Toggle to display the assessment as an upcoming event in the users’ portal. Otherwise, the assessment will appear only on the scheduled date.
Criteria Section
At the Assignment with Criteria, Assessment Method Option:
Since a marking scenario with criteria is set at the Subject Form > ‘Academic’ Tab > Criteria Model Scenario, the creation will inherit the criteria and allow the user to select during creation:

Max allowed mark will be automatically updated, based on the selected criteria.
At the Collection of Outcomes option, the Creation will not include the criteria, since in this option the criteria will be set later on by the Teacher.
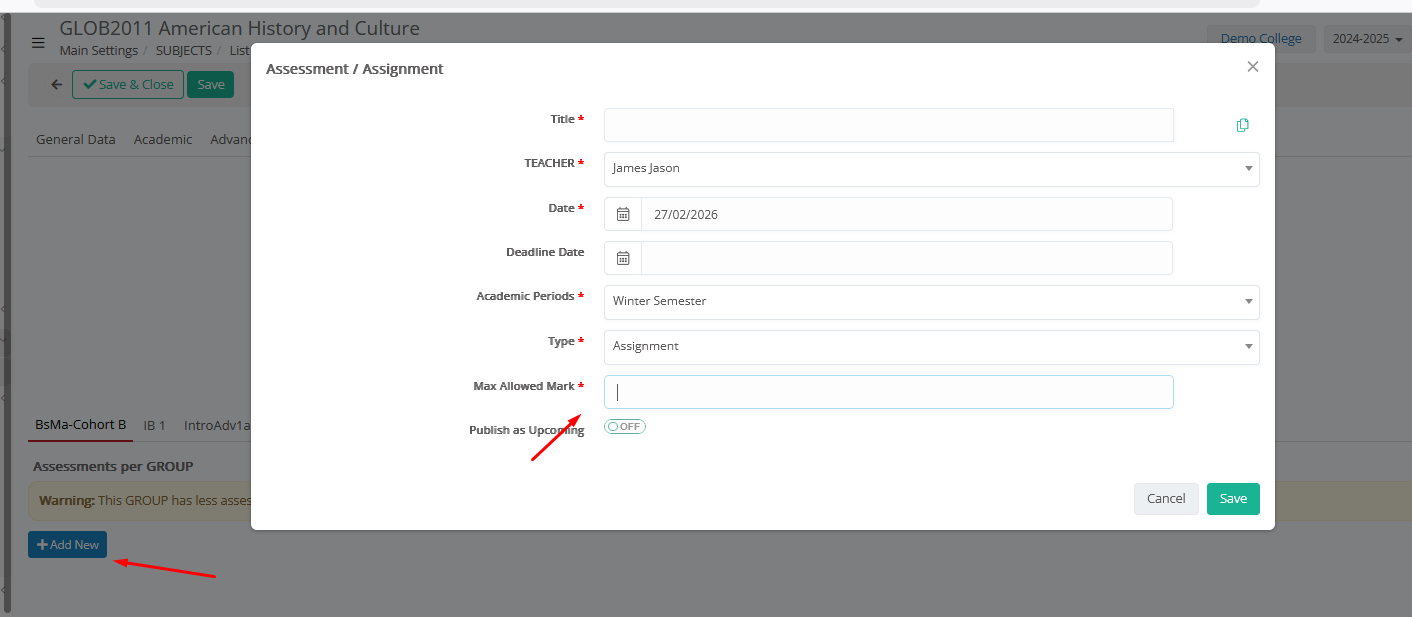
Max allowed mark is editable in this case and will restrict the selected outcomes at later step.
Warnings (Creation):
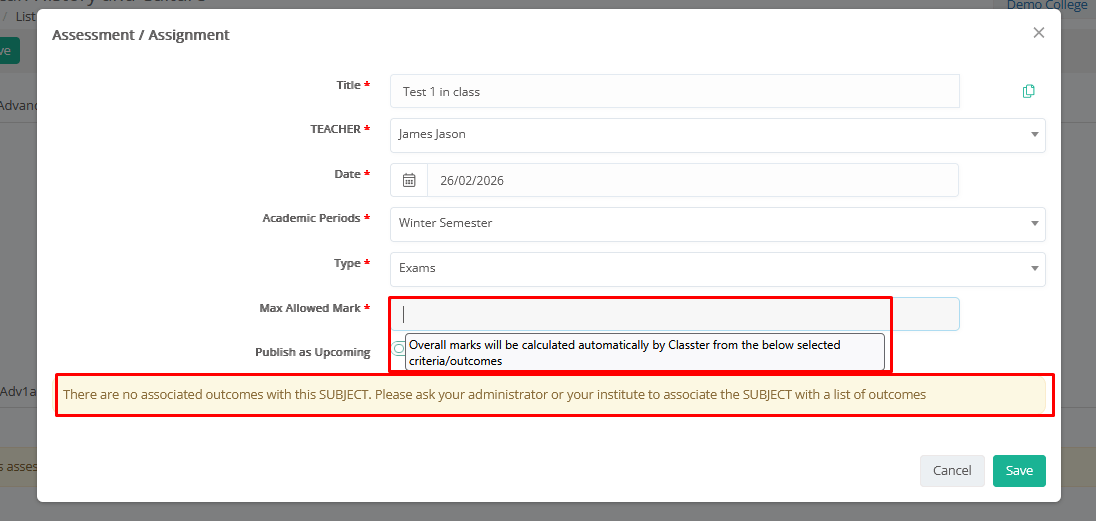
Info & Warning: (At the Max Allowed Mark) “Overall marks will be calculated automatically by Classter from the below selected criteria/outcomes.” & “There are no associated outcomes with this _Subject_.” Why → This is based on the selected Assessment Method:
If the option includes criteria/outcomes, then these properties are defined on the Criteria Model Scenario (using marking criteria/outcomes)
How to set up the subject’s Criteria Model Scenario:
Create the Marking Criteria / Outcomes
From CONFIGURATION > Academic Settings > Marking Settings > Marking Criteria.
e.g.
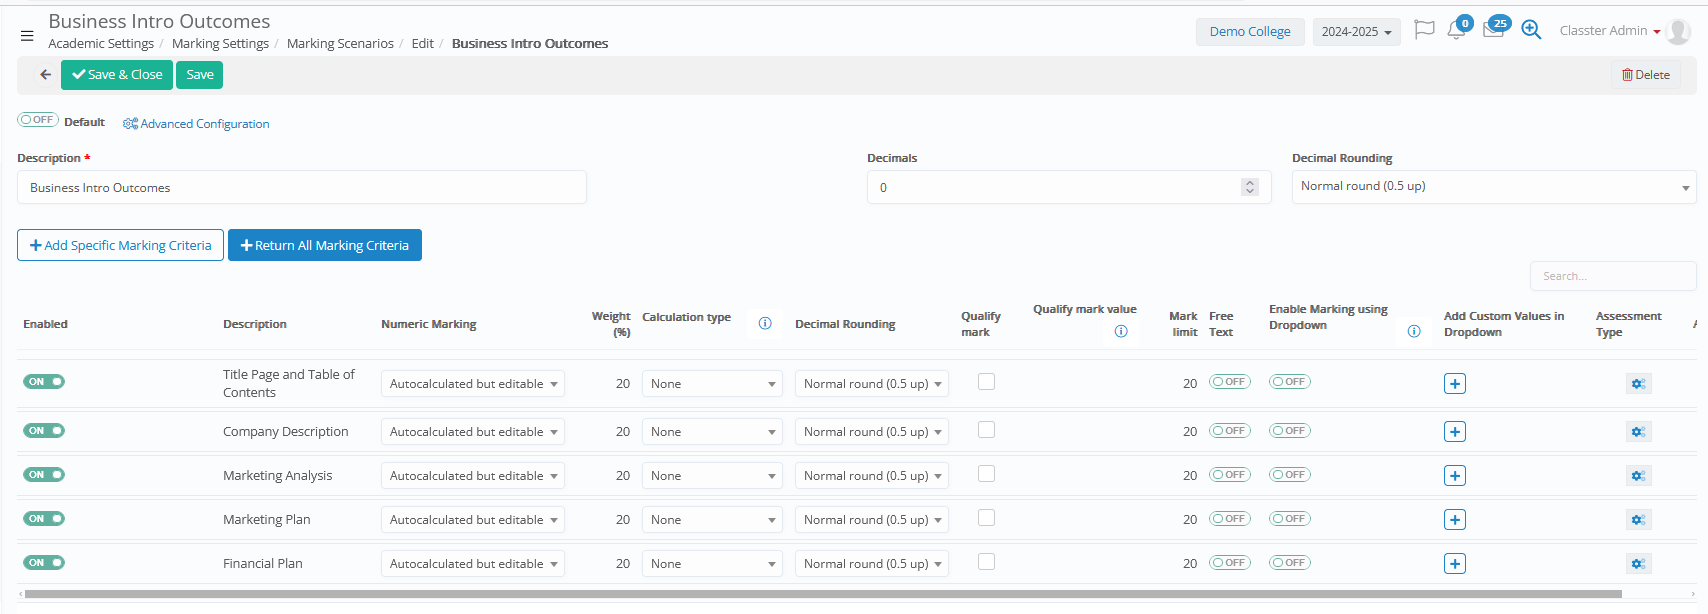
Connect the marking scenario to the _Subject_ as Criteria Model Scenario
From the Subject Form > ‘Academic’ Tab > ‘Criteria Model Scenario’ field
Scheduled Assessments will appear, organized per associated _Group_.
Files & Links
Use this Tab to attach any content for the _Subject_, related to general info, official documents, academic info, pricing info and any other category you may need.
The files can be made visible to different user types and categorized for easy access.
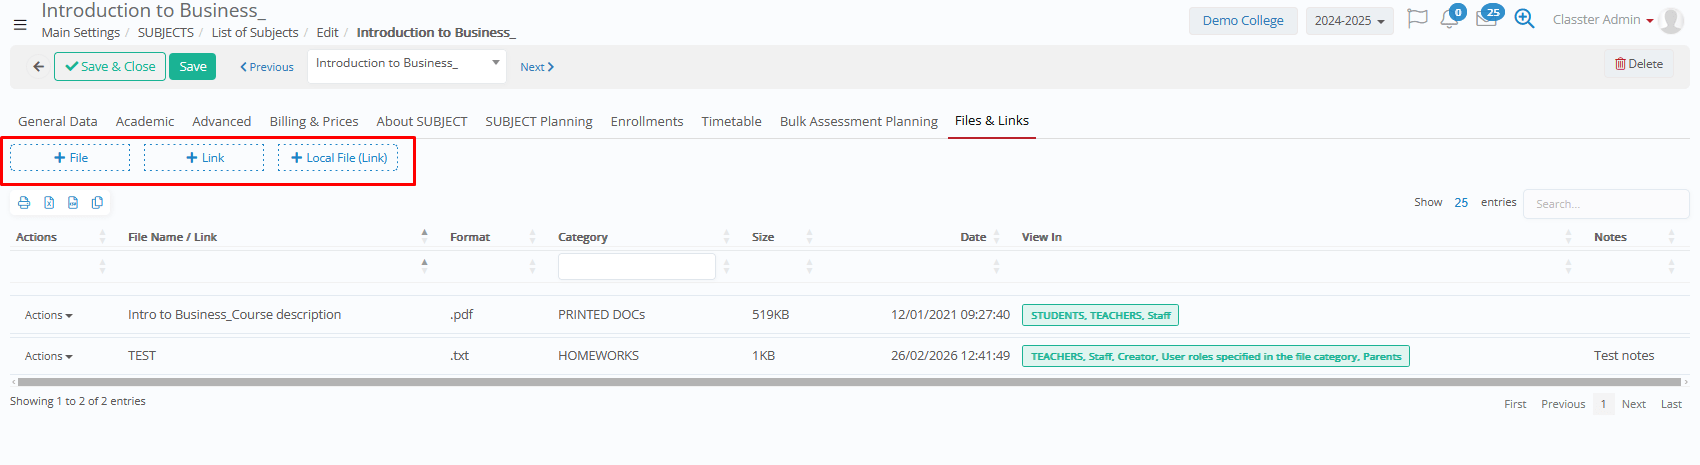
There are 3 options to attach data:
- Files: Upload/attach documents related to the service (e.g., consent forms, schedules, notices, instructions).
- Links: Add URLs/resources related to the service (e.g., external information pages, online material, forms).
- Local file (link): Add a local path that points to a file stored at your own machine.
! Please note that no other users will be able to see these files even if you open the view at the privileges, since this option will not upload a file, but saves only the path, so you will open the file quickly from your machine.
Adding a new file:
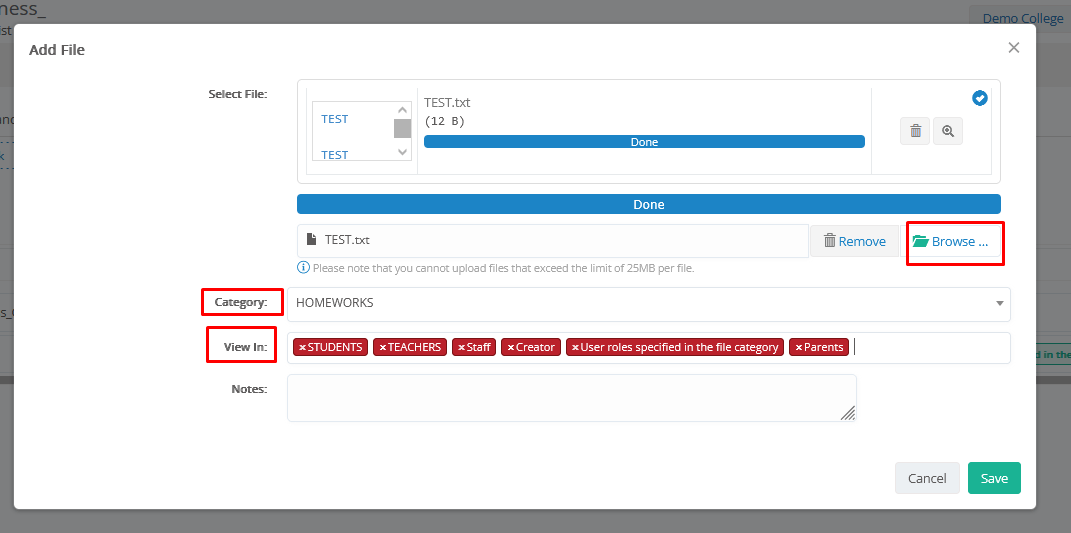
Based on the Type of file you will select (File, Link, or Local File), a pop-up window with the relevant fields will open.
- Select File: Click on Browse to select the file to attach or add the link/URL or Path of your machine.
- Category: You can organize your documents per category, such as ‘Activities Documents’, ‘Images’, ‘Official Documents’, ‘Notices’ and any other option you may need. If you don’t need a special categorization, please just keep a generic category for all.
- Service Categories can be configured from CONFIGURATION > Main Settings > Dropdown Lists > Type: System, Dropdown list: Files Category.
- View in: Make the file visible to other users. You can select the file to be visible at _Students_, _Teachers_, Staff, Parents, the Creator, and/or specific user roles (as defined in the file category).
Notes: Any notes, comments, or clarifications related to the file.
Tip!
While working on a specific Tab-section, or updating various info at your _Subjects_, you can switch between the subjects using the following options:
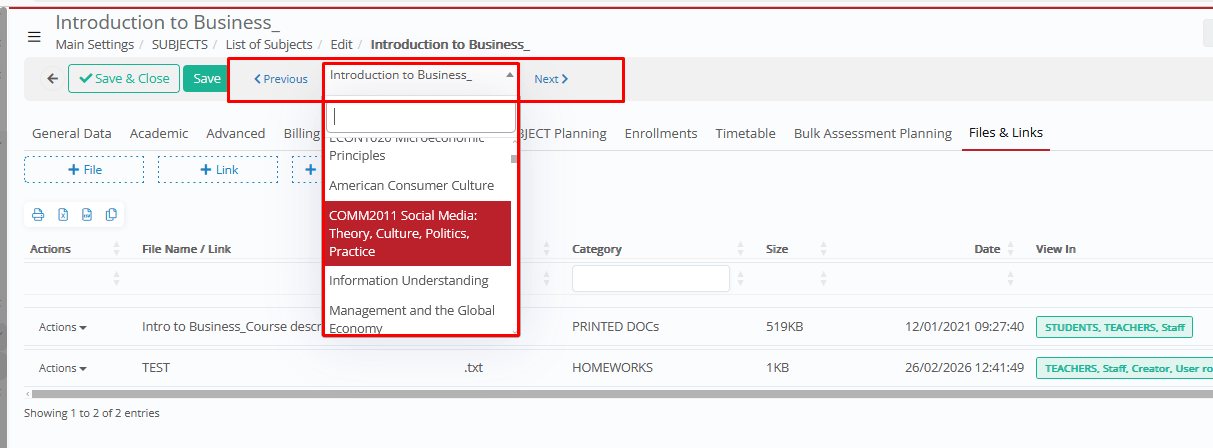
The system will automatically open the selected (or previous/next subject from the list), at the current working Tab.
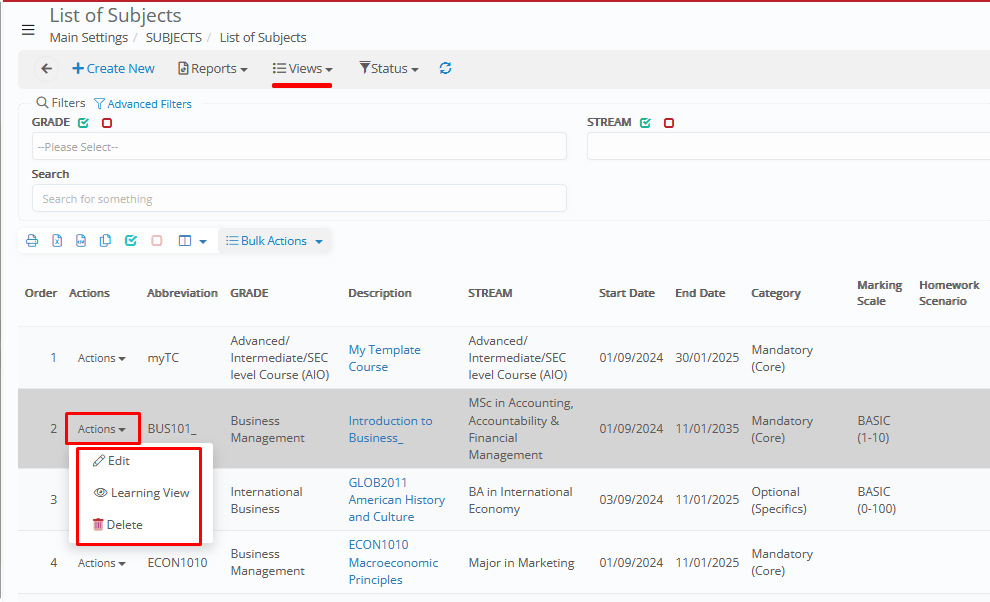
Actions/edits from the list
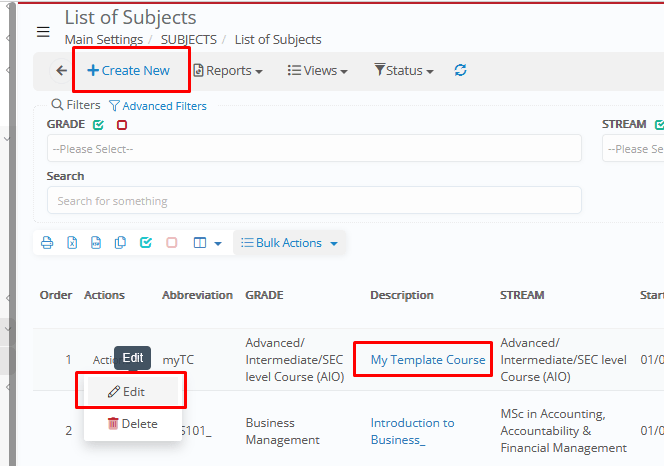
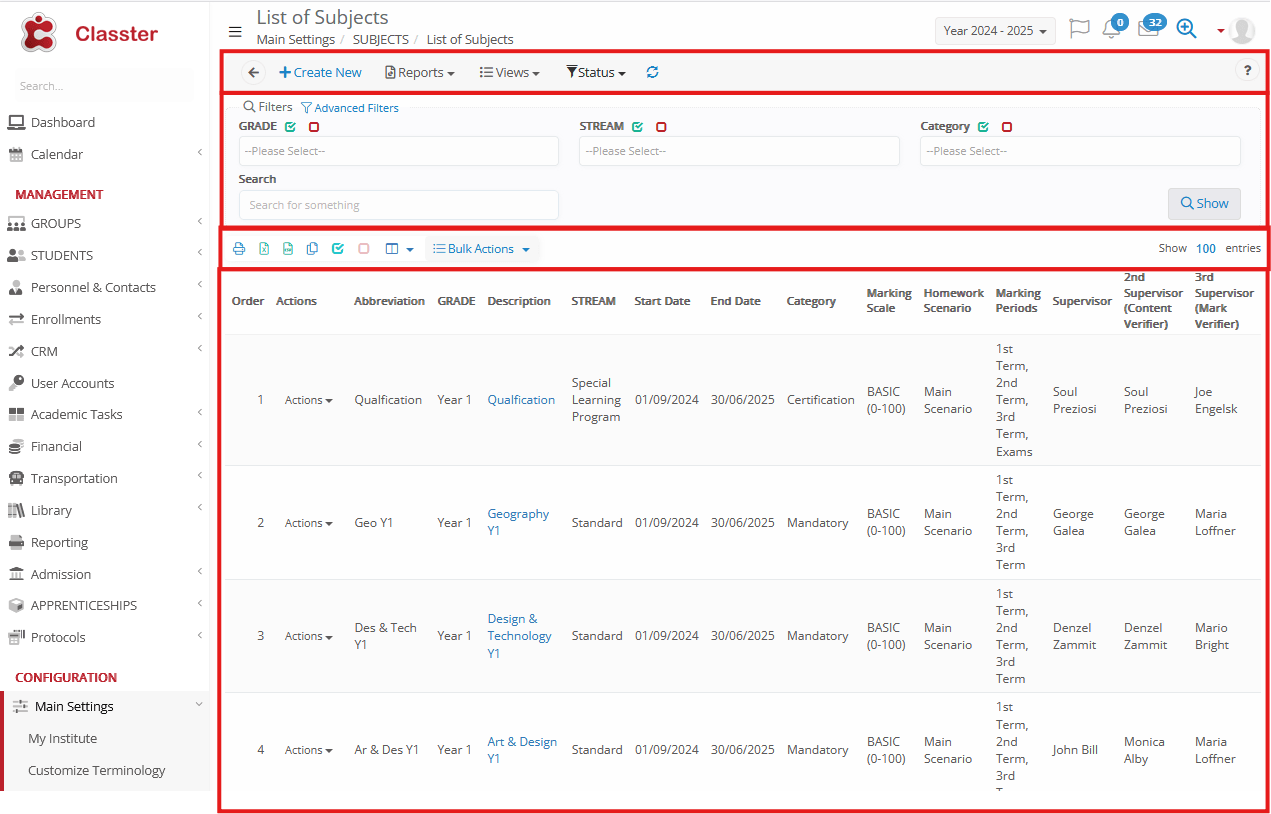
From the List of Subjects, you can perform the following actions:
(Card View)
(Grid View)
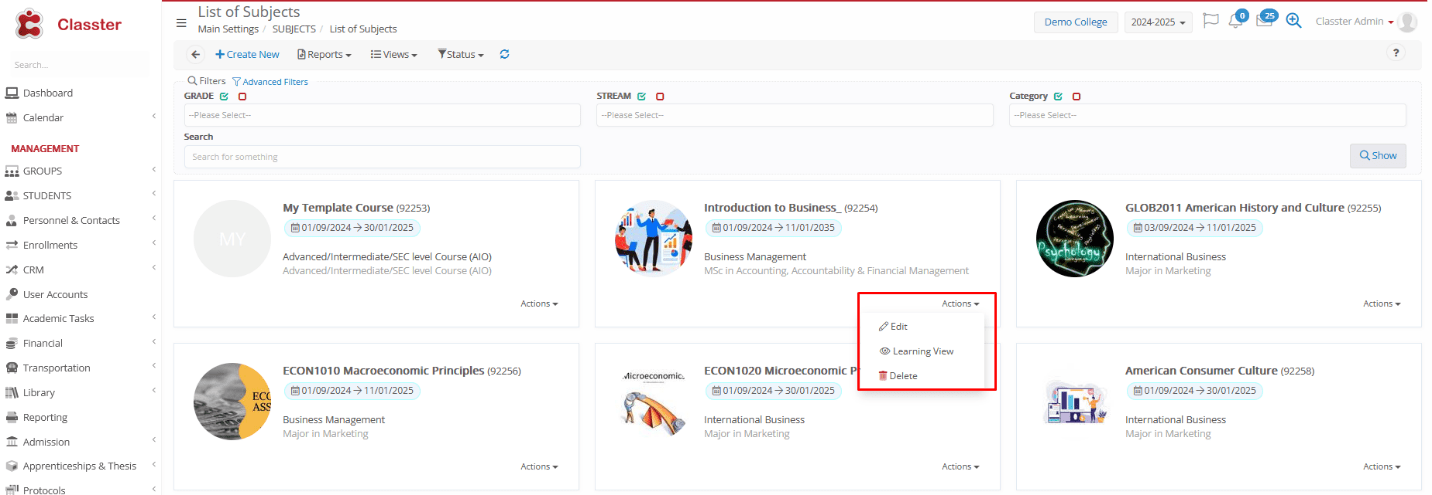
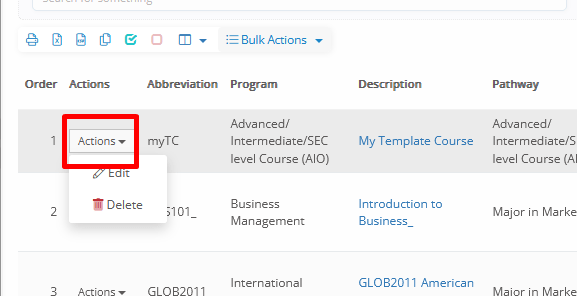
- Edit: Open the subject. This option will open the full subject card with all Tabs explained above open for edit.
- Learning View: From this option, you can access and edit quickly an academic-focused view of the subject quickly, including:
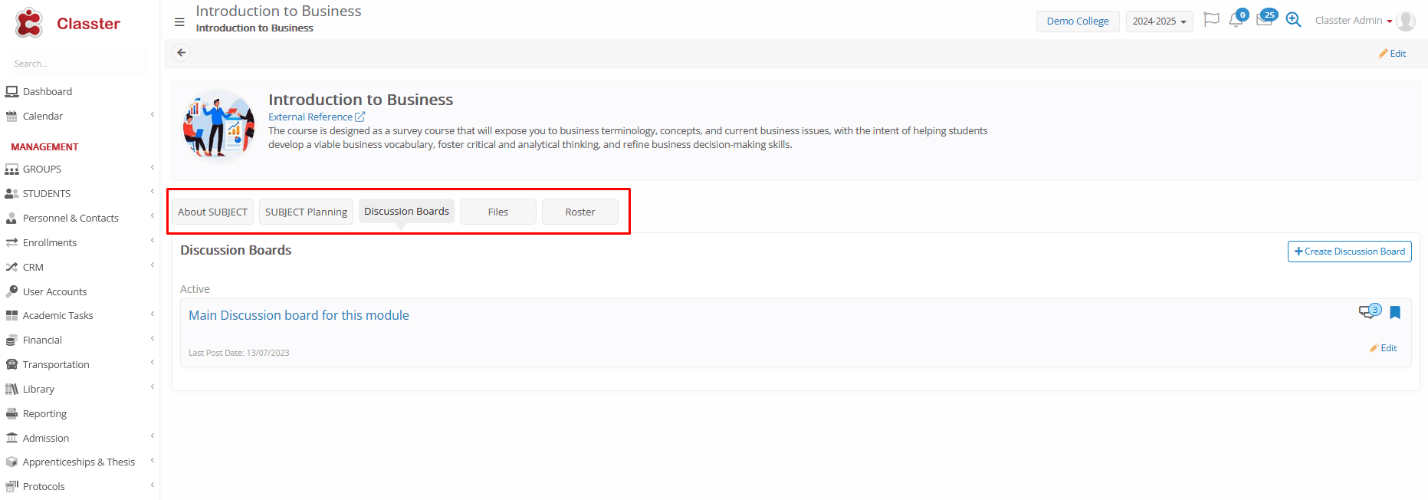
About Subject (refer to relevant content above), Subject Planning (refer to relevant content above), Discussion Boards – Collaborative space for communication. Discussion Board Manual, Files, Roster – Displays the list of enrolled _Students_ and associated groups and teachers.
- Delete a Subject – Go to Configuration > Main Settings > Subjects > List of Subjects, find the subject, and choose ⋮ Options > Delete.
Note: A subject cannot be deleted if it is associated with other data — for example, sessions or marks. In such cases, you must first deactivate or retain it instead of deleting it.
Menu – List of Subjects
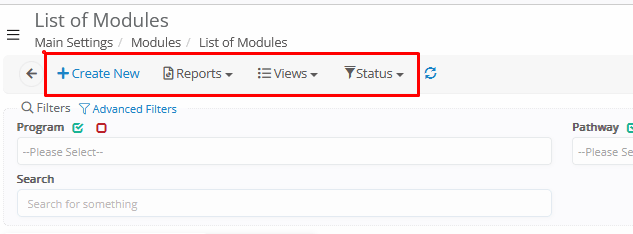
Main Actions & Views
- Create New → Opens a _Subject_ card, to create a new subject.
- Reports → Access predefined or custom reports, such as the ‘Marks per group and subject’ report.
- Switch View → Choose Card or Grid view.

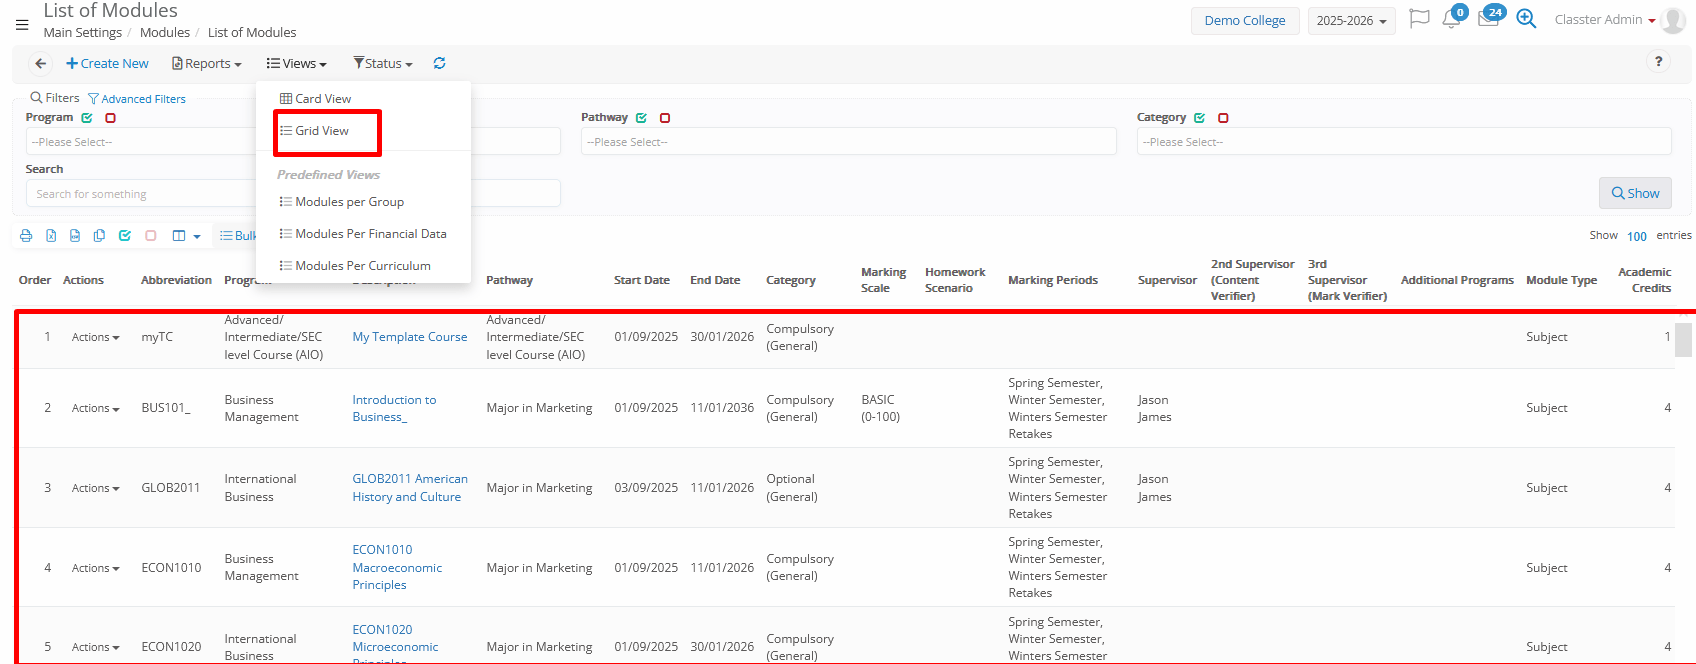
Predefined Views:
- Subject per _Group_
- Subject per Financial Data
- Subject per Curriculum (Higher Education only)

- Status Filter → Show All, Active, or Inactive _Subjects_.
Filters
Filter subjects based on their connected entities:
- _Grades_
- _Streams_
- _Subject_ Categories
- free text search → in subject’s abbreviation/code, description

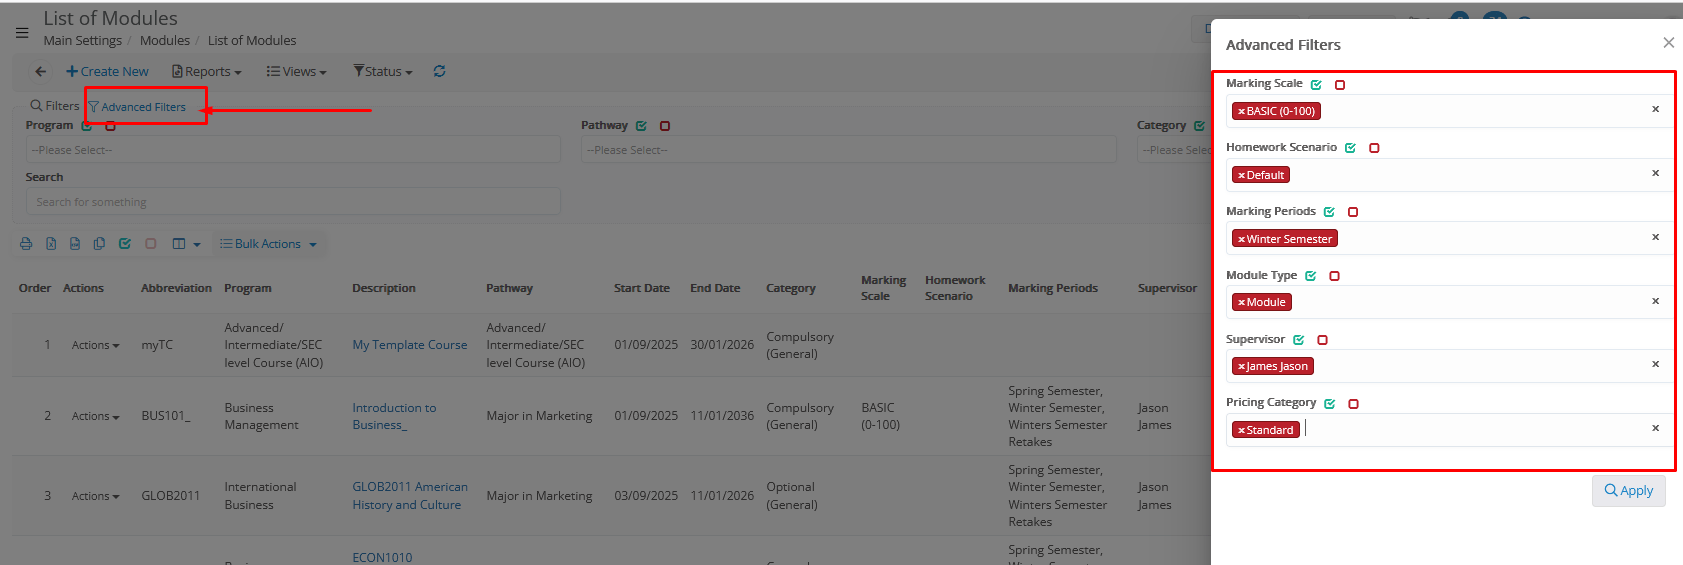
Advanced Filters
Advanced filters to filter subjects based on their connected attributes:
- Marking scale → the default subject marking range (e.g., ‘0-100’)
- Homework Scenario → the default subject homework scenario (e.g., ‘Grade 4 scenario’ or ‘Maths scenario’)
- Marking Periods → the marking periods connected to the subject (e.g., ‘1st trimester’ or ‘1st semester’).
- _Subject_ Type → the type of the entity (_Subject_, Thesis, Internship etc.)
- Supervisor → the subject Supervisor (supervisor functionality, where supervisors/teachers can view data from all groups-students connected to the subject)
- Pricing Category → the default subject pricing category (used in billing, for multiple subject prices based on various attributes)
Advanced filters can help with filtering the correct entries in order to perform Bulk Actions.
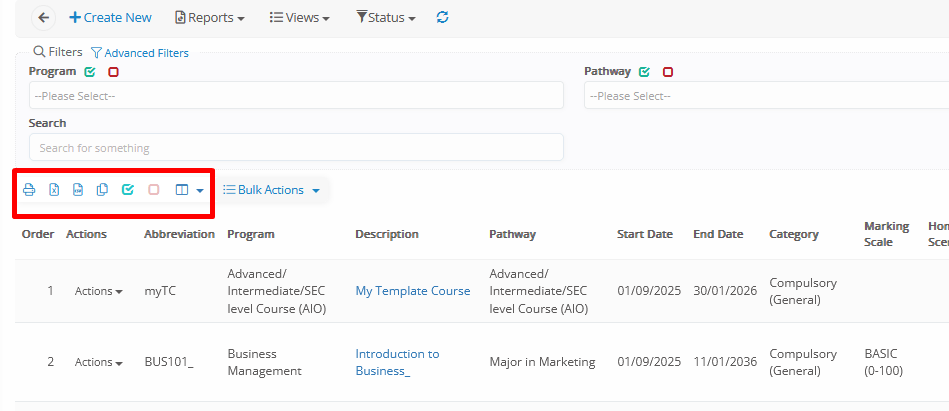
Grid Tools
- Print → Print the subject list (print, PDF, etc.).
- Export → Save as Excel (XLS) or CSV.
- Copy → Copy the list to the clipboard.
- Select All / Unselect All → Manage bulk selection.
- Manage Columns → Show, hide, or reorder list columns.
- Bulk Actions → Apply actions to multiple subjects at once (e.g., delete, export).
Grid Bulk Actions
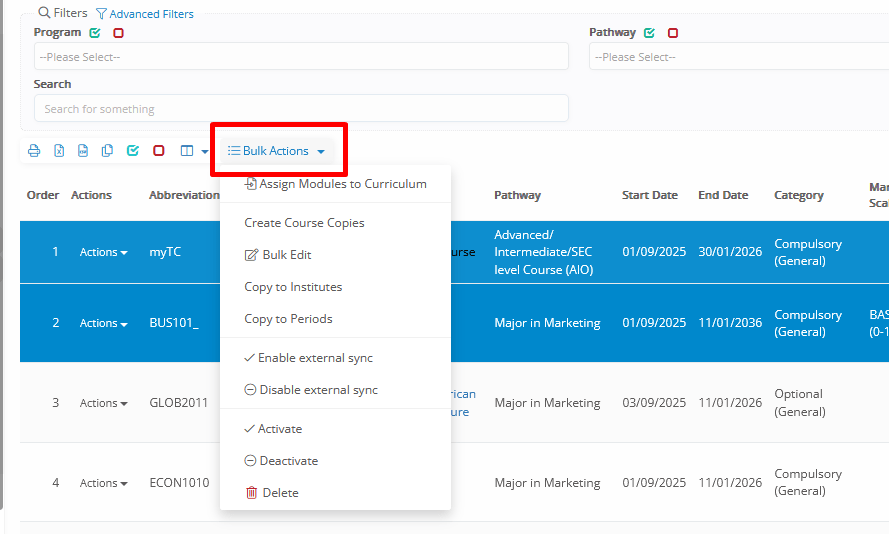
For these actions, you must select the subjects/rows to take the action:
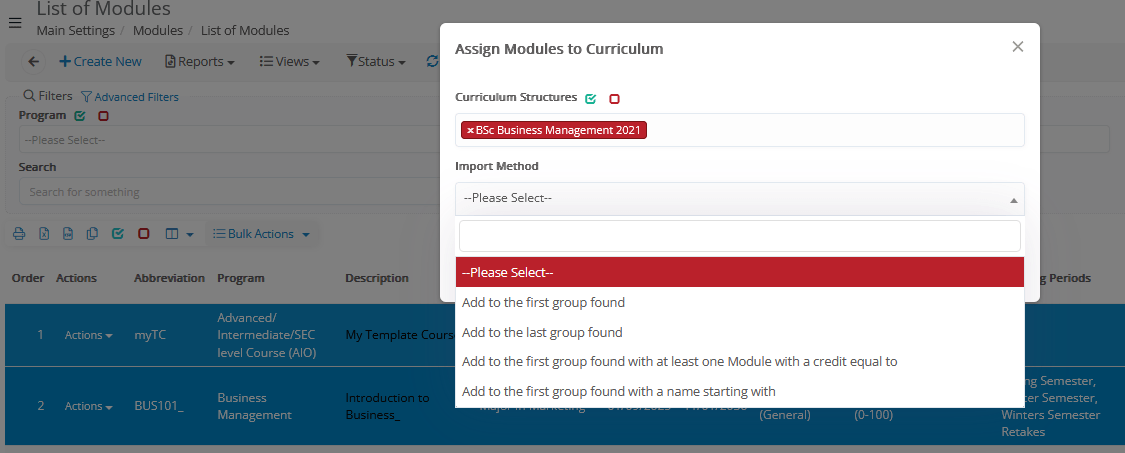
- Assign _Subjects_ to Curriculum→ Only for HE. This process supports specific methods to bulk/quick assign subjects to curricula, such as ‘add in first classification found’ in the curriculum. (The default curriculum creation of structure and adding subjects is done from the list of curricula)
- Create _Subject_ copies → Opens a bulk creation of copies in rows, with options to change the Abbr, Description, Lab, Hours per week, Supervisor, _Grade_, and _Stream_.

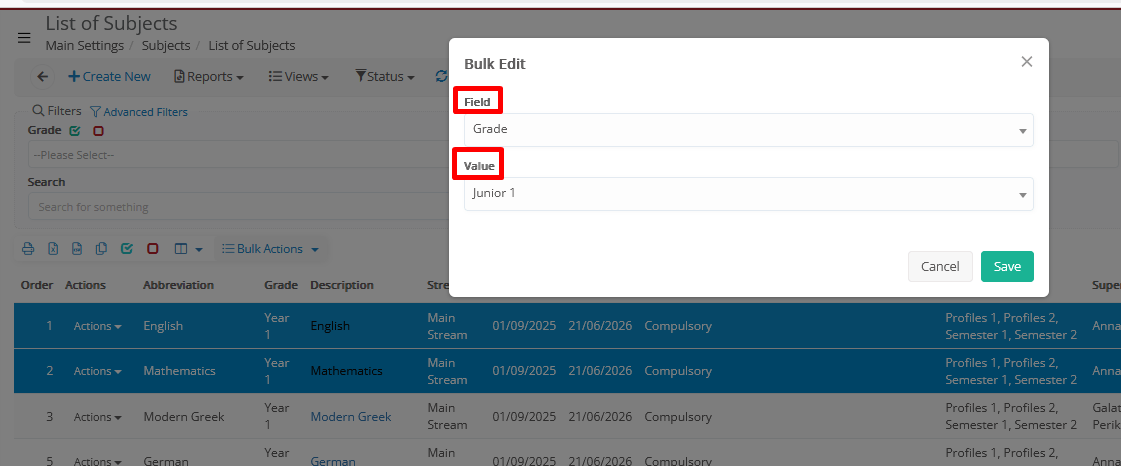
- Bulk edit → Select the Field you wish to edit and then the value to save. E.g., edit the field ‘_Grade_’ with value ‘Junior 1’.
Multiple fields are supported in bulk editing, such as subject category, add/remove additional connected _Grades_, credits, hours, supervisors, start/end dates, billing settings, default quiz, etc.
- Copy to Institutes→ Only for educational groups, having the district management module enabled, you can copy subjects to other Institutes/schools. This process helps with cross-company/institute management, since it saves a cross-company code for each subject (which is not done if you manually create or import subjects in each institute).
- Copy to Periods→ If you already have multiple academic periods, you can copy subjects between them. A cross-period code is also saved for each subject. (Subjects are normally copied during the new academic period creation, but this action helps in cases where we create new subjects in a later stage or edit default properties. If the subject already exists in the destination period, then the system will update the default properties of the subject.)
- Enable/Disable External Sync→ Refers to external systems integrations, such as LMS systems – Moodle, Brightspace. By default, all subjects are synced (after being enrolled for users) if you enable a relevant integration. But with these actions, you can manually disable/enable specific ones at your convenience.
- Activate/Deactivate→ Activates or deactivates the chosen subjects in the current academic period. The deactivate does not delete any data, just deactivates the subject for new enrollments (subject is also deactivated as a Filter in various lists).
- Delete→ Deletes the subject from the current academic period. Please note that if the subject is connected to various entities, these connections must be erased first.
Row Actions
- Edit → Opens the Subject Card to modify data and properties.
- Deletes → Deletes the subject from the current academic period.