

When applying, an applicant must choose an Application Type. Common application types for new students/ applicants can be New Application, Re-Applying. This may vary from institution to institution. If you are applying for the first time for example you would use a New Application type. The types you create indicate and categorize applicants based on what they wish to do by creating an application.
- By clicking on the dropdown lists and choosing Application Type the page will automatically load (Figure 41).
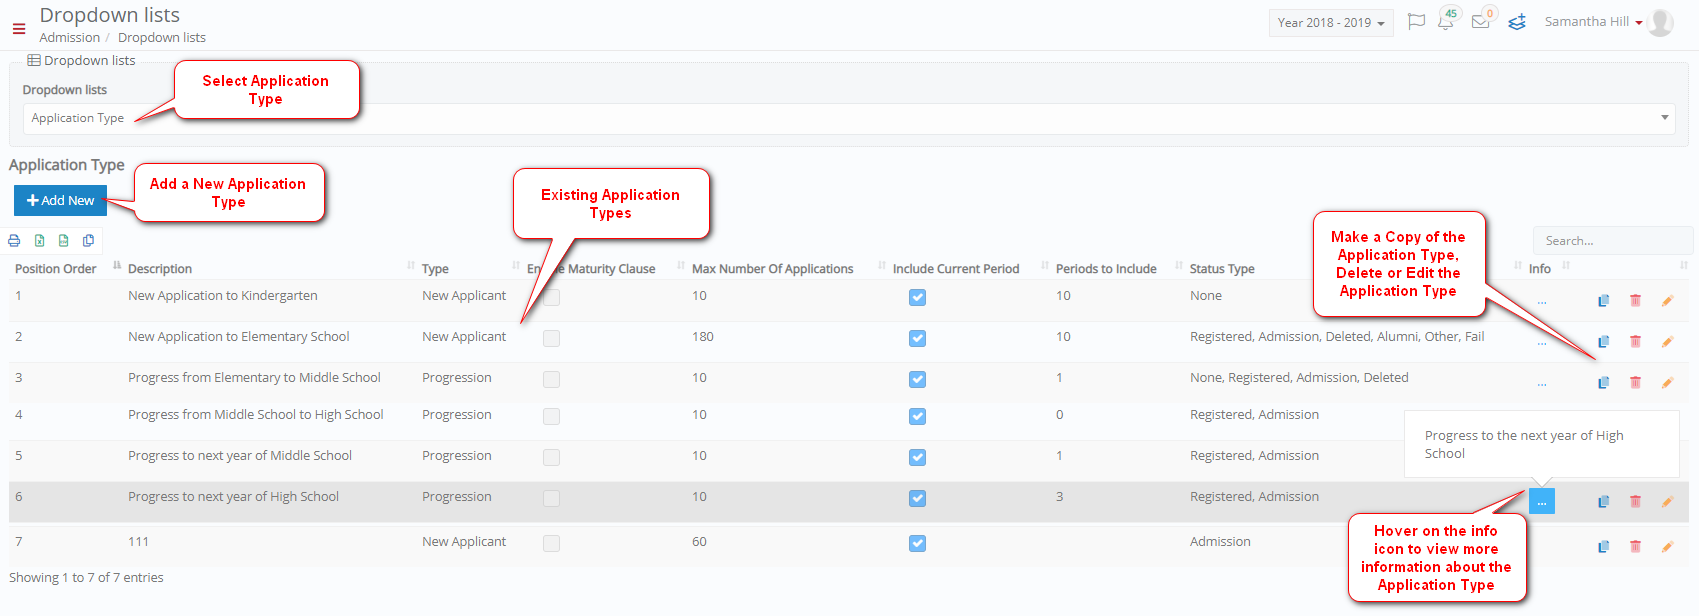 Figure 41
- Click on the
 button to view the categories in ascending or descending order (Figure 42, Yellow Arrow).
 Figure 42
- Use the buttons to copy, print or export (Excel, Csv) Application Categories (Figure 40).
![]()
Figure 43
- Hover over a button to show the explanation of the buttons function e.g ‘Print’.

Figure 44
- Use the Search tool to find a specific category (Figure 45).
![]()
Figure 45
Create Application Type
Click on the + Add New button to create an Application Type e.g., ‘New Application’ (Figure 41). Once you have clicked on the + Add New button you will be able to see a popup window (Figure 46):
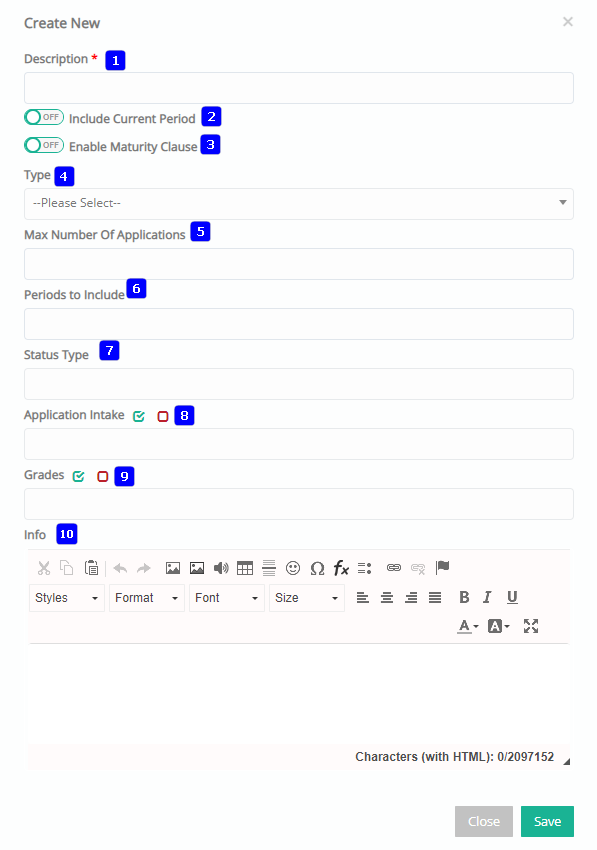
Figure 46
Note: Fields with a red asterisk are mandatory.
- Description: Click on the Description field to add a name for this Status e.g ‘Re-Apply’.
- Include Current Period: Click on Include Current Period button to allow or not the application to the current academic year.
- Enable Maturity Clause: Click to Enable or Disable the Maturity Clause button (eliminate applicants who are over the age limit).
- Type: Click on the Type dropdown list to enter the type e.g ‘Re-Apply’.
- Max Number of Applications: Click on Max Number of Applications field and add the number of Applications an applicant can make e.g., 2.
- Periods to Include: Click on the Periods to Include and add the number of academic years an applicant can apply too e.g 10.
- Status Type: Click on the Status Type field and add a status type e.g ‘Admission’.
- Application Intake: Select the intake period from the dropdown list.
- Grades: Select the grades that this application type will be applicable to from the dropdown.
- Info: The Info box should contain some information about the New Application Type. It will appear underneath the selected Application type in the application tab of the applicant’s portal.
Click on Save to save your changes (Figure 46).
Edit Application Type
Click on the Edit button to edit a currently available Type e.g., ‘New Application to Elementary School’ (Figure 41). Once you have clicked on edit type you will see a popup window appear (Figure 41):

Figure 47
Note: Fields with a red asterisk are mandatory.
- Description: Click on the Description field to edit a name for this Status e.g., ‘New Application’.
- Include Current Period: Click on Include Current Period switch to allow or not the application to the current academic year.
- Enable Maturity Clause: Click to Enable or Disable the Maturity Clause switch (eliminate applicants who are over the age limit).
- Type: Click on the Type dropdown list to change the type e.g., ‘New Applicant’.
- Max Number of Applications: Click on Max number of Applications field and edit the number of Applications an applicant can make e.g., 3.
- Periods to Include: Click on the Periods to Include and edit the number of academic years an applicant can apply to.
- Status Type: Click on the Status Type field and add or remove status types.
- Application Intake: Select the intake period from the dropdown list.
- Grades: Select the grades that this application type will be applicable to from the dropdown.
- Info: Enter a message that will appear once you have chosen ‘New Application to Elementary School’ in the applicant’s portal (Application Tab).
Click on Save to save your changes (Figure 47).