

Select Calendar from the main menu (Figure 57).
Figure 57
My Calendar
The Calendar presents events, meetings or other announcements for specific days or periods. You can select to view the Calendar by day, week, month or as a list. You can navigate through different dates using the arrow buttons ‘<’ ‘>’, and you can return in the current day by clicking the ‘today’ button (Figure 58).
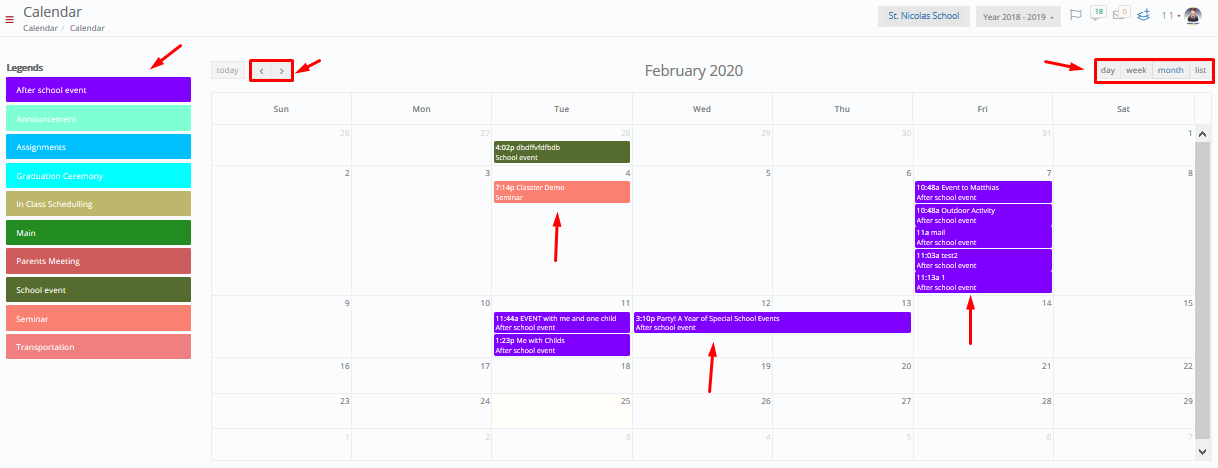
Figure 58
- Click on the specific event on the calendar (Figure 58), to see its contents (Figure 59) i.e.:
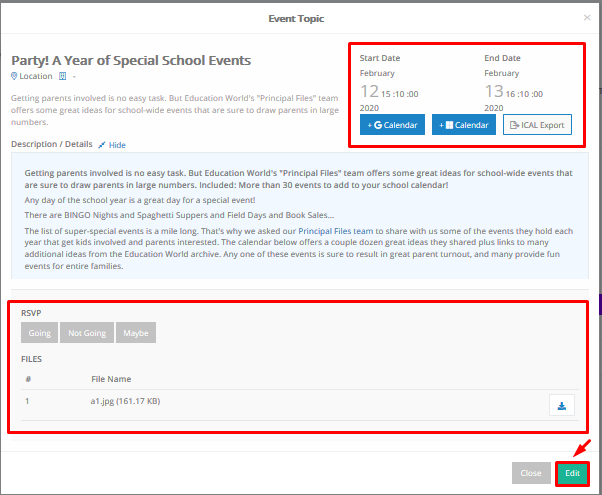
Figure 59
- You can edit this event by clicking on the ‘Edit’ button (Figure 50).
Events Management
In this menu you can add and manage your events and announcements.
An Event is a meeting or an event where you can invite students, parents, teachers, or employees. All events can be presented in the participant’s calendar.
An Announcement is a general article or news presented in the announcements page.
View, Edit or Delete Events/Announcements
To search for events and announcements (Figure 60):
- Select a range of dates for which you would like to see the events/announcements.
- Define if you want to see events/announcements that are shown in the Calendar or not.
- Click on the ‘Search’ button to see results.
- To edit or delete an event/announcement, click on Actions, and select either edit or delete button.
 Figure 60
Create New Event
- To create a new event, click on the ‘+ Create New Event’ button (Figure 59).
At the ‘Create Event’ page (Figure 61):
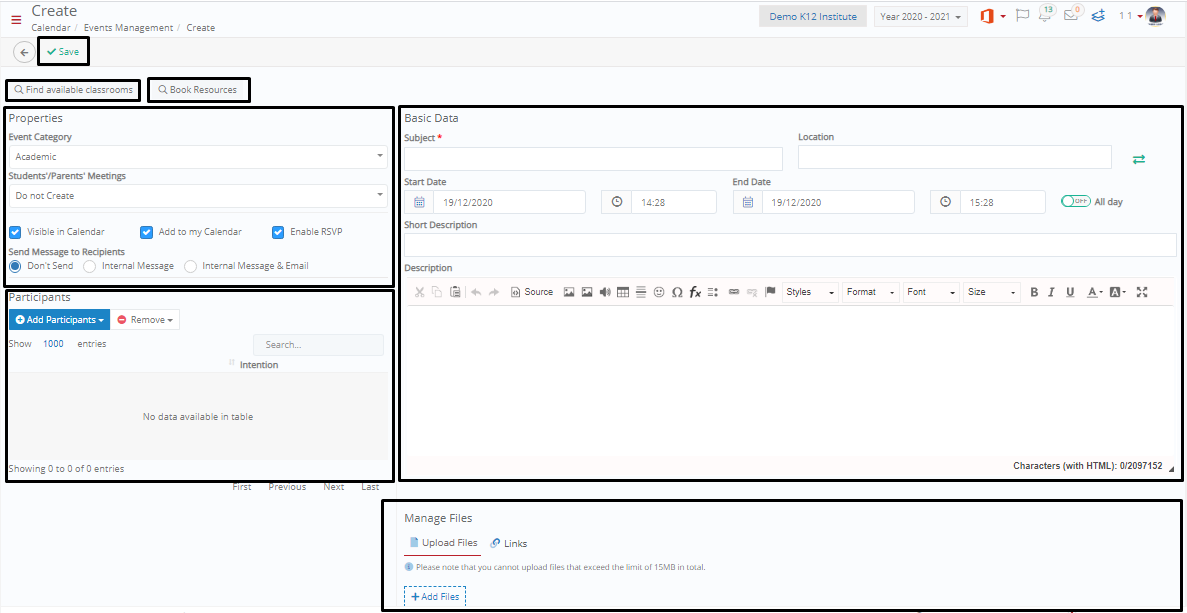
Figure 61
- Check classroom availability and book a classroom
- Click on ‘Find available classrooms’
- Select date, time, and minimum number of participants
- Click on the ‘Search’ button
- Click on the ‘Book Classroom’ button of the classroom you want to book.
Note: It will search for classrooms with capacity equal or greater than the number of recipients you have defined.

Figure 62
- Book resources
Click on ‘Book Resources’ > Select category e.g., Projectors > Search > Select resource from the available list> Add (Figure 63).
Note: Resources may be added per classroom from your administrators.

Figure 63
- Properties
- Select Event Category. E.g., Parents Meeting (Figure 64).

Figure 64
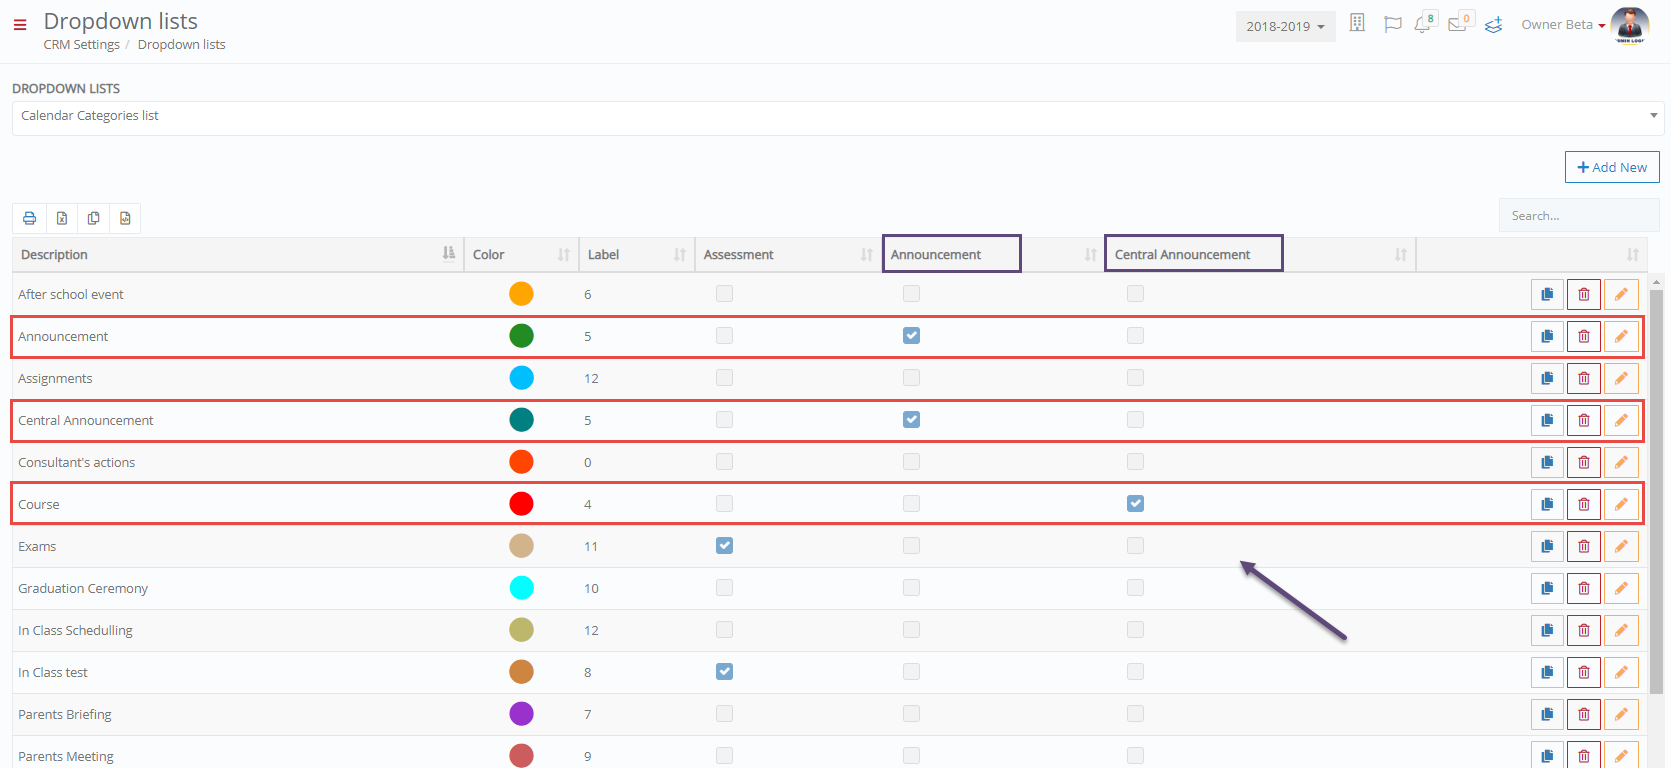
Note: Each category will be shown with a different color in calendar. The colors are set in the Configuration CRM Settings Dropdown lists Calendar Categories list (Figure 65).
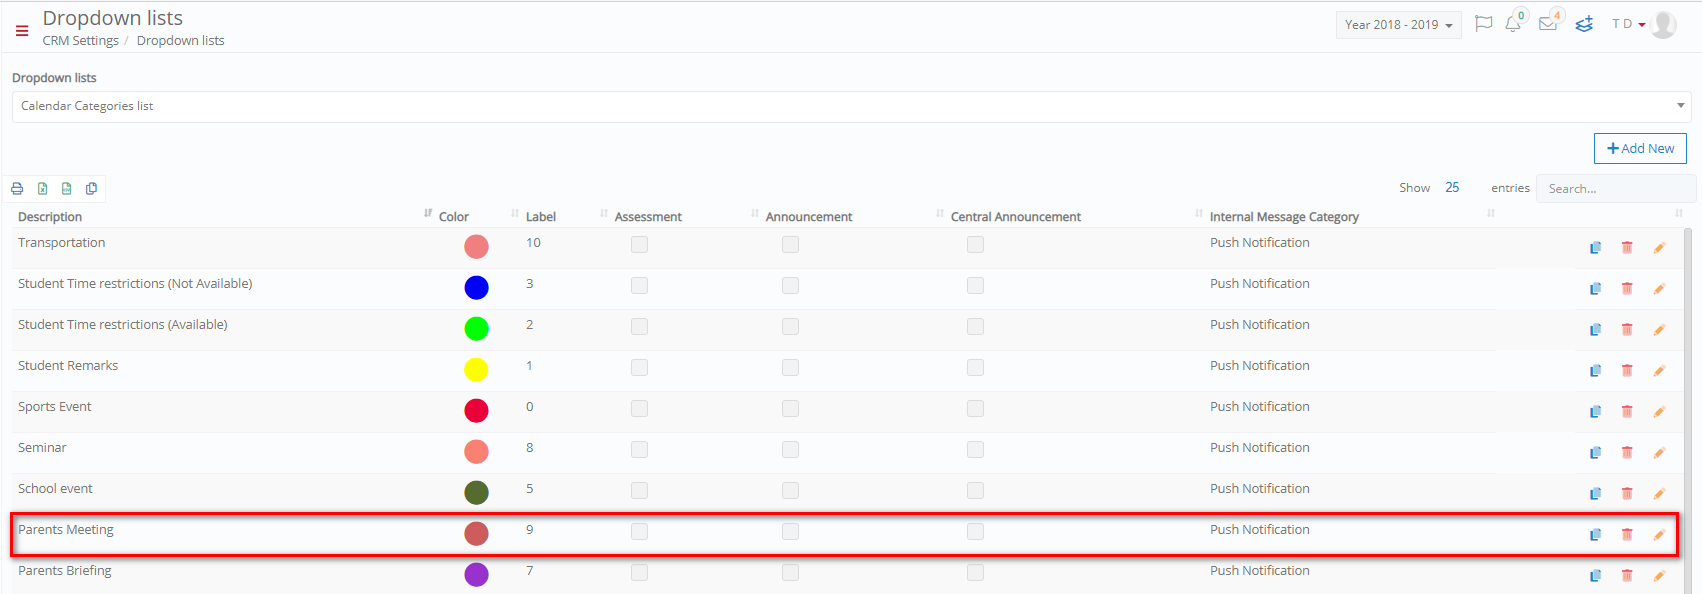 Figure 65
Properties
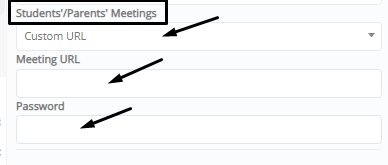
Select Students’/Parents’ Meetings. E.g., Custom URL (Figure 64). This option will allow you to create a virtual meeting by using the telecommunications platform you have integrated with your Classter platform or which you personally use e.g., Zoom, MS Teams etc. For example, if you have chosen the event category parents’ meeting, you can choose to create a virtual meeting room for the parents meeting.
You have three options:
- The first is “do not create” in this case no virtual meeting is created because you prefer the meeting to be held face to face at school (Option A).
- The second option is “auto create” this option will allow you to create a virtual meeting room for participants automatically once you save the event you are creating (Option B).
- Third option is” custom URL” which also helps you create a virtual meeting room for participants of the event but in this case, you need to enter your personal meeting room URL and account password (The fields appear once you select the option) (Option C).
Note: For Option B, you must have integrated Classter with a specific platform e.g., Zoom, MS Teams. For Option C, you must have a personal account on a platform such as Zoom or MS Teams.

Option A

Option B
Option C
- You have the option to show the new event on recipients’ calendar i.e., ‘Visible in Calendar’ and/ or your calendar i.e., ‘Add to my Calendar’, by activating the following check boxes (Figure 66):
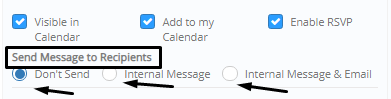
Figure 66
- Check the ‘Enable RSVP’ box to enable recipients confirm their acceptance of the event.
Select the ‘Send Message to Recipients’ option that you want. You have three choices: “Don’t Send”, “Internal Message” or “Internal Message & Email” notifications to recipients for every new event created. Depending on the choice you make, once the event is saved, the system will either not send messages to participants, send an internal message to participants, or send both an internal message and an email to participants. Recipients/Participants of events regardless will be able to view the event in their Dashboard calendar.
Note: Make sure your Admin has emails set up in Advanced Configurations, so that participants can be notified via email. If you select the option Internal Message & Email, the system will send notifications both with internal message and email (if emails – mailgun has been setup).
Participants
You can select multiple participants (go to Add Recipients to see how to add participants):
Note: Once added, you can enable the e-mail check so that they are informed of the event by email.
- Teachers and Students – filtered by: Year, Group, Subject (e.g., Year 5, Y5B, Mathematics). Note: The word ‘Year’ may be different in your installation. This is a literal defined in the institute terminology.
- Parents – filtered by: Year, Group (e.g., Year 5, Y5B)
- Employees – filtered by: Categories (e.g., Bus Drivers)
- By Level, Year, Group, Subject
- Basic Data
- Enter the event’s subject, location, date, short description and main description (Figure 67).
Note: Click on the double arrow button if you want to select Classroom instead of Location

Figure 67
- Manage Files
- Upload files and/or links for the event.
- Click on Save.
Create New Announcements
To create a new announcement, click on the ‘+Create New Announcement’ button.
At the ‘Add Announcement’ page (Figure 68):

Figure 68
- Select an announcement category e.g., Announcements. (the list is set by the admin)
- Write the subject of the announcement.
- Select the announcement’s start/end date and hour.
Note: The end date is the date after which the announcement will be hidden from end users.
- Write a short description and/or description.
- Add/Remove participants (as described at Create New Event).
- You have the option to show the new event on recipients’ calendar i.e., ‘Visible in Calendar’ and/ or your calendar i.e., ‘Add to my Calendar’, by activating the following check boxes (Figure 66):
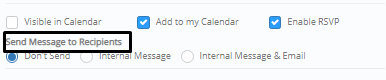
Figure 69
- Check the ‘Enable RSVP’ box to enable recipients confirm their acceptance of the event.
- Select the ‘Send Message to Recipients’ option that you want. You have three choices: “Don’t Send”, “Internal Message” or “Internal Message & Email” notifications to recipients for every new event created. Depending on the choice you make, once the event is saved, the system will either not send messages to participants, send an internal message to participants, or send both an internal message and an email to participants. Recipients/Participants of events regardless will be able to view the event in their Dashboard calendar.
Note: Make sure your Admin has emails set up in Advanced Configurations, so that participants can be notified via email. If you select the option Internal Message & Email, the system will send notifications both with internal message and email (emails – mailgun setup is required).
- Click on save.
Note:
- If the announcement category selected is a central announcement, then the options available will be just Enable RSVP and Send Notification Message to Recipients.
- A central announcement is always shown on the top center of recipient’s page. A non-central announcement is shown in the recipient’s calendar (Figure 70).
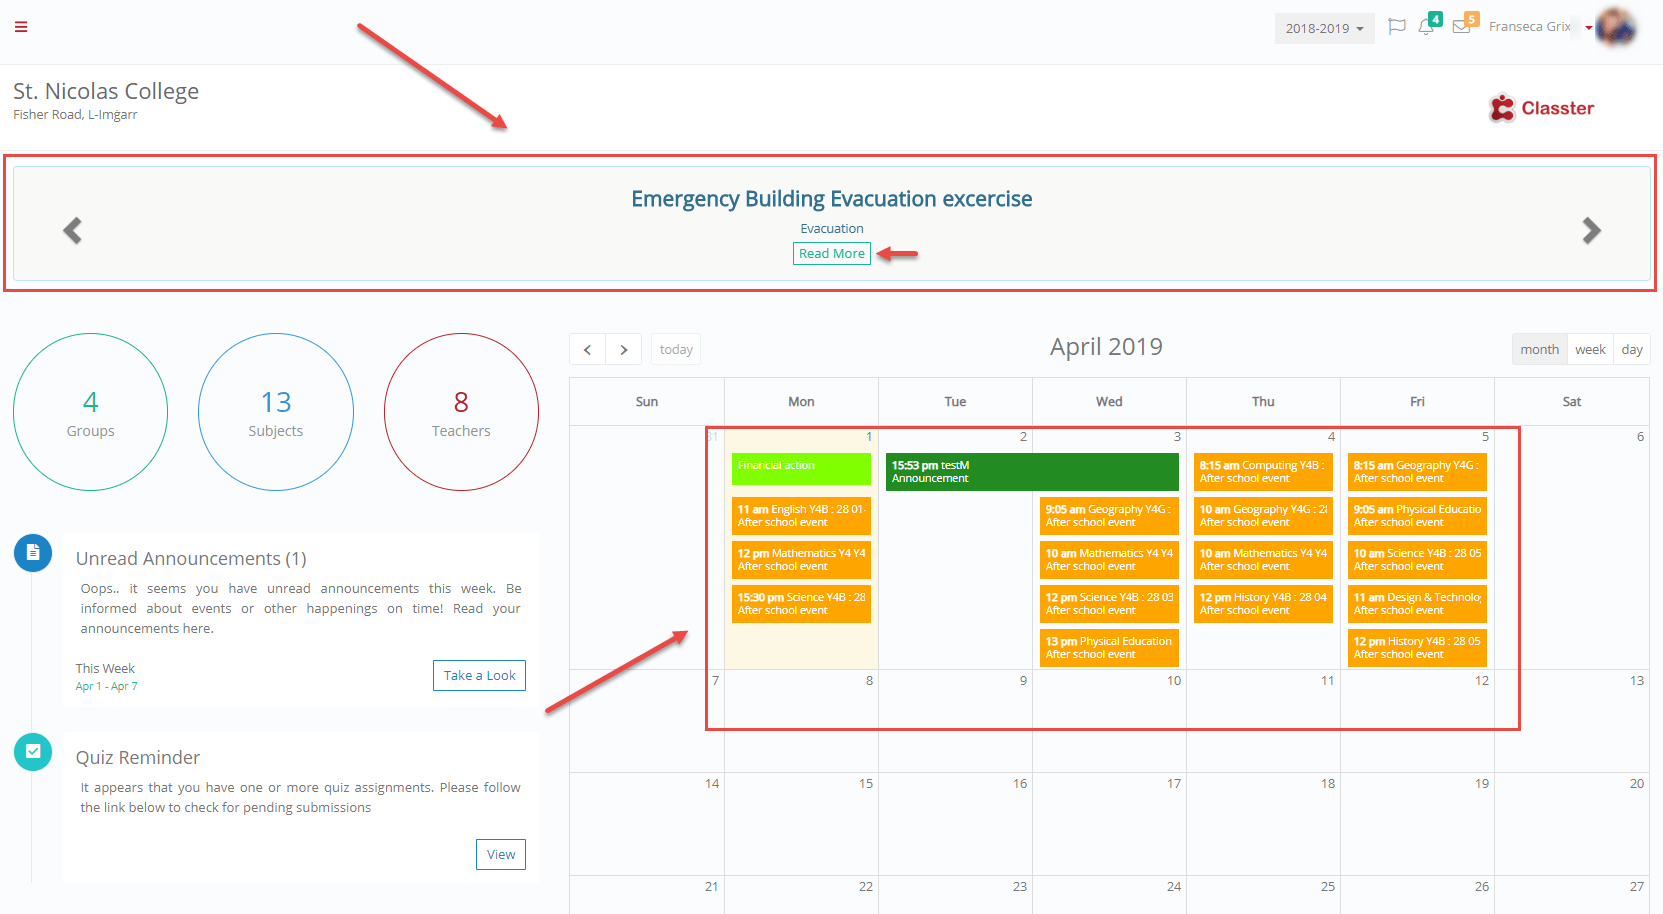
Figure 70
Attending to Events
You can manage the participants’ attendance to events and/or distribute a quiz/survey to them.
- Use the available filters to show the participants of a specific event (Figure 71).
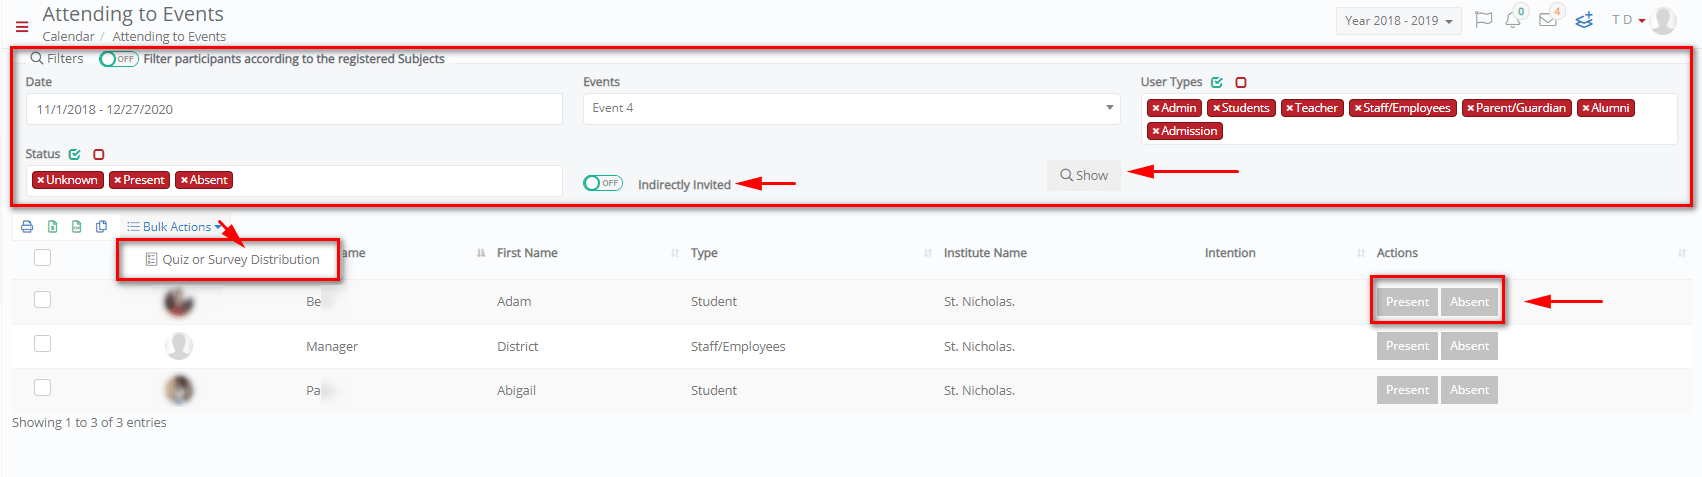
Figure 71
- Select the ‘Date’ of the event
- Select the specific ‘Event’ from the drop-down list e.g., ‘School Trip Announcement’.
- Select the ‘User Type(s)’ e.g., Teacher
- Select the ‘Status’ e.g. Present, to show participants who have been recorded as present
- You can use the ‘Indirectly invited’ filter to show participants who were invited indirectly i.e., the invitation was sent to the Group
- Click on ‘Show’.
Note: Activate the filter ‘Filter participants according to the registered subjects’ switch to show the participants enrolled in the selected subject(s) (Figure 71).
At the results, you can record the participants’ presence or absence at the event, and you can distribute a survey to the selected participants (Figure 72).

Figure 72
- Select the participants e.g., who were recorded as Present.
- Select the ‘Quiz or ‘Survey Distribution’ menu from the Bulk Actions button to distribute a selected quiz/survey to the participants (Figure 73).

Figure 73
- At the Quiz or Survey Distribution window, you can manage the details of the distribution (Figure 74).

Figure 74
- Select the quiz/survey you want to distribute from the ‘Quizzes’ drop-down list e.g., Educational work writing.
- Set the period that it will be available to the participant to complete and submit.
- Click on ‘Check for existing distributions’ to check if the distribution has previously been done.
- Click on ‘Distribute only once per Entity to send the quiz/survey only once, in case a participant is e.g., a teacher in multiple institutes.
- Click on ‘Save’.
Student Position Calendar
Use the student position calendar to create and manage students’ everyday specific position(s) at school e.g. on 01/04/2019, student Abdila Gianluca was at the classroom from 09:00 until 15:00, and then at the Library from 15:10 until 16:30 when his mother picked him up. This way, you can always be aware of where the student is at any date and time, and you can inform parents if required (Figure 75).
- Use the filters to show students’ created Check-ins/outs at a specific date and position or at all positions.
- Select the type e.g., classroom, library, doctor etc. or all positions
- Choose the status i.e., to Check-in a student from a class/room or Check-out a student from a class/room
- Select the group/class
- Select the date you want to show Check-ins/outs for
- Click on the ‘Search’ button
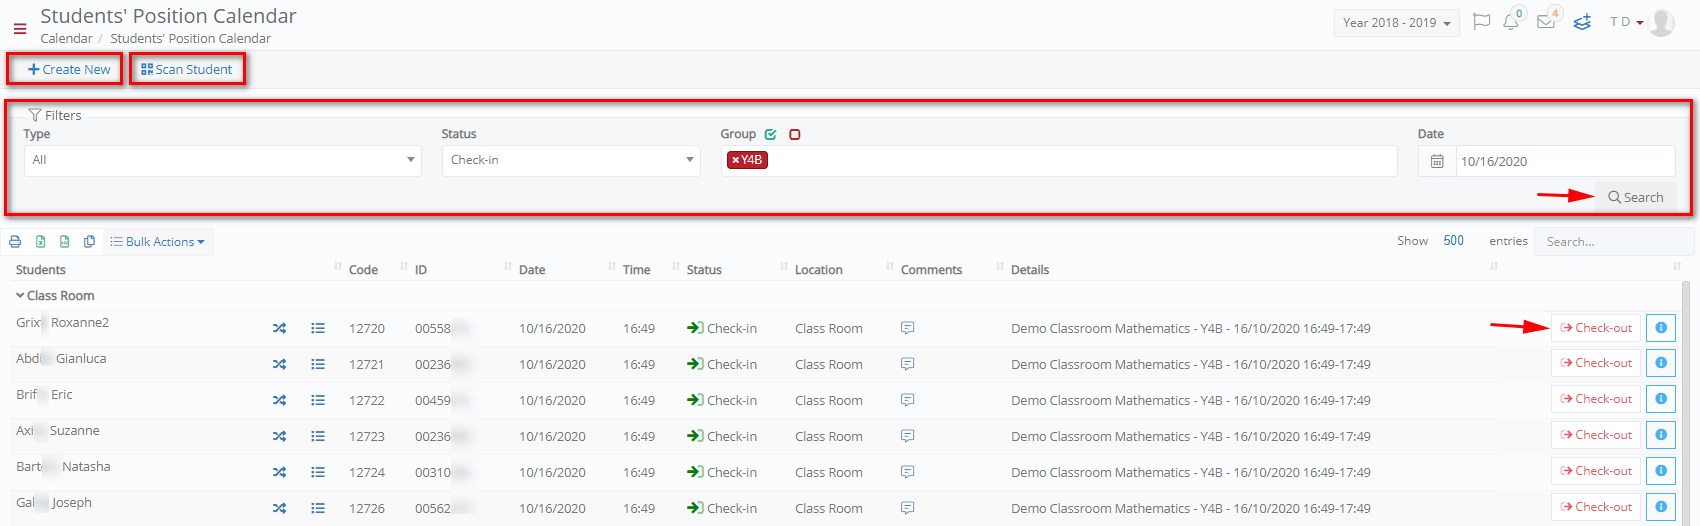
Figure 75
- If you have not recorded a Check out for a Check in entry, click on the ‘Check-out’ button to add it.
Note: Check-out will be recorded automatically using the current date and time. If the check-in is created for a future date you will not be able to check-out until the defined date.
- Click on the remarks/actions button to add and view remarks/actions.
- Click on the comments icon to see any comments added on creation.
- Click on the delete button to delete a check-in/out record.
- Use the bulk actions to check-out all students or to send out notifications (Figure 76).

Figure 76
Create New
Use the ‘Create New’ function to create one or multiple check-ins/outs for the selected student(s).
- Click on the ‘Create New’ button
At the Check in/out creation pop-up window (Figure 77):

Figure 77
- Use the ‘Type’ filter to search for students you want to add a position for, e.g., Grade > Year 6 > Search
- Select the student(s) from the updated, according to the type, list or you can use the select/deselect all buttons
Note: ‘Select All’ is useful when you want to make mass check ins e.g. classroom check in for all the students of a year (Figure 78).
- Define the position details, such as position e.g., Classroom, date e.g., 02/04/2019, time e.g., 09:10, status e.g., Check in, and comments e.g., Classroom Mr5
- Add additional information like the student’s temperature, a general health comment, etc.
- Click on the ‘Save and Close’ button or click on the ‘Save’ button if you want to continue creating new check-ins/outs

Figure 78
Note: You can enable a special setting, so that attendance registration also updates the student positioning calendar with students’ classroom check ins (set by the admin).
Scan Student
You can click on the Scan Student button to scan students using a QR code.

Figure 79
CRM Settings > Dropdown Lists > Calendar Categories list
Academic Settings > Attendance Settings > Attendance Settings.