

Dropdown Lists
The following is the main page of the dropdown lists in the configuration menu (Admissions tab).
Configuration > Admission > Dropdown Lists
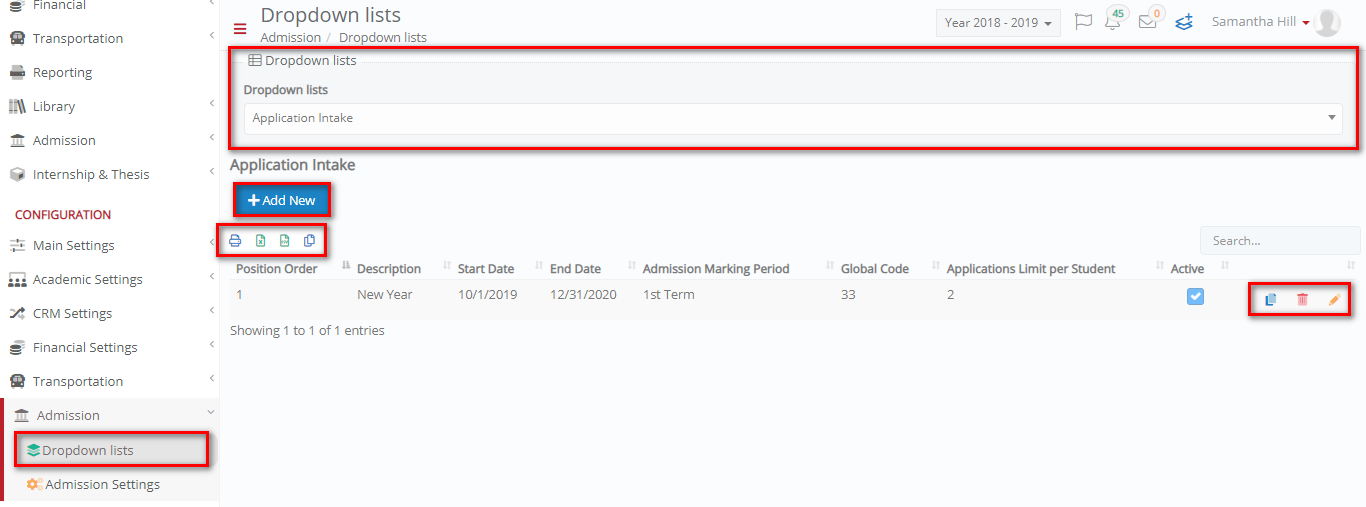 Figure 22
Note: Dropdown lists (Top of the page, first dropdown box) are defined by the Admin.
Below you will see the dropdown list options. When opening the Admissions Dropdown List page you will arrive at the main page (Figure 22) and the Application Category dropdown list option will be pre-selected.
Application Intake
Click on Application Intake in the dropdown box at the top of the main page (Figure 23).
 Figure 23
Once you have clicked on the Application Intake button the page will automatically load and you will see the following (Figure 24):
 Figure 24
Click on the ![]() button to view the intakes in ascending or descending order (Figure 25, Yellow Arrow).
button to view the intakes in ascending or descending order (Figure 25, Yellow Arrow).
 Figure 25
- Use the buttons to copy, print or export (Excel, Csv) Application Categories (Figure 26).
![]()
Figure 26
- Hover over a button to show the explanation of the buttons function e.g ‘Print’.

Figure 27
- Use the Search tool to find a specific category (Figure 28).
![]()
Figure 28
- Click on the Edit button to edit a currently available intake period e.g., ‘New Year’.
Create New Intake Period
 Figure 29
- Click on +Add New to add a new intake period (Figure 29).
The pop-up window to create a new intake period will appear (Figure 30).

Figure 30
Note: Fields with a red asterisk are mandatory.
- Active: Click on Activate to make this Intake period available.
- Description: Click on the Description field to add a name for this intake period e.g ‘New Academic Year’.
- Start/End Date: Click on the Start/End Date box to define starting and ending period of the year e.g 13/9/2019 -13/7/2020.
- Admission Marking Period: Click on the marking period drop-down list to choose which term the new applicant will be entering in upon registration e.g 1st Term registration.
- Global Code: Click on Global Code field to add an institution code e.g 33, varies from institution to institution ask your Admin.
- Application Types: Click on the ‘Application Types’ box to add one or more types this intake period will be available too e.g ‘New Application to Elementary School’.
- Application Limit per Student: Set a limit to the number of applications can be submitted per student.
Click on Save and you will have created a new Intake period (Figure 30).
Edit Intake Period
At this point of the process, you have opened the popup window to edit the existing intake period. The following is the popup window titled edit ‘New Year’ (Figure 27).

Figure 31
Note: Fields with a red asterisk are mandatory.
- Active: Click on the Active button if you want to activate or deactivate this intake period.
- Description: Click on the Description field and re-name the intake period.
- Start/End Date: Click on the Start / End Date fields to change the start and finish date of the term.
- Admission Marking Period: Click on the marking period field to change the term the new applicant will enter upon registration.
- Global Code: Click on the Global Code varies from institution to institution ask your Admin.
- Application Types: Click on ‘Application Types’ field to connect Intake period with a different type of Application or to add this intake period to more than one Application Types.
- Application Limit per Student: Set a limit to the number of applications can be submitted per student.
Click on Save to save the changes you made to this intake period.