

Select ‘Groups’ from Management Category at the main menu. There are two submenus: ‘Manage’ & ‘Statistics’ (Figure 80).
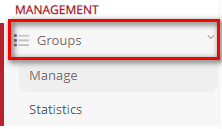
Figure 80
Manage Group
Groups can be viewed in Card or Grid View. At the top of the page the following tools are available: Create New, Reports, View, Status & Refresh. There is a search tool that can be used to quickly find a class by its name and there is a Filters bar, where you can apply filters to search classes in various types (Figure 81).

Figure 81
- Use the View menu to change the view mode between Card View or Grid View (Figure 82).

Figure 82
- Use the Status menu to show either All groups, Active (Current Period) or Inactive Groups (Current and All Periods) (Figure 83).

Figure 83
Grid View
In the Grid View, you can view a detailed list of groups. Information such as full description, group type, stream, supervisor, number of registered students, number of registered subjects, etc. is available from this view (Figure 84).
Note: A student may be enrolled to multiple groups. He/she can have a main group where he does most of his subjects e.g., S2A, and might be enrolled in other groups as well, where he does specific subjects e.g., Science.

Figure 84
- To display the filters, click on the show button and use the Filters bar to show groups according to level, Courses, Program, Year etc. or use the Search tool to show a specific group.
- Click on the Actions button next to each group on the list then select the
- Preview & Edit – This is used to preview and edit the group information.
- Create a Copy – This will create a copy of the group of the same name.
- Group Constraints – Allows you to set availability and constraints for a group.
- Delete/Remove from period – Deletes the entry from the selected academic period.
Group Constraints (Figure 75)

Figure 74
Card View
At Card View you can see groups/classes in cards showing the basic info of the group/class such as name, type, year, stream, number of registered students and subjects (Figure 85).

Figure 85
- Use the Filters bar to show classes according to School, Year etc. or use the Search tool to find a specific class.
- Click anywhere on the card to edit the class.
Edit Group
At the Edit page, you can save or delete the group/class, see, or edit group’s/classes’ data using the available tabs as well as switch between groups (Figure 86).
- Use the Actions menu to:
- Be redirected to the Class Statistics page (alternatively, go to Classes Statistics)
- Send emails to invite your students to become registered in Classter and automatically enroll to the group (Figure 86).
- Create a Copy of the Group.
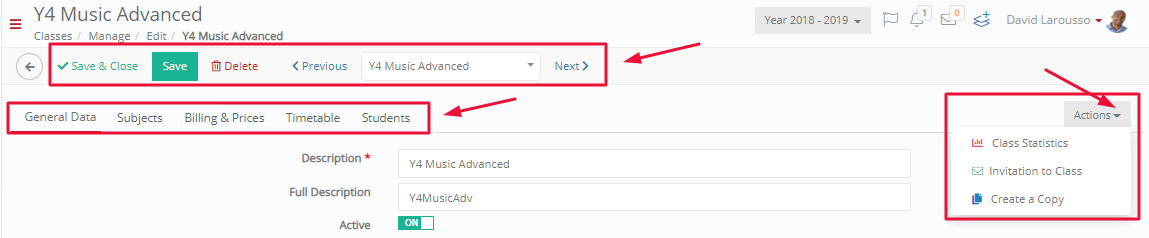
Figure 86
Note: ‘Invitation to Group’ (also seen on the card) allows you to invite student(s) to a group using their email address. The students will receive an Invitation to Group/Class email (Figure 87) and can use the link to register to the group. Once registered, they will receive a Welcome to Classter email with their login credentials (Figure 88).

Figure 87

Figure 88
GENERAL DATA
You can edit the groups’ main data as explained below (Figure 89).

Figure 89
- Use ‘Description’ to enter the groups short name e.g., Y4.
- Use ‘Full Description’ to enter the groups full name e.g., Y3 Music Advanced.
- Select if the group will be ‘Active’ i.e., available for students to enroll to.
- Define the ‘Start’ and ‘End Date’ of the group e.g., from 01/07/2017 to 30/06/2018.
- Select the group’s ‘Color’ e.g., cornflower blue; this will be the color that the group will be presented in the timetable or elsewhere.
- Select the ‘Year’ e.g., Year 4.
- Select the ‘Group Type’ e.g., Main; the class type indicates if it is a main group or foreign languages, projects class etc.
- Select the Main Group if not greyed out.
- Select the ‘Previous Groups’ e.g., Y3 Music Advanced; the student has to have passed all the subjects of the previous class to be able to enrol to the current group.
- Select ‘Classroom’ e.g., Senior Room 5.
- Select ‘Supervisor’ e.g., Elaine Borg; she/he is responsible for the group i.e., write comments about the classes’ performance or state any incidents, approve assessments’/assignments’ content etc.
- Select ‘Second Supervisor’ e.g., Formosa Denzel; for example, he/she might be selected for assessments’/assignments’ 2nd marking.
- Define the ‘Students limit’ e.g., 20 which is the maximum number of students that can be enrolled in the class.
- Define the ‘Absence Limit’ e.g., 10 which is the maximum total absences allowed to the class students.
- Define the ‘Unauthorized Absences Limit’ e.g., 3 which is the maximum unauthorized absences allowed to the classes’ students.
- Enter ‘External Timetable Code’ if you have set a timetable for the class in a third-party application and you want to import it in to Classter.
- Enter ‘External Class Name’ if you have classes’ basic info in a third-party application and you want to import it in to Classter.
- Use the ‘Comments’ text box to enter any special comments about the class.
- Activate the ‘Enable cross institute teaching’ to make the class available for enrollment to students at other institutes.
- Click on the ‘Save and Close’ button to save changes and return to the Manage Group menu.
- Click on the ‘Save’ button to save changes and continue with the next or another class.
- Use the ‘Delete’ button to delete the class.
- Use the ‘Previous’/’Next’ buttons to go to the previous/next class or select the class you want from the drop-down list (Figure 90).

Figure 90
SUBJECTS
You can define which subjects are available in the groups. These will also be the ones available to choose from, at the student’s Enrollments page. Additionally, you can see subjects’ basic info such as the name, year, stream, and the name of the teacher who teaches the subject (Figure 91).
Note: Alternatively, you can go to Enrollments→ Enroll Subjects to Groups
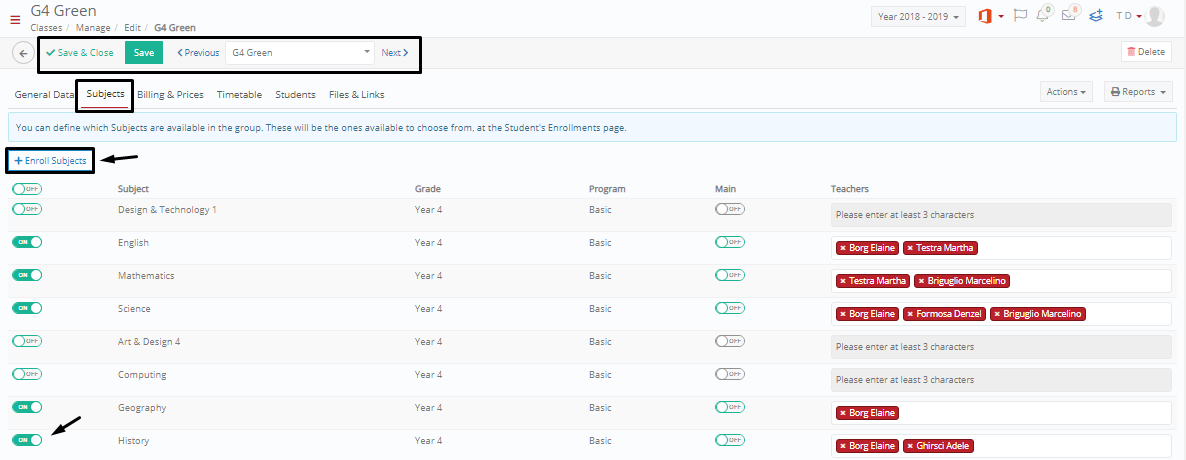
Figure 91
- Click on the subject’s ON/OFF button to activate/deactivate the subject’s availability at the group.
Note: If you want to activate/deactivate all subjects, click on the ON/OFF button of the column title ‘Subject’
- Click on the ‘Enroll Subjects’ button to enroll subjects of another grade and/or program to the group (Figure 92).

Figure 92
BILLING & PRICES

Figure 93
- Here you can enable the addition of this group into the financial module.
- Add the price for enrolling to this group.
- Select the tax code from a dropdown e.g., main, tax free.
- Click on ‘Save’ and continue to the next tab.
TIMETABLE
You can see the groups weekly timetable.
- Select the timetable category e.g., Main, Exams, Activities etc. to see the corresponding weekly timetable (Figure 94).

Figure 94
STUDENTS
You can see the students enrolled in the group, the group type e.g., Main, the year e.g., Year 4, the stream e.g., Basic, and the subjects they are enrolled in (Figure 95).
- Click on the Non-Registered Students checkbox to display the list of students who are enrolled to the group but not registered.
Note: The ‘Students’ tab is Read-Only, so you cannot select/deselect subjects here.

Figure 95
FILES & LINKS
Files and links related to the group/class can be uploaded here.
- Use the File link to upload file e.g., books
- Choose a file
- Select a category
- Select in which views these can be accessed, i.e., View in Staff, Students, Teachers, Creator, etc.
- Add Notes related to the file

Figure 96
- Use the Link button to add links related to group

Figure 97
- Use the Local File (Link) to upload files from the local file directory.
Note: Maximum file size for uploads is 15mb. Keep in mind the more files you upload the longer the delay will be in viewing the pages.
Statistics
At the Group Statistics you can see the group’s teachers, supervisor’s comments, assessments workload, students and their progress presented in marks and assessments comparative charts (Figure 98).
- Go to Groups →Statistics

Figure 98
- To load the statistics for a group of students, select the group from the dropdown e.g., Y4B.
- You can see students’ information in Card or Grid view.
- With Card View, you can see the student’s basic information; Name, Surname, Father’s name, Grade e.g., Year 4 and Class Y4B. You can also check the student’s academic progress (Figure 99).

Figure 99
- With Grid View, you see student’s personal info in more details, check his academic progress and print, copy or export data (Figure 100).

Figure 100
- You can see the group’s teachers, with their job position and email

Figure 101
- You can also check the assessments due today and the assessments workload

Figure 102
- You can view, edit, and delete supervisor’s comments

Figure 103
- At the top of the right pane, you can view the following actions (Figure 104): Calendar, Message to Teachers, Message to Teachers (via e-mail), Copy Teachers emails, Copy Students emails, Supervisor’s Comments.

Figure 104
- Select Calendar to view the assessment workload for each day (Figure 105):
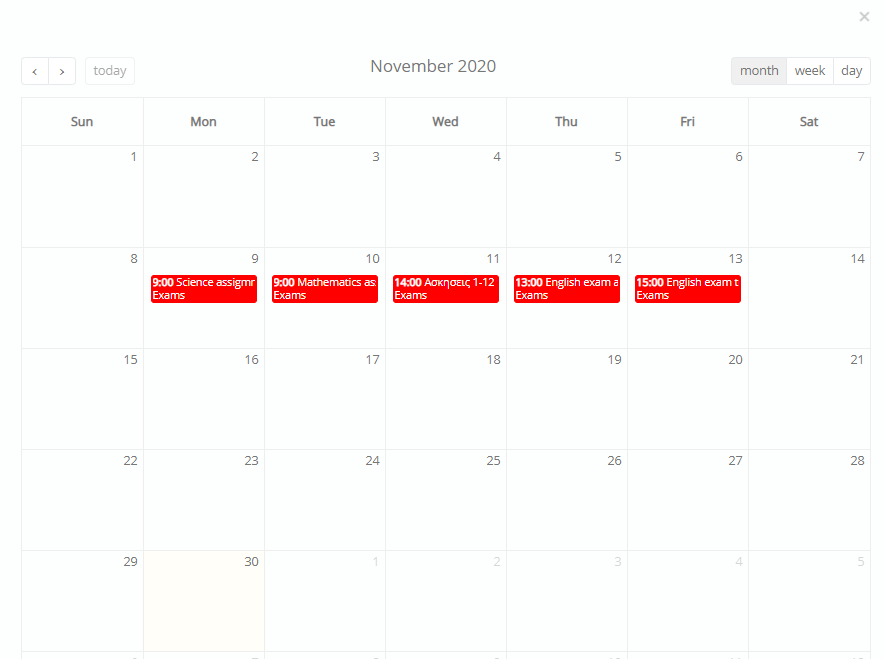
Figure 105
- Click on Message to Teachers to send internal messages to teachers. See Internal Message
- Click on Message to Students (via e-mail) to send e-mail messages to students. See E-mail via Classter
- Click on Message to Teachers (via e-mail) to send e-mail messages to students. See E-mail via Classter
- Click on Copy Teachers email, or Copy Students email to copy all the emails of the teachers or students, respectively.
- Click on Supervisor’s Comments, to add/edit comments and set completion percentage of the topics added in the comments (Figure 106).
Note: Only teachers who are set as Supervisors (by the admin), can add/edit Supervisor comments.

Figure 106
Academic Progress
- Click on ‘Academic Progress’ button to check student’s academic progress
- The entries are split into the following tabs (Figure 109):
- Overview
- Marks Analysis
- Descriptive Marks
- Assessments
- Attendance
- Outcomes
- Annual Results

Figure 107
OVERVIEW
The Overview is the first tab. From this section, you can get an overview of the student’s academic performance and achievements. You will see student marks comparison, attendance records, disciplinary actions and comments from teachers and administrative staff.
- You can view the following on the left pane (Figure 108):
- Photo of the student
- The student’s grade
- Attendance information, i.e. number of Authorised/Unauthorized attendance
- Points earned or deducted during the academic year
- Thumbs up and Thumbs down
- Badges earned
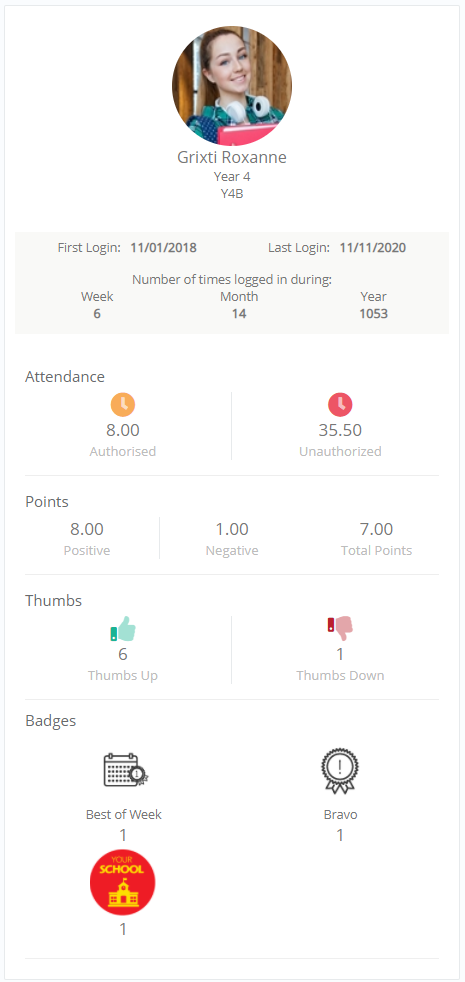
Figure 108
- On the right pane you can view the students mark comparison against the group mark (Figure 109):
- The Student – Group Term Marks Comparison and the Student – Group Term Assessment Marks Comparison (Percentage %) for a selected marking period in a graph. e.g., if you hover over the Science column of the graph you will see that the student’s term mark in Science is 60 while the group’s average term mark in the same subject is 67.87.

Figure 109
- Using the Add Remark option will create a Remarks & Action category. Under the Remarks & Actions, you can also view academic remarks and actions and rewards/detentions. By default, you will be able to see the 10 first entries, you are able to change the number of results presented by clicking on the number next to show entries (Figure 110).

Figure 110
- You can also view the data trail log for the points allocated to the student (Figure 111).

Figure 111
MARK ANALYSIS
The Marks Analysis tab is the second tab. Clicking on it will take you to a view with a list of all the student’s marks.
- Switch on the Analysis per Marking Categories to view the analysis of marks (Figure 112).
- Hover over a mark to show the tooltip that presents how is the student’s term mark at the specific subject and marking period calculated e.g. The term mark at Science at the 2nd Term is 76.70, which is the average of the Essay1 0.00, Classwork 78.00, Personal Assessments 0.00, and Exams 77.00.

Figure 112
In the Marks Analysis page, you will be able to see the student’s grades/marks detailed term by term for each class the student is enrolled in.
Note: If there are many entries, you can click on the plus sign to view the additional mark entries.
DESCRIPTIVE MARKS
The next tab is the Descriptive Marks tab (Figure 113). You can see student’s descriptive marks such as current grade, effort grade, strengths, weaknesses etc. in his enrolled modules. You will also be able to see student behavioral grades.

Figure 113
Note: Click on the descriptive mark text to show the complete text in a pop-up window.

Figure 114
ASSESSMENTS
The Assessment tab gives you a view of the student’s assessments and the list of the grades attained on each assessment for every class subject (Figure 115).

Figure 115
- Hover over a mark to show the tooltip that presents the date, time, subject and marking period the assessment was completed.

Figure 116
ATTENDANCE
In the Attendance tab, you can the breakdown of the student’s attendance.
- The overview has the number of absences, number of lateness and the actual hours of unauthorized absences.
- The list entries have all the attendance entries with the attendance category, subject, time attendance was taken, number of absences, session hours and course.

Figure 117
OUTCOMES
You can view academic outcomes for all subjects per marking period. This shows the educational objectives that have been achieved by the student in each subject/course.

Figure 118
ANNUAL RESULTS
Under the Annual Results tab you can view the annual performance of the student.

Figure 119