

This part of the Admissions settings page focuses on the management and configuration of Qualification requirements for the application process. The path to the Qualification Settings tab is the following:
Configuration > Admission > Admission Settings > Qualifications Settings
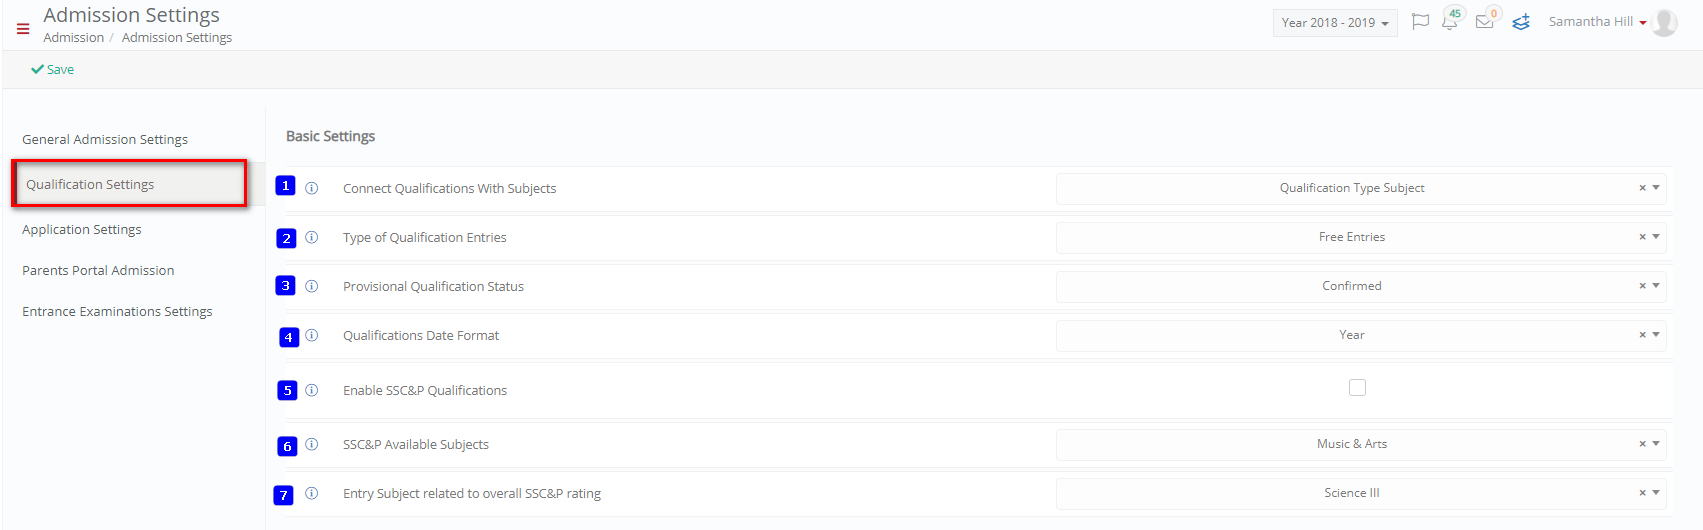 Figure 13
- The ‘Connect Qualifications With Subjects’ option sets the connection that is made when entering Qualifications by the Applicant in the Personal Data tab of the Applicant portal (Figure 13). You have the following options (Figure 14):

Figure 14
- You can connect Qualifications to all enrolled subjects of the Applicant by clicking on ‘Enrolled Subject’ option.
- You can connect Qualifications to a specific type of Subject by clicking on ‘Qualification Type Subject’ option.
- You can connect Qualifications to a subject in the Normal Category by clicking on the ‘Normal Type Subject’ option.
- You can choose to have Qualifications unconnected to Subjects by clicking on the ‘No Connection’ option.
- The ‘Type of Qualification Entries’ option affects the applicant portal and sets the type of Qualifications you want the applicant to fill in. You can choose List Based, Free Entries or both. If you choose the list based option, the applicant will be able to choose from a predetermined list of qualifications set by the Institution Admin e.g., Subject Mathematics, Grade Level 2. If you choose free entries, you will allow the applicant to fill in the name and details of his Qualifications e.g., English as a Second Language, Grade A. You may also choose to have both. Note: Requirements vary from institution to institution, Qualification lists are given by each institution’s admins.
- The ‘Provisional Qualification Status’ option can be used by back office admins to set Qualifications entered and submitted by applicants as e.g Provisional (awaiting final results from candidate). Thus, they will be distinguishable from regular Qualifications in your review process. Note: Admins can set up different types of provisional statuses according to your Institutional needs.
- The ‘Qualifications Date Format’ option allows you to define the Date format in which the applicant must enter just the Year he attained a specific Qualification e.g 2018 or a full date meaning Day/Month/Year e.g., 12/4/2018. You may also choose to remove Date as a requirement for entering Qualifications. The applicant views your changes in the Personal Data tab Qualifications section in the applicant portal.
- The ‘Enable SSC&P Qualifications’ option enables a tab in the personal data tab of the applicant’s portal that allows applicants to enter more specific Qualifications. These Qualifications are Institution specific and if you do not need them you can have this option disabled by unchecking this option. The name for this tab can be changed in the Custom Terminology tab in the Main Settings of the Configuration Section.
- The ‘SSC&P Available Subjects’ option is related to previous option (Number 5). If you have enabled option number 5 then you can choose the subjects that appear in the SSC&P Qualifications Tab e.g., Music & Arts. These Subjects are Institution specific and if you do not need them you can have this option disabled by unchecking option number 5.
- The ‘Entry Subject related to overall SSC&P rating’ option is related to options number 5 and 6. It allows you to set a specific Subject that is key to the overall rating the Qualifications entered. All Qualifications entered in the SSC&P tab will fall on this specific subject e.g., Science. These Subjects are Institution specific and if you do not need them you can have this option disabled by unchecking option number 5.
Never forget to click on the ‘Save’ button once you have added any changes to configuration.