

The Path to this page is Dashboard > Configuration > Academic Settings > Marking Settings > General Marking Settings > Marking (Figure 149).
Note: Info Tooltips are available next to every option.
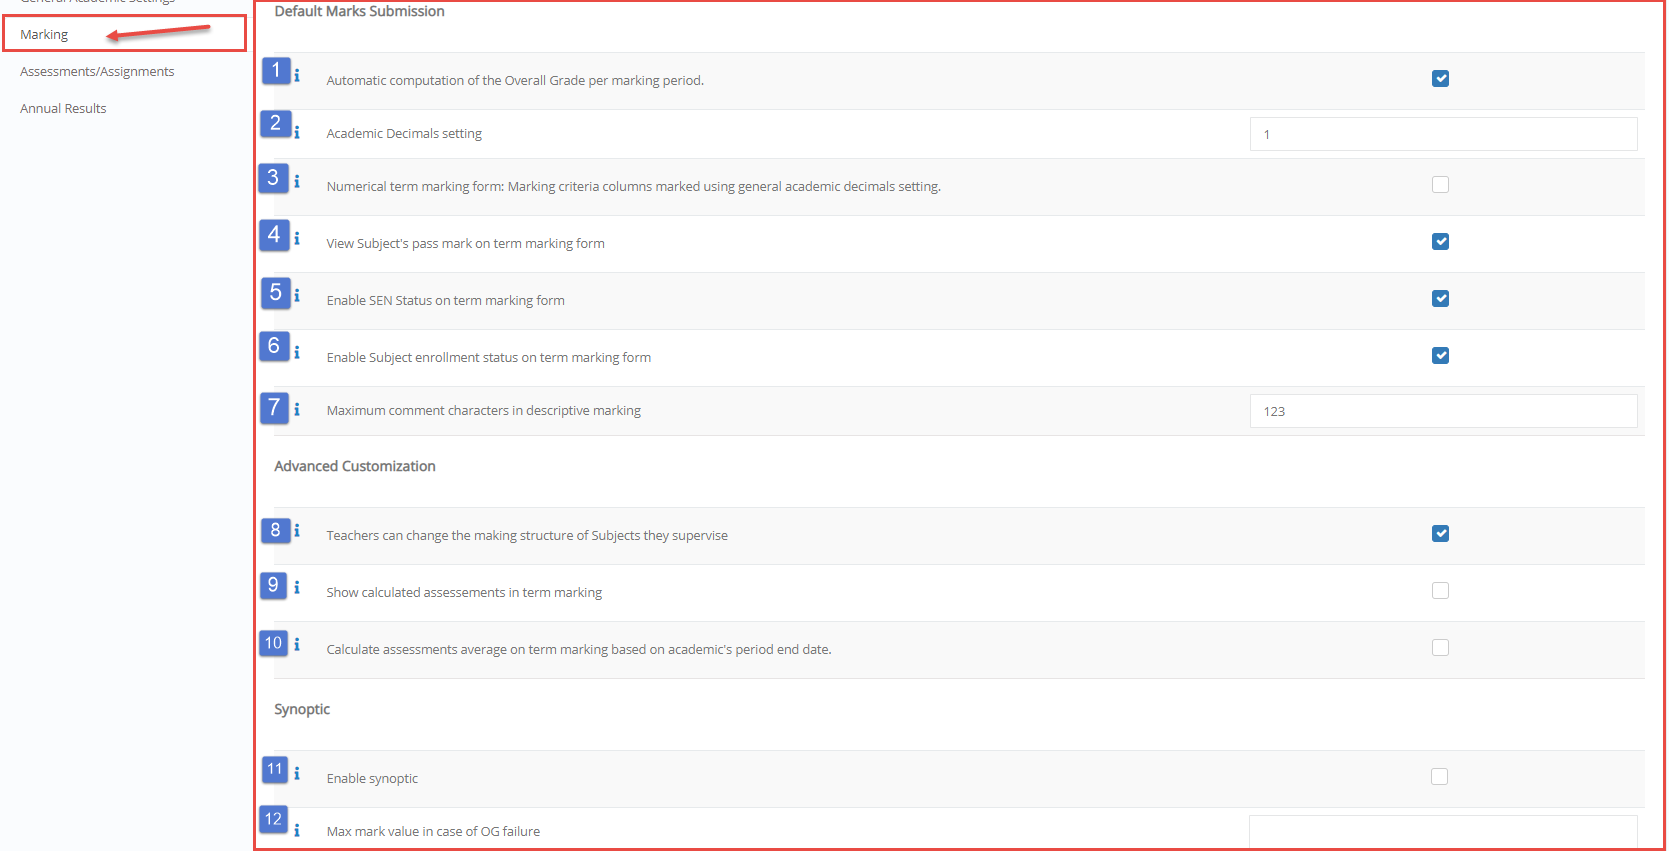
Figure 149
- ‘Automatic computation of the Overall Grade per marking period’ If this setting is enabled, then Classter will automatically calculate the overall {Grade} per marking period. This {Grade} will be set in the O.G. Free field. This means that the end user, may change the final {Grade} (unless this is disabled using another setting) (Figure 149).
- ‘Academic Decimals setting’ Here we define the default decimals for academic-related values (e.g. term marks, exam marks, Subject marks etc.). This is a default value. Admin may override this default value by defining other decimals in Marking scenario, {Subject} or Assessment type level (Figure 149).
- ‘Numerical term marking form: Marking criteria columns marked using general academic decimals setting’ (Used in term marking form – marking criteria columns) – If we want to have a different number of decimal digits in the Overall Mark in comparison to the decimal digits used in each individual marking criteria column, then we enable this setting. Like that, the Overall mark decimals are defined in the Marking Scenario or Subject and the digits for the marking criteria columns are defined in the general academic decimals setting (Figure 149).
- ‘View Subject’s pass mark on term marking form’ Here we define if the pass mark information for a {Subject} is visible on the term marking form used by {teacher} and employees (Figure 149).
- ‘Enable SEN Status on term marking form’ Here we can enable the {StudentParemetricField6} field to be visible in the term marking form. Note that the {StudentParemetricField6} is associated with the {Subject} passing mark (i.e. the passing mark may be different per {StudentParemetricField6} value. Note: This can be configured only in Classter Manager. (Figure 149).
- ‘Enable Subject enrollment status on term marking form’ Here we select if the {Subject} enrollment status field is visible on term marking form (Figure 149).
- ‘Maximum comment characters in descriptive marking’ Here we can define a maximum number of characters allowed in any comment type of marking category. This is a useful limitation in case a term marking report has not enough space for very long text (Figure 149).
- ‘Teachers can change the making structure of Subjects they supervise’ If this setting is enabled, then on the term marking form, a new configuration button will be visible. If a {teacher} selects this button, he/she can setup a custom marking scenario for this Subject and marking period. This change is possible only if no mark has been entered for the specific marking period for this {Subject}. Note: This button will appear only if the {teacher} is registered as a supervisor for the {Subject} (set in the {subject} form , main TAB (Figure 149).
- ‘Show calculated assessments in term marking’ If you enable this setting and a marking criteria/category column is associated with one or more assessment marks (i.e. the marking scenario defines that a particular column value is calculated by a number of assessments) then the term marking form will have multiple columns, one for each assessment included in each marking criteria mark (Figure 149).
- ‘Calculate assessments average on term marking based on academic’s period end date’ By enabling this option, the auto-calculated mark is being calculated based on all scheduled assessments prior to academic’s period end date and not based only on current’s marking period assessments. (i.e. A column that derives each mark from a set of assessment type, will be calculated by all assessments of the given type for the whole academic year. Term mark period will be not taken in consideration. For example, if the user created 2 assessments of type X during the first term and 3 during the second term. then the Term 2 marking for this column will be the average of all assessments, two from term 1 and three from term 2
- ‘Enable synoptic examinations’ By enabling this option, Classter will automatically create a new Assessment with assessment type being synoptic. A synoptic is a type of Re-take or re-exam. It allows an academic institute to run a specific exam for {students} that have failed to pass a {Subject}. Failure is defined as the overall mark to lower than the pass mark defined in a Marking Scale/range entity associated with the {subject}. A synoptic is a special exam mark because (if passed) it will change the overall term mark of the {subject}
- ‘Max mark value in case of OG failure’ In the case there is a synoptic, then we can define that the {student} is capped with a max allowed mark. For example: Let’s say you enter here 65 and a {subject} is marked from 0 to 100 with a pass mark 51. If the {student} gets 48 then the {student} has failed. In this case the {student} is allowed to take a synoptic (i.e. a re-take exam). Then the {student} will be allowed to have a max mark of 65. So, if the {teacher} give 55%, then the {student} will get 55%. On the other hand, if the {teacher} gives 85% in the synoptic exam, then the {Student} will get only 65 since this is the value specified here.
Assessment/Assignment Settings
The Path to this page is: Dashboard > Configuration > Academic Settings > Marking Settings > General Marking Settings > Assessment/Assignment (Figure 150).
Note: Info Tooltips are available next to every option.
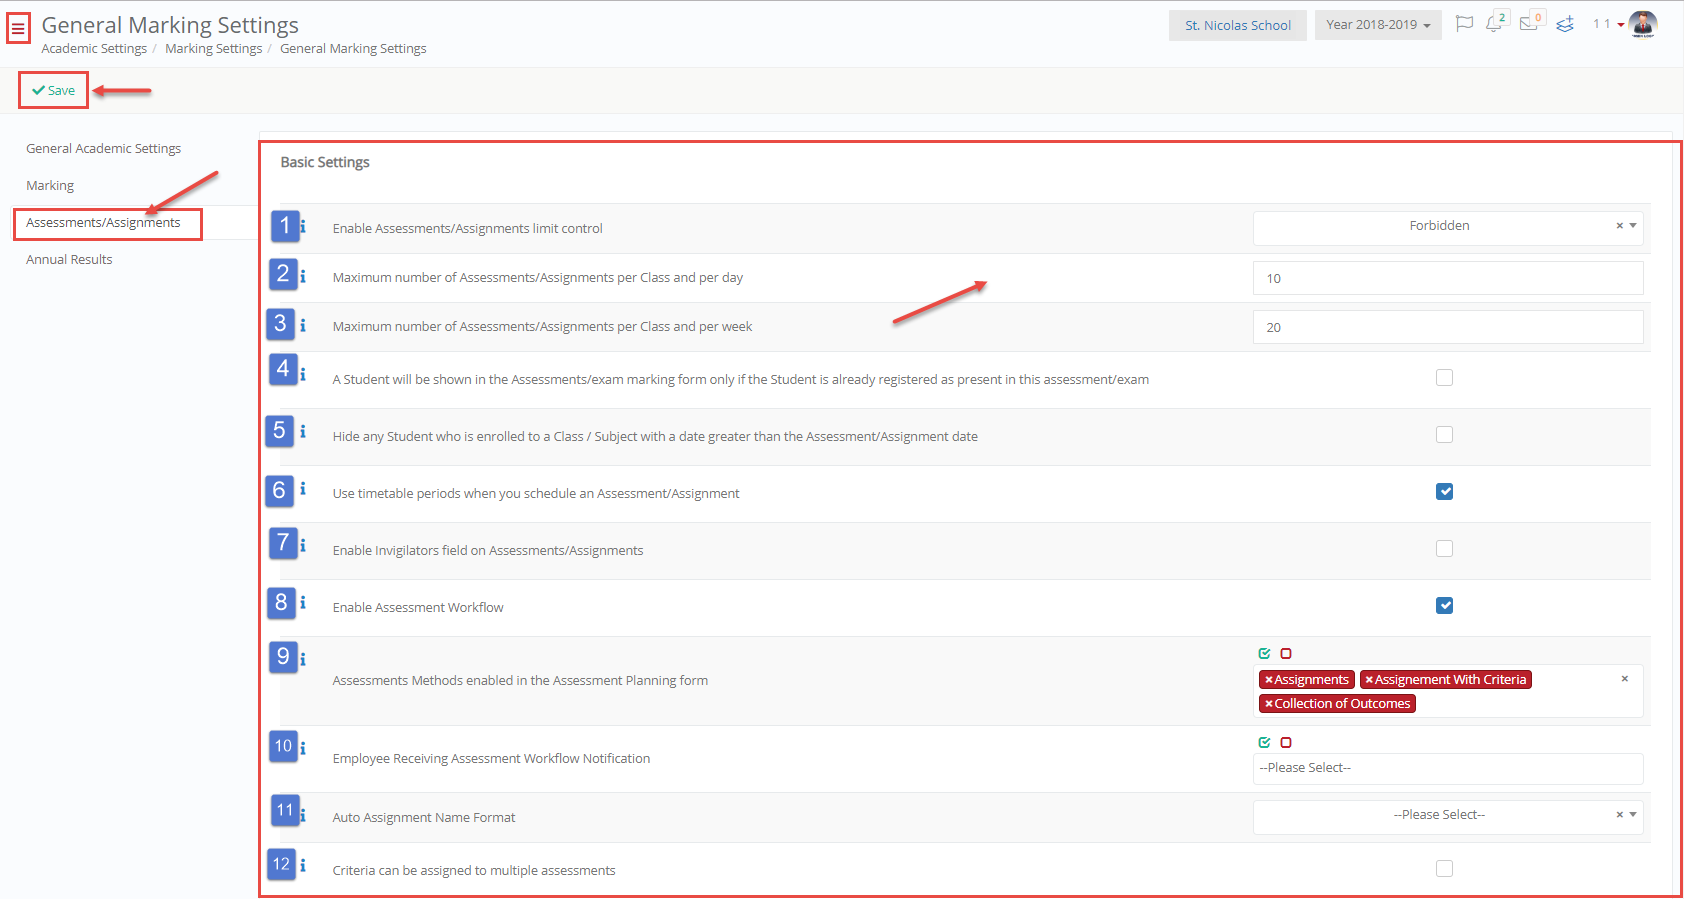

Figure 150
- ‘Enable Assessments/Assignments limit control’ Here you can define the type of control related to the number of assessments or assignments scheduled by the Teachers. The control may be disabled here. Alternatively, you can enable just a warning or make a strict control. In the latter case, Classter will forbid Teachers from scheduling an assignment or assessment based on the limits provided. Note that the control may be done per Year or per Class. In the first case, you can define a limit per Year on the Year form. In the latter case, you can define a general limit for all Classes in the settings. In this case, the control is done only for the assignments or assessments related to the selected Class of the assessment/assignment.
- ‘Maximum number of Assessments/Assignments per Class and per day’ When Teachers plan an assessment or an assignment for a class, then the system can control the number of assignments/assessments that are set in this specific Class on the particular date. Here we define the number of assessments/assignments that a Class is allowed to have in one day. Note that if the Student has multiple Classes, then the check is related only to the Class registered in the assignment.
- ‘Maximum number of Assessments/Assignments per Class and per week’ When the Teacher plan an assessment or an assignment for a class, then the system can control the number of assignments/assessments that are set in this specific Class in the particular week. Here we define the number of assessments/assignments that a Class is allowed to have in one week.
- ‘A Student will be shown in the Assessments/exam marking form only if the Student is already registered as present in this assessment/exam’ If you enable this setting, then in the Teachers’ portal, on the assignment marking form, Students will be visible for marking only if they are already set as present in the exam/assessment. This is done using either the employee’s portal or Classter Manager.
- ‘Hide any Student who is enrolled to a Class / Subject with a date greater than the Assessment/Assignment date’ if selected, then on the Assignment/Assessment marking form, all Students with a Subject enrollment date newer than the Assignment/Assessment date will be hidden. This allows Classter to hide {Students} from an assessment or assignment marking list, if the {Student} was not part of the {Group} when an assessment took place. The date used here is defined in the {Student} form / Enrollments tab.
- ‘Use timetable periods when you schedule an Assessment/Assignment’ If you select this, then the end-user has to select a timetable period when the user schedules a new assessment or exam. If not selected, then the user can select a start and end time freely.
- ‘Enable Invigilators field on Assessments/Assignments’ If you enable Invigilators field on Assessments/Assignments, then this field will be unhidden on Assignment/Assessment scheduling form as well as in all associated views.
- ‘Enable Assessment Workflow’ Classter supports assessment workflows. In particular, you can enable workflows related to
(1) Content Verification, i.e. Somebody to verify the quality of an assessment, assignment or exam content
(2) Publishing, i.e. somebody can approve the publishing of assessment content and date to {students} or parents
(3) Mark Reviewing, i.e allow the supervisor to randomly evaluate the correct marking of assessments or assignments or exams.
This is a general setting. However, you need to enable a particular workflow model in each assessment type.
- ‘Assessments Methods enabled in the Assessment Planning form’ Select which assessment methods have the assessment planning form enabled e.g Assessments with Criteria.
- ‘Employee Receiving Assessment Workflow Notification’ When the status of assessment changes (as part of an assessment workflow), then email is sent to an internal employee. Here you can define who is the employee to receive the workflow notification assessment.
- ‘Auto Assignment Name Format’ Here you define the format of the assessment name auto-suggested by Classter when a new assessment is scheduled by a user.
- ‘Criteria can be assigned to multiple assessments’ Assessments can be associated with multiple marking criteria or outcomes. In this case the end user does not just provide an assessment overall mark, but he/she should mark each associated criterion. If this setting is enabled, then any criterion can be associated with multiple assessments. If it is disabled, a criterion used in one assessment, it cannot be used by another assessment (for the same {Group}/{Subject} per academic year.
- ‘Use Examination Levels’ This option will enable a “Difficulty Level” drop-down in the assessment/assignment scheduling form. This drop-down can be used to distinguish or group assessments based on the level of their difficulty. It is used in some custom implementations or reports. ‘Assessment reviewing percentage ‘
- ‘Minimum number of Student for marking approval’ This setting works in conjunction with the previous setting. If for example, you define here 5, then at least 5 {students}’s marks should go through mark review assessment. For example, let’s say that you define 10% as the percentage of assessment results that go via mark review. If an assessment is done by 20 {students}, then only 2 {students}’s marks will be reviewed. If you define here 5, then this setting overrides the 10% and Classter will randomly selects 5 {students} for mark review. On the other hand, if an assessment is done by 100 {students}, then 10% is 10 {students}. In this case, Classter will select 10 {students} and not just 5
- ‘Enable CRM on Assessment Marking’ This option will enable a button in the Assessment Marking form which allow end-users to enter CRM educational remarks. These remarks may be sent to Parents or {Students} based on the CRM category configuration. The CRM created will be associated with the assessment. CRM action is usually related to assessment participation or behavior.
- ‘CRM Category for Remarks’ Set here the default CRM category to be used for new CRM remarks in the Assessment Marking Form
- ‘Enable “Delivery Status” indication on Assessments’ this option enables the Delivery Status indication for Assessments distributed to students e.g if a student submits an assignment on time this will be the status of the Assessment ‘in time’.
- ‘Assessment Type Test Alias’ Give a different name other than Test e.g exam.
- ‘Assessment Type Assignment Alias’ Give a different name other than Assignment e.g project.
- ‘Assessment Type Quiz Alias’ Give a different name other than Quiz e.g in-class test.
- ‘Hidden Assessment Types’ this option allows you to hide certain assessment types e.g Test.
Annual Result Settings
The Path to this page is Dashboard > Configuration > Academic Settings > Marking Settings > General Marking Settings > Annual Results (Figure 151).
Note: Info Tooltips are available next to every option.

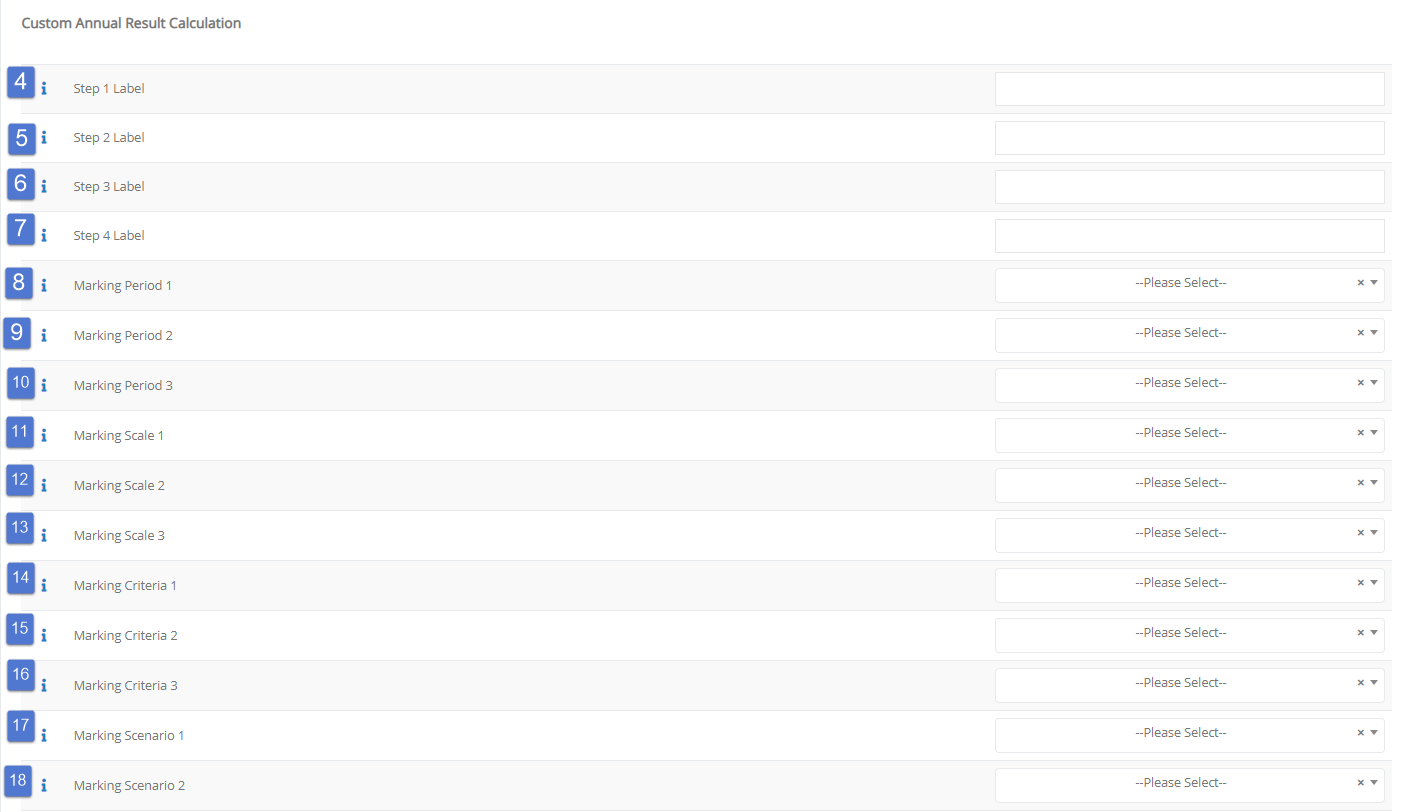
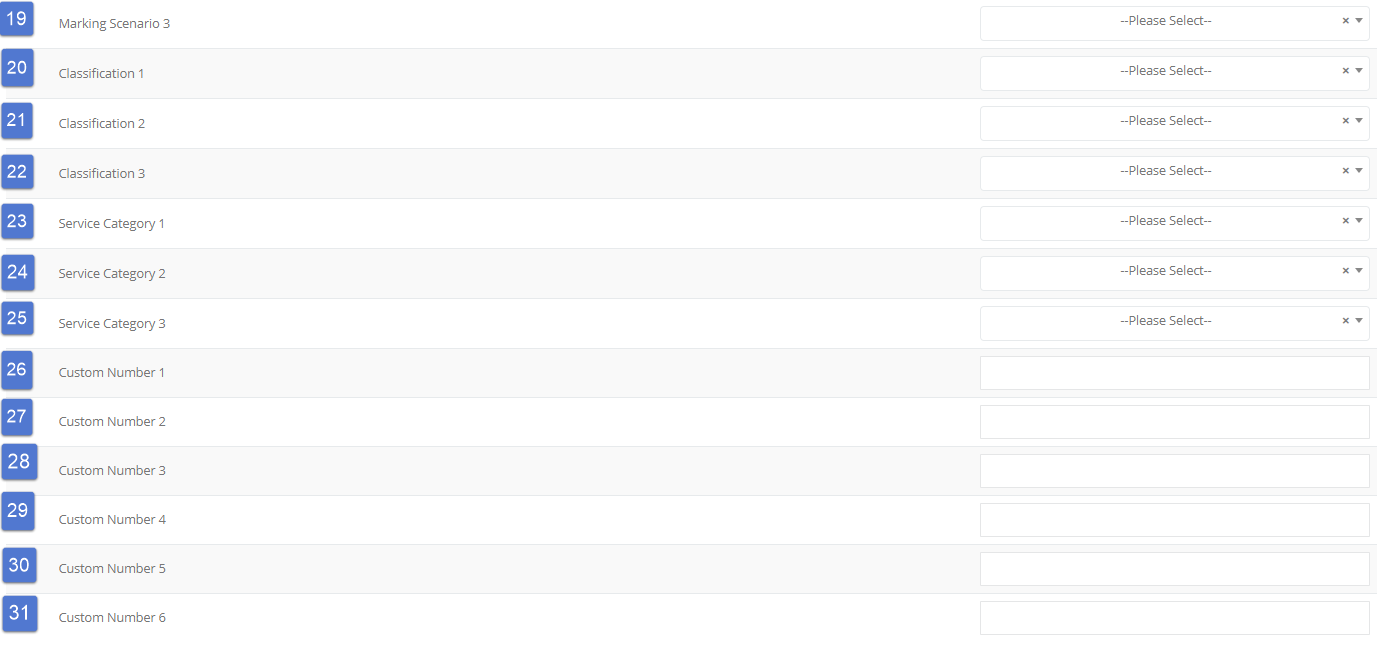
Figure 151
- ‘Change Subject Status based on Yearly Result’ If this setting is disabled, then when a user enters marks in the term marking form, the enrollment status of a {subject} will be updated. So, if the overall final mark is a pass mark then the enrollment status will change to pass status. If it is failed will change to fail status. However, if this setting is enabled, then the enrollment status of the {subject} will not change. If enabled, the annual result calculation routine will change the final enrollment status based on the overall marking structure rule used per {subject}. Here are 2 examples of how this setting can be used to modify Classter’s behavior.
(1) Higher Education institute setup: Disable this setting. In this case, the term marking form is normally related to a semester mark. So, when a user enters a final semester mark, a {student} may pass or may not pass the {subject}
(2) High School institute setup: In this case, the academic period is split into terms. {Teachers} enter marks multiple times per year. The overall result is however calculated at the end of the year and it is an average or summary of all terms marks. In this case, you should enable this setting.
- ‘Annual Result Scale’ Each {subject} is associated with a numeric and a descriptive marking scale. This scale is used per {subject}. However, there is a case that we need to calculate the overall mark of all {subjects} passed. In this case, the final mark should be part of a marking scale or range used for the overall annual mark. Therefore, here we define the scale to be used for the overall mark that is calculated by all {subjects} of the {student}. Note: this mark is calculated using the marking structure associated with each educational program of a {student}
- ‘Certification code format’ When an annual result is calculated the {student} may be entitled to certification (e.g. graduation certificate). In this case, Classter will produce a unique certification number or code. Here we can define the format of the code generator of the certification.
- ‘Step 1 Label’ This applies only to Customer with Single DB Licenses (i.e. they own their own single database): Classter allows administrators to create custom SQL Procedures for annual result calculation. This allows for maximum flexibility. The SQL procedure may consist of 4 distinct steps of calculations. The procedure should allow for an end-user to run any of the steps 1 up to 4 (all steps or just some of the steps). Thus, when the user selects to run a custom annual result calculation, Classter will ask end-user to select which steps must run. Here the admin can define a name for each step (to be presented as a label next to each selection option).
- ‘Step 2 Label’ Please check Step 1 Label info tooltip for more information.
- ‘Step 3 Label’ Please check Step 1 Label info tooltip for more information.
- ‘Step 4 Label’ Please check Step 1 Label info tooltip for more information.
- ‘Marking Period 1’ This is associated with the custom annual result calculation. Here you can define the Marking Period to be used by the custom SQL script.
- ‘Marking Period 2’ This is associated with the custom annual result calculation. Here you can define the Marking Period to be used by the custom SQL script.
- ‘Marking Period 3’ This is associated with the custom annual result calculation. Here you can define the Marking Period to be used by the custom SQL script.
- ‘Marking Scale 1’ This is associated with the custom annual result calculation. Here you can define the Marking Scale/Range to be used by the custom SQL script.
- ‘Marking Scale 2’ This is associated with the custom annual result calculation. Here you can define the Marking Scale/Range to be used by the custom SQL script.
- ‘Marking Scale 3’ This is associated with the custom annual result calculation. Here you can define the Marking Scale/Range to be used by the custom SQL script.
- ‘Marking Criteria 1’ This is associated with the custom annual result calculation. Here you can define the Marking Criteria to be used by the custom SQL script.
- ‘Marking Criteria 2’ This is associated with the custom annual result calculation. Here you can define the Marking Criteria to be used by the custom SQL script.
- ‘Marking Criteria 3’ This is associated with the custom annual result calculation. Here you can define the Marking Criteria to be used by the custom SQL script.
- ‘Marking Scenario 1’ This is associated with the custom annual result calculation. Here you can define the Marking Scenario to be used by the custom SQL script.
- ‘Marking Scenario 2’ This is associated with the custom annual result calculation. Here you can define the Marking Scenario to be used by the custom SQL script.
- ‘Marking Scenario 3’ This is associated with the custom annual result calculation. Here you can define the Marking Scenario to be used by the custom SQL script.
- ‘Classification 1’ This is associated with the custom annual result calculation. Here you can define the Classification to be used by the custom SQL script.
- ‘Classification 2’ This is associated with the custom annual result calculation. Here you can define the Classification to be used by the custom SQL script.
- ‘Classification 3’ This is associated with the custom annual result calculation. Here you can define the Classification to be used by the custom SQL script.
- ‘Service Category 1’ This is associated with the custom annual result calculation. Here you can define the Service category to be used by the custom SQL script.
- ‘Service Category 2’ This is associated with the custom annual result calculation. Here you can define the Service category to be used by the custom SQL script.
- ‘Service Category 3’ This is associated with the custom annual result calculation. Here you can define the Service category to be used by the custom SQL script.
- ‘Custom Number 1’ This is associated with the custom annual result calculation. Here you can define the Customer Number to be used by the custom SQL script.
- ‘Custom Number 2’ This is associated with the custom annual result calculation. Here you can define the Customer Number to be used by the custom SQL script.
- ‘Custom Number 3’ This is associated with the custom annual result calculation. Here you can define the Customer Number to be used by the custom SQL script.
- ‘Custom Number 4’ This is associated with the custom annual result calculation. Here you can define the Customer Number to be used by the custom SQL script.
- ‘Custom Number 5’ This is associated with the custom annual result calculation. Here you can define the Customer Number to be used by the custom SQL script.
- ‘Custom Number 6’ This is associated with the custom annual result calculation. Here you can define the Customer Number to be used by the custom SQL script.