

On the Marking Ranges page, you can create and edit marking ranges that you then apply to subjects.
The path to this page is:
Dashboard > Configuration > Academic Settings > Marking Settings > Marking Ranges (Figure 9).

Figure 9
You can view the ranges in a Grid or Card View.

You can view all existing ranges here, both for Descriptive and Numerical Marking (Figure 9).
Likewise, you are able to search for a specific Marking Range by entering a description in the search box (Figure 9).
Filter out existing descriptive or non-descriptive ranges by clicking on the filter buttons (Figure 9).
You can click on an existing range to edit it (Figure 9).
You can click on the +Create New button to create a new Marking Range (Figure 9).
Create a New Range
Once you have clicked on the +Create New button, a new page will automatically load (Figure 10).
 Figure 10
- Add a ‘Description’ e.g Behavioural Scale (Figure 10).
- Add how many ‘Decimals’ you want the range to use e.g 0. You must keep in mind that Descriptive marking rarely will need any decimals and in most cases the number you put in this field will be 0.
Note: Only in special circumstances will you need to add a number other than 0 in this field (Figure 10). - Add the starting value ‘From’ of the range e.g 1 the usual range for descriptive marking is 1-5 (Figure 10).
- Add ending value ‘To’ e.g 5 (Figure 10).
- Enter a ‘Base’ value which is the minimum passing mark e.g 3 (Figure 10).
- ‘Default’ switch, if this option is switched on then this Marking Range will be added by default (Figure 10).
- ‘Descriptive’ switch this option on to make this a Descriptive Marking Range (Figure 10).
- This final option ‘+’ adds descriptions for every numeric value. This is used for creating a Descriptive Marking Range e.g Desc. Very Bad corresponds to the number 1 the lowest value (Figure 10).
You can add Full Descriptions or Alternative descriptions that will appear in reports. Note: In the ‘From’ and ‘To’ fields the system takes into consideration ONLY the number from the ‘From’ field.
Do not enter different numbers in the ‘From’ and ‘To’ fields. - Save the new Descriptive Marking Range by clicking on the save button (Figure 10).
Note: All fields with a red asterisk are Mandatory fields. You will be prompted to fill in a mandatory field if it is left empty (Figure 11).
You will be unable to save the new range if a mandatory field is empty.
![]()
Figure 11
Even in the case of Descriptive marking the system requires a numeric value in order to understand and save the descriptive marking, for this reason, you can see that you need to add numbers after descriptions.
Edit Marking Range
Once you have clicked on the marking range you want to edit (Figure 9) the following page will appear (Figure 12).
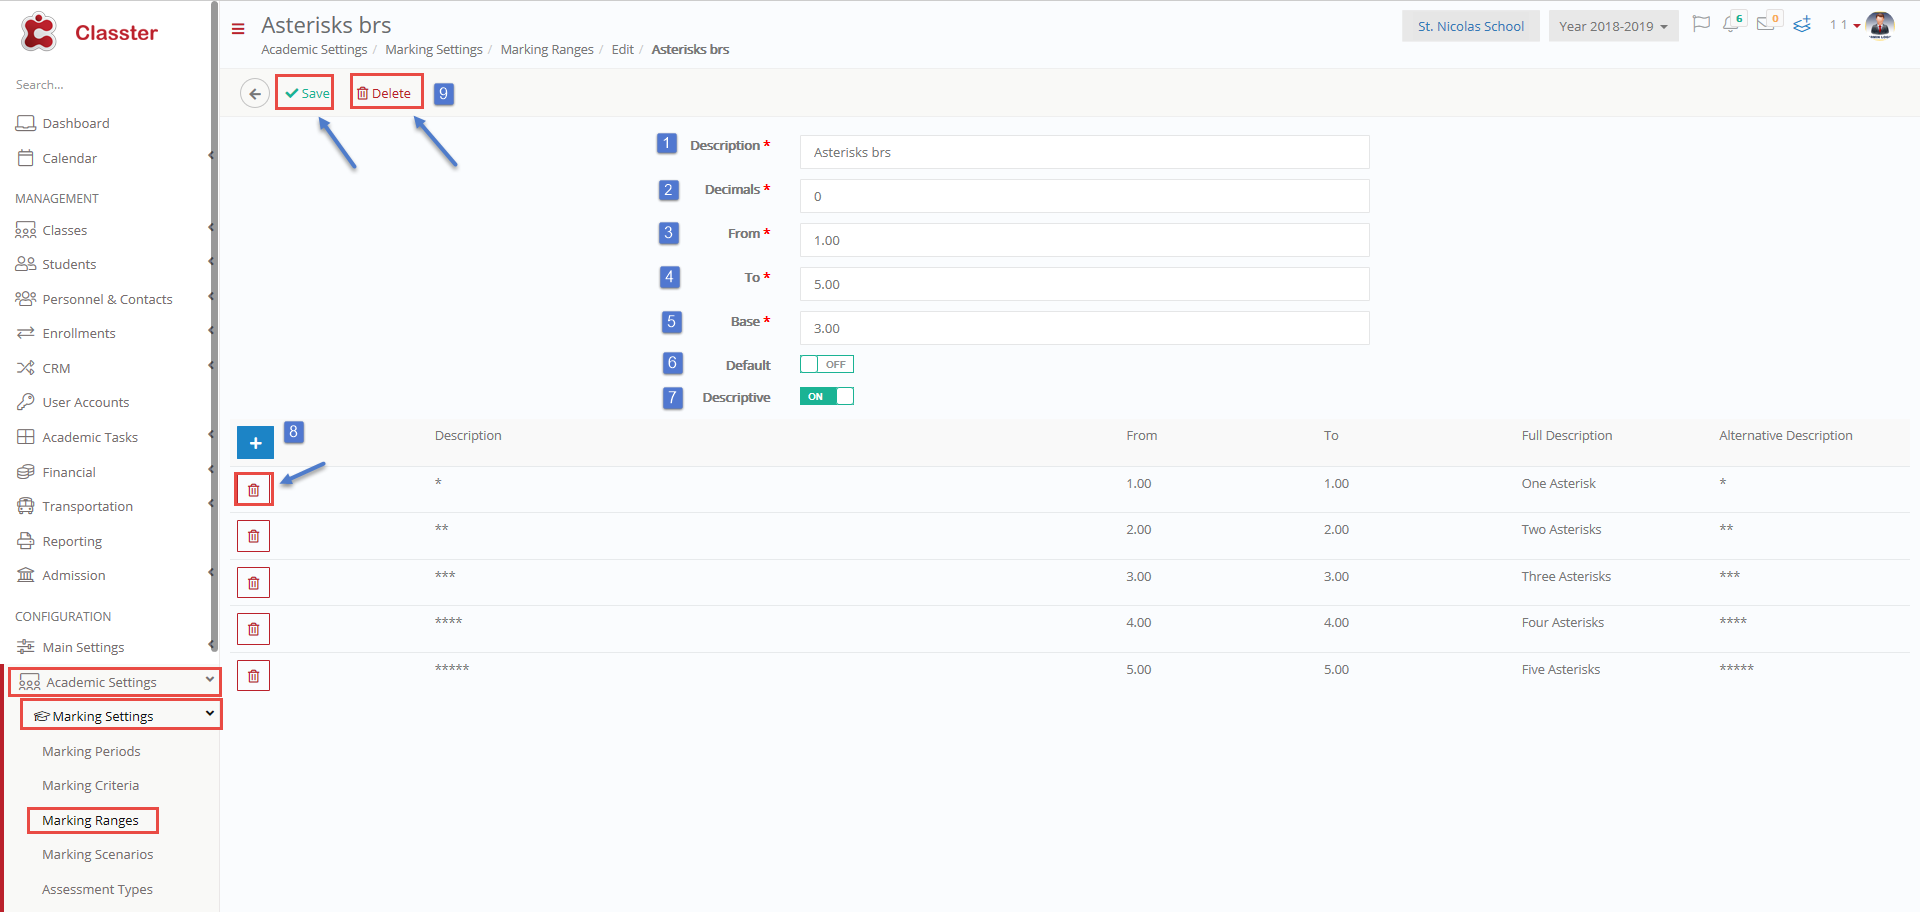 Figure 12
- Edit the ‘Description’ (Figure 12).
- Change how many ‘Decimals’ you want to be included in the Marking Range. Note: Decimals in Descriptive Marking are changed from 0 only under Special circumstances (Figure 12).
- ‘From’ change starting number for the Range (Figure 12).
- ‘To’ change the ending number for the Range (Figure 12).
- ‘Base’ changes the base value for the minimum passing mark (Figure 12).
- ‘Default’ switch, if this option is switched on, then this Marking Range will be added by default. Switch it off to disable this option (Figure 12).
- ‘Descriptive’ this option must be switched on in order for this to be a Descriptive Marking Range if you wish to change it to numeric switch this option off (Figure 12).
- ‘+’ Here you can add more descriptions or delete existing descriptions you no longer need (Figure 12).
- Save your changes by clicking on the ‘Save’ button, or click on ‘Delete’ to delete this Marking Range (Figure 12)