

Watch the How-to Video

This section describes one of the unique functions of the Classter Portal, which is Custom Terminology. This is a very important section because it allows you to modify terminology to meet the needs of your educational institution. In various educational systems there are terms that have different names but mean the same thing or many things e.g., Grade, Year, Class etc. There are two types of fields in custom terminology.
1. Dynamic fields, of which there are 7 (Only in Student Forms)
2. Custom Fields (Available in all User Forms Student, Teacher, Relatives, and Employees/Staff).
Example of Dynamic Fields:

Figure 1
- The fields you edit, here in Figure 1, are located in student forms (Figure 1a). There are only 7 dynamic fields, and those are available only in Student forms (Figure 1a).
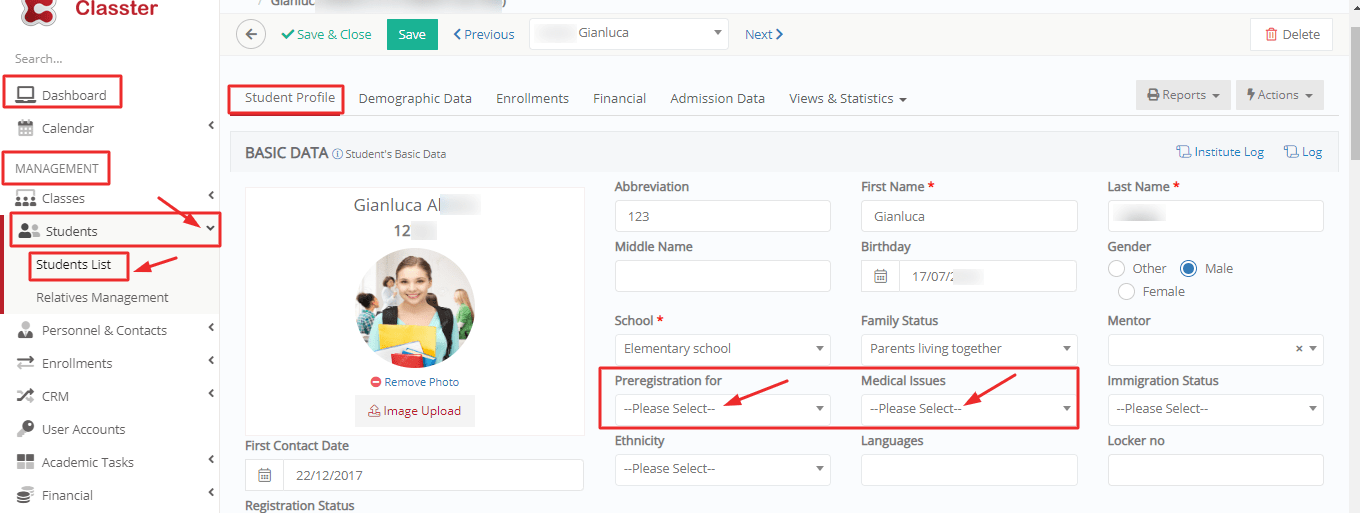
Figure 1a
Example of Custom Fields:

Figure 1b
- The fields you edit, here in Figure 1b, are located in student forms (Figure 1c). The custom fields are available in all forms Student, Teacher, Relative, and Employee, e.g., Student form Figure 1a.
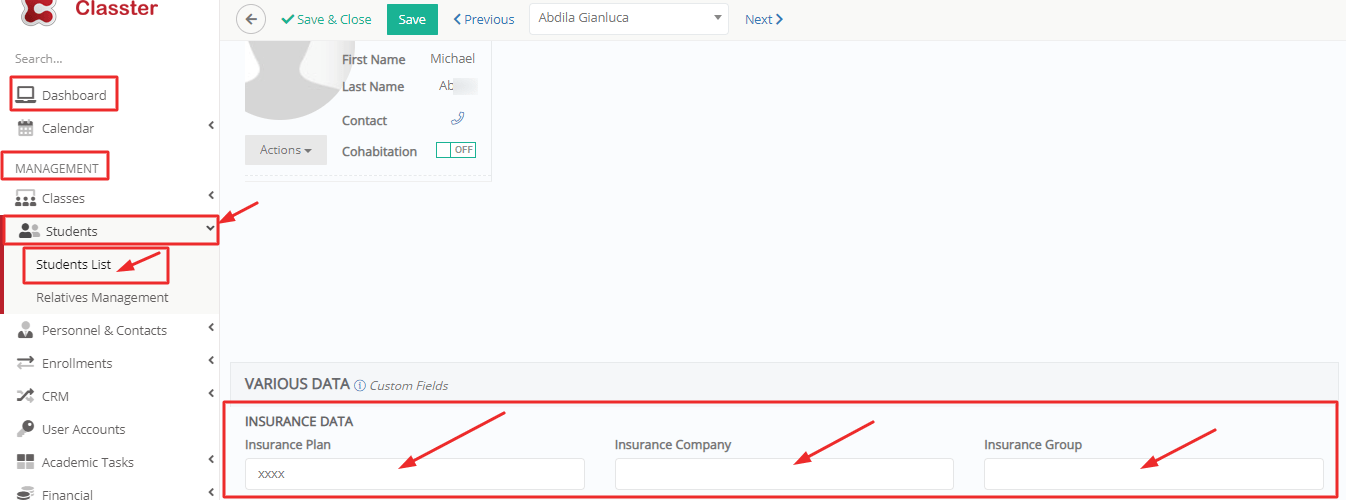
Figure 1c
Note: The Terminology used in this manual may differ from the terminology you may see on your platform. The Manual uses a K12 School Terminology set, this is the reason some things may look different. It is no cause for concern!
Customize Terminology
The path to this page is as follows: Dashboard > Configuration > Main Settings > Customized Terminology (Figure 2).

Figure 2
On this page, you will see the following (Figure 2):
- View terminology in a Card or Grid view by clicking on the View button and choosing either option.
- From the search field, you may locate the term you wish to change.
- You can switch between tabs e.g., General, Custom Student, Custom Teachers, Custom Other Contacts and Custom Admissions. When first visiting the page, you will land on the General tab.
- By clicking on the term card, you can edit it.
- Click on the refresh button to refresh the page.
Note: If a term is left empty, the system will apply the Global Culture Term.
Edit Terminology
Once you have clicked on the term you want to edit, you will be transferred to the edit page (Figure 3).
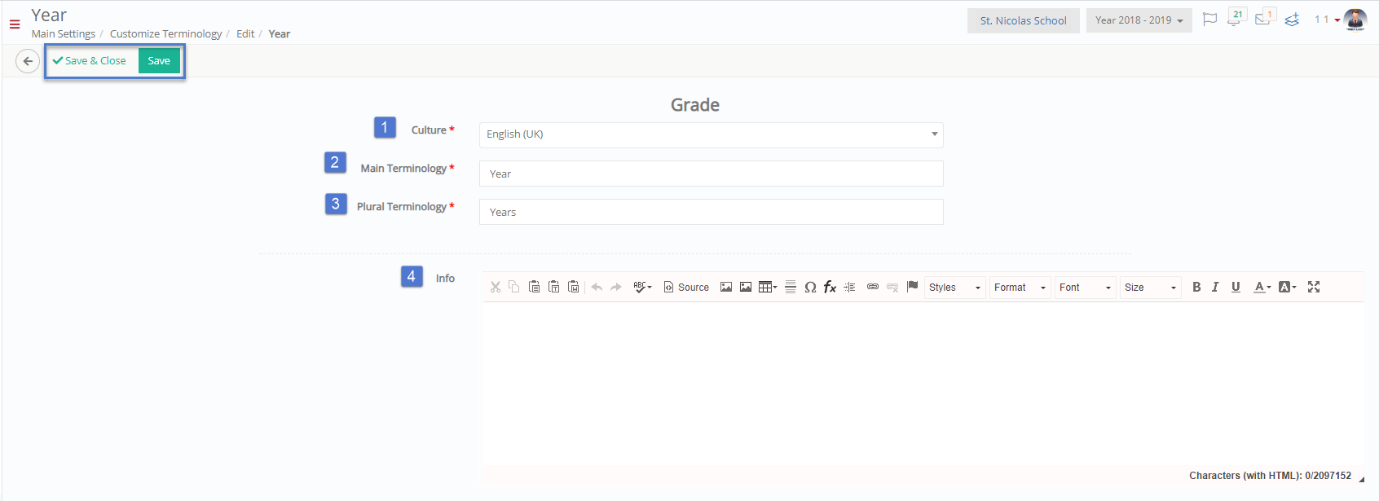
Figure 3
On the edit page, you must fill out the following fields (Figure 3):
- Culture option: here, you can select the language you wish to change the terminology in. Most likely the language you use in the portal, e.g., English (UK). The terminology change will apply only to the specific language in which you make the change.
- Main Terminology field: Instead of Grade, you can enter Year.
- Plural Terminology field: here you must write the plural form of Year, e.g., Years.
- Info text field: Is used in custom fields as an info tooltip (explaining the use/function of the term).
Once you are done, click on the ‘Save and Close’ button to save changes and close this page. You will return to the main customize terminology page.
Note: you will be able to view changes by logging out and in again.
Examples of how this change in terminology will appear in the portal (Figure 4).
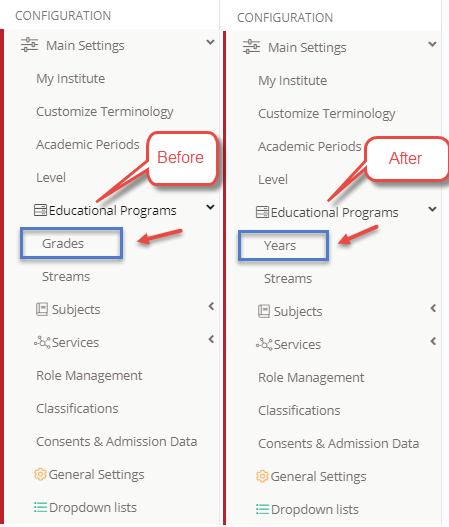
Figure 4
Customization Tabs
We already saw above the general tab of the Customize Terminology page. Now we will take a look at the rest of the tabs. All tabs operate in the same way.
General Note: All fields or options with a red asterisk next to them are mandatory fields or options. If you do not fill them in, you will be unable to save your creations or edits.
Custom Student tab
This is the custom students tab of the customize terminology page. Here you can find terms referring to students and student forms (Figure 5).

Figure 5
On this page, you will see the following (Figure 5):
- View terminology in a Card or Grid view by clicking on the View button and choosing either option.
- From the search field, you may locate the term you wish to change.
- You can switch between tabs e.g., General, Custom Student, Custom Teachers, Custom Other Contacts and Custom Admissions. When first visiting the page, you will land on the General tab.
- By clicking on the term card, you can edit it.
- Click on the refresh button to refresh the page.
Edit Terminology
Once you click on edit, you will be transferred to the edit page (Figure 6).

Figure 6
On the edit page, you must fill out the following fields (Figure 6):
- Culture option: here, you can select the language you wish to change the terminology in. Most likely the language you use in the portal, e.g., English (UK). The terminology change will apply only to the specific language in which you make the change.
- Active Switch: If this is turned on then the field will be available for use in the custom field area of all user forms e.g., Student, Teacher, Relative and Employee Forms.
- Main Terminology field: Instead of Insurance plan, make it Insurance Package.
- Plural Terminology field: here you must write the plural form of Insurance Package, e.g., Insurance Packages.
- Info text field: Is used in custom fields as an info tooltip (explaining the use/function of the term).
- The Category option: here choose under which category in the student form (or other user form), you will place the term and its field.
Once you are done, click on the ‘Save and Close’ button to save changes and close this page. You will return to the main customize terminology page.
Note: you will be able to view changes by logging out and in again or refreshing pages.
Examples of how this change in terminology will appear in the portal (Figure 7).

Figure 7
Custom Teachers Tab
This is the custom teachers tab of the customize terminology page. Here you can find terms referring to teachers and teacher forms (Figure 8).

Figure 8
On this page, you will see the following (Figure 8):
- View terminology in a Card or Grid view by clicking on the View button and selecting either option.
- From the search field, you may locate the term you wish to change.
- You can switch between tabs e.g., General, Custom Student, Custom Teachers, Custom Other Contacts and Custom Admissions. When first visiting the page, you will land on the General tab.
- By clicking on the term card, you can edit it.
- Click on the refresh button to refresh the page.
Edit Terminology
Once you click on edit, you will be transferred to the edit page (Figure 9).

Figure 9
On the edit page, you must fill out the following fields (Figure 9):
- Culture option: here, you can select the language you wish to change the terminology in. Most likely the language you use in the portal, e.g., English (UK). The terminology change will apply only to the specific language in which you make the change.
- Active Switch: If this is turned on then the field will be available for use in the custom field area of all user forms e.g., Student, Teacher, Relative, and Employee Forms.
- Main Terminology field: Instead of Teacher’s Experience, make it Teacher’s Background.
- Plural Terminology field: here you must write the plural form of Teacher’s Background, e.g., Teachers Backgrounds.
- Info text field: Is used in custom fields as an info tooltip (explaining the use/function of the term).
- The Category option: here choose under which category in the student form, you will place the term and its field.
Once you are done, click on the ‘Save and Close’ button to save changes and close this page. You will return to the main customize terminology page.
Note: you will be able to view changes by logging out and in again or refreshing pages.
Examples of how this change in terminology will appear in the portal (Figure 10).

Figure 10
Custom Other Contacts
This is the custom other contacts tab of the customize terminology page. Here you can find terms referring to other contact data and forms (Figure 11).

Figure 11
On this page, you will see the following (Figure 11):
- View terminology in a Card or Grid view by clicking on the View button and choosing either option.
- From the search field, you may locate the term you wish to change.
- You can switch between tabs e.g., General, Custom Student, Custom Teachers, Custom Other Contacts and Custom Admissions. When first visiting the page, you will land on the General tab.
- By clicking on the term card, you can edit it.
- Click on the refresh button to refresh the page.
Edit Terminology
Once you click on edit, you will be transferred to the edit page (Figure 12).

Figure 12
On the edit page, you must fill out the following fields (Figure 12):
- Culture option: here, you can select the language you wish to change the terminology in. Most likely the language you use in the portal, e.g., English (UK). The terminology change will apply only to the specific language in which you make the change.
- Active Switch: If this is turned on then the field will be available for use in the custom field area of all user forms e.g., Student, Teacher, Relative, and Employee Forms.
- Main Terminology field: Instead of Occupation, make it Work Field.
- Plural Terminology field: here you must write the plural form of Work Field, e.g., Work Fields.
- Info text field: Is used in custom fields as an info tooltip (explaining the use/function of the term).
- The Category option: here choose under which category in the student form (or other user form), you will place the term and its field.
Once you are done, click on the ‘Save and Close’ button to save changes and close this page. You will return to the main customize terminology page.
Note: you will be able to view changes by logging out and in again or refreshing pages.
Examples of how this change in terminology will appear in the portal (Figure 13).

Figure 13
Custom Admission
This is the custom admission tab of the customize terminology page. Here you can find terms referring to the admission portal (Figure 14).
 Figure 14
On this page, you will see the following (Figure 14):
- View terminology in a Card or Grid view by clicking on the View button and selecting either option.
- From the search field, you may locate the term you wish to change.
- You can switch between tabs e.g., General, Custom Student, Custom Teachers, Custom Other Contacts, and Custom Admissions. When first visiting the page, you will land on the General tab.
- By clicking on the term card, you can edit it.
- Click on the refresh button to refresh the page.
Edit Terminology
Once you click on edit, you will be transferred to the edit page (Figure 15).
 Figure 15
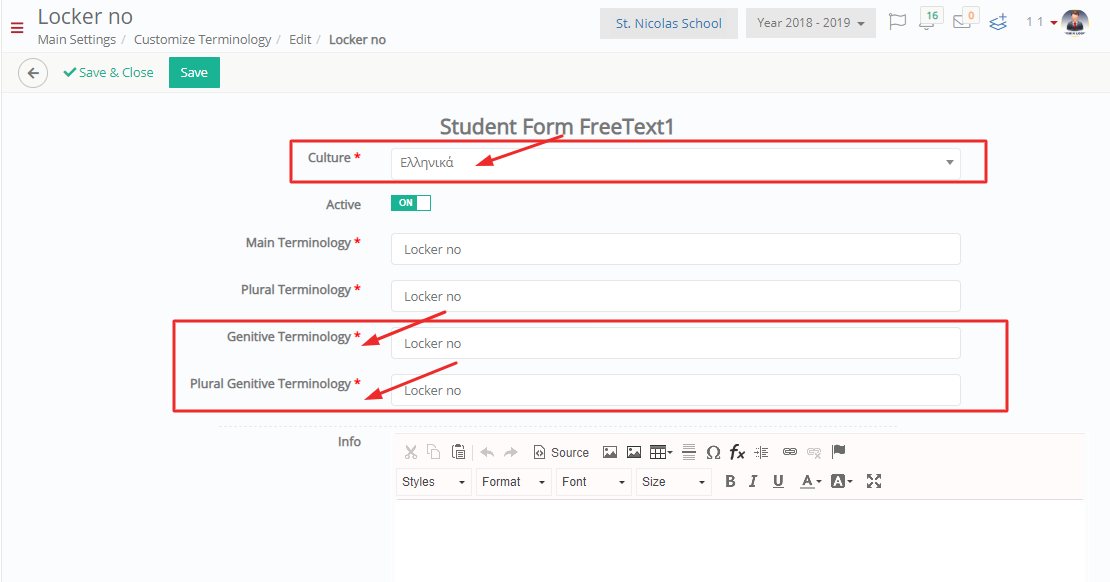
On the edit page, you must fill out the following fields (Figure 15):
- Culture option: here, you can select the language you wish to change the terminology in. Most likely the language you use in the portal, e.g., English (UK). The terminology change will apply only to the specific language in which you make the change.
- Main Terminology field: Instead of Grade, you can enter Year.
- Plural Terminology field: here you must write the plural form of Year, e.g., Years.
- Info text field: Is used in custom fields as an info tooltip (explaining the use/function of the term).
Once you are done click on the ‘Save and Close’ button to save changes and close this page. You will return to the main customize terminology page.
Note: you will be able to view changes by logging out and in again.
Note: Some languages in terminology may unlock/present more fields to be filled out. This is due to unique/differing language grammar, e.g., when you choose the Greek Language.
More languages will be developed this way in the future. For example Figure 15b.
General Note: All fields or options with a red asterisk next to them are mandatory fields or options. If you do not fill them in, you will be unable to save your creations or edits.