

Creating and Editing Custom Menus
Once you click on the ‘+Create New’ button (Figure 3), you will see the creation pop-up window (Figure 4).
On the creation pop-up window, we can see the following (Figure 4):
- You can select a specific portal language that this custom menu will appear in. This means that if this option is set to English, the custom menu will only appear in user portals set to the English language.
- Select a title for this custom menu, e.g., Opinion Polls.
- Add a description to this custom menu that will appear underneath the title. E.g. Questionnaires for Students and Parents.
- Internal Form checkbox: if this is selected, then you will need to enter the custom HTML code for a custom webpage in the description textbox. Once you click on the button or menu item, you will be taken to the page you created and entered the description. You can create an HTML page from an editor and copy the address in the description.
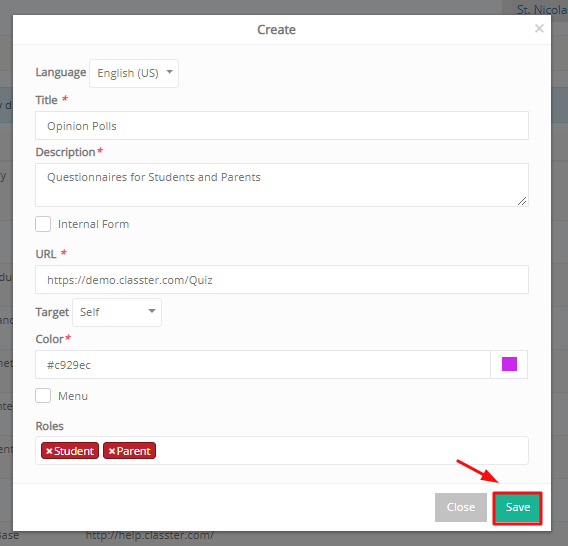
Figure 4
- The ‘URL’ field: here you must enter the URL address of the page you wish to redirect yourself to another page in the classter platform.
- Target dropdown option: here you have two options, Blank and Self. If you choose Self, the button or menu option you create will open the link in the same tab you were viewing, if you choose blank, the button or menu option you create will open in a new tab on your internet browser. URLs must include https:// before the www. If you just add the URL it will appear as an external site but if you just add an extension e.g /fileslibrary it will appear as an extension of the classter website.
- Choose a color for the button you create.
- If you click on the menu box option, this will become a new menu option. It will not appear as a button on your dashboard, but as a dashboard menu option.
- From the ‘Roles’ option, you must select the user types that will be able to view this button or menu option you create.
Note: Any Button or Menu option you create is specific to the academic period you create them in, e.g., 2019-2020. If you change academic period e.g., 2020-2021 you will not be able to see the button or menu option, you created in a previous academic period.
To edit an existing button link or menu option, you will need to click on the edit button (Figure 3) and then follow the steps from the creation process.
Once you are done creating or editing, click on the ‘Save’ button to save new or changes made (Figure 4).
Sample – Digital Library Button on Student, Parent and Teacher Dashboards.

Figure 4a
- Click on Save button (Figure 4a).
 Figure 4b
- Click on the Digital Library button that was created, to go to the student’s digital library (Figure 4b).
 Figure 4c
- The page opens in a new browser tab (as we set it up to do so).
Sample Menu Option – Knowledge Base on Teacher, Secretary, and Admin Dashboard Main menu.

Figure 4d
- Click on Save button (Figure 4a).
 Figure 4e
- Click on the Useful Links Menu option and then on Knowledge Base menu option (which we created) (Figure 4e). You will be transferred to the Classter Knowledge Base (Figure 4f).
 Figure 4f
- You have left the Dashboard and are now on a different webpage (You stayed on the same tab as you set it up upon creation).