

Watch the How-to Video

Create a Team
Once you have signed in, you will view the following page first (Figure 3).

Figure 3
- You will arrive on the Teams tab (Tab is on the left bar).
- You can see all the classes you had on classter on the teams tab.
- Click on one of the teams/classes transferred from classter to edit them and add information and files.
- You can manage each class/team by clicking on the button with the three dots in the top right corner of each class/team box (Figure 4). In the dropdown list you will be able to manage the class/team, add members, add channels/sessions, leave the class/team or delete it (Figure 4).
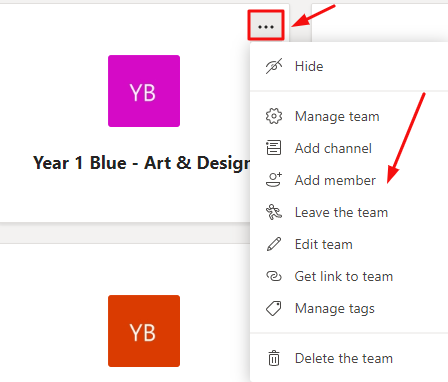
Figure 4
- Click on the Join or Create Team button to join a specific class/team or to create one (Figure 3).
Once you have clicked on the Join or Create Team button you will be taken to the following page (Figure 5).

Figure 5
- On this page, you can see all teams, the join team box and the create new team box.
- Use the search field to locate a specific team/class.
- Click on the Join Team button to join a team/class that was transferred from Classter.
- Enter the Team/class code in the field underneath ‘Join a team with a code. By entering the class/team code you will be able to join it even if it is hidden.
- Click on the create team button to create a team/class.
Once you have clicked on the create new team button you will see a popup window (Figure 6).

Figure 6
- In the popup window you will be shown 4 options. Class, Professional Learning Community, Staff, Other. We will be clicking on the Team type Class. Because we want to create a new class.
- Once you have clicked on the class button you will be shown a new popup window (Figure 7).

Figure 7
- Enter a name for the class you wish to create e.g Math 101.
- Fill in a short description of this class. In this case e.g Basic Numbers, Fractions and Decimals.
- You can also create a new class based on an existing team. You would be transferring students, additional teachers and all the rest of the information and files the sourcing team has.
- Click on the ‘Next’ button to move to the next step of the creation process.
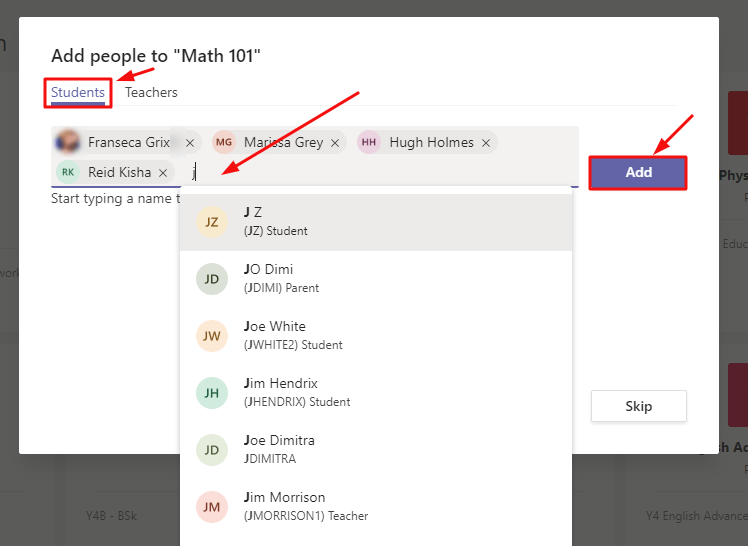
Figure 8
Now it’s time to add the students we want to our new class ‘Math 101’ (Figure 8).
- From the Students tab, we need to choose students from the add field. Enter the first letters of a name or surname to locate students, click on them to select them. Repeat until all have been selected. Note: As you will notice all contacts from classter are made available here on Teams.
- Click on the Add button (Figure 8), to add selected students to the class list (Figure 9).
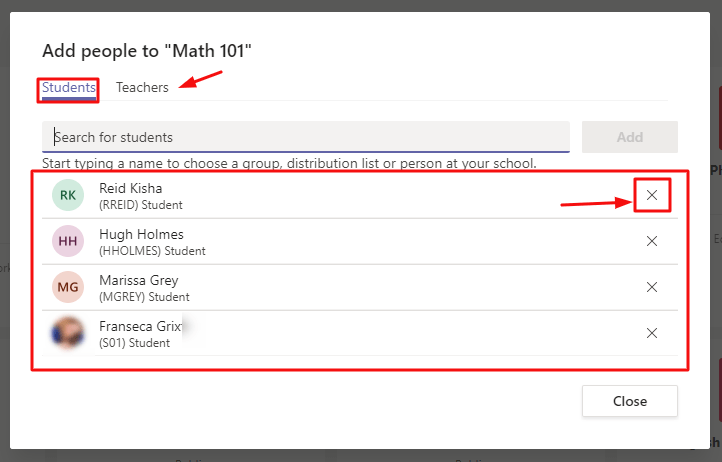
Figure 9
- You can now view the student list. If you have added someone you should not have, click on the X button to remove them (Figure 9).
- Once you are done with students, click on the ‘Teachers’ tab so you can add additional teachers to the class. Since you are creating this class you will be considered as the owner. If there are more teachers involved in this class add them from the teacher tab. Note: As you will notice all contacts from Classter are made available here on Teams (Figure 10).

Figure 10
- As when you added students by entering the first letter of a name you will see the list of contacts where you can click and select them.
- Once you have made your selection click on add to add them to the list.
- Once you are done, click on close to close the window (Figure 11).

Figure 11
Here you can now see the team/class you created (Figure 12):

Figure 12
- This is the main page of the new team/class ‘Math 101’, we land on the first tab ‘Posts’.
- Here you can have an open discussion via chat with the members of the team/class.
- On the left side of the screen you will see the option button (Three dots) next to the class name. If you click on the button you will be able to add members, manage the team/class, delete the team/class and leave team/class, edit team/class and add a channel (in classter we call this a session) (Figure 13).
- You can similarly click on channel options (three dots) to manage the channel/session (Figure 14).

Figure 13

Figure 14
Files Tab
This tab allows for the addition of files regarding this class and the ability to create word, power point, excel and OneNote files. These are useful for the entire class or specific channels/sessions. Follow the path: Teams tab > Files tab (Figure 15).

Figure 15
- From the new dropdown button, you can create new folders, excel, word. Power point and OneNote files.
- You can upload files from your computer or other mobile device.
- You can download any file you have in this section by clicking on it from the list and then clicking on the download button.
- You can view and open files and folders from the list by clicking on them.
Class Notebook Tab
Here you can create a class notebook for your students with the class structure and information about sessions etc. Follow the path: Team tab > Class Notebook (Figure 16).

Figure 16
- On this tab, you can see the ‘Set-up a OneNote Class Notebook’ button
- When clicking on the ‘Set-up a OneNote Class Notebook’ button you will be able to choose from Blank Notebook or From existing notebook content (Figure 17).
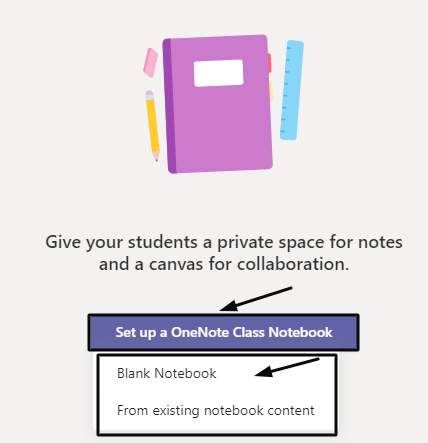
Figure 17
- Click on the ‘Blank Notebook’ button
- Once you click on the ‘Blank Notebook’ button you will see the following info page (Figure 18).

Figure 18
- Click on the ‘Next’ button (Figure 18).
- Once you click on the ‘Next’ button you will be transferred to the following page (Figure 18a).

Figure 18a
- Here you can organize the class notebook however you like. You can use the suggested sections, or you can delete the existing ones and add your own.
- Once you are done with this part click on the ‘Create’ button.
- Below you will see the notebook you created, and you can use it as if it were a OneNote document (Figure 18b).

Figure 18b
- You can view every section of the document by switching sections, you can fill in the notebook with the information you want.
Next, we will see the Assignments tab, here you will be able to create assignments and quizzes for your students (Figure 19a).
Assignments Tab
Assignments tab (Figure 19a).


Figure 19a
- Once you click on the assignments tab you will view this page containing drafts, assignments and quizzes (Figure 19a).
- You can click on the ‘Create’ button and choose to create an assignment or quiz (Figure 19a).
- You can also choose an assignment or quiz from existing or imported (from Classter) class (Figure 19a).
Assignment
Once you click on create/assignment (Figure 19a) you will be taken to the following page (Figure 19b):

Figure 19b
- Fill in the title of the assignment e.g Math 101 – Fractions.
- Add Instructions for this assignment e.g Follow the steps we discussed in class and answer the questions X.
- Add the point worth of this assignment e.g 10 points.
- Select the class this assignment should be assigned to e.g Math 101.
- Add students who will receive this assignment,
- Enter a due date for this assignment e.g 15/03/2020.
- Add the cut off time for this assignment e.g 15/03/2020 at 11.59 p.m.
Once you filled in all the information, click on the ‘Assign’ button to send this assignment to your students.
You can also save the assignment (as a draft) or discard the assignment.

Quiz
Once you click on create/quiz (Figure 19a) you will se the following popup window (Figure 19c):
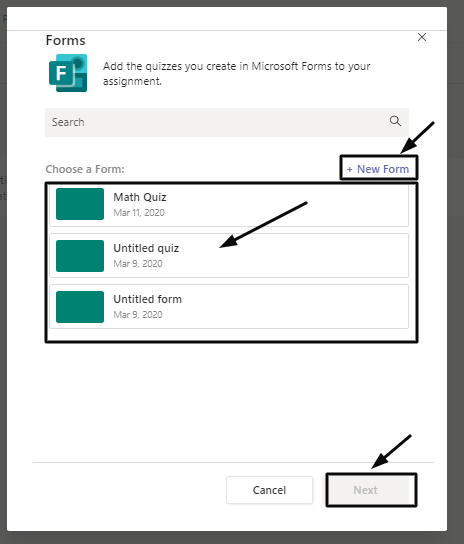
Figure 19c
- Add a new form (Quiz) by clicking on the +new form button or choose from an existing list of quizzes below (Figure 19c).
- If you click on the +new form button you will be taken to an external page (Figure 19d).

Figure 19d
- Click on the ‘+New Quiz’ button to begin setting up your new quiz (Figure 19d).

Figure 19e
- In the creation page for quizzes, you can add multiple choice questions, open-ended questions and rating buttons (Figure 19e).
- You can click on the ‘Theme’ button to change the aesthetic presentation of the quiz (Figure 19e).
- You can also preview the quiz by clicking on the ‘Preview’ button.
- Once you have added questions, themes and previewed your quiz, click on the share button to make your new quiz available for sending to students.
Once you click on ‘Share’ you will see a side window appear (Figure 19f).
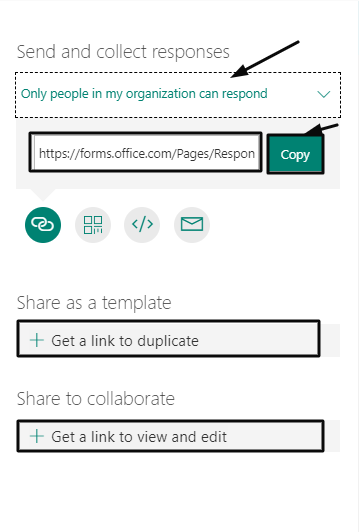

Figure 19f
- As you can see there are options with links for sharing with students and colleagues.
- You can get a link for the quiz template.
- Sharing the quiz link with students is one way of distributing the quiz.
- Once you return to the MS Teams environment you will be able to see the quiz you created and send it through teams in a faster and more efficient way (Recommended) (Figure 19g).

Figure 19g
- Click on the quiz you created.
- Then click on the ‘Next’ button (Figure 19g), you will be transferred to the following page (Figure 19h).

Figure 19h
- Fill in the title of the Quiz e.g Math 101 – Fractions.
- Add Instructions for this quiz e.g Follow the steps we discussed in class and answer the questions X.
- Add the point worth of this quiz e.g 10 points.
- Select the class this quiz should be assigned to e.g Math 101.
- Add students who will receive this quiz.
- Enter a due date for this quiz e.g 16/03/2020.
- Add the cut off time for this quiz e.g 16/03/2020 at 11.59 p.m.

Figure 19i
Once you have assigned the quiz you will return to the main assignments page, where you will see the quiz in the assignments list (Figure 19i).
Finally, you can also add an assignment or quiz from another existing class. By clicking on Create/From existing.

From Existing
- Once you click on the create/from existing button you will be able to see the following popup window (Figure 19j).

Figure 19j
- Select a class you want to take an assignment or quiz from (Figure 19j).
- Click on ‘Next’ to proceed.

Figure 19k
- Click on the Assignment or Quiz you want to use and click on ‘Next’ (Figure 19k).

Figure 19l
- Here you can change the title, instructions, points, the class it is assigned to, the students and due date of the assignment or quiz (Figure 19l).
- Click on ‘Assign’ to assign this assignment or quiz to students.
- If you want, you can save this to drafts by clicking on save or click on discard to discard assignment or quiz (Figure 19l).
- Once you have completed this step you will return to the assignments tab (Figure 19m).

Figure 19m
You can also view all the activities you have done on the Activities tab. You will be able to see all activities on the left side of the screen. You will notice also the assignments and quizzes you have assigned in post form on the main chat area of the page (Figure 19n).

Figure 19n
- On this page, you can see all your activities feed on the left-hand side of the screen (Figure 19n). Activities included are from all classes you are a teacher in.
- In the center of the page, you can see assignments and quizzes in post form. You can add or reply to comments as well as view assignments or quizzes by clicking on the respective buttons (Figure 19n).
Grades Tab
Here you can review the turned in assignments, quizzes and grade students on those assignments and quizzes (Figure 20).

Figure 20
- On this page you can see a grid with students on the one axis and assignments and quizzes on the other.
- You can add grades in each field to represent the performance of every student in each type of assignment.
- Keep in mind grading must follow the points allowed in each individual assignment or quiz.
- If you click on the button with the three dots you will have the options to view student’s assignments and to return grades to students.
Meeting Notes Tab
Once you have completed a meeting with your class, you will also see an additional tab in the Meeting Notes tab (Figure 21).

Figure 21
- View Notes related to the meeting you had.
- Add Notes for students to see by clicking on the ‘add a new section here’ button.