

Create New
Student Profile
- Click on ‘Create New’ to create a new student or click on the ‘Start Adding Student’ button (Figure 122).
Note: The Start Adding Student option is available for new institutes without students.

Figure 122
Note: Alternatively, you can create a new student using the ‘Create Student’ button under Quick Actions on the Dashboard (Figure 123).
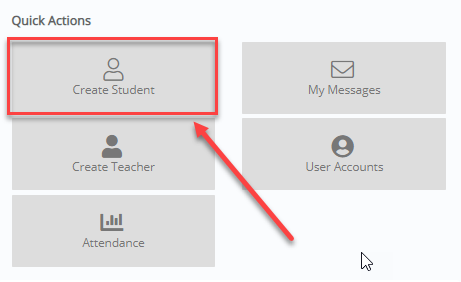
Figure 123
Insert student’s basic data in the ‘Student Profile’ tab (fields with a red asterisk are mandatory) (Figure 124).
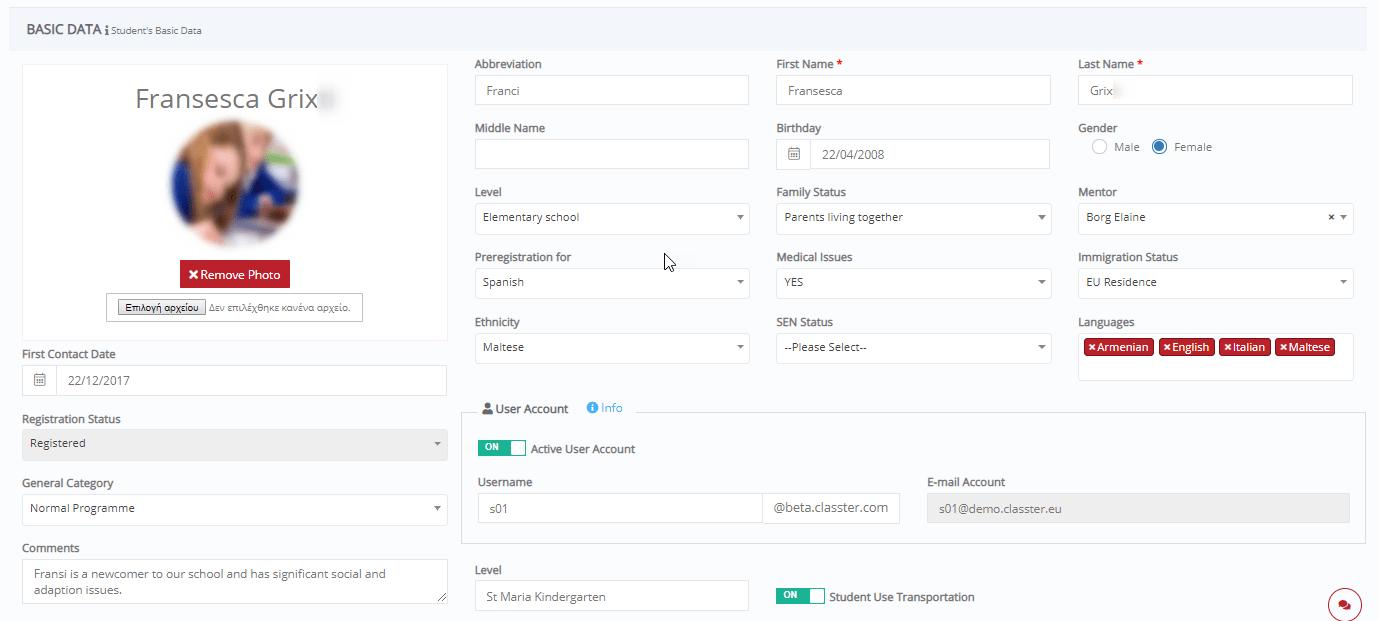
Figure 124
Note:
- ‘User Account’ area: A Classter user account will automatically be created e.g., Username mtester@beta.classter.com.
- If the school uses an external provider e.g., Office365, an Office365 email account (‘E-mail Account’) will automatically be created as well. The student will use this account to login to Classter web portal.
- If not, you can insert student’s private email – only in the case that you want the student to login to Classter web portal using the email. The student will initially have to verify the email account, through the verification email he/she will receive, before he/she can have access to Classter web portal.
- The field ‘Level’ is a custom text field, and its terminology is set by the admin.
- The default ‘Registration Status’ is set by the admin.
- The admin sets the ‘General Category’ list options as well as if the field is visible to the user or not. The field can be used for a special indication concerning the student e.g., he/she is in a special program.
- Click on ‘Add’ to add one or more educational programs to the student. The educational program encompasses the academic requirements for a specific academic period (Figure 125).

Figure 125
- You can edit or delete the registered educational program using the relevant buttons (Figure 102).
- Click on the ‘School Registration History’ button to see the student’s status history such as grade, previous and status, date of change (Figure 126).

Figure 126
Note: If the educational program is used in a financial arrangement, you will not be allowed to delete it (Figure 127).

Figure 127
- Add student’s contact data (Figure 128).

Figure 128
Note: Click on the maps button to add the student’s address in Google maps (this function will be available only if it is set by the admin[4]) (Figure 129).

Figure 129
- Click on ‘Add’ to add extra phones/contact data e.g., vacation home phone (Figure 130). You can edit or delete the extra phones/contact data using the relevant buttons.

Figure 130
- Click on ‘Add’ to add additional addresses e.g., vacation home address (Figure 131). You can edit or delete the additional addresses using the relevant buttons.

Figure 131
- Click on ‘New Relative’ to add a student’s relative or Click on ‘Connect with Existing’ to connect student with a relative that already exists (Figure 132).
Note: Go to ‘Create New’ to check out how to create a new relative
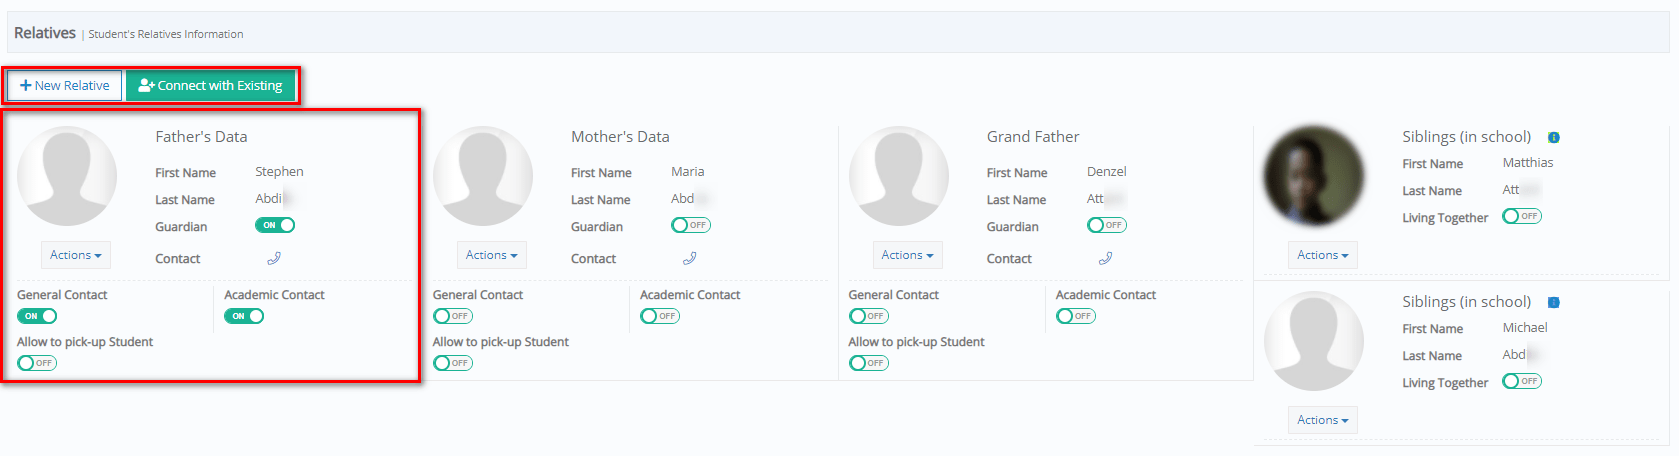
Figure 132
- You can define if the relative is the student’s guardian or the one to be contacted for general and/or academic issues, or if allowed to pick-up the student, by activating the relevant options. In the case of a sibling, you can activate the Cohabitation or Living Together option to state that the siblings live together.
- Click on the phone button to see relative’s contact data or click on ‘Actions’ to preview or edit the relative’s data, change connection by selecting another relative from the list, change the relative relationship or delete the relative connection with the student (Figure 133).
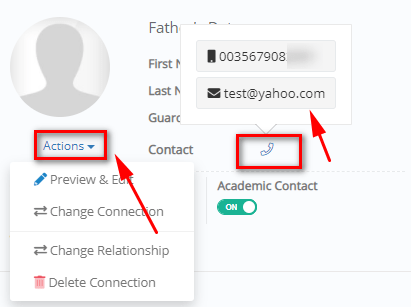
Figure 133
- Add Various Data e.g., student’s insurance company, plan etc. (the fields of this area are custom and set by the admin) (Figure 134).

Figure 134
New Relative
- Click on the ‘New Relative’ to create and a new relative.
- At the ‘Add Relatives’ pop-up window (Figure 135):

Figure 135
- Select the ‘Relatives Types’ i.e., Father or Mother, or Other to select from the drop-down list e.g., Grand Mother
- Fill in the Basic Data of the relative i.e., Name, Gender, Birthday, Username, etc.
- Add Contact Data, Other Data, Various Data, etc.
- Click on ‘Save’
Connect with Existing
- Click on the ‘Connect with Exiting’ to connect the student with an existing relative.
- At the ‘Select Relatives’ pop-up window (Figure 136):
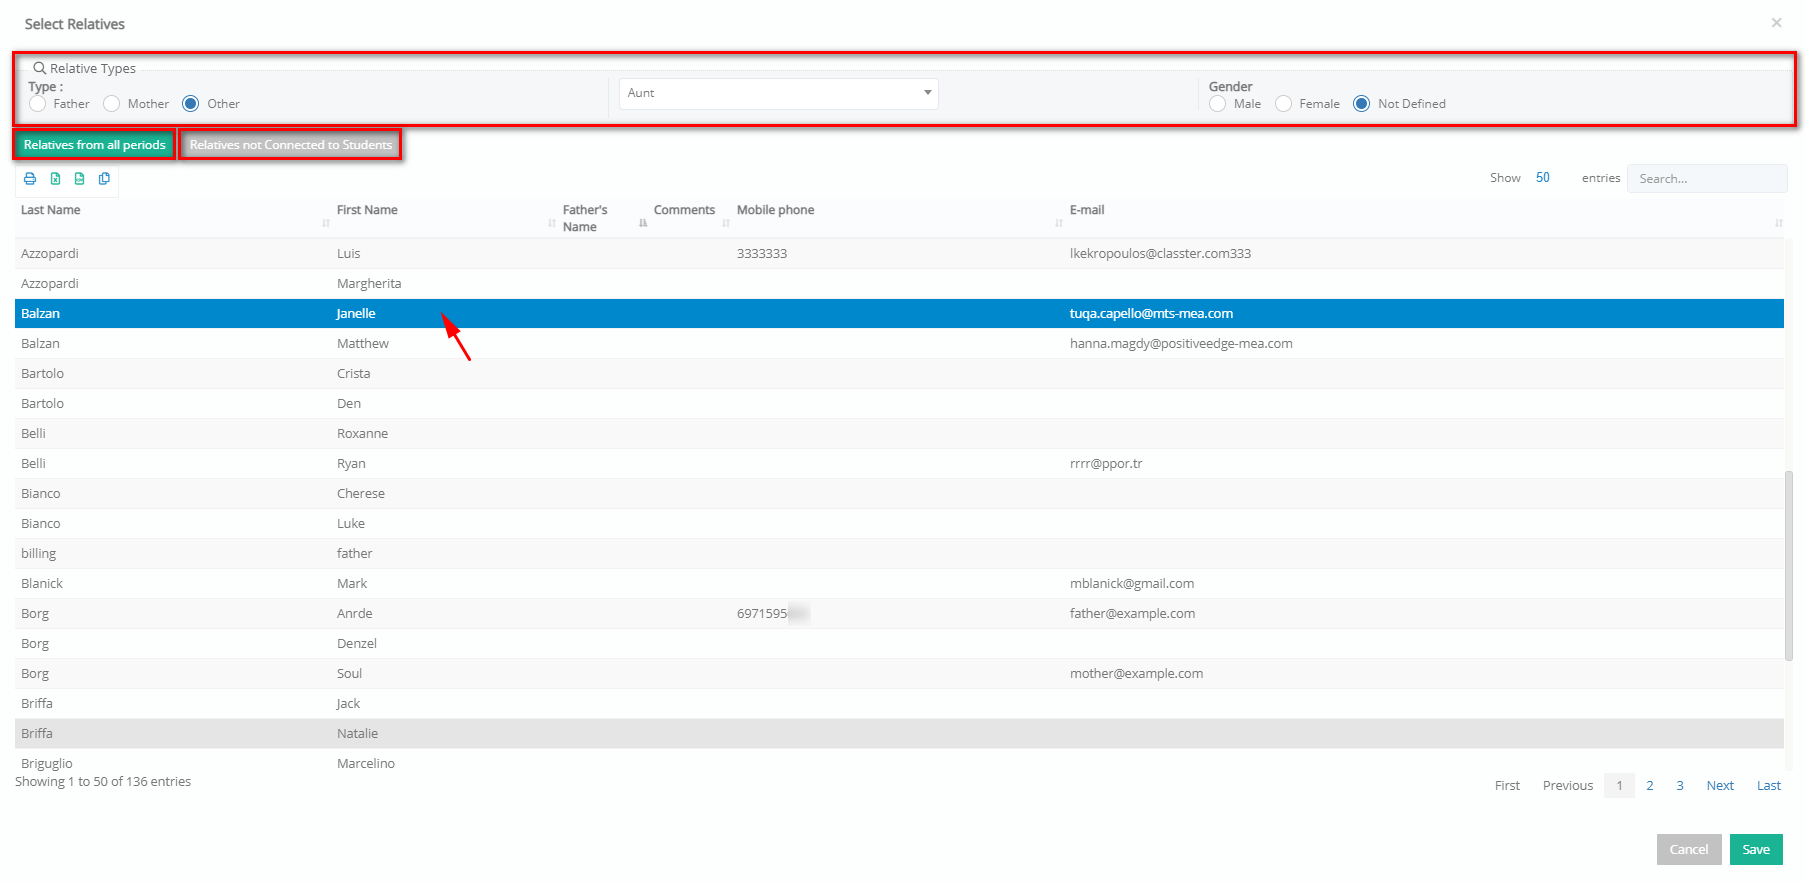
Figure 136
- Select the ‘Relatives Types’ i.e., Father or Mother, or Other to select from the drop-down list e.g., Grand Mother
- Select the Gender e.g., Female
- Select if you want to see ‘Relatives from all periods’ or ‘Relatives not connected to students’
- Select the relative from the list
- Click on ‘Save’
Demographic Data
- Add student’s demographic data i.e., Nationality, Academic registration number, Identity number etc. (Figure 137).

Figure 137
Note:
- The ‘Nationality’ and ‘Country’ fields are dropdown lists set by the admin[6].
- The ‘Identity Number’ can be used at dashboard’s student quick search (Figure 138).

Figure 138
- Click on ‘Save & Close’ or ‘Save’ (if you want to remain on the page) to save data.
Note: When you save student’s mandatory data (first name, last name, educational program), you will have another four tabs available (Enrollments, Financial, Admission Data, Views & Statistics)
Enrollments
Click on ‘Enroll Groups – Subjects’ to enroll the student in groups and subjects (Figure 139).

Figure 139
- Select the group you want to enrol to the student e.g., Y4 English Beginners (Figure 140).
- Click on ‘Add’

Figure 140
Note: In case you want to enroll the student in a group or subject that is not available in the registered educational program, turn the setting to ON.
- You can see the groups enrolled to the student and you can expand/collapse to see the subjects (Figure 141).
- You can define which subjects of the group will not be enrolled to the student, by deactivating them
Note: You cannot deactivate a subject once the student has registered assessments, assignments, marks etc. in this subject.
- If you have enrolled to the student more than one groups, you can define one of them as the student’s ‘Main Group’. This will be the group that the student attends most of his/her major subjects.
- Activate ‘Show All Group Subjects’, to show the deactivated subjects as well.
- Activate ‘Show Deleted Subjects’, to show the subjects you have deactivated after initial enrolment.
On the Subject line you can (Figure 141):
- Select the Subject’s status e.g., Registered to define that the student is registered to this subject
- Click on the Quick View to see
- The timetable concerning the specific subject, or
- The teachers teaching the subject.
- Click on the ellipses beside the subject name to
- Change the subject group, or
- Deactivate and change the group of the subject.

Figure 141
- Go to the Services tab and click on ‘Enroll to Services’ to enrol the student in a service e.g., Sports club, Library, School trips etc. (Figure 142).

Figure 142
- Select a service from the categories drop-down list and click on search to see available services.
- Select the service you want and click on ‘Add’.
- Once added, you can see the service, start, and end dates, days, and time (if applicable) (Figure 143).

Figure 143
- Click on the ‘Recycle bin’ icon if you want to delete the service.
- If you want to delete a day of a service, click on the check box to select it, and select the ‘Remove Selected’ option from the ‘Remove’ menu.
- Click on the ‘Actions’ menu to stop the service or check the history of the service i.e., start date of the service, active days etc.
Financial
Go to student’s financial tab to manage arrangements, get a financial balance overview, a total view of installments per arrangement and a detailed view of transactions (Figure 144).
- Note: Refer to the Billing (Financial) Manual for a comprehensive guide on managing Classter’s financial module.

Figure 144
Admission Data
- At the Admission Data page, you can (Figure 146):
- Register student’s admission data (the admission data list is set by the admin at the back-office application – Classter Manager).
- Add marketing data i.e., how did the student hear about the school e.g., Internet (Figure 145).
- Add school transfer info i.e., the transfer type, reason and date of transfer, previous school studies, latest class, and overall grade etc. (Figure 146).

Figure 145

Figure 146
- Other tabs are the following:
- Qualifications

Figure 147
- Admission Documents

Figure 148
- Admission Application

Figure 149
Views & Statistics
- At the Views & Statistics tab you can use the drop-down list to navigate in the menu (Figure 150).

Figure 150
Academic Progress
- Click on Academic Progress to see student’s detailed academic data. Refer to the Academic Progress section for a detailed description of each tab under this section.
Certifications
- Under this tab you can add the student’s certifications

Figure 151
Timetable
Once the timetable has been published, students can view and print the timetable from the timetable tab.
- Select a timetable category to view.
- Use the ‘Print’ option to print the timetable in a grid across multiple pages.
- Use the ‘Print Table’ option to print the timetable on one page.

Figure 152
Remarks & Actions
- Use filters to show student’s remarks and actions added by teachers or staff (Figure 153).
Note: The types of the available Remarks and Actions is set by the Admin.
- Select date range, type e.g., Remarks and
- Choose the Functional Modules from the drop-down list e.g., Achievements
- The results are also shown in a chart

Figure 153
- Click on Collapse/Expand to see the results (Figure 154).
- Use the filter ‘Status’ to see results according to their status e.g. Approved.
- Use the filter ‘Refers To’ to see results according to whom they refer to or were recorded by.
- Use the ‘Actions’ button to manage the Remarks and Actions e.g. Decline Approval, Edit, Complete or Delete the selected Remark/Action.

Figure 154
Transportation
You can view and manage the student’s transportation route and route exceptions. Refer to the Transportation Manual for a comprehensive guide on working with the transportation module.

Figure 155
Files & Links
You can manage student’s personal files and links.
- Use the File link to upload files e.g., books
- Choose a file
- Select a category
- Select in which views or which users can access the document, i.e., View in Staff, Students, Teachers, Creator, etc.
- Add Notes related to the file

Figure 156
- Use the Link button to add links related to group

Figure 157
- Use the Local File (Link) to upload files from the local file directory.
Consents
You can manage parental consents, also known as parental involvement laws. One or both parents may have to be notified and consent (according to the country’s law), before their child participates in certain activities (Figure 158).
Parental consent may, for example, refer to:
- A parent’s right to give his/her consent or to be informed before his/her child undergoes medical treatment.
- A parent’s right to be involved in their child’s education, including the right to approve/disapprove a certain curriculum, or consent to extracurricular services and field trips.

Figure 158
SEN & Medical Condition
In this section, you can record information concerning student’s medical condition or special educational needs (SEN).
- At the Main Data area, you can (Figure 159):
- Add comments about student’s medical condition e.g. The student suffers from asthma.
- Record his/her blood type.
- Add recommendations for teachers e.g. The student should avoid contact with plants.
- Add special warnings e.g. In case of an asthma crisis, the medicine is in the student’s bag.
- Set an individual education plan date for the student and the person that it will be reviewed by.
- Add a record number
- Allocate a Mentor LSA (Learning Support Assistant).
- Set exam access arrangements, such as helper type e.g., Prompter and access requirements e.g., practical assistance.
- Set transport needs, such as transportation type, the person responsible for student’s transportation and access requirements e.g., by minibus

Figure 159
- Under SEN & Medical conditions, click on ‘+Medical Condition’ or ‘+Allergy’ to add student’s medical condition and/or allergies (Figure 160).
- Click on ‘Actions’ to edit or delete a record
 Figure 160
- Under Medical Examinations & Vaccinations, click on ‘+Vaccinations’ or ‘+Medical Examinations’ to add student’s medical condition and/or allergies (Figure 161).
 Figure 161
- Select the medical examination type, insert a comment and the doctor’s information, state if it is exempted or done (Figure 162).
 Figure 162
- Select the vaccination type, insert a comment, and dose number, state if it is exempted or done (Figure 163).
 Figure 163
- Click on ‘Actions’ to edit or delete a record (Figure 161).
Lending History
You can view the student’s book lending history. You can see active loans, books in reservation and their lending history.

Figure 164
Messages
Go to messages to view messages in the student’s inbox and sent items.

Figure 165
View
- Select between the two main views ‘Card’ or ‘Grid’ view or a ‘Predefined’ view to see students according to e.g., their group, educational program, bus usage etc.

Figure 166
Card View
You can see student’s information such as student’s full name, father and mother’s name, year, class, student ID and medical data on the card form (Figure 167).
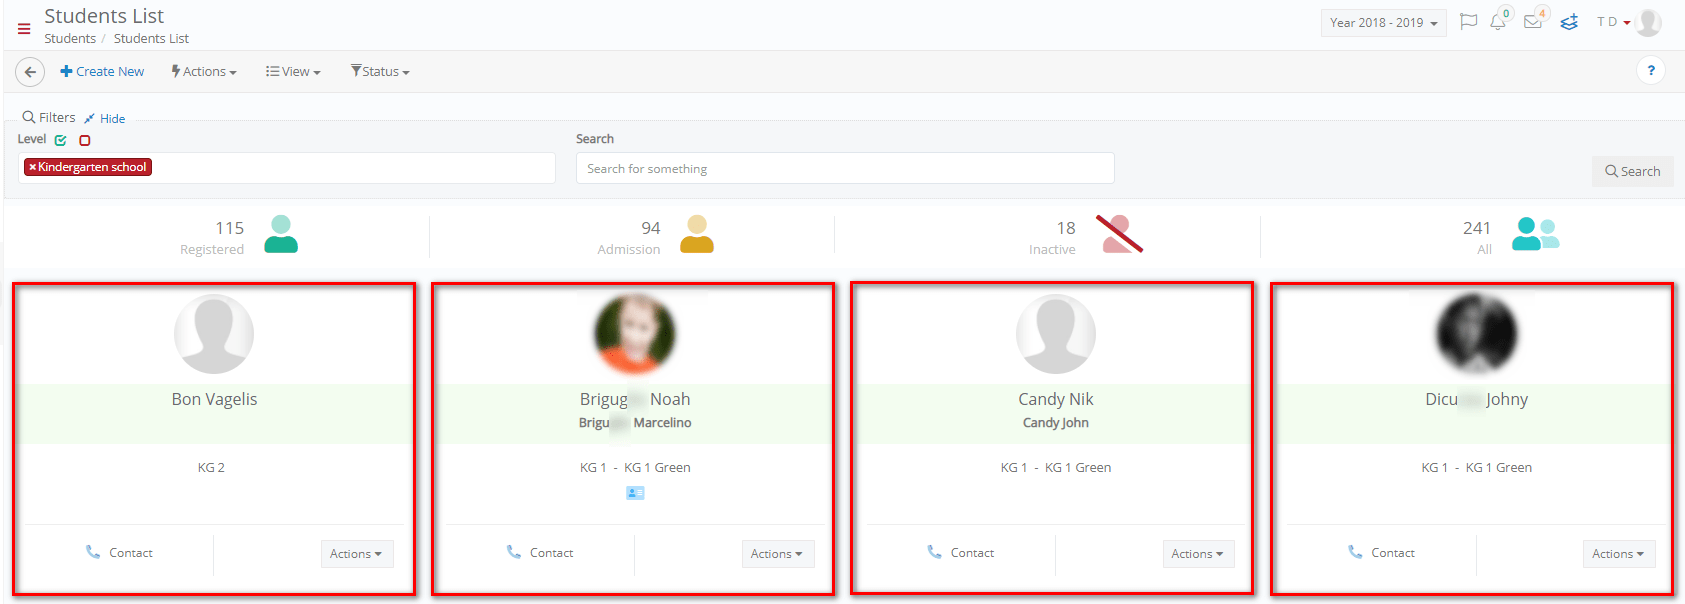
Figure 167
- Click on the ‘Contact’ button to see student’s basic contact info (Figure 168).
- Click on the ‘Actions’ button to Preview student’s overall data, to manage student’s transportation or contact the student via email or SMS (Figure 168).
Note: By selecting ‘Internal message’, you will only send an internal Classter message. The recipient needs to logon to Classter to read the message.
By selecting ‘Send Email’, you will send an email to the recipient. Classter will send emails only to those recipients with an associated email record.
By selecting ‘SMS’, you will send an SMS via an SMS gateway. The recipient will receive an SMS on their Mobile phone. Classter will use the main mobile phone associated with the recipient, and it will also send an internal message. This option will be available only if your institute’s administrator has enabled the SMS gateway configuration of Classter, and there are enough SMS credits available in the SMS provider account. (Check Endnote iv).
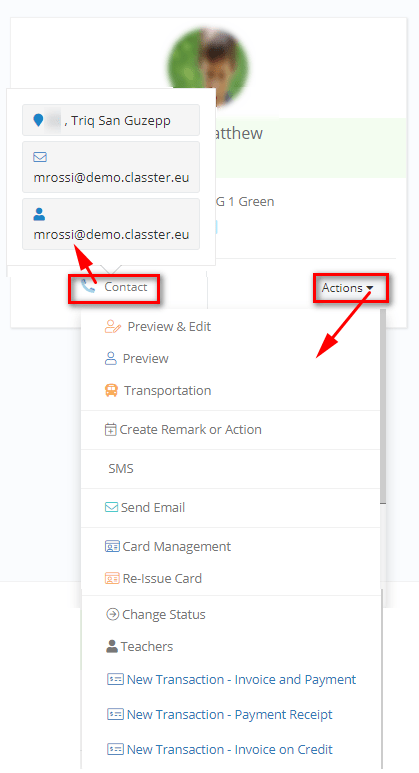
Figure 168
- Click on the card icon to see student’s ID (Figure 169).
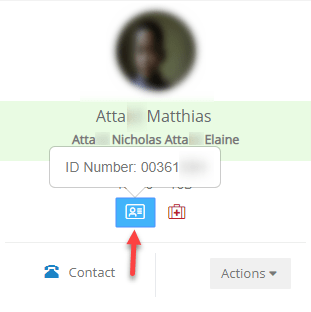
Figure 169
- Click on the ‘first aid box’ icon to see student’s important medical information (Figure 170).
Note: Student’s medical info is visible to the admin, secretary, student’s mentor and LSA mentor.

Figure 170
Grid View
You can see and select the students you want to apply an action (Figure 171).

Figure 171
Note: You can print, copy, or export student list to an Excel or CSV spreadsheet.
- Click on ‘Actions’ button of the selected student to (Figure 172):

Figure 172
- Preview & Edit student’s overall data
- Manage student’s Transportation e.g., add or edit student’s routes
- Contact the student via Email, Message or SMS
- Select Card Management to create student card (go to Create Card to check out)
- Select Re-Issue Card to re-issue the card of the student
- See the student’s teachers per group and subject (Figure 173):
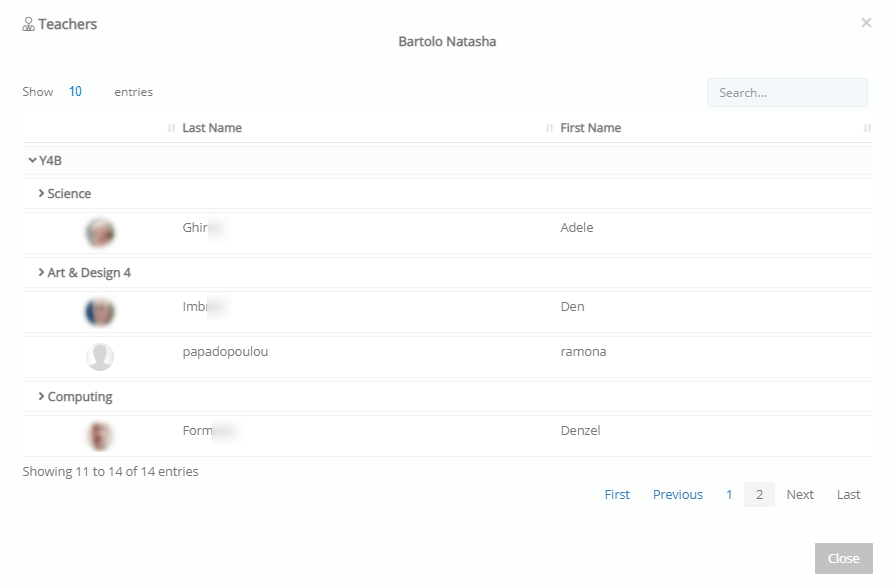
Figure 173
- Change the student’s status e.g., a registered student was transferred to another school (Figure 174):
- Expand the bulk actions and set the date and reason of change
- Set the new status
- Click on ‘Apply to all rows’
- Click on ‘Save’
 Figure 174
- Make new financial transactions (Presented in the Financial Module manual).
Report
Select the student(s) and click on the ‘Reports’ menu to create student labels (Figure 175, Figure 176). Does not exist anymore

Figure 175
 Figure 176
Predefined Views
For example, you can see students by group. Click on Collapse/Expand to see students of all groups or of a specific one (Figure 177).
 Figure 177