In the Timetable Scheduling and the Calendar View windows, click on the Actions Menu to use the timetable constraints, actions settings, teacher availability and constraints and teacher allocation (Figure 61).
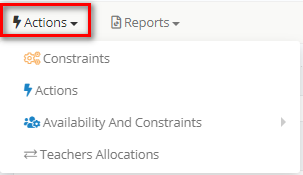
Figure 61
Constraints
Select ‘Constraints’ from the Actions menu to manage the available constraints which enable you to make various timetable checks when a new entry is added (Figure 61).
The following constraints are available (Figure 62):
- Check Teachers Hours: Checks if the timetable entry exceeds the teachers’ declared total working hours (this can be set in the Teacher Profile under Employment Data tab).
- Check Teacher Hours per Subject: Checks if the timetable entry exceeds the teachers’ declared hours in the specific subject.
- Check Teachers Time Availability: Checks if the teacher is available on the day and time of the timetable entry in respect to his/her availability schedule.
- Check Students Enrollments: Checks students’ availability comparing the Group/Subjects they are enrolled to and the ones of the timetable entry.
- Check Students Time Availability: Checks if the students, enrolled to the selected group, are available on the day and time of the timetable entry in respect to e.g. their declared school activities.
- Check Subject Hours: Checks if the timetable entry exceeds the declared teaching hours for the specific subject. This information is retrieved from the subject and not from the curriculum.
- ‘Check Subject Constraints’: Checks for time, duration, year constraints that have been entered in to subjects during creation or through later addition, before allowing the creation of a session.
- Check Class/Subject Enrollments: Checks if the timetable entry exceeds the declared teaching hours for the specific subject per class or per group.
- Check Classroom: Checks classroom availability and capacity in respect to the selected group’s number of students.
- Include all constraints of the associated main classes when you check class constraints
- Check Classroom Time Availability: Checks for Classroom time conflict e.g. another session is planned at that time in this classroom.
- Check Class Time Availability: Checks for possible Class Time conflicts e.g. If the Class has sessions already planned for this period, you cannot plan a new one.
- Check Grade Time Availability: Checks for possible grade/year time conflicts before it allows the creation of the new session e.g. if Year 1 has other sessions planned it will warn about the conflict.
- Check resources: Checks that the resources are in use by another class.
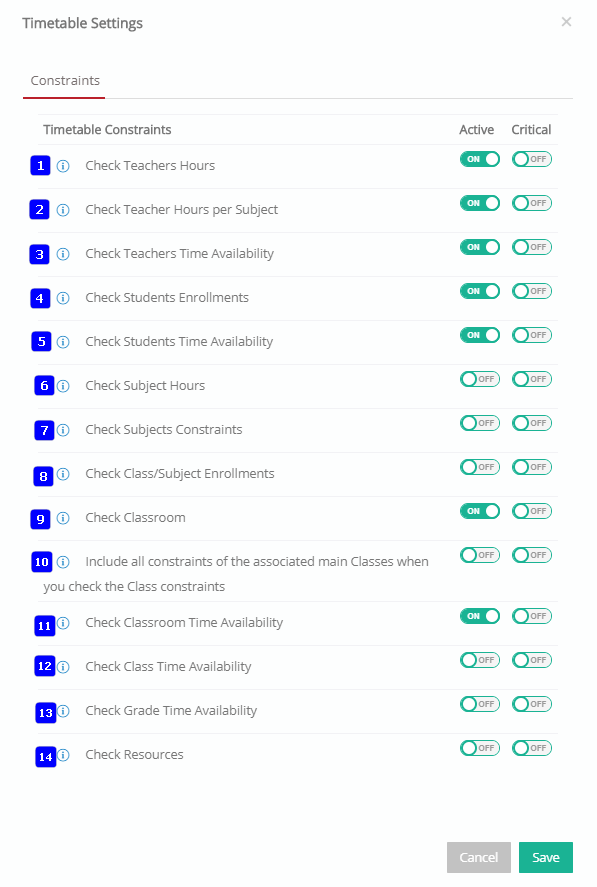
Figure 62
You can set a constraint as ‘Active’ and/or ‘Critical’ (Figure 62):
- If Active, the constraint will be checked in every new addition on the timetable and if the constraint is true, a warning message will appear.
- If the Constraint is Critical, the warning message will become a restriction not allowing the user to proceed with the new timetable entry.
Note: The system also allows users to set time constraints at teacher level for specific days and hours of the week or dates and times
- Click on ‘Save’ to Save changes (Figure 62).
Actions
Select ‘Actions’ from the Actions menu to update enrollments according to timetable, copy or delete timetable, and create the timetable automatically (Figure 61).
Actions
In the ‘Actions’ tab, perform any of the following actions (Figure 63):
- Update Teachers’ enrollments based on timetable entries: Activate switch to set teachers’ working hours concerning a class/unit to zero if there is no timetable entry for this class/unit.
- Remove Classes/Subjects if total hours equal zero: Activate switch to remove class/unit from lecturers’ enrollments if the class/unit total timetable hours equal to zero.
- Categories: Select the timetable category.
- Grade: Select the grade to update enrollments of the selected grade according to timetable.
- Click on the ‘Update Enrollments’ button to apply selected actions.
Note: The action cannot be undone once applied.
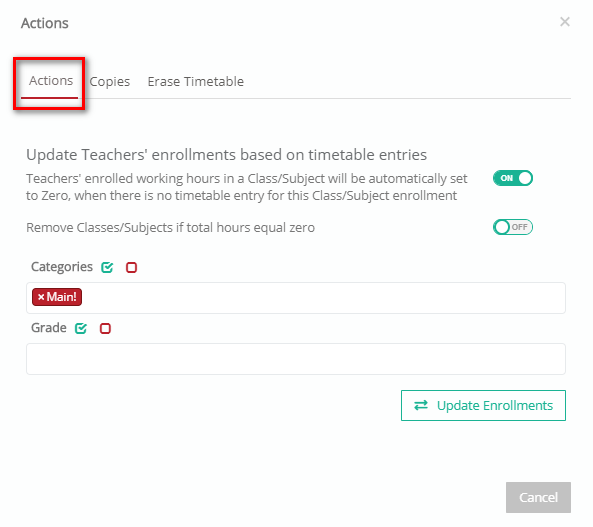
Figure 63
Copies
In the ‘Copies’ tab, you can copy a timetable from one timetable category to another timetable category e.g. from Semester A to Semester B (Figure 64).
- In ‘From Category’, select the timetable category you want to copy.
- In ‘To Category’, select the category you want it copied to.
- To make the copy more specific, select the division (school), grade (year/course) and program (stream). This will copy only the selected options.
- Enable the Clear up destination category before copying option to empty the contents of the destination category before copying.
- Click on the ‘Copy’ button.
The timetable can also be copied from the current Academic Period to the next Academic Period (Figure 64):
- Select the timetable category you want to copy.
- Select from what period you want it copied.
- Select the period you want it copied to.
- To make the copy more specific, select the division (school), grade (year/course) and program (stream). This will copy only the selected options.
- Enable the Clear up destination period before copying option to empty the contents of the destination academic period before copying.
- Click on ‘Copy’ button.
Note: Once you apply, you will not be able to undo actions
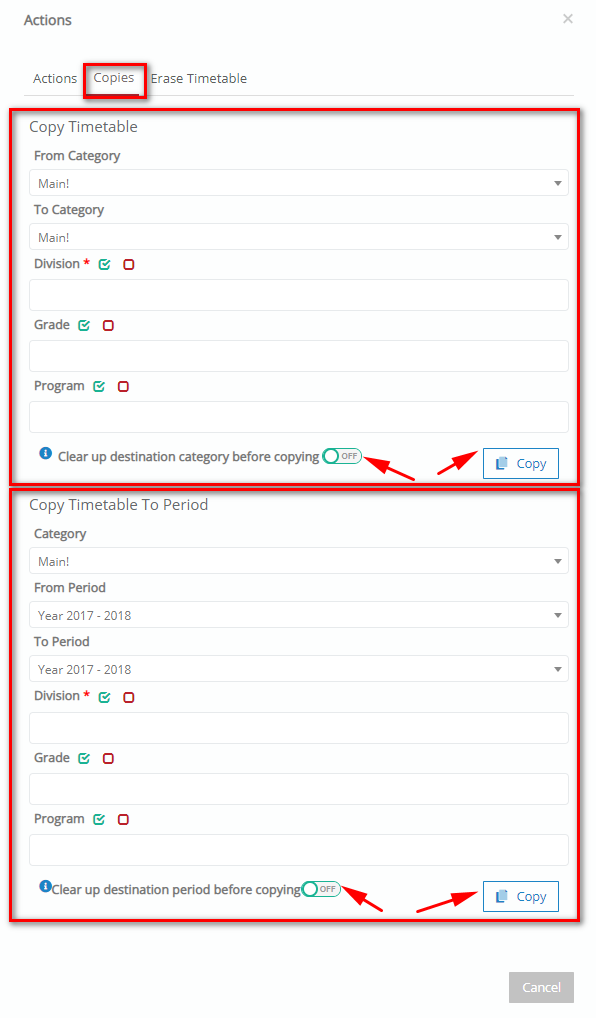
Figure 64
Erase Timetable
In the ‘Erase Timetable’ tab, you can delete the selected timetable or part of it (Figure 65).
- Select the timetable category
- Select the day(s), hour(s), division(s), grade(s) and program(s) to be deleted
- Click on ‘Delete’ button
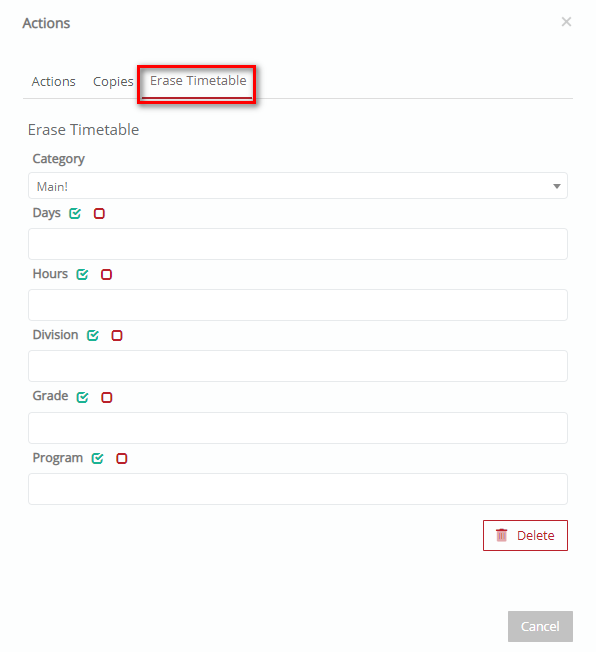
Figure 65
Availability and Constraints
From the ‘Actions’ dropdown, there is the Availability and Constraints. Here you can view the availability of a Teacher, Grade, Class or Classroom and set the times where they will be unavailable for planning sessions.
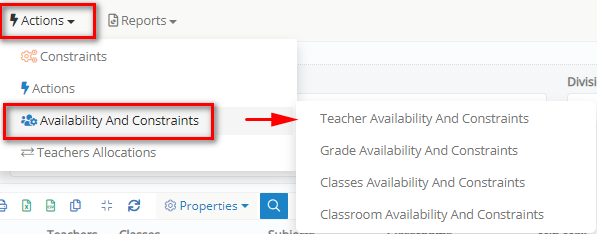
Figure 66
Teacher Availability and Constraints
Select ‘Teacher Availability and Constraints’ from the Actions menu to update a teacher’s availability (Figure 61).
Use the Filter to search for a teacher (Figure 67):
 Figure 67
In the resulting window, click on a time slot to setup the teacher’s availability and constraints (Figure 68).
- Description: in this field you can enter a description of the reason for being available or unavailable. The default setting ‘Non-Available’.
- Availability Status: this option defines availability or unavailability for this time slot. You can have a description Teachers Meeting and status unavailable or available. Only the unavailable status will appear on the timetable in Calendar View, available status will just show the time slot as available.
- Valid For: this option defines if this timeslot entry will affect the Main timetable in the Calendar View. E.g. if you choose Status Unavailable and Timetable Limitations then it will make the time slot unavailable on the main timetable in calendar view.
- Day: this option will be filled in automatically since you selected the time slot based on Day and time. You may change it if you wish.
- Start Time: this option defines the time this constraint begins. It can be modified.
- End Time: this option defines the time this constraint ends. It can be modified.
- Click on the ‘Save’ button to save changes.
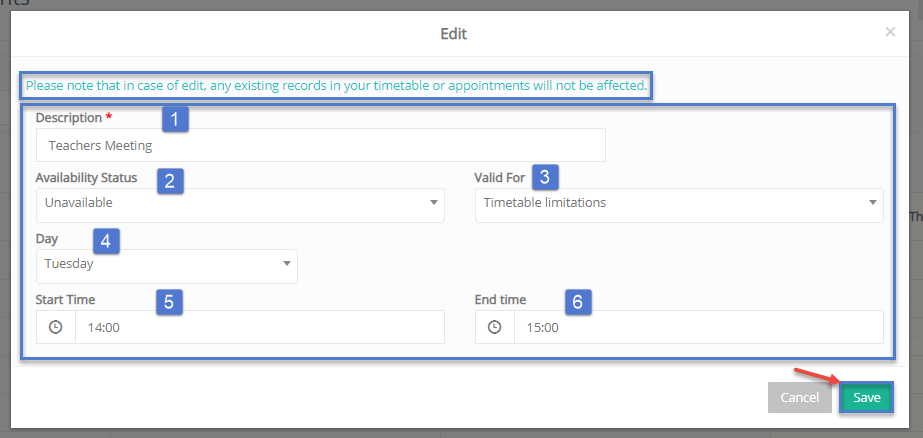
Figure 68
Note: Before leaving ‘Availability and Constraints’ page click on ‘Save’ button to save the constraints added (Figure 69).
 Figure 69
- Enable the ‘Show All Day’ switch to view the timetable for the entire day
Note: Follow the steps in the Teacher Availability and Constraints to set up the Grade/Class/Classroom Availability and Constraints.
Edit Availability and Constraints
If you click on a time slot which has been set as Available or Unavailable, you will be able to edit it. The edit popup window will appear, and you will be able to change the available fields (Figure 68). Note: Pre-Existing time slot Availabilities and Constraints if edited will have no impact on Timetable or Appointments.
Teachers Allocations
Select ‘Teachers Allocations’ from the Actions menu to update the teacher’s allocation hours for a specific group and subject (Figure 61 and Figure 70). This page helps you to massively allocate Teachers to Groups and Subjects but is not advised.
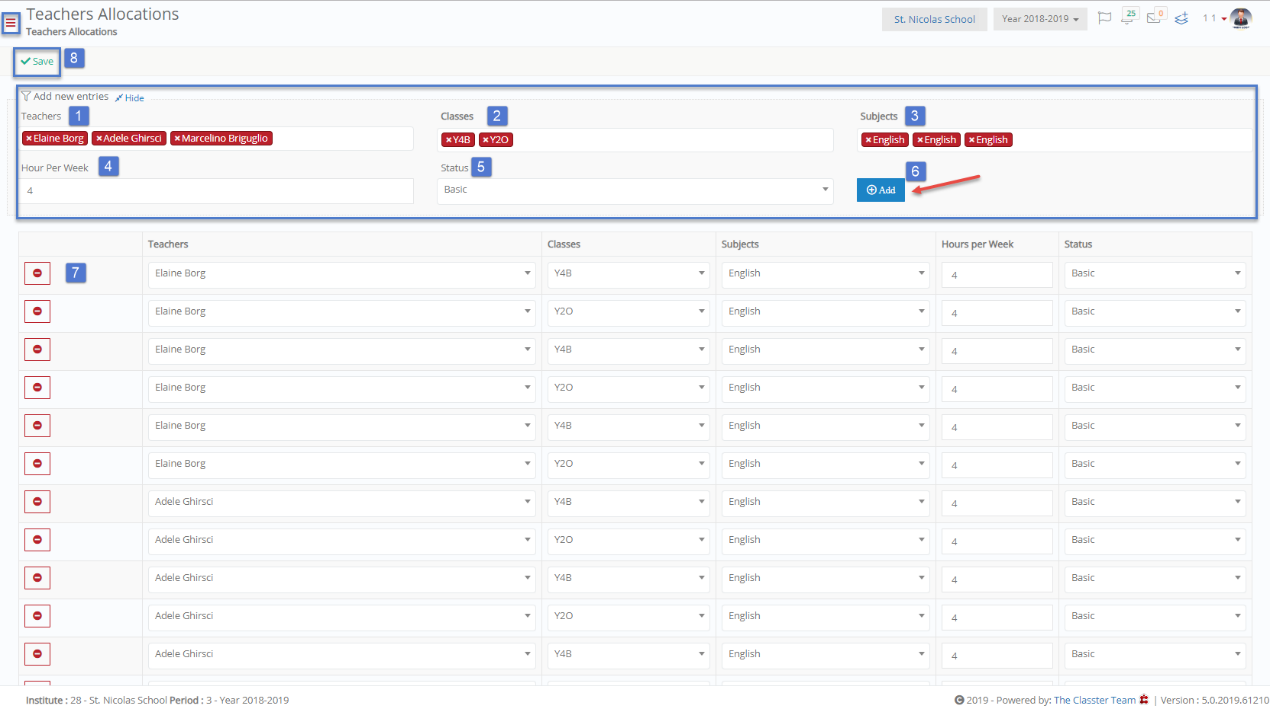 Figure 70
- Once you click on the ‘Teachers Allocations’ button, you will be redirected to the Teachers Allocations page.
- Click on the Show button to display and apply the filters
- Select teachers from the dropdown field; you may choose one or more Teachers to be assigned the selected Classes and Subjects.
- Select Classes from the dropdown field; you may choose one or more to be assigned to the Teachers.
- Select Subjects from the dropdown field; you may choose one or more Subjects to be assigned to the Teachers.
- Assign Hours Per Week; in this text box you may enter the number of hours Teachers will be teaching each subject to the selected class.
- Set the Status; this dropdown list defines the status of the teacher with regards to the Classes and Subjects e.g. supervisor, mentor, lab instructor, etc.
- Once done, click on ‘Add’ button. Now you will be able to view all the allocations in a list view.
- From the list, you can delete allocations by clicking on the delete button. You are also given the option to edit the allocations made by choosing to change Allocated Teachers, Classes, Subjects, Hours per Week or Status from each respective column and line.
Once you are done with everything, you can click on the ‘Save’ button to save your additions.


