

|
The envelop icon, informs you of the number of unread internal messages, email, SMS, i.e., 3. (Note that any e-Mail or SMS sent by the school’s back office employee to you, is also saved as an internal message) Click on the envelop icon, to see a list of the last 3 unread messages. Click on the ‘+New Message’ to go directly to the compose new message page. Select the “Read All Messages” option, to enter your mailbox. (message center). |
 |
Read All Messages
If you click on ‘Read All Messages’, it will redirect you to the Message Center where you can open, reply or archive messages.
- Select Inbox or Sent items, to see the incoming or sent items (Figure 10). Messages are marked by their type (internal message, email, SMS). You can filter messages by:
- Selecting Message Type(s) you want to see, e.g., Email, SMS, or Internal Message. The available message types are subject to your institute’s configuration.
- Selecting Category(ies) you want to see, e.g., Academic Notification.
- Use the search button for free-text searching.
 Figure 10
- To read a message, click on the line of the message you wish to open (Figure 10).
- At the page ‘View Message’, you can read the message, print, reply (may be disabled by the sender), or delete it (deletion is subject to rights given by the administrator), forward it or archive it (Figure 11).

Figure 11
- Click on ‘Print’ to print out the message content.
- Click on ‘Reply’ to reply to the message.
Note: The reply button is available only if activated by the sender of the message
- Click on the ‘Forward’ button to forward a message to another use. This functionality works in a similar way to creating a new message which is explained in the following section.
- Click on the ‘Archive’ to delete a message.
Note: Once you archive a message it will no longer be available in your inbox and you will not be able to retrieve it. Archived messages remain in the database.
- Under the ‘Files & Links’ section you can view any attachments which were sent as part of the original message. Clicking on the attachment will download it to your device.
- In the list of incoming or sent messages, select one or more messages and then select ‘Archive selected messages’ to Archive it (Figure 12).

Figure 12
Messages History
Click on the Message Trace button, to get a historical view/analysis of all messages sent from the portal (Figure 13).

Figure 13
In the History page (Figure 14) you can:
- Use the date filter to search messages of a specific period.
- Enter specific text in the text field to help narrow search results.
- Click on the add button to see recipient’s info.
- To remove messages, select them and click on the ‘Remove selected messages’ option
Note: The messages are removed but not permanently deleted from database.

Figure 14
Compose New Message
- To send a new message, choose a message type (Figure 16)
Note: Depending on your configuration you may have up to 4 alternatives:
- Internal Message
- E-mail via Classter
- SMS
- User Preferred Method
- At the end of the form, you can select if you want recipients to be able to reply (Figure 15).
![]()
Figure 15
- Then click on ‘Send Message’ to send your message.
 Figure 16
Internal Message
- This option allows users to send an internal Classter message. The recipient needs to login to Classter to read the message.
- Select a template (optional).
- Choose a message category.
- Enter the subject and text of the message (Figure 17).
- Under the manage file section, you can attachment file attachments.
 Figure 17
E-mail via Classter
The E-Mail via Classter option will send an email to the recipient. This option sends emails using the MailGun transactional email gateway. If you are an Admin, you can set it up using the Advanced Configurations menu within the Configuration panel. If you have many recipients, Classter will send a separate email to each recipient. This way, the possibility of spamming is minimized (but it cannot be fully avoided). The recipient will receive a normal email in their email inbox. Classter will either use the e-mail associated with the recipient’s account, or the personal email of the recipient. Classter will send emails only to those recipients with an associated email record.
Note:
- Classter will also send an internal message.
- This option will be available only if your administrator has configured all email settings in Classter configuration menu.
 Figure 18
- Select a template (optional).
- Choose a message category.
- Enter the subject and text of the message (Figure 18).
- Under the manage file section, you can attachment file attachments.
- Click on Advanced Actions to enable the ‘Send it Later’ option. This can be used in case you do not want to have the message sent immediately. Check the option “Send it later” to set a specific date and time for the message to be sent (Figure 19).
 Figure 19
SMS
SMS is sent via an SMS gateway. The recipient will receive an SMS on their Mobile phone. Classter will use the main mobile phone associated with the recipient, and it will additionally send an internal message, anyway. This option will be available only if your institute’s administrator has enabled the SMS gateway configuration of Classter, and there are enough SMS credits available in the SMS provider account.

Figure 20
- Select a message category.
- Choose a template for your message and/or insert your text in the SMS text box.
- Add a sender name in the Sender text field.
Note:
- You can check the number of characters included and the total number of available Credits.
- If you do not have available credits, the SMS message type will not be available.
- The length of a single message is 160 characters. So, a message of 420 characters will be sent and charged as three text messages.
User Preferred Method
This uses the User Preferred Method configured by each end user (i.e., student, teacher, parent, employee) in their profile. They can choose if they want to receive messages using Classter internal messaging system, SMS, or e-mail.
Note: For this option, you must fill in both the e-mail and SMS template or text boxes, since there may be some recipients that have selected the E-mail as preferred communication method and others the SMS. Therefore, the type of message sent to each user will depend on their selected preferred method of contact. (Go to Edit Profile to see how end users may configure this setting in their profile). Classter will also send internal messages to all recipients.

Figure 21
Message Category
Select message category to categorize your new message (Figure 22). Message Categories make it easier to organize/find sent messages.
Note: The list of message categories available, is defined by your admin.

Figure 22
Recipients
Add
You can select multiple recipients e.g., Students, Groups, Teachers, Employees, Relatives.
- Click on the “Add Recipients” button to add recipient(s). The recipient categories available (i.e. Students, Teachers, Parents, Employees etc.) are customized by the school administration. Thus, due to configuration restrictions, you may see some of the available types.
(Figure 23).

Figure 23
Students
The ‘Add: Students’ form will pop up (Figure 24).

Figure 24
- Filter students using the Year, Group/Class, Subject or Statuses.
Note: Each dropdown list filters the next one.
- Use the ‘Text to be searched’ field to help narrow down search results e.g., students with the letters S and T in their names.
- Click on ‘Search’ to see the filtered list of students.
- Use the search field above student list to locate a specific student.
- Click on ‘Select All’, to select all students.
- Click on ‘Remove All’, to deselect all students.
Alternatively, you can manually select multiple students, by clicking on each student name.
- Click on ‘Add’, for the selected students to be transferred to the recipients list (Figure 25).
 Figure 25
Note: For example, if you choose to send an e-mail via Classter but a recipient has no assigned email in his/her form, then Classter will automatically select internal message.
Teachers
The ‘Add: Teachers’ form will pop up (Figure 26).

Figure 26
- Filter teachers using the Year, Group/Class, Subject.(The word ‘Year’ is defined in Classter configuration (terminology settings). In your installation you may have a different name. This is a label that it is usually related to Year, Grade, Level, Program or Division of studies.)
Note: Each dropdown list filters the next one.
Use the ‘Text to be searched’ field to help narrow down search results e.g., teachers with the letters S and T in their names.
- Click on ‘Search’ to see the filtered list of teachers.
- Use the search field above student list to locate a specific teacher.
- Click on ‘Select All’, to select all teachers.
- Click on ‘Remove All’, to deselect all teachers.
Alternatively, you can manually select multiple teachers, by clicking on each teacher name.
- Click on ‘Add’, for the selected teachers to be transferred to the recipients list (Figure 25).
You can ‘Select All’, or you can ‘Search’ by name and select as shown below. As you write in the search box the first letters of the name or surname, the list is updated (Figure 27)

Figure 27
After you have repeated the procedure for all the teachers you want, delete any letters from the search box to see all the selected teachers (Figure 28).

Figure 28
- Press ‘Add’, for the selected teachers to be transferred in the recipients list.
Employees
The ‘Add: Employees’ form will pop up (Figure 26).
- Filter employees using the categories dropdown list e.g., Bus Drivers.
- Use the ‘Text to be searched’ field to help narrow down search results e.g., employees with the letters S and T in their names.
- Click on ‘Search’ to see the filtered list of employees.
- Use the search field above employees list to locate a specific employee.
- Click on ‘Select All’, to select all employees.
- Click on ‘Remove All’, to deselect all employees.
Alternatively, you can manually select multiple employees, by clicking on each employee name.
- Click on ‘Add’, for the selected employees to be transferred to the recipients list (Figure 25).

Figure 29
Relatives
- Filter relatives using the Year, Group/Class, Subject, Relative Types or Statuses.
Note: Each dropdown filters the next one (Figure 30).
- Use the ‘Text to be searched’ field to help narrow down search results e.g., relatives with the letters S and T in their names.
- Click on ‘Search’ to see the filtered list of relatives.
- Use the search field above relatives list to locate a specific relative.

Figure 30
You can ‘Select All’, or you can manually select multiple relatives. In the list you can see the name of the relative and underneath the name of the connected student(s).
Click on the ‘Add’ button, for the selected relatives to be transferred in the recipients list.
Parents
This option is an indirect way to search for parents. This means that you search for students (in a similar way as with ‘Students’), but the message will be sent to student’s parents (Figure 31, Figure 32).
- Filter relatives using the [Year], Group/Class, Subject, Relative Types or Statuses.
Note: Each dropdown filters the next one (Figure 30).
- Use the ‘Text to be searched’ field to help narrow down search results e.g., relatives with the letters S and T in their names.
- Click on ‘Search’ to see the filtered list of relatives.
- Use the search field above relatives list to locate a specific relative.

Figure 31

Figure 32
Next to each recipient name you can see whom it concerns e.g., the recipient parent is John Grixti who is the father of the selected student Roxanne Grixti, the selected message type e.g., Internal Message and the receiver’s Contact Data e.g., e-mail or number to be used.
Guardian
This option is an indirect way to search for Guardian(s). This means that you search for students (in a similar way with ‘Students’ above), but the message will be sent to student’s guardian (Figure 33, Figure 34) e.g. the selected student is Roxanne Grixti and the student’s guardian is her father John Grixti.

Figure 33

Figure 34
Note: To set a relative as a guardian, go to Students→Student List→ Student Profile and switch on the guardian option (Figure 35).
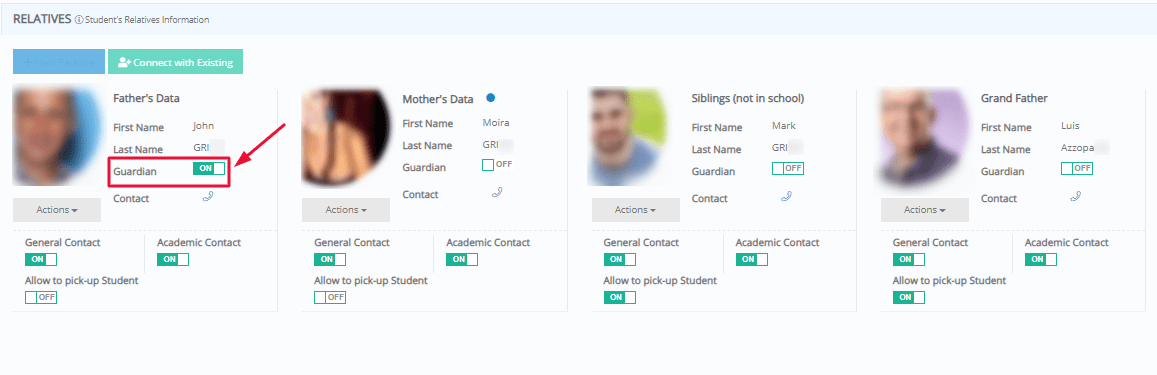
Figure 35
Financial Contact
This option is like Parents. The difference is that the message will be sent to the financial contact of the students. Therefore, if a relative is not identified in Classter as a financial contact, he/she will not receive the message (Figure 36, Figure 37).

Figure 36

Figure 37
Note: To set student’s financial contact, go to Students→ Student List→ Financial (Figure 38).
 Figure 38
General Contact
This option is like Parents. The difference is that the message will be sent to the General Contact of the student (Figure 39, Figure 40).

Figure 39

Figure 40
Note: To set student’s general contact, go to Students→ Student List→ Student Profile (Figure 41).

Figure 41
Remove
- Click on the Remove button, to remove all or selected recipients (Figure 42).

Figure 42


