

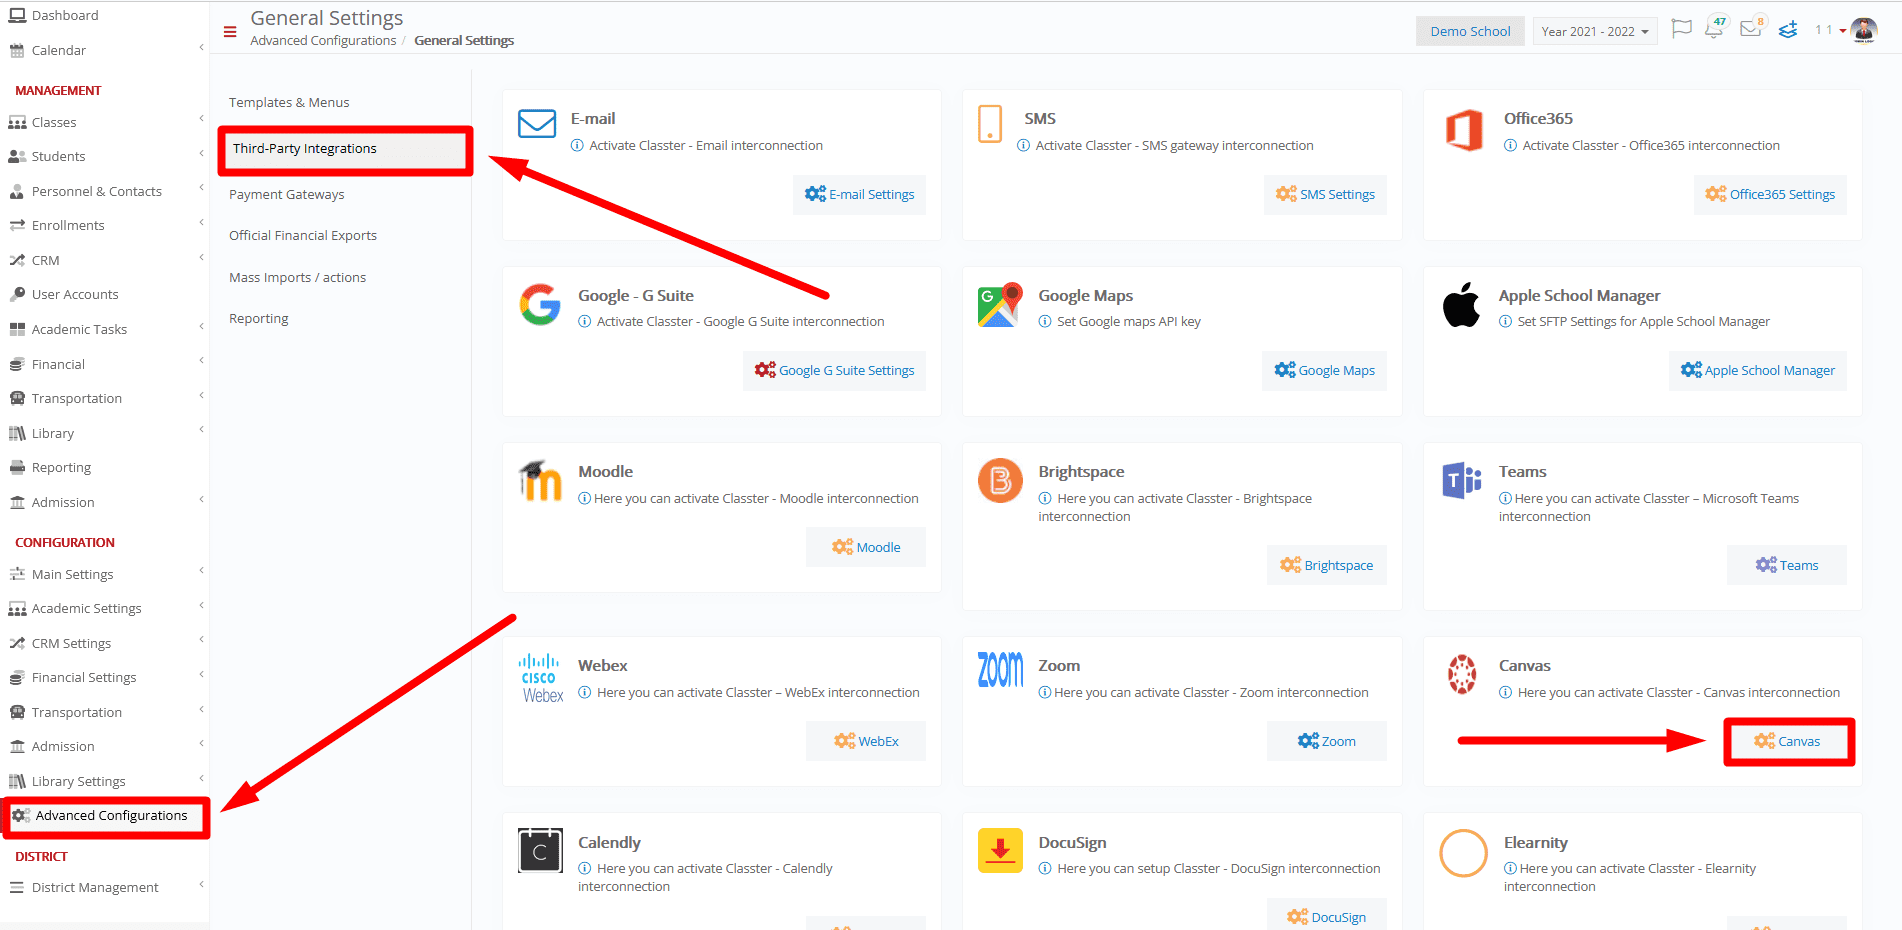
This section of the advanced configuration page allows you to create integrations, connections with third party programs such as Office 365, Google Workspace, Email Accounts MS Teams and more (Figure 19).
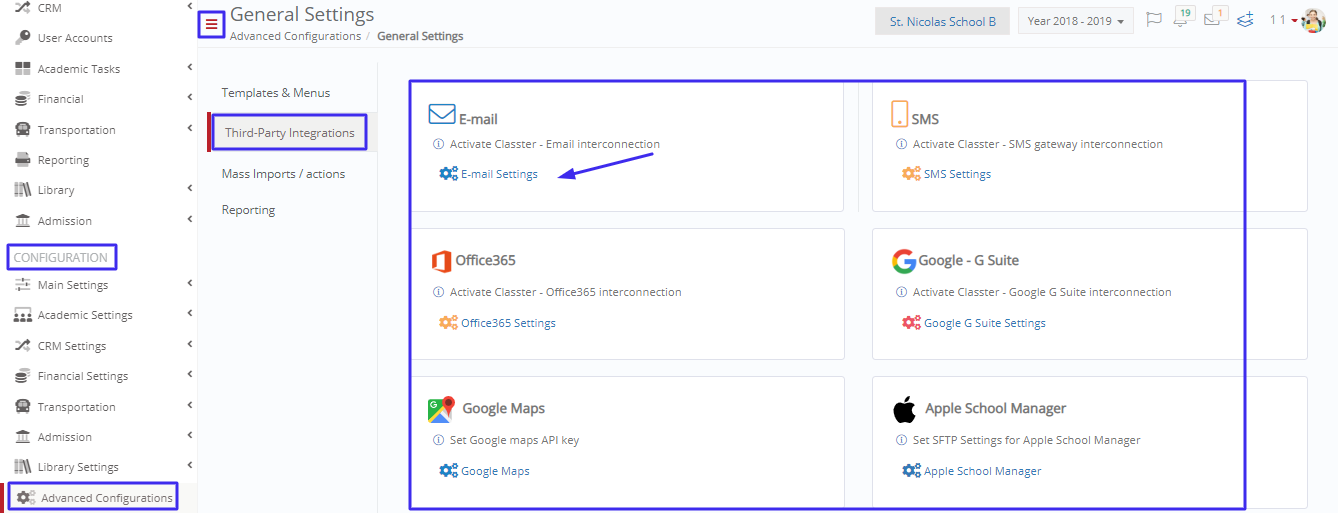
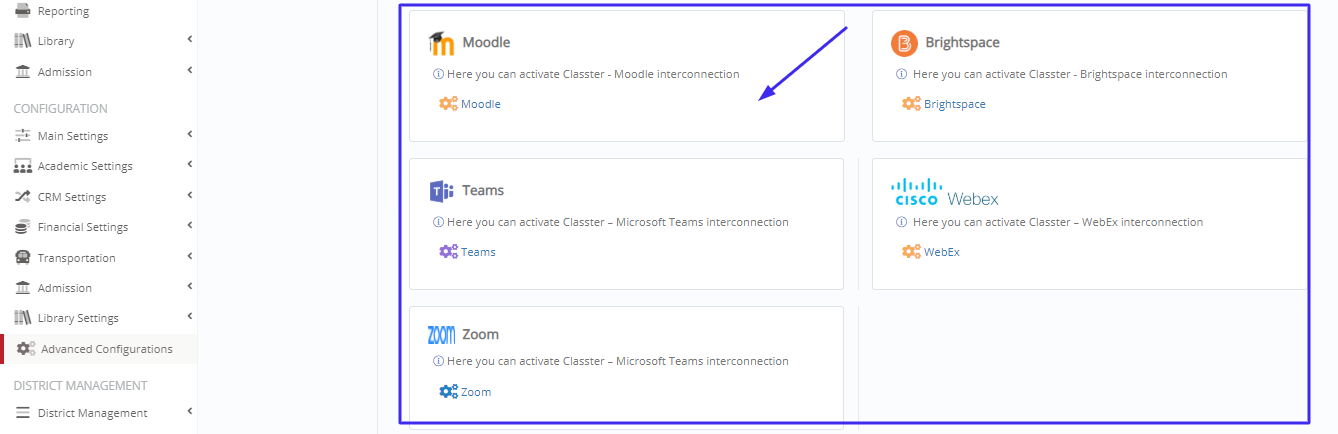 Figure 19
In this screen you can see the following (Figure 19):
- Here you can see all available integrations. These include Emails, SMS, Office 365, Google Workspace, Google Maps, Apple School Manager, Moodle, Brightspace and MS Teams, CISCO WebEx and Zoom.
- Click on the setup buttons underneath each integration to set them up.
Emails
Integrating the email service to Classter is very important in order to get communications running for your institution.
The mailing service is offered by Classter through our account with Mailgun. Find out more about Mailgun here: Mailgun Integration
The services offered by Mailgun is a transactional one, it allows for single or bulk emailing as well as automated emails. You also have the option of using your own Mailgun account. (www.mailgun.com)
Let’s take a look at how we set this up. Follow the path: Dashboard > Configuration > Advanced Configuration > Third-Party Integrations > Email Settings Button (Figure 20).
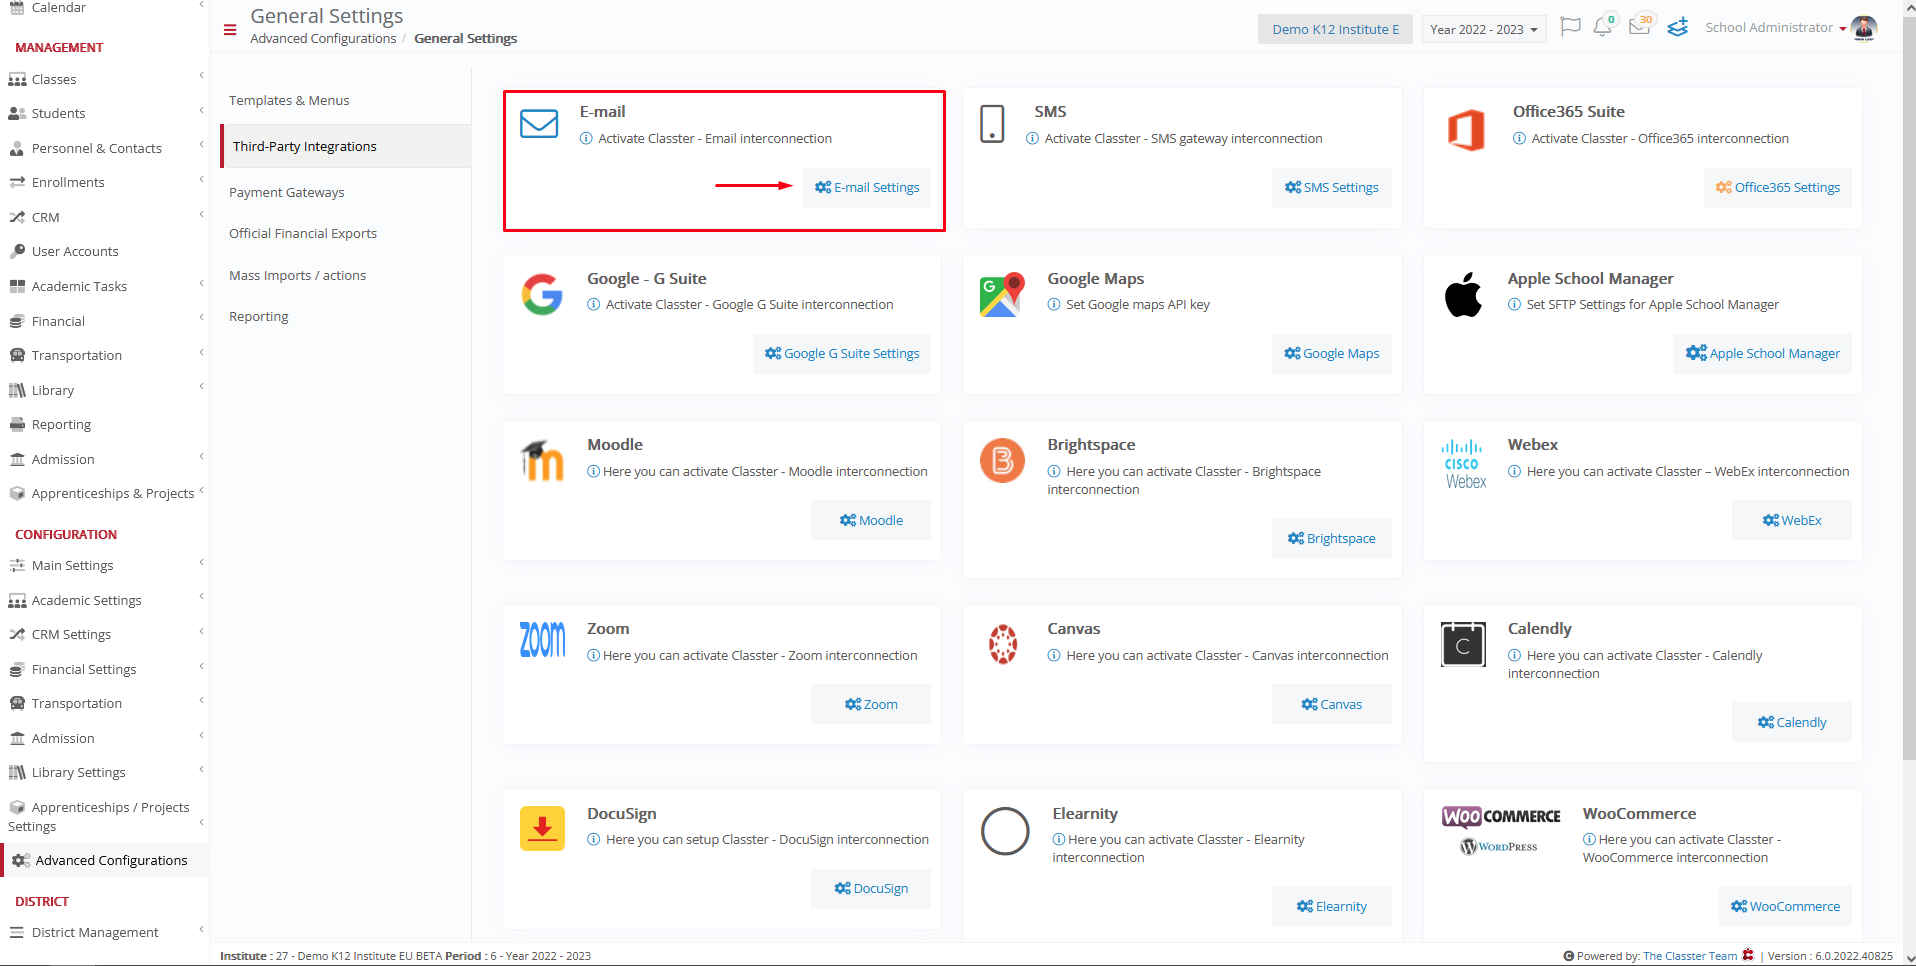
Figure 20
- Here you can see all the available integrations for Classter (Custom Integrations are available as well but are not included here).
- Click on E-mail Settings (Figure 20) to enter the integration page for the Email Service (Figure 21).
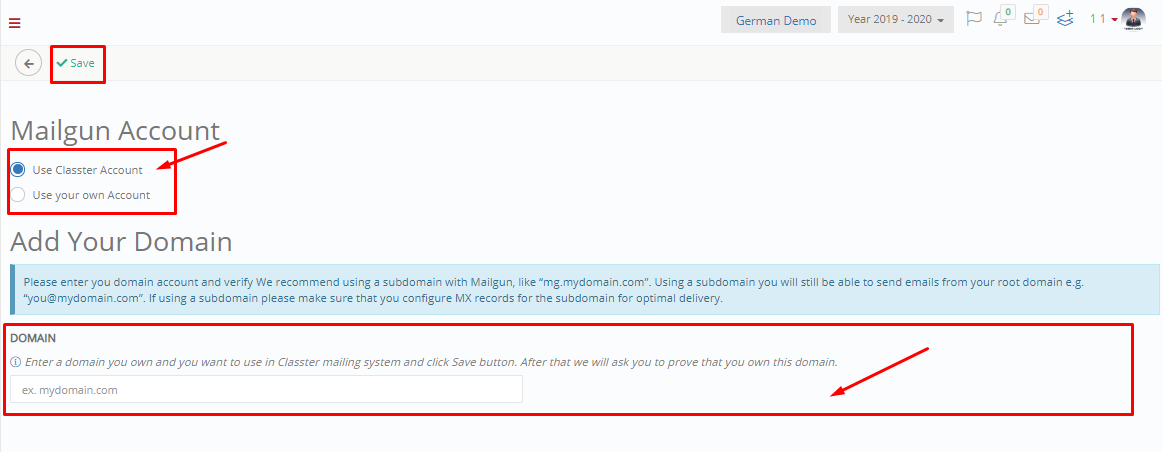
Figure 21
- On this page you can see two options. Use Classter Account (Classters Mailgun Account) which offers up to 10,000 emails a month. Use your own Account, which involves using the account you have created (Paid or Free Mailgun Account).
Note: If you choose to create and use a Mailgun Account, we do not recommend using a free account as it uses a shared IP address, and it may create issues (Figure 21).
Use Classter Account
- If you select Use Classter Account, you will need to fill in your domain name in the Domain field below, e.g. Demo.classter.com.
- Once you have entered the domain, click on the ‘Save’ button.
- You will now see the following page (Figure 22).
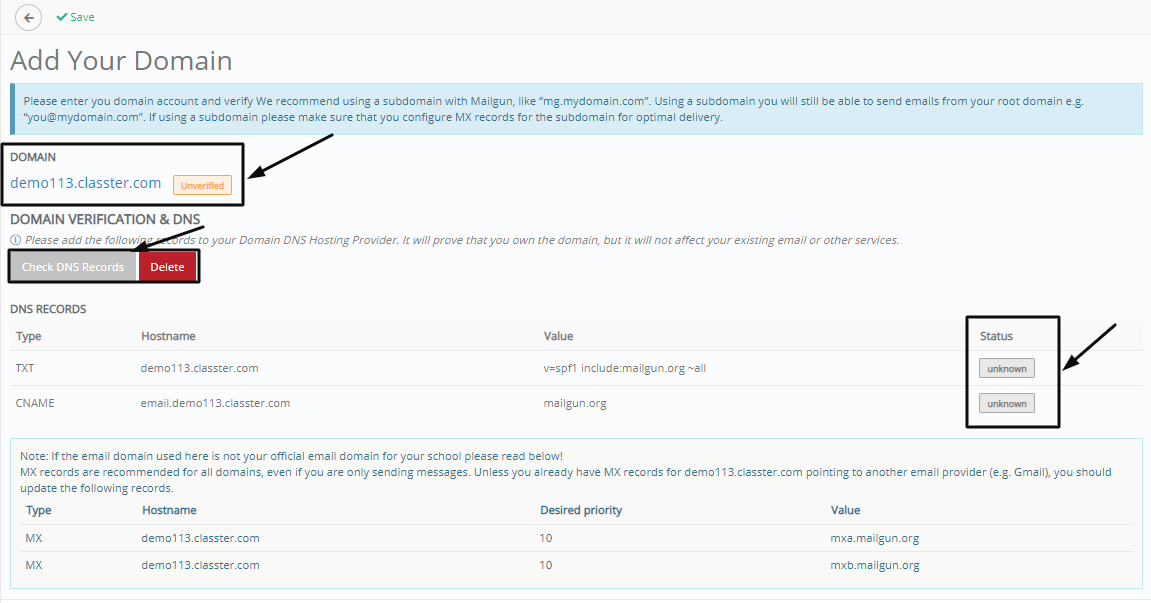
Figure 22
- Configure your Institutions (Name Server) Email-Server and then add the DNS Records you see in this page (This is done to verify the email server is indeed yours) after you have saved the actions from the previous step.
- Once your DNS records are confirmed, the status of the files will change from ‘Unknown’ to ‘Valid’ (Figure 23)

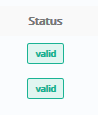
Figure 23
Lastly, once you have validated your DNS Records, you will see a new section below where you can enter the email you want to be used in the Name field and then by clicking on the default button next to the email you entered (Figure 24).
Click on “Save” to save changes (Figure 22).

Figure 24
Use your own Account
To use your own account, you follow the same steps as when you use the Classter account, with one additional step in the beginning. Go to the main page (Figure 25).
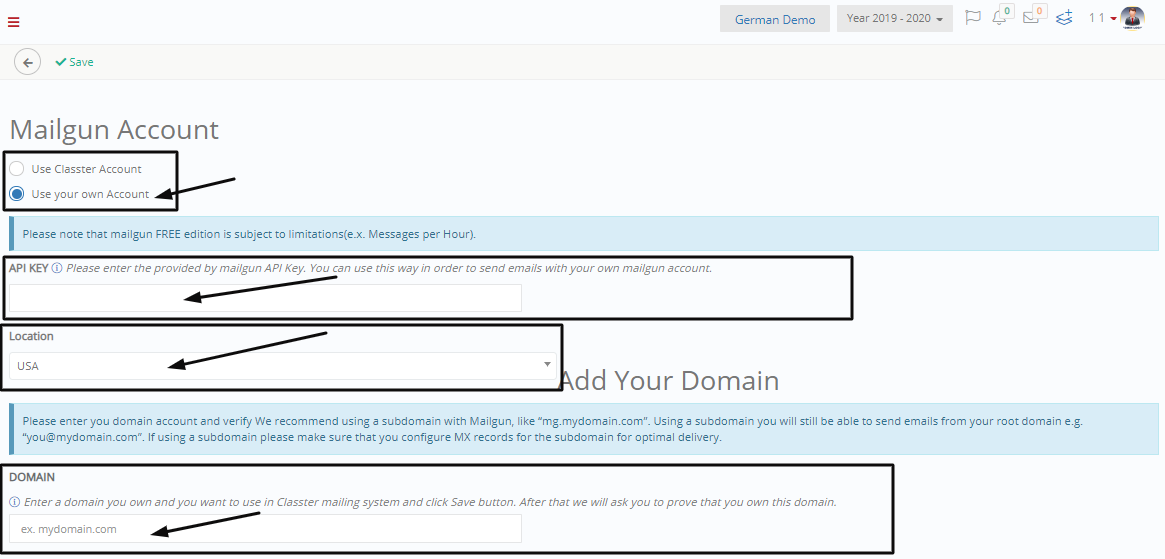
Figure 25
- Choose the ‘Use your own Account’ option (Figure 25).
- Enter your API KEY (Figure 25). You will find the API KEY and validation key from the API KEYS tab in your Mailgun Account menu (Figure 26).
- Select your location/country from the dropdown menu (Figure 25).
- Enter your Domain in the Domain field (Figure 25).
- Click on ‘Save’ button (Figure 25).
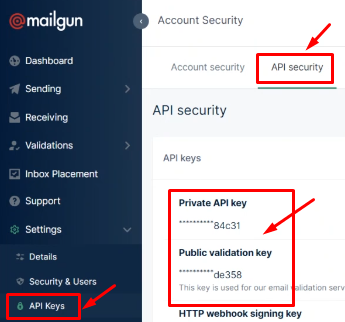
Figure 26

Figure 27
- Configure your Institution’s Email-Server (Name Server) and then add the DNS Records you see in this page (This is done to verify the email server is indeed yours) after you have saved the actions from the previous step (Figure 27).
- Once your DNS records are confirmed, the status of the files will change from ‘Unknown’ to ‘Valid’ (Figure 28).

Figure 28
Lastly, once you have validated your DNS Records, you will see a new section below where you can enter the email you want to be used in the Name field and then by clicking on the default button next to the email you entered (Figure 29).
Click on “Save” to save changes (Figure 27).

Figure 29
When you use the Message Center to send emails, you will be using your Mailgun account or Classter’s Mailgun account (Figure 30).
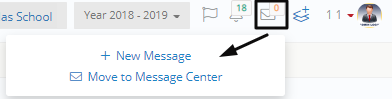
Figure 30
SMS
Classter offers the ability to send messages and notifications via SMS. To be able to use this functionality, you will need to have subscribed to an SMS provider who will provide you with SMS credits.
Once you have acquired an SMS service provider you will need to integrate that service to Classter.
To do this follow the path: Dashboard > Configuration > Advanced Configuration > Third-Party Integrations > SMS Settings (Figure 31).
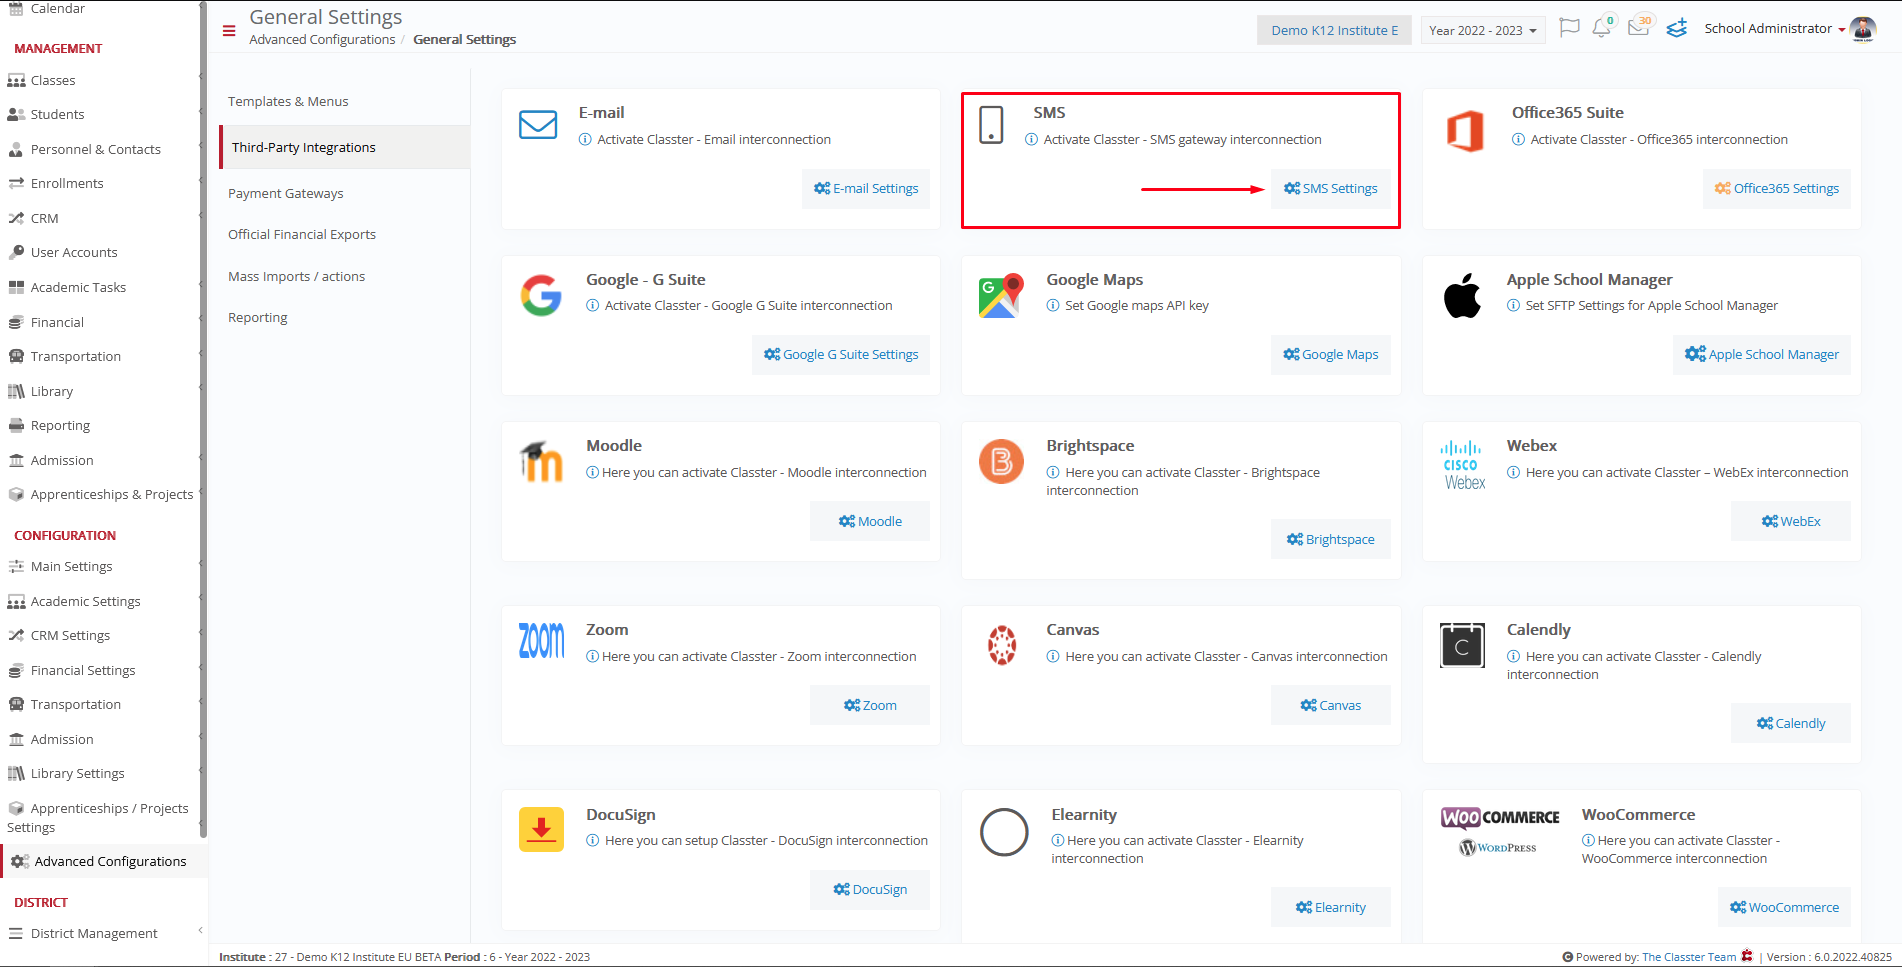 Figure 31
- Here you can see all third-party integration options.
- Click on ‘SMS Settings’ button to begin integration.
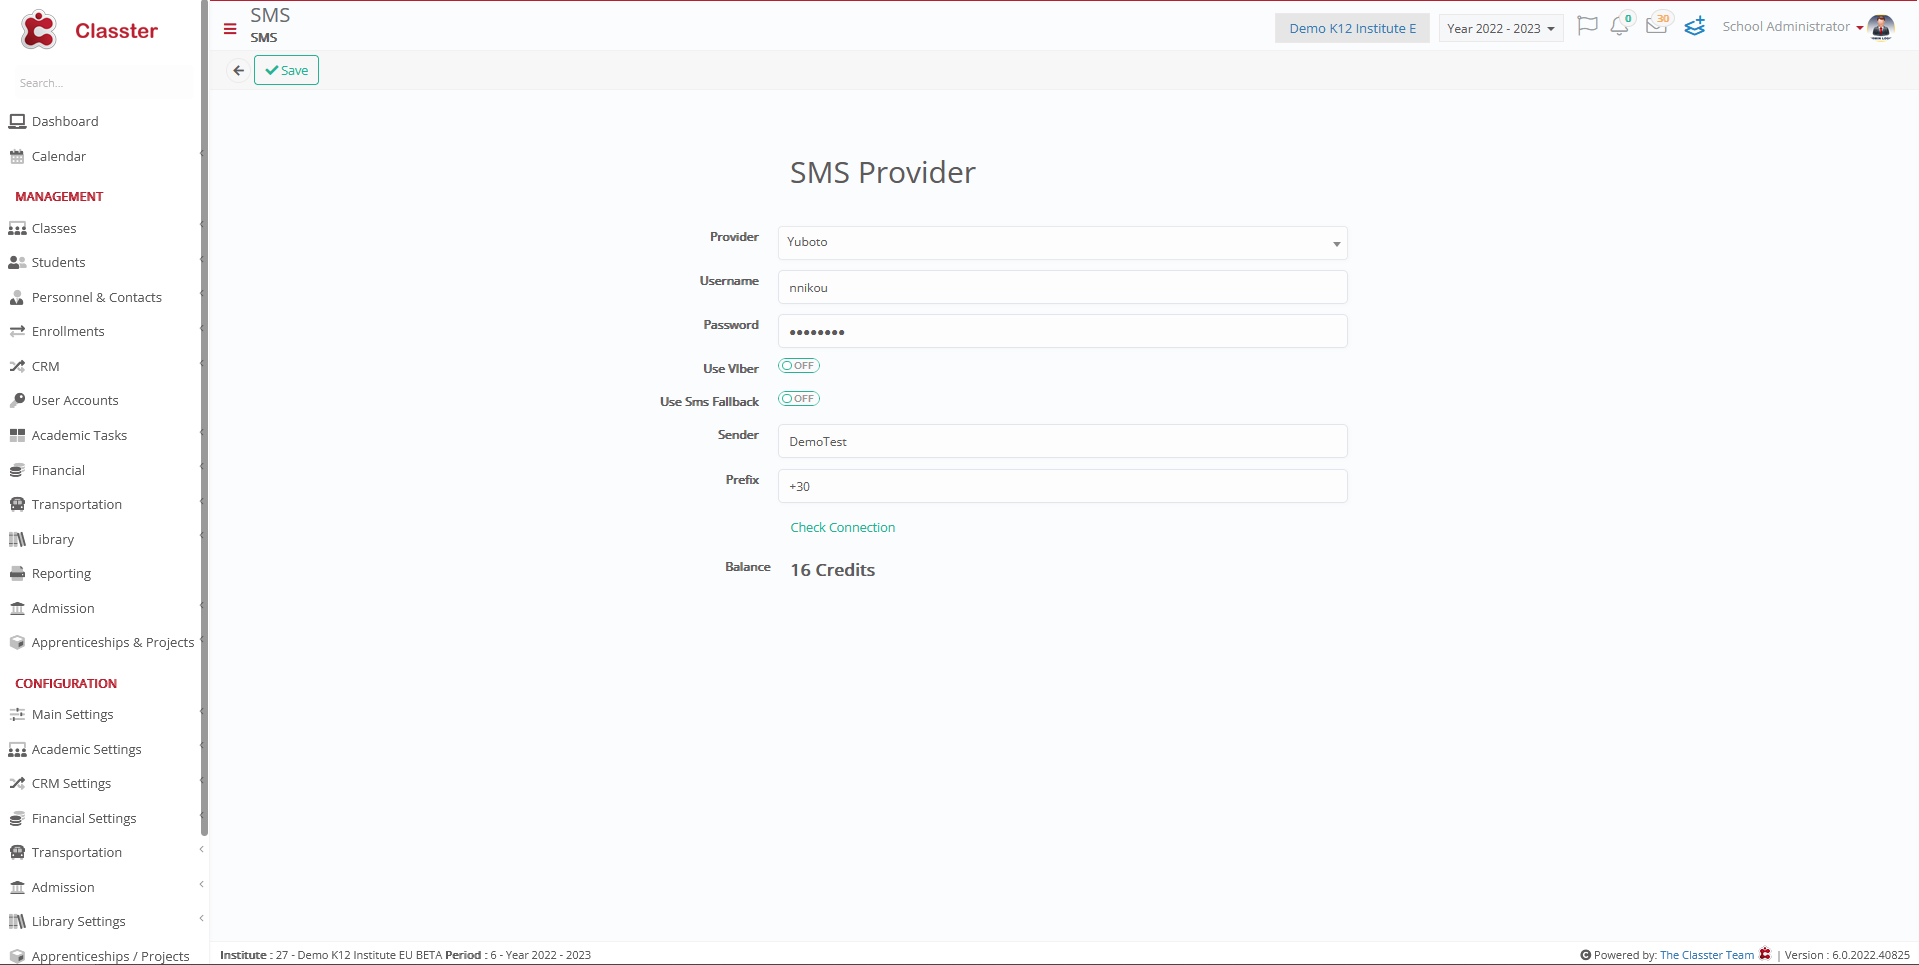
Figure 32
In the following page you will see (Figure 32):
- Select your SMS provider from the dropdown list of providers (If your provider is not on the list you need to contact Classter Support).
- Enter your SMS Provider account Username and Password. These credentials are given to you by the SMS Provider you chose. Note: depending on the SMS Provider you may be asked to enter alternative info, so instead of username and password you could be asked to enter Token & Secret Key, Application ID & Application Secret or API ID & API Password. No mater what combination you see the information will be provided by your SMS Provider.
- Enter the name that will appear as the sender in the sms messages you send through the Classter. SMS sender must be a maximum of 16 numeric characters or maximum of 12 alphanumeric characters.
- In the prefix field enter your country telephone code e.g +30 for Greece. This will help in successfully sending SMS messages to user’s mobile phones.
- Once you have completed the process, click on the ‘Save’ button.
To let the system know you want to use SMS messages to notify students, teachers etc. you need to indicate this in the Main Settings > General Settings > Basic Customizations > Notiufications (Figure 33).

Figure 33
Office 365
Classter integrates Office 365 into its system and is considered the Master, this means that when you create a user on Classter e.g Student, Teacher etc.
Classter runs a system that will automatically create the user in Office 365 (The users role is also taken into consideration when the Office 365 account is created for him).
To set up this integration possible your institution must already have a school account in Office 365. You must also posses an administrator account in Office 365.
Check out how to create a new Microsoft Education Account here: Office 365 Integration
Follow the path: Dashboard > Configuration > Advanced Configuration > Third-Party Integrations > Office 365 settings (Figure 34).
 Figure 34
- Here you can see all third-party integration options.
- Click on ‘Office 365 Settings’ button to begin integration.
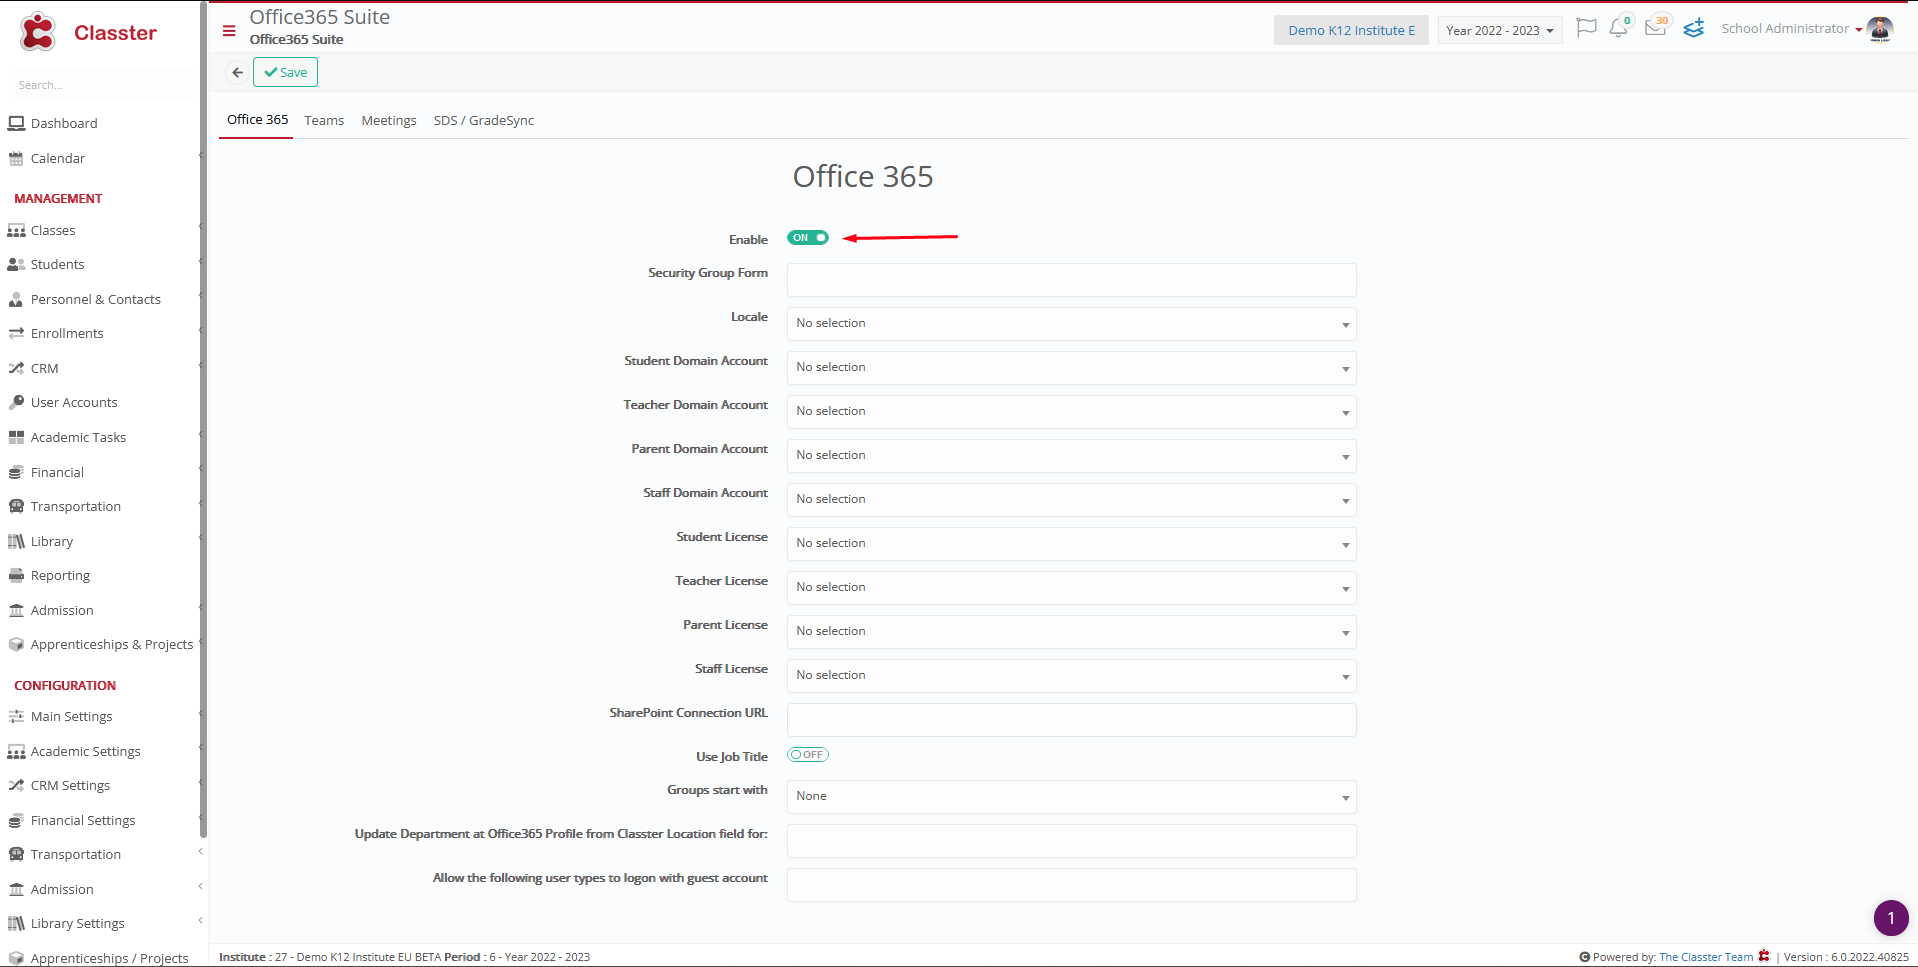
Figure 35
- Once you have clicked on the Office 365 Settings button you will see the Settings page (Figure 35)
- You will need to click on the Activate button (Figure 35) and login to your Schools Office 365 account as Admin with full configuration rights (You will be transferred to the office 365 login page).
- Once you have logged in to your School Office 365 account, you will see that the Office 365 Settings page in the Classter portal has changed (Figure 36).
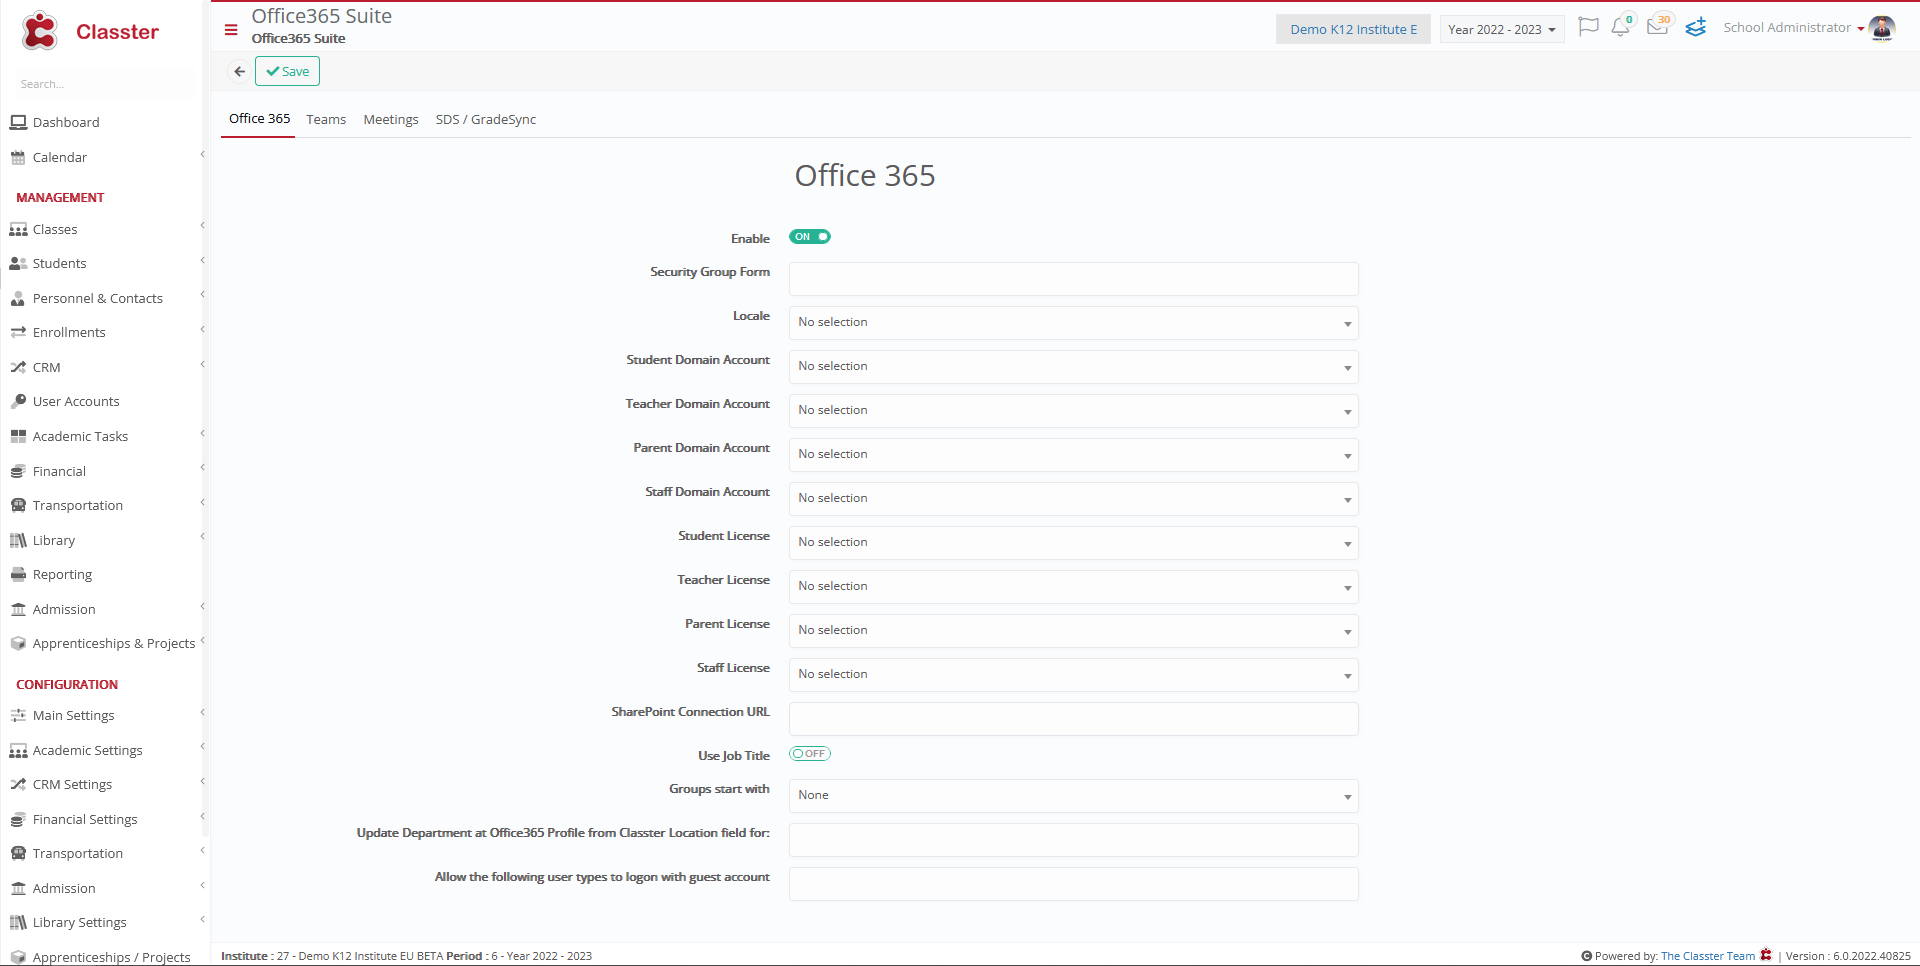
Figure 36
- In the following page, you will see (Figure 36):
- Enable option: Turn this switch on to Enable Office 365 for use with Classter.
- Security Group Form option: Here you can add security parameters for what files and capabilities different user types may have according to their enrollments on Classter. You create security groups from your School’s Office 365 Account. If you choose a security group e.g. Year, then users such as Students or Teachers will be able to access Office 365 material that is designated to them based on what Year they belong to. A Student in Year 4 would be able to see only Year 4 material.
You can create and add security groups in your School’s Office 365 account (Admin account full rights) and set security parameters on each file created, e.g. You can create a file and indicate it can be opened by Students of Year 4, from Class Y4B, attending Math Year 5 and History Year 5. Security groups can include Year, Stream, Class, Subject the system creates security groups for all of these entities a Student or Teacher is enrolled to. The suggested security groups for K12 are just the Year, for higher education Year and Subject. - Locale option: Choose a Location that will be assigned to a user upon creation to indicate where they are from, e.g. English (United Kingdom).
- Student, Teacher, Parent, Staff Domains: In each field you can enter the domain name you want each type of user to use for their O365 email account e.g Students can be “studentmyschool.com” and for Teachers can be “teachermyschool.com” or all types of users may have the same domain name, it’s your choice.
Domains are free for Students, Teachers, and Staff. If you wish to create accounts for Parents, it will come as an extra cost (Parents can create their own accounts directly from Office 365 for free). - Student, Teacher, Parent, and Staff Licenses options: In each option, you must choose the corresponding licenses you have for each user type. Licenses are given from Office 365.
For both the domains and the licenses, contact the administrator of your organization’s Office 365 account. - SharePoint URL field: Here you must add your institution’s SharePoint URL. This allows Students to connect to SharePoint through a link from their portal.
- Use Job Title option: if this is switched on, Teachers’ job titles will be set in their Office 365 account profile.
- Groups Start with option: here you can choose the form in which groups are presented, either institute code first or institute description first.
- Update Department at Office 365 Profile from Classter “Location” field for: The options currently are Students and Teachers. The Users selected here will get the Location they have on Classter in their Office 365 account profiles.
- Allow the following user types to log on with guest account: The available option here is the Relatives user type. When relatives are selected, instead of them having an Office365 account, they can log in both in Office365 as guests with their personal emails. When enabled, the parent’s license and domain fields are disabled on the integration page.
- Click on the ‘Save’ button to complete the process.
Google Maps
Here you will be able to set up your integration with Google maps in order to be able to show Institution and student addresses in the Classter platform and so you can use google maps for live tracking of busses in the transportation module.
Find out more about Google Maps integration here: Google Maps Integration
Follow the path: Dashboard > Configuration > Advanced Configuration > Third-Party Integrations > Google Maps button (Figure 37).
 Figure 37
In the following page you will see (Figure 37):
- All the available integrations.
- Click on the Google Maps button.
- Once you have clicked on Google Maps you will be transferred to the setup page (Figure 38).

Figure 38
- In the API Key field enter the google maps API Key you will find in your Google account.
- You must have an account on google.
- The API for Google Maps is not free, and you will need to create a billing account through your google account.
- Underneath the API Key field you will find a link that will open a guide for you, with instructions on how to get an api key from your google account.
MS Teams
This integration with teams allows for the creation of Classes and Subjects on the MS Teams platform.
It will give you the ability to use teams teleconferencing capabilities with Classters education management system.
Note: The Office 365 Integration is a prerequisite, so by integrating O365, MS Teams integration also becomes available.
Find out more about MS Teams integration here: Microsoft Teams Manual
To connect these to systems you need to follow the path: Dashboard > Configuration > Advanced Configuration > Third-Party Integrations > Office 365 settings > Teams button (Figure 39).
 Figure 39
- Click on the Teams button.
- Once you have clicked on Teams you will be transferred to the setup page (Figure 40).
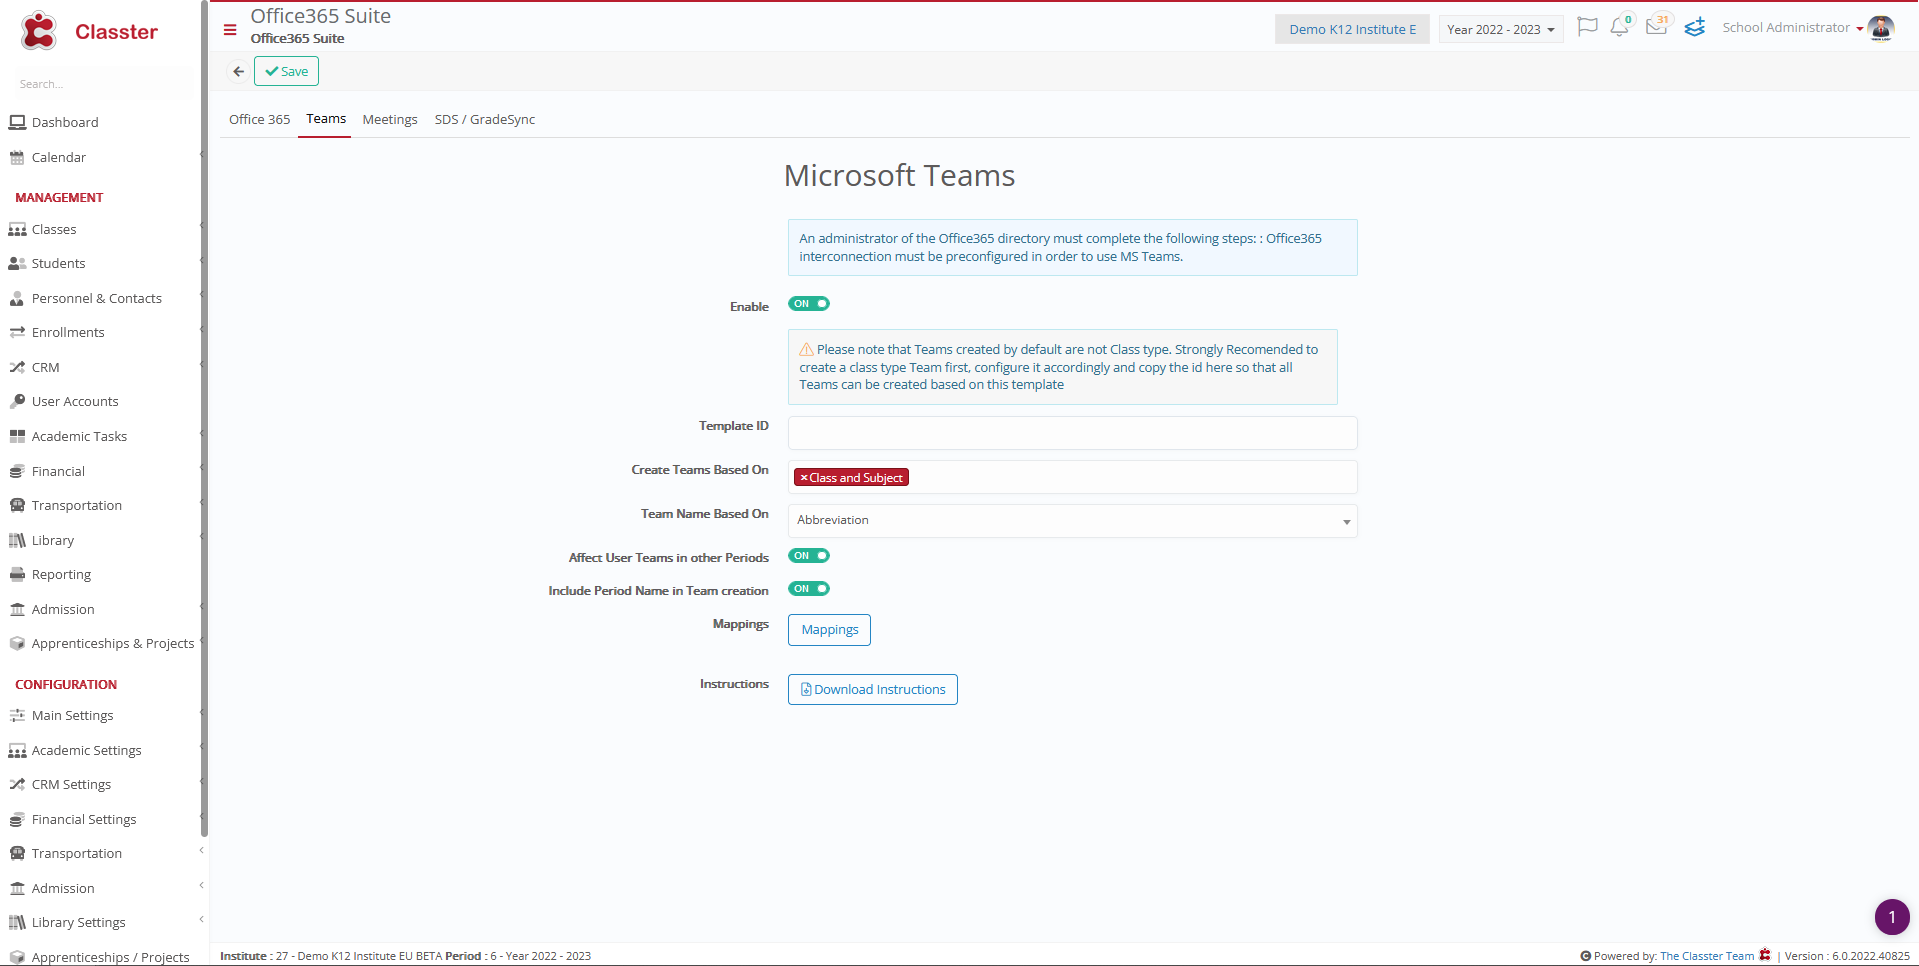
Figure 40
In the following page you will see (Figure 40):
- Enable: turn this switch on to enable the use of the Team integration.
- Client ID, Tenant ID and Client Secret fields: in these fields you need to enter the id numbers and secret you will find in your Azure, MS Teams and Office 365 accounts.
(Click the Meetings tab, this setup is required only when using MS Teams Meetings) - Template ID field: here you will need to create a class type team on MS Teams and paste the id of that team into this field. This will serve as a template for the creation of classes on Teams via Classter.
- Create Teams Based on option: Here you select the information you wish to transfer from Classter to Teams e.g Classes and Subjects. You can also choose to create either classes only or the Year only.
- Team Name Based on option: The team that is created should have a name based on the title of the class or the abbreviation of the class. Choose how you want the team to be named, based on title or abbreviation.
- You can click on the Download Instructions button, so you may see a detailed manual on how to create and then copy Client ID, Tenant ID, Client Secret and Template ID. This manual will take you through the entire process.
- Once you are done, click on the ‘Save’ button.
Moodle
The popular LMS Moodle is also an available integration with Classter. It can be set up so whatever Class, Subject, Assignment or Grade created and given to students in Classter is at the same time created in Moodle.
Each student and teacher created in Classter is then available in Moodle. Keep in mind that this integration only shares data one way. Updates made in Moodle do not affect the Database of Classter. www.moodle.com
Find out more about Moodle integration here: Moodle Integration
To proceed with the integration setup please follow the path: Dashboard > Configuration > Advanced Configuration > Third-Party Integrations > Moodle (Figure 41).
 Figure 41
- All the available integrations.
- Click on the Moodle button.
- Once you have clicked on Moodle you will be transferred to the setup page (Figure 42).
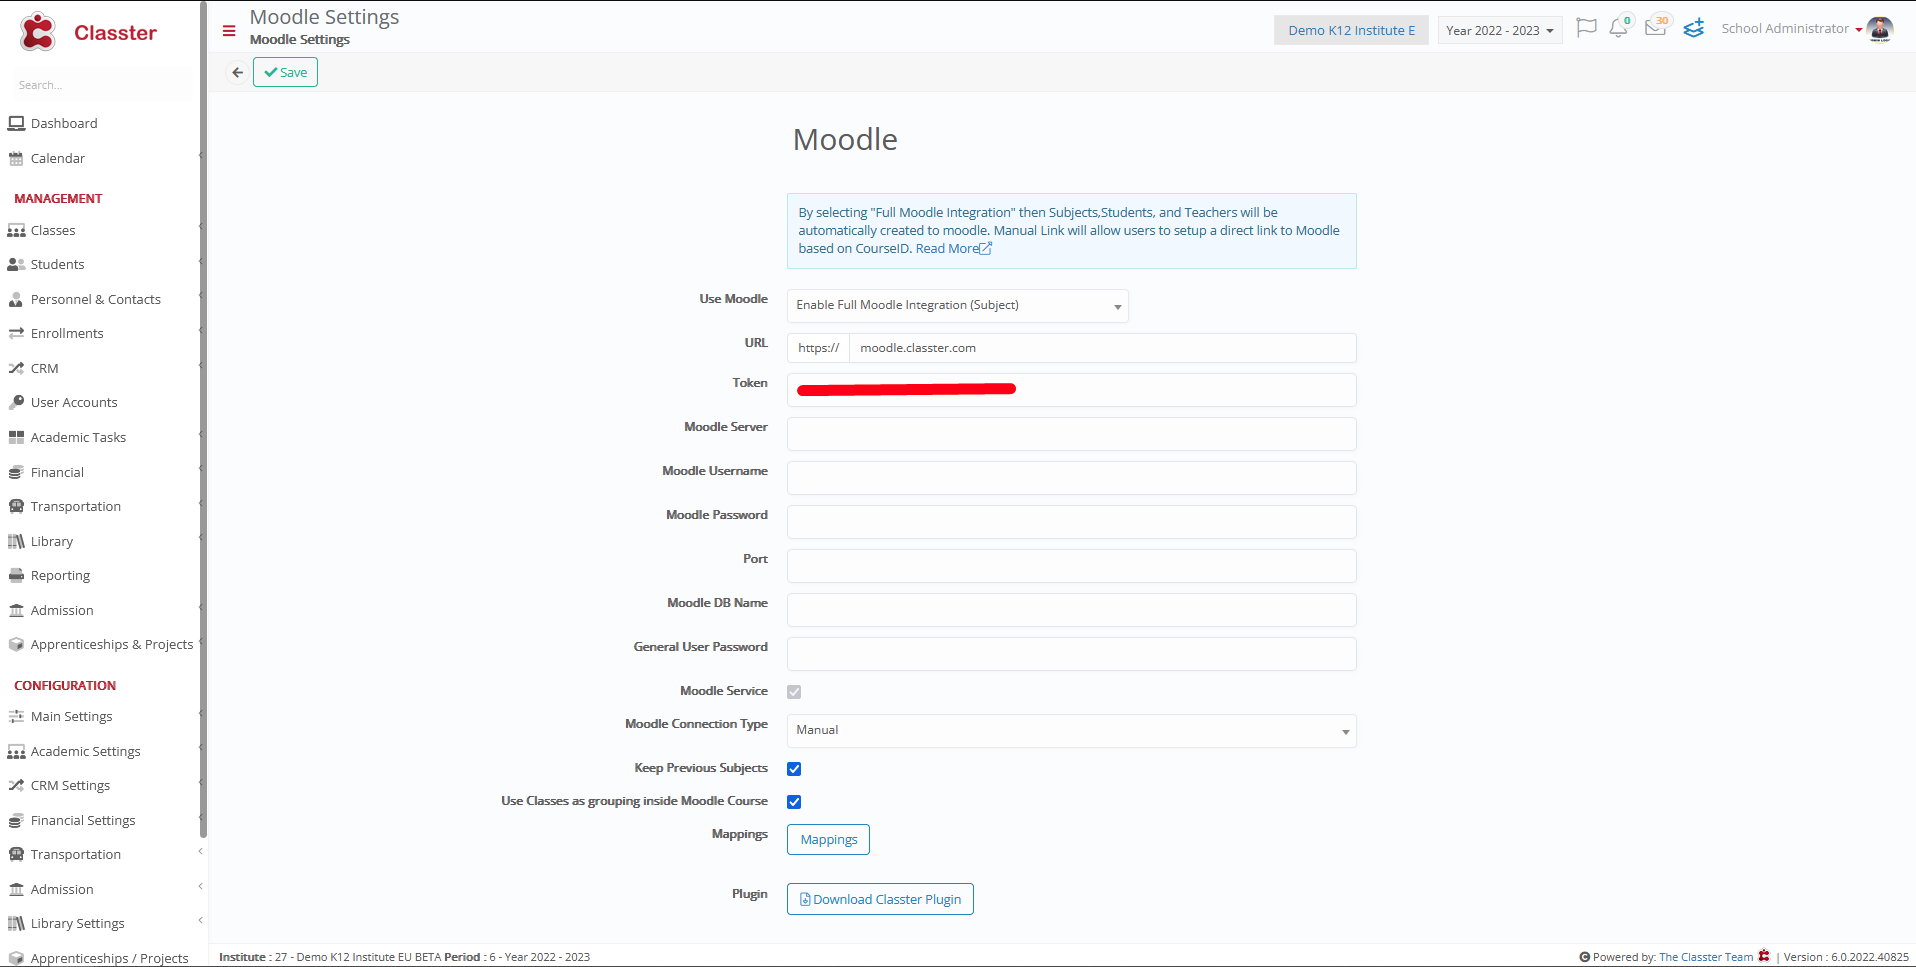
Figure 42
In the following page you will see (Figure 42):
Here you can setup the options to enable the integration of Moodle to Classter. In the use Moodle field select the option Enable Full Moodle Integration. Once this is done you need to select the version of Moodle your institution is using. The available versions of Moodle are 1.9, 2.32, 3, 3.1.
We will not describe the connection between Moodle 1.9 and Classter because Moodle v1.9 is a Legacy version and rarely used now a days.
Choose one of the versions of Moodle (whichever your institution uses) e.g version 3 . Once you have selected a Moodle version you will notice that most of the fields will turn a grey color and will be un-editable. The fields that are now available are the following:
- URL filed: In the field enter the url address of your institutions Moodle account e.g http://previewmoodle.classter.com.
- Use Moodle dropdown list: From this dropdown list you can see three options available. The first option which is the default one is Do not use Moodle e.g Moodle will not be used all fields remain grey and un-editable. The second option is ‘Enable Full Moodle Integration’, this is the option we recommend for you. The third option ‘Enable Moodle Manual Links’ is not yet operational. In this example we selected Enable Full Moodle Integration in order to create every Class, Teacher, Student or Class material that we create on Classter in Moodle as well.
- Token field: here you need to place the Token code you will receive from in your Moodle Account options. Copy the Token Code and paste it into this field.
- Keep Previous Subjects checkbox: By clicking on this checkbox you enable your Moodle classes/subjects to retain information from Classter classes/subjects even when there is a change in the academic year e.g when you move from academic year 2019-2020 to 2020-2021.
- Plugin button: Next to the Plugin option, you will find the Download Classter Plugin button. Click on the button to download the plugin you need to install in order to finish the integration with Moodle.
- Click on ‘Save’ once you are done.
- This process if followed for all versions of Moodle except version 1.9!
Brightspace
For the initial integration with brightspace you will need to own a brightspace account.
Once you create a brightspace account (www.brightspace.com) follow the path: Dashboard > Configuration > Advanced Configuration > Third-Party Integrations > Brightspace button (Figure 43).
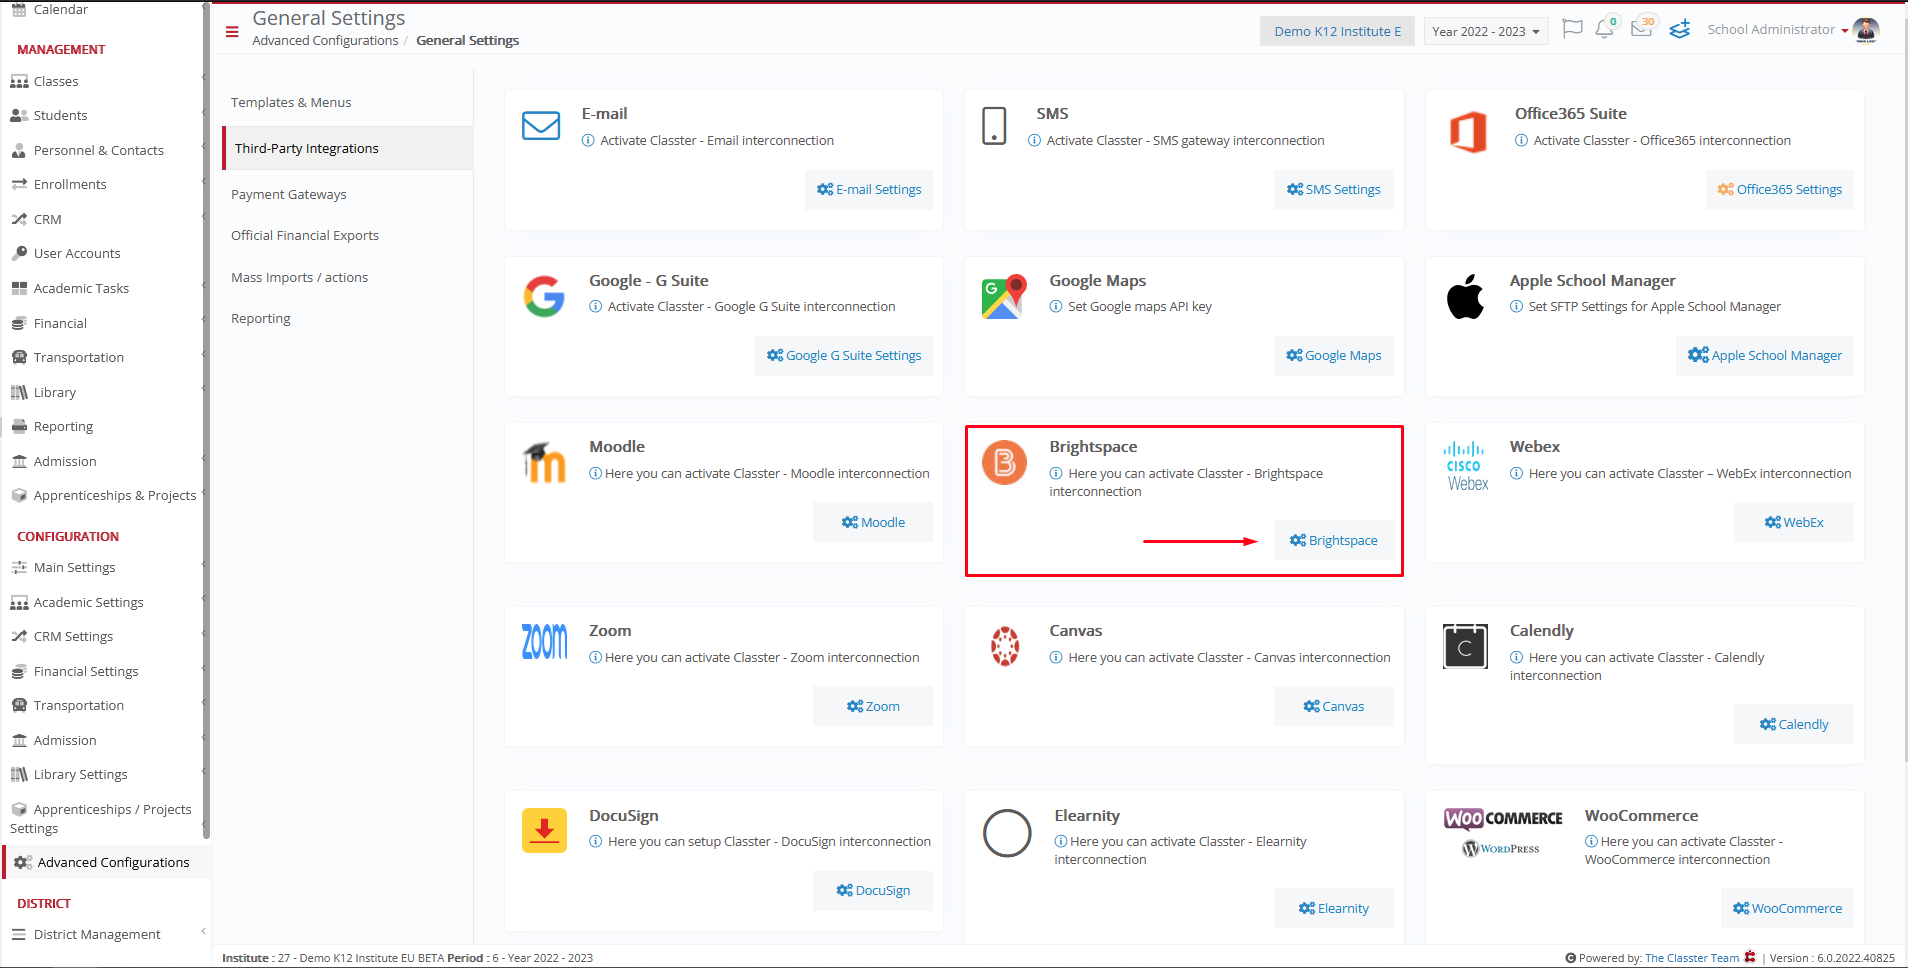 Figure 43
- All the available integrations.
- Click on the Brightspace button.
- Once you have clicked on Brightspace you will be transferred to the setup page (Figure 44).
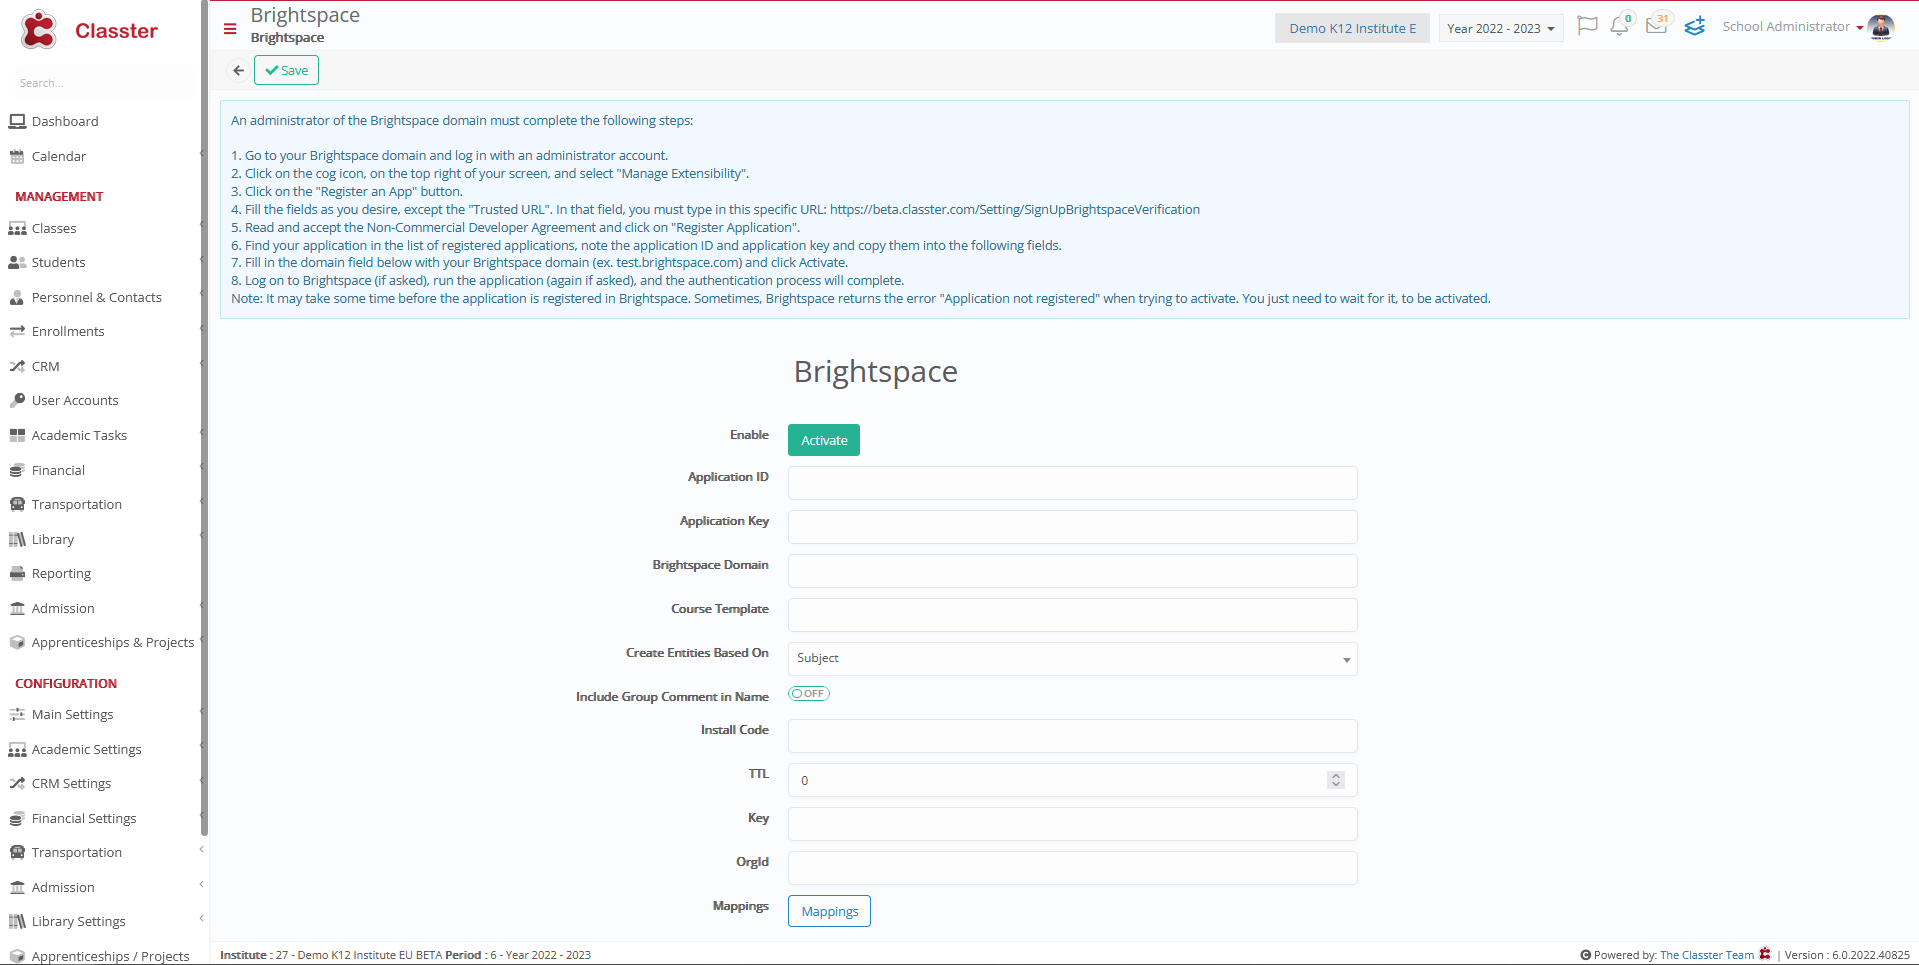
Figure 44
In the following page you will see (Figure 44):
- The fields you see are all required to set up the connection between Classter and Brightspace.
- You will find the application ID and application Key in the Manage Extensibility page of your Brightspace account. Copy and past the ID and Key here.
- Enter your brightspace domain name in the field e.g myschool.brightspace.com.
- Enter a course template link in this field so the system has a sample course it will create on brightspace every time you create a new course on Classter.
- Click on ‘Save’ when all fields are filled.
Brightspace
(Figure 45):
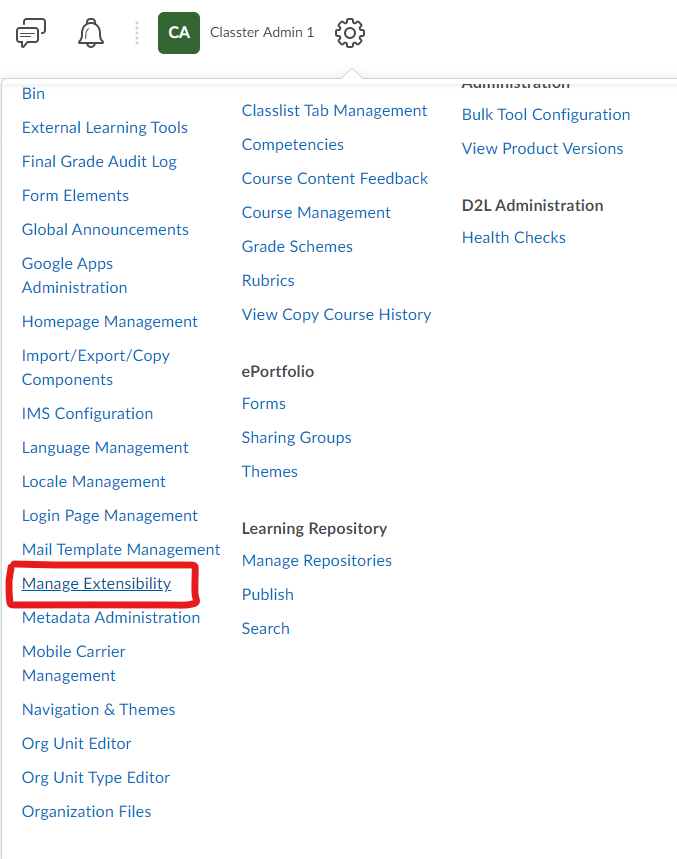
Figure 45
- From the settings menu on your Brightspace page, click on the ‘Manage Extensibility’ button. There you need to follow the instructions and you will set up an API for your institution on Brightspace and you will enable the application for use with Classter (Figure 46).

Figure 46
- Here you will find the Application ID and Key you need to enter in the fields in Figure 44.
Note: Brightspace does not have a free account and you will need to pay for a full license.
Classters database is not changed if you make changes on your Brightspace classes.
Brightspace classes are updated with content based on the content you enter on Classter classes.
A detailed guide to the process will be added to the Brightspace integration page on Classter.
CISCO WebEx
You can set up an integration with WebEx in order for your institution to apply a synchronous method of teaching for your students and teachers.
The integration with CISCO WebEx will require you to have a paid version of the CISCO WebEx platform.
Find out more about WebEx integration here: WebEx Integration
To begin the process of connecting Classter with WebEx you will need to follow the path: Dashboard > Configuration > Advanced Configuration > Third-Party Integrations > WebEx button (Figure 46a).
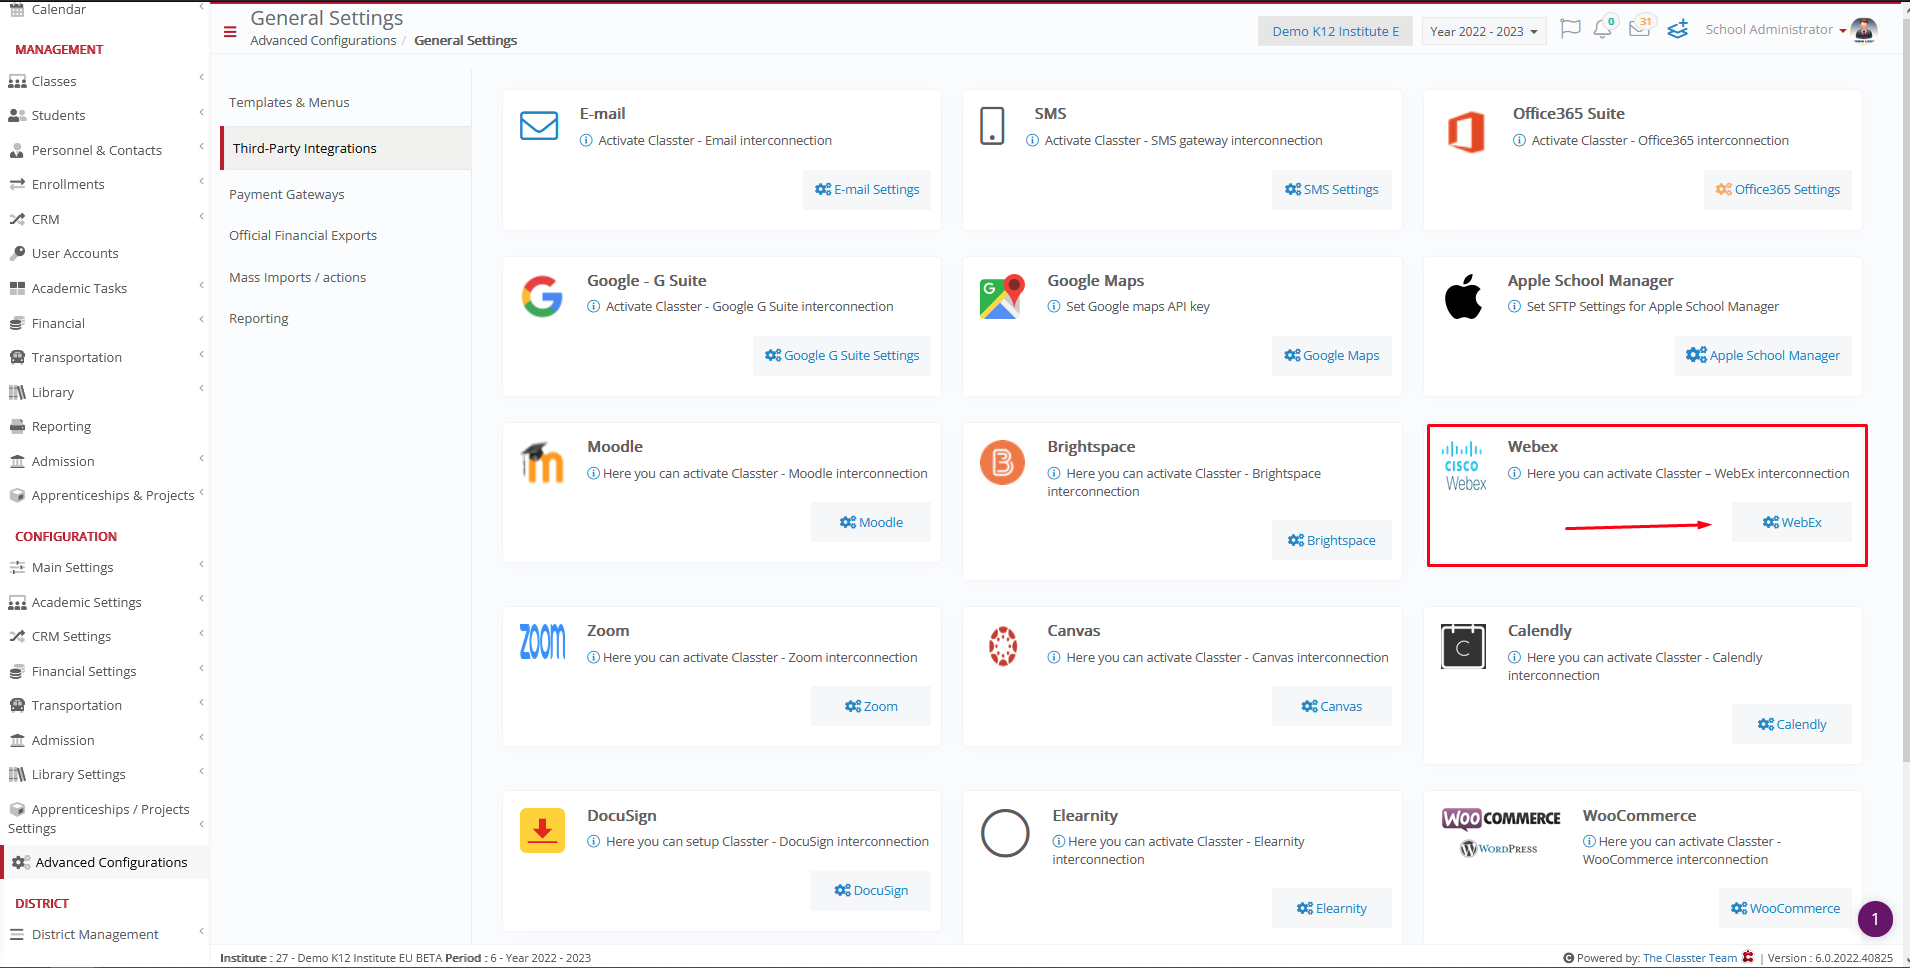 Figure 46a
- Once you reach the advanced configuration page and click on the Third-party integrations tab, you will see the WebEx button underneath the CISCO WebEx section.
- Click on the WebEx button, you will be transferred to the WebEx configuration page (Figure 46b).
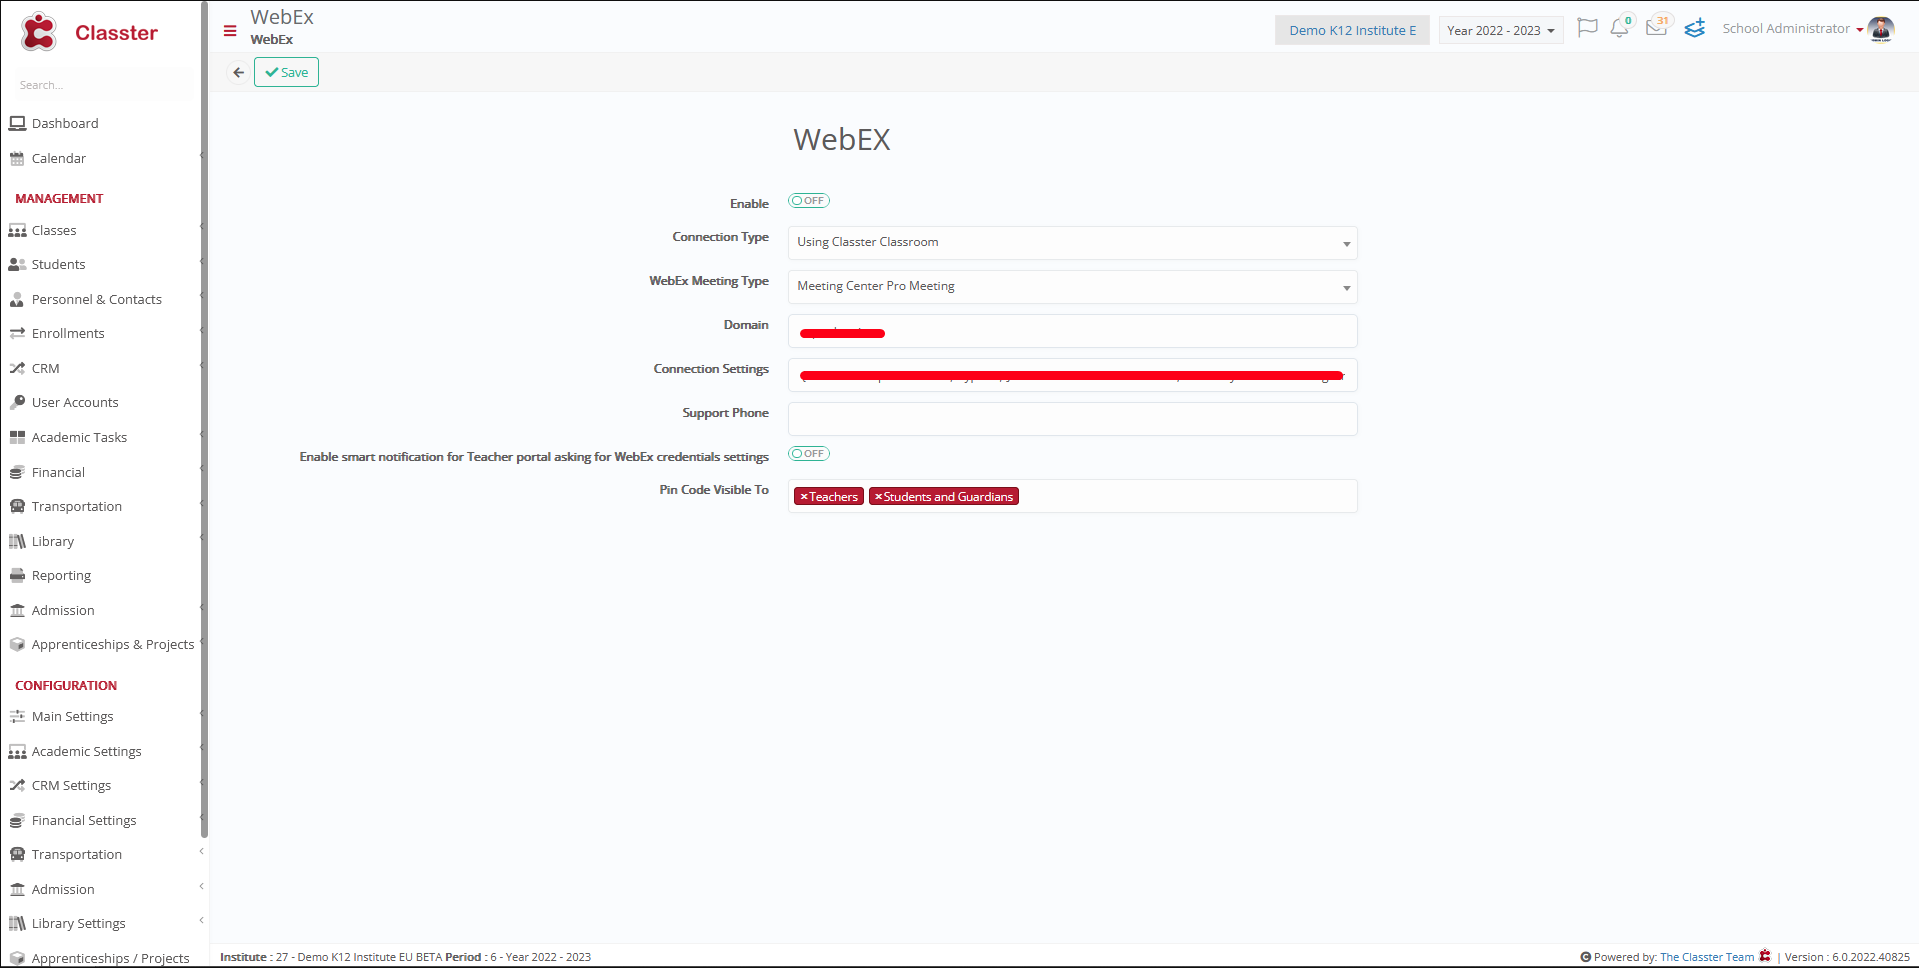
Figure 46b
WebEx Configuration page (Figure 46b):
- Enable switch: turn the enable switch on to activate the process of integration. If it is turned off the connection will be disabled.
- Connection Type dropdown list: There are three available connection types. Using Classter Classroom, Using Teacher Personal Account and Using Plain Personal Account. We will be looking into each option further on down (*). Note: Only the two first options communicate with the WebEx API.
- WebEx Meeting Type dropdown option: Here you will be able to see the various types of WebEx meetings, these types are made available by WebEx. Choose the type you prefer. Note: You can learn more about the differences between the meeting types in your WebEx account.
- Domain field: Enter a domain name for your account e.g The name of the institution St.Nicolas School.
- Connection Settings: This field is auto filled once you save the integration. It basically is a code describing all the connections and choices you made. Note: Connection Settings code that appears is based on data from WebEx meeting Type – Domain- Support Phone.
- Support Phone field: Enter the telephone number for WebEx support that is provided to you by WebEx.
- ‘Enable smart notification for Teacher portal asking for WebEx credentials settings’ switch: If you turn on this switch then the system will automatically notify teachers who have not filled in their personal WebEx account in their profile page. The notification will appear in the dashboard as a popup (Example A).
Click on the ‘Save’ button to save your additions/changes for WebEx Integration.
Example A:
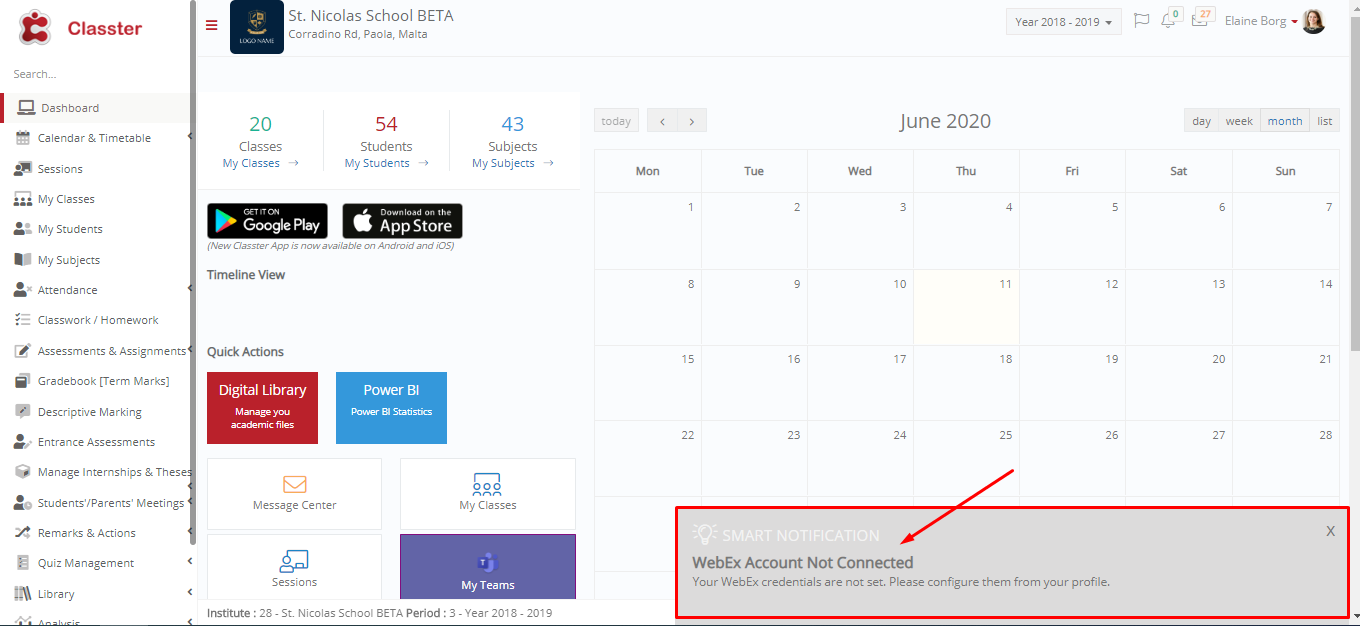 Example A
(*) Connection Types:
- Using Classter Classroom: If you choose this option then, you will need to have created a classroom (from ConfigurationAcademic SettingsTimetableClassrooms). The system will take the credentials directly from that specific classroom and every time that classroom is used for a session, a link to a WebEx classroom will be included. See the following Example 1.

Example 1
- This section in the classroom creation page is connected to the connection type option ‘Using a Classter Classroom’. Note: You will be able to see WebEx as a provider if you have saved this connection type in the WebEx Integration page.
- In the classroom you create, add the provider ‘WebEx’ then the Username and Password of your WebEx account.
- Every time someone plans a session using this classroom, they will be able to have a WebEx session.
- Make sure to ‘Save’ your additions to the classroom.
Using Teachers Personal Account
This connection option is connected with the teacher’s profile page.
Once you have selected and saved this connection type, the teacher will need to enter his/her WebEx credentials in her Classter Profile page. See Example 2.
Follow the Path: Dashboard > Actions > Menu > Button with user Photo > My Profile Button.
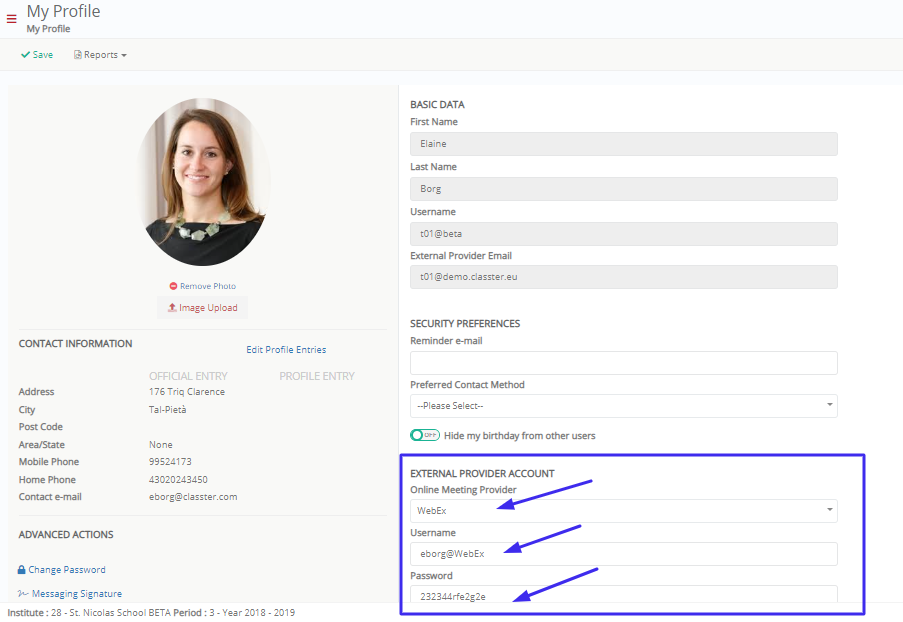
Example 2
- The External Provider section of the my profile (Teacher) page is connected to with the ‘Using Teachers Personal Account’ connection type in the WebEx integration page.
- In this page, add the external provider ‘WebEx’ then the Username and Password of the teachers personal WebEx account.
- Every time the teacher creates a session, it will be a WebEx session (link will be provided to a WebEx classroom).
- Make sure to ‘Save’ your additions in the My Profile page.
Using Plain Personal Account
You follow the same process as you did with the previous connection type.
The difference is that the ‘Using Plain Personal Account’ is that the system does not connect directly to the WebEx API, but you use a specific link from WebEx in all sessions.
Zoom
Zoom is a leading platform for online meetings. Classter has an integration with Zoom for the purpose of providing online classes.
Find out more about Zoom integration here: Zoom Integration
You will require a paid version of Zoom for this process. To configure this integration, you will need to follow the path: Dashboard > Configuration > Advanced Configuration > Third-Party Integrations > Zoom button (Figure 47).
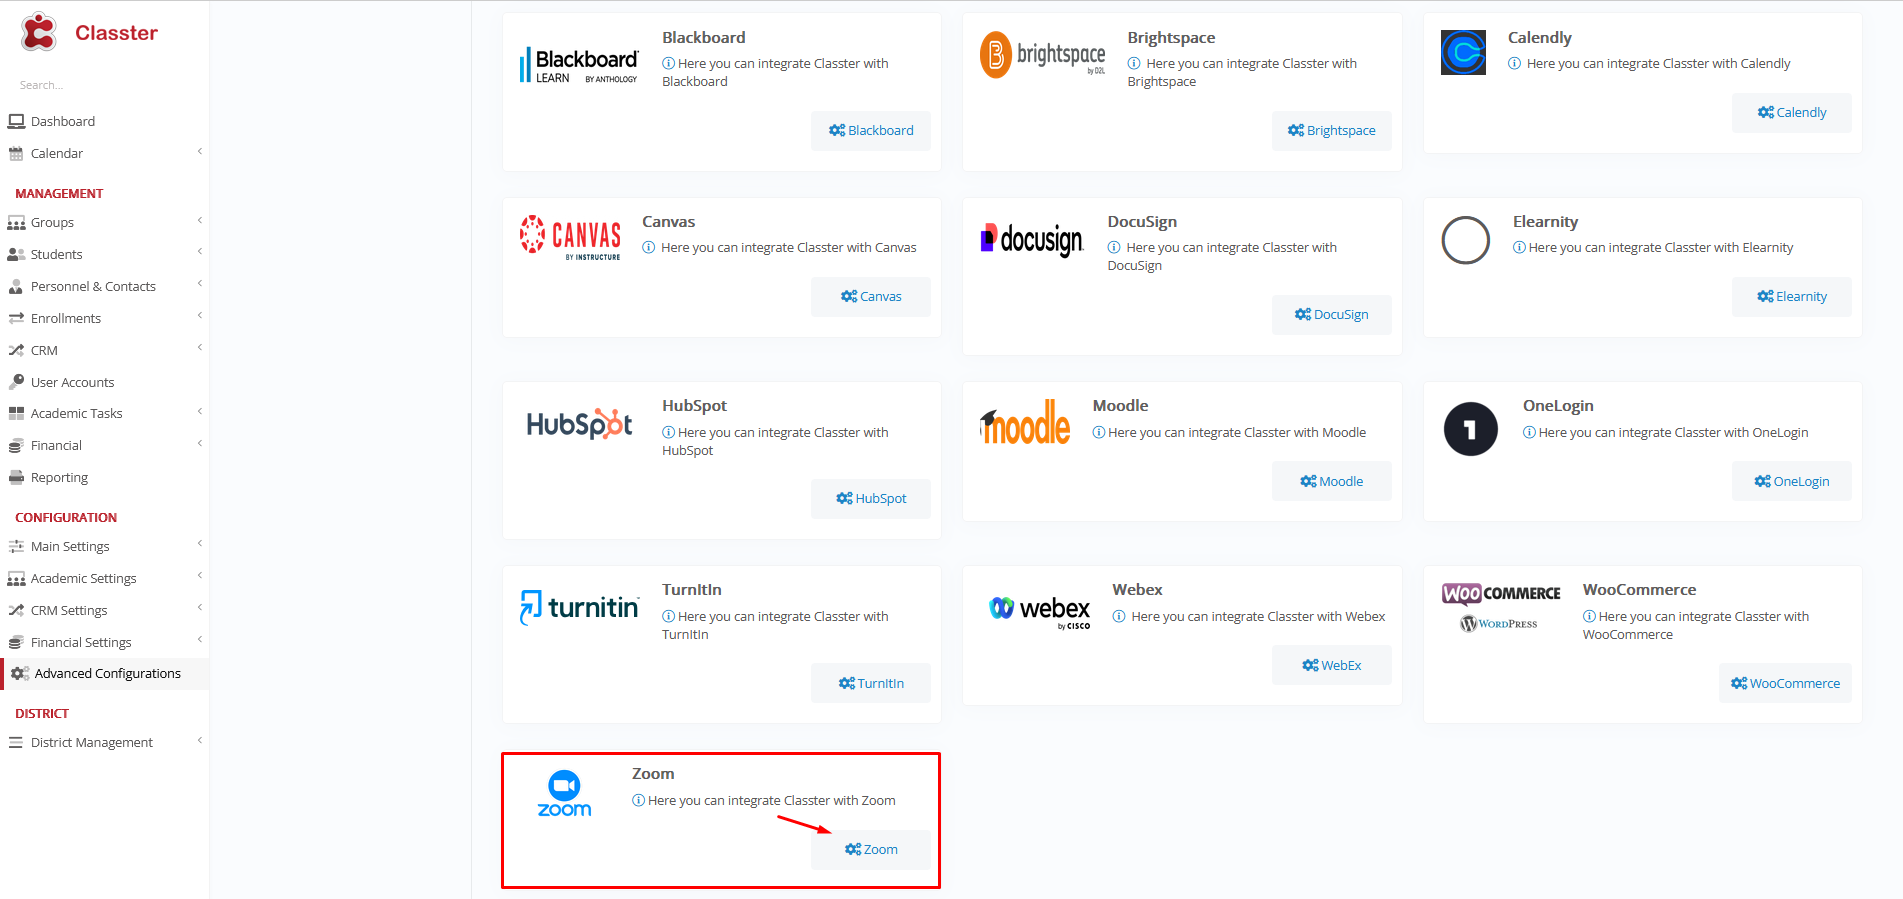
Figure 47
- Click on the Zoom button you see under the Zoom section description.
- Once you have clicked on the Zoom button, you will be transferred to the Zoom Integration page (Figure 47a).
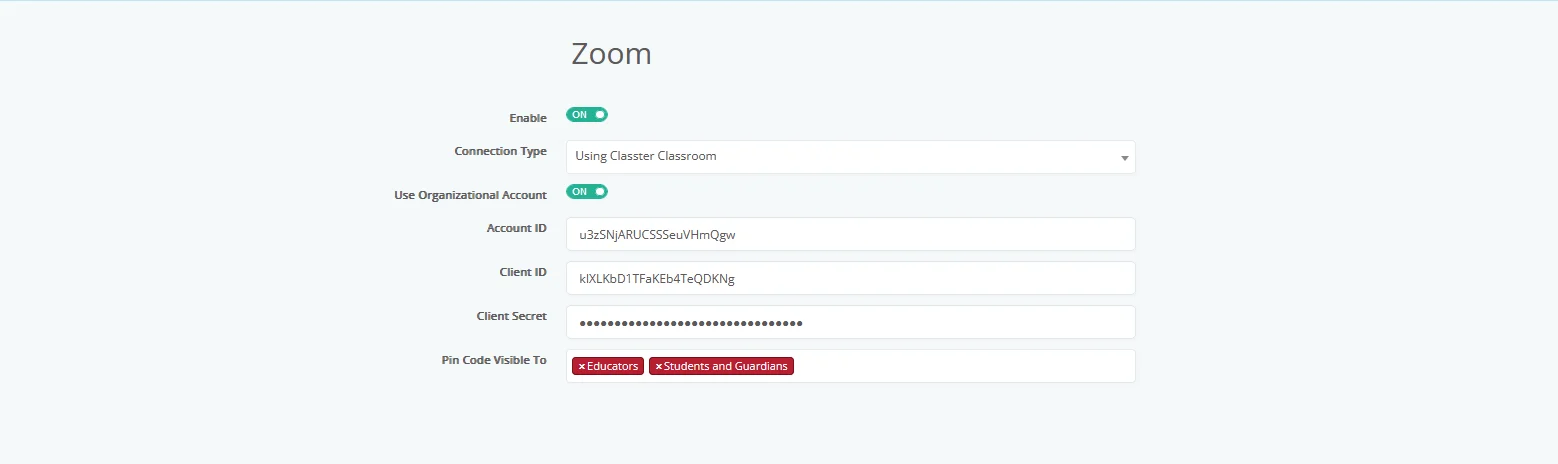
Figure 47a
Zoom Integration Page (Figure 47a):
- Enable: turn the enable switch on to activate the process of integration. If it is turned off the connection will be disabled.
- Connection Type dropdown list: There are four available connection types.
Using Classter Classroom, Using Teacher Personal Account, Using Plain Personal Account and Using Classter Class. - Use Organizational Account switch: If this option is turned to on, the first thing you will see, is three additional fields appearing ‘Account ID’, ‘Client ID’ and ‘Client Secret’.
This option allows for the use of an organizational zoom account to be used for the creation of Zoom online classrooms when creating sessions for subjects/classes. - Pin Code Visible To: If this option is enabled, then Zoom pin code will be visible to all Educators or other selected User Type options.
Google Workspace
You can integrate Classter with Google’s Workspace, to provide your users with gmail accounts according to their user types e.g Student, Teacher or Employee emails.
Find out more about Google Workspace and Google Classrooms integration here: Google Workspace Integration
You will also have access to the Google Drive, Calendar, Forms, Docs, Sheets and Slides as well as the Jamboard.
Let’s discover together how can Classter integrate with Google Workspace.
First, you will need a Google Workspace account.
To create one, visit the official Google website by clicking here.
Step 1
Click on the “Get Started” button and fill in your details in the next steps. (Figure 1)

Figure 1
Step 2
If you have carefully completed the registration process, you will be taken to the Admin Console home page.
Go to the Security > Access and data control > API Controls menu. (Figure 2)

Figure 2
Step 3
Press “MANAGE DOMAIN WIDE DELEGATION” and then “Add new“.
(Figures 3 & 4)

Figure 3

Figure 4
Step 4
Fill in the following information.
- Type “105665636440034667261” in the “Client ID” field,
- Paste “https://www.googleapis.com/auth/admin.directory.group,https://www.googleapis.com/auth/admin.directory.user,https://www.googleapis.com/auth/admin.directory.domain.readonly,https://www.googleapis.com/auth/classroom.courses,https://www.googleapis.com/auth/classroom.rosters” in the “OAuth Scopes (comma-delimited)” field,
- then click on “AUTHORIZE”. (Figure 5)

Figure 5
Step 5
After doing this, you need to head back to the Classter portal, in the Google Workspace Settings page, to continue. (Figure 6)

Figure 6
First, you need to click on the “Activate” button. (Figure 7)

Figure 7
Let’s explain the available fields one by one (Figure 8):
- Enable option:
By clicking on the Activation button, you will be automatically redirected to the Google Workspace page to log in to your account. After doing so, you will get redirected back to Classter again, where the rest of the fields will be available for configuring. - Username field:
Enter your Google Workspace Username here. - Student Domain Account dropdown:
This dropdown will be filled in automatically with the different domains you own in your institutional Google Workspace account. Select the appropriate one to be used for Students. - Teacher Domain Account dropdown:
This dropdown will be filled in automatically with the different domains you own in your institutional Google Workspace account. Select the appropriate one to be used for Teachers. - Parent Domain Account dropdown:
This dropdown will be filled in automatically with the different domains you own in your institutional Google Workspace account. Select the appropriate one to be used for Parents. - Staff Domain Account dropdown:
This dropdown will be filled in automatically with the different domains you own in your institutional Google Workspace account. Select the appropriate one to be used for Admins/Employees.

Figure 8
Apple School Manager
Finally, in our list of integrations, we have the integration between Classter and Apple School Manager. This system allows the interconnection of apple products and educational suites between Classter and all ipads, macbooks etc.
This integration requires a paid apple school manager account.
To establish a connection/integration with apple school manager follow the path: Dashboard > Configuration > Advanced Configuration > Third-Party Integrations (Figure 47d).
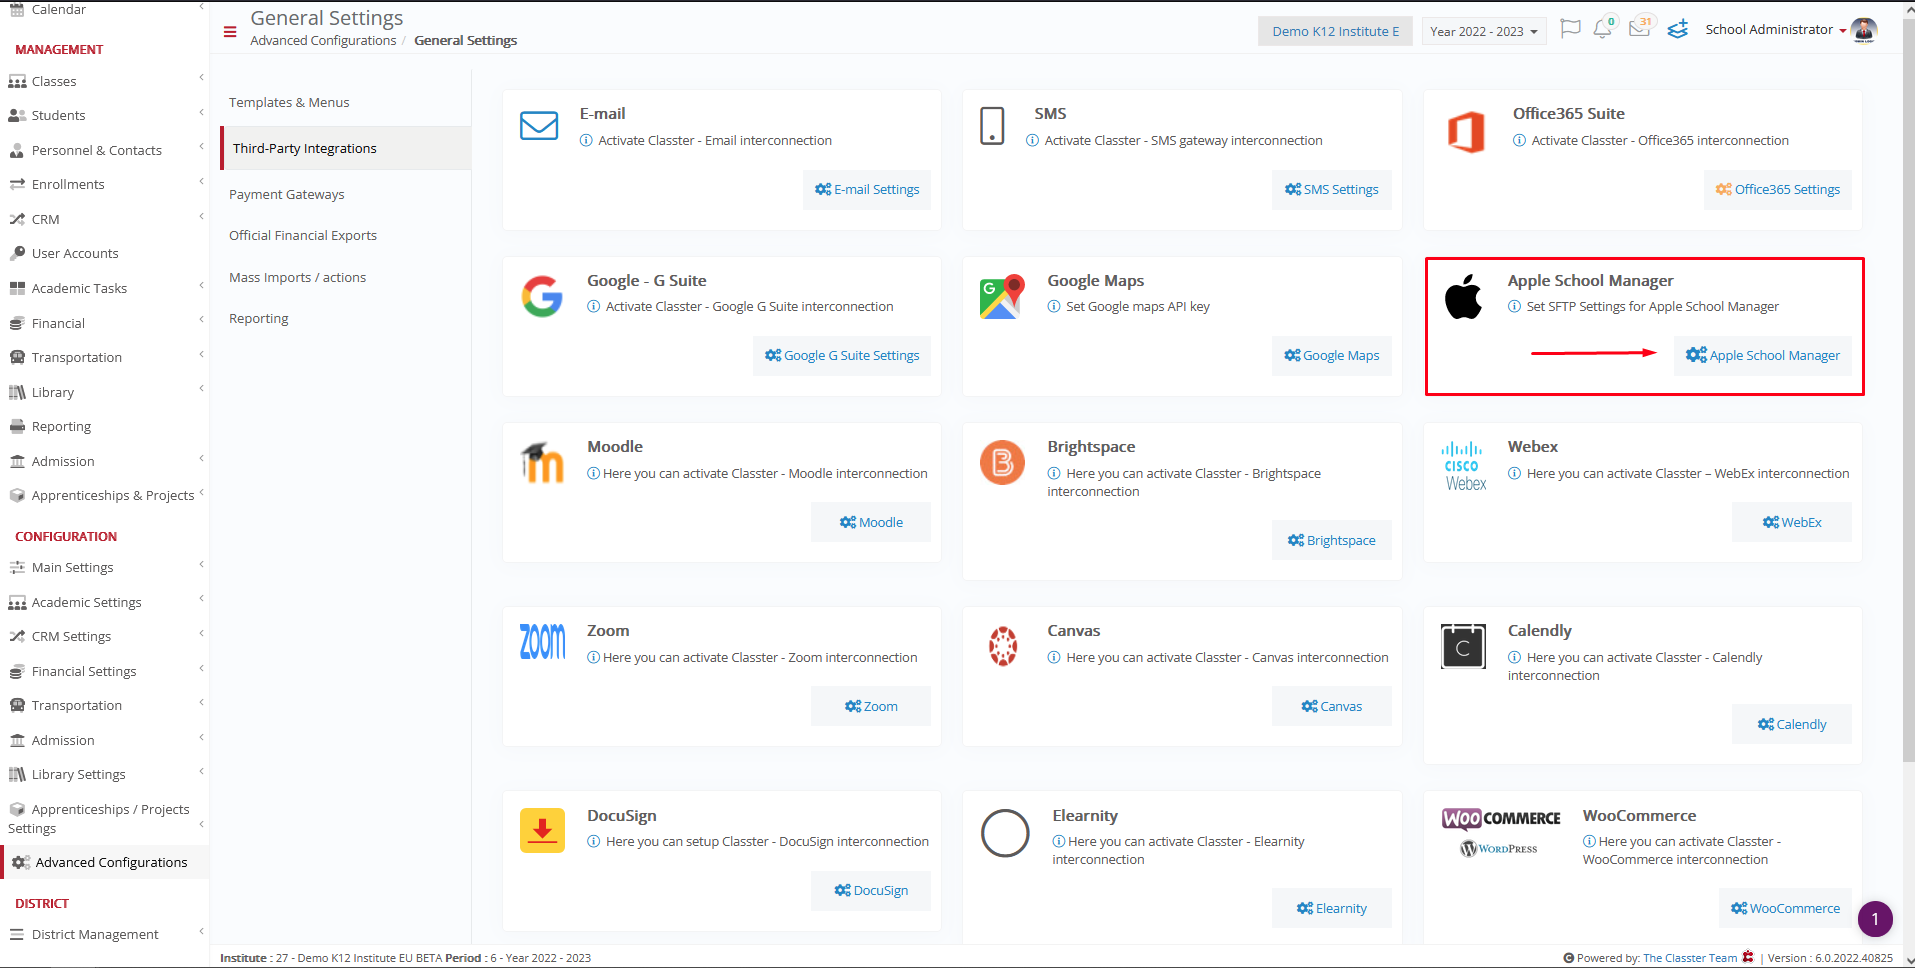 Figure 47d
- Once you reach this page, click on the Apple School Manager button.
- Once you have clicked on the button, you will be transferred to the Classter integration page for Apple School Manager (Figure 47e).

Figure 47e
Classter/Apple School Manager integration page (Figure 47e):
- SFTP Destination field: In this field you need to enter the link to the Apple School Manager account. Information available from Apple School Manager Account.
- SFTP Host field: Enter the address/link of the host server. Information available from Apple School Manager Account.
- SFTP Port field: Enter the address/link of the port that will be used for the connection. Information available from Apple School Manager Account.
- SFTP UserName field: Enter your Classter portal username (Admin).
- SFTP Password field: Enter your Classter portal password (Admin).
- Download CSV button: If you click on this button you will download Classter Classes, Courses, Students, Staff, Rosters and Locations in CSV format.
- Upload to Apple School Manager button: If you click on this button you will be transferred to the upload page, you select files for upload. You can upload the csv files downloaded in the previous step, so as to upload the Classter data to Apple School Manager (Example 1).
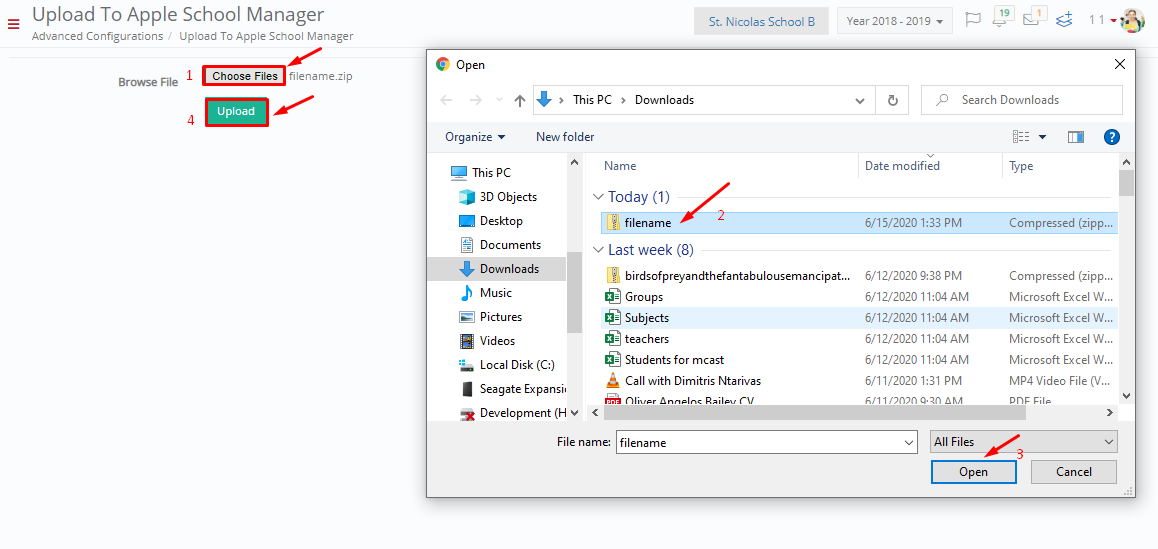
Example 1
HubSpot
Classter supports a HubSpot integration. The way the integration works is that changes happening in Classter get exported to HubSpot.
Those changes are related to two things; the Student and the Registration Status of their Educational Programs.
To start the integration, go to CONFIGURATION > Advanced Configuration > Third-Party Integrations. (Figure 1)
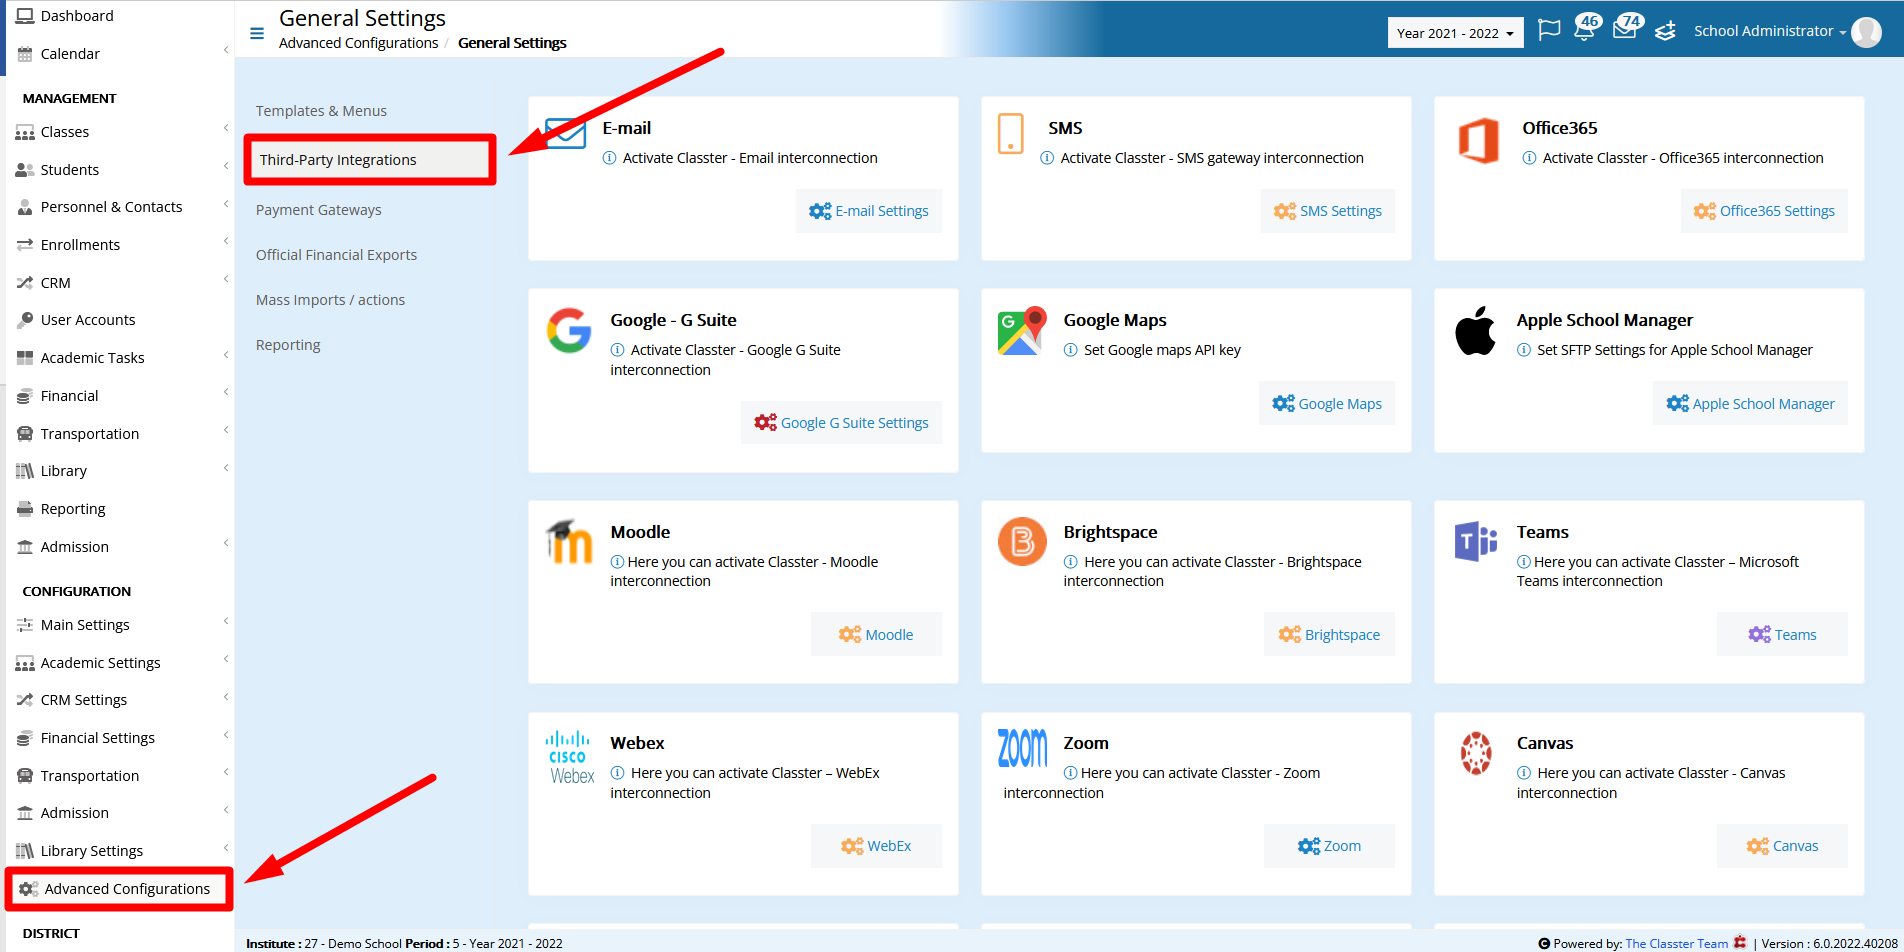
Figure 1
Find HubSpot in the list and click on the button as in Figure 2.

Figure 2
In the next window, enter the access token generated through the HubSpot administrative platform (Private App) and click Save to proceed with configuring the required integrated fields and actions.
The token must include the following scopes: crm.objects.custom.read, crm.objects.contacts.read, crm.objects.contacts.write, crm.objects.deals.read, crm.objects.deals.write, crm.schemas.contacts.read, crm.schemas.contacts.write, crm.schemas.deals.read, and crm.schemas.deals.write. Then click Save to apply and store the configuration settings.
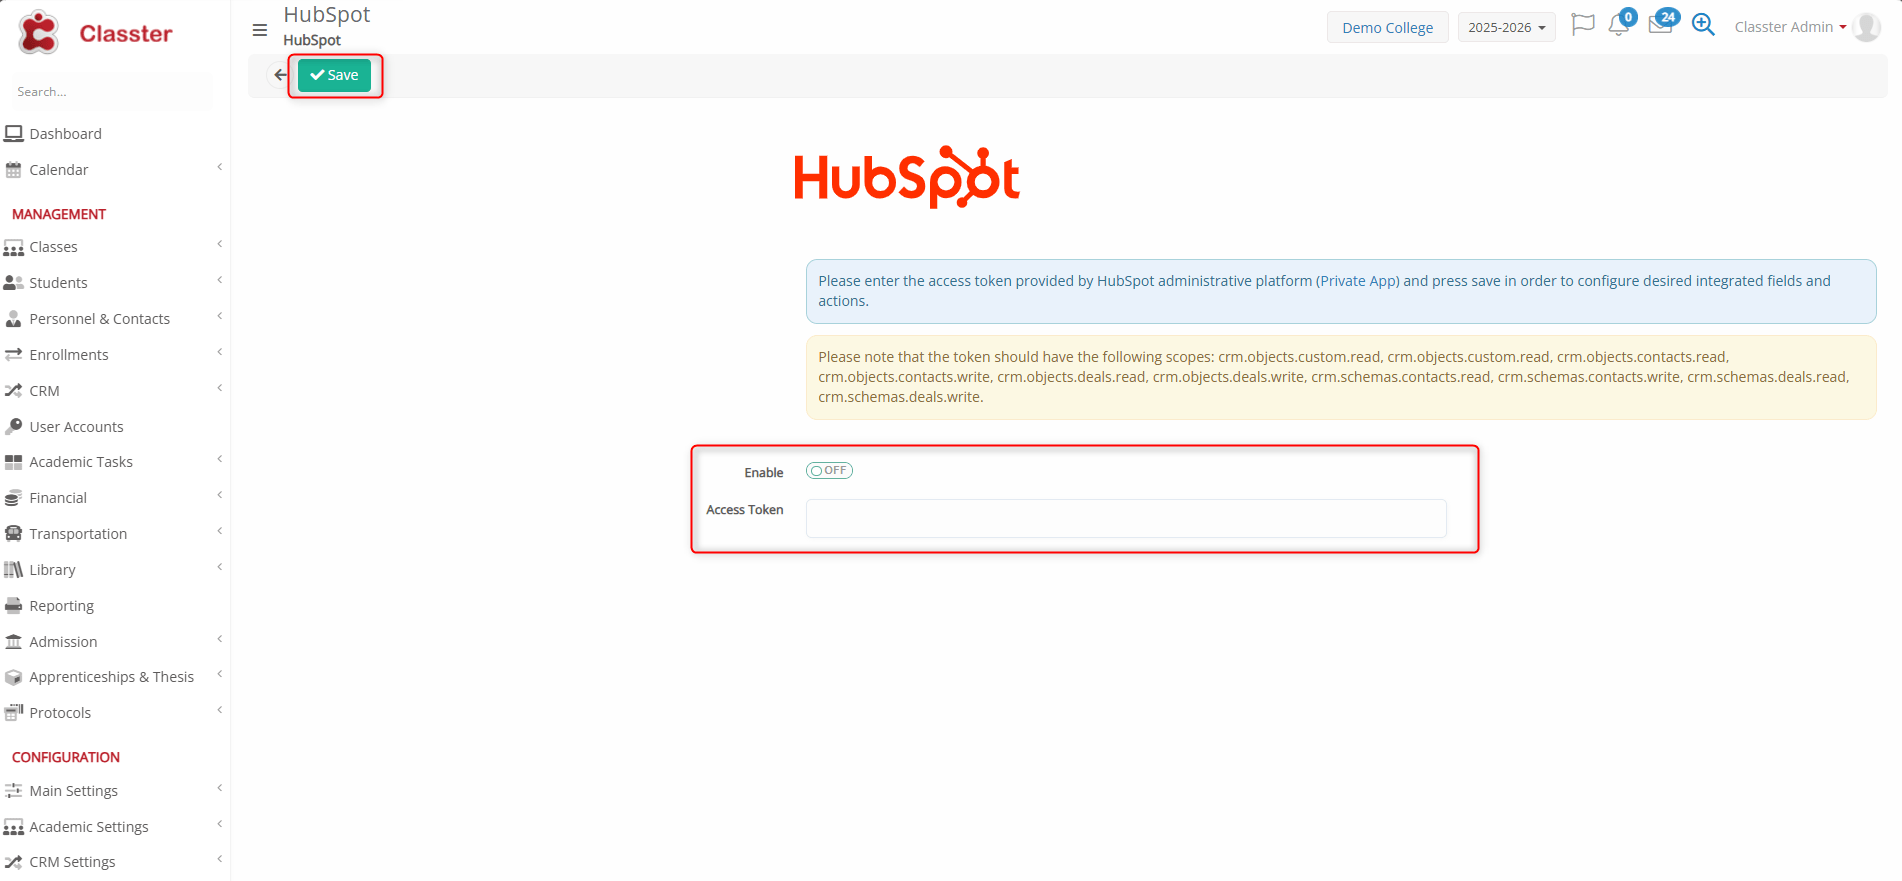
Figure 3
After applying the settings and clicking Save, the following fields will become available.
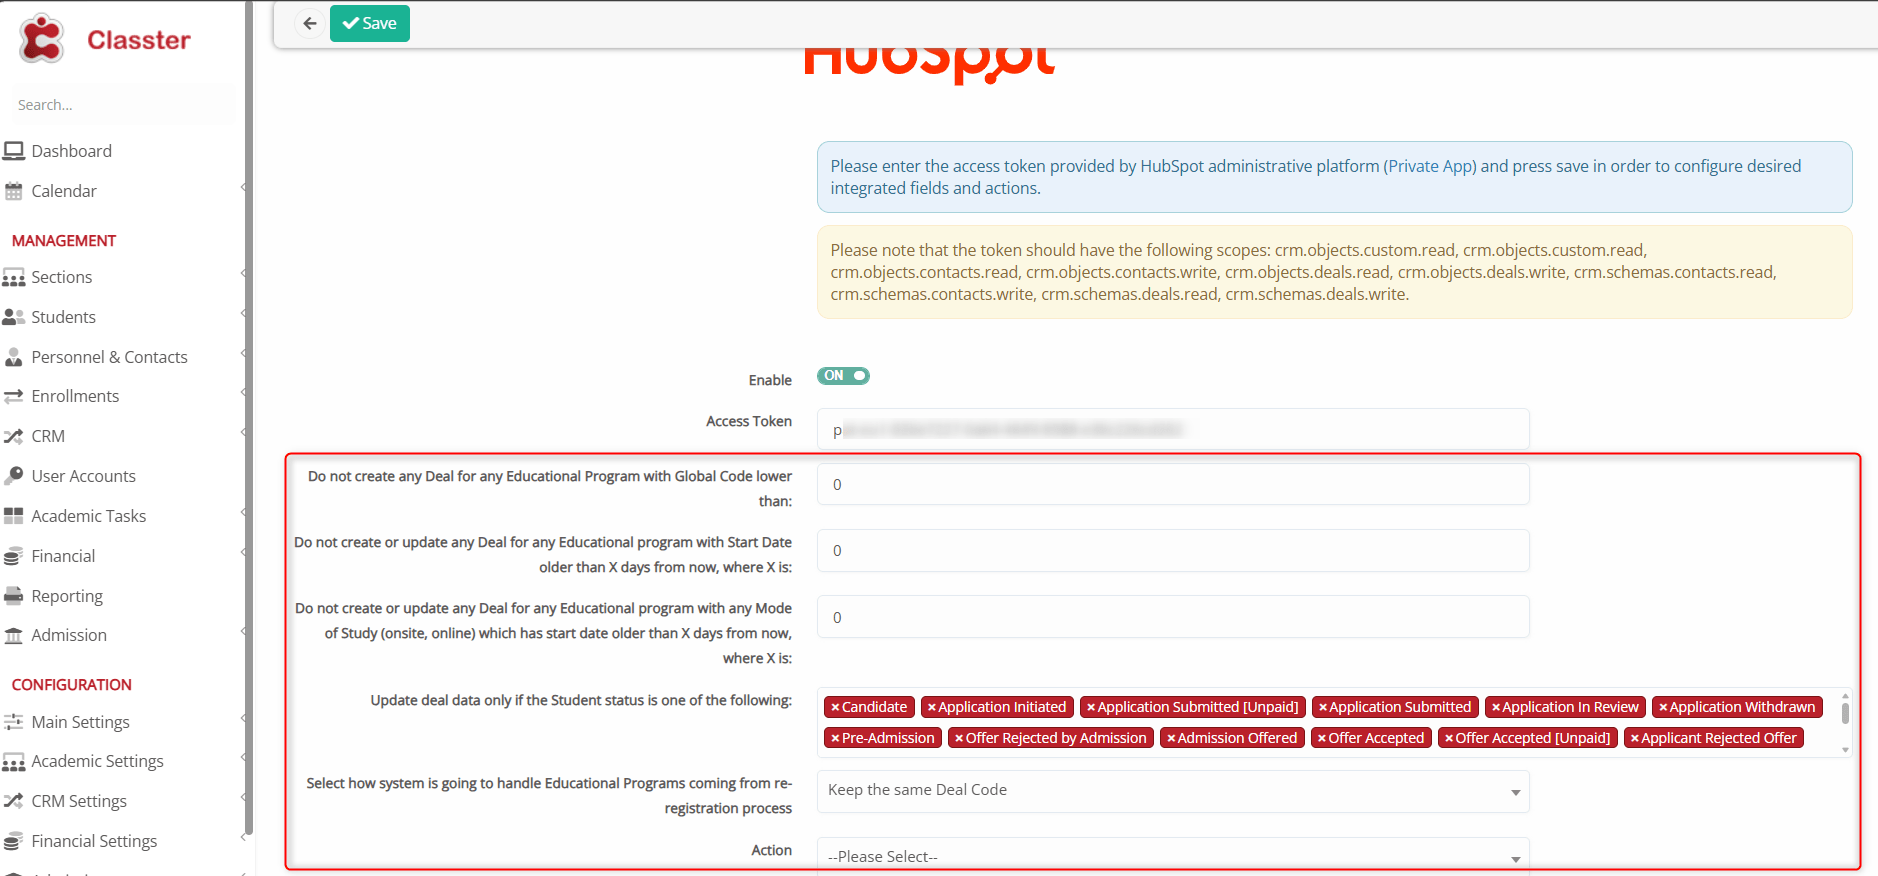
Figure 4
After the integration settings are saved, additional configuration fields will appear. These fields allow administrators to define how HubSpot Deals are created and updated based on Educational Program and Student data synchronization rules.
- Do not create any Deal for any Educational Program with Global Code lower than: Prevents the system from creating HubSpot Deals for Educational Programs whose Global Code value is below the specified number.
- Do not create or update any Deal for any Educational Program with Start Date older than X days from now, where X is: Restricts Deal creation or updates for Educational Programs whose start date is older than the number of days entered.
- Do not create or update any Deal for any Educational Program with any Semester which has start date older than X days from now, where X is:
Prevents processing Deals related to semesters that started earlier than the configured number of days. - Update deal data only if the Student status is one of the following: Allows Deal updates only for _Students_ whose status matches the specified values.
- Select how system is going to handle Educational Programs coming from re-registration process: Defines how the integration should manage Deals generated through the re-registration process, such as keeping the same Deal Code or creating a new one.
- Action: The Action field is used to define which synchronization actions the user wants to configure and support through the HubSpot integration mapping process.
Actions
The available actions are separated into two main categories: Contact and Deal.
- Contact actions are related to the _Student’s_ personal and contact information.
- Deal actions are related to the _Student’s_ enrollment or educational program records.
The following actions are available:
- CreateContact: Creates a new _Student_ contact.
- UpdateContact: Updates an existing _Student_ contact.
- CreateDeal: Creates a new Deal related to the _Student’s_ educational program or enrollment.
- UpdateDeal: Updates the information of an existing Deal.
- ChangeDealStatus: Updates the current stage or status of an existing Deal.
It is recommended to configure all required Contact and Deal actions before enabling the integration. For example, if the CreateDeal action is configured without also configuring CreateContact, the integration may be unable to create the Deal successfully.
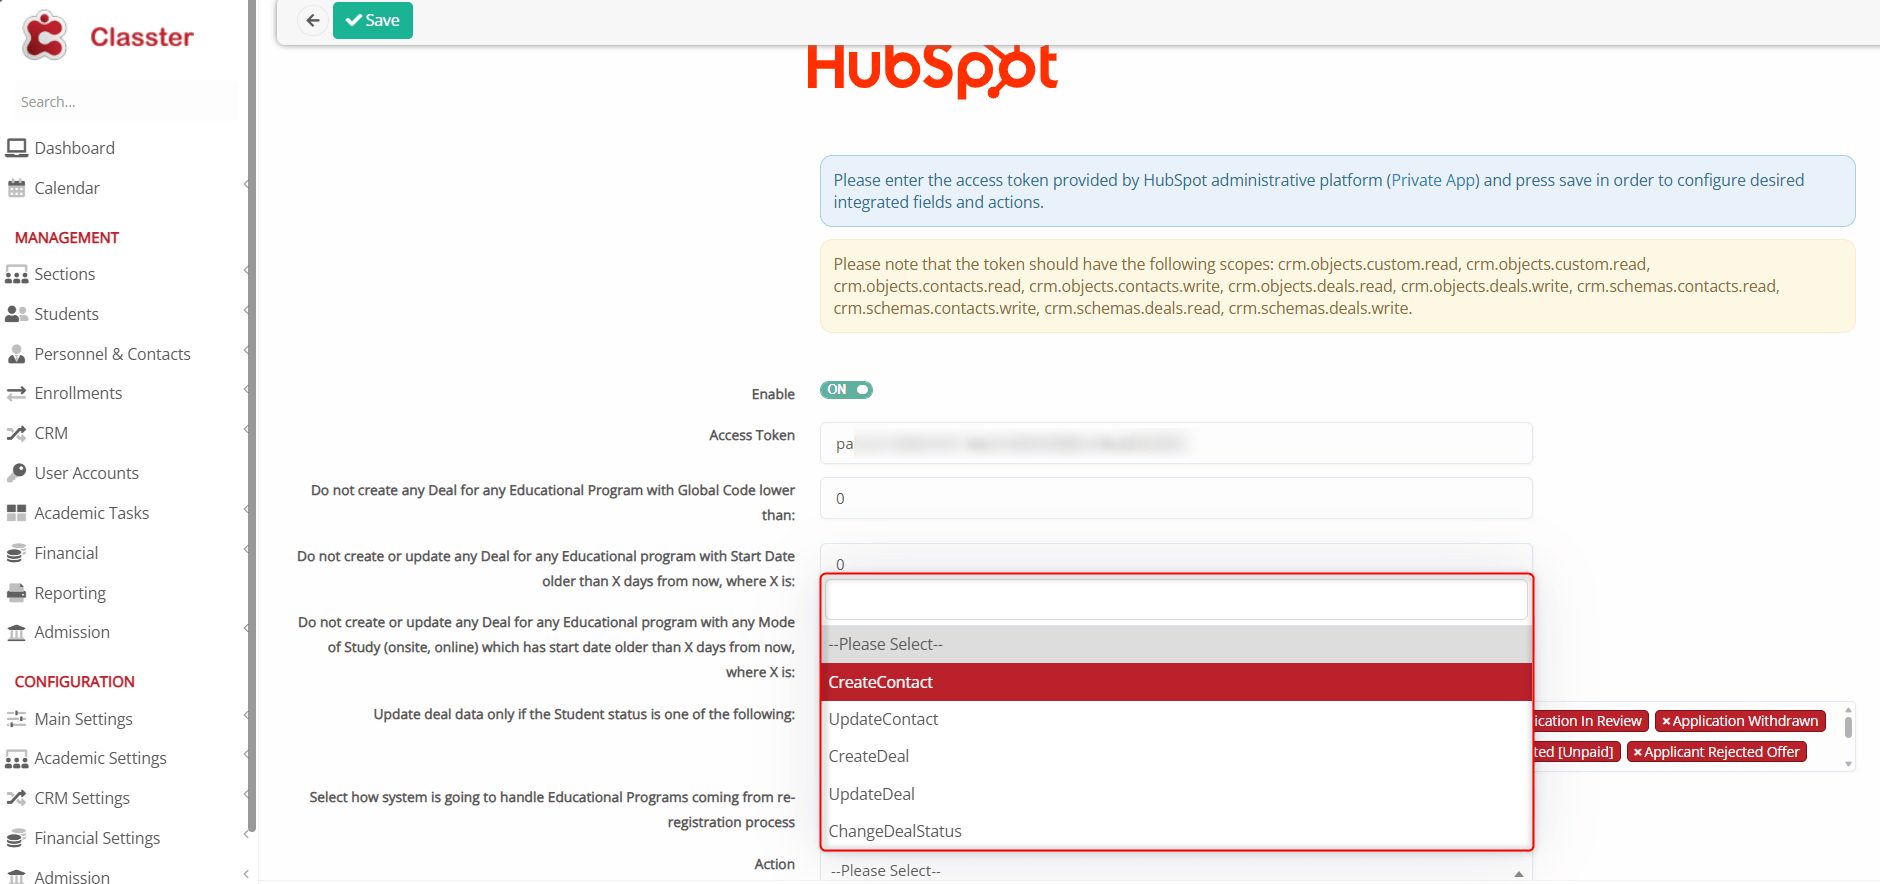
Figure 5
By selecting one of the available actions, the corresponding menu will appear, allowing the user to define and configure the fields related to the selected Contact or Deal action.
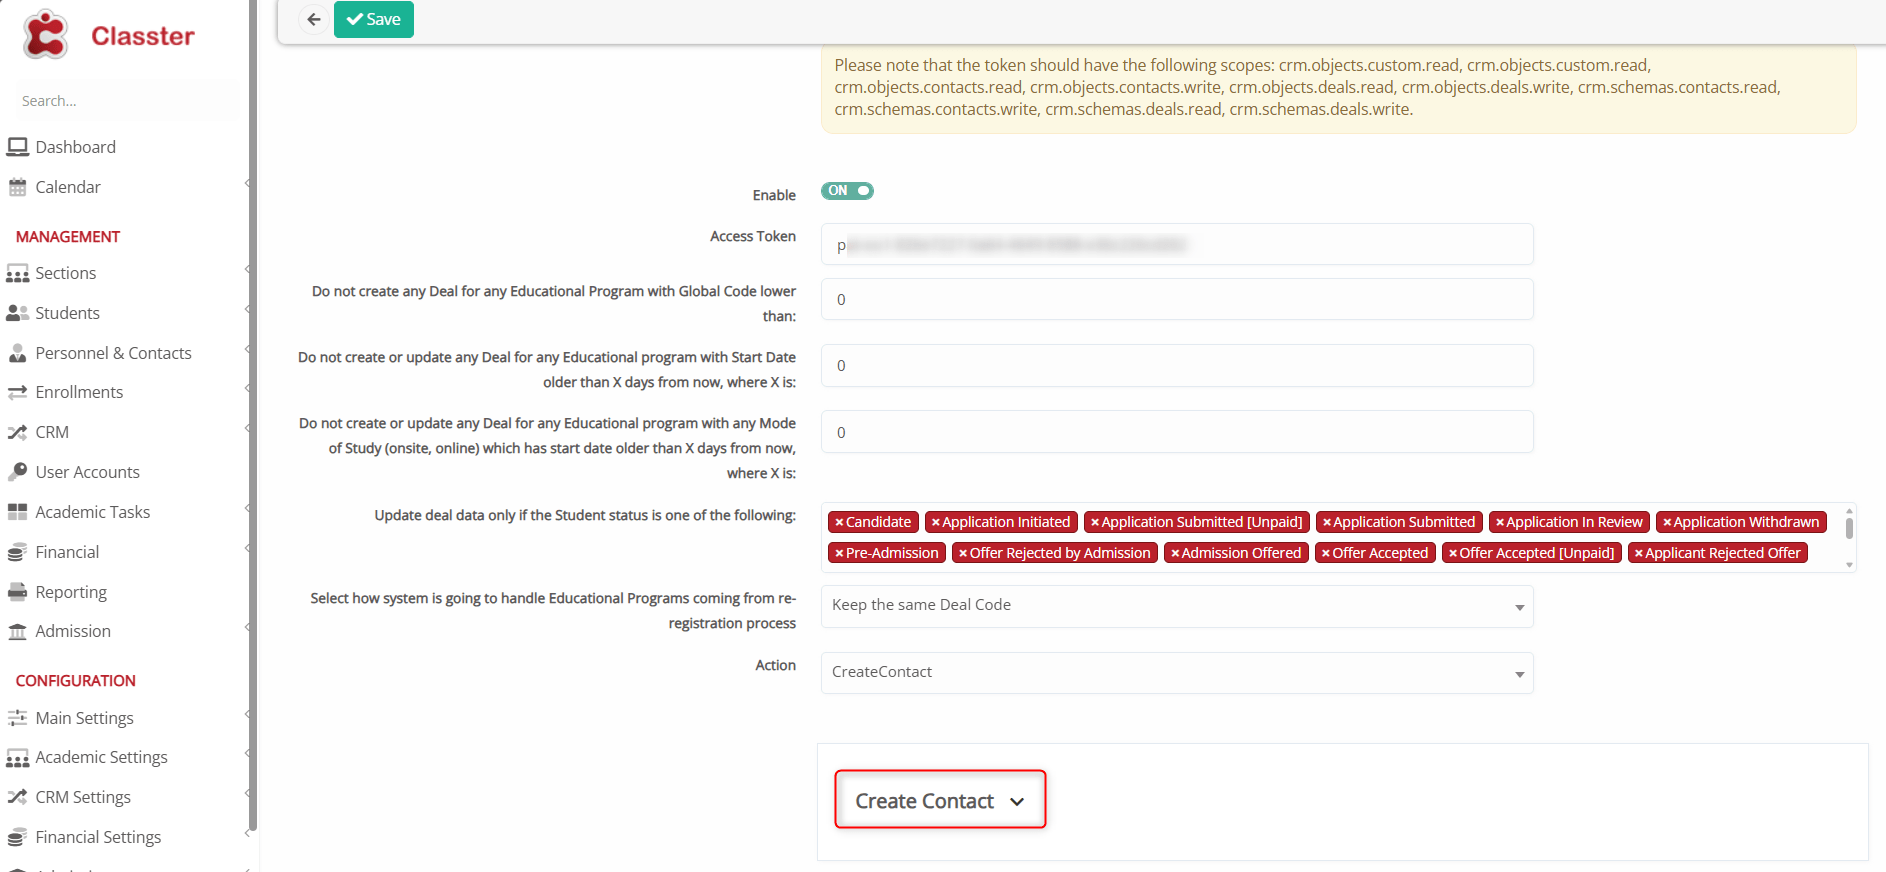
Figure 6
Create Contact
In the HubSpot Available Fields section, the user can select which HubSpot field will be used for the mapping configuration. Two mapping methods are available:
- Model Mapping – Uses predefined system mappings between Classter and HubSpot fields.
- Custom Mapping – Allows the user to manually define and customize the field mapping.
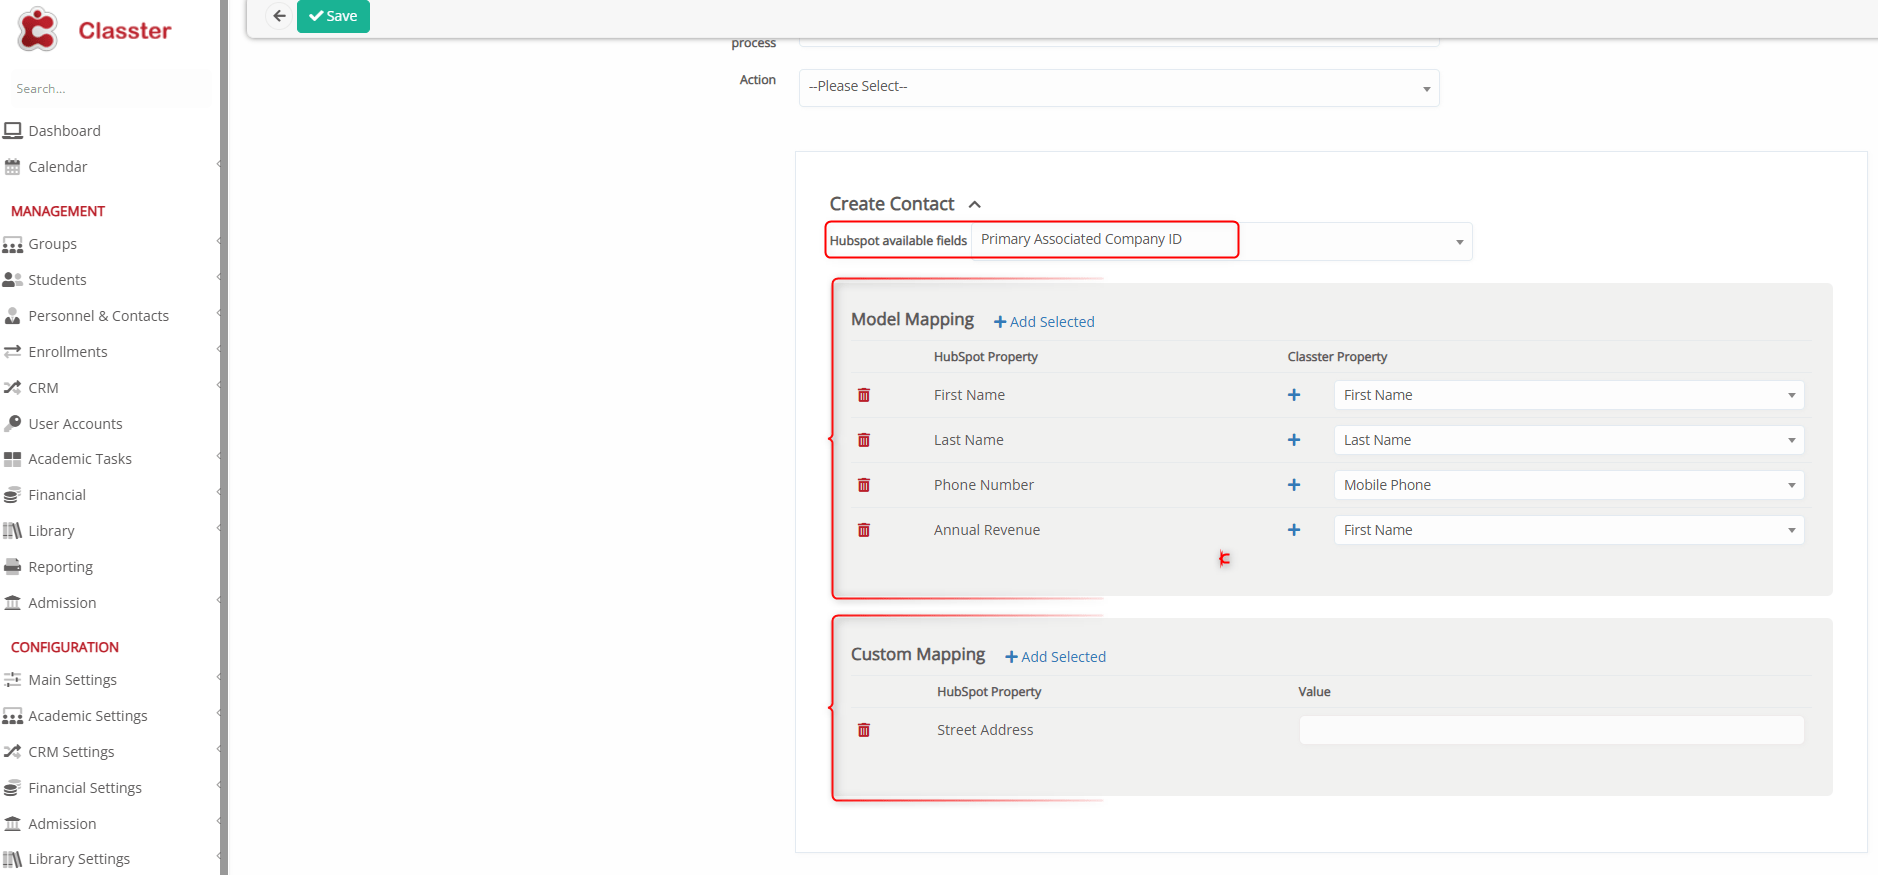
Figure 7
When a HubSpot available field is selected (for example, Gender), it can be added to either the Model Mapping or Custom Mapping configuration by clicking the Add Selected button.
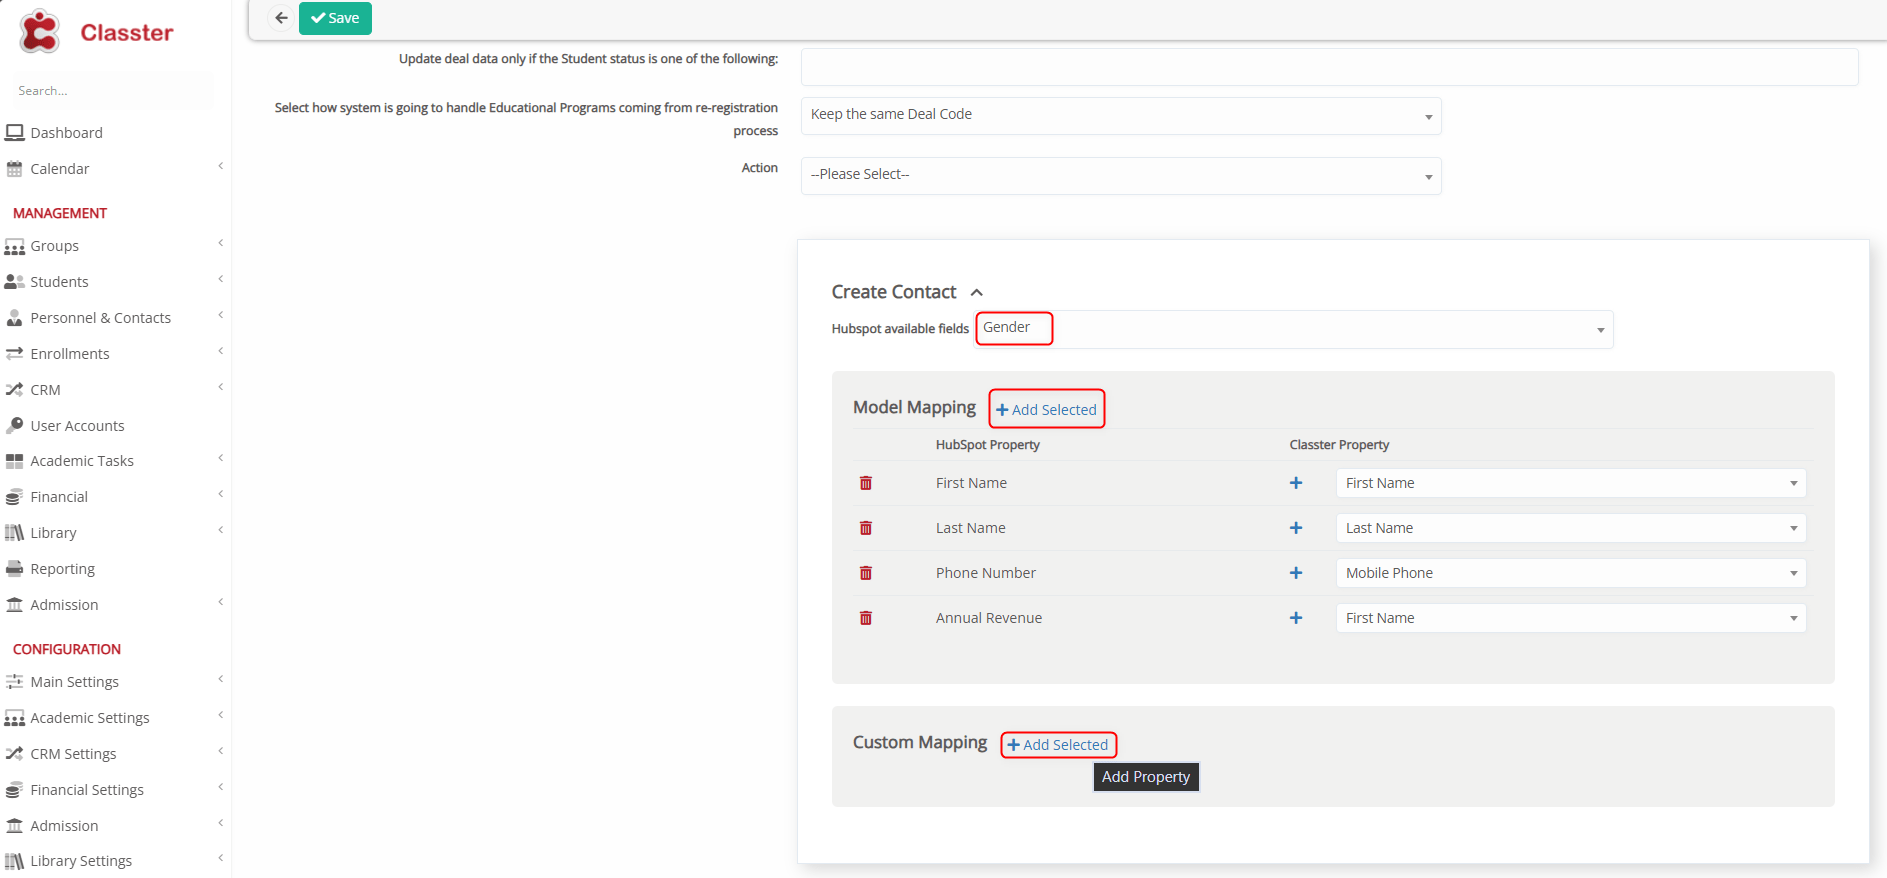
Figure 8
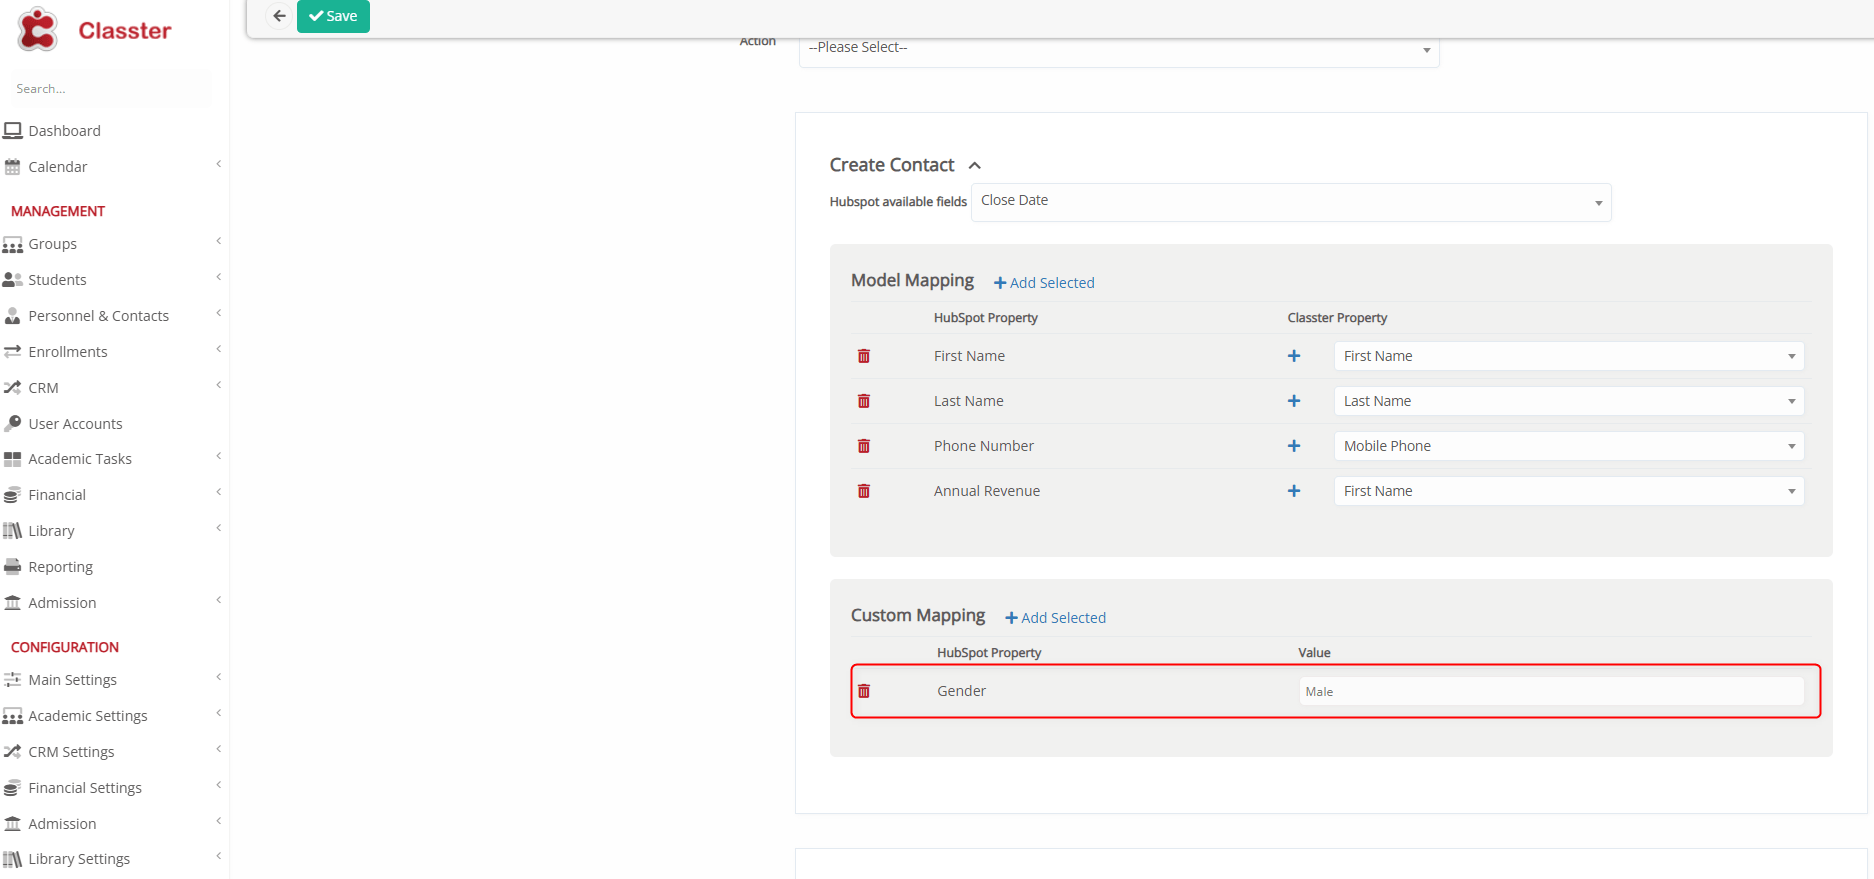
Figure 9
Note that the concept of “required” is not explicitly enforced in this context. The user must verify what HubSpot considers required fields in order to successfully create a record.
If something is not working in Classter, the user should check the HubSpot API logs and review the error message returned by Classter for the specific action.
Important: In both the Create Contact and Update Contact sections, the Email property must be mapped and configured correctly. If the Email field is not configured, HubSpot will not be able to create the corresponding Deals.
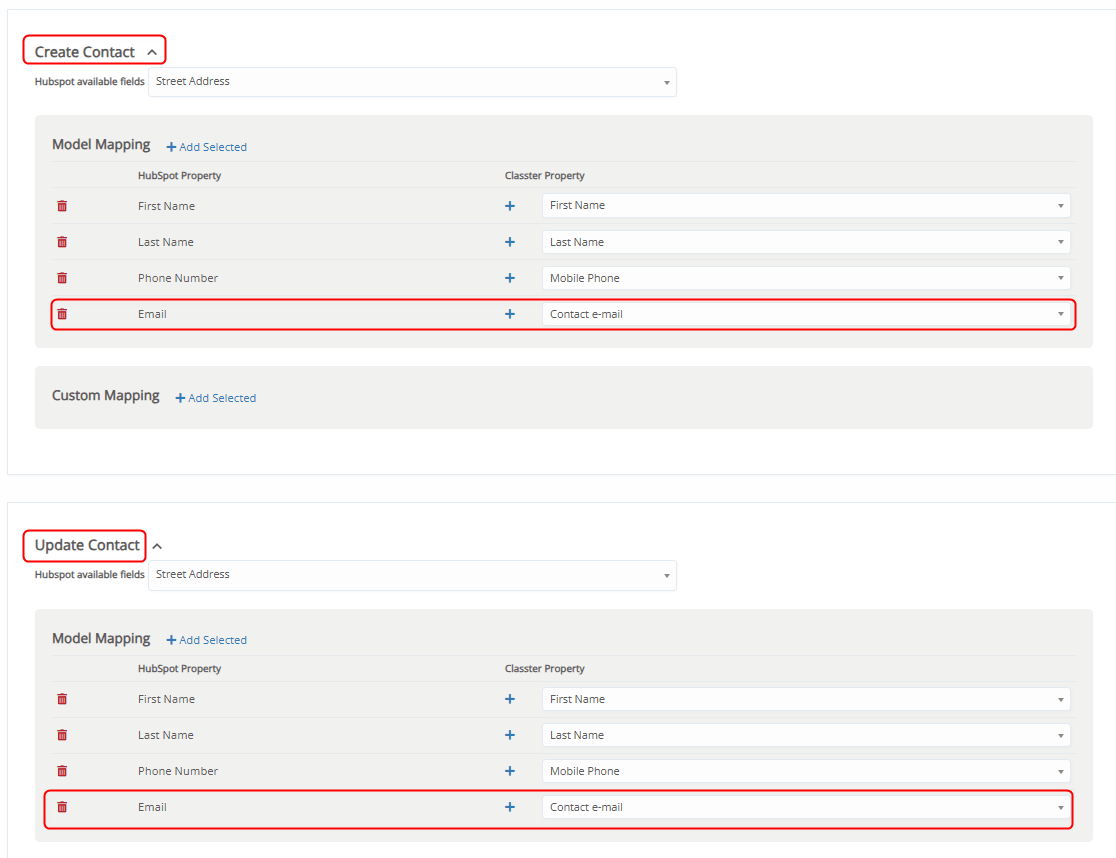
Figure 10
HubSpot Property and Classter Property
Below are the corresponding properties between Classter and HubSpot. By clicking the + button, a new dropdown menu appears. Using this approach, you can map multiple properties together, for example: First Name, Middle Name, etc.
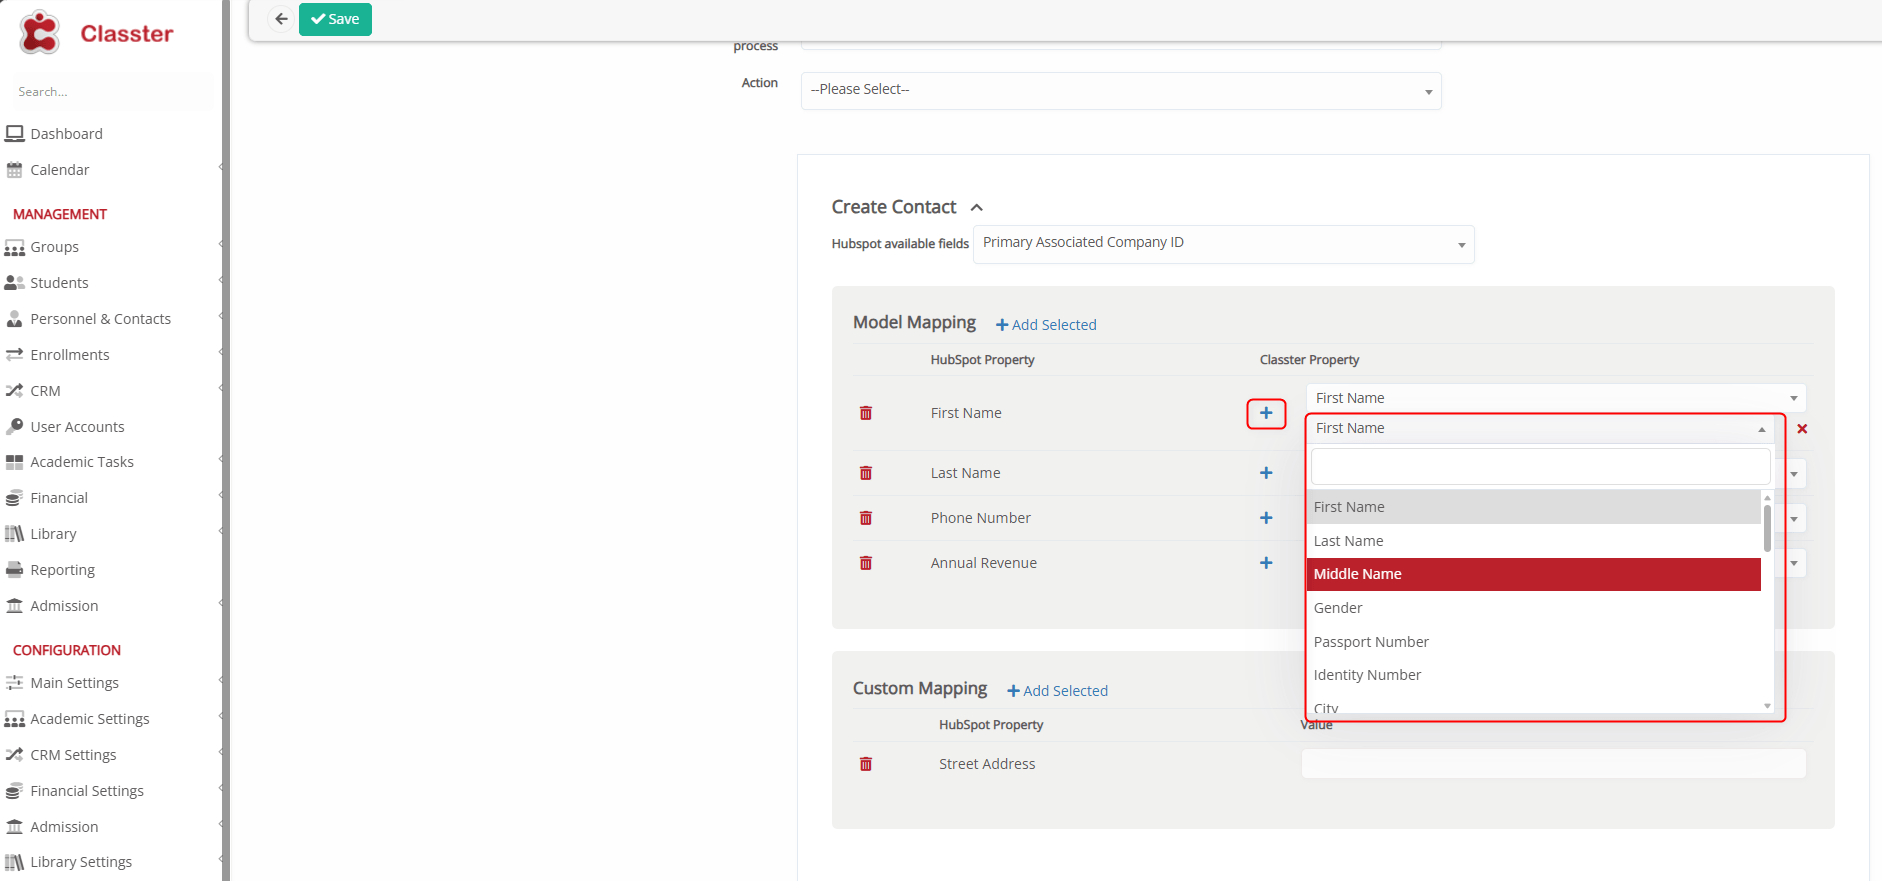
Figure 11
Sales Pipeline
Next to Create Deal and Update Deal, there is a Pipeline selection. This acts as a categorization mechanism, meaning that depending on the selected pipeline, additional properties may become available or required.
Pipelines are not created within Classter; they are configured in HubSpot, and the user selects which pipeline the integration should use. This is especially important for the Change Deal Status functionality.
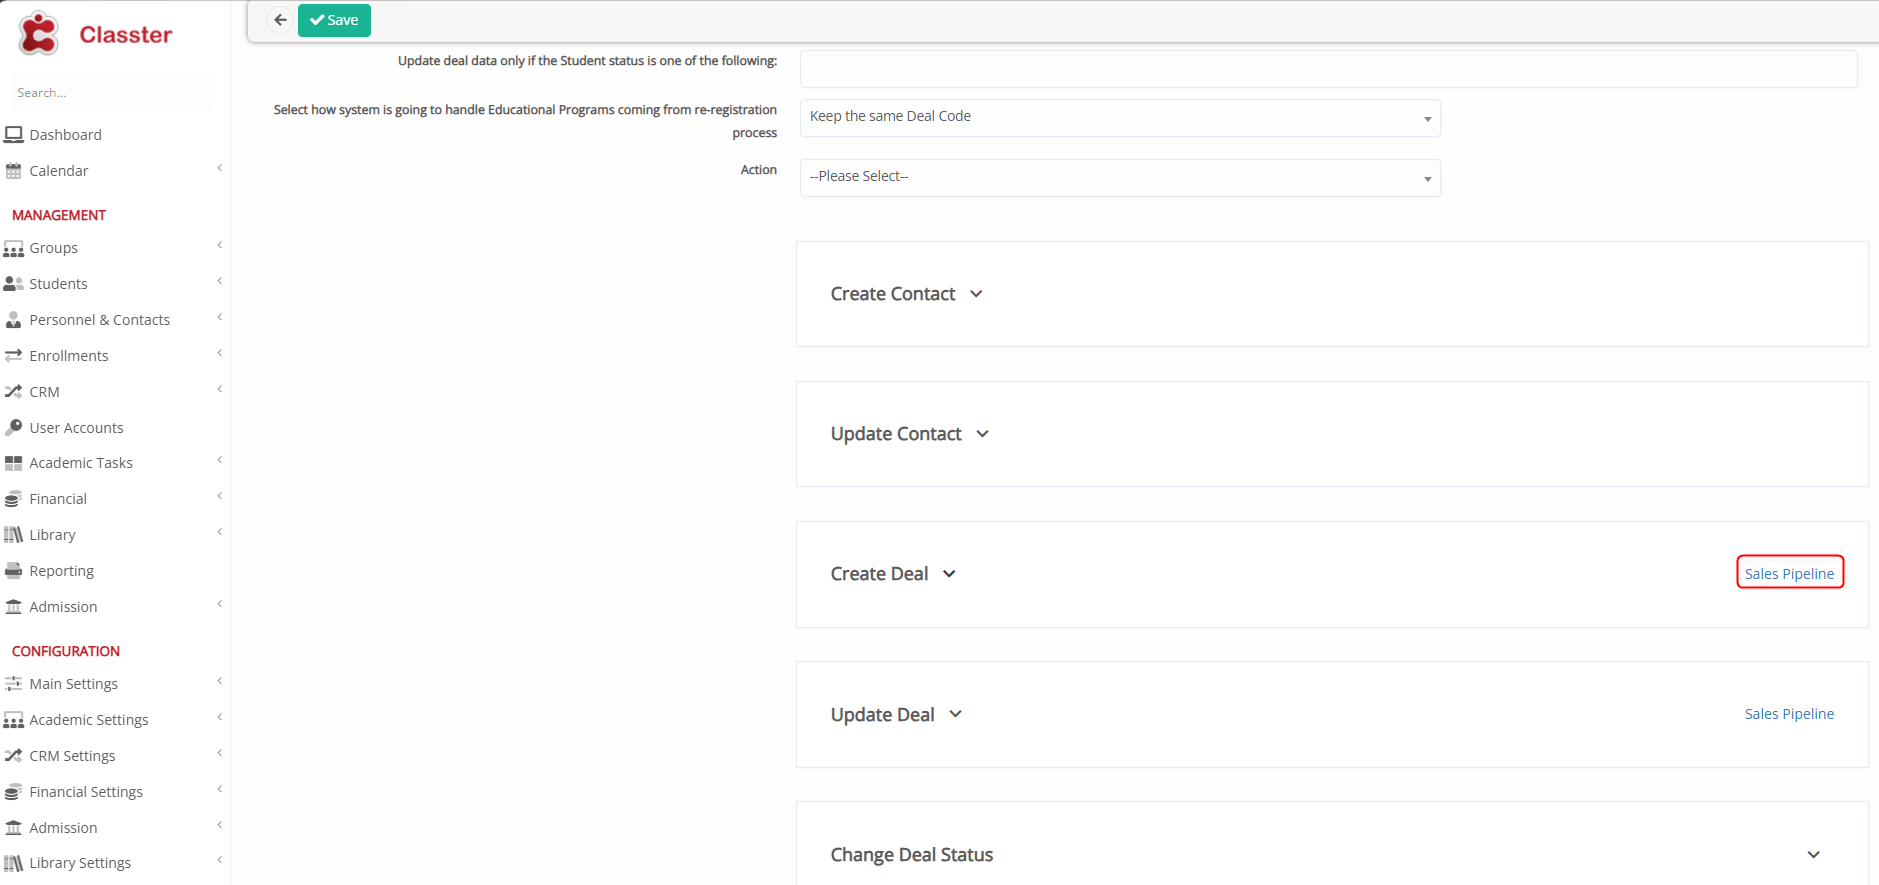
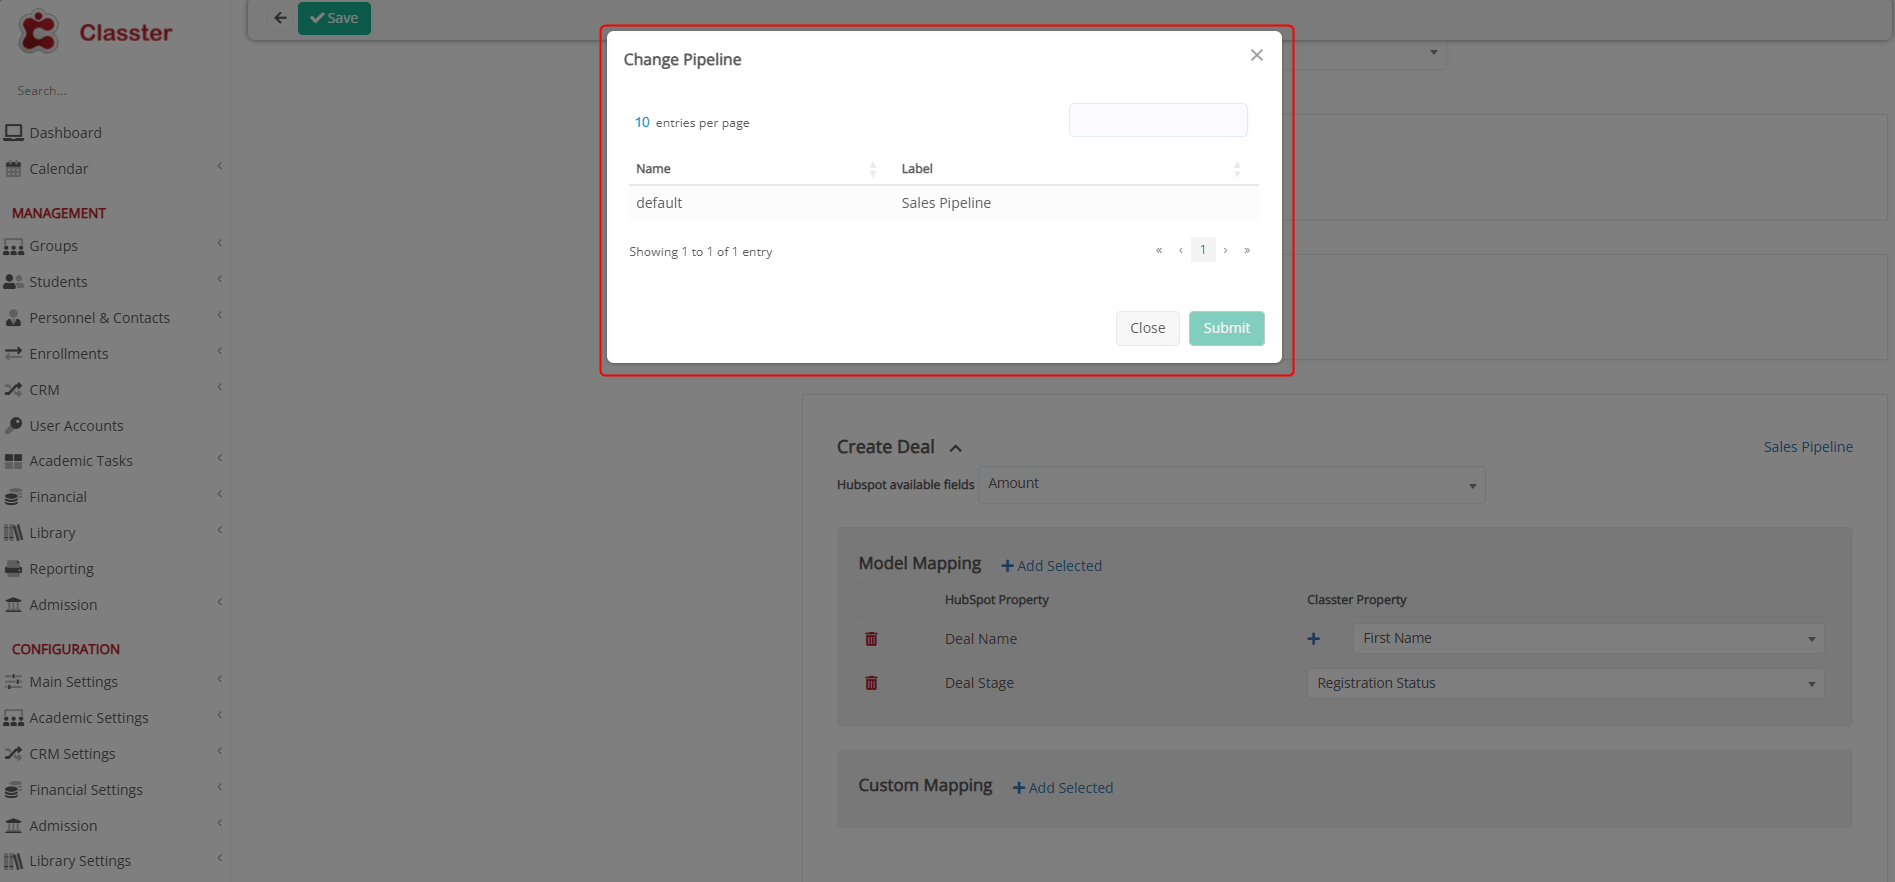
Figure 12
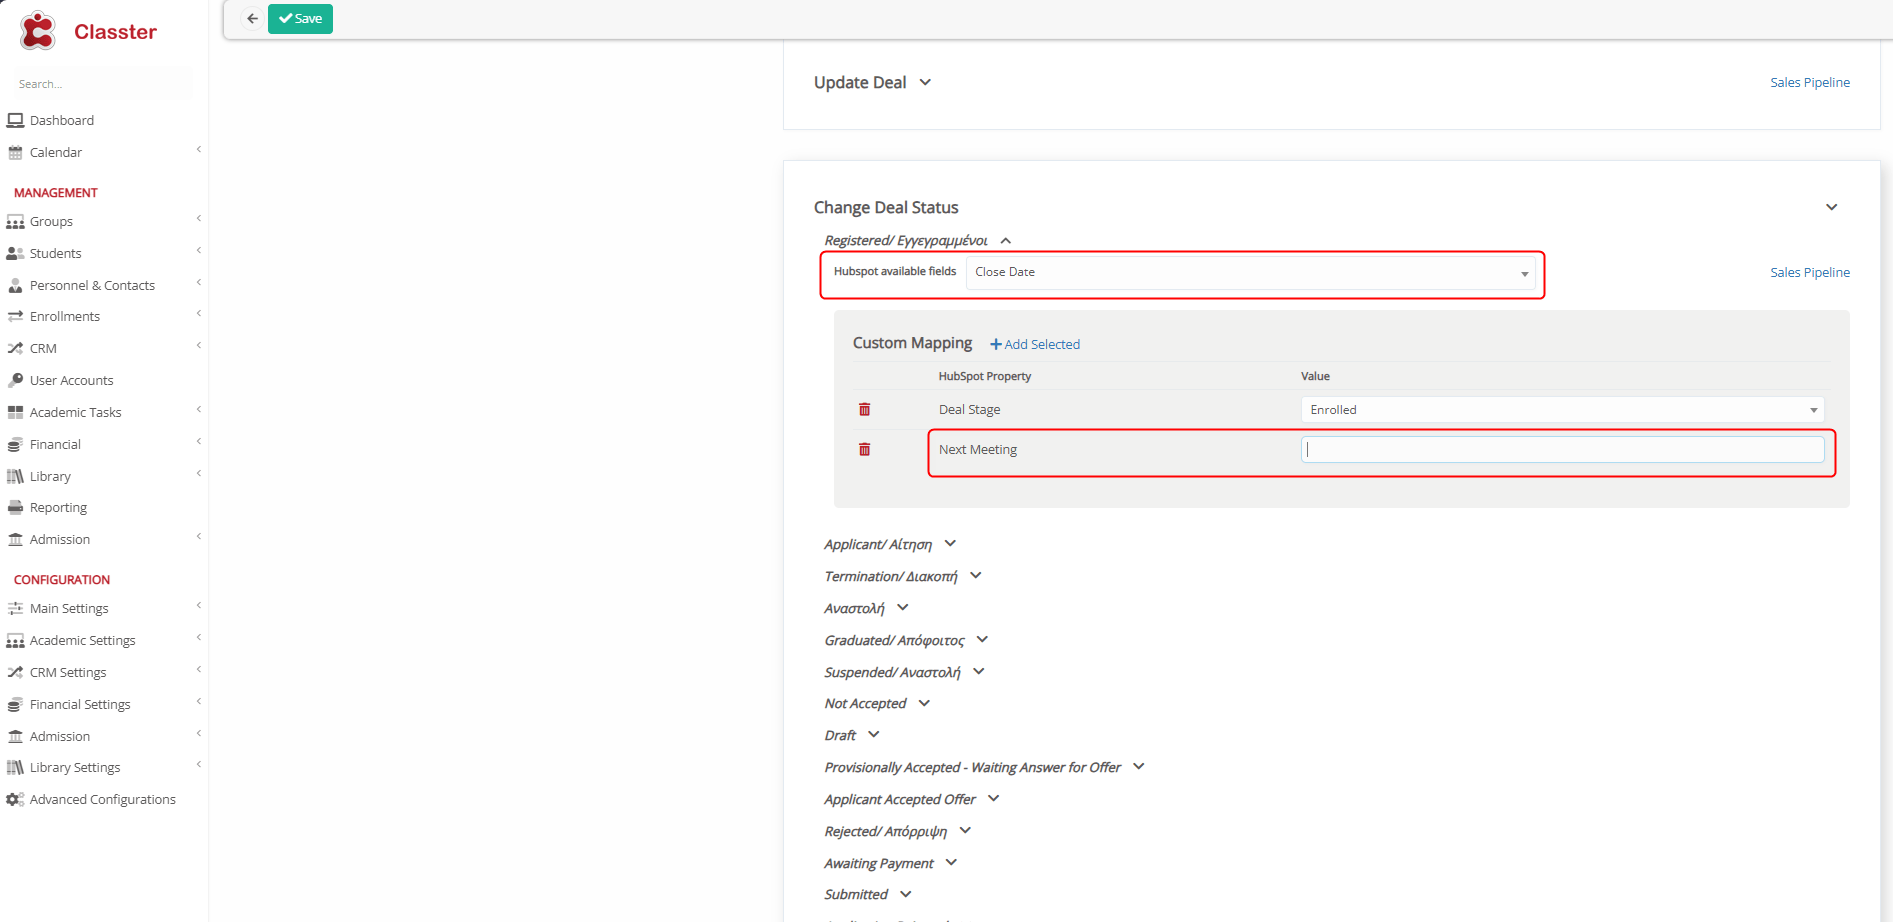
Change Deal Status
This section is used to configure the Deal mapping, defining which Classter fields correspond to which HubSpot Deal fields. The mapping determines how information from Classter is transferred and synchronized with HubSpot Deal records.
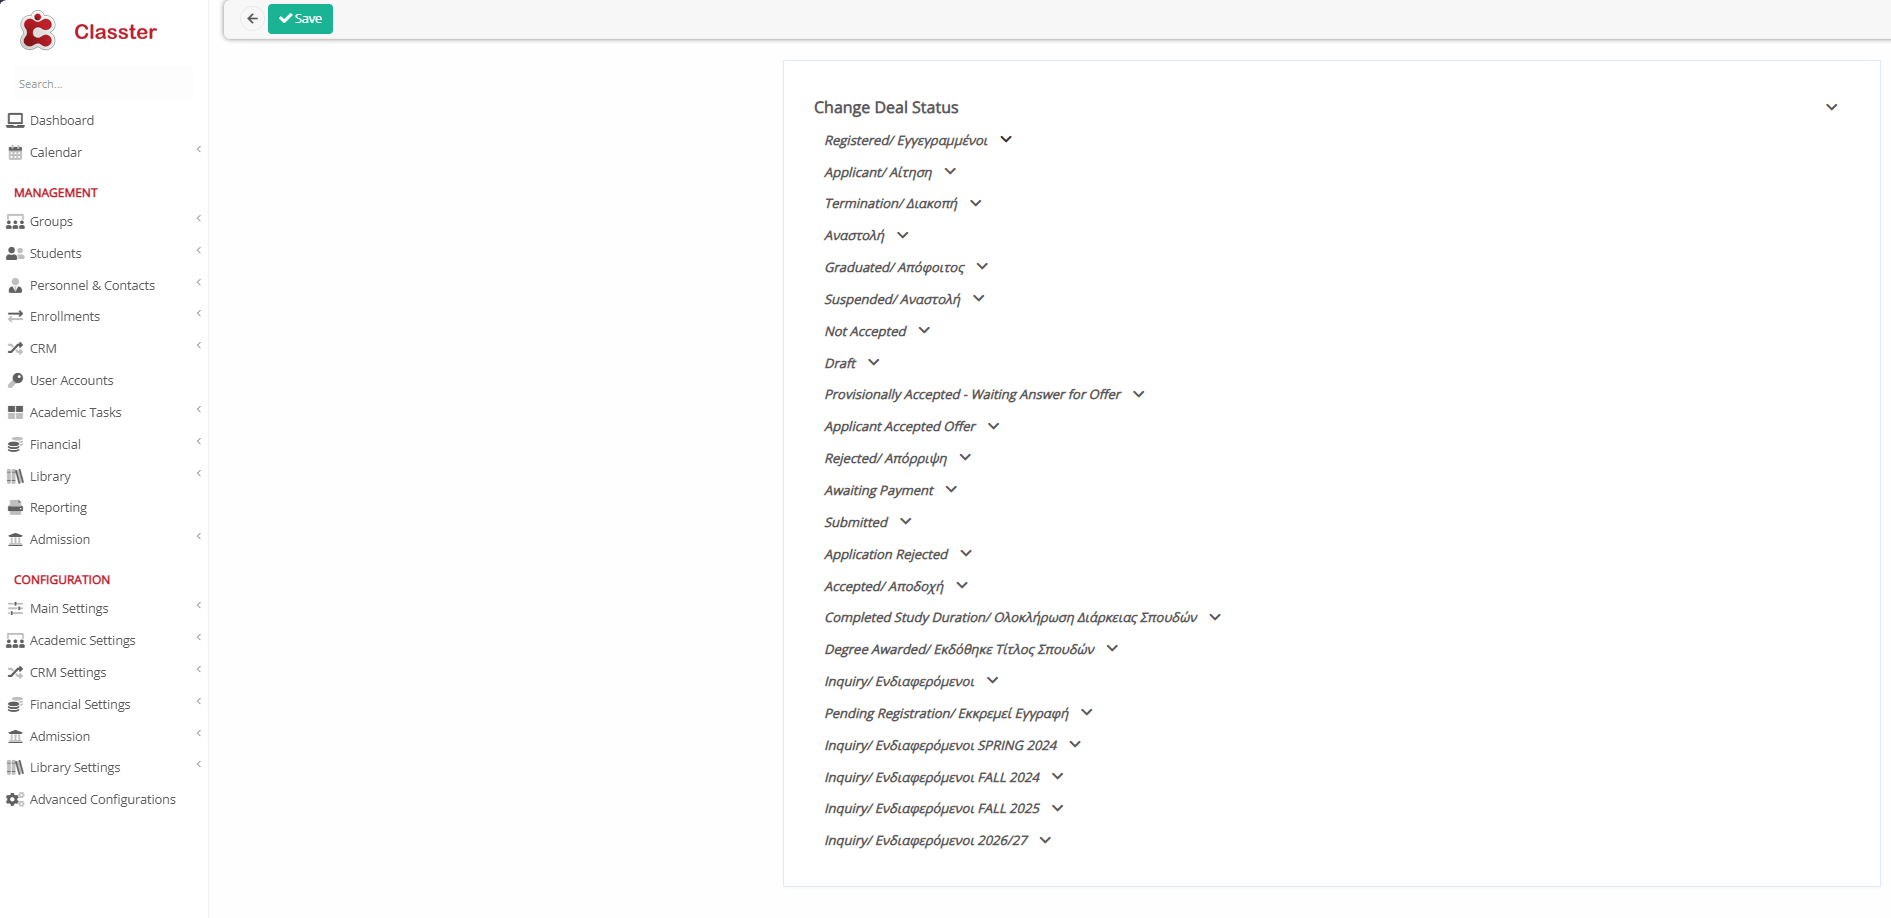
For most Deal actions, users can choose between Model Mapping and Custom Mapping. However, the Change Deal Status action supports Custom Mapping only.
Turnitin
Classter can integrate Turnitin, the top platform to use for checking out assignments for plagiarism.
Find out more about Turnitin integration here: Turnitin Integration
To integrate Classter with Turnitin, go to Advanced Configuration > Third-Party Integrations and select Turnitin. (Figure 1)

Figure 1
In the Turnitin Settings, you must switch ON the “Enable” radio button. In the Turnitin Administration portal, go to integrations and Add an integration.
The Scope Name and API key that you get from there should be filled in the Domain and the API Key fields respectively. (Figure 2)
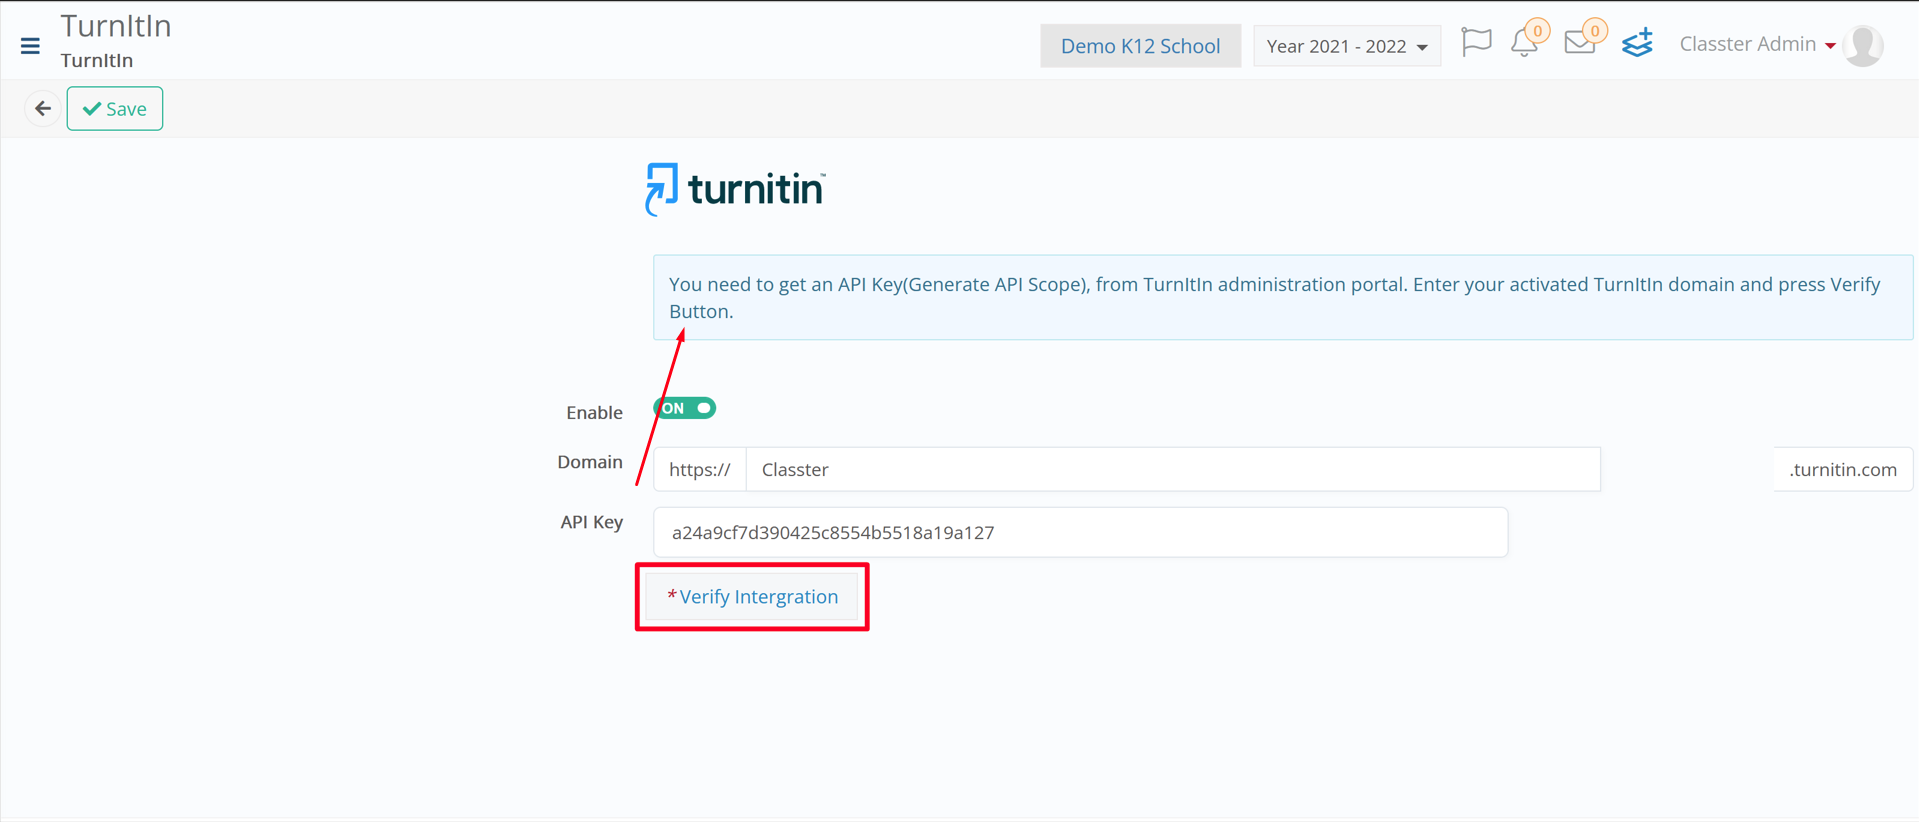
Figure 2
Save your changes and then click on the “Verify Integration” button. (Figure 3)
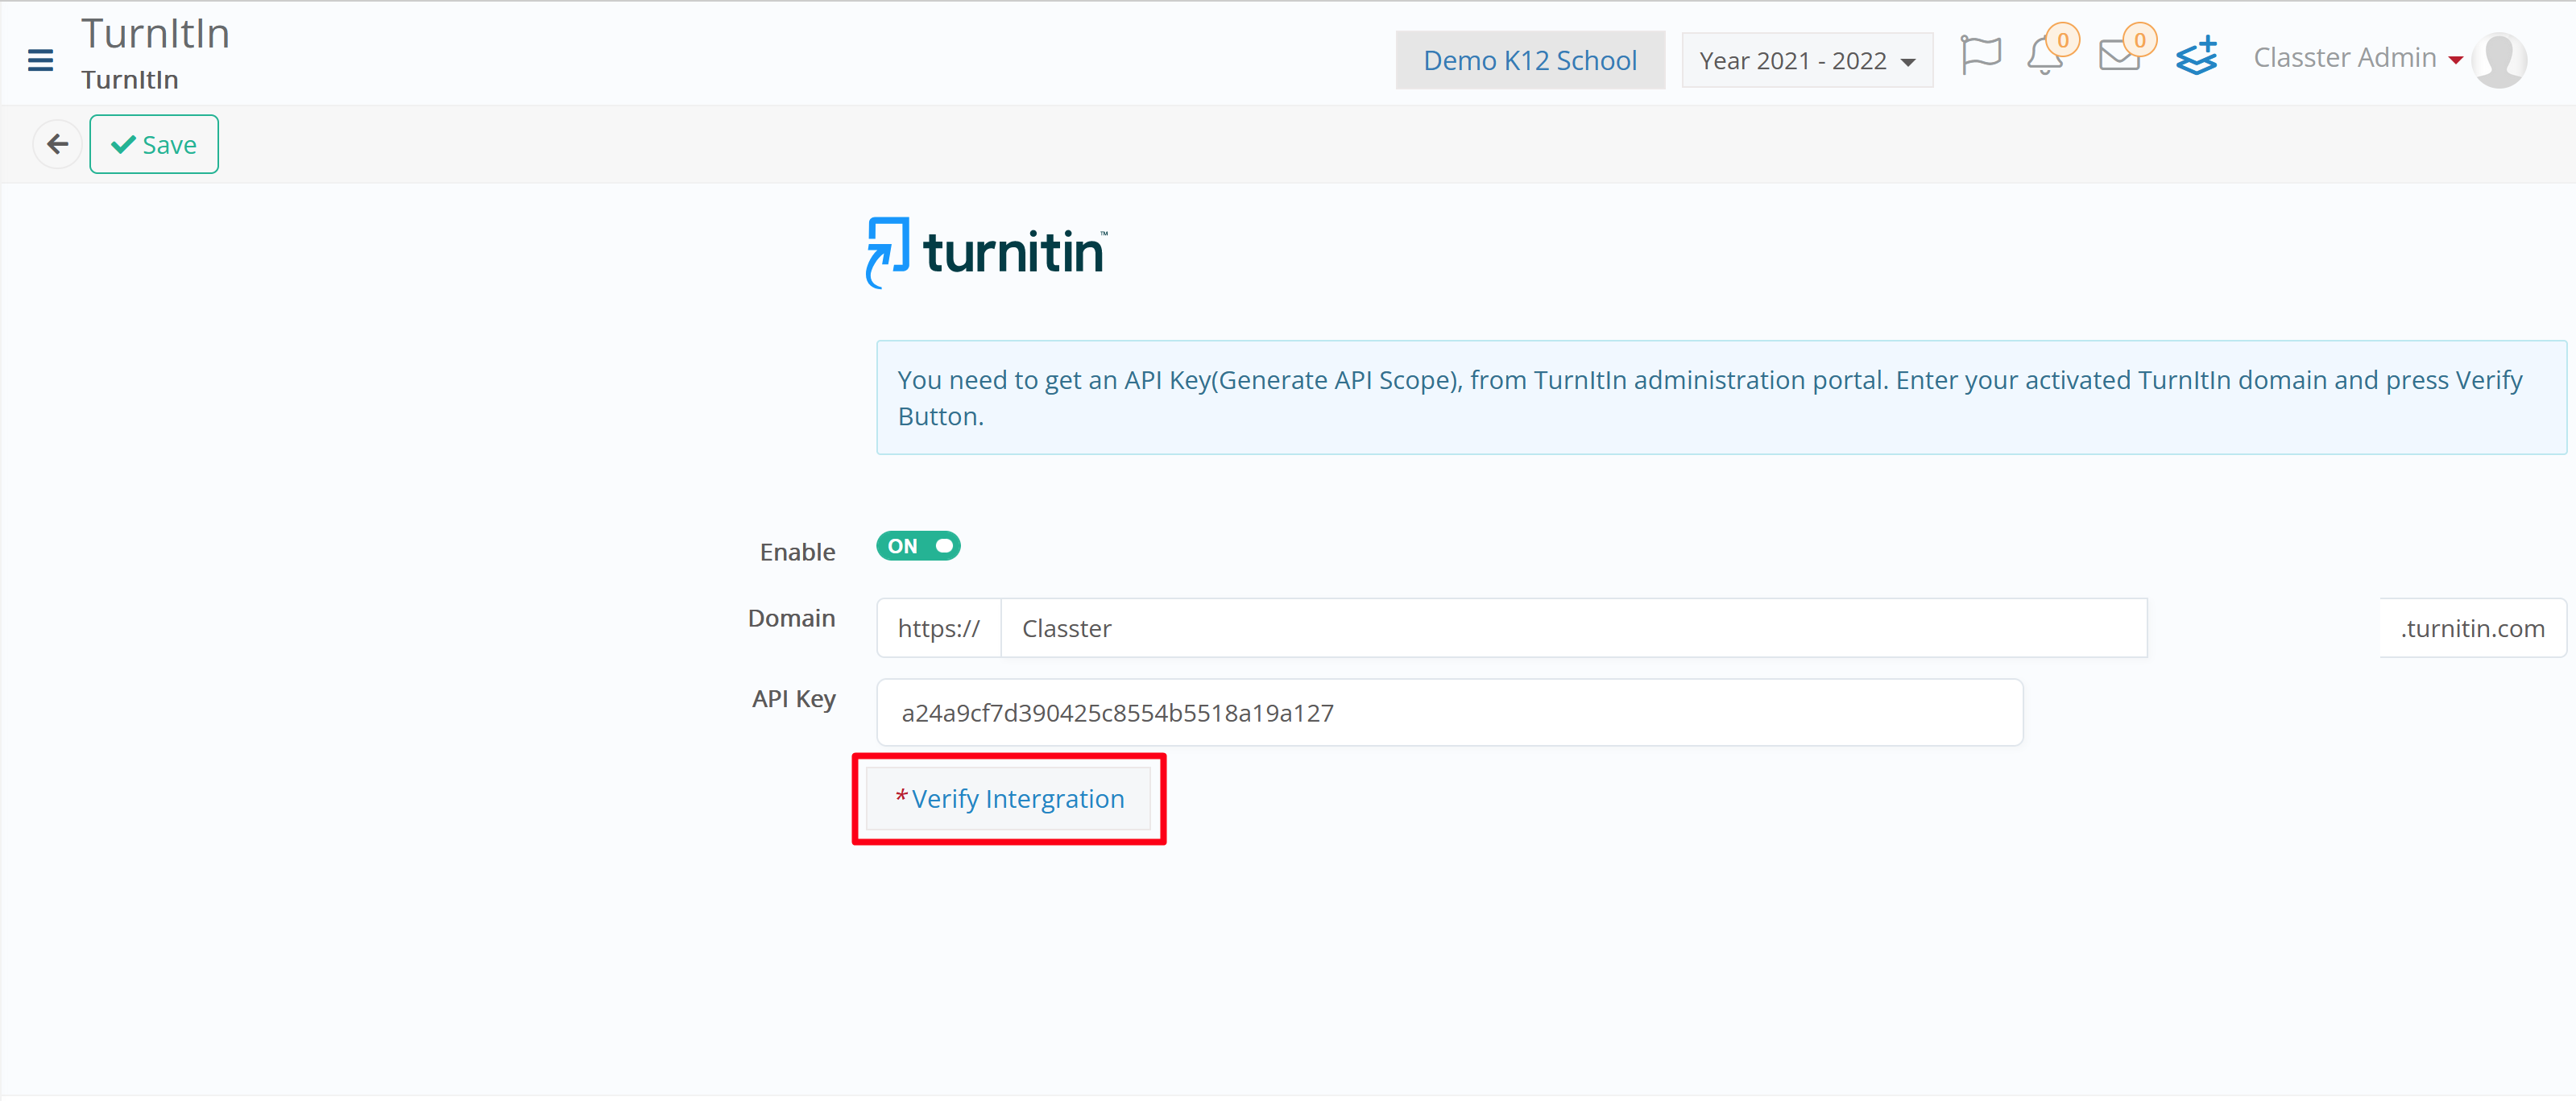
Figure 3
Calendly
Calendly’s Integration in Classter is pretty straightforward and provides to an Educational Institute the functionality of having Applicants of the Institute book a meeting/interview.
To set up the integration, a User must go to CONFIGURATION > Advanced Configurations > Third-Party Integrations and click on Calendly.
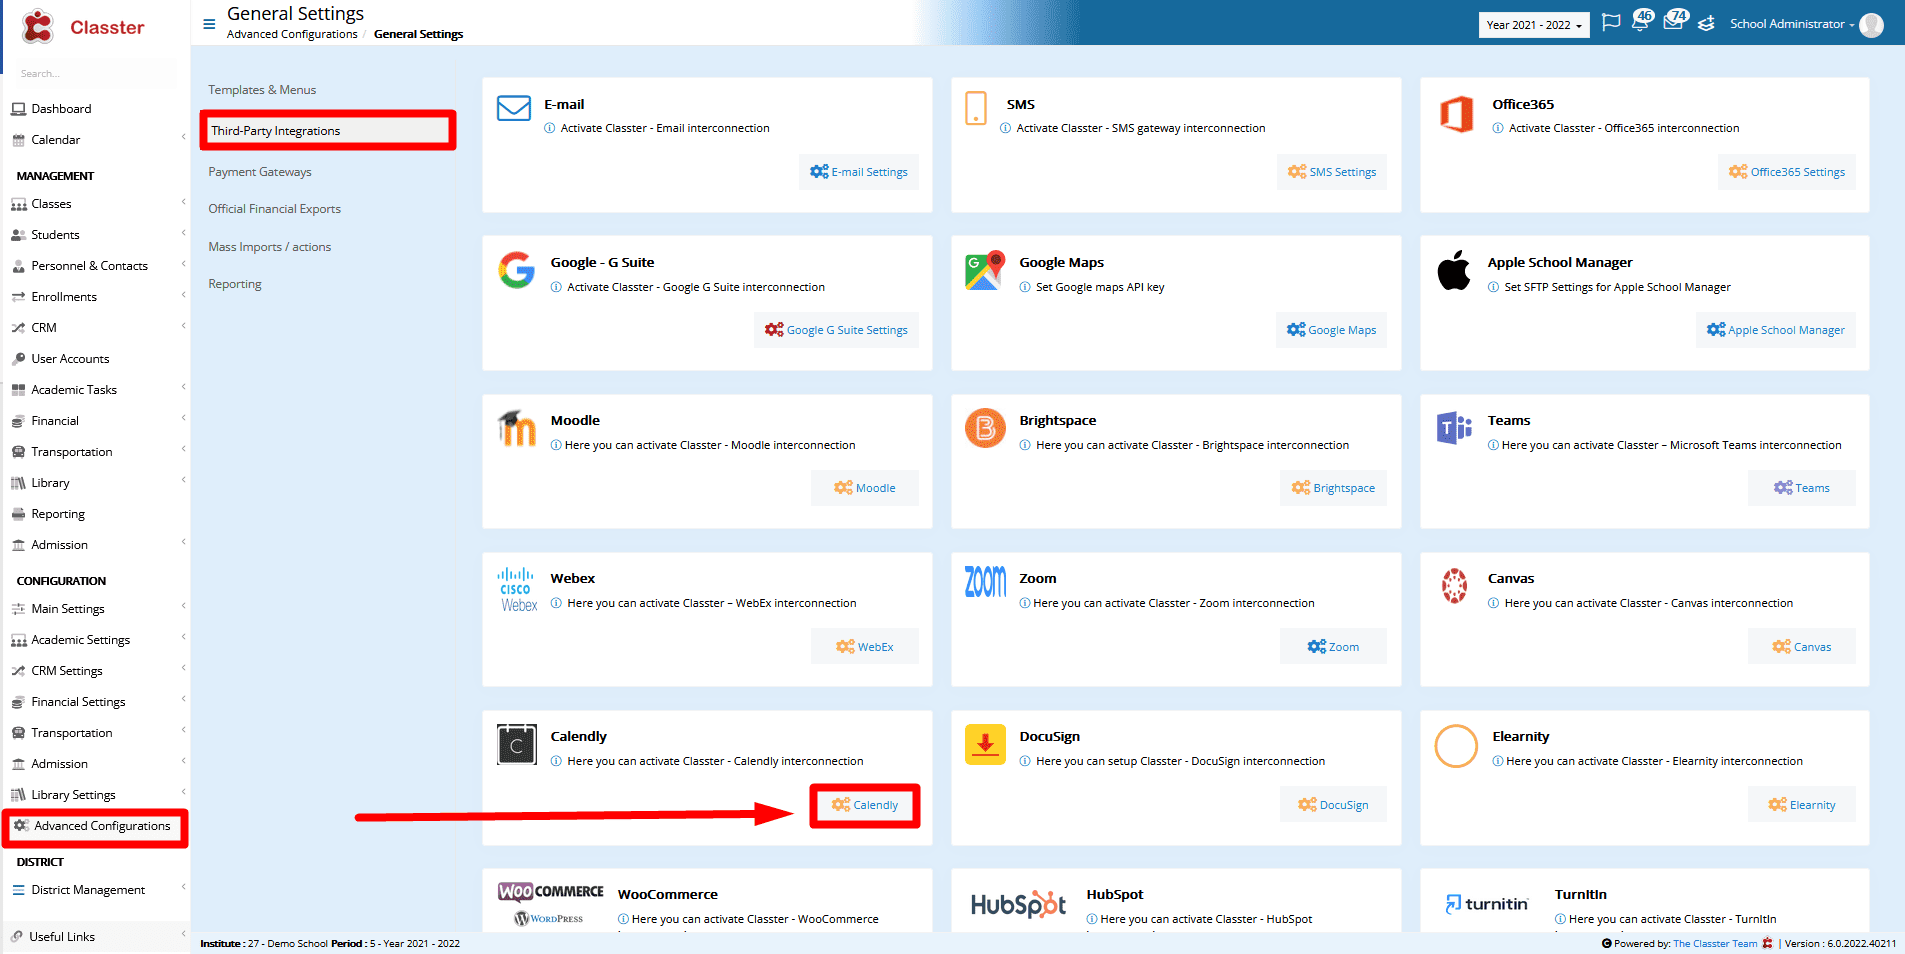
Here there is a single URL field where the User can paste his Calendly link. It can either be the general link of the account or the link of a specific type of meeting.
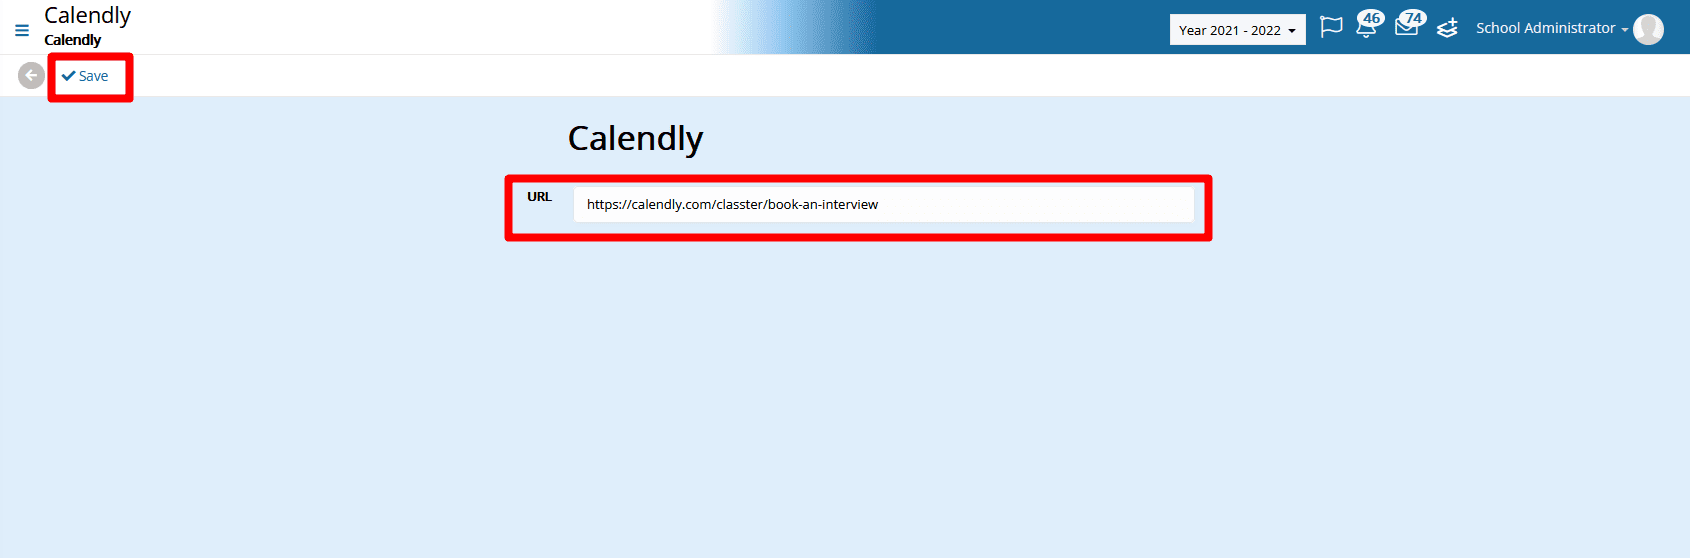
Paste the link, Save and you are all set.
Canvas
Classter supports an Integration with Canvas which provides multiple functionalities and can come in handy for Institutes that what to use both platforms. The integration offers three functionalities:
- Automatic creation of Students and Teachers in Canvas when created in Classter
- Automatic creation of Subjects/Modules in Canvas when created in Classter
- A single sign-on for Teachers and Students on both platforms.
Keep in mind that this works one way, meaning that the entities created in Classter will be automatically created in Canvas but not the other way around.
To set up the integration go to CONFIGURATION > Advanced Configurations > Third-Party Integrations > Canvas
On the next page, configure the available fields as described below:
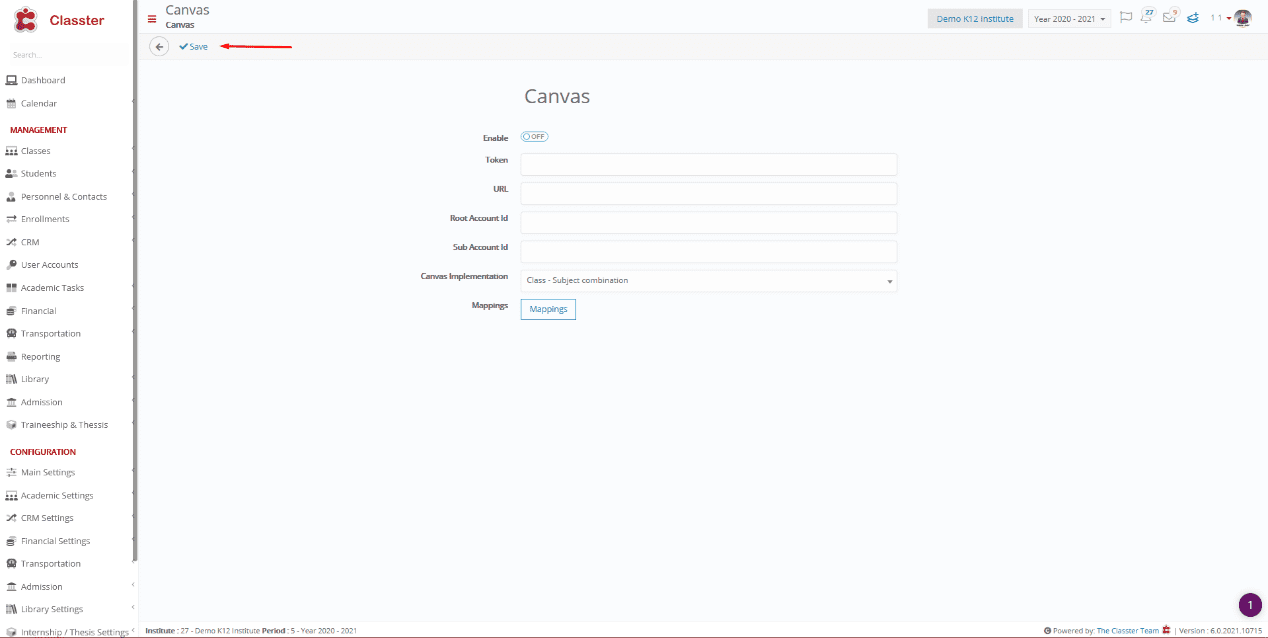
- Switch the Enable radio button ON.
- From your Admin account on Canvas, go to settings and get a New Access Token. Copy it and paste it into Classter’s Token field.
- In the URL field fill in the Institution’s Canvas URL address.
That’s the URL of the sign-in page of your Canvas account. - Root Account Id: Depending on the Institute’s Canvas account, there might be one or two accounts. The Id required in this field is visible in the accounts URL and is the number digit or digits at the end of the URL. If for example, the URL is this http://canvas.sampleschool.co.uk/accounts/1?, then the digit 1 must be filled in the Root Account Id field.
Note: On a Canvas admin account you will see an admin tab on the left of your screen. Click on it and then click on the main account you use. This will produce the URL you need. - Sub Account Id: In the cases when two accounts are used in Canvas, the Id of the second account should be filled in here with the same process as described above. If there is no second account, then the same Id must be filled in as in the Root Account Id field.
- The Canvas Implementation field is a list with two options, Class – Subject combination and Class as Term and Subject on Term. The first option will create 1 entity in Canvas for each Subject-Class combination of Classter on the default Term in Canvas. The second option will match the classes of Classter with Terms in Canvas and the Subjects of the classes will be created on those Terms.
- The Mappings section allows the pre-existing subjects of Canvas to be connected with Subjects in Classter. When clicking on the Mappings button a pop-up appears with every Class-Subject combination of Classter and a Provider Id field next to every combination.
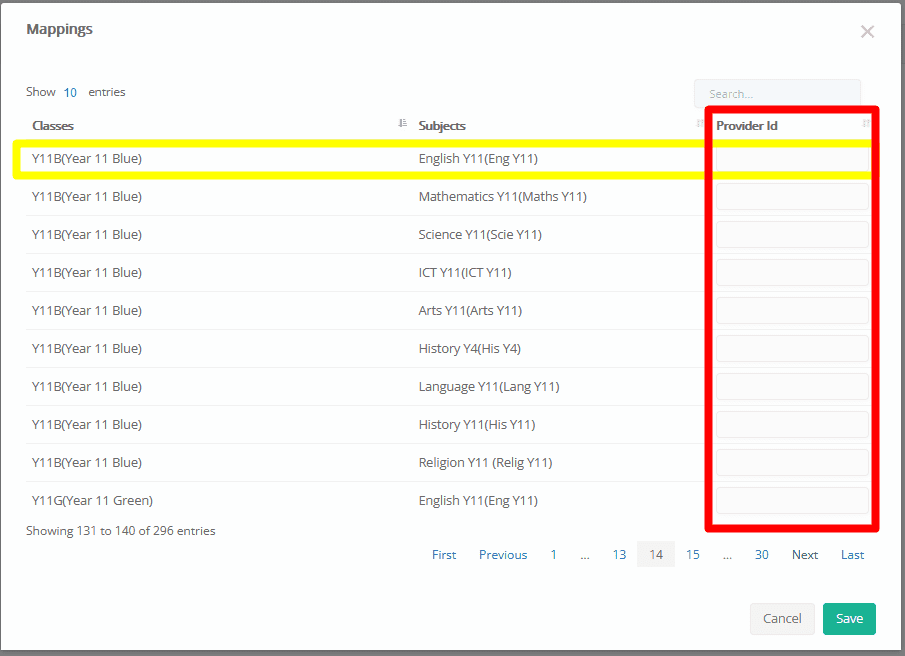
To set up the connection, get the Subject’s Id from Canvas and paste it in the respective field. Then save.
When done with the Configuration save to finalize the integration.
For more information, check out our Canvas Integration | Step By Step Guide.
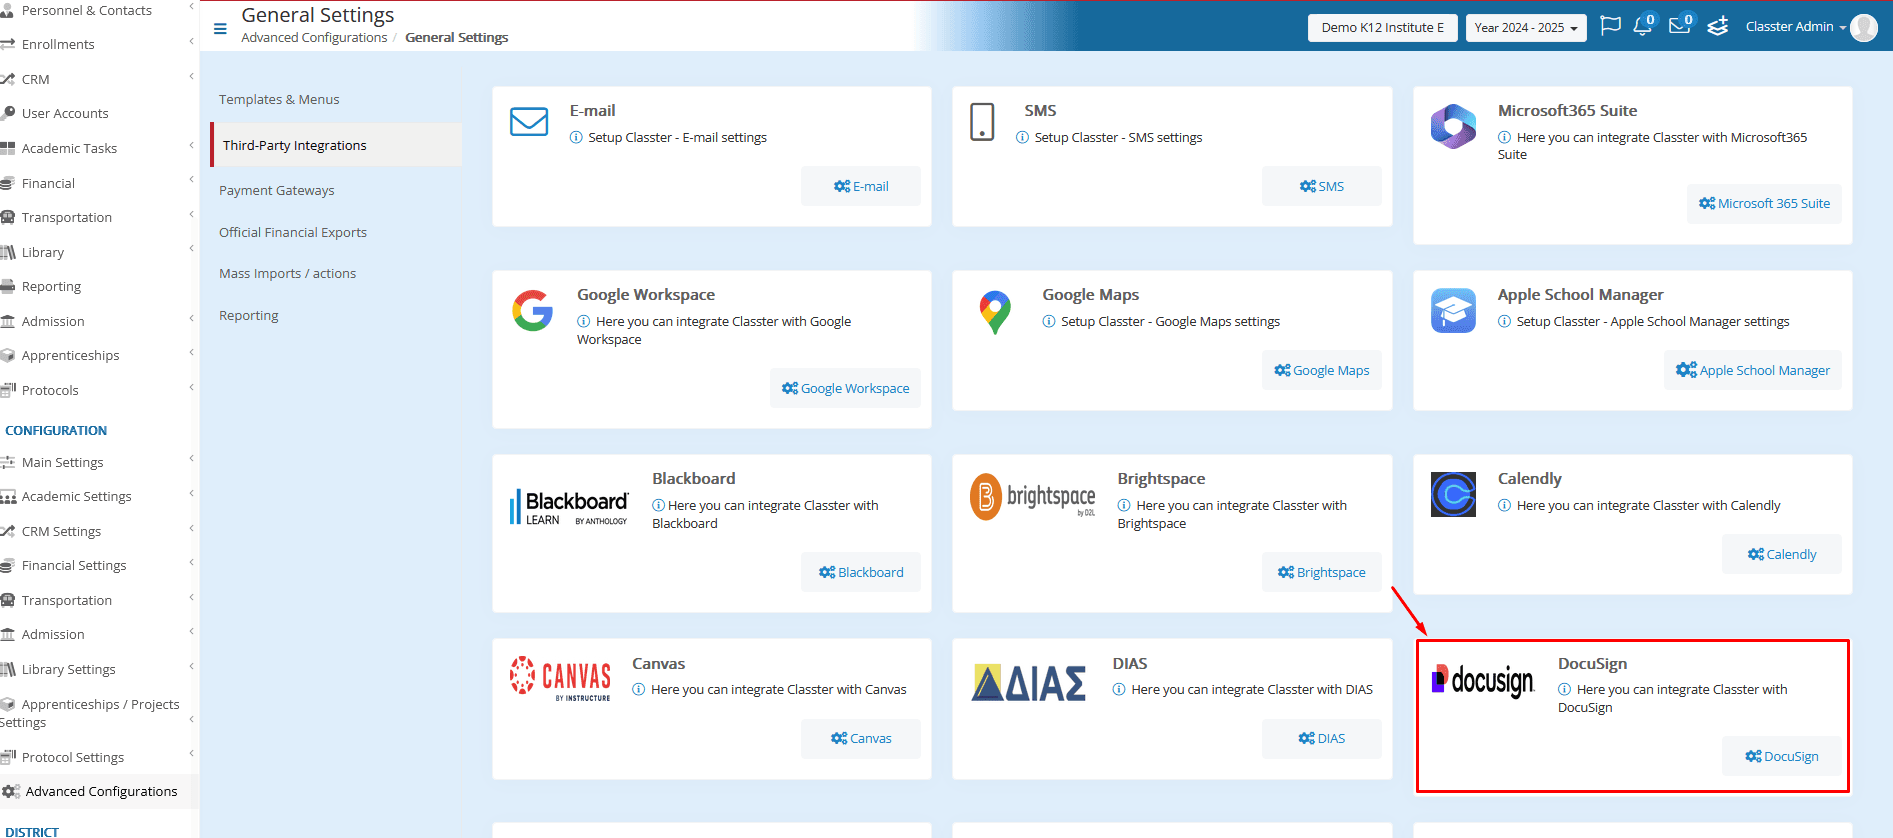
DocuSign
When there is the need for signing official documents, Classter provides integration with DocuSign, to easily get through with it from within Classter’s interface.
To integrate DocuSign, go to CONFIGURATION > Advanced Configurations > Third-Party Integrations and click on DocuSign.
In the next window, you will see that there is an instruction section with the steps you need to follow.
Follow the instructions and fill in the Integration Id, API Username, API Account Id, and Private Key fields.
Switch the “Use SandBox” radio button ON if you are Integrating a sandbox account, otherwise leave it switched OFF. When all the fields are configured, click on the Activate button.

Enable additional signatory persons: Turn this switch on if you want to designate a specific person to receive the documents after the main signatories have signed them.
Predefined signatory person: Define the additional signatory person for your institute here.
Note: To make the documents signable, include the text **signature** somewhere in the content. Since DocuSign cannot replace this text, you can hide it by matching the font color to the background. Additionally, add the text **date_signed** to automatically insert the signing date in the document. For the predefined signatory person, use the text **signature_**,**date_signed_2** to achieve the same functionality.
Note: When clicking on Activate you might get redirected to DocuSign where you might get asked to accept the permissions request.
When the integration is done the screen should look like this. Make sure the Enable switch is ON and Save.

More about Docusign: Docusign Integration
Elearnity
Classter can be integrated with Elearnity. This provides the following functionalities:
- Single sign-on on both platforms
- Students and Subjects created in Classter get created automatically in Elearnity
- Students can get the Elearnity links for the Subjects they are enrolled in from their Classter portal.
- When a Student has finished a Subject, the Subject Status in the Student’s portal in Classter gets updated
To set up the integration, go to CONFIGURATION > Advanced Configurations > Third-Party Integrations and click on Elearnity.

In the next window enable the Use Elearnity Radio button. In the Tenant and Token fields fill in the values provided by Elearnity.
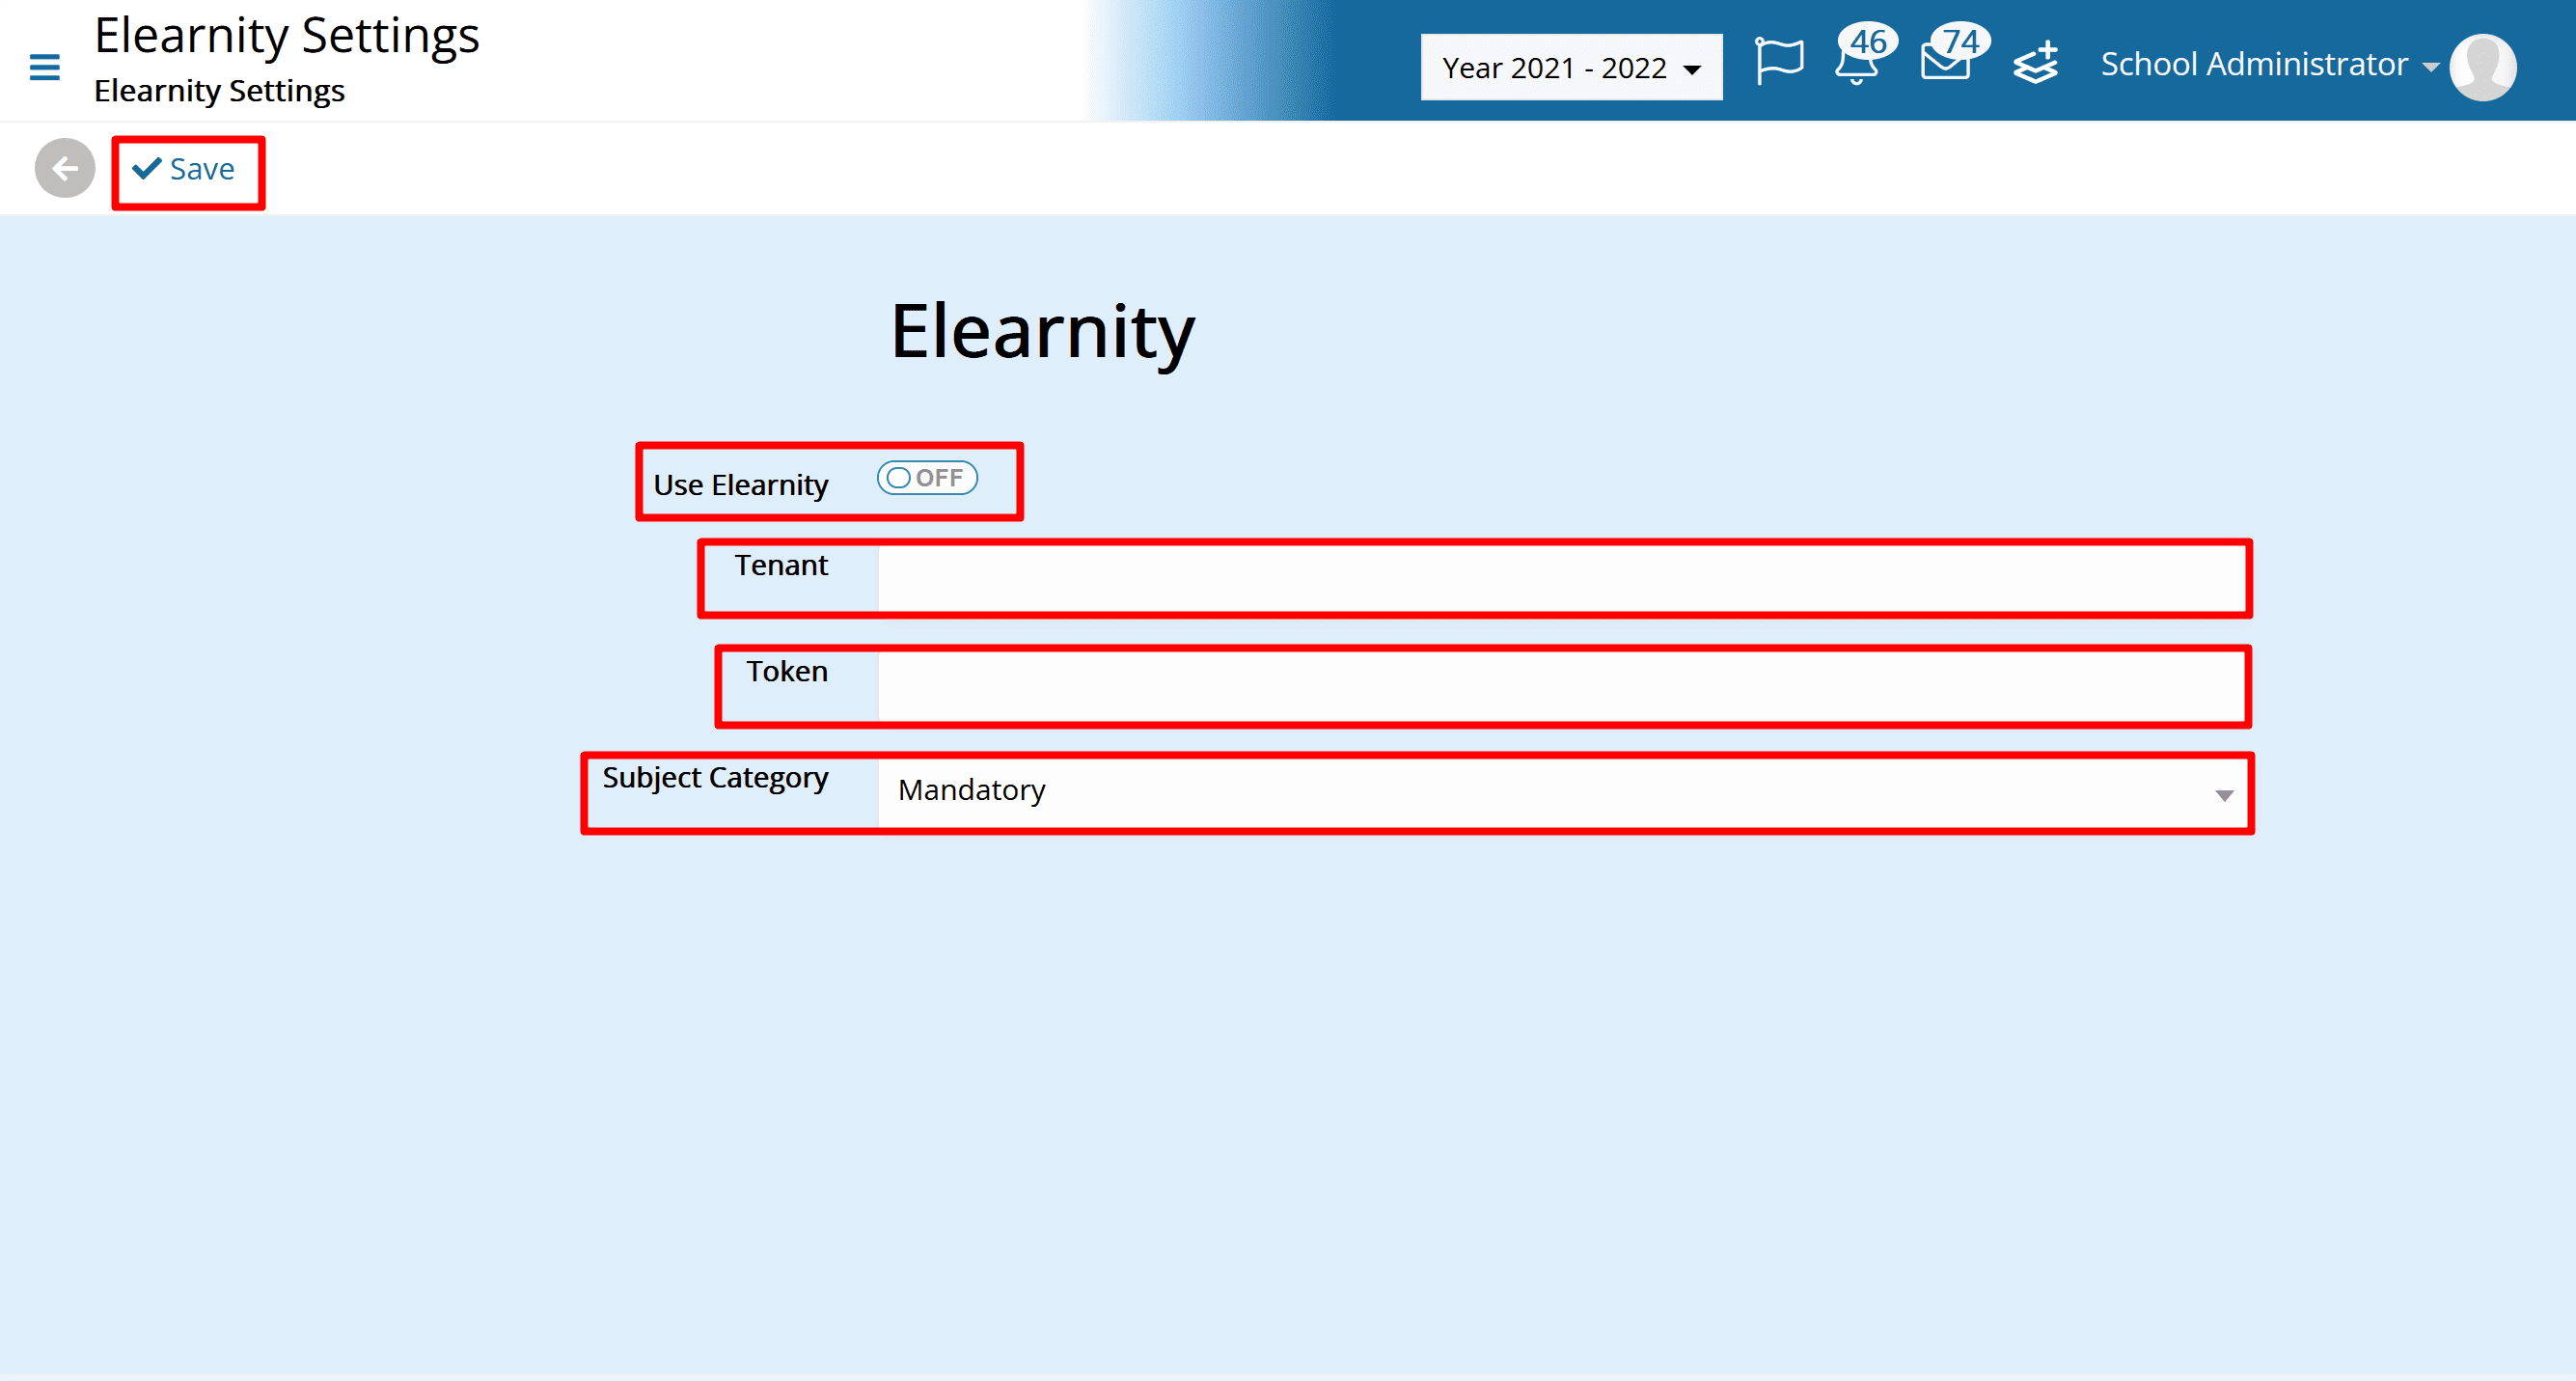
Finally, in the Subject Category field, select from the list the Subject Category of Classter whose Subjects you require to be created in Elearnity.
Click on Save and the integration is done.
Note: When a Student finishes a Subject, the Subject Status with which his profile is updated is selected automatically.
The Subject Statuses can be found in Main Settings > Dropdown lists.
Select Students Type and Subject Status. From the integration the Subject Status selected is always the first in the list with both the Mark Success and Online Courses boxes checked, which for the example below means the Pass status.

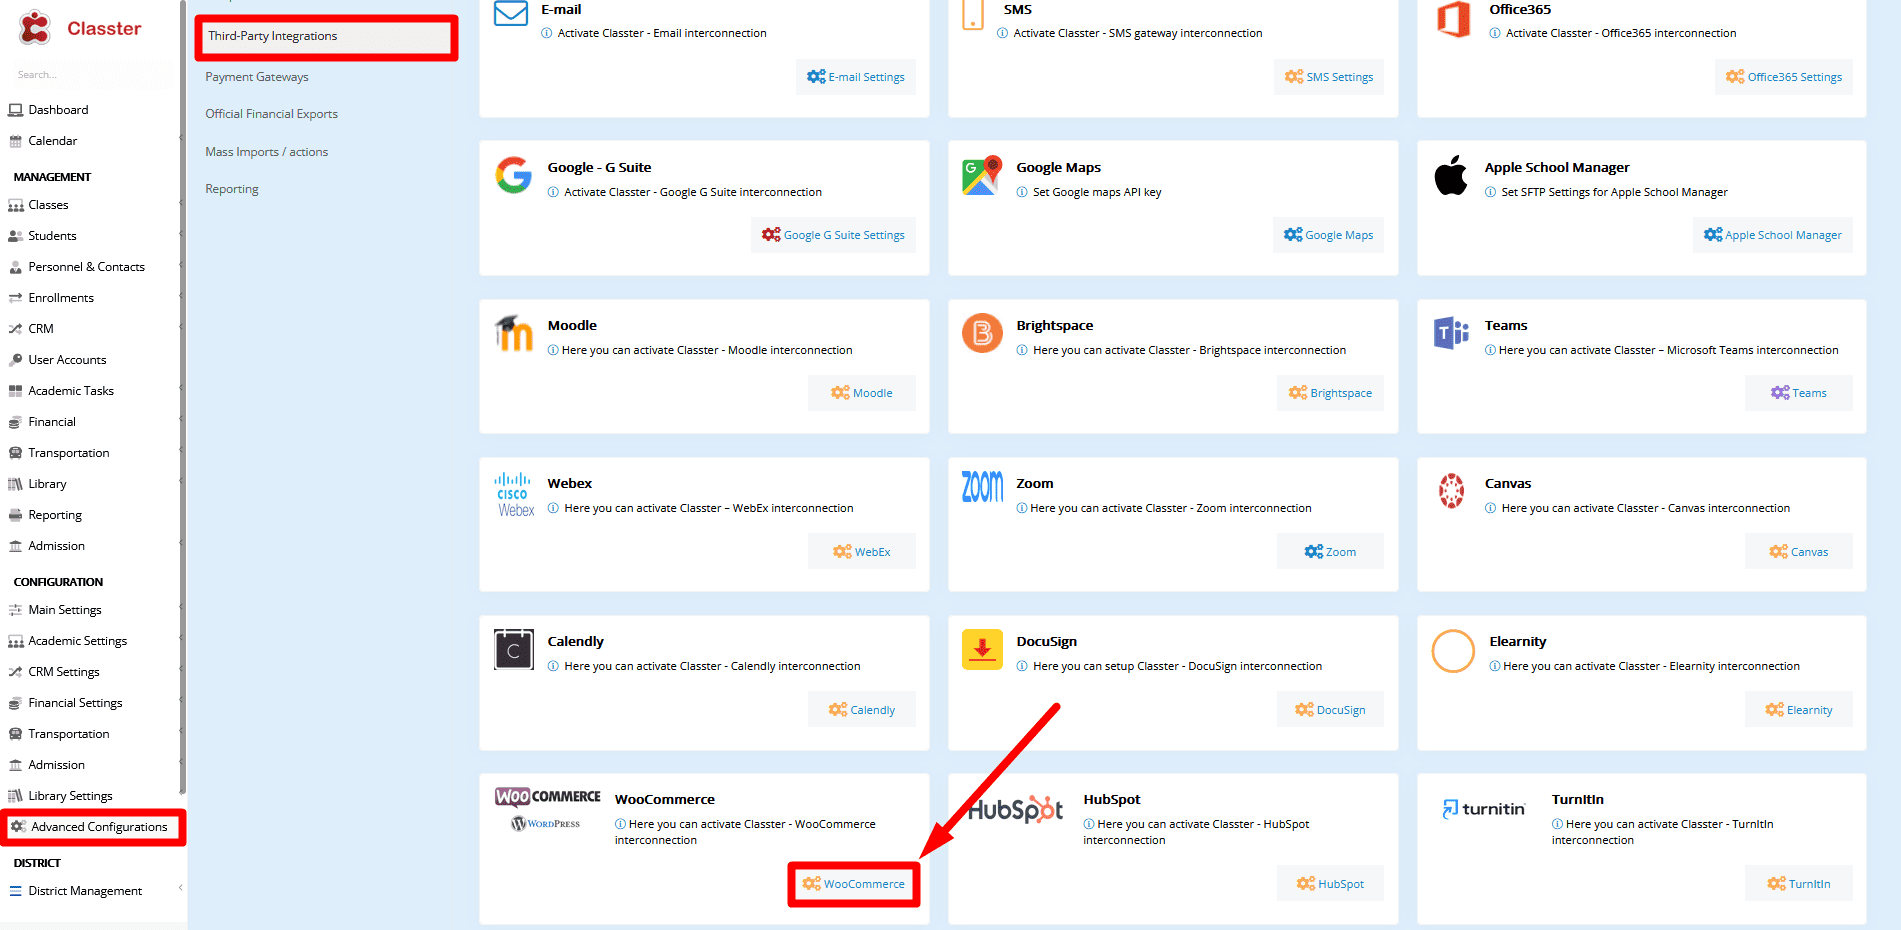
WooCommerce
The integration with WooCommerce can be a great time saver.
That’s because an Organization using a WooCommerce e-shop can have its clients instantly created in Classter the moment they make a purchase in the e-shop.
Specifically, when a Student makes a purchase in the shop, an account is automatically created in Classter, the Student gets enrolled in the purchased program and the amount he paid is saved in Classter.
To set up the integration, go to CONFIGURATION > Advanced Configurations > Third-Party Integrations and click on ![]() .
.
The first step for the integration is to fill the URL, Private Key, Type, Arrangement Types, and Status fields.

- URL: Fill in the URL of the e-shop.
- Private Key: Get this from WooCommerce when adding a webhook. WooCommerce will require a Delivery URL to provide the Private Key. Fill in the Delivery URL field with https://consumerapi.classter.com/api/webhooks/incoming/woocommerce.
- Type: It depends on the e-shop’s configuration. Choose accordingly whether the products are available in the e-shop per Group/Module or Grade/Stream.
- Arrangement Type: Select what Type of Arrangement will be saved in Classter for the transaction that takes place in the e-shop. Choose whether the Arrangement Type is of Service, Grade, Stream, Group, Module, or Administrative Fees.
- Status: Select the Registration Status with which the new Students will be created in Classter. The options here are those Student Statuses created in Classter.
After filling those fields, switch ON the Enable radio button and save.
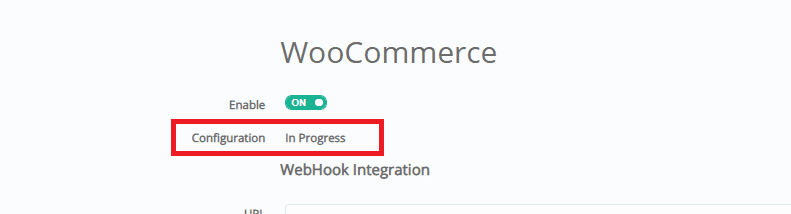
When you do, you will get this sign of Configuration: In Progress.
The data will be reviewed by our Team and we will do some work from our side. When the sign changes to Configuration: Completed, the integration will be ready for use.
The second section of the integration configuration is not mandatory.
If implemented, single sign-on is supported, where the user who has purchased a product from the customer’s shop can now log into Wordpress with Classter credentials.

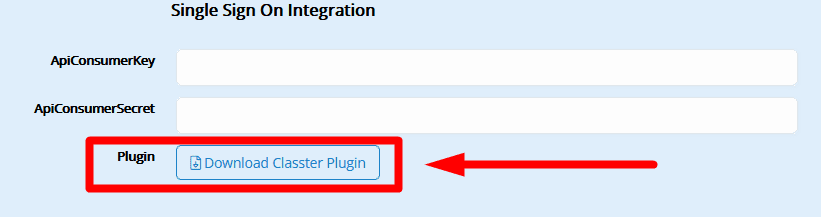
Find the ApiConsumerKey and the ApiConsumerSecret from WooCommerce in the Advanced tab by going in REST API and adding a key.
When generating the key, you will get the values required in the respective fields.
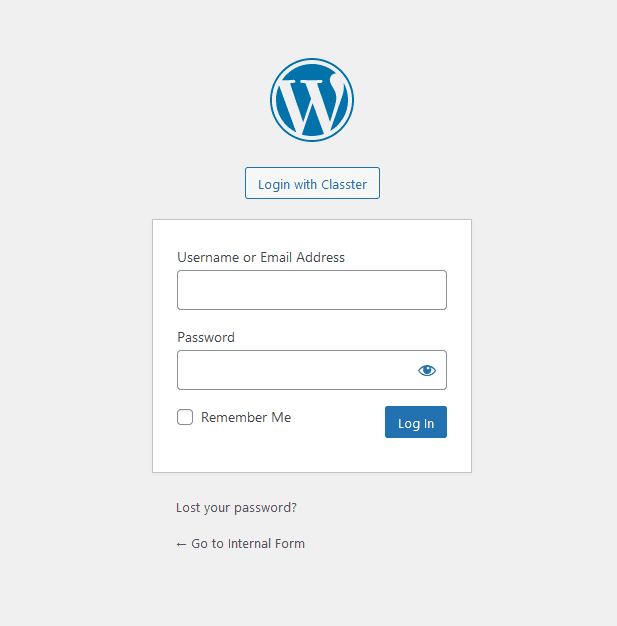
Finally, download the Classter Plugin from the integration window and install it in the site’s Wordpress.
Now, when going to log into the e-shop there will be the “Login with Classter” option.
If you encountered any difficulties, feel free to contact us at support@classter.com