

Prerequisites
Enabling Office 365
For you to be able to activate MS Teams Integration, first you need to have the Office 365 Integration up and running.
Please refer to this manual: https://help.classter.com/kb/how-to-onboarding-manuals/integrate-with-office-365-for-education-onboarding-manual/
If you need more help on the topic, feel free to send us an email at support@classter.com
MS Teams Required Actions
Signing In
Use the URL: https://www.microsoft.com
Click on “All Microsoft” and then under “Software” click on Microsoft Teams

You will be redirected to a screen similar to this:

By clicking the “Sign in” button you will be redirected to Microsoft’s secure login environment
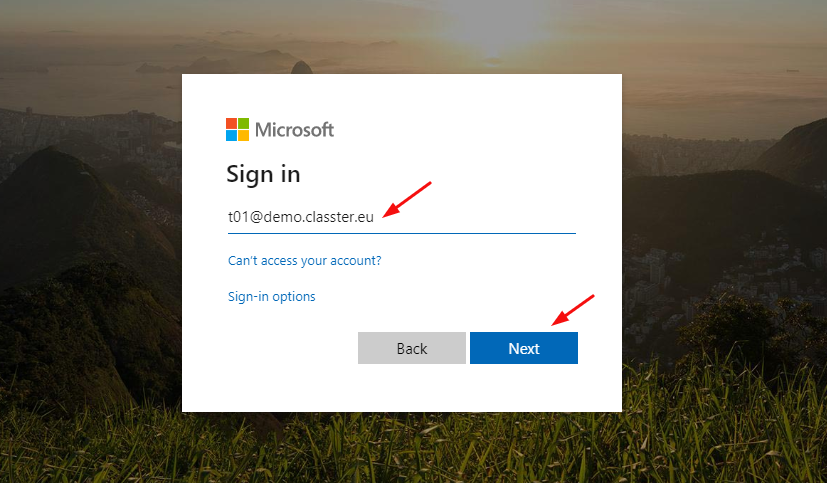
Type in your Classter username/email and click on the “Next” button.

Type in your Classter password and click “Sign in” to enter Microsoft’s Teams Environment
*Find out more about Signing in, here: https://help.classter.com/kb/integration-with-ms-teams/sign-in-to-ms-teams-users-guide/
Creating the Classes
The first step you need to complete is to create a class type team on MS Teams and retrieve the corresponding code for this class type team from MS Azure (Figure 1).
- From the Teams tab in MS Teams, click on the ‘Join or Create Team’ (Figure 1) button.

Figure 1
- In the next page click on the ‘Create a Team’ button. (Figure 1a)
- A popup window will appear (Figure 2).
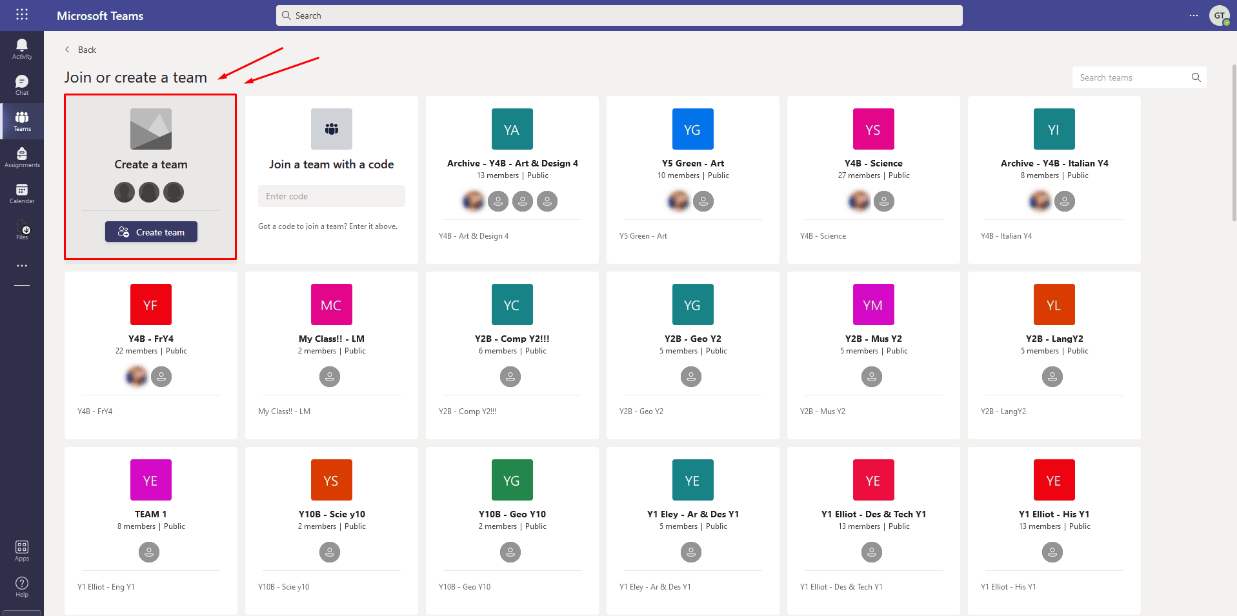
Figure 1a
In the pop up window you are given the option of four different types of teams (Figure 2):
- Click on the class type that best serves your needs (Figure 2).

Figure 2
- Once you click on the class type team you will view a popup window similar to the one displayed in Figure 3

Figure 3
To correctly set up the class you should add a Name for your new class (e.g. Math 101), a Description e.g. (Basic Numbers, Fractions and Decimals) and some Students (Figure 3 & 4):
- Find Students by typing one or more letters of their name.
- Click on their names to select your Students.
- Once selected, click on the add button to add them to the class.
- Click on the ‘Next’ button to proceed further with the creation process.
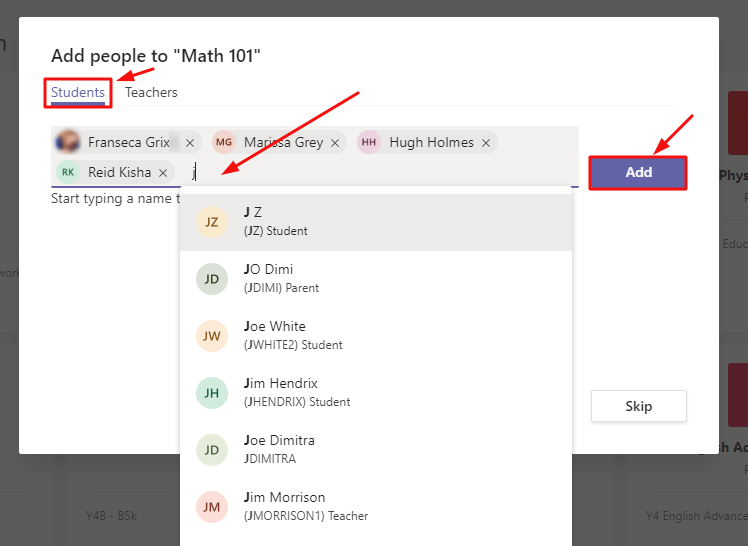
Figure 4
Repeat the above process, with Teachers this time. Once you are done click on the “Close” button (Figure 5).

Figure 5
The team functionalities can be viewed in Figure 6.

Figure 6
Note: The end user should have signed up at least once in their Office 365 account in Classter, to ensure Classter is a registered application in the user’s Office 365 account
Note: The end user should have signed up at least once in their MS Teams account excluding Classter, to ensure MS Teams is a registered application in the user’s Office 365 account
*Find out more about Creating Classes, here: https://help.classter.com/kb/integration-with-ms-teams/create-classes-in-ms-teams-users-guide/
*Find out about all the actions you can do with MS Teams Classes
here: https://help.classter.com/kb/integration-with-ms-teams/chat-assignment-calendar-tans-users-guide/
MS Azure Required Actions
Setting up Class interconnection
As a second step you need to log in to MS Azure. Follow the link: https://www.Portal.azure.com

Figure 7
In the login page you must type in your email (Figure 7).
- If you do not have an account, you can create one by clicking on the ‘Create One’ button.
- Click on ‘Next’ to proceed to the next step.

Figure 8
In the next page, type in your unique password (Figure 8).
- Click on the ‘Sign in’ button to sign into MS Azure.
- If you have forgotten your password, click on the forgot my password button and follow the retrieval process.
After logging in successfully you will be redirected to a page similar to the following, click on your profile icon and then “Azure Portal” (Figure 8a)

Figure 8a
Now you are into the MS Azure environment. Pay attention to the following steps required by the Classter third party integration page for MS Teams. (Figure 9)

Figure 9
- Click on the menu button located in the top left of the screen, it’s the button with the three lines.
- From the menu, click on the ‘Azure Active Directory’ button.
- You will be transferred to the Azure Active Directory page.

Figure 10
From the menu bar of the Azure Active Directory page, click on the Groups page (Figure 10).
- Once you have clicked on the ‘Groups’ button you will be transferred to the following page (Figure 11).

Figure 11
Remember the class type team we created in MS Teams? Here you can select it and find out more info.
- Double click on the Class ‘Math 101’.
- You will now be transferred to the Class page (Figure 12).

Figure 12
On this page you can view regarding this specific class you created earlier on MS Teams.
- Keep the Object Id handy as we will use it, in the Classter part of our integration for MS Teams.
- To copy the Object Id click on the copy button next to it.
Note: If your Teams integration doesn’t require [Application (Client) ID, Directory (Tenant) ID] and Client Secret, simply paste the Object Id in the Template ID field, as described below and move on to Step 6.
As not to keep you waiting, have a tab on your browser open with the Classter portal.
In the Classter portal follow the path: Dashboard > Configuration > Advanced Configuration > Third Party Integrations > MS Teams (Figure 13).

Figure 13
This page holds the fields that need to be filled in order to build the connection between Classter and MS Teams.
- Remember the code you copied from ‘Math 101’ in Azure > Groups page (Figure 12)? You need to copy and paste it in the Template ID field in Classter.
Note: This step can be skipped if no Template Class needs to be used.
Microsoft Teams Meetings
This step is required only if you want to use Microsoft Team Meetings
Back to MS Azure, follow the steps to acquire the rest of the codes that you might need to fill in the fields of Classter (Figure 13).
In the main page of MS Azure (Figure 14), click on the Azure Active Directory once more.

Figure 14
Once you have clicked on the ‘Azure Active Directory’ button from the menu, you will get redirected to the following page (Figure 15).

Figure 15
In this page, click on the ‘App registrations’ button from the menu on your left side.
- Once you click on App registrations you will be transferred to the following page (Figure 16).

Figure 16
Here you can see all expired and current app registrations.
- Click on the ‘+New registration’ button to add a new registration.
- Once you click on the new registration button you will be transferred to the registration page (Figure 17).

Figure 17
Enter the name for the new registration e.g., Classter Teams.
- From the radio button options, click on the third one ‘Accounts in any organizational directory (Any Azure AD Directory – Multitenant) and personal Microsoft account (e.g., Skype, Xbox)’.
- In the Redirect URI field select the Web option and paste the following URL https://snappy.appypie.com/app/onedrive
- Last click on the ‘Register’ button to complete the new registration.

Figure 18
This page in Figure 18 will appear once you have created the new registration.
- Copy the code from the Application (Client) ID field.
- Copy the code from the Directory (Tenant) ID field.
- Switch to the Classter Portal (Figure 19).

Figure 19
In the Client ID for Meetings field (Figure 19), you need to paste the code you copied in the previous step from the Application (Client) ID field in MS Azure (Figure 18).
In the Tenant ID for Meetings field (Figure 19), you need to paste the code you copied in the previous step from the Directory (Tenant) ID field in MS Azure (Figure 18).
Once again, this step is only required if your Institute is using Microsoft Teams Meetings
Configuring Certificates & API Secrets
This is the final step you need to complete the integration of MS Teams Meetings with Classter.
Back to MS Azure, click on the Certificates & Secrets button from the menu on the left side of the page (Figure 20).
 Figure 20
Once you click on the ‘Certificates & Secrets’ you will be transferred to the following page (Figure 21).
Click on the ‘New Client Secret’ button.

Figure 21
Once you click on the button you will get redirected to the page in Figure 22.

Figure 22
Select an expiration period for the client secret e.g., 12 months.
- Click on the ‘Add’ button.
- Once you complete this step, you will see the client secret code (Figure 23).

Figure 23
- Important: By adding a new Client Secret, two fields are generated, Value and Secret ID.
- Secret ID will be always visible but Value won’t be after closing or refreshing the page.
- We strongly advise you to keep a backup copy (either screenshot or by text) of Value for future usage
- Copy the Value code as shown in Figure 23.
- Paste the code in the Secret of Meetings in the Classter portal (Figure 24).

Figure 24
Configuring API Permissions
Next you need to check the permissions of your new created app. Click on the API Permissions button from the menu on the left side of the page (Figure 25).

Figure 25
Important: If you already have an active app and you want to edit the permissions, we strongly advise you to remove all permissions first before adding new ones.
- If you have no permissions in your app, go directly to Figure 28

Figure 26
On the API Permissions page, click on the options button next to the permission. (Figure 26)
- Click on ‘Remove all permissions’

Figure 27
- In the warning window click on the ‘Yes, remove’ button. (Figure 27)
- Once you have removed the permissions, click on the ‘Add a Permission’ button (Figure 28).

Figure 28
Once you click on the ‘Add a Permission’ button, you will see a window popup from the right side of the screen (Figure 29).

Figure 29
Click on the ‘Microsoft Graph’ button (Figure 29).

Figure 30
Click on the ‘Application permissions’ button (Figure 30).
- Click on “Application permissions” to load all the available options (Figure 31
Use the search field to locate User privileges e.g., user. (Figure 31)
Figure 31
- Click on the User dropdown list and select ‘User.ReadWrite.All’.

Figure 32
Use the search field to locate Directory privileges e.g., directory. (Figure 32)
- Click on the Directory dropdown list and select ‘Directory.ReadWrite.All’.

Figure 33
Use the search field to locate Group privileges e.g., Group. (Figure 34)
- Click on the Group dropdown list and select ‘Group.ReadWrite.All’.

Figure 34
Use the search field to locate Calendar privileges e.g., Calendar.
- Click on the Calendar dropdown list and select ‘Calendar.ReadWrite.
- Finally click on the ‘Add permissions’ button in the bottom of the page (Figure 34).
Once you have added the permissions, you will be redirected to the main permission page.
- You will notice that the permissions have not been granted consent.
Click on the Grant Admin consent For Vertitech button, and you will see that all your permissions will turn green (Figure 35).

Figure 35
What to expect
Back to Classter portal, follow the path Dashboard > Configuration > Advanced Configuration > Third Party Integrations > MS Teams (Figure 36).

Figure 36
Create Team Name Based On:
Teams can be created based on Groups/Classes, Year or Group/Class and Subject.
- Depending on your Classter terminology the terms you see may differ.
- The Group/Class option will create teams based on groups/classes. It will add all students and teachers to the appropriate group/class.
- The Year option will create teams based on the Year (Grade). It will add all students and teachers of the year/grade to the appropriate team.
- The Group/Class and Subject option will create teams for the Group/Class based on the Subject. Each group/class will have its own team for each subject.
Affect User Teams in other Periods:
When Enabled:
- Checks every period in the Institute.
- Classter checks each student status and removes the students from the corresponding team.
- Select enabled when you want to use the same Team instead of creating new ones but you want Students to change according to the period.
When Disabled:
- Checks only the selected period of the Institute
- Classter does not check each student status so it does not remove the students from the corresponding team
- Select disabled when you want to use the same Team instead of creating new ones but you don’t want Students to change according to the period.
Mappings:
Mappings allow the user to set his own custom connection between Classter and MS Teams (Figure 37)
- Copy the Provider ID of a Team and paste it accordingly to connect Classes and Subjects with already created Teams.
- Click “Save” when ready.

Figure 37
MS Office Required Actions
Configure Access
Go to the website of Office 365. (Figure 38)
Use the link: https://www.microsoft.com/en-us/microsoft-365/microsoft-office
 Figure 38
Click on Office and then click on Sign In (Figure 38)
- Once you click on sign in you will be asked to fill in your username and password to enter.

Figure 39
- Click on the ‘Admin’ button (Figure 39)
- You will be transferred to the Admins page (Figure 40).

Figure 40
In the Admin’s page, navigate to Settings > Org settings. In the Services tab, click on Microsoft Teams and select for which users you want to turn on MS Teams. (Figure 41).
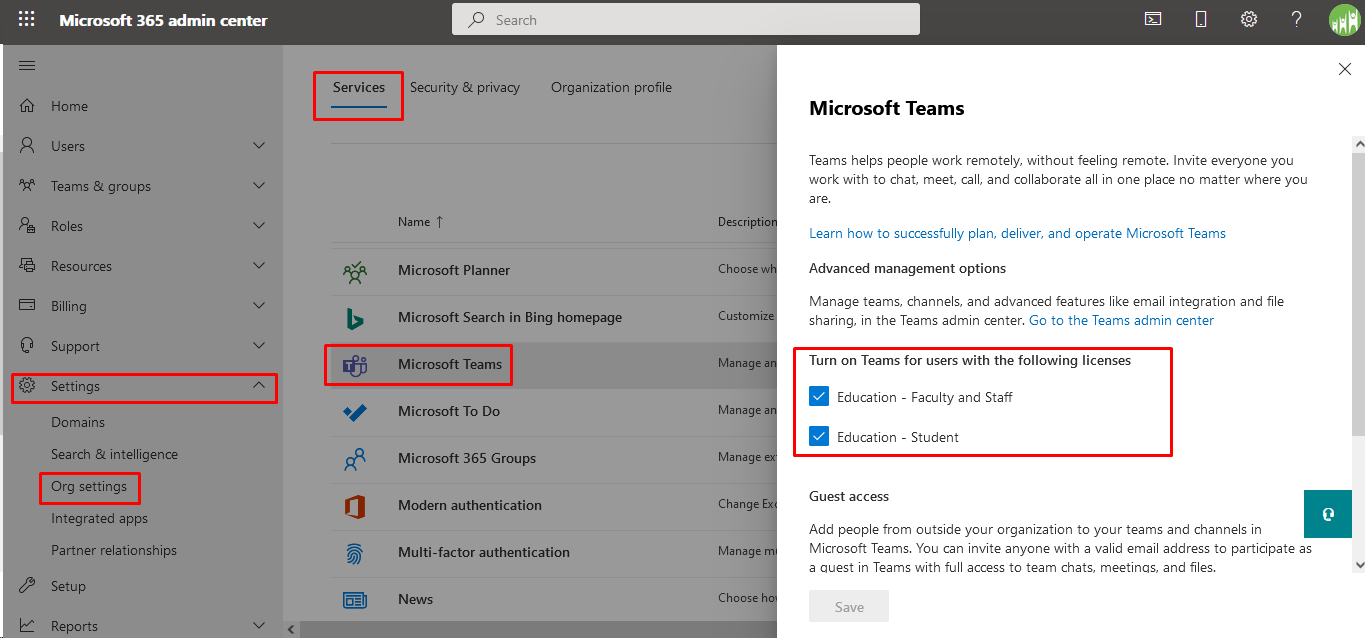
Figure 41
- When Ready, click on Save.
- Return to Classter Portal for the final step of the process.
Classter Required Actions
Syncing Users
Once you are in the Classter Portal, navigate to the User Accounts page (Figure 42).
Follow the path: Dashboard > Management > User Accounts (Figure 42).

Figure 42
In the User Types dropdown list select Students
- Click on “Search“
- Click on the select all entries button, to select all students in the list.
- Now with all the students selected open the Bulk Actions dropdown button and select the ‘Sync External Provider/Users Data’ button. (Figure 42)

Figure 43
Once you have synced the data you will see that in the pending changes column of the list the ‘No’s’ have turned to ‘Yes’ (Figure 43).
- Repeat this process with Teachers this time.
- Note: This Process may take up to 24hours to be completed.
That’s it, Classter is now integrated with MS Teams, enjoy!