

During the application process, an applicant’s status may appear different terms depending on the institution’s configuration of statuses, i.e. accepted, preliminary accepted, rejected etc. Accordingly, the applicant may decide to accept an offer, reject an offer or accept another offer.
Tip: You can benefit from our complete guide in application statuses.
To differentiate when an applicant completely rejects an offer or accepts another offer in the same institution, you need to adjust the corresponding statuses in the configuration settings. To do so, from the configuration menu, go to Admission → Admission Settings. (Figure 1)
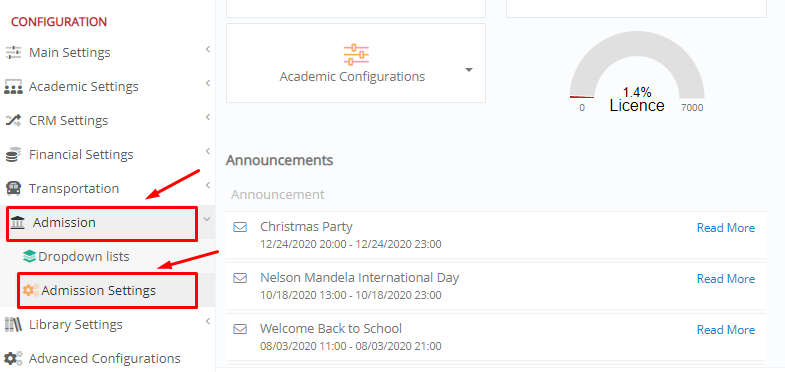
Figure 1
In the next window, you want to go to the Application Settings tab.
Tip: A detailed overview of all application settings can be found in this article.
Click on the Application Management Tab, then scroll down until you see the “Application Acceptance & Rejection Settings” section (Figure 2)
Here you are interested in two settings, “Default Application Rejection Status” and “Default Application Rejection Status when an applicant accepts another educational program”. (Figure 3)
The first setting means that the applicant rejected the offer, while the second that the applicant accepted another offer. Meaning that if a student rejects an offer the status will automatically go to the first setting. If the student accepts another offer, any other application or educational program is automatically changed to the second setting.
Once this configuration is completed, click on the “Save” button to save your changes. (Figure 2)
Therefore, you can distinguish the two cases based on the status you assign to each one of them. For example, you can have the “Rejection” status for someone who flat out rejects the offer, and the status “Rejected for another offer” if the student rejected one offer for another.
 Figure 2

Figure 3
The application period is a particularly stressful time of the year for all educational institutions. Classter’s Admission Module simplifies the whole process.
Tip: You may read a detailed overview of the general settings of the Admission Module to understand how different settings work.
Find more or post your questions on our Facebook Community Page. Also, watch our how-to videos on our Youtube channel.