

In this section, you can manage various systemic lists that concern many parts of the Classter System. Here we will be focusing on the lists that are included in the Admissions and subsequently the application process.
- Click on the Main Settings dropdown list.
- Choose a dropdown list type which indicates where these lists belong e.g., Student etc.
- Choose a specific list belonging to the type selected in the previous step. This option is filtered by the choice you made in the Type option. Since the choice of type was Student then the first dropdown list of this type would be Advertising Medium.
- Below we will see all types and dropdown lists used in the admissions and application process.
System – Dynamic Documents Categories
Once you choose System from the Type option and you choose Dynamic Documents Categories you will be taken to the following page (Figure 65).
 Figure 65
On this page you will see the following (Figure 65):
- You can change the order of the list by dragging and dropping the items on the list. Once you do it you will see a new button called ‘Save-Re-ordering’.
- If you have changed the order of the items on the list, you can click on the ‘Auto Order’ button to revert the order to its original order.
- You can use the search field to find a specific Dynamic Document Category.
- You can copy, edit, or delete an item on the list by clicking on the respective buttons.
- To create a Dynamic Document Category, click on the +add new button.
Once you click on the +add new button you will see the following popup window (Figure 66):

Figure 66
- Add a title for this new dynamic document category e.g., Additional Documentation.
- Add a description for this new custom field category e.g., Additional Documentation.
- If the is Required option is turned on, then the user must add document/s to this category.
- Click on the ‘Save’ button to save this new dynamic document category.
Once you click on the edit button (Figure 65) you will see a similar popup window with the creation popup window. Make your changes and click on the ‘Save’ button to save changes.
System – Dynamic Dropdowns
Once you choose System from the Type option and you choose Dynamic Dropdowns you will be taken to the following page (Figure 67). This dropdown option can be used to setup the answer options for consents.
 Figure 67
On this page you will see the following (Figure 67):
- You can use the search field to find a specific Dynamic Document Category.
- You can copy, edit, or delete an item on the list by clicking on the respective buttons.
- To create a Dynamic Document Category, click on the +add new button.
- Once you create a new dynamic dropdown list you can add items to the list by clicking on the add items button (next to the copy button).
Once you click on the +add new button you will see the following popup window (Figure 68):

Figure 68
- Add a description for this new dynamic dropdown list e.g., Consent.
- If the is Consent option is turned on, then this dropdown list will be considered a consent dropdown list.
- Click on the ‘Save’ button to save this new dynamic dropdown list.
Once you click on the edit button (Figure 67) you will see a similar popup window with the creation popup window. Make your changes and click on the ‘Save’ button to save changes.
Once you have created the dynamic dropdown list, click on the add items button (Figure 67) to add options to this list. You will be transferred to the add items page (Figure 69).
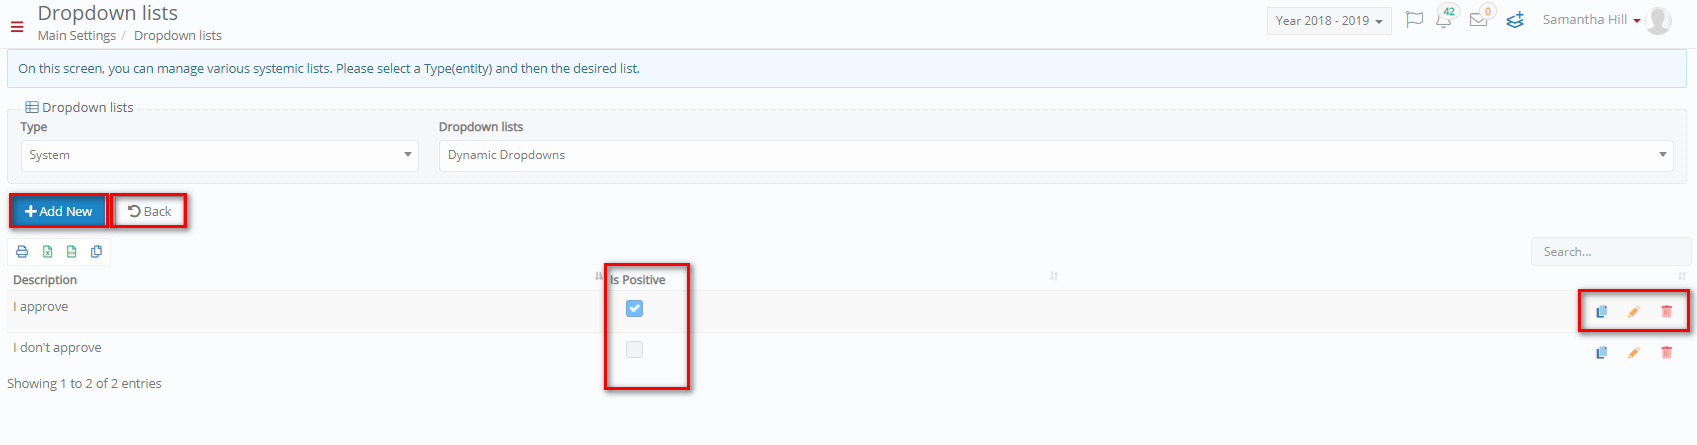 Figure 69
On this page you will see the following (Figure 69):
- You can print, export, or copy this list of items by clicking on the respective buttons on the left side of the page.
- You can use the search field to find a specific item in this case, consents.
- You can copy, edit, or delete an item on the list by clicking on the respective buttons.
- You can click on the ‘Back’ button to return to the dynamic dropdowns page.
- To create an item, click on the +add new button.
Once you click on the +add new button you will see the following popup window (Figure 70):

Figure 70
- Add a description for this new list item e.g., I approve.
- If the is Positive option is selected, then this list item will be considered a positive choice.
- Click on the ‘Save’ button to save this list item.
Once you click on the edit button (Figure 69) you will see a similar popup window with the creation popup window. Make your changes and click on the ‘Save’ button to save changes.
System – Scientific Field
Once you choose System from the Type option and you choose Scientific Field you will be taken to the following page (Figure 71).
 Figure 71
On this page you will see the following (Figure 71):
- You can change the order of the list by dragging and dropping the items on the list. Once you do it you will see a new button called ‘Save-Re-ordering’.
- If you have changed the order of the items on the list, you can click on the ‘Auto Order’ button to revert the order to its original order.
- You can use the search field to find a specific scientific field.
- You can copy, edit, or delete a scientific field on the list by clicking on the respective buttons.
- To create a new scientific field, click on the +add new button.
Once you click on the +add new button you will see the following pop-up window (Figure 72):

Figure 72
- Description: Add a description for this scientific field e.g., Chemistry.
- Global Code: Add a global code if applicable e.g., 7
- Custom Lookup 1: You can choose to use a custom lookup list (Optional)
- Custom Lookup 2: You can choose to use a second custom lookup list (Optional)
- Parent Scientific Field: Choose a parent scientific field for the one you are creating, e.g., Science (If applicable).
- Scientific Field Category: Choose an additional form of categorization of this new scientific field e.g., Scientific Field, Category A (optional).
- Scientific Field Use: Which system entities will be able to use this scientific field e.g., Both (Teachers and Subjects).
- Click on the ‘Save’ button to save this new religion.
Once you click on the edit button (Figure 71) you will see a similar popup window with the creation popup window. Make your changes and click on the ‘Save’ button to save changes.
System – Scientific Field Category
Once you choose System from the type option and you choose Scientific Field Categories you will be taken to the following page (Figure 73).
 Figure 73
On this page you will see the following (Figure 73):
- You can change the order of the list by dragging and dropping the items on the list. Once you do it you will see a new button called ‘Save-Re-ordering’.
- If you have changed the order of the items on the list, you can click on the ‘Auto Order’ button to revert the order to its original order.
- You can use the search field to find a specific scientific field category.
- You can copy, edit, or delete a scientific field category on the list by clicking on the respective buttons.
- To create a new scientific field category, click on the +add new button.
Once you click on the +add new button you will see the following popup window (Figure 74):

Figure 74
- Add a short description for this new scientific field category e.g., LNG
- Add a description for this new scientific field category e.g., Linguistics.
- Click on the ‘Save’ button to save this new scientific field category.
Once you click on the edit button (Figure 73) you will see a similar popup window with the creation popup window. Make your changes and click on the ‘Save’ button to save changes.
System – Subject Category
Once you choose System from the Type option and you choose Subject Category you will be taken to the following page (Figure 75).
 Figure 75
On this page you will see the following (Figure 75):
- You can change the order of the list by dragging and dropping the items on the list. Once you do it you will see a new button called ‘Save-Re-ordering’.
- If you have changed the order of the items on the list, you can click on the ‘Auto Order’ button to revert the order to its original order.
- You can use the search field to find a specific subject category.
- You can copy, edit, or delete a subject category on the list by clicking on the respective buttons.
- To create a new subject category, click on the +add new button.
Once you click on the +add new button you will see the following popup window (Figure 76):
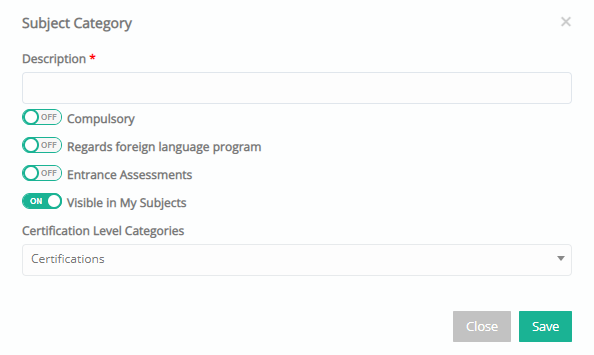
Figure 76
- Add a description for this new subject category e.g., IB.
- Turn the Compulsory option on to make this subject category compulsory.
- Turn the Regards foreign language program option on to indicate that this subject category relates to subjects of a language program.
- Turn on the Entrance Assessments option on if you want subjects in this category to have entrance assessments e.g., prerequisites etc.
- Choose a Certification Level category for this subject category e.g., Advanced.
- Click on the ‘Save’ button to save this new scientific field category.
Once you click on the edit button (Figure 75) you will see a similar popup window with the creation popup window. Make your changes and click on the ‘Save’ button to save changes.
Student – Status Dropdown list
Once you choose Students from the ‘type’ option and you choose Status you will be taken to the following page (Figure 77).
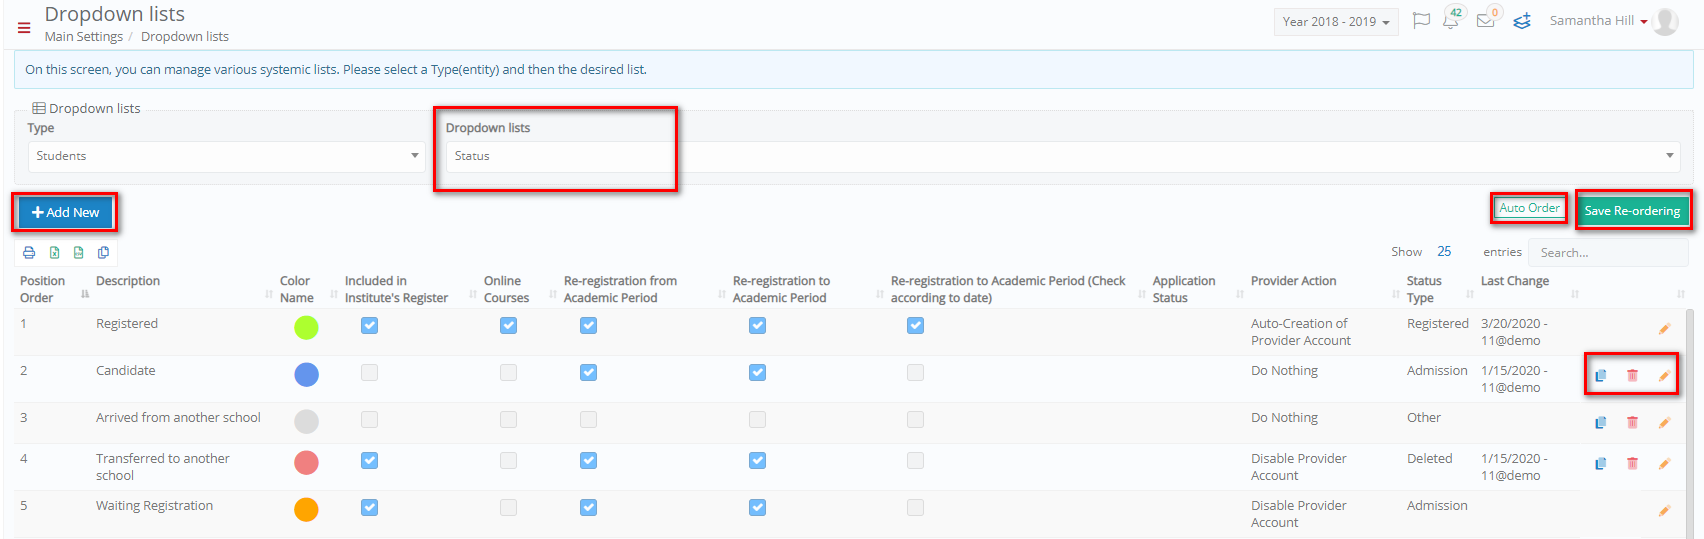 Figure 77
- On this page you will see the following (Figure 77):
- You can change the order of the list by dragging and dropping the items on the list. Once you do it you will see a new button called ‘Save-Re-ordering’.
- If you have changed the order of the items on the list, you can click on the ‘Auto Order’ button to revert the order to its original order.
- You can print, export, or copy list of reasons by clicking on the respective buttons
- You can use the search field to find a specific status.
- You can copy, edit, or delete a status on the list by clicking on the respective buttons.
- To create a new status, click on the +add new button.
Once you click on the +add new button you will see the following popup window (Figure 78):

Figure 78
- Description: Add a description for this new status e.g., Registered.
- Color Name: Add a color to identify this status in the list of statuses
- Status Type: Choose a status type to connect (relate to the function) to this new status e.g., Registered
- Include in Institution’s Register: If this is turned on then this status will be included in institution register.
- Online Courses: Turn this on to include this status in online class enrolments.
- Re-registration to Academic Period (Check according to date): Turn this on to include this status in re-registration to academic periods (checks according to date) cases.
- Re-registration from Academic Period: Turn this on to include this status in re-registration from academic periods cases.
- Re-registration to Academic Period: Turn this on to include this status in re-registration to academic periods cases.
- Application Status: Choose an application status that corresponds to the new status you are creating e.g., Registered Student.
- Provider Action: Choose the action to be taken if user student attains registered status e.g., Auto-Creation of Provider Account.
- Click on the ‘Save’ button to save this new status.
Once you click on the edit button (Figure 77) you will see a similar popup window with the creation popup window. Make your changes and click on the ‘Save’ button to save changes.
Student – Certification Categories/ Qualification Levels
Once you choose Students from the Type option and you choose Certification Categories/Qualification Levels you will be taken to the following page (Figure 79).
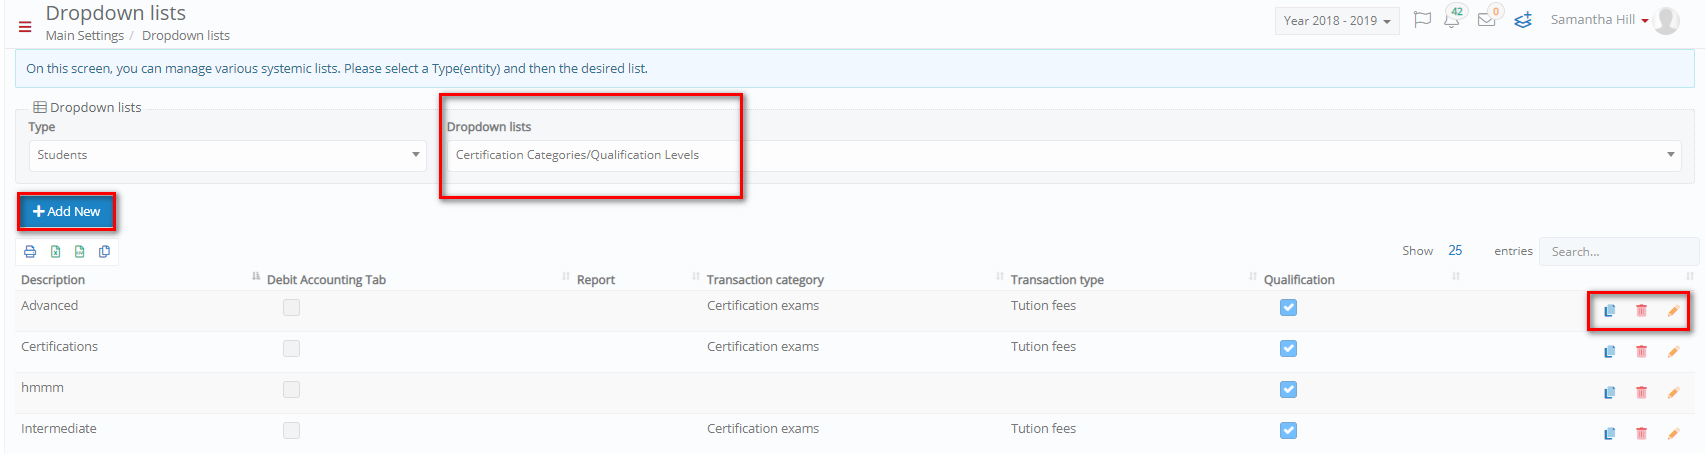 Figure 79
On this page you will see the following (Figure 79):
- You can use the search field to find a specific certification categories/ qualification level.
- You can copy, edit, or delete a Certification Category/ Qualification Level on the list by clicking on the respective buttons.
- To create a new Certification Category/ Qualification Level, click on the +add new button.
Once you click on the +add new button you will see the following pop-up window (Figure 80):

Figure 80
- Add a description.
- Enable the default accounting tab.
- Select a default report for this certification category/qualification level from the dropdown.
- Select a transaction category from the dropdown.
- Select a transaction type from the dropdown.
- Enable the qualification switch if this is a qualification.
- Click on the ‘Save’ button to save.
Once you click on the edit button (Figure 79) you will see a similar popup window with the creation popup window. Make your changes and click on the ‘Save’ button to save changes.
Student – Certification Units/ Qualification Marks
Once you choose Students from the Type option and you choose Certification Units/Qualification Marks you will be taken to the following page (Figure 81).
 Figure 81
On this page you will see the following (Figure 81):
- You can use the search field to find a specific certification units/qualification mark.
- You can copy, edit, or delete a certification unit/qualification mark on the list by clicking on the respective buttons.
- To create a new certification unit/qualification mark, click on the +add new button.
Once you click on the +add new button you will see the following popup window (Figure 80):

Figure 82
- Add a description.
- Add a value.
- Add an account information.
- Add the send account details.
- Enable the provisional switch for provisional grades.
- Enable the qualification switch for qualification marks.
- Click on the ‘Save’ button to save this new type of studies.
Once you click on the edit button (Figure 81) you will see a similar popup window with the creation popup window. Make your changes and click on the ‘Save’ button to save changes.
In the Students Type you can also create custom dropdown lists by using a custom dropdown and by customizing terminology for that dropdown.
Student – Certification Levels/ Qualification Exam Boards
Once you choose Students from the type option and you choose Certification Levels/Qualification Exam Boards you will be taken to the following page (Figure 83).
 Figure 83
On this page you will see the following (Figure 83):
- You can use the search field to find a specific certification levels/qualification exam board.
- You can copy, edit, or delete a type of studies on the list by clicking on the respective buttons.
- To create a new certification levels/qualification exam board, click on the +add new button.
Once you click on the +add new button you will see the following popup window (Error! Reference source not found.):

Figure 84
- Add a description
- Enable the unit switch to mark this as a unit.
- Enable the qualification switch to mark this as a qualification.
- Select the category from a category dropdown.
- Add certification units
- Add an account.
- Add second account information.
- Click on the ‘Save’ button to save.
Once you click on the edit button (Figure 84) you will see a similar popup window with the creation popup window. Make your changes and click on the ‘Save’ button to save changes.
Student – Qualification/ Certification Status
Once you choose Students from the Type option and you choose Qualification/Certification Status you will be taken to the following page (Figure 85).

Figure 85
On this page you will see the following (Figure 85):
- You can use the search field to find a specific qualification/certification status.
- You can copy, edit, or delete a qualification/certification status on the list by clicking on the respective buttons.
- To create a new qualification/certification status, click on the +add new button.
Once you click on the +add new button you will see the following pop-up window (Figure 86):

Figure 86
- Add a description for this new qualification/certification status.
- Select a certification status type.
- Click on the ‘Save’ button to save.
Once you click on the edit button (Figure 85) you will see a similar pop-up window with the creation popup window. Make your changes and click on the ‘Save’ button to save changes.
In the Students Type you can also create custom dropdown lists by using a custom dropdown and by customizing terminology for that dropdown.