

This section is where the book creation and lending process takes place. You will need to add books and keep track of borrowers and the lending process in general. To manage your library module from the administrator portal, go to:
Management > Library
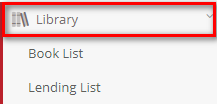
Figure 16
- Once you follow the path, you will be able to select the Book List page or the Lending List page
- The Book list page is where you will create the books of your library and lend out books to users.
- The Lending list page is where you will be able to manage books that have been borrowed by users and return books to the library.
Book List
This section holds all the books your library contains. You can create books and place them in separate libraries. This section will focus on creating all your books manually. To reach this section, go to:
Management > Library > Book List

Figure 17
Note: To massively upload your library books in an excel sheet or in XML format, go to Configuration Advanced Configurations Mass imports/actions Import Books.
Book List page (Figure 18):
 Figure 18
- Use the filters to generate the list of books you want to see. The available filters will allow you to search for books based on library, category, title, author, publisher, ISBN, book code, other contributor, languages, book summary, etc. You will be able to search in each of the libraries your institution has and per book category. Once you fill in the filters click on the ‘Search’ button. If filters are left empty, the search will return all books in the list.
- Once you generate the list of books you can use the search field to locate a specific book.
- Select the number of results you wish to see in the book list e.g., 100.
- From the book list you can click on a specific book to preview the book, edit the book, lend a copy of the book, view the rental history, or delete the book.
- Click on the +Create New button on the top of the page, to create a new book.
Creating a New Book
Once you click on the +Create New button, you will be taken to the book creation page (Figure 19).
 Figure 19
Book Tab
Main Data
- Active switch: Click on the ‘Active’ switch to make this new book active/visible and usable.
- Used in Courses switch: Enable the Used in Courses switch to make this book useable as part of a course requirement or as part of a subject. This will be found under the Academic Tab (Figure 20) of the subject or course (Configuration > Main Settings > Courses > List of Courses). The books that will be visible here are books that have been enabled for use in subject (Figure 21). Once they have been added to the subject, these books cannot be deleted from the book list until they have been removed from the subject.
- Title field: enter the title of the book you wish to create e.g., Lord of the Rings – The Fellowship of the Ring.
- Abbreviation field: enter an abbreviation of the book e.g., LOTR1
- Number of Copies field: enter the number of copies of the book your library has e.g., 3.
- Library option: Select the library to which this book belongs e.g., Main Library. Libraries are created from the dropdown list page in the configuration section.
- Categories option: Select a category of books to which this book belongs e.g., Main.
- Book Code field: enter the book code located in the book e.g., 3223242342.
- Tags field: you can add the common tags for the book, e.g., for Lord of the Rings, these can be fantasy, fiction, magic, etc.
- Series field: enter which series in a collection of books this specific book is e.g., 1.
- Summary: enter a short summary of the book which will be shown underneath the book photo in the preview page.
- Volumes field: enter the volume of the book if there is more than one volume in a series of books e.g., 1.
- Pages field: enter how many pages the book is e.g., 356.
 Figure 20
 Figure 21
Various Data
- For Ages field: enter the age range this book is addressed to e.g., 10+.
- ISBN 13 field: enter the ISBN 13 code of the book, you will find it in the book. Books can be located based on this number and if you use a paid ISBN.com account you can gather info regarding this book (done through library settings).
- ISBN 10 field: enter the ISBN 10 code of the book, you will find it in the book. Books can be located based on this number and if you use a paid ISBN.com account you can gather info regarding this book (done through library settings).
- LCC field: here, enter the Library of Congress Classification call number which can be used for organizing the book in the library.
- DDC field: here, enter the Dewey Decimal Classification code used for organizing the book in the library.
- Publication field: enter the publisher name and date of publication.
- Year of Publication field: here you can add the full date of publication of this book.
- Edition field: enter the edition of the book e.g., 1st edition.
- Languages option: select the language of the book e.g. English and German.
- Record Date field: enter the date this book was created in the library e.g., 3/6/2020.
- Purchase Date field: enter the date your institutions library purchased this book.
- Price field: Enter the price paid for this book by the institution’s library.
- Link field: add a link to a webpage e.g., publisher webpage or authors webpage.
- Suggested lending duration (days) field: If this book does not follow the standard lending duration, then enter the number of days this book can be kept out e.g., 30 (days).
- Position field: enter the following details.
- X field: Optional field for extra information, can be adjusted to fit institutional needs.
- Y field: Optional field for extra information, can be adjusted to fit institutional needs.
- Z field: Optional field for extra information, can be adjusted to fit institutional needs.
- Position in the area field: enter the physical location of the book e.g., Institutions Library, 1st floor.
- Donation field: If a book has been donated by an individual or organization, you can add the name of the donor here.
- Book contributors: Under the book contributors section select books contributors (publisher, author, etc.) from an existing list or add new contributors.
- Similar books field: here you can select and add books which are similar to the one being created.
Click on the ‘Save’ button to save the new book or click on ‘Save & Close’ to save new book and close the creation page.
If you click on the Save button, the following additional tabs, Copies and Files & Links, will become available.
Copies Tab
In the copies tab, you can add details for each copy of the book that is available. The barcode field will depend on the format selected in the settings. From here you can also see which copies have been loaned out and which have been reserved. You can also mark one of the copies as inactive by unchecking the active box. This can be a reference copy of the book, to make sure it is always available in the library.
 Figure 22
Files & Links
You can add PDF copies of the book or links to online resources. All of this information will then be visible to any user (teacher, students or others) who borrow the book.
 Figure 23
Click on the ‘Save’ button to save the new book or click on ‘Save & Close’ to save new book and close the creation page.
Preview Book
To Preview a book from the book list, click on the title (Figure 24).
 Figure 24
Clicking on the link opens the popup window below (Figure 25):
 Figure 25
Edit Book
The book edit page has the same three tabs as the Create book page: Book tab, Copies tab, Files & Links tab. Click on the Edit button of the book to be modified.
 Figure 26
- Fill in data you may have left out during creation or correct existing data in the Book Tab.
- Next Click on the Copies tab. This tab will show you in a list form each copy of the book, your library has. The number of copies you have was entered when you created the book in this case 6 copies.

Figure 27
- You can describe the condition of each copy, the row each copy belongs to in the library shelves, the column, shelf the copies belong to.
- You can enter comments about each copy of the book.
- You can see the status of each copy of the book, if it is reserved or lent out.
- Lastly you can delete copies of the book from the list.
Lend a Copy
From here, you can loan books to users. Click on the Lend a Copy button of the book to be loaned out. This will open the below popup window (Figure 28). At the top of this window, we can see two thumbnails of users who have loaned the book and reserved the book (a teacher and student, respectively).

Figure 28
Lending tab
- Select the user type you are looking for e.g., Student, Teacher or Employee. In the field below you enter the three letters of the name or surname of a student (or other user type depending on what you have chosen) since we selected student user types and we select the student from the dropdown list that appears e.g., Grixti Roxanne.
- Copies option: Select the barcode number of the copy you wish to lend to Roxanne Grixti from the dropdown list.
- Loan Date field: here you can enter the date the book in question is borrowed out e.g., Current date 03/31/2021.
- Leave open the return date switch: if this switch is turned on then, the return date can be different than the default lending period. In library settings you can define the default lending period.
- Return Date field: This field is auto filled when you enter the loan date. It will fill in a date that corresponds to the default lending period e.g., if you have entered a load date 03/31/2021 and the default loan period is 90 days then the return date will be filled in with a date 90 days later 06/29/2021. In library settings you will define the default lending period. If the open return date is switched on, then you can enter any return date you want.
- Comments field: Enter free text, you can add any information relevant to this book loan.
Reservations tab
Here we can select the specific user from the dropdown list who has reserved the book. Note that having reserved the book does not automatically loan out the book. All reservations need to be loaned out or cancelled manually.
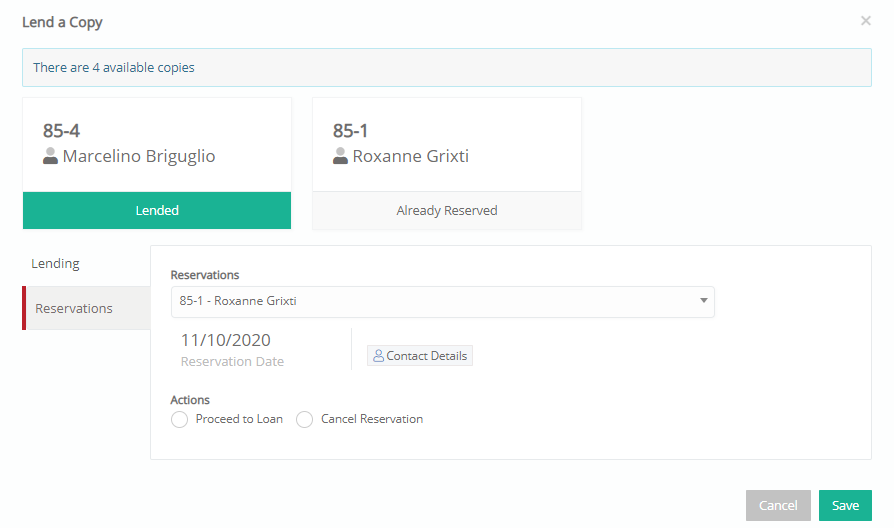
Figure 29
After selecting a user from the dropdown list, click on proceed to loan (Figure 30).

Figure 30
- Select the loan date
- Select the return date. This should be automatically populated if the default lending period setting is configured. You can also choose to leave the return date open.
- Add comments, if necessary.
Once you are done with the lending fields and options, click on the ‘Save’ option to save the lending transaction.
This process can be done in the same way for Teachers and Employees as well.
Once you have saved the Lending of a book to a user, once you re open the lend a copy page for the same book, you will be able to see which user has borrowed a copy of the book, as seen in Figure 29.
Rental History
In the rental history, you can see the lending history for a selected book.
 Figure 31
Delete Book
Before deleting a book, you need to make that the book is not loaned out or reserved and that the book has not been assigned to a subject.
Lending List
View the books Students, Teachers and Employees have borrowed and are in possession of. Return books or change the due date for returning a book.

Figure 32
Lending List page (Figure 33):
 Figure 33
- Use the filters at the top of the page, to look for Students/Teachers/Employees who have borrowed books.
- You can search for books based on the barcode or search using the title.
- You can also filter using either Only Reservations, or Only Loans, or All. For example, if you select Only Reservations, the list will display only books that have been reserved.
- You can filter your search by entering a date from-to. You can also search for book reservations and books that need to be returned within a specific date or until a specific date.
- Once you are done entering filter parameters, click on the search button to generate a list of borrowed or returned books.
- You can use the ‘Search’ field to locate a book in the list.
- You can copy, print or export (Excel, CSV) the lending list by clicking on the corresponding buttons.
- In the list you can click on the in-line action button and depending on the status of the book, you can use choose to either select the return book option or the update lending data option (Figure 34).

Figure 34
- If you want to return a book then from the in-line actions button, select Return Book. You will view a popup window (Figure 34).
- If you want to change the date a book needs to be returned, click on the in-line actions button, and select update lending data. You will view a popup window (Figure 34).
- For reservations, you can also choose to address reservation or cancel reservation (Figure 35).

Figure 35
Returning a Book
Once you click on the return book option (Figure 34), you will see the following popup window (Figure 36).

Figure 36
- Returned Date field: Enter the day the book is returned e.g., 5/6/2020.
- Comment field: Enter a comment about the return of the book e.g., Book returned in damaged condition.
- Click on the ‘Save’ button, to finish the process of returning a book.
Update Lending Data
Once you click on the update lending data option (Figure 34), you will see the following popup window (Figure 37). You will be able to change the return date for the selected book.

Figure 37
- Date to Return field: Alter the date the book should be returned e.g., 06/30/2021.
- Comment field: Enter a comment about the reason for the new return date of the book e.g., Extension requested.
- Click on the ‘Save’ button, to finish the process of updating lending data.
Address Reservation
Once you click on the update lending data option (Figure 35), you will see the following popup window ( Figure 38). You will need to select the specific user from the dropdown list who has reserved the book. Then proceed to perform any of the actions, Proceed to Loan or Cancel Reservation.
- If you select Proceed to Loan, select the loan date.
- Select the return date. This should be automatically populated if the default lending period setting is configured. You can also choose to leave the return date open.
- Add comments, if necessary.
- Then save.

Figure 38
Cancel Reservation
To cancel the reservation, either select the Cancel Reservation radio button in the address reservation popup window (Figure 38), then save. Or click on the Cancel option from the inline Actions menu in Figure 35.
Delete
To delete entries from the lending list, use the delete option in the bulk actions. Select one or more entries then click on the delete option.
 Figure 39