

Subjects Absences
Use filters to show students (Figure 370).
Note: There are 4 available methods of recording absences (or late arrivals). The default method is set by the admin.
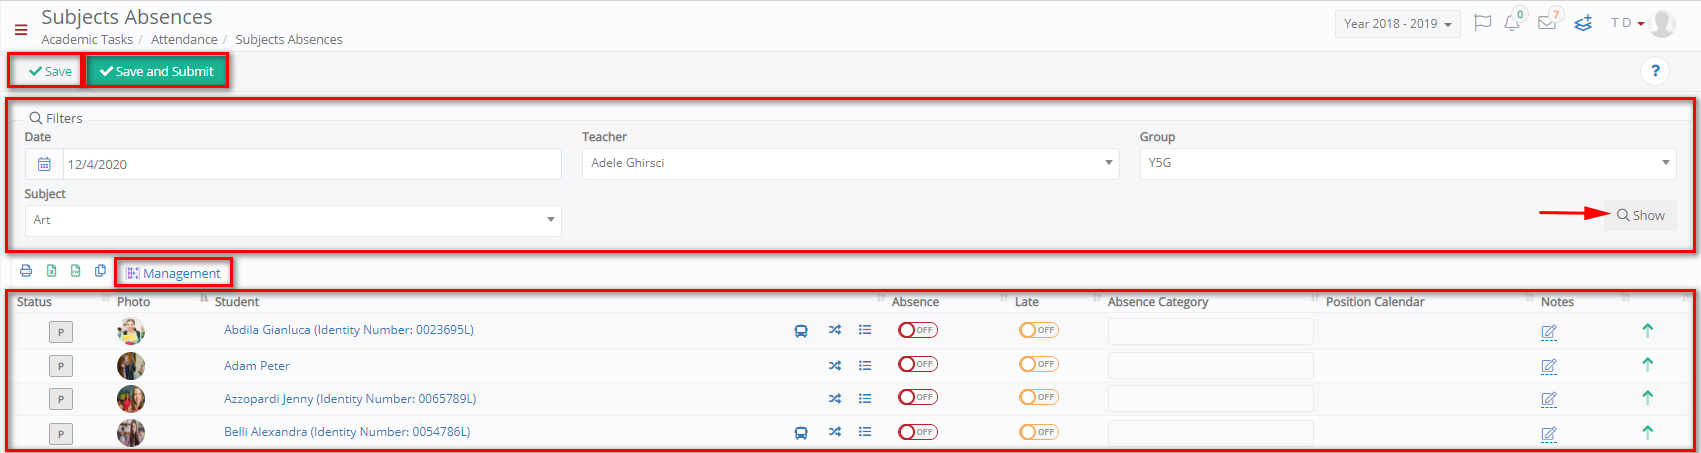
Figure 370
- Use the bus icon to check student’s bus route (available only if the student uses the school’s transportation services (Figure 371).
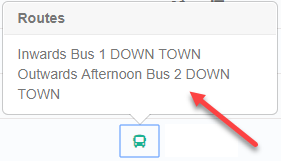
Figure 371
- Use the ‘Add Remarks & Actions’ button to add remarks or actions (Figure 372).
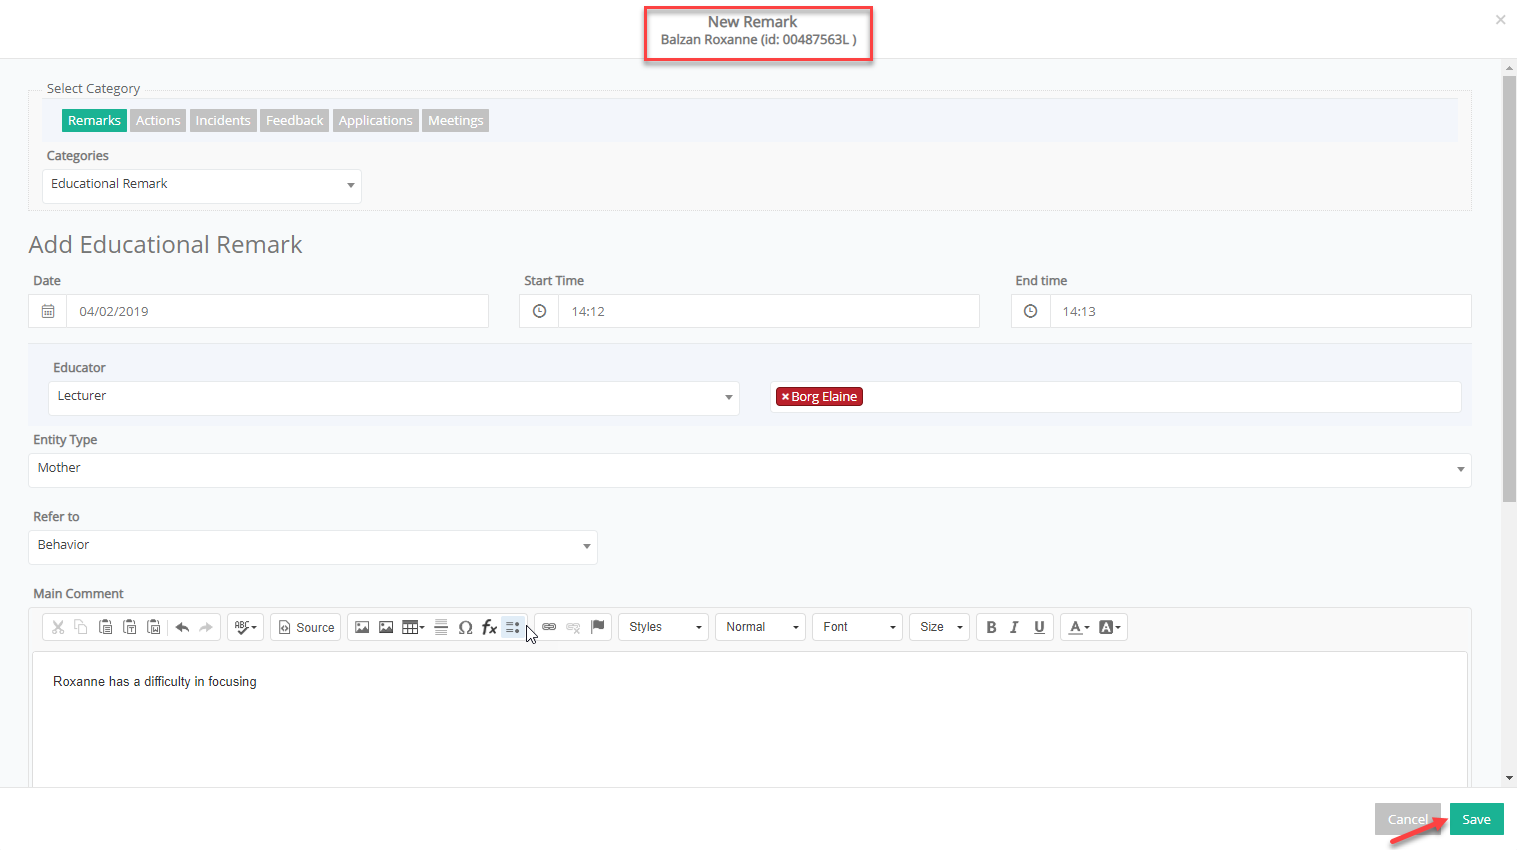
Figure 372
- Use the ‘Remarks & Actions’ button to check remarks or actions added (Figure 373).
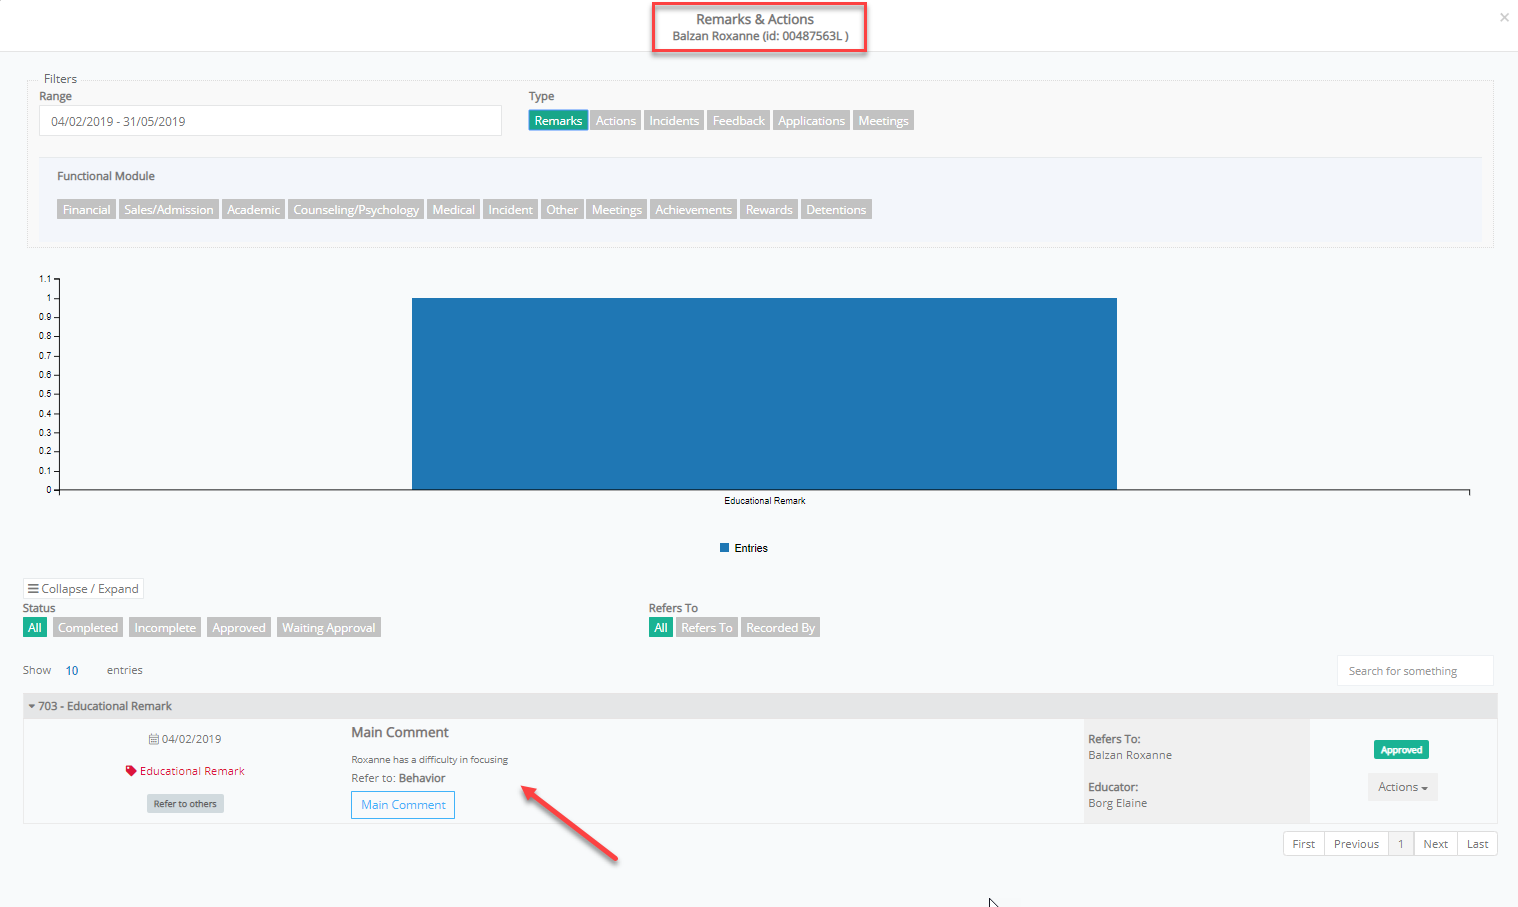
Figure 373
- Activate/Deactivate ‘Absence’ or ‘Late’ to record student’s presence
Note: Column status i.e. A (absent), L (late), P (present).
- Select ‘Absence Category’
Note: The list is available only if set by the admin.
- Click on the Notes icon to add comments.
- Check the total number of absence/late per student in the column ‘Total’.
Note:
- It is subject to settings made by the administrator, whether the student’s account will be instantly updated with the activated absences or not.
- The days’ limit, for employees being able to edit the submitted absences, is set by the administrator[4] (Figure 374).

Figure 374
- In case a student is set as “unavailable” by the admin (is set at the back-office application – Classter Manager) because for example he is attending a school project, his entry line will be colored, and you will not be able to add an absence.
- When the absence recording system is based on Timetable Hours and a student gets an absence for the 1st period, then the system dynamically fills in an absence in the rest of the teaching periods. Click on ‘Save’ to add the suggested absence.
Fast Absences Entry
- From ‘Quick Actions – Actions Menu’ select the ‘Fast Absences Entry’ (Figure 375).
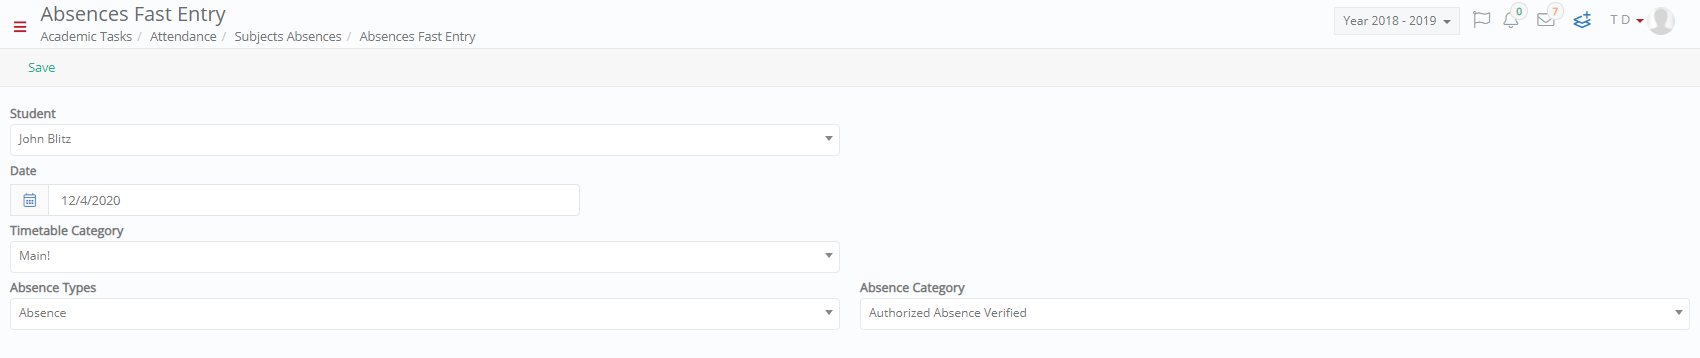
Figure 375
- Select the student
- Select date
- Select the timetable category
- Select the absence type and category
- Write the student’s name to select it from the list
- Select the hours you want to record an absence for, from the hours list.
Note: Click on the ‘Registration for the rest of the day’ button if you are recording absences on real time and you want all hours onward to be selected.
Note: “Fast Absence Entry” button is available in quick actions only if the Admin has enabled it.
- Click on ‘Save’
DAILY
You can add several absences (1 or more) per specific date (Day).
- Use the Date, Teacher and Group/Class filters to show students (Figure 376).

Figure 376
PER TIMETABLE PERIOD
You can add absences per Student of a specific Group/Class, at a specific Date and Timetable period (you do not need to create a Timetable).
- Use the Date, Teacher, Group/Class, Timetable Categories and Periods filters to show students (Figure 377).
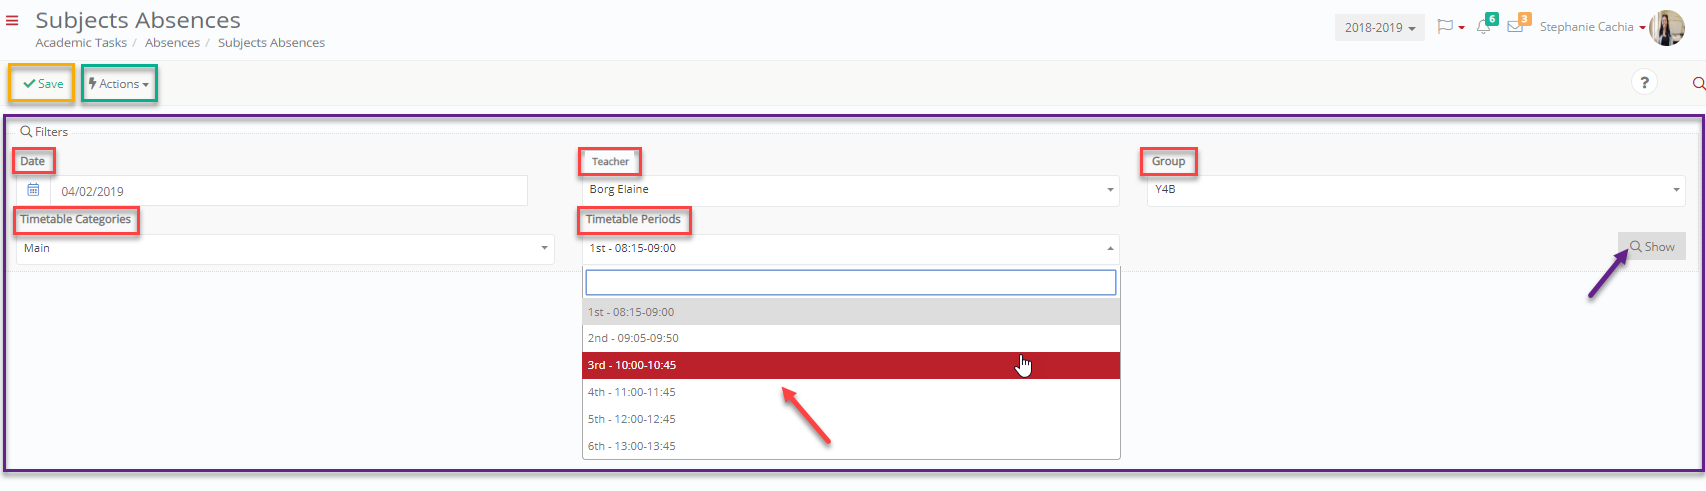
Figure 377
PER SUBJECT
You can add several absences (1 or more) for a specific Subject at a specific Date.
- Use the Date, Teacher, Group/Class and Subject filters to show students (Figure 378).

Figure 378
BASED ON TIMETABLE
You can add absences per Student of a specific Group/Class, at a specific Date, Time period, for a specific Subject based on the Timetable entries (Timetable creation is mandatory with this option).
- Use the Date, Teacher, Group/Class, Timetable Categories and Periods filters to show students (Figure 379).
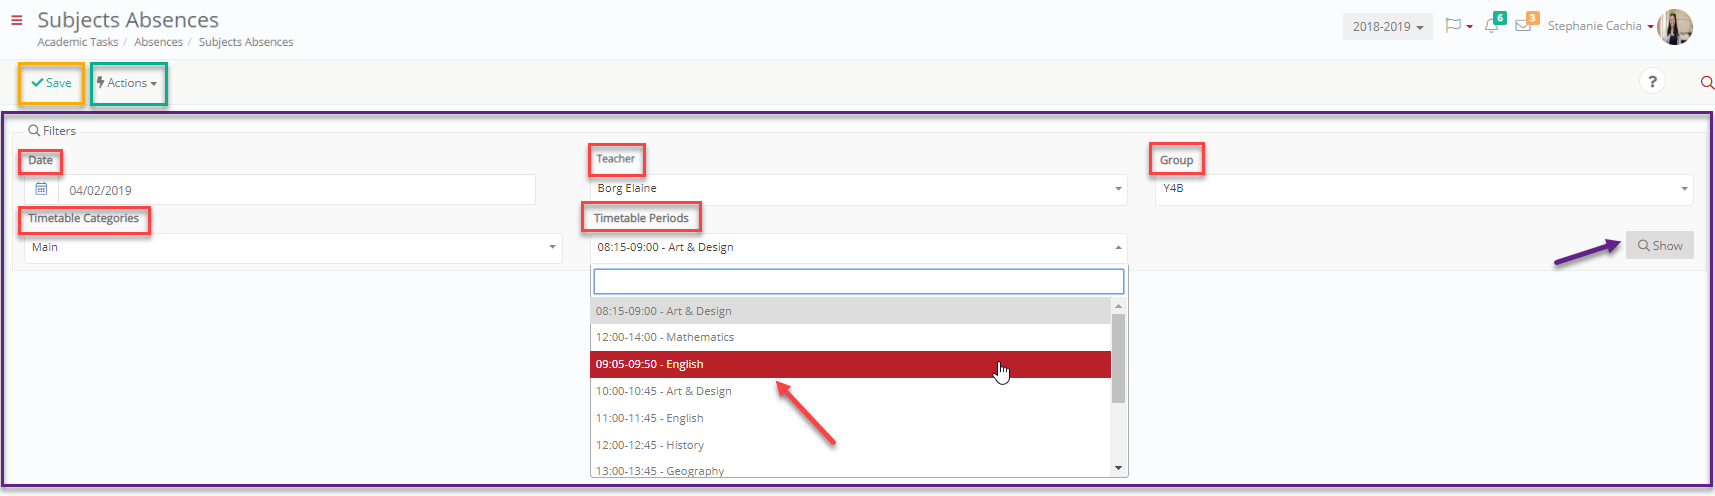
Figure 379
Services
In this section, you can record student’s absences at extracurricular activities (Figure 380).
- Select date, teacher, service, and timetable period filters to show students.
- Activate/Deactivate student’s attendance.
- Click on ‘Save’.
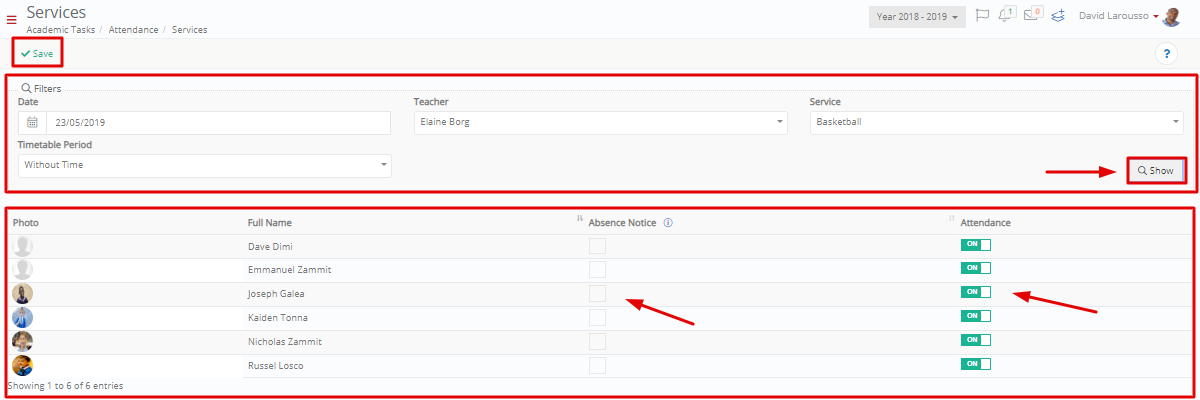
Figure 380
Attendance List
Here, you can get statistics and manage students’ absences.
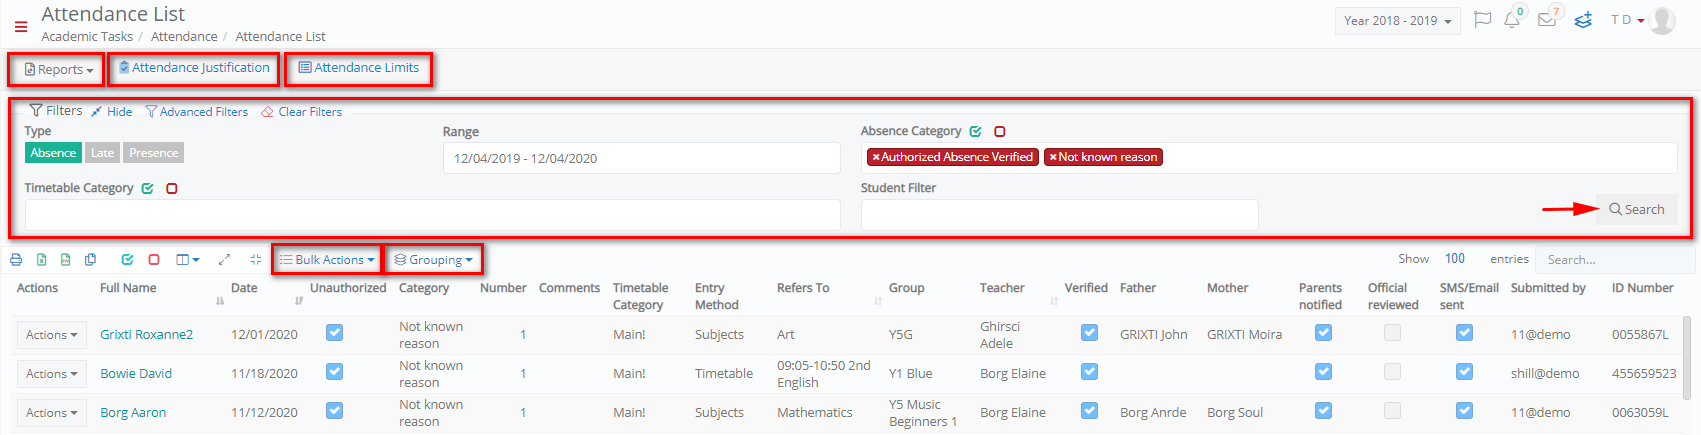
Figure 381
- Use the attendance type, date range, and timetable category, student filter, etc., filters to show results (Figure 381).
- You can group results per student, per date, per teacher, per subject or per group.
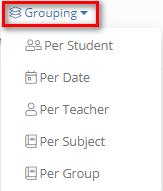
Figure 382
- Collapse / Expand results to manage easier.
- Click on ‘Manage Columns’ button to add or remove columns from the list.
- Click on ‘Maximize Grid’ button to view the list in full screen.
- Use the ‘Actions’ menu to delete, verify, review or convert the attendance type of an entry (Figure 383).
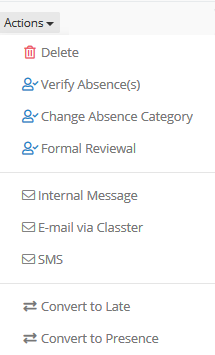
Figure 383
- Use the ‘Bulk Actions’ button to delete or review the selected rows
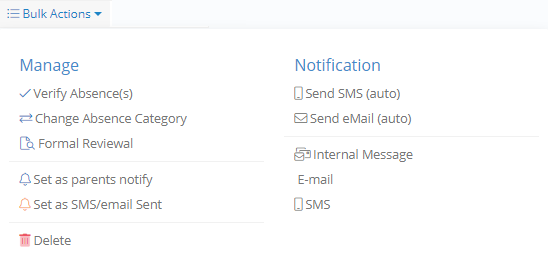
Figure 384
- Click on ‘Advanced Filters’ button if you wish to narrow search even more. These filters include School e.g., Middle School, Year e.g., Year 8, Subject e.g., Art & Design, Teachers e.g., Elaine Borg, Type e.g. All, Verification Status e.g. Yes, SMS/Email Sent e.g. Yes, Parents Notified e.g. Yes, and Official Review e.g. Yes (Figure 385).
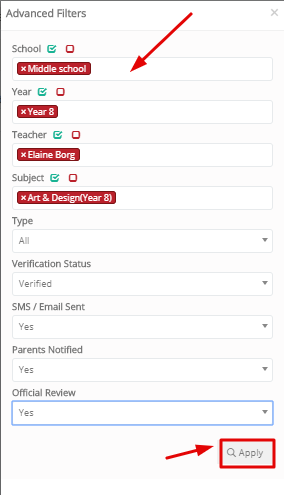
Figure 385
Note: At the Formal Reviewal window you can verify the absence, activate formal reviewal or change the absence category and type (Figure 386).
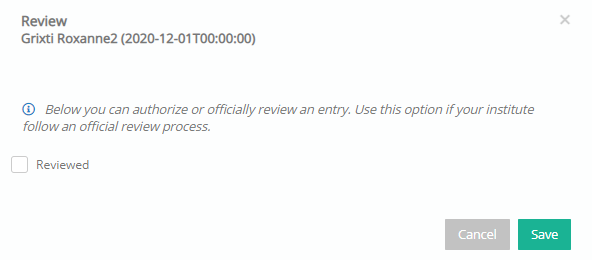
Figure 386
ATTENDANCE JUSTIFICATION
Use the attendance justification to upload documents and files that justify lateness or absence entries. To do this, click on the Attendance Justification button.
![]()
Figure 387
This opens a popup window where you can view previous justification requests or add new requests.

Figure 388
- You can approve, edit, or delete a pending request using the Actions options.
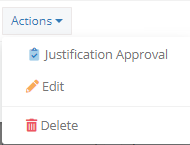
Figure 389
- Click on the files button to view the uploaded supporting documents.
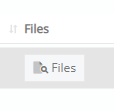
Figure 390
- Click on the entries button to view all attendance entries linked to that request.
Figure 391
- Click on New Request to add a new justification request.

Figure 392
- Select a date range and the student from the dropdown, then click on the show attendance entries button. This will return a list of all unauthorised absences.
- Select one or more entries.
- Choose a type (absence reason) from the dropdown. E.g., Medical reasons or Family reasons.
- Add a comment.
- Upload supporting files. E.g., medical certificates.
- Save.
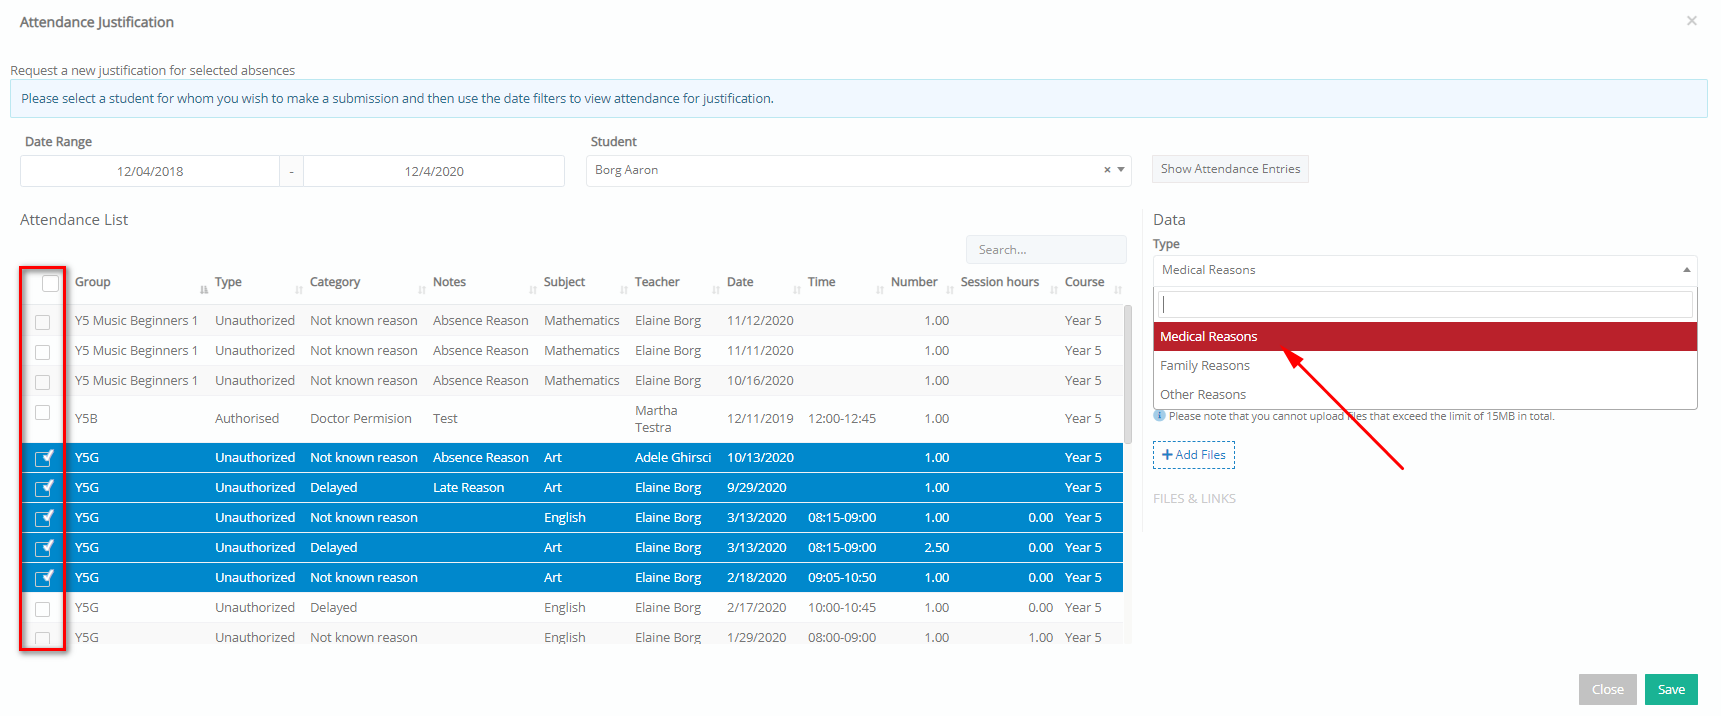
Figure 393
ATTENDANCE LIMITS
Here, you can view and manage students’ absences limits.
- Use the year, start/end date filters to show results (Figure 394).
- Maximize results list to manage easier.
- Use the ‘Bulk Actions’ dropdown button to change student’s status or email student via Classter.
- Use list filters to filter out any information from the list.
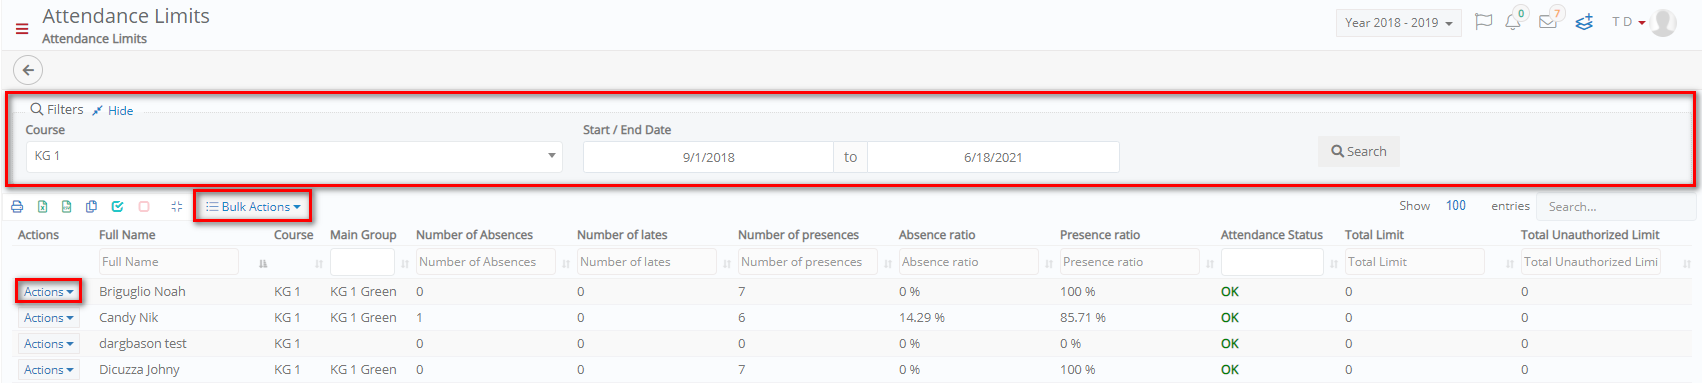
Figure 394
Attendance Analysis
In this section, you can have a variety of attendance statistics.
- Use the date, type, grade, and group filters to show results.
- Select a query type and use the operator filter according to the statistics you want to see (Figure 395) e.g., query type: Student’s Absence, operator: Absences above 5.
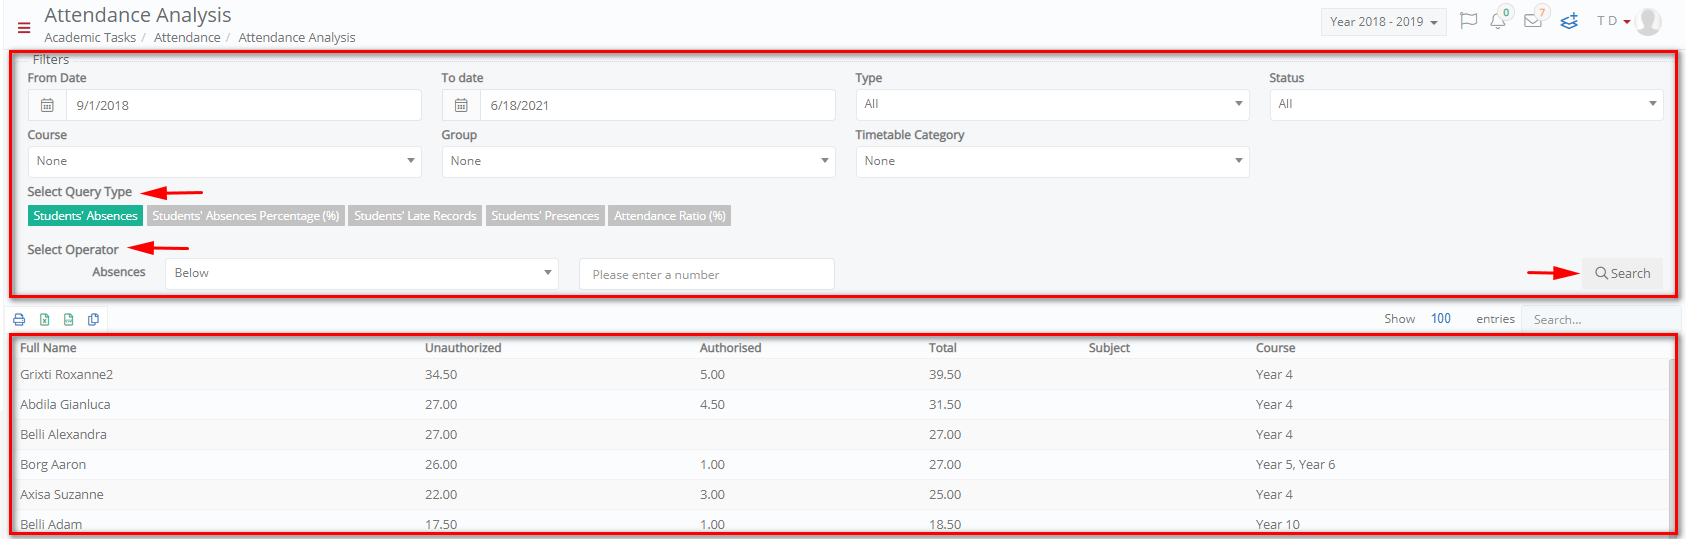
Figure 395
Query Types
![]()
You can see the number of absences per student (Figure 396).
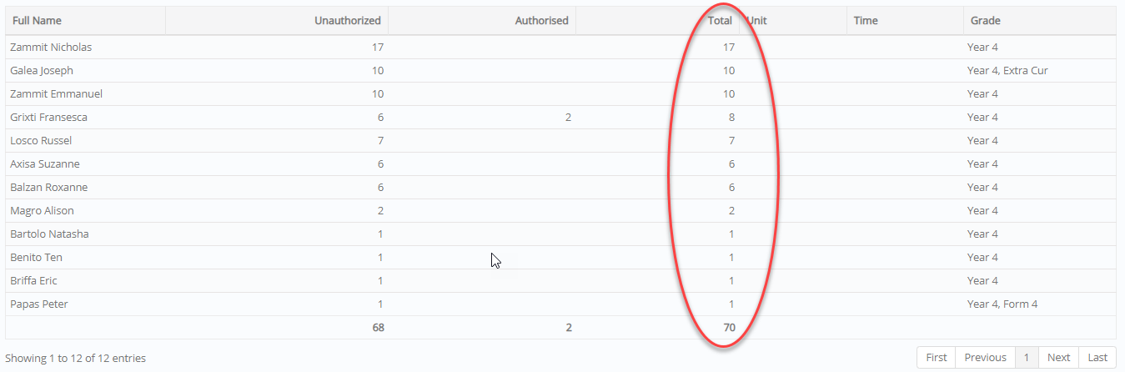
Figure 396
![]()
You can see the Presence to Absence Percentage per student for the selected group, in the specified date period (Figure 397).

Figure 397
![]()
You can see the recorded late arrivals per student of the selected group, in the specified date period (Figure 398).

Figure 398
![]()
You can see the recorded presences per student of the selected group, in the specified date period (Figure 399).

Figure 399
![]()
You can see students’ attendance percentage per session (Figure 400).
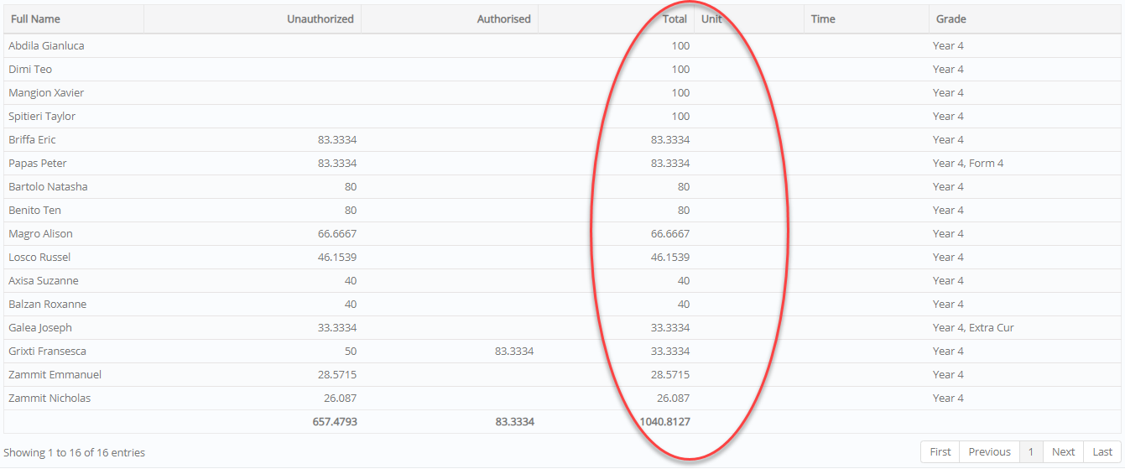
Figure 400