

Entrance Assessments allow institutions to evaluate applicants through structured, _Subject_-based assessments during the admission process. Administrators and secretariat staff can schedule assessments, assign applicants, record marks, and transfer final grades as application points, all from within the Admission module.
The tool includes three functionalities:
- Entrance Assessments List: view and manage scheduled entrance assessments
- Entrance Assessments: record marks for applicants assigned to an assessment
- Entrance Gradebook: view consolidated entrance marks per subject and marking period, and transfer final marks to application points
How can I assign students to entrance assessments?
Step 1: Creation of an Entrance Subject Category
To enable marking for entrance assessments, a Subject Category of type Entrance Assessment must exist. To create one, go to CONFIGURATION > Main Settings > Dropdown lists and select System > Subject Category. (Figure 1)
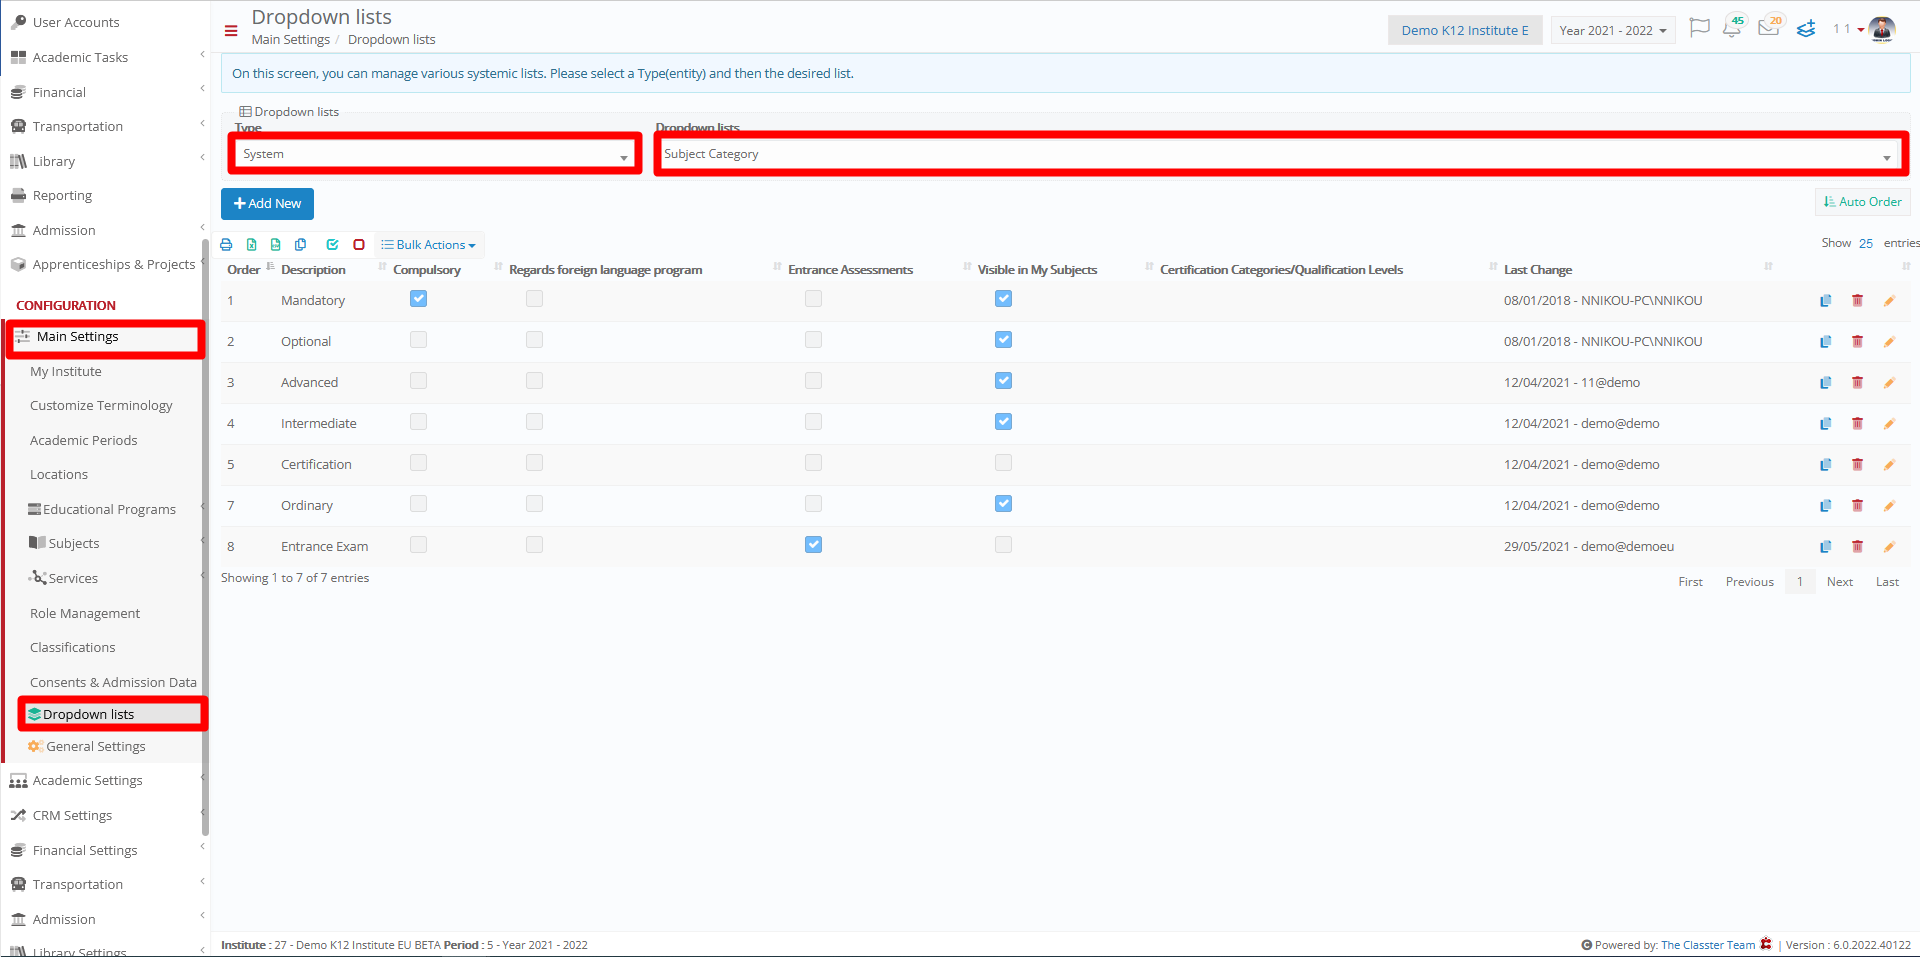
Figure 1
Then, click on Add New, and in the pop-up window write a Description, turn the Entrance Assessments radio button ON, and Save. (Figure 2)
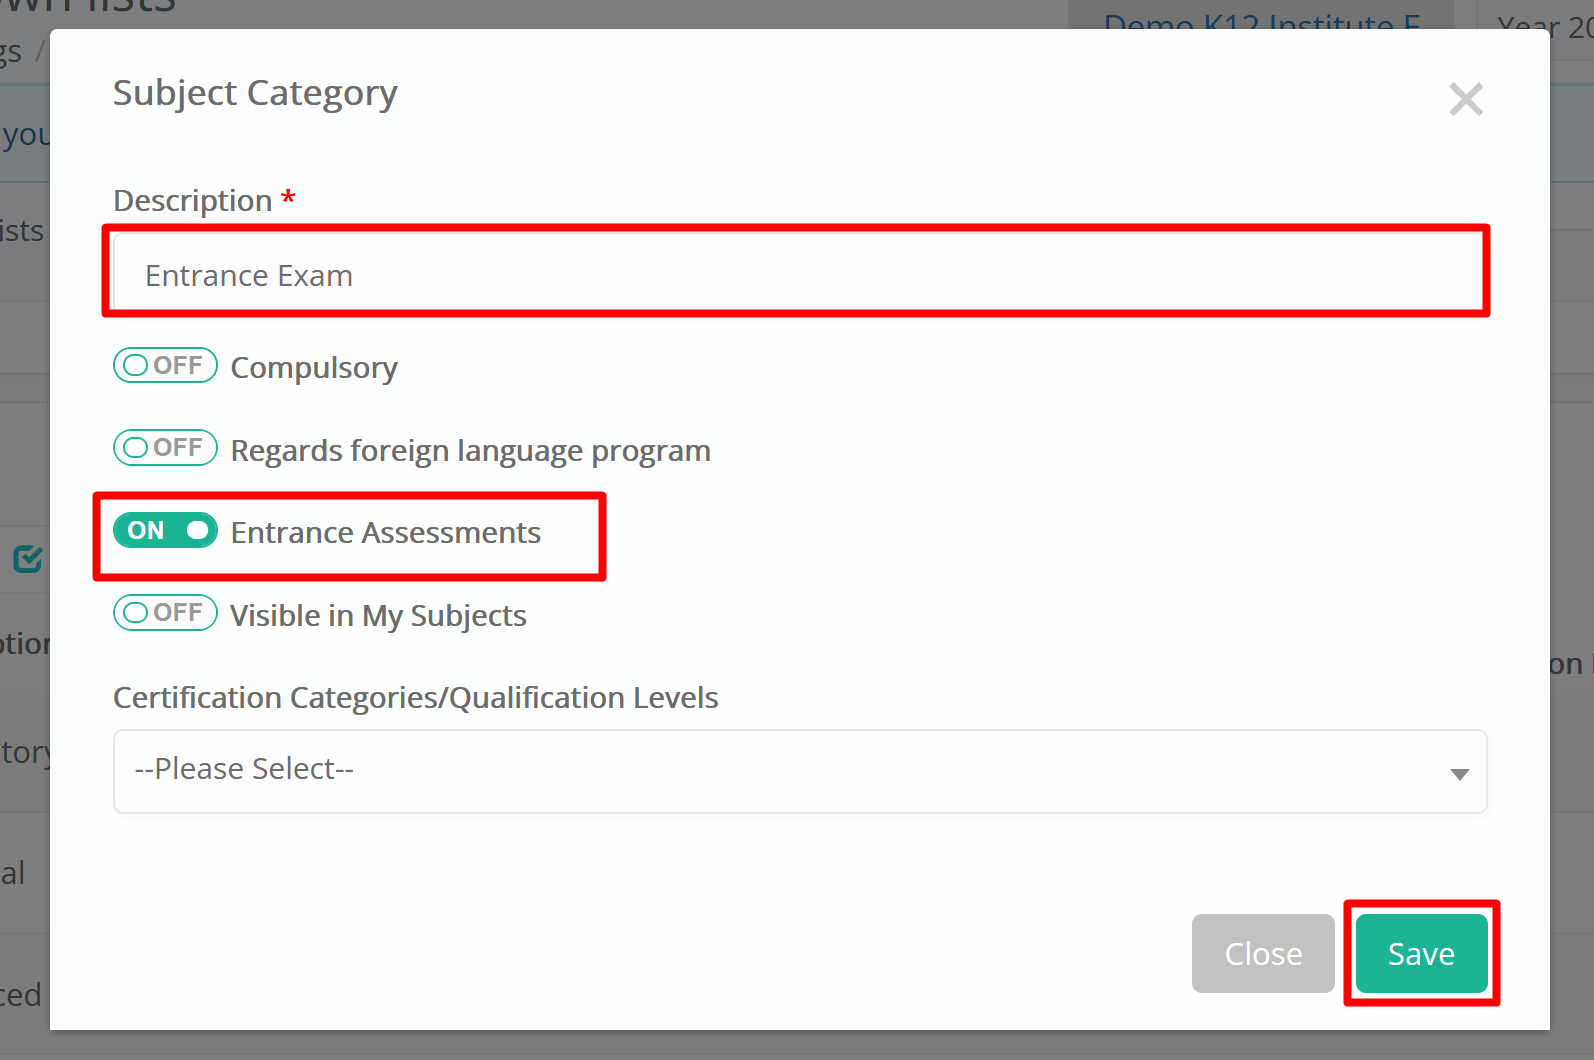
Figure 2
Step 2: Create a Subject
Once the Subject Category exists, create the subject that will be used in entrance assessments. Go to the Subjects list and create a new subject, setting its category to the one created in Step 1. Subjects of this category are treated as entrance subjects throughout the system and will appear in the Entrance Gradebook and the transfer tool (Figure 3).
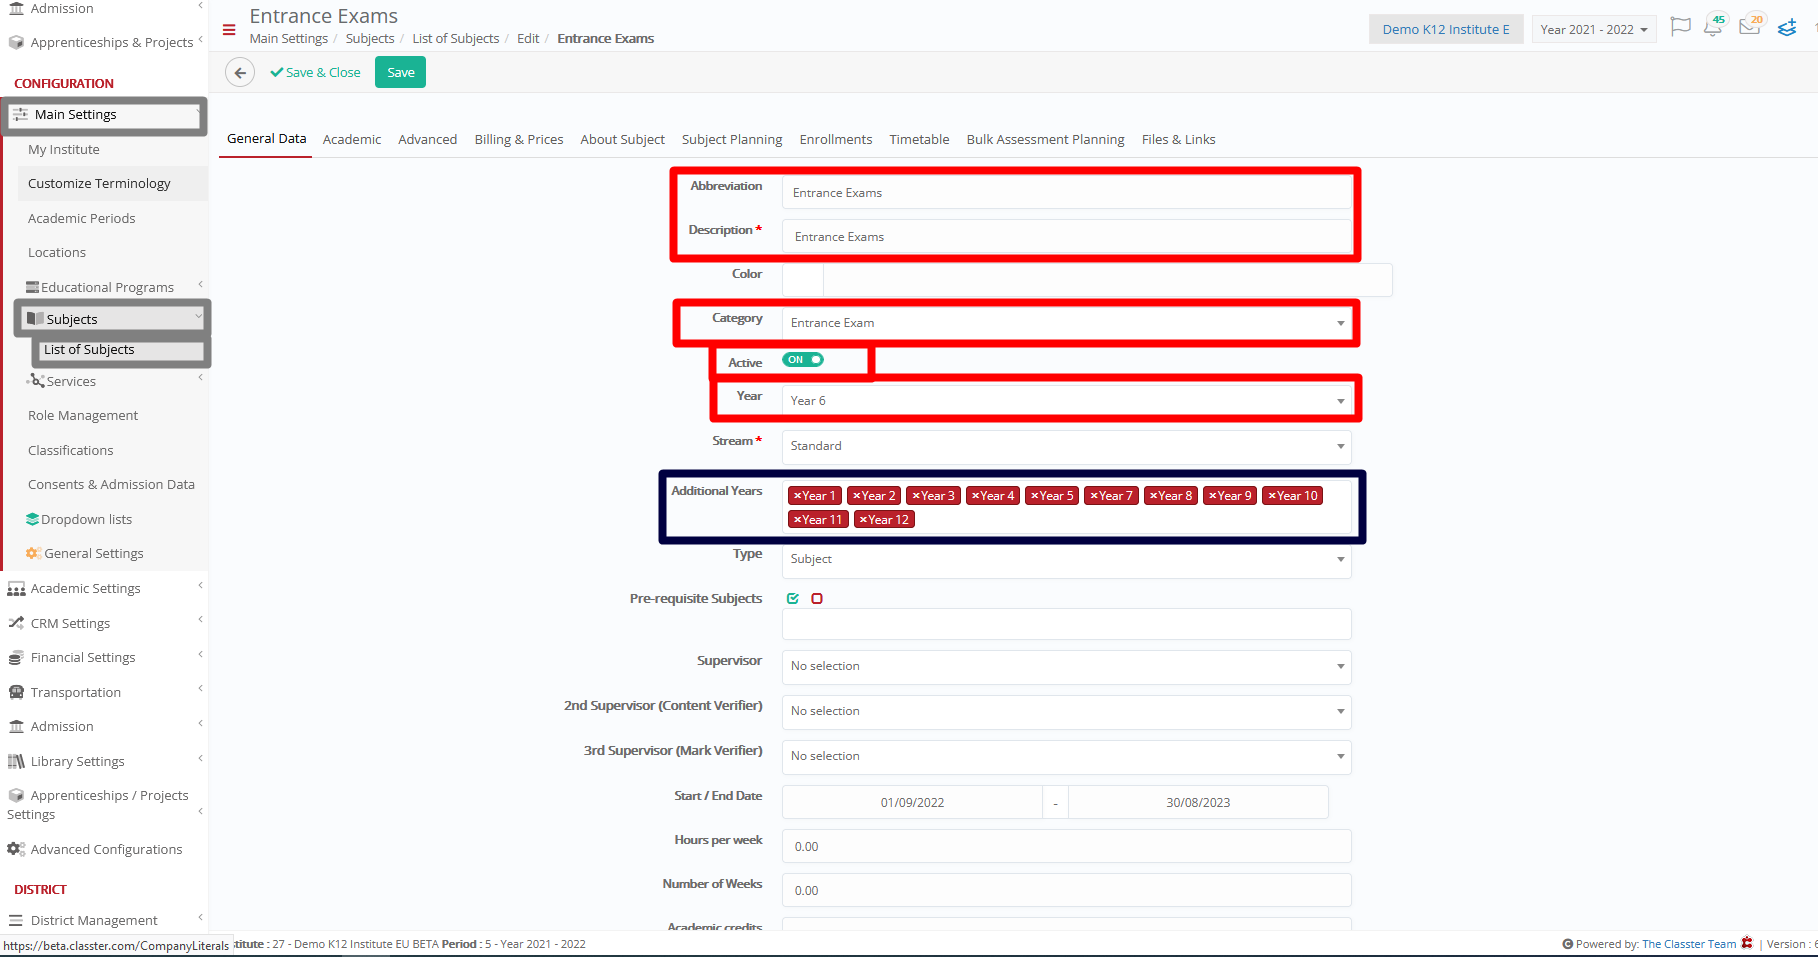
Figure 3
In the Academic tab, a Marking Period with a future Lock Date must be selected, and a Marking Scale. (Figure 4)
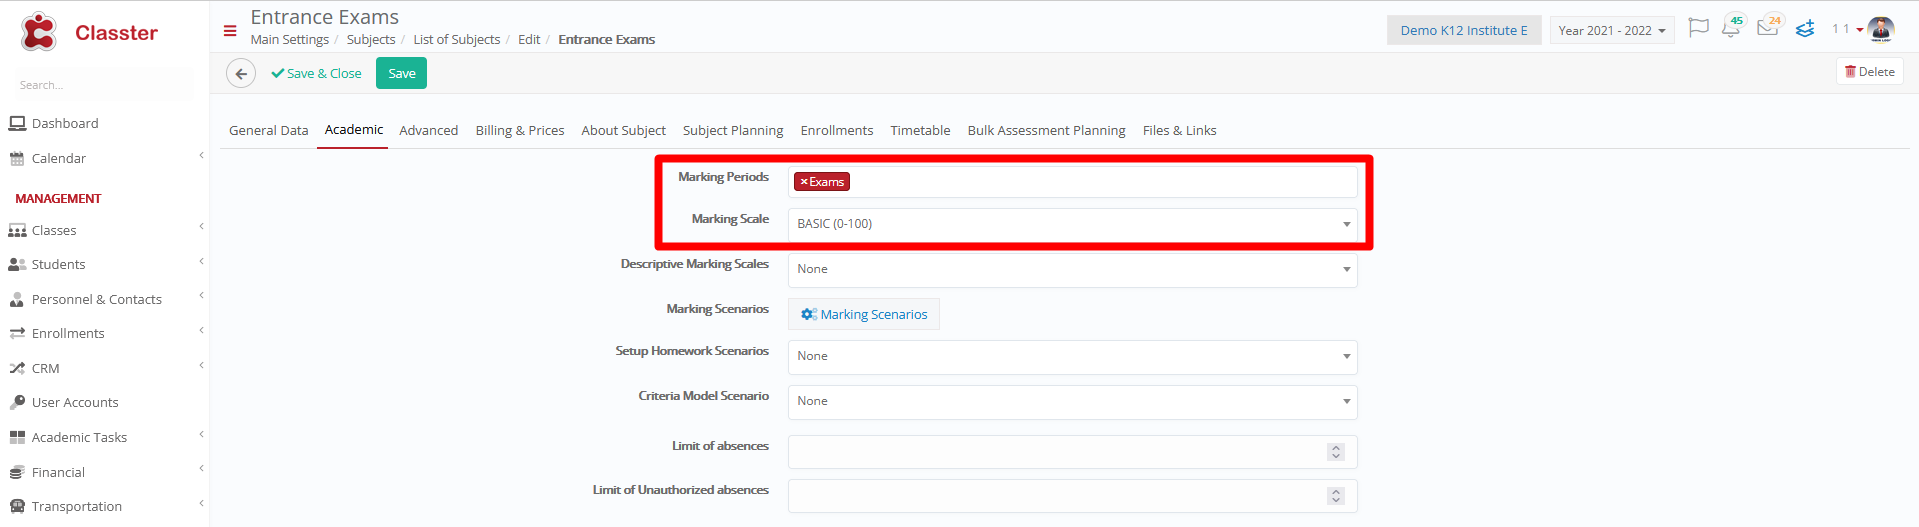
Figure 4
Step 3: Marking Configuration
Now the configuration of how the Assessment will be marked needs to be completed. First, an Assessment Type needs to be created. To do that, navigate in CONFIGURATION > Academic Settings > Marking Settings > Assessment Types > Create New (Figure 5)

Figure 5
In the creation window, fill in the fields as shown in Figure 6 below and Save.
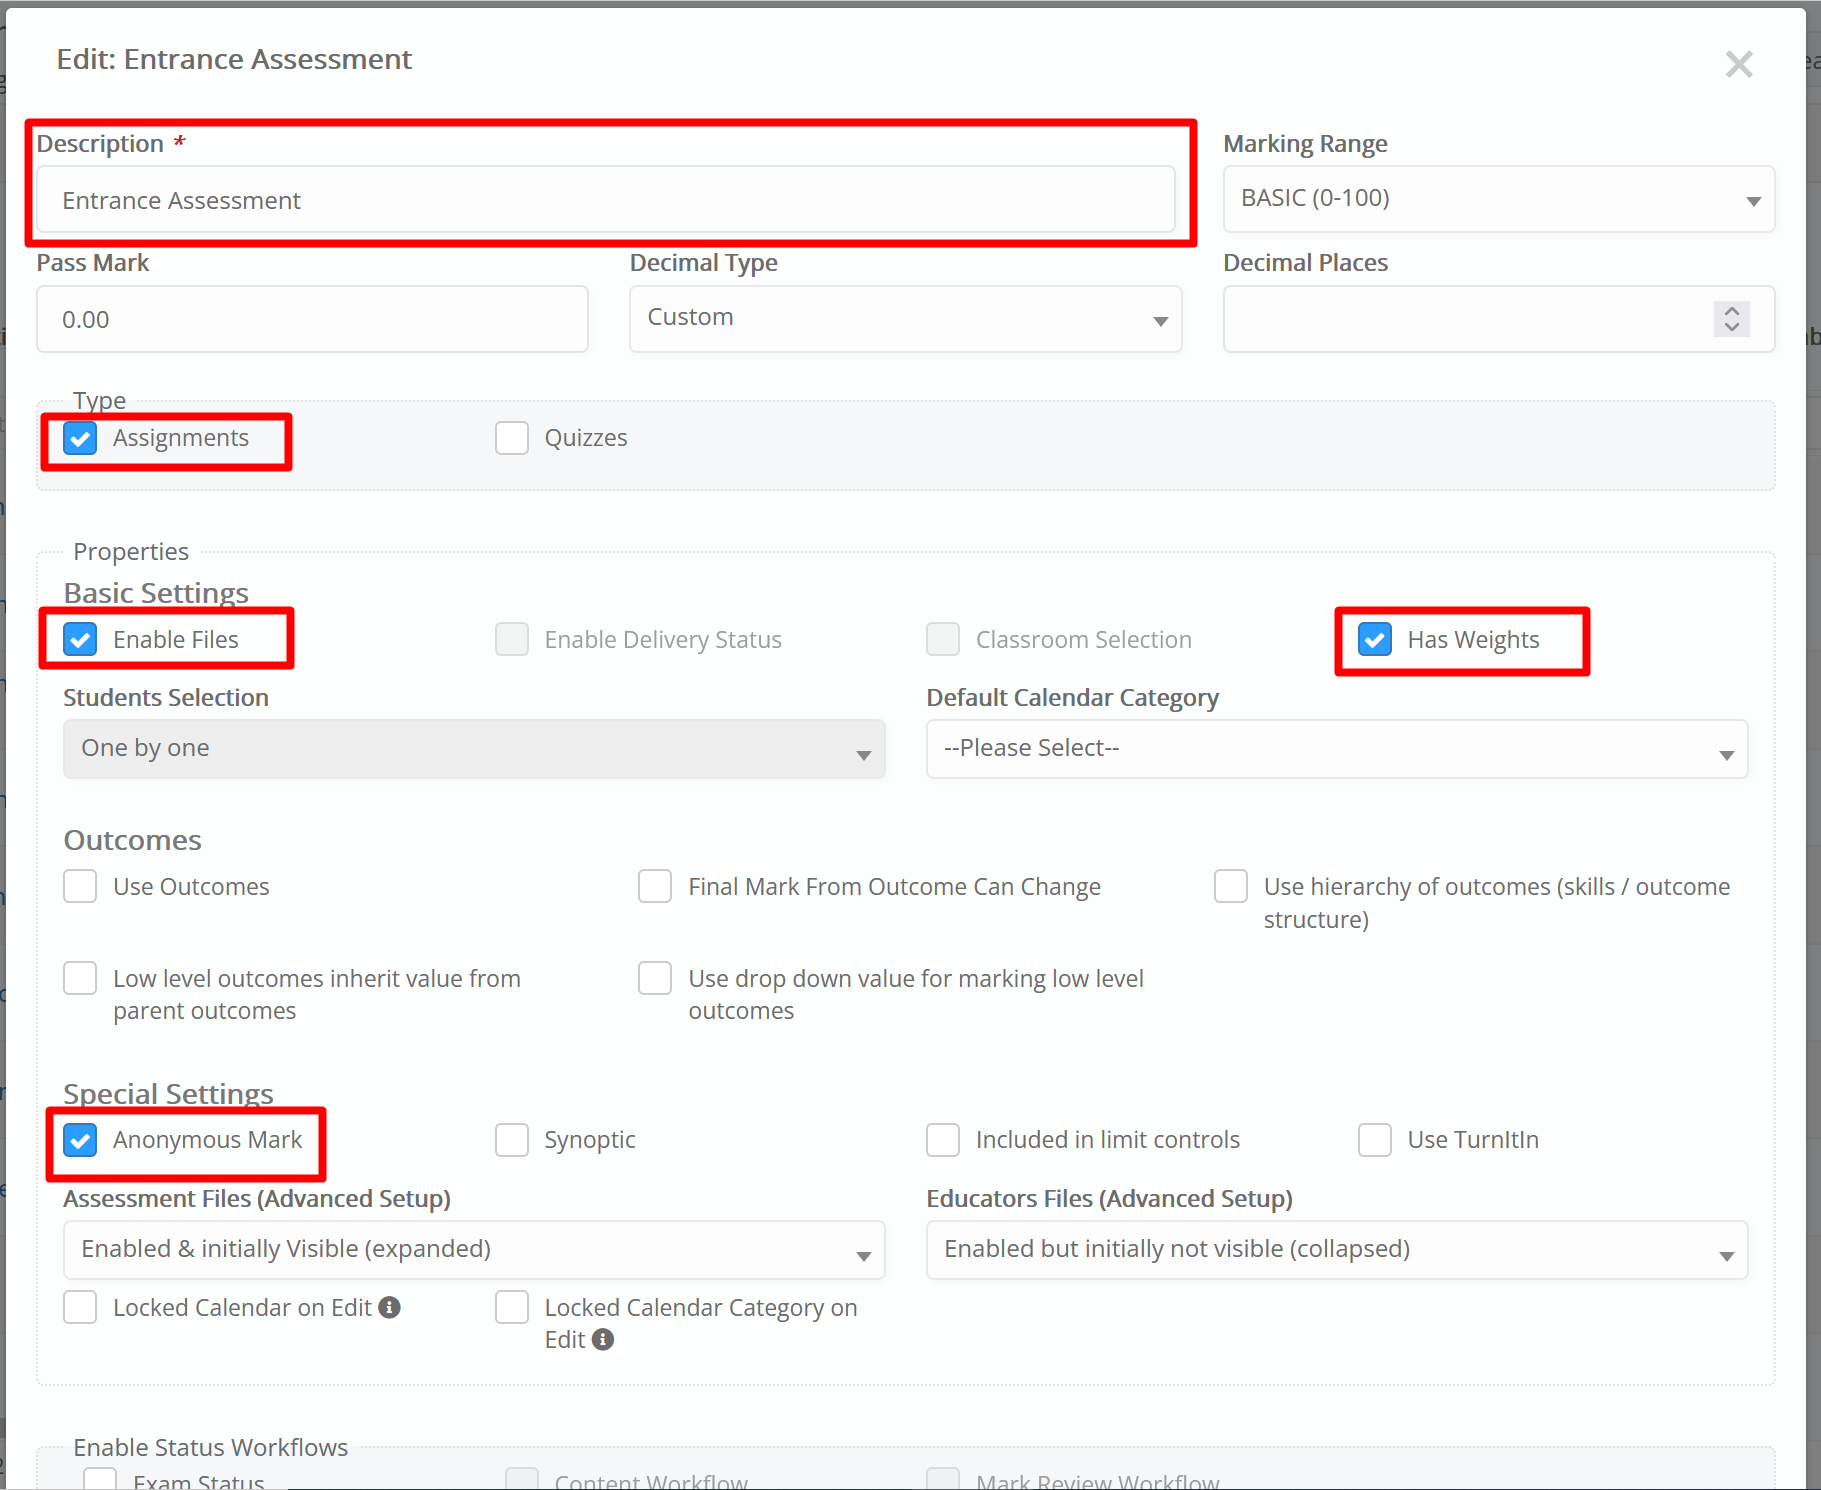
Figure 6
Second, the Marking Criteria need to be created and configured. To do that go to CONFIGURATION > Academic Settings > Marking Settings > Dropdown lists, select Marking Criteria Categories, and Add New. (Figure 7)

Figure 7
Write a Description, e.g., Entrance Exams, select a Color, and Save. (Figure 8)
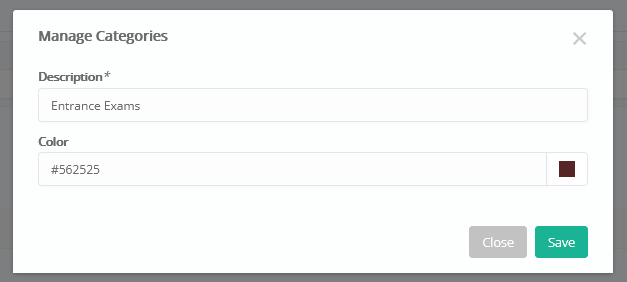
Figure 8
Then, go to CONFIGURATION > Academic Settings > Marking Settings > Marking Criteria and Create New. In the creation window, write a Description, select the Marking Criteria Category created above, and select all the Years/Grades for which applicants will be evaluated. (Figure 9)
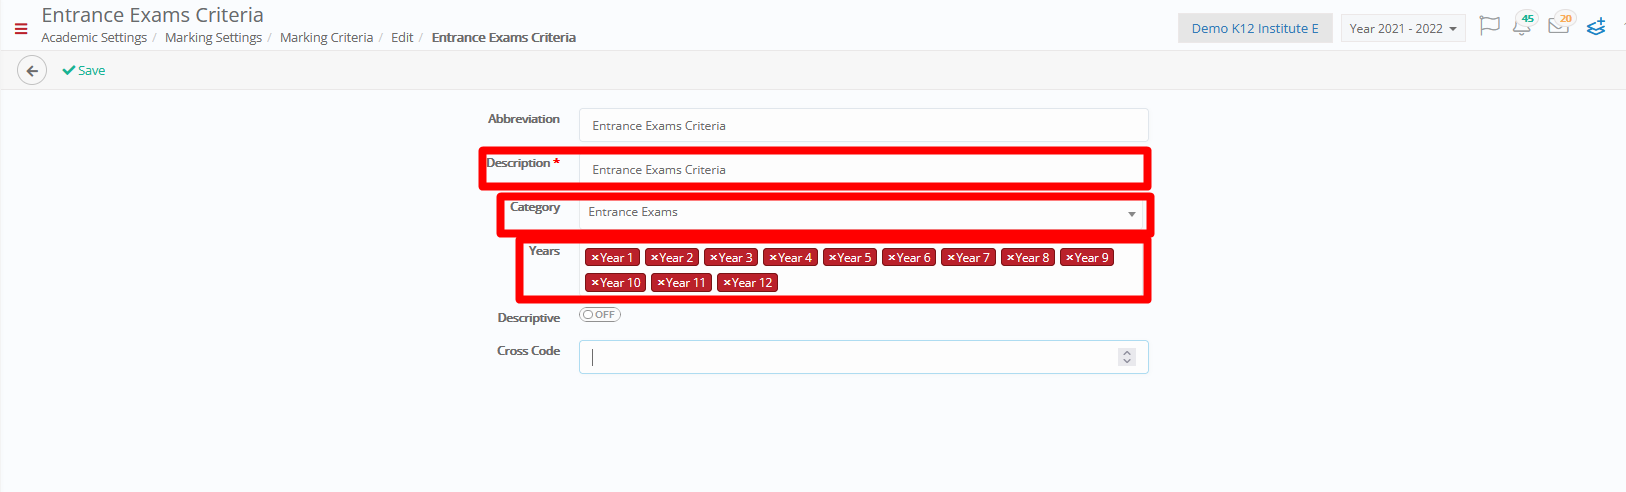
Figure 9
The last step in Marking Configuration is to create a Marking Scenario. That is completed in CONFIGURATION > Academic Settings > Marking Settings > Marking Scenarios. (Figure 10)
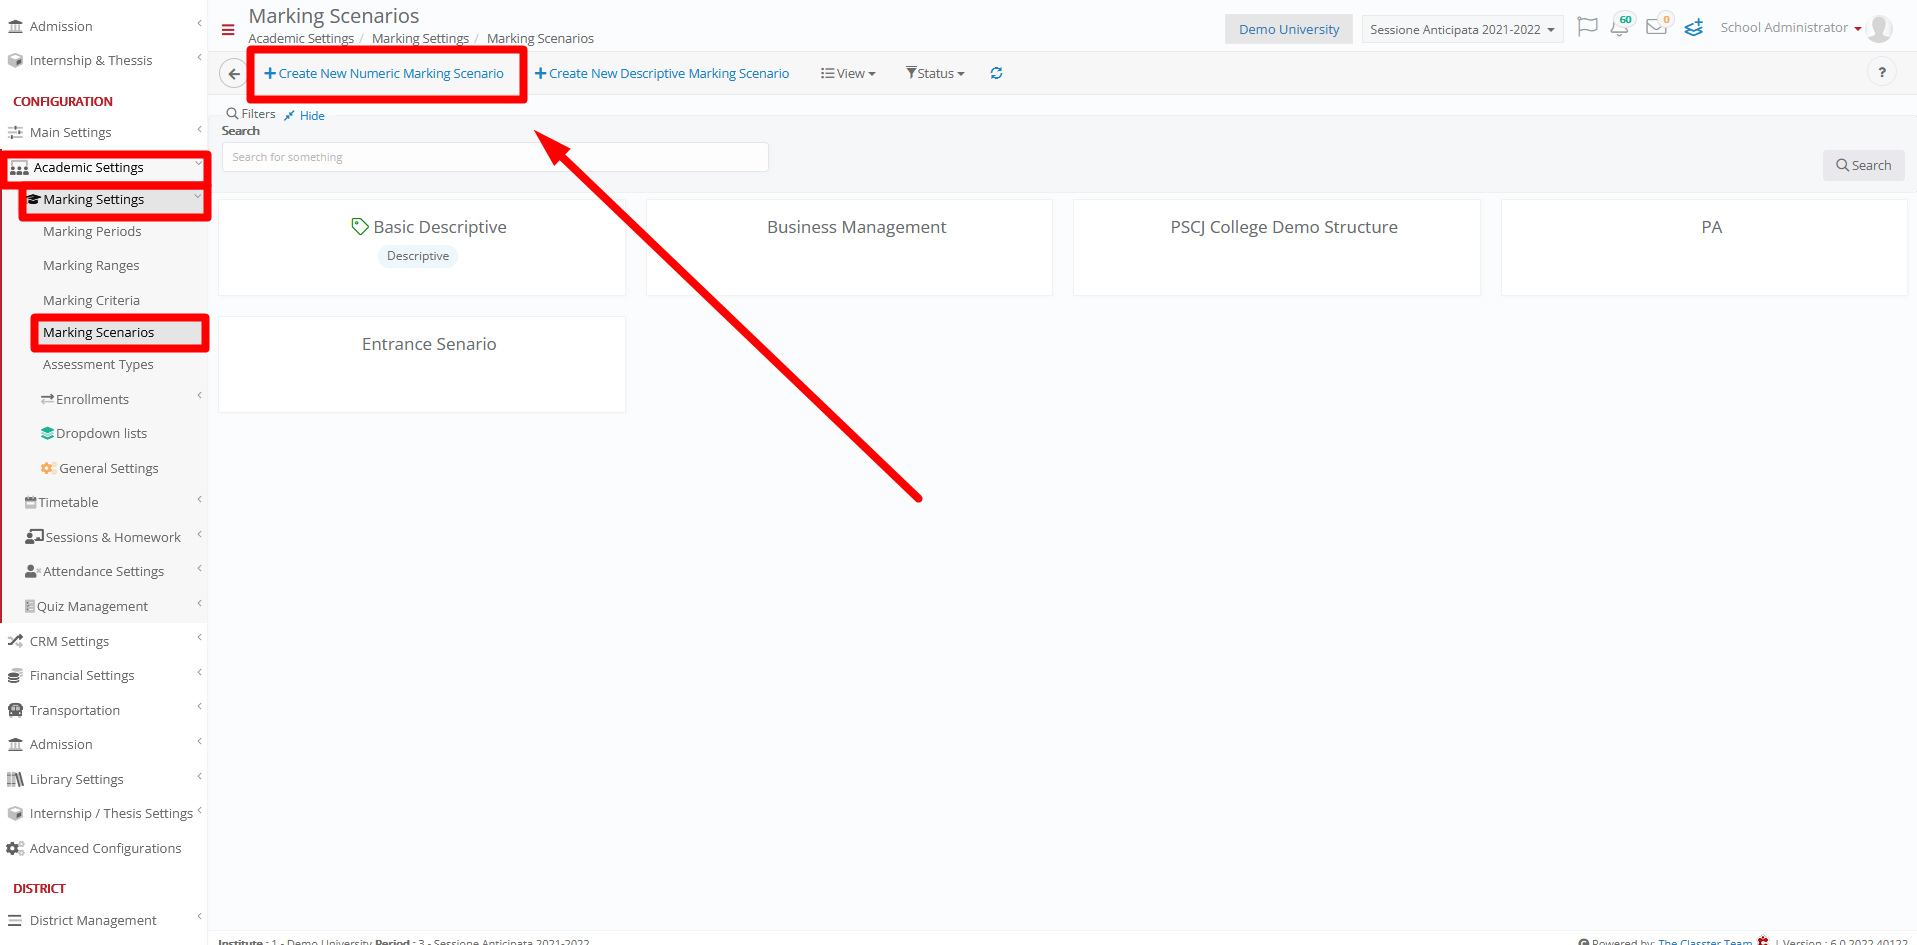
Figure 10
In the creation window, write a Description and click on the Add Specific Marking Criteria button. (Figure 11)
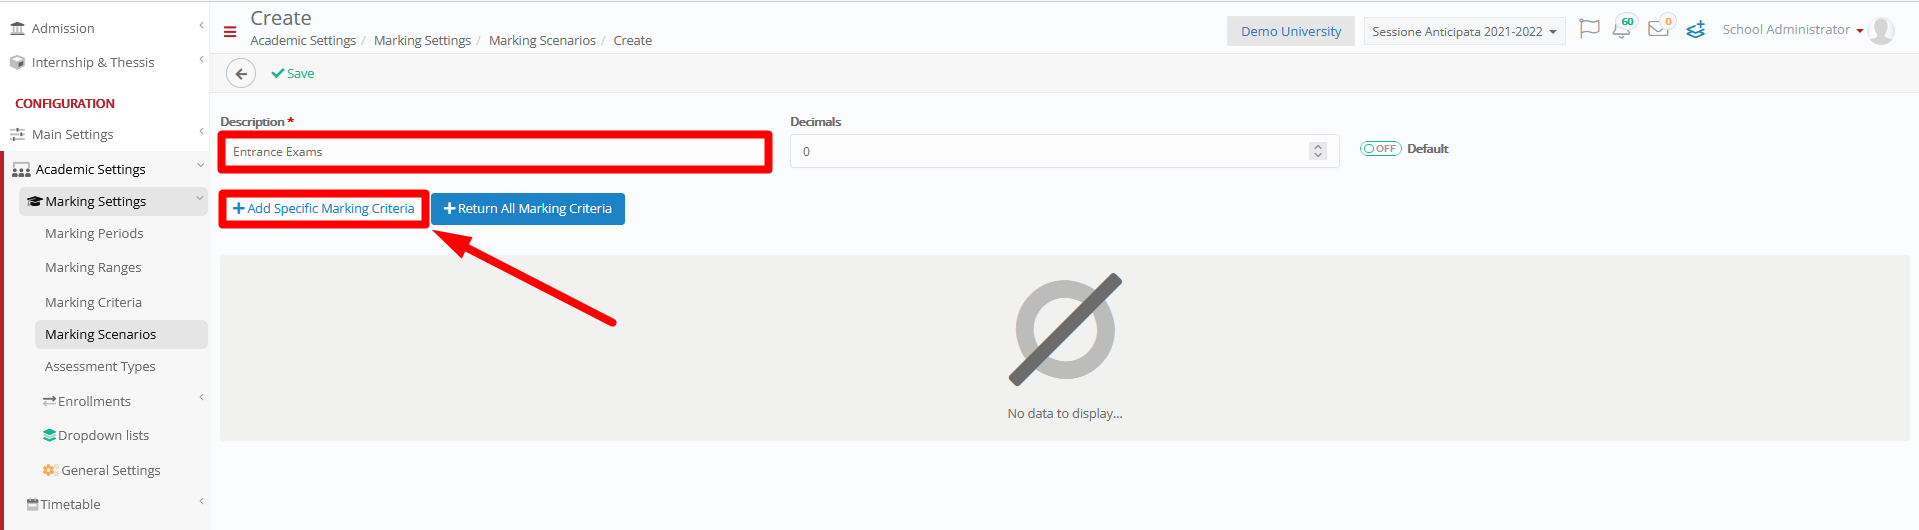
Figure 11
In the pop-up window, select the Marking Criteria Category created before, search, and select the specific Marking Criteria created above. Once ready, click on Save. (Figure 12)
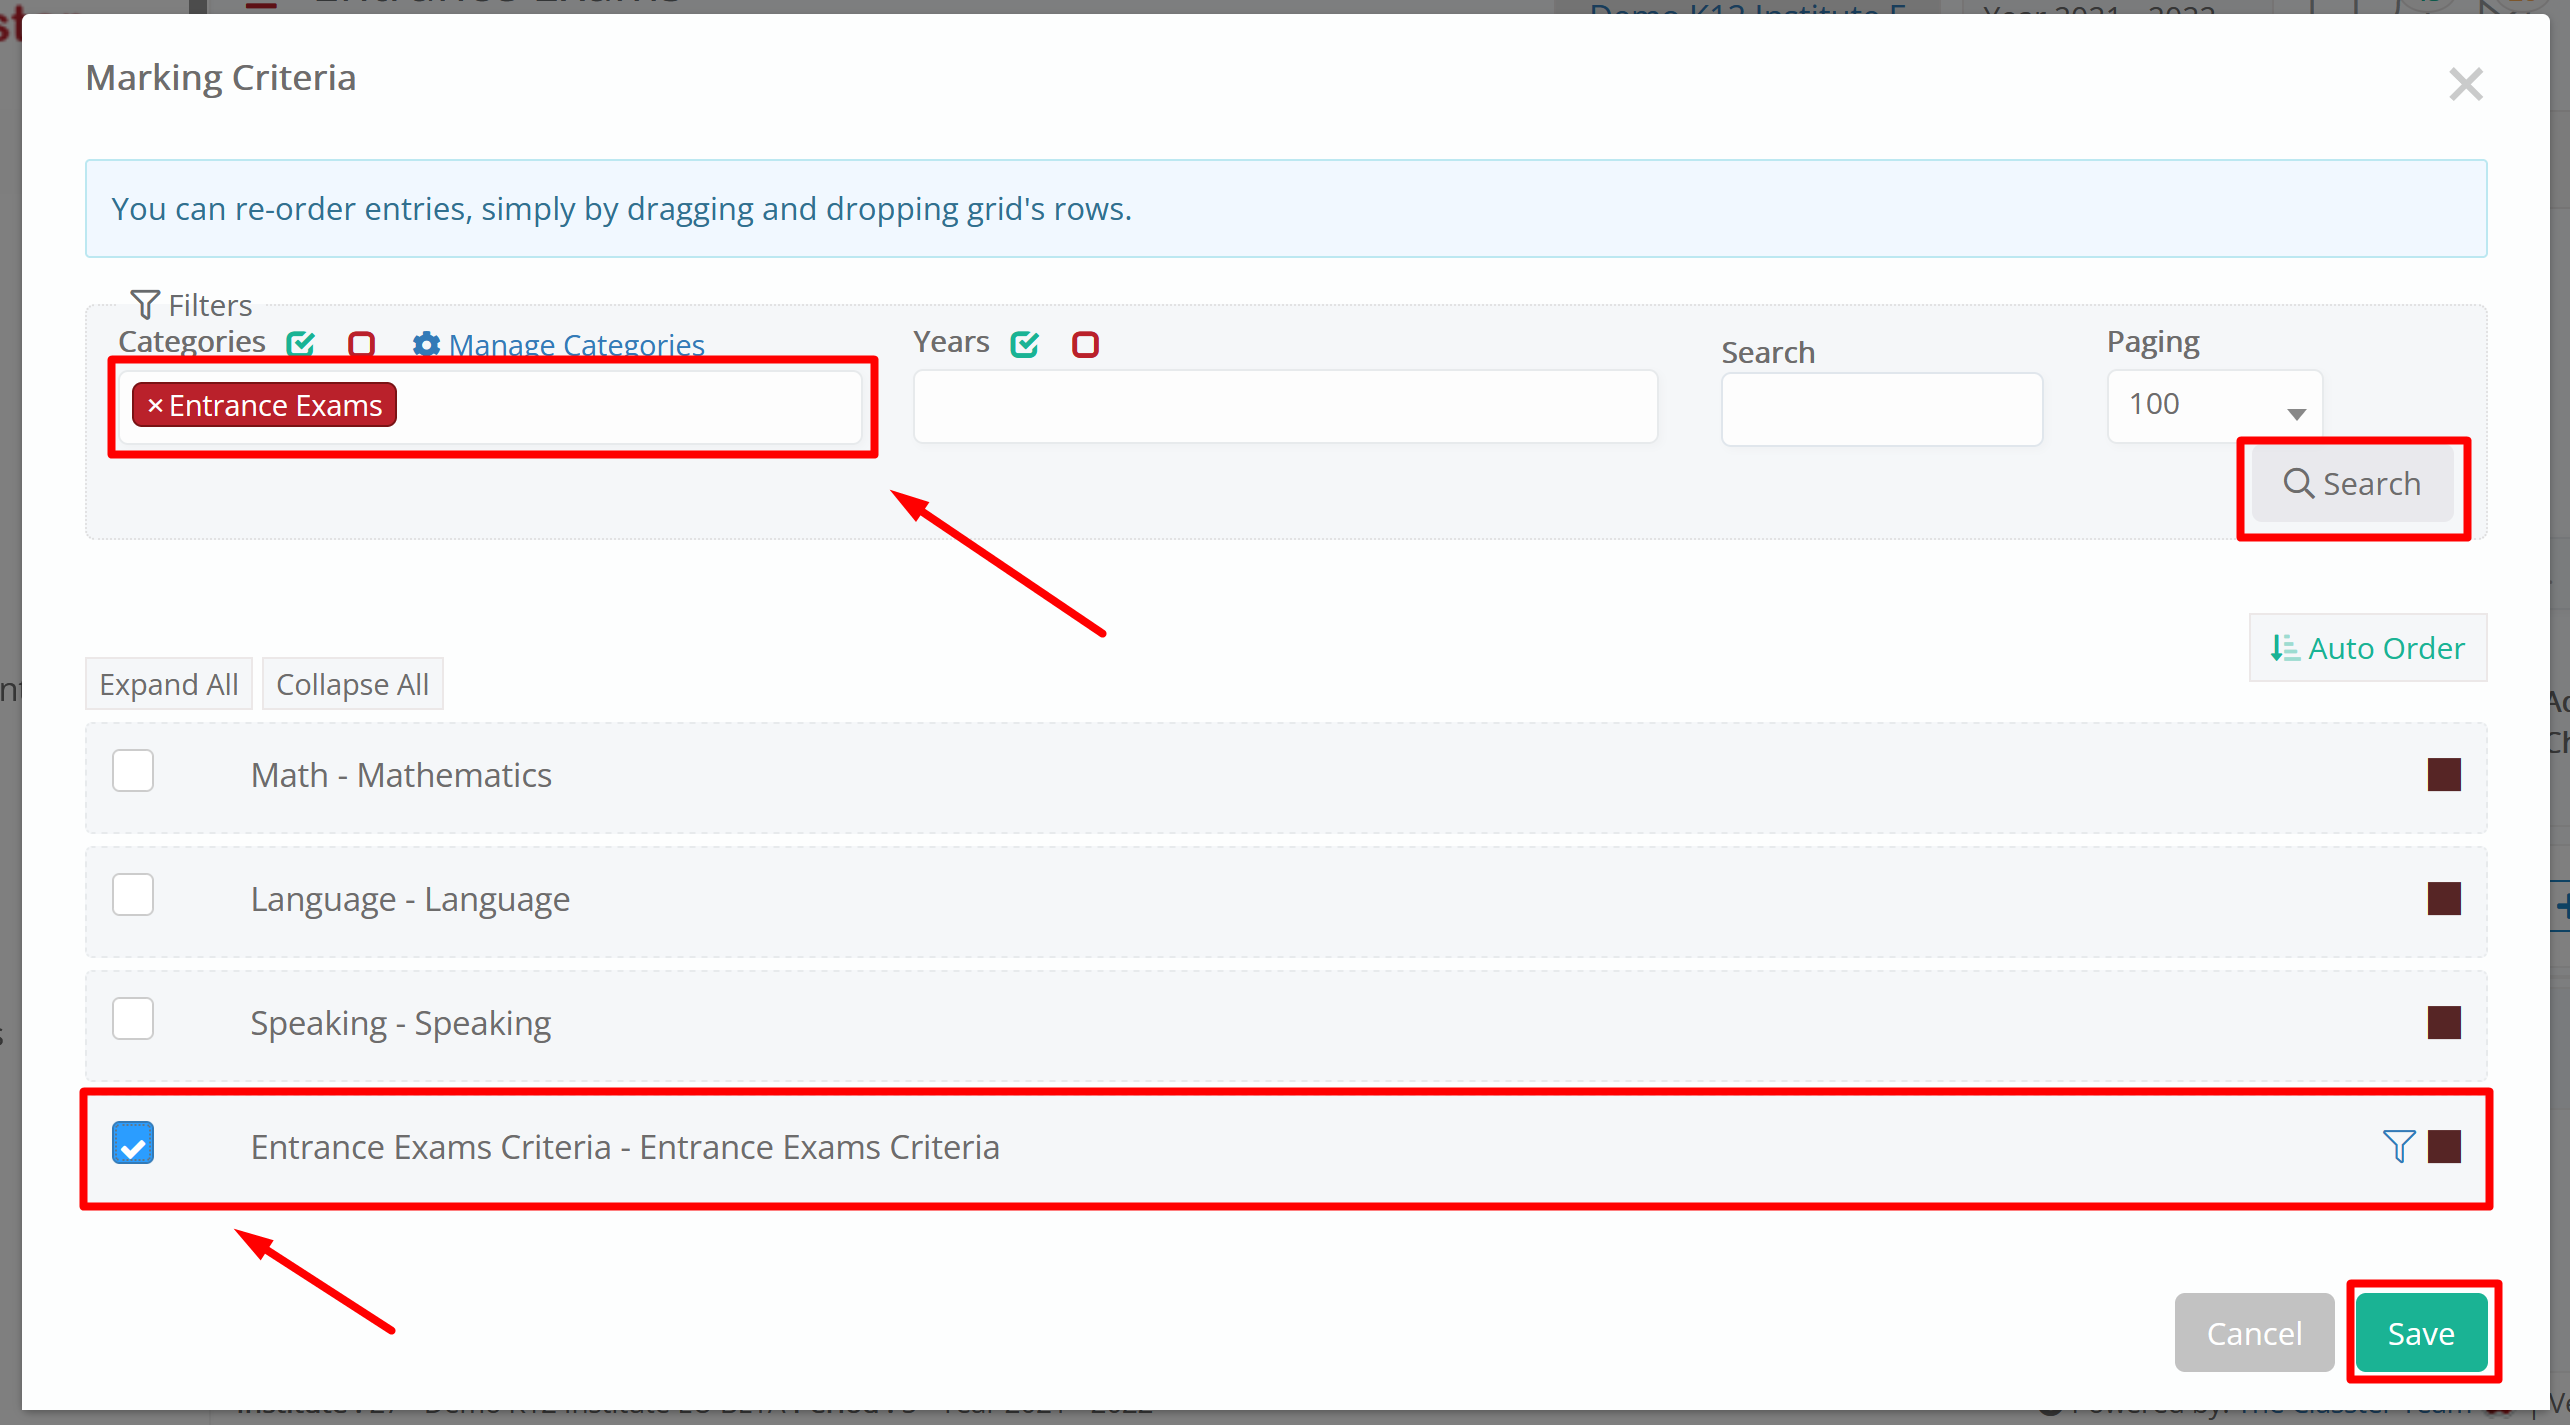
Figure 12
Then click on the Settings button (Figure 13), enable the Entrance Assessment Type, and click OK. (Figure 14) Don’t forget to save your changes in the Marking Scenario.
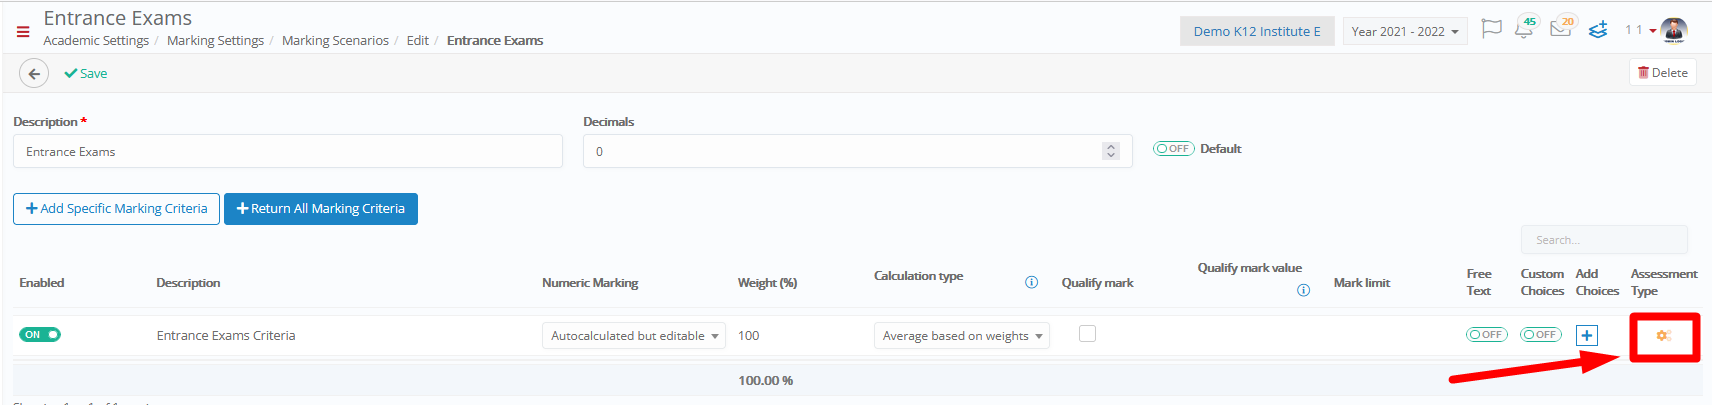
Figure 13
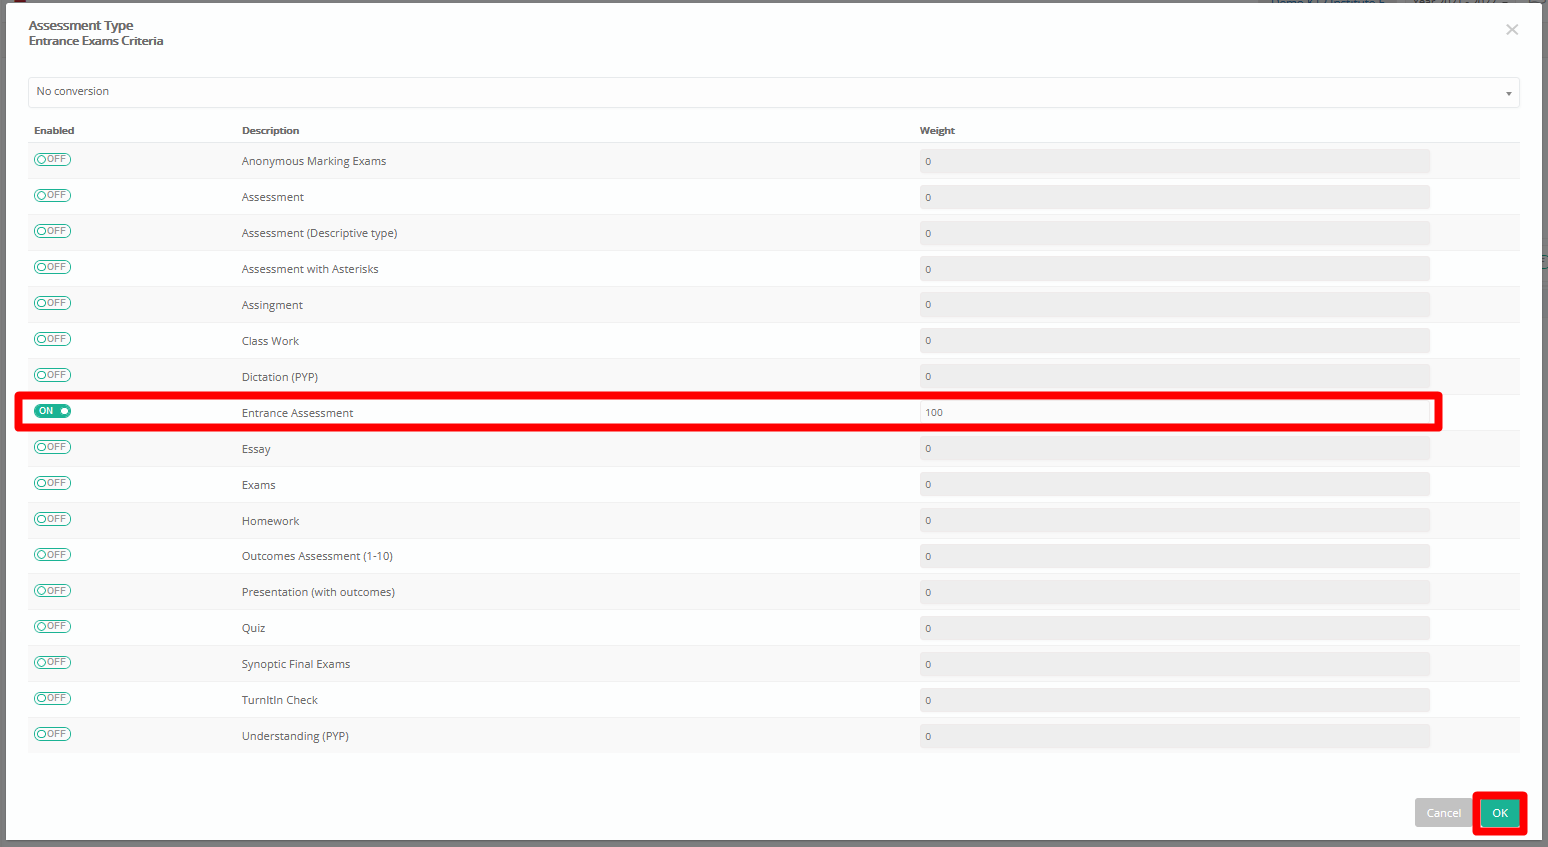
Figure 14
Step 4: Creating a Group
Teachers can evaluate an Assignment when a Group/Class with the Entrance Assessment Subject enrolled is created, and the Teachers who will complete the Marking are allocated to it. (Figure 15)

Figure 15
Step 5: Settings
To complete configuration, navigate to CONFIGURATION > Admission > Admission Settings > Entrance Marks Settings. (Figure 16)
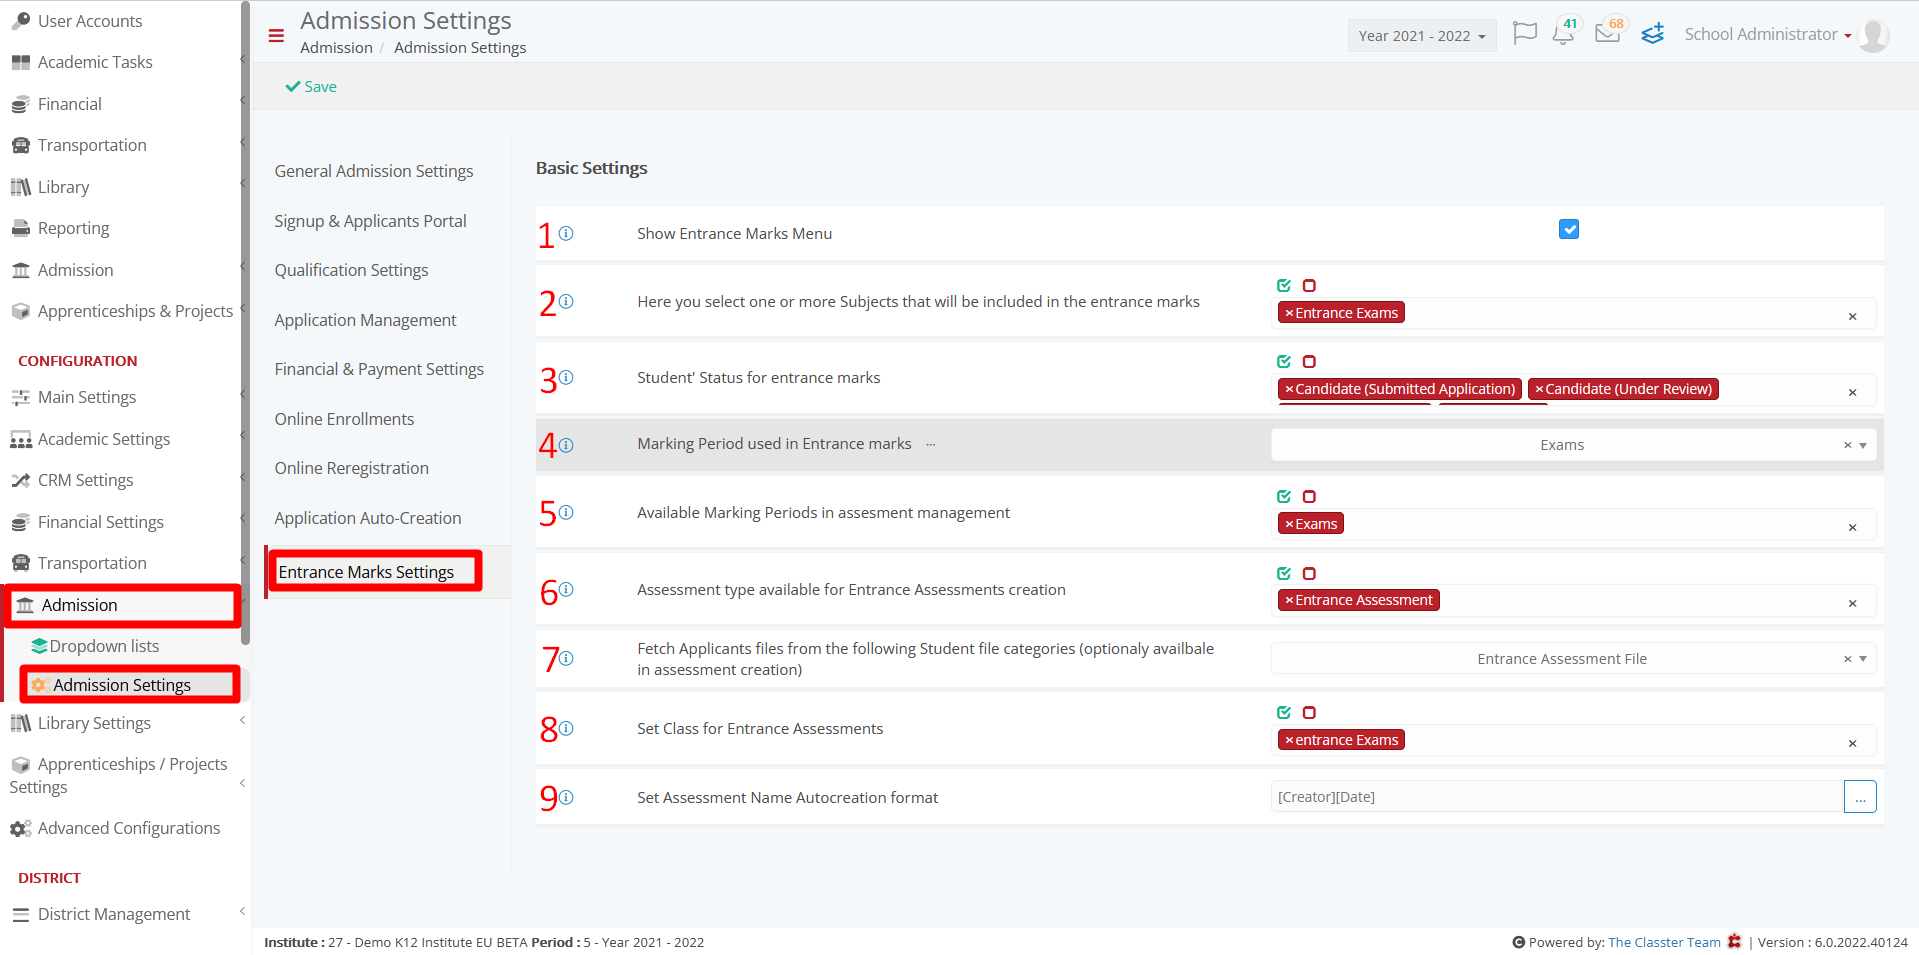
Figure 16
- Enable the Show Entrance Marks Menu.
- Select the Subject created in Step 2 of this guide.
- Select the Status of the Students that will take the test, usually Submitted Application.
- Select the Marking Period that will be used in the Entrance Assessment. Must be the same that was selected in Step 2 in the Subject’s Academic tab.
- Here you can select all the marking periods that the Administrators and Teachers will see in the Entrance Marks Gradebook. The Marking Period used in the current Entrance Assessment must be included.
- Select the Assessment Type created in Step 3.
- Select the File Category that you created in the beginning. The Applicants’ Assignments will be in that Category.
- Select the Group/Class created in Step 4.
- Here you can create your own title for assessments format by adding tags.
Click on Save when ready.
Optional step 1: Having more than one Teacher to evaluate the Assignment
If there is a need for more than one Teacher to evaluate the Entrance Assessments, that can be defined with some minor changes in Step 3. The Assessment Type is created as described, but we create more different Marking Criteria, as many as the evaluators needed. All are configured in the same way as shown in Step 3 but then they are all connected with the same Marking Scenario. So, if we have 2 Teachers Evaluating, the Marking Scenario will look like Figure 17.
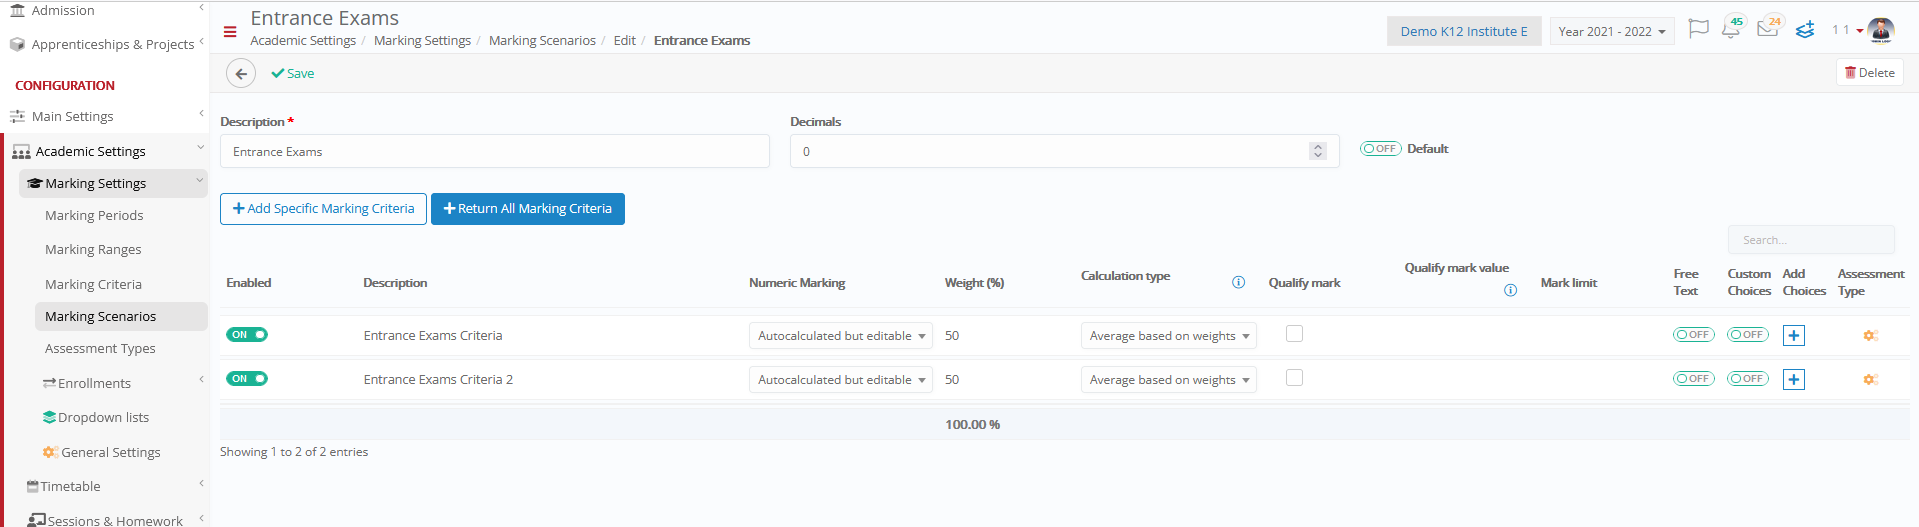
Figure 17
Optional step 2: Using Application points based on Entrance Assessments
From the configuration up to this point, Marks for the Entrance Assessment of the Applicants can be visible in the Entrance Gradebook. With a bit more configuration we can convert those Marks into application points.
First, go to CONFIGURATION > Admission > Dropdown lists >Entry Requirements > Add new. In the pop-up window, fill in a Description and select Entry Exams in the Entry Requirement Type and Save. (Figure 18)
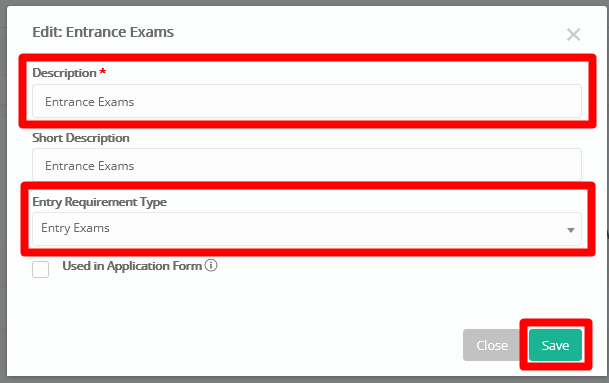
Figure 18
Then find the Subject created in Step 2, go to the Advanced tab, select Entry Exams in the Entry Requirement Type field and Save. (Figure 19)

Figure 19
Using the Entrance Assessment as a Teacher/Employee
Now that the configuration is completed, teachers/employees can proceed with assigning the Applicants to the entrance Assessment. Go to Admission > Application Management, select the Applicants you want and then click to Bulk Actions > Assign Students to Entrance Assessment. (Figure 20)
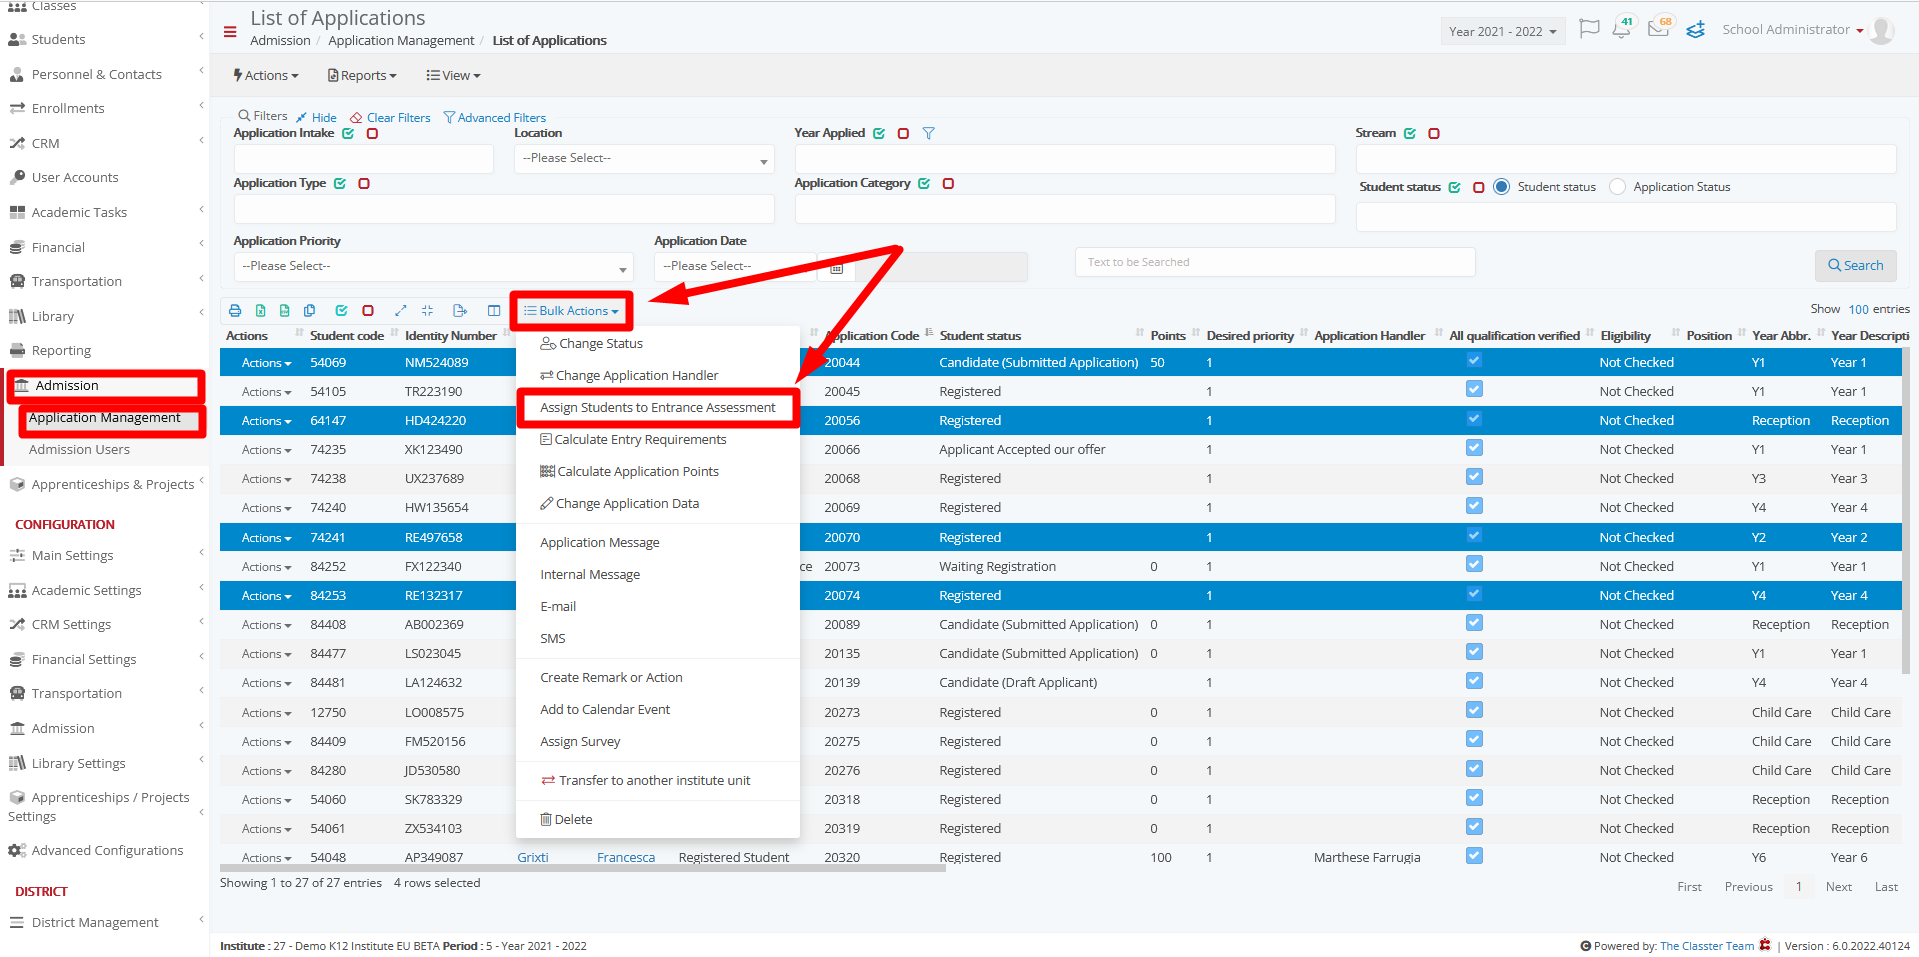
Figure 20
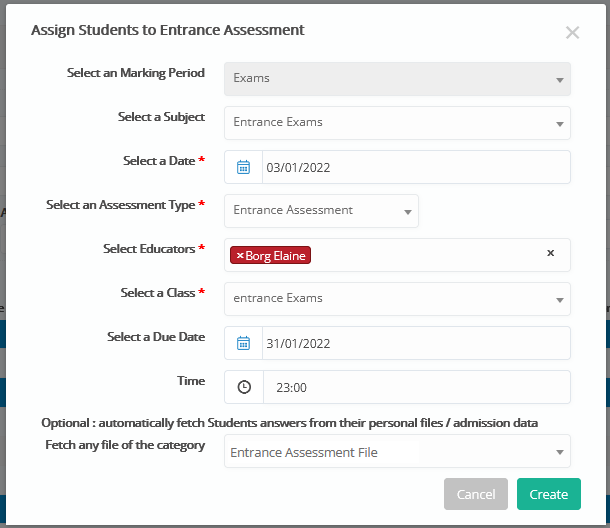
Figure 21
Select the Subject created in the Select a Subject field, the Assessment Type in the Select an Assessment Type field, and the Teacher/s that will evaluate the Assignment in the Select Educators field. Fill in the start date and the due date of the assessment in the Select a Date and Select a Due Date field respectively. (Figure 21)
In the Select a Class dropdown, select the Class/Group created in Step 4. In the Fetch any file of the category dropdown, select the Files Category created where the Applicants’ Assignments are in. Then click on create. (Figure 22)
Now Teachers can see from their portal the files for the assignment each applicant has uploaded, and mark them. (Figure 23)
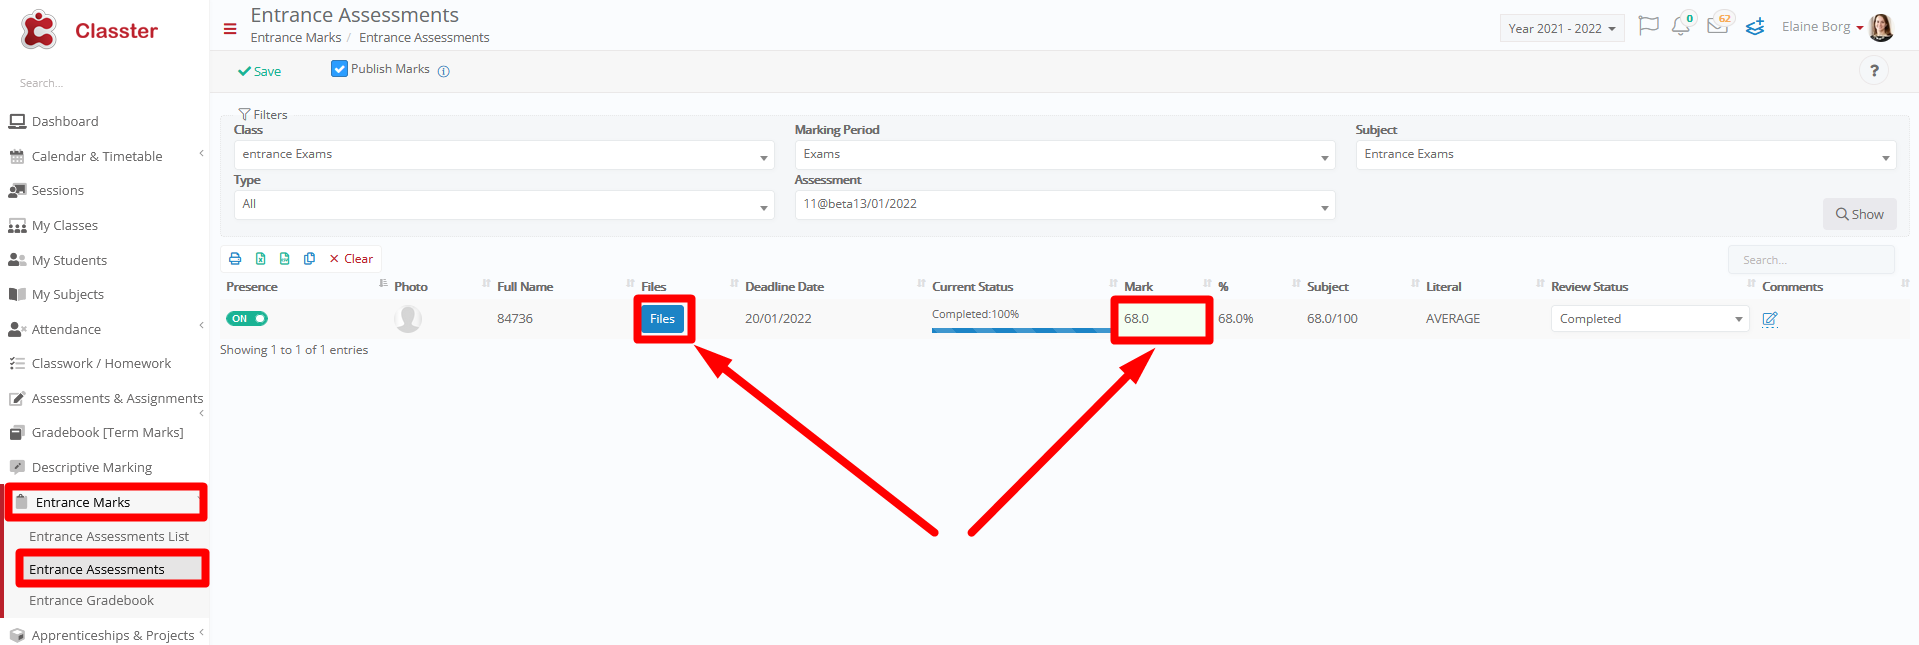
Figure 23
After the Marking is saved, the Applicants’ Marks can be seen in the Entrance Gradebook. If points in the applications are being used, then an employee needs to go to the Entrance Gradebook and click on the Calculate & Transfer Points button so the points will be added to every application. (Figure 24)
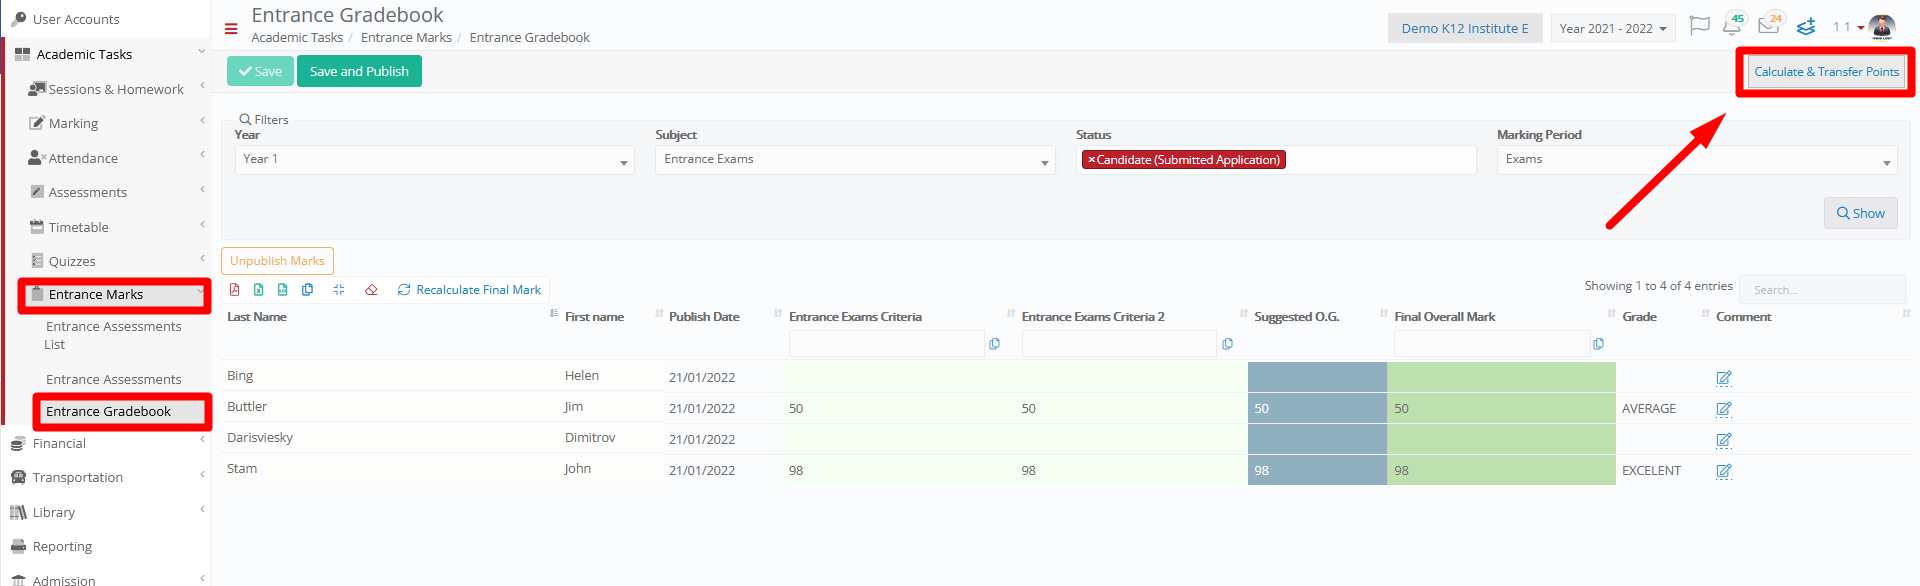
Figure 24
In the pop-up window, select the Entrance Assessment Subject, the intake of the applications, the marking period of the Entrance Assessment, and the Entrance Exams (created in the Entry Requirements dropdown list) as shown in the Figure 25.
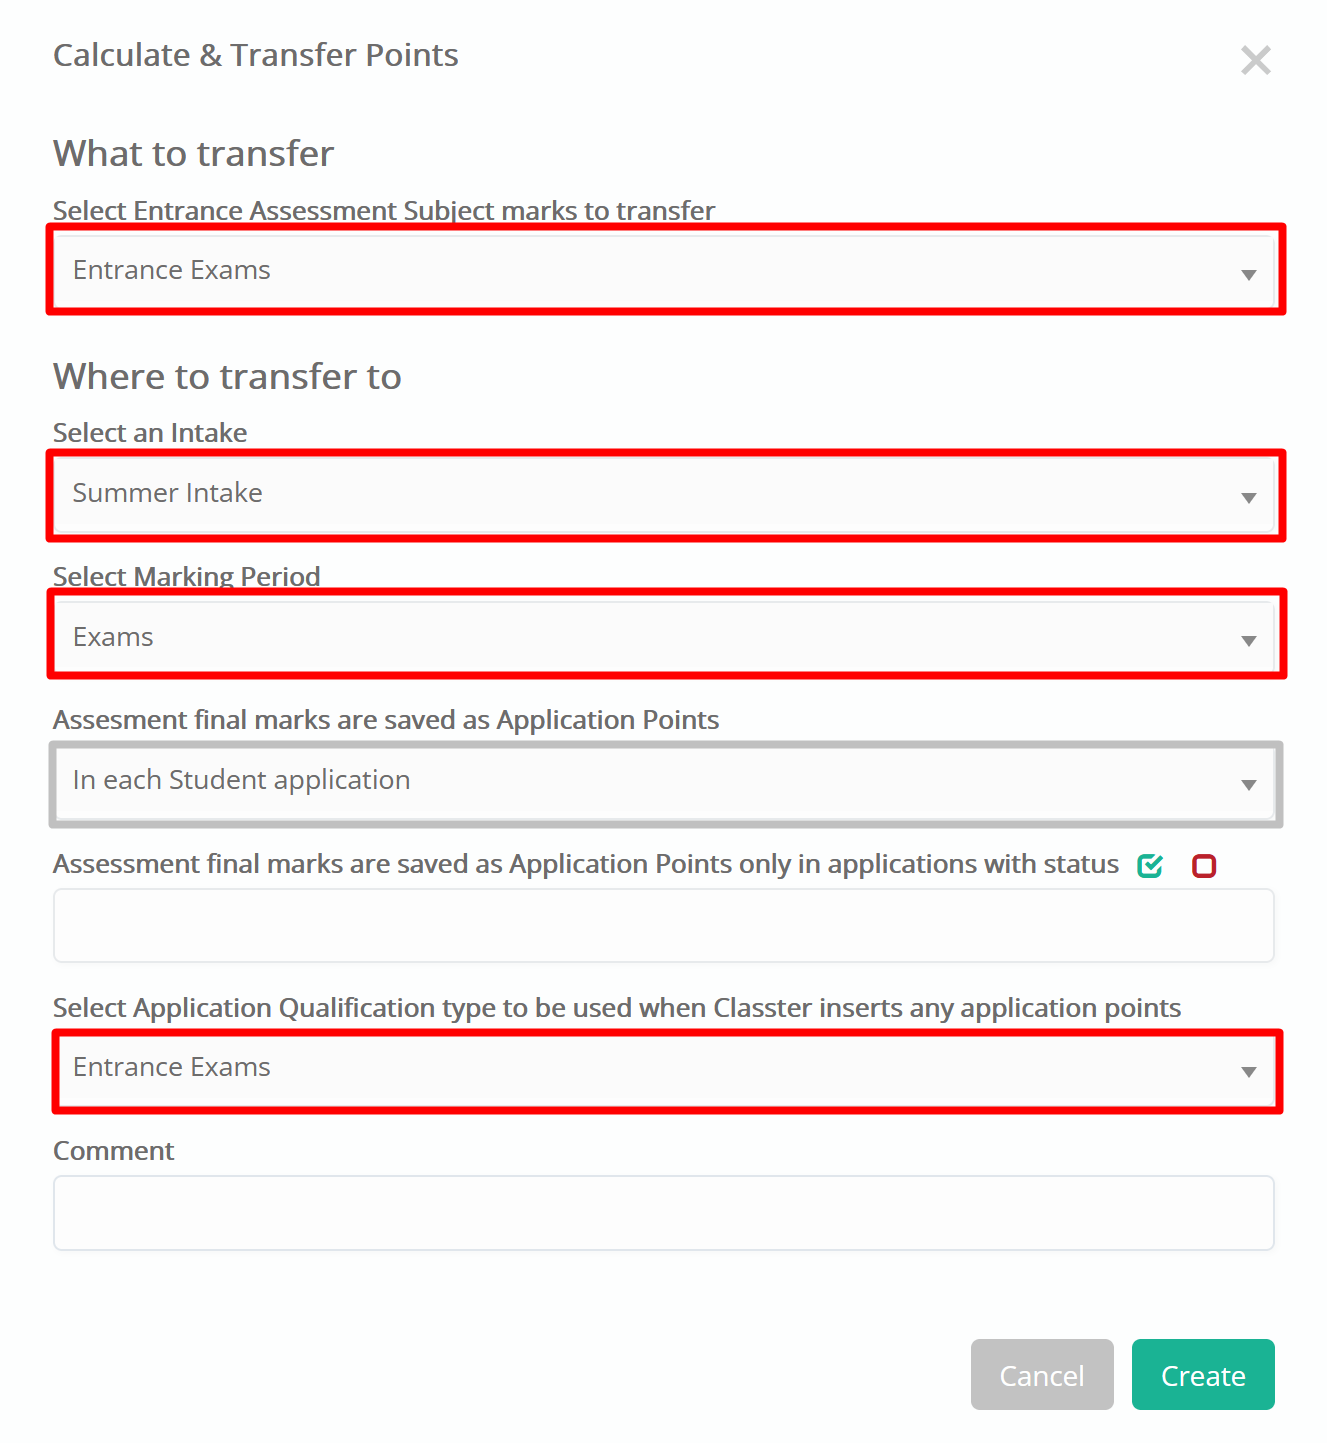
Figure 25
Now the points appear on the Application Management list, based on which applications can be sorted.