

Watch the How-to Video

You can refer to this tab as your own question library. In this section, you can see all your archived Questions and their respective Answers.
When we open the tab, we see the following screen (Figure 4). It consists of a Create button, a Search button with filters, and a table with Questions.
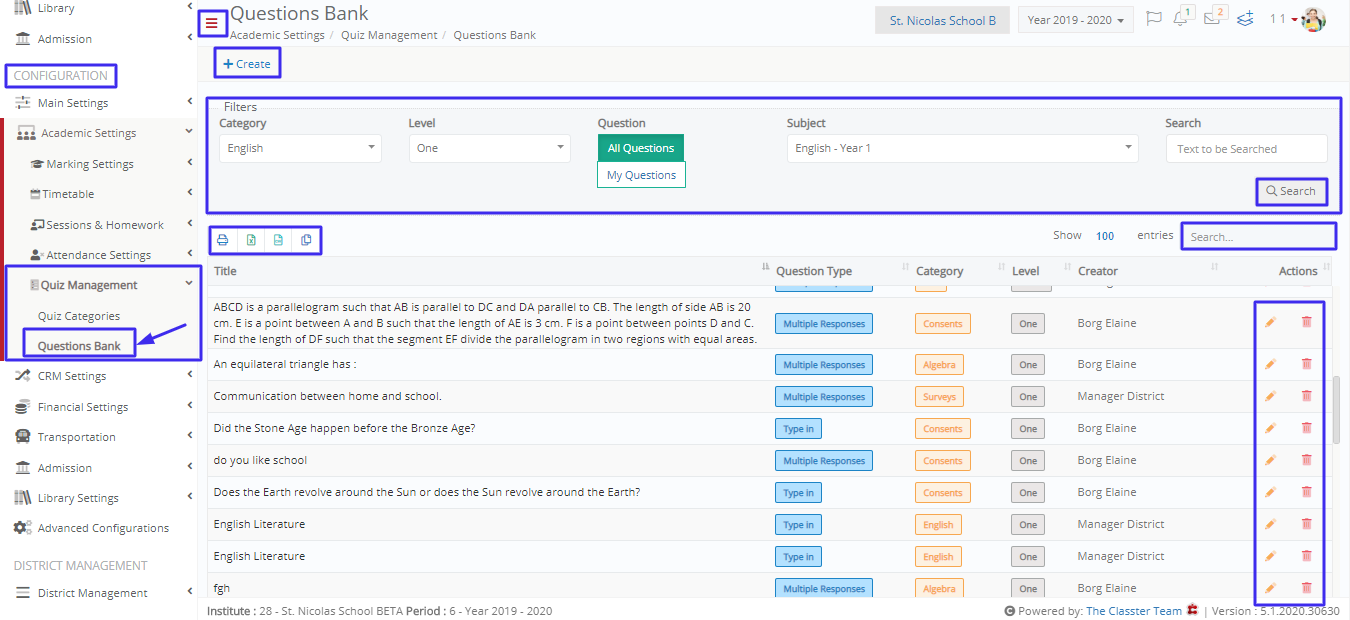 Figure 4
A bit crowded, right? Let’s start from the beginning!
Create Button
To add a new Question to the Database we click on the Create button.
By clicking on the Create button, a screen containing the Question (Top left of the screen), Categorization & Properties (Top right of the screen), and possible Answers (bottom rectangle) shows up (Figure 5).

Figure 5
Question:
- Label: The label field is like an inscription or a tab. For example, “Math Problem 03”.
- Title: Contains the text that will appear as the title of the Question. For example, “How would you describe Classter?”.
- Question Type: This drop-down box has three options. Either Multiple Choice, Type in, or Matching. If we select the option Type in, then the Add Answer (a right rectangle of Figure 5) disappears and the answer will be free text. If we select Matching, then the Add Answer becomes Add an item – match e.g Item Bird – match chirp and so on. When you choose Multiple Choice, Type in, or Matching you will see the two adjacent fields change e.g Type: Multiple Choice, Allowed Choices Number field, and Answer Rows.
- Info: In that field, we can provide additional information, about the question. This could be in the form of a photo, a plot, or just some extra details, regarding the question.
Categorization & Properties:
- Category: Here we can choose to add the Question to one of the Categories we created in Quiz Category.
- Level: This is an extra categorization of questions. You can translate it as difficulty level, work time level, or whatever suits your needs.
- Subject: Choose the subject this Question regards/is associated with.
- Points: The number of points, the question is worth if answered correctly.
- Public: If active, then this question will be made available for use by all your colleagues.
If you have selected multiple-choice as your Question Type, then the Add Answer button will be available at the bottom center of the screen. By clicking this button an answer field will appear (Figure 6).
- In the first field, we type the number of points this answer is worth.
- The second field is the name of the answer.
- By clicking the Needs Justification checkbox, another text field appears, where the user can type in some information regarding his/her answer.
- On the upper right side there is an X button, for removing the specific answer.
- On the upper left side, there is a cross-like sign. This is used for dragging and changing the order of the answers.
- Finally, by clicking the thumbs up/thumbs down button, we can turn the answer from correct to wrong and vice-versa.

Figure 6
A completed Question looks like the one in Figure 7. We click the Save button in the upper left corner to save it.


Figure 7
If you have selected a Type in choice as your Question Type, then you will see the following (Figure 7a). This question type does not have an add answers button, students will have a defined number of text or rich text lines to type in their answers.

Figure 7a
If you have selected Matching as your Question Type, you will see the following (Figure 7b).

Figure 7b
- By clicking on the “Add” button you can add a Matching Answer (Figure 7b).
- By dragging the cross-shaped button up or down you can change the order of appearance for the answers (Figure 7b).
- Fill in the Item field and the Match field to indicate that the item e.g Frodo is the Match for Bilbo (Bilbo is the adopted father of Frodo) (Figure 7b).
- Click on the X button to delete an answer (Figure 7b).
- If you click on the “I” button you will be able to add useful tips for answering a question (Figure 7b). If you click in the “I” button you will see the following popup window (Figure 7c).

Figure 7c
- Fill in the info box with useful tips for students.
- Click on ‘Save’ to save this tip.
- Once students hover over the I button they will be able to see the info you have entered here.
Search bar and Filters
After we made a few questions it’s time for the search bar. As we can see in Figure 8, there are three filters.
The first one being the Category dropdown. By selecting a category, only the questions which belong in the specific category will be shown.
The second filter is the Level. As we said before, the level is like a categorization defined by the user. It could be a difficulty level or any other level the user decides. So, by selecting a specific level, only it’s questions will be available.
The third filter is in the form of a button. It’s the Show filter and it has only two selections. It either shows every question, created by every user or it only shows your own questions.
Of course, you can perform any possible combination of the said filters, to achieve the desired result.
By clicking the Search button, the table below is modified by the filters to show the questions.

Figure 8
Question Table
In Figure 9 we can see the Question Table. It is composed of six columns, which are described below:
- Title: This is where the title of the Question appears.
- Question Type: This column is either Multiple Choice, Type in or Matching, depending on the type of the question.
- Category: The Category, which the question belongs to.
- Level: Represents the level of the Question.
- Creator: The user, who created the specific question.
- Actions: With the edit button we can edit the question. We could change the title, the answer, the number of points, etc. Delete button we can delete a question.
Finally, in the upper left corner, we can select the number of entries that will appear on the page and in the right corner, there is a search bar.

Figure 9