

The institutions admins involvement concerning online payments is part of a two-step process. First the Payer will make a payment, and this will then notify the Institutions Admin of the payment made through the Financial tab transactions page. The second step involves the institutions admin invoicing and sending the receipt to the payers Classter Portal. This process may take some time, this is defined by institution policy and may vary from institution to institution. In our example used in the parent’s portal section of the manual it would take 3 working days.
Transactions
The path you need to follow is Dashboard > Management > Financial Transactions (Figure 5).
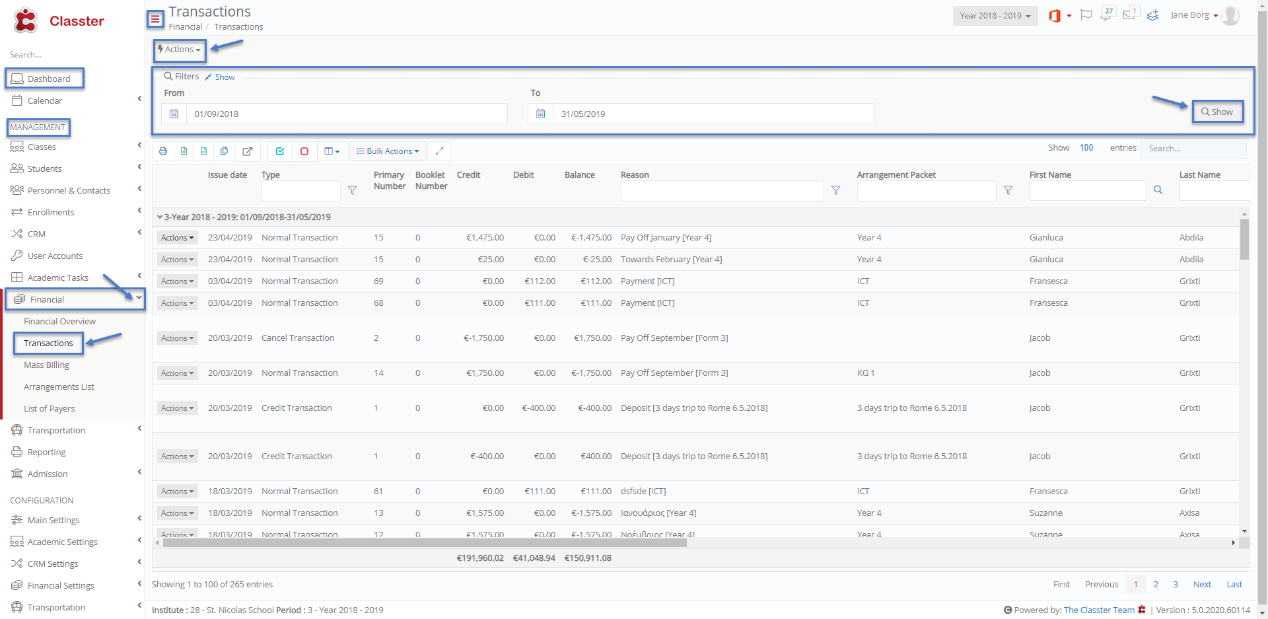 Figure 5
On the Transactions page you will be able to see the following (Figure 5):
- Here you can use the filters to find all transactions between the institution and the payer concerning students.
- You can see the detailed list below the filters.
- Through the Action button next to each entry in the list you can email, message payers concerning the transactions.
- You are able to copy and export the list of transactions to Excel, Word or Csv.
- With the proper authorization you can also delete transactions.
- This page does not cover online transactions.
- Click on the Actions button on the top left of the page and then on Online Payments in order to manage online payments.
Online Payments
Once you have clicked on the Online Payments button (Figure 6) path: Dashboard > Management > Financial Transactions. You will be transferred to the online payments page (Figure 7).
 Figure 6
Follow the path: Dashboard>Management>Financial Transactions>Actions Online Payments (Figure 7).
 Figure 7
On the Online Payments page, you will be able to see the following (Figure 7):
- By filling in the filters From Date/To Date you will be able to see the online payment transactions for this period.
- By clicking on the Show Unverified Transactions switch, you will be able to search for unverified transactions.
- By clicking on the Show Addressed Transactions switch, you will be able to search for transactions that have been addressed already.
- Click on the Show button to see the results based on the filters you entered.
- You will now be able to see the transactions in list form below the filters.
- As you can see all transactions are completed by the payers (Blue ticked boxes) this is the first step to finishing the Online Payments process done by payers.
- To complete the process, click on the action dropdown button next to every transaction and then click on Invoice and Payment. Lastly click on Payment receipt in order to send the payment receipt to the payer.
Once you have clicked on the Invoice and Payment button you will see a popup window asking you to confirm. Click on the confirm button.
Note: If the payer has no outstanding payments then you will receive a warning popup window asking you if you are sure you want to continue (Figure 8).
 Figure 8
Once you click in Payment Receipt you will see the following popup window:
 Figure 9
- Fill in all the fields with info concerning what type of transaction this is, the cashier responsible, the payment employee handling the case, Date, Reason type and Financial Series.
- Last you can save this receipt by clicking on save. Alternatively, you can click on Save and Email payer or Save and Print a receipt. The suggested action is, save and email the payer.