

Quick Navigation
Watch the How-to Video
In this section, you can create and manage Assessments, such as scheduling, marking, results and analysis (Figure 65).

Figure 65
Assessment Scheduling
Use filters to show assessments that relate to the selected group/class, subject, marking period, type, date, Assessments for and Status (Figure 66).
Note: Assessment types e.g. assessment, assignment, exam, quiz etc. are set by the admin.

Figure 66
- Click on the student icon at the column ‘Students’ to check which students were assigned the specific assessment (Figure 66).
- Click on the edit button to edit the selected assessment (Figure 66).
- Click on the delete button to delete the selected assessment (Figure 66).
Note: If there are activated presences and/or registered marks in the assessment, you will not be allowed to delete it (Figure 287). Therefore, you must first delete the assessment results.

Figure 287
- Click on the assessment marks button to go to ‘Marking’ menu and manage assessment marking (Figure 66).
- Click on the message button to send a message to students, teachers or supervisors (Figure 66).
Create New
In this section you can create and assign assessments, exams, assignments and quizzes to the selected students (Figure 67).

Figure 67
New Assessment/exam
You can create an assessment/exam for a group/class.
- Fill in the assessment/exam fields as shown below (Figure 68).
- Click on ‘Manage Files’ button to upload files.

Figure 68
Click on ‘Save’ to Save Assessment/Exam or ‘Save and Close in order to Save Assessment Exam and close the page.
Note: Click on the ‘View Students’ Workload’ button to check students’ current workload (Figure 69).

Figure 69
New Assignment
You can create an assignment for a group/class or specific students.
- Fill in the new assignment fields as shown below (Figure 70).
- Click on ‘Manage Files’ button to upload files.
- Click on the ‘Add’ button to select specific students.
- Click on ‘Save’ to Save Assignment or ‘Save and Close’ in order to Save Assignment and close the page.

Figure 70
Note: Click on the ‘View Students’ Workload’ button to check the students’ current workload (Figure 71).

Figure 71
New Quiz
You can select or create a quiz for a group or students.
- Fill in the quiz fields as shown below (Figure 72).
- Click on ‘Save’.

Figure 72
Note: Click on the ‘View Students’ Workload’ button to check the students’ current workload (Figure 73).

Figure 73
Note: At the ‘Quiz’ drop-down list, you can either select an existing quiz (defined by the admin[2]) or create a new one (for answers only) (Figure 74).

Figure 74
Auto Quiz creation
- Select ‘Auto Quiz Creation – Answers Only’ (Figure 75).
- Click on the ‘Insert Quiz Questions/Answer Structure’ button.

Figure 75
At the popup window (Figure 76):

Figure 76
- Set the number of questions, the number of answers per question and the number of points per answer
- Click on ‘Create Structure’
- Set the ‘Type’ e.g. Multiple Responses and ‘Correct Answer’ e.g. 2
Note: If you select the type ‘Type in’, you do not set a correct answer
- Click on ‘Submit’
Assessment Marks
Use the filters to show the assessment/exam, assignment or quiz of the selected teacher, group/class, marking period, subject and assessment type. Use the search field to find a specific student or entry (Figure 77).

Figure 77
Assessment/Exam & Quiz
- Activate/Deactivate presence and add or edit students’, marks, comments, and the date that the assessment was completed by the student. You can export or print the list by clicking on the respective buttons (Figure 78).

Figure 78
Click on the ‘Bulk Actions’ button, if you want to add a general comment to the assessment (Figure 79).

Figure 79
- Click on ‘Save’.
Assignment
- Activate/Deactivate presence and define review status. You are also able to export or print the list by clicking on the respective buttons. Use the Search field to find a specific student or entry (Figure 81).

Figure 81
- If the status is ‘Submitted’, click on the ‘Collect Assignment’ to collect the assignment student answer (Figure 82).

Figure 82
- Click on ‘Save Changes’.
Note: Once the assignment is collected and reviewed, you can add a mark and change the assignment’s status to ‘Completed’ (Figure 83).

Figure 83
Assessment Results
You can see a group’s assessment results for a selected period (Figure 84).
- Use the marking period, Classes and Date filters to show results.
- Activate the ‘Only students having main group’ button if you want to show results only for students with a main group.

Figure 84
- Use the ‘Bulk Actions’ button to delete selected assessment results.
- Use the relevant buttons to print or export results.
- Use the Search box to find specific information (on the page).
- Use the ‘Reports’ button to produce reports presenting students’ examination marks and attendance statistics (Figure 85).

Figure 85
Reports (Figure 86):
Examination Attendance Report

Figure 86
Examinations View

Figure 87
Students without Examination Marks

Assessment Analysis
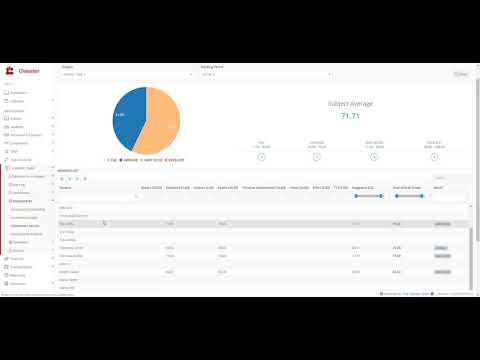
In this section, you can check average marking per assessment (Figure 90).
- Use the class and subject filters to show assessment results (Figure 90).
- Use the marking list columns to filter or sort results (Figure 89).

Figure 89
Hover over the graph columns to check the average marking per assessment (Figure 90).

Figure 90
- Use the Print and Export buttons to export or print the list of assessments (Figure 90).
- Use the search box to locate any specific info you may be looking for on this page (Figure 90).
General Note for Section: Terms may appear differently in each institution according to their academic terminology. For printing, you must have an operational printer set up (fully loaded with ink cartridges). For exporting you must have installed PDF readers and the MS Office suite.