

Watch the How-to Videos
Part 1

Part 2

Attendance
- Click on “Absences” from the main Menu, to record or check a student’s absence or being late at a specific subject.
Note: There are 4 ways of recording absences (or late arrivals), set per Grade/Year by the admin
- Per day – you can add several absences (1 or more) for a specific Date
- Based on Timetable Hours – you can add absences per Student of a specific Group, at a specific Date and Time period
- Based on Subjects – you can add several absences (1 or more) for a specific Subject at a specific Date
- Based on Timetable – you can add absences per Student of a specific Group, at a specific Date, Time period, for a specific Subject
Subject’s Absences
You can manage absences for a selected subject of a class/group, on the selected date. (Figure 53)
- Select Date, Group that you want to manage absences for (depending on the attendance method used you may also see the filters timetable category and period).
- You can activate the ‘Activate Supervisor Mode’ if you are a supervisor of a group(s) or subject(s) and you want to check /submit student absences.
- Activate the ‘Activation Substitution Mode’, if you’re substituting the teacher for a specific day and you want to submit student absences.
 Click at the ‘Show’ button to see students’ absences according to the filters given.
 Click on ‘Add remarks/actions’ button to add remarks & actions .
- Click on the remarks/actions button to view the remarks & actions that have been added.
 Click at the ‘Show’ button to see students’ absences according to the filters given.
 Figure 53
- At each student entry you can activate ‘Absence’ or ‘Late’, select Absence Category, see Absence Type, add comments and check the absences’ total number. (Figure 54)
 Figure 54
Note:
- It is subject to settings, made by the administrator, whether the student’s account will be instantly updated with the activated absences or not.
- The days limit, for teachers editing the submitted absences, is set by the administrator. (Figure 55)
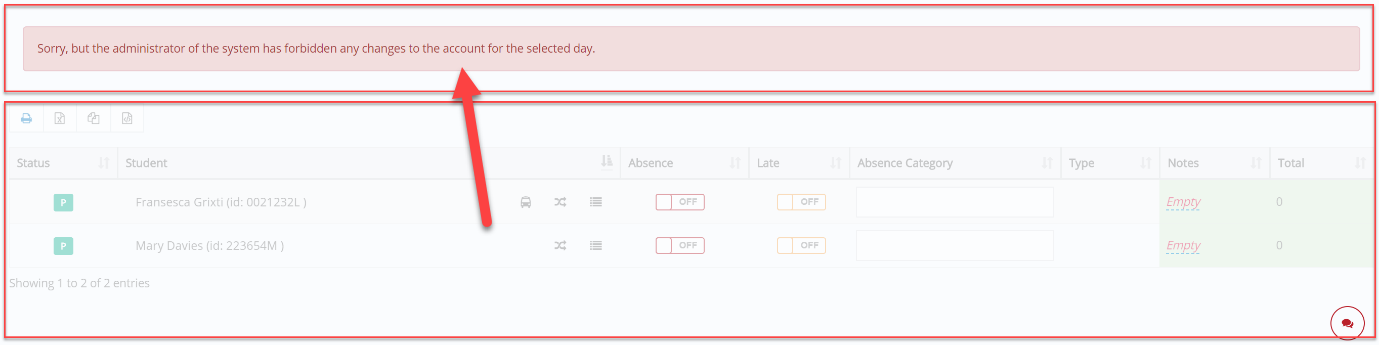 Figure 55
- In case a student is set as “unavailable” by the admin (because e.g. he is attending a school project), you will not be able to add an absence.
- When the absence recording system is based on Timetable Hours and a student gets an absence for the 1st period, then the system dynamically fills in an absence at the rest of the teaching periods. Click on ‘Save’ to add the suggested absence. (Figure 56)
 Figure 56
History

- Select the History button (Figure 56) to check the absences that you have added to students of the selected Group for the selected time period (Figure 57).
- You can further filter results by clicking on the Absence, Late or Presence tags so you can view Absences only or Late only or only Presences (Figure 57).
- You can select the absences and use the Actions menu to approve them.
 Figure 57
Services Attendance
It is used to submit absences to students’ extracurricular activities. Its availability is subject to access rights given by the administrator (Figure 58).
- Select the Date, Service, and Timetable period.
- Click on Search.
- You can activate the Absence for students who were absent at the selected service.
- If you need more info regarding this page you can click on the “?” button.
Note: In case a student was absent during the normal timetable hours the ‘Absence Notice’ will be checked.
 Figure 58
Attendance Analysis
Use this function to get statistics about absences. (Figure 59)
- Select the Date, Type e.g. Authorized/Unauthorized, Status e.g. Verified/ Unverified, Grade, Group, Query type and Absences filters e.g. Above 0.
- Activate the ‘Disable filters’ setting so that the Grade and Group are deactivated, and the results concern all grades and groups.
- Click on Search.
 Figure 59
Note:
- There is a series of query types of absence/attendance, the ones available depend on the type of the recording absences system.
- You can use the ‘Select Operator’ to set Absences Above, Below or Equal to a specific number (Figure 60).
 Figure 60
- Student’s Absences – you can see the number of absences per student of the selected group, in the specified date period. You can separately see authorized, unauthorized and total number of absences. (Figure 61)
 Figure 61
- Students’ Absence Percentage (%) – you can see the Absence to Presence Percentage per student of the selected group, in the specified date period (Figure 62).
 Figure 62
- Student’s Late Records – you can see the late records. (Figure 63)
Note: Late Records are always Unauthorized
 Figure 63
- Students’ Presences – you can see the recorded presences per student of the selected group, in the specified date period. (Figure 64)
 Figure 64
- Attendance Ratio% – you can see the Presence to Absence Percentage per student of the selected group, in the specified date period. (Figure 65)
 Figure 65