

Marking Scenarios are here to group marking criteria together so you can apply multiple criteria to subjects by choosing a Marking Scenario. This helps in cases were subjects follow the same Marking methods. You can create one Descriptive Scenario which can be applied to multiple Subject (If Subjects are intended to use the same Marking Method). You can create multiple Scenarios for each individual subject according to your Academic requirements.
To reach this page please follow the path: Dashboard > Configuration > Academic Settings –> Marking Settings –> Marking Scenarios (Figure 108).
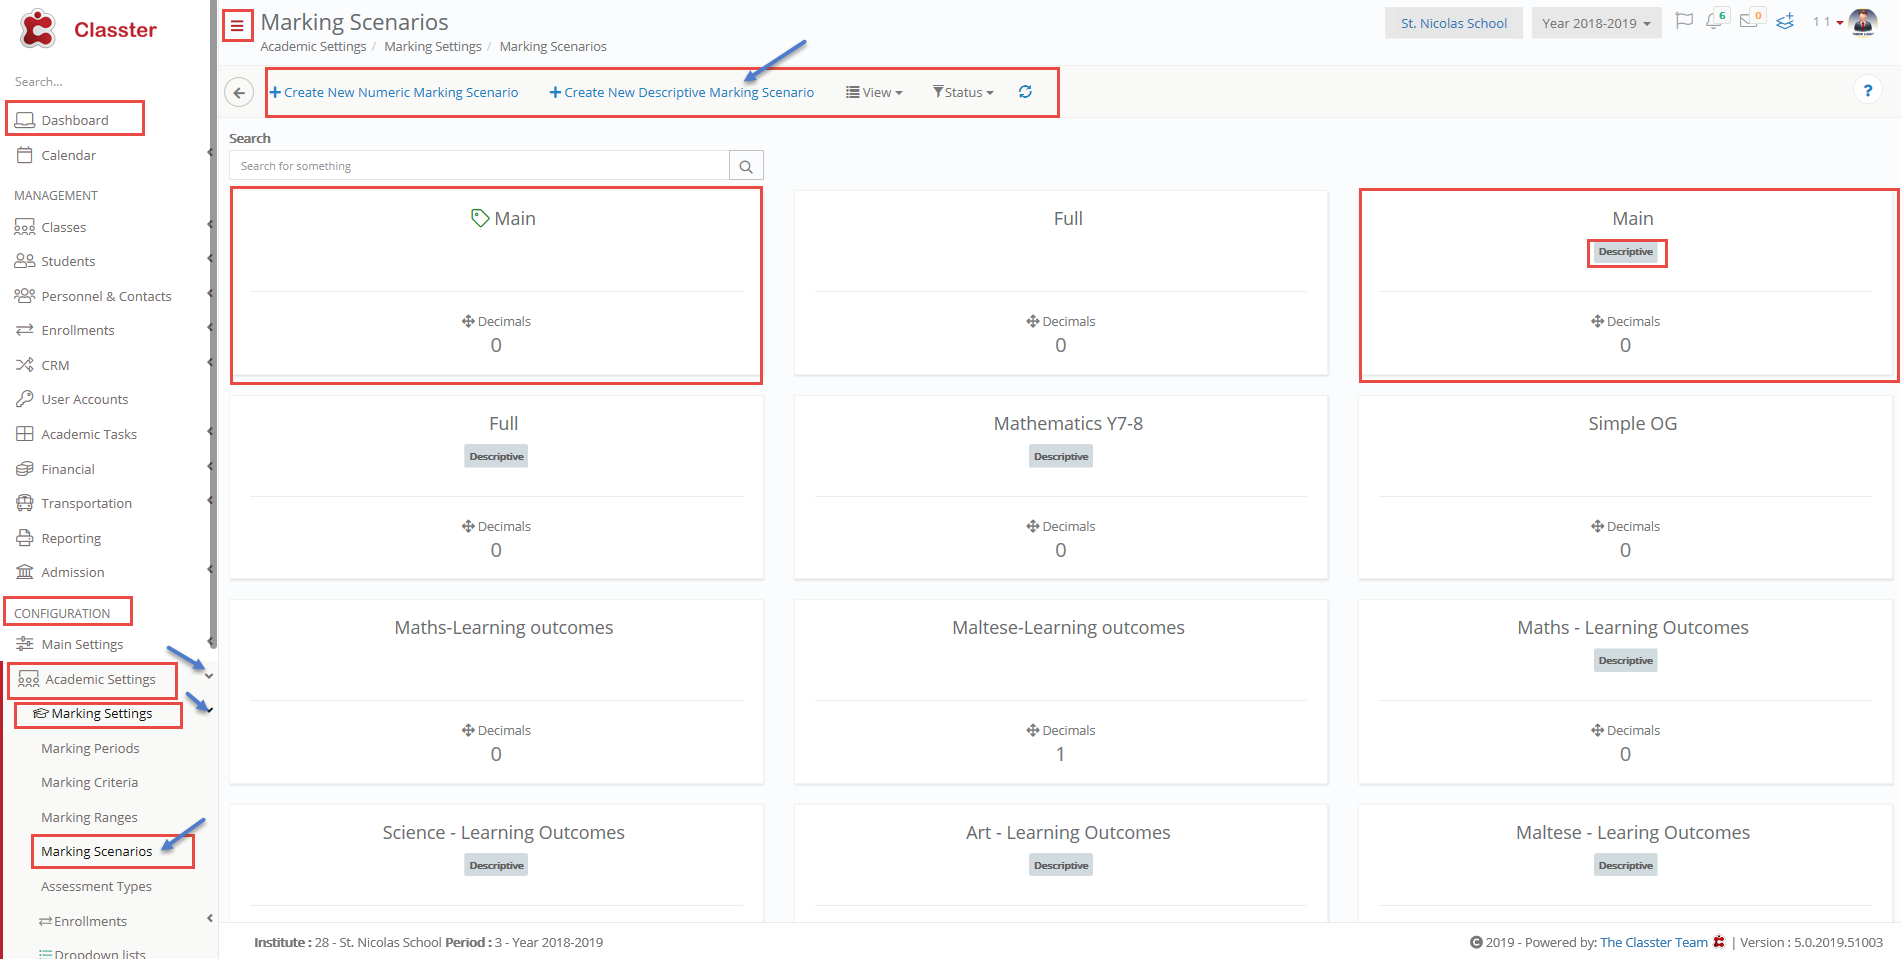
Figure 108
- From the ‘View’ drop-down button you can change to a grid or card view (Figure 108).
- From the ‘Status’ dropdown button you can choose to view only Descriptive Marking Scenarios, Numeric Marking Scenarios or All (Figure 108).
- By clicking on a Scenario, you can edit it (Figure 108).
- Underneath each Scenario you can see an indication of what type of Scenario it is e.g Descriptive (Figure 108).
- Click on Create New Numeric Marking Scenario (Figure 108).
- Click on Create New Descriptive Marking Scenario (Figure 108).
Note: This Manual covers only parts involving Descriptive Marking Scenarios.
Create New Descriptive Marking Scenario
Once you have clicked on the +Create New Descriptive Marking Scenario (Figure 108) you will be redirected to the +Create New page (Figure 109).
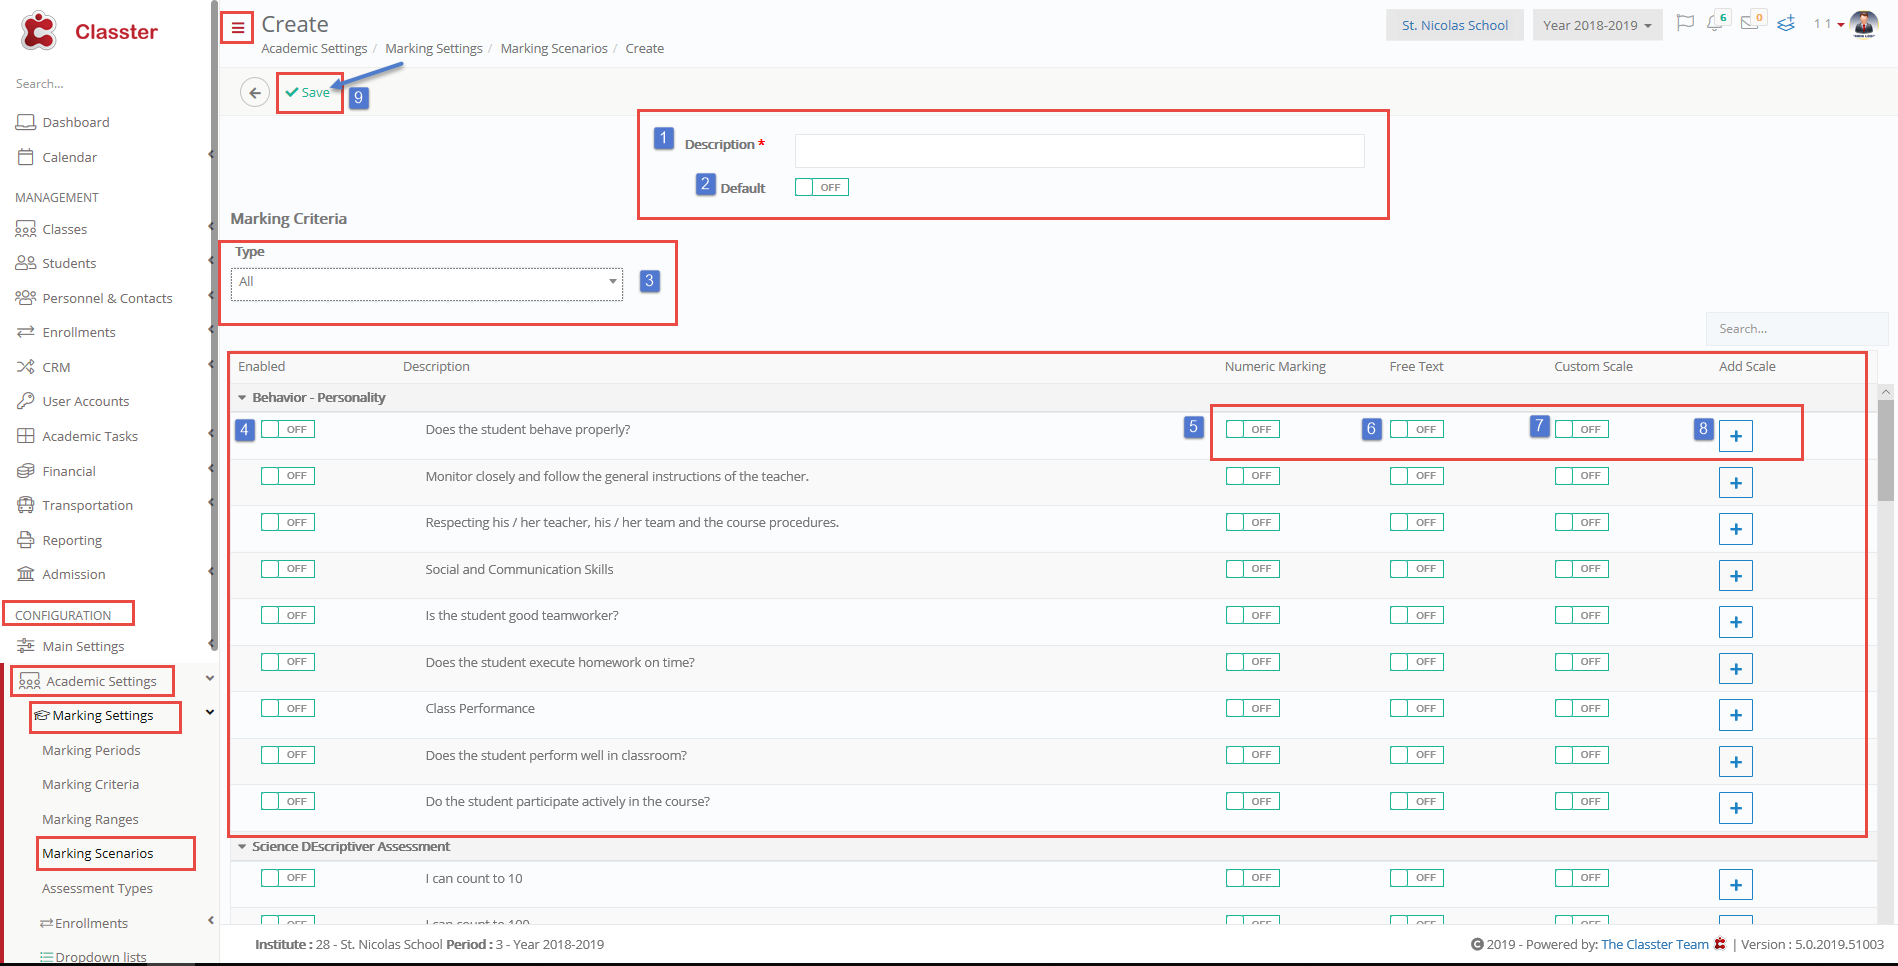
Figure 109
- ‘Description’ adds a Description for this Scenario e.g Main (Figure 109).
- ‘Default’ switch, the button on to make this the default scenario for Descriptive Marking (Figure 109).
- Marking Criteria Type drop down box, here you can filter out results by choosing enabled criteria only or all criteria (Figure 109).
- Turn switch on to Enable use of the Criterion (Figure 109).
- By switching on Numeric Marking, you allow the Teacher to manually give a Numeric Mark to this Criterion (Figure 109).
- By switching on the Free Text switch, you will allow Teachers to fill in comments about the students’ performance in regard to this criterion (Figure 109). Note: You may only have Free Text or Numeric Marking turned on at the same time.
- If you switch on the Custom Scale switch you will disable the marking scale set by the Marking Range you created earlier, and you are allowed to add a different scale.
- Add a Scale by clicking on the + button. This will only work if previously you have switched on the Custom Scale switch (Figure 109).
- Once you have completed the process click on the ‘Save‘ button (Figure 109).
Adding a Scale
In step 8 (Figure 109) if you choose to add a custom scale you will see the following pop-up window (Figure 110).
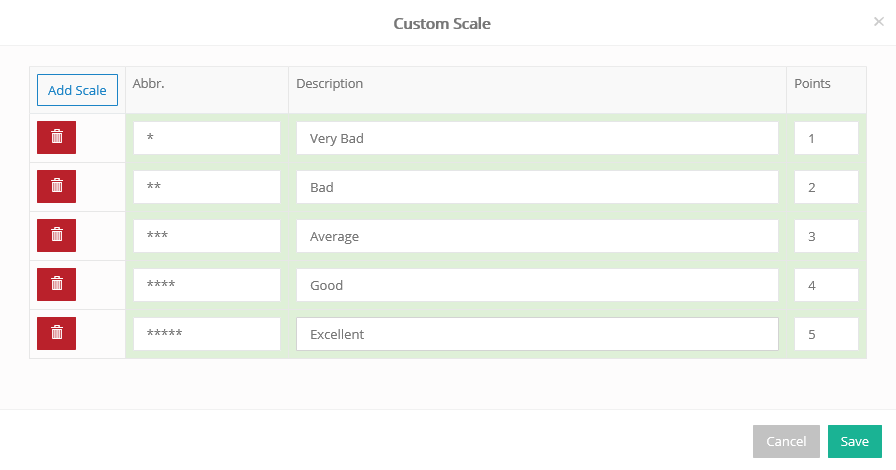
Figure 110
- First, click on the Add Scale button to add as many lines as you require (Figure 110).
- To erase a line, click on the Delete button in the beginning of each line (Figure 110).
- You can add an abbreviation e.g * (Figure 110).
- You can add a description e.g Very Bad (Figure 110).
- You can add the point value e.g 1 point (Figure 110).
You can see that you have now completed a scale from one * to *****, from Very Bad to Excellent and from 1 point to 5 points.
E.g one star * is equal to one point in the system which is described as a Very Bad marking.
You must never forget to always use different point values for each description because the database recognizes the numbers. So, if you were to make each description equal to 1 point, once the professor would choose an option the system database would not recognize which result to bring back.
You can set this scale-up anyway you prefer for your institution. The highest point value equals the best mark or the other way around.
Edit Descriptive Marking Scenario
In the main page of Marking Scenarios, you will have to click on the Scenario you want to edit (Figure 13) and then the edit page will appear (Figure 111).
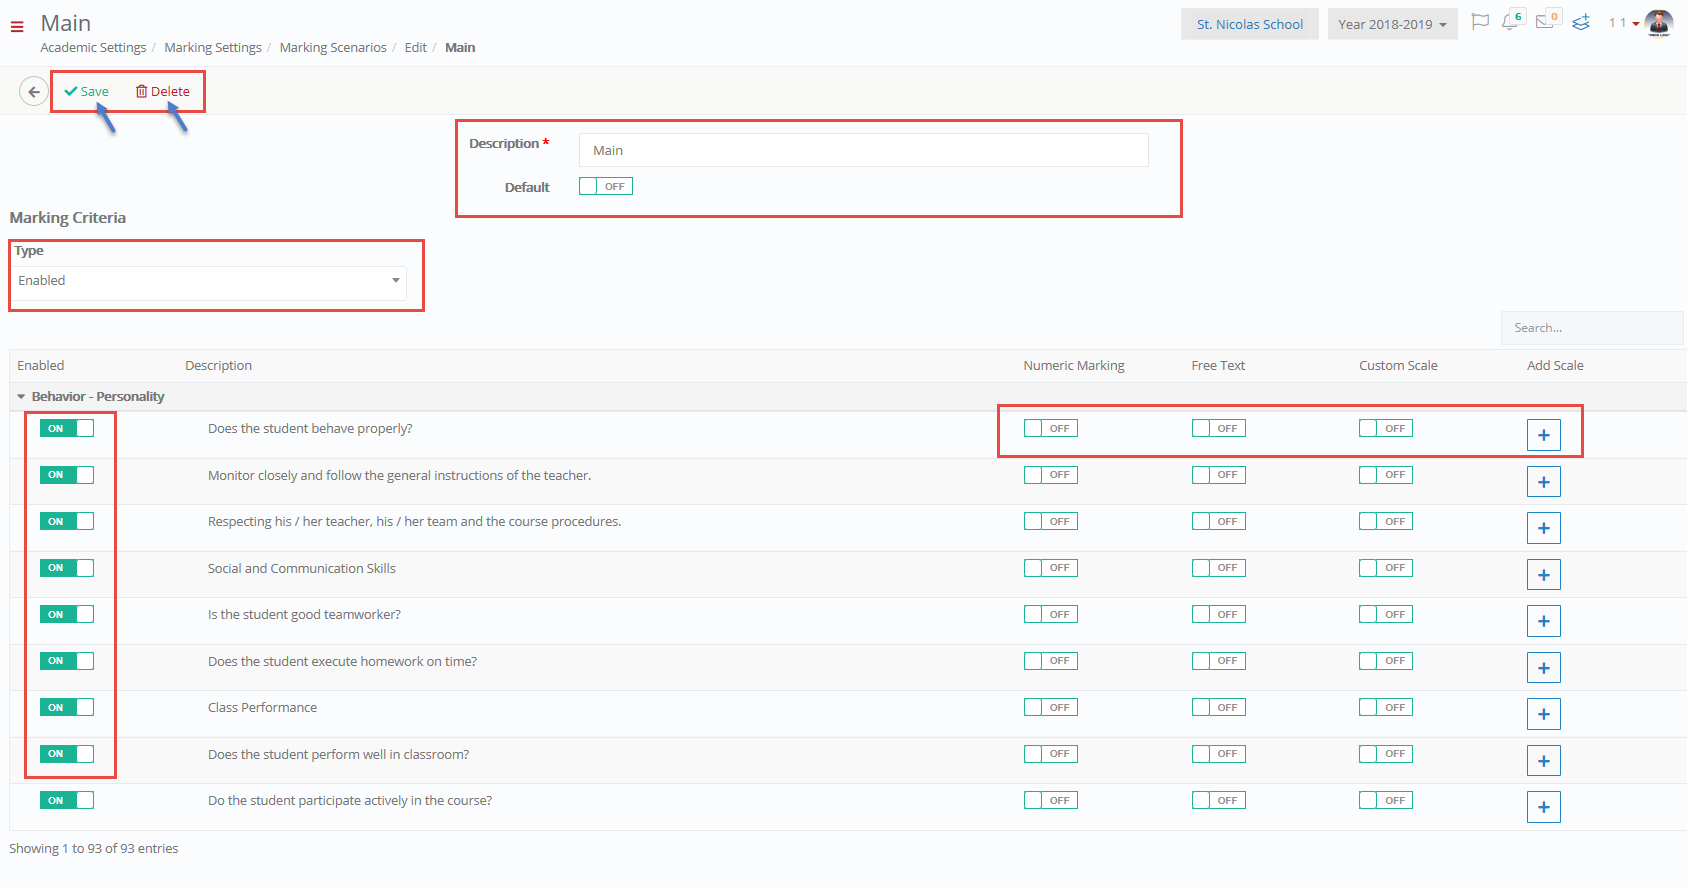
Figure 111
- ‘Description’ changes the Description for this Scenario (Figure 111).
- ‘Default’ change this option by switching the button on or off to make this the default scenario for Descriptive Marking (Figure 111).
- Marking Criteria Type drop-down box, here you can change the filter to view different results. (Figure 111).
- Turn the switch on or off to Enable or Disable the use of the Criterion (Figure 111).
- Switching Numeric Marking on or off (Figure 111).
- By switching on the Free Text switch, you will allow Teachers to fill in comments about the students’ performance in regard to this criterion (Figure 111). Note: You may only have Free Text or Numeric Marking turned on at the same time.
- If you switch on the Custom Scale switch you will disable the marking scale set by the Marking Criterion you created earlier, and you are allowed to add a different scale.
- Add a Scale by clicking on the + button. This will only work if previously you have switched on the Custom Scale switch (Figure 111).
- Once you have made your changes click on the ‘Save’ button to save changes (Figure 111).
- If you want to delete this Scenario just click on the Delete button (Figure 111).
Create New Numeric Marking Scenario
Once you have clicked on the +Create New Numeric Marking Scenario (Figure 108) you will be redirected to the +Create New page (Figure 112).
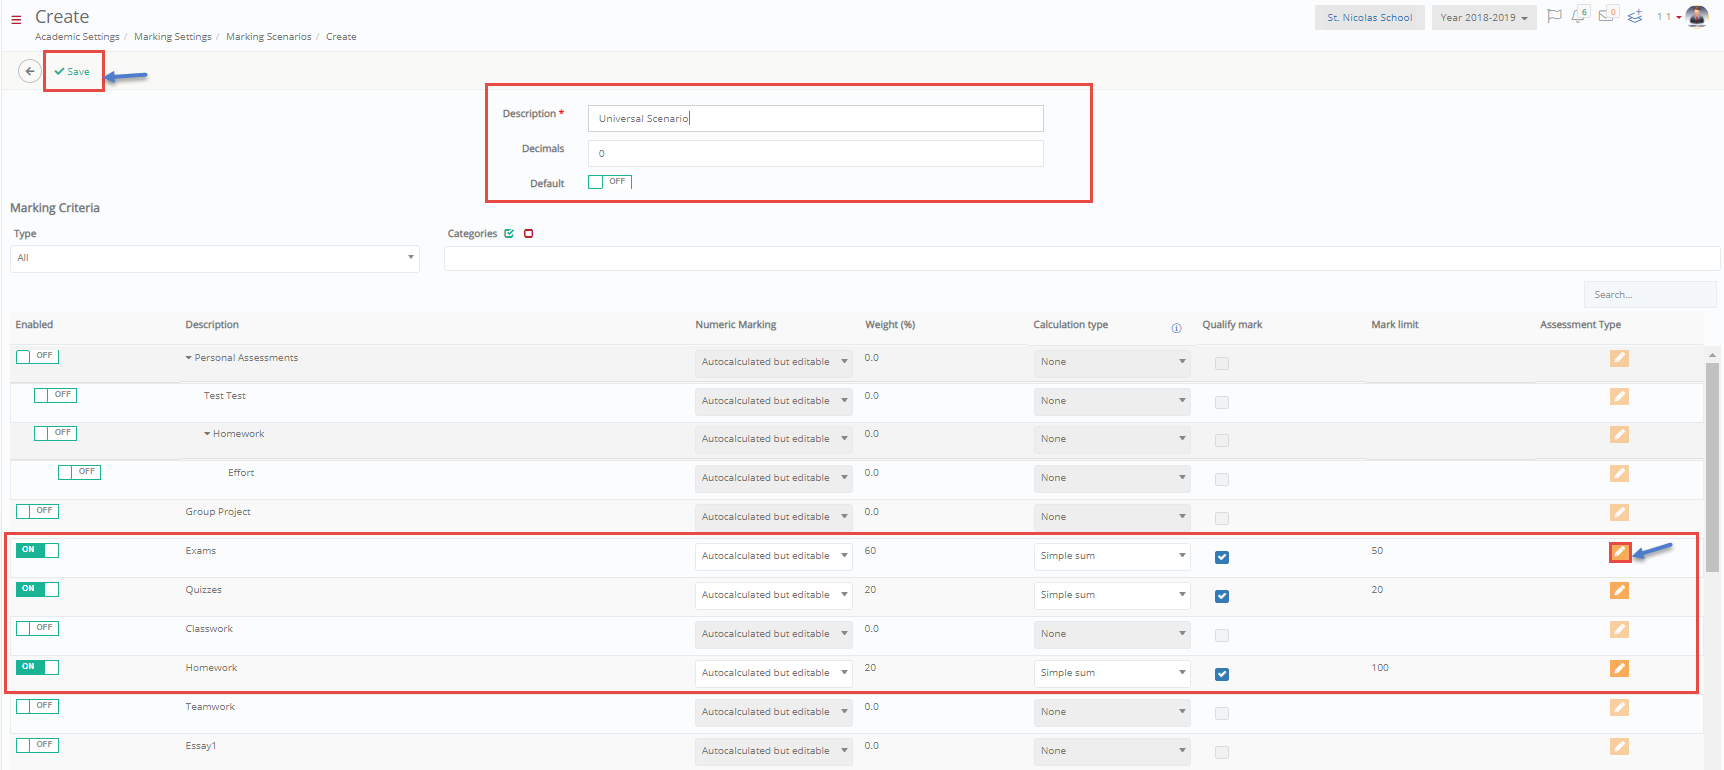
Figure 112
- ‘Description’ add a Description for this Scenario e.g Universal Scenario (Figure 112).
- ‘Default’ switch the button on to make this the default scenario for Numeric Marking (Figure 112).
- Marking Criteria Type drop-down box, here you can filter out results by choosing enabled criteria only or all criteria (Figure 112).
- Turn the switch on to Enable use of the Criterion e.g Exam, Quizzes, Homework (Figure 112).
- In the Numeric Marking column, you can choose the following:
- Auto calculated: Has the system calculate the mark and brings you the result.
- User Editable: The teacher needs to fill in the mark for each subject
- Auto calculated but editable: Has the system calculate the mark and brings you the result but the teacher can also manually add a mark.
- In the Weight (%) column you can enter how much this criterions mark weighs on the final mark e.g 50 (Figure 14). Note: All weights should equal 100 e.g if there are three criteria then 30, 20, 50.
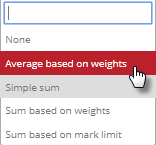
- In the Calculation type column, you have the following options:
- Average based on weights: Calculates Average total marks based on weights (You must have added weights).
- Simple sum: Calculates total mark based on the marks received.
- Sum based on weights: Calculates marks total based on weights (You must have added weights).
- Sum based on mark limit: If we have criteria graded in various scales e.g 1-20 and 200-800, but we want our final marks to be out of 100 then we choose Sum based on mark limit. You would have to add mark limits to each criterion (Figure 112).
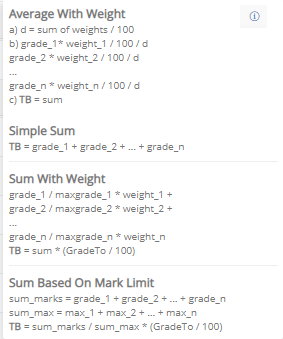
- Info Button: This button helps you understand each function while on the page, it appears like this:
In any case you need to make sure all Criteria have the same Calculation Type selected (Figure 112).
- Assessment Type column, here you need to click on the edit button, and you will view a popup window (Figure 113).
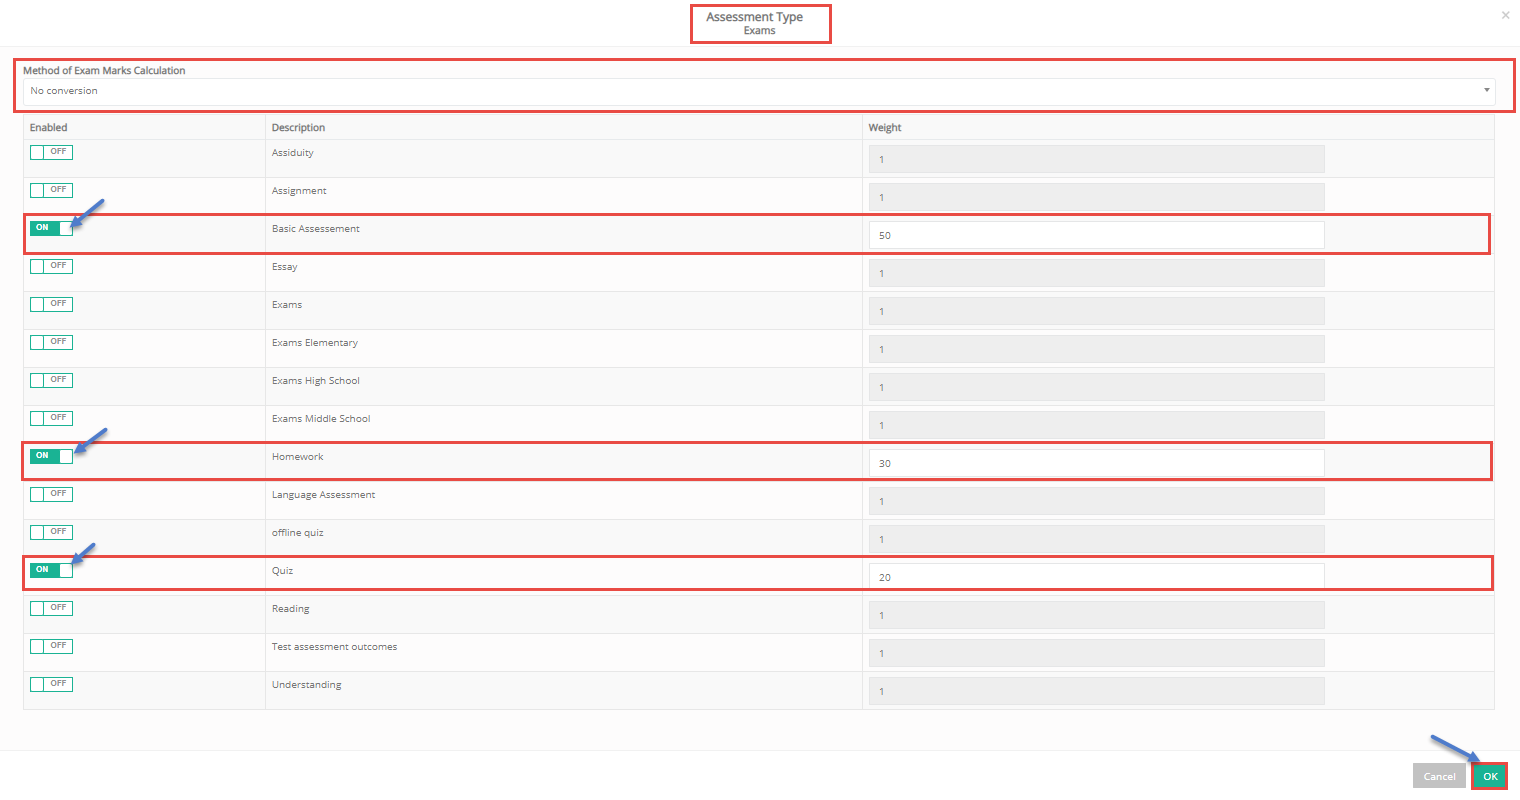
Figure 113
You should use Assessment Type if previously in the ‘Numeric Marking’ column of Figure 112 you chose Auto calculated or Auto calculated but Editable. Assessment Types tell the system where it will find the marks to Auto calculate.
Click on the switch next to the Assessment/s you want to connect with the ‘exams’ criterion (Figure 113).
If you want, you can enter weights for each Assessment type. The weights must equal 100. (Figure 113).
On the top of the page there is a dropdown list where you can choose Method of Exam Average Marks Calculation. You have the following options:
- No Connection: Allows process to continue based on the weights you have entered
- First Literal Conversion: Collects averages of the first literal mark (Marks you entered in the Mark Range/ Full Description Column).
- Second Literal Conversion: Collects averages of the Second literal mark (Marks you entered in the Mark Range/Alternative Description Column).
- Summary of all assignments / assessment marks: Sums up all the marks from the assessments chosen.
Once you have completed the process click on the ‘Save‘ button (Figure 112).
Edit Numeric Marking Scenario
In the main page of Marking Scenarios you will have to click on the Scenario you want to edit (Figure 108) and then the edit page will appear (Figure 114a).

Figure 114a
- ‘‘Description’ change a Description for this Scenario (Figure 114a).
- ‘Default’ switch the button on to make this the default scenario for Numeric Marking (Figure 114a).
- Marking Criteria Type drop down box, here you can filter out results by choosing enabled criteria only or all criteria (Figure 114a).
- Turn switch on to Enable use of the Criterion (Figure 114a).
- In the Numeric Marking column, you can choose the following:
- Auto calculated: Has the system calculate the mark and brings you the result.
- User Editable: The teacher needs to fill in the mark for each subject
- Auto calculated but editable: Has the system calculate the mark and brings you the result but the teacher can also manually add a mark.
- In the Weight (%) column you can change how much this criterions mark weighs on the final mark (Figure 16a). Note: All weights should equal 100 e.g if there are three criteria then 30, 20, 50.
- In the Calculation type column, you have the following options:
Average based on weights: Calculates Average total marks based on weights (You must have added weights).
Simple sum: Calculates total mark based on the marks received.
Sum based on weights: Calculates marks total based on weights (You must have added weights).
Sum based on mark limit: If we have criteria graded in various scales e.g 1-20 and 200-800, but we want our final marks to be out of 100 then we choose Sum based on mark limit. You would have to add mark limits to each criterion (Figure 114a).
Info Button: This button helps you understand each function while on the page, it appears like this:
In any case you need to make sure all Criteria have the same Calculation Type selected (Figure 114a).
- Assessment Type column, here you need to click on the edit button, and you will view a popup window (Figure 114b).
- Marking Periods

Figure 114b
You should use Assessment Type if previously in the ‘Numeric Marking’ column of Figure 112 you chose Auto calculated or Auto calculated but Editable. Assessment Types tell the system where it will find the marks to Auto calculate.
Click on the switch next to the Assessment/s you want to connect with the ‘exams’ criterion (Figure 114b).
If you want, you can enter weights for each Assessment type. The weights must equal 100. (Figure 114b).
On the top of the page, there is a dropdown list where you can choose the Method of Exam Average Marks Calculation. You have the following options:
- No Connection: Allows a process to continue based on the weights you have entered
- First Literal Conversion: Collects averages of the first literal mark (Marks you entered in the Mark Range/ Full Description Column).
- Second Literal Conversion: Collects averages of the Second literal mark (Marks you entered in the Mark Range/Alternative Description Column).
- Summary of all assignments/assessment marks: Sums up all the marks from the assessments chosen.
Once you have completed the process click on the ‘Save‘ button (Figure 114a).