

Employees can Manage Cards individually for every _Student_ through the Students List and Students form. The same logic applies for teachers and employees e.g _Teacher_ cards from teacher list and teacher form. Bulk actions are also available in the Student list.
So, let us look at the Card Management functions in the _Student_ list. To go to the student list, follow the path: Dashboard > Management > Students > Students list (Figure 6).
 Figure 6
In the student list page, you will see all available _Students_. Filter the list to locate the students you want and click on “Search”.
Click on the inline action’s menu next to the _Student_ you want. From the dropdown list that appears click on Card Management. Note: this method regards single student id card management (Figure 7).
 Figure 7
Once you click on the “Card Management” button, you will view the card management pop-up window (Figure 8).
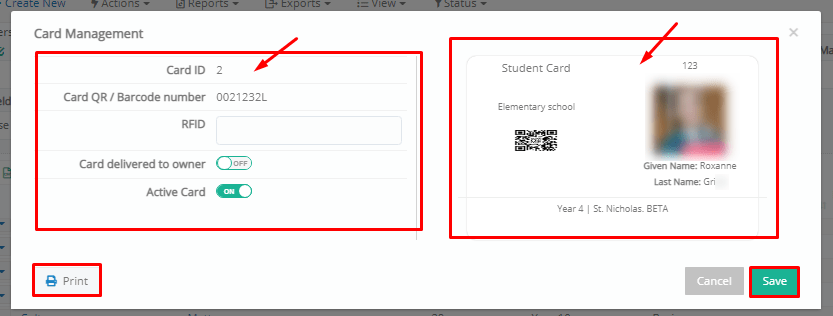
Figure 8
In the Card Management pop-up window, you will see options on the left and a preview of the student card on the right (based on the student card template created by the admin).
You will be able to view the _Students_ Card ID (issued automatically), Card QR / Barcode number, RFID number (editable), Card delivery to owner option, and Active Card option.
- You can enter the RFID number in the RFID field if applicable to your institution.
- Switch the card delivered to owner switch on if the student has been given his/her card.
- Active Card switch, this option if turned on activates the card in your system (for scanning etc.)
Once you are ready, you can click on “Save” to save changes, or you can click on the “Print” button to print the card. Note: Specialized printers are needed for printing the typical id card. Once you have clicked on “Print” you will view your default print screen of your printer. Note: Make sure you enable the option “card delivered to owner” so you know this _Students_ card has been printed and delivered to the student. The same options and menus apply for managing _Teacher_ and Employees ID Cards.
You can also manage card from the _Students_ form by following the path: Dashboard > Management > Students > Students list > Select Student and Edit & Preview > Actions menu > Card Management & Re-Issue Card options (Figure 9).
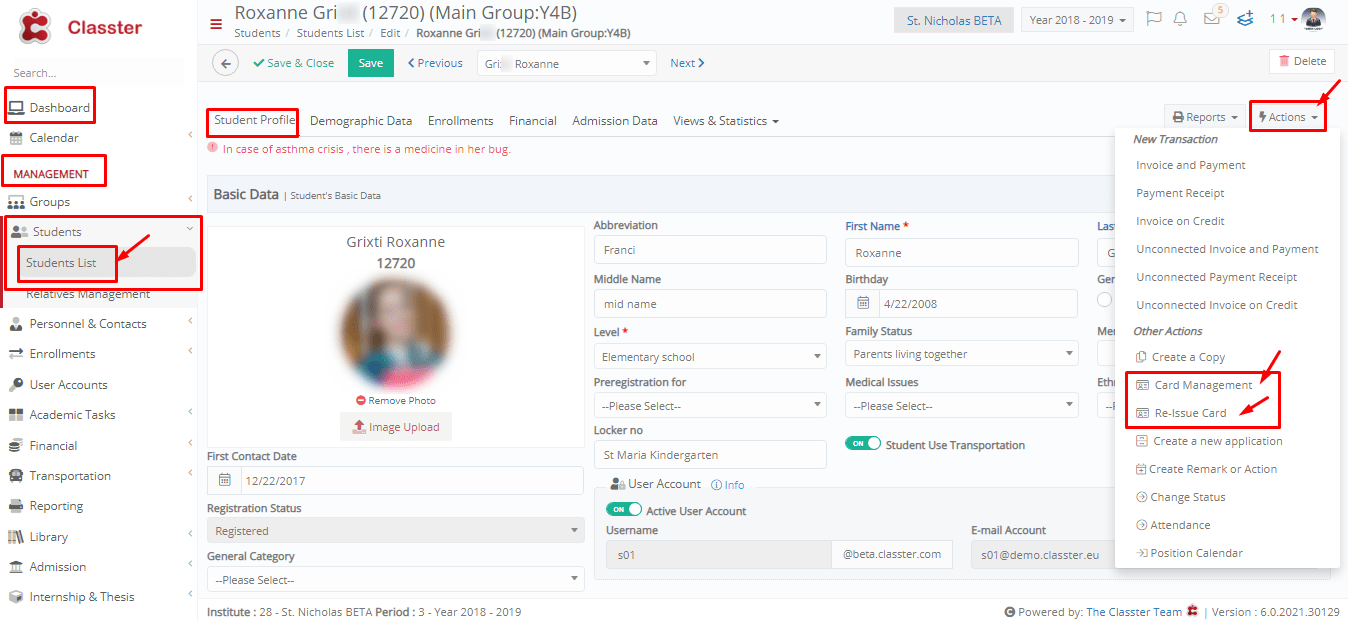
Figure 9
Card Management in Bulk
You can manage multiple students, teachers, employees’ cards. Let us take a look at managing multiple _Student_ cards (it’s the same process for _Teachers_ and employees).
Go to the Students list page and set the view to grid view. You can follow the path to reach the _Students_ list and set the view. Path: Dashboard > Management > Students > Students list > View > Grid view (Figure 10).
 Figure 10
In the grid view page of the students list, you need to select the _Students_ for whom you wish to manage cards, and then from the action’s menu, select the option “Card Related Actions” (Figure 11).
 Figure 11
By selecting the “Card Related Actions” option, you can manage multiple _Student_ cards. Click on the “Card Related Actions” button and you will view a popup window (Figure 12).

Figure 12
In the Bulk Actions window you can see the following choices (Figure 12):
- Update and re-issue existing cards switch: if this switch is turned on and you click on the execute button, then any updated information/field from the student form will be updated to the cards and the system will re-issue cards for the selected _Students_. This action can be combined with the rest of the available functions e.g Bulk print cards. Once you click on execute the function takes place automatically, you will see a message to that effect.
- Bulk print cards switch: If this switch is turned on then by clicking on the execute button you will be taken to the print screen (varies according to your computer/printer), so you may print all the cards of the selected students as they are. This function can be combined with the “Update and re-issue existing cards” function, this combo would update and re-issue cards in the system and then it would print the updated and re-issued cards for _Students_.
- Enter RFIDs for cards switch: By turning on the switch and clicking on execute you can add a RFID number to each card. Once you click on execute you will see the popup window widen and the names and RFID fields for each student card (Figure 12a). You can manually write in the RFID number or depending on the equipment you have scan the number directly into the field. This function can be combined with the previous two.
- Set all cards as delivered to end users: Once you have updated and re-issued cards or printed them you can turn this switch on to mark all the cards as delivered to the end users.
All the options can be combined accordingly.
Figure 12a:

Figure 12a