

Creating New Templates and Viewing/Editing Existing Templates
On the templates editing page you could view all the template categories (Figure 5). Let’s take a look at each category individually.
![]()
- All messages having to do with the admission portal and the admission process eg. New User Creation.
- Once you have selected the Admission templates, click on the ‘Create New’ button (Figure 5) to create a new admissions template (Figure 6).
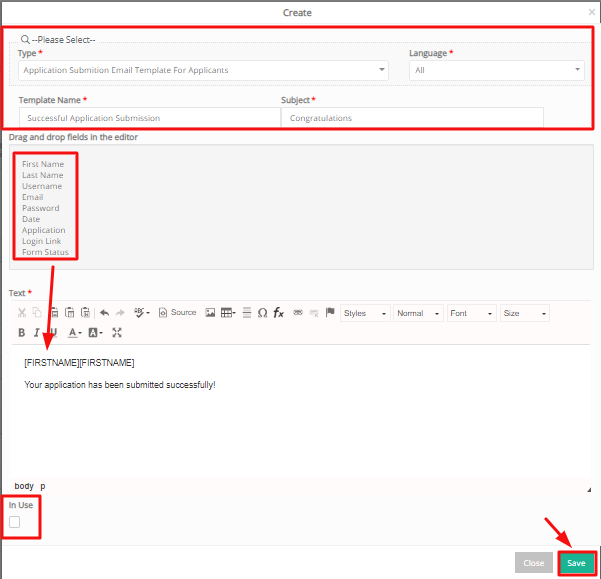
Figure 6
- In the fields area choose the type of admissions message you want to create e.g Application Submission Email Template for Applicant. This will be an email confirming that the applicant’s application has been successfully submitted. Choosing a type will generate choices of fields to be placed in the editor.
- Languages option: here you can select the language of the message e.g English. You can alternatively select the all option to make this message available to applicants no matter what language applicants are using. If you choose a specific language this message will appear only to applicants using that specific language.
- Template option: here you can add the name of the template you are creating e.g Successful Application Submission.
- Add a subject for this message e.g Success.
- From the fields list, drag the fields you need and drop them in to the editor. You can drag First and Last name of the applicant and then add any text to this message.
- Click on the ‘In Use’ checkbox to make this template available upon creation.
- Click on the ‘Save’ button to save this new admissions template.
Different Types of admission messages are available (Figure 6a):

Figure 6a
- Types include: Application Submission Email Template for Officers (e.g emails sent out to employees responsible for admissions about the admission of a new student), Admission Acceptance Letter (Letter templates sent out once an applicant has accepted his admissions offer to the institution), Admission Rejection Letter (Letter sent if a applicant is not accepted to the institution) and Admission Other Letter (Letter template used for other communication regarding admissions).
- Each type may have different fields available to drag and drop in the editor.
Sample of real-life situation
You have imported via Excel Sheet your institutions list of Students successfully and now you need to invite them to log in. From the user accounts page, you search for students you uploaded and select them all. From bulk actions you click on send initial invitation button to send a welcome email to the students. The template that will be used is the following:

Sample Template
Edit the Template you see above (That you used to invite new users to Classter) to create a new ‘admission – new user creation’ email to use for students regardless of language settings of users. See the following process:

Admissions-New User Creation Template List
- Click on the ‘create a new template based on this one’ button next to the template you want to use.
- View the following screen (Figure 6b)

Figure 6b
- To make this template available for use with all students regardless of language their Classter is using, select the All option from the language dropdown list.
- Now you have an email template for all students, you can change the template name, subject and fields if you want to.
- Click on the In-Use checkbox to make this template the default one to use in cases where there are no templates for specific languages e.g if student being emailed uses a language other than Greek or English, he will receive the template with the language setting ‘All’.
- For the purpose of the example we have made the changes we need and now we click on the
 button.
 button.
![]()
- The CRM templates are used as you can imagine in CRM Remarks and Actions etc.
- Once you have selected the CRM template category, click on the ‘Create New’ button (Figure 5) to create a new CRM template (Figure 7).
 Figure 7
- In the fields area choose the type of CRM message template you want to create e.g SMS. This will be an SMS notification from St.Nicolas School via sms including student credentials.
- Languages option: here you can select the language of the message e.g Ελληνικά. You can alternatively select the all option to make this message available to applicants no matter what language applicants are using. If you choose a specific language this message will appear only to applicants using that specific language.
- Template option: here you can add the name of the template you are creating e.g My SMS Template.
- Add a subject for this message e.g SMS only.
- Click on the ‘In Use’ checkbox to make this template available upon creation.
- Click on the ‘Save’ button to save this new crm sms template.
Note: CRM Template categories can create two main types of messages, either Emails or SMS. More categories may be added upon request.
Sample of real-life situation
The St.Nicolas School administrator has received an email from a student Aaron Borg that his email is not working and he cannot receive his credentials to enter the Classter platform. The Admin experienced as he is with these situations informs Aaron that he will receive his credentials via SMS on his mobile phone. The admin goes to the User Accounts page and selects students in the search filters and then clicks on search. He locates the student Aaron Borg clicks on him and then on bulk actions. From the bulk actions dropdown list he chooses SMS Initial user Credentials option (Figure 7a).
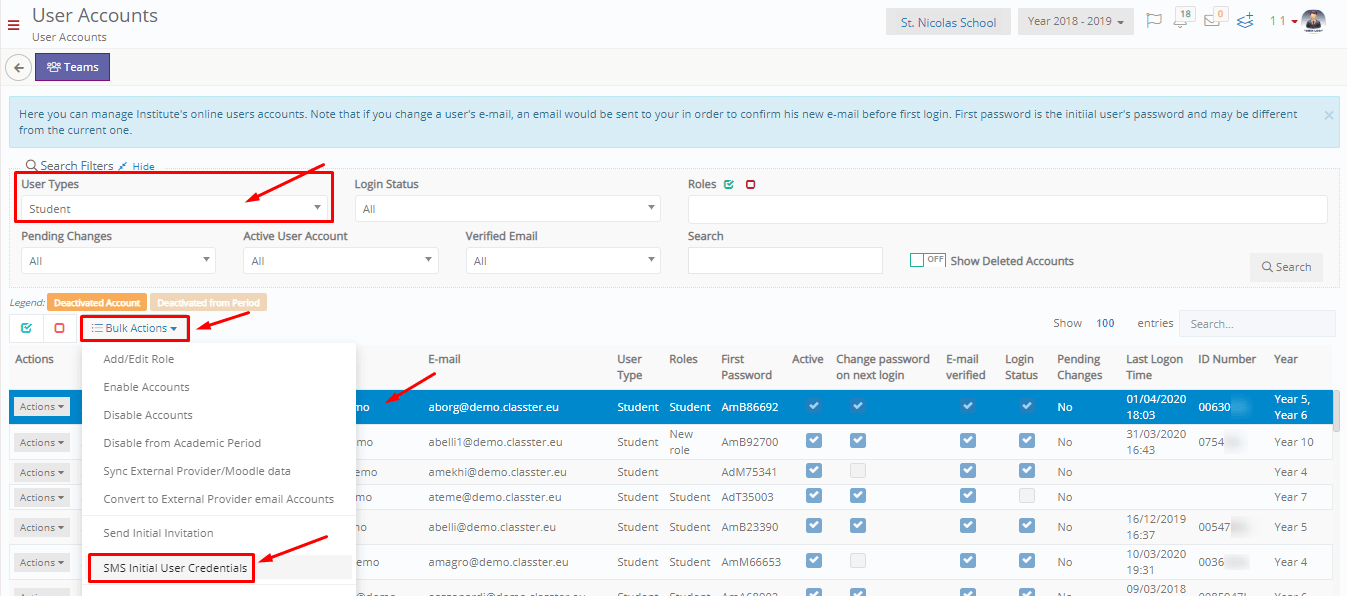
Figure 7a
Once he clicks on the SMS initial user credentials button, the admin must select the sms template he created earlier and then click on send (Figure 7b).

Figure 7b
Aaron Borg will look at his phone for messages and will see the message sent by the Admin. All good (Figure 7c).

Figure 7c
![]()
- All messages regarding user accounts e.g forgot user password request.
- Once you have selected the User Management template category, click on the ‘Create New’ button (Figure 5) to create a new User Management template (Figure 8).
 Figure 8
- In the fields area choose the type of User Management message you want to create e.g Forgot user password request. This will be an email notifying that the any type of user has forgotten or lost his user account password. Choosing a type will generate choices of fields to be placed in the editor.
- Languages option: here you can select the language of the message e.g English. You can alternatively select the all option to make this message available to applicants no matter what language applicants are using. If you choose a specific language this message will appear only to applicants using that specific language.
- Template option: here you can add the name of the template you are creating e.g. Forgot user password request.
- Add a subject for this message e.g Password Change Notification.
- From the fields list, drag the fields you need and drop them in to the editor. You can drag Reset password link and login link for the user and then add any text to this message.
- Click on the ‘In Use’ checkbox to make this template available upon creation.
- Click on the ‘Save’ button to save this new financial template.
 to save this new financial template.
Sample of real-life situation
Oliver is a student looking to register to St. Nicolas School, he has heard good things about the school from his parents and has been tasked to register himself online. Oliver will fill in all the information requested in the sign in form and click on sign up (Figure 8a)!
 Figure 8a
Once Oliver has completed the sign-up stage, he will be receiving an email with his credentials so that he may enter the School portal and register (Figure 8b).
 Figure 8b
Oliver can get his credentials, verify his account and begin the admission process. Oliver received the email based on a User Management template created by the Admin.
![]()
- All messages regarding the financial section of Classter e.g General Financial Notification. Financial templates can be pre-existing or added upon request.
- Create New CRM Template (Figure 9)
 Figure 9
- In the fields area choose the type of financial message you want to create e.g General Financial Notification. This will be an email notifying that the student or payer has an outstanding balance of X amount of money. Choosing a type will generate choices of fields to be placed in the editor.
- Languages option: here you can select the language of the message e.g English. You can alternatively select the all option to make this message available to applicants no matter what language applicants are using. If you choose a specific language this message will appear only to applicants using that specific language.
- Template option: here you can add the name of the template you are creating e.g General Financial Notification.
- Add a subject for this message e.g New Financial Notification.
- From the fields list, drag the fields you need and drop them in to the editor. You can drag First and Last name of the applicant and then add any text to this message.
- Click on the ‘In Use’ checkbox to make this template available upon creation.
- Click on the ‘Save’ button to save this new financial template.
 to save this new financial template.
Sample of real-life situation
The Administrator of St. Nicolas School is going over the financial overview of the institution DashboardManagementFinancialFinancial Overview (Figure 9a). He decides its time to remind payers (Students or Parents according to who has been selected as payer) that they have an outstanding amount to pay. The admin searches by using the filters in the financial overview to see only outstanding payments, once the list shows him the outstanding payments of the various payers, he selects the first payer Aaron Borg and from the bulk actions button chooses the Send Financial Notification button.
 Figure 9a
Aaron Borg now a student at St Nicolas School is responsible for paying his tuition himself because his parents are not very tech savvy. He goes to the message center in his student portal and finds an email from the School Administrator (Figure 9b).
 Figure 9b
Aaron has opened the email sent by the school administrator and he is shocked to find out that he had forgotten to complete the required payment based on his billing arrangement.
Aaron informs his parents and he proceeds to pay the outstanding amount.
![]()
- All messages concerning assessments, attendance and sessions e.g New Session Notification.
- Click on the ‘Create New’ button once you have selected the Academic Templates Category.
 Figure 10
- In the fields area choose the type of Academic message you want to create e.g New Session Notification. This will be an email notifying the student that his teacher has created a new session. Choosing a type will generate choices of fields to be placed in the editor.
- Languages option: here you can select the language of the message e.g English. You can alternatively select the all option to make this message available to applicants no matter what language applicants are using. If you choose a specific language this message will appear only to applicants using that specific language.
- Template option: here you can add the name of the template you are creating e.g New Session Notification.
- Add a subject for this message e.g New Session Notification.
- From the fields list, drag the fields you need and drop them in to the editor. You can drag Teacher and Subject name then add any text to this message.
- Click on the ‘In Use’ checkbox to make this template available upon creation.
- Click on the ‘Save’ button to save this new academic template.
 to save this new academic template.
Sample of real-life situation
Elaine Borg a teacher at St.Nicolas School has decided to create next weeks sessions on classter. She goes to the teacher portal and from the main menu/sessions tab, she reaches the sessions page. Elaine creates a new session and saves & sends an email to students and parents about this new session (Figure 10a).
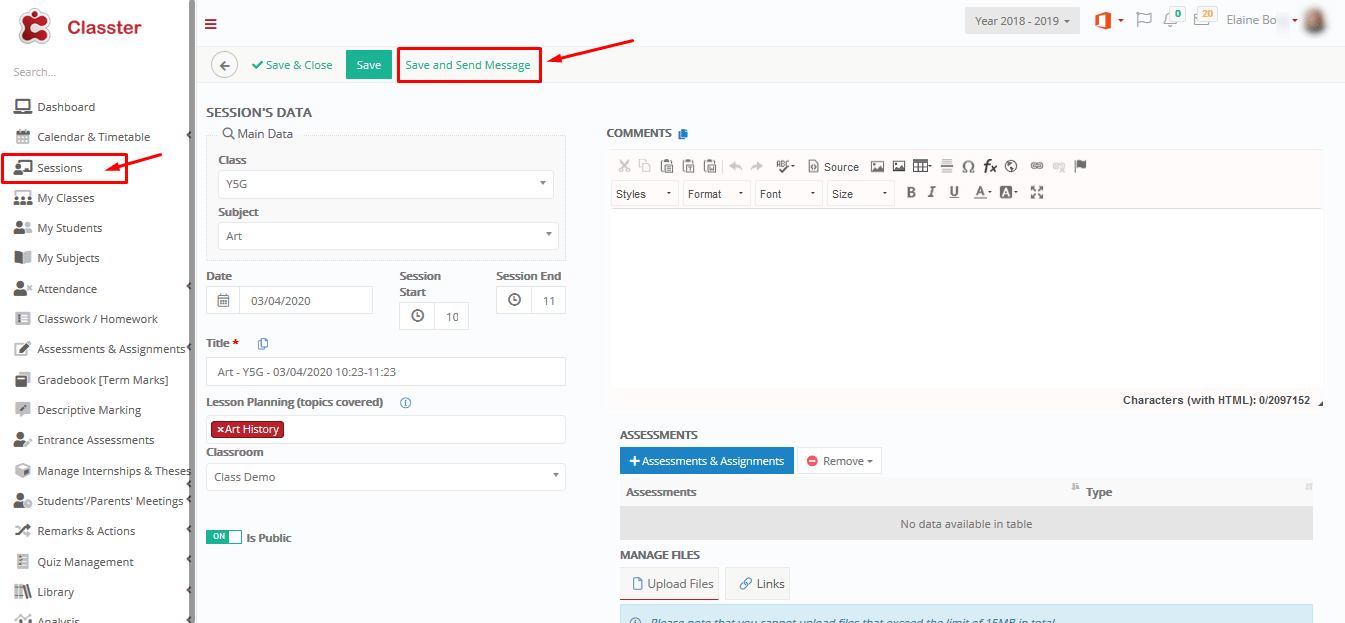
Figure 10a
Aaron Borg a student of Ms. Elaine Borg in class Y5G is checking his messages in his portals Message Center. He notices in the message preview a new email from his teacher Elaine Borg (Figure 10b).
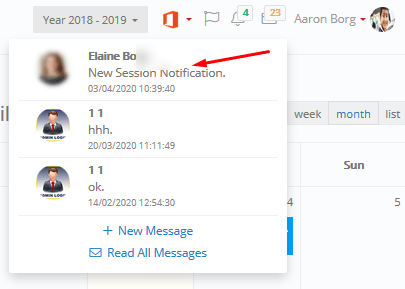
Figure 10b
Aaron clicks on the email to open it (Figure 10b)
 Figure 10c
Aaron Borg has opened the email and finds out that he has a new session with his favorite teacher Ms. Elaine Borg on the 3/4/2020 from 10.23-11.23 in the morning. Aaron can’t wait!
![]()
- Concerns any template used in the reporting section of classter e.g Acceptance Letter (Figure 11).
- Click on the ‘Create New’ button once you have selected the Reporting Templates Category.
 Figure 11
- In the fields area choose the type of Reporting message template you want to create e.g Acceptance Letter. This will be an email notifying the student that his application has been accepted and he has been admitted to the school. Choosing a type will generate choices of fields to be placed in the editor (If applicable in email).
- Languages option: here you can select the language of the message e.g English. You can alternatively select the all option to make this message available to applicants no matter what language applicants are using. If you choose a specific language this message will appear only to applicants using that specific language.
- Template option: here you can add the name of the template you are creating e.g Acceptance Letter.
- Add a subject for this message e.g Letter of Acceptance.
- Click on the ‘In Use’ checkbox to make this template available upon creation.
- Click on the ‘Save’ button to save this New Reporting template.
 to save this New Reporting template.
![]()
- This section is part of the general function of sending notifications (Automated). Notifications are based on rules set in the General Settings of classter e.g what message times are used for which user types, if notifications are enabled etc. Further rules about notifications are configures in the next section ‘Notification Service Configuration’. In this section we will deal with the actual messages that are sent as notifications of Attendance or Assignment issues e.g exceeding attendance limit.
- Click on the ‘Create New’ button once you have selected the Notification Service Templates Category.

Figure 12
- In the fields area choose the type of Notification Service message template you want to create e.g Attendance Limit Exceeded. This will be an email notifying the student/parent that the student has exceeded the allowed absence limit for a class or subject. Choosing a type will generate choices of fields to be placed in the editor (If applicable in email).
- Languages option: here you can select the language of the message e.g English (UK). You can alternatively select the all option to make this message available to applicants no matter what language applicants are using. If you choose a specific language this message will appear only to applicants using that specific language.
- Template option: here you can add the name of the template you are creating e.g Attendance Limit exceeded.
- Add a subject for this message e.g You have exceeded your absence limit.
- Click on the ‘In Use’ checkbox to make this template available upon creation.
- Click on the ‘Save’ button to save this New Notification Service message template.
- The messages of Notification Service Category are sometimes automated and triggered when in this case a student exceeds his absence limit.
 to save this New Notification Service message template.
All templates are pre-set in the Templates Editing page. You can request more from Classter support. Templates are used all around the Classter Platform.
Make sure you have configured General Settings so the default message type of notifications is set!
Terminology used may vary from institution to institution.
General Note for all New Template Categories: There are available options for pre-configured templates that you can select to use. Please create at least one template per language used. In case you don’t want to have a different template per language, then create only one template and select the option “None” in the language drobox. You can find and edit all your new custom templates using the templates list.