

Introduction
Role Management in Classter enables institutions to efficiently define, assign, and manage user access and permissions across the system.
- You can create multiple roles for each User Type to assign to users, ensuring they have appropriate access only to relevant modules, menus, and data.
- Role-Based User Privileges allow administrators to configure detailed access settings based on each role.
- Access to Software Modules
Determines access to core areas such as Academics, Financials, HR, and Admissions. - Menu Visibility
Allows administrators to show, hide, or rename menus based on user roles. - Mobile-Specific Permissions
Configures access to mobile-only features, including notifications and data input options. - Action & Data Permissions
Controls the ability to view, create, edit, or delete records, and defines access to specific datasets. - Report Management
Grants control over report visibility and customization—such as enabling, renaming, or hiding reports. - Special Settings
Adds role-based constraints, including location-based access, academic period restrictions, and advanced permission filters.
- Access to Software Modules
Managing Roles from the Dashboard
Classter provides administrators with a centralized dashboard to manage user roles efficiently. From this interface, administrators can:
- Create, edit, copy, or delete roles using the Actions button available next to each role.
- Assign role-based privileges to ensure secure access control across the system.
Role Types in Classter
On the Role Management page, existing user roles are categorized under five primary role types:
- Administrator/Admin (Access to Advanced Settings)
- _Teacher_
- _Student_
- Parent/Guardian
- Partner/Employer
- Staff/Employee
- Agent
These default roles provide a base configuration, but institutions can create custom roles under these categories to fit their needs. For example, Secretary, Accounting role get under the Staff/Employee.
Note: Teachers job roles cannot replace user roles. A job role refers to a person’s employment position, while user roles refer to the access rights. Learn more.
Creating and Editing User Roles
To create a new user role, follow these steps:
1. Navigate to Main Settings > Role Management.
2. Click on the Create New button.

3. Fill in the necessary fields, including:
- Description/Title
- User Type (e.g., _Student_, _Teacher_, Parent, Admin)
- Additional Comments (if needed)

4. Configure the role’s settings across the various tabs (Modules, Menus, Privileges, Reporting, Special Settings, Mobile Menu) to define its access levels.
5. Click Save to finalize role creation.
To edit an existing role:
- Click Edit next to the desired role.
- Adjust permissions, modules, or other settings as needed.
- Click Save to apply changes.
This process enables institutions to customize roles according to job descriptions, responsibilities, or security policies.
Actions Button Functionalities
The Actions button in the Role Management section provides multiple functionalities for modifying roles:
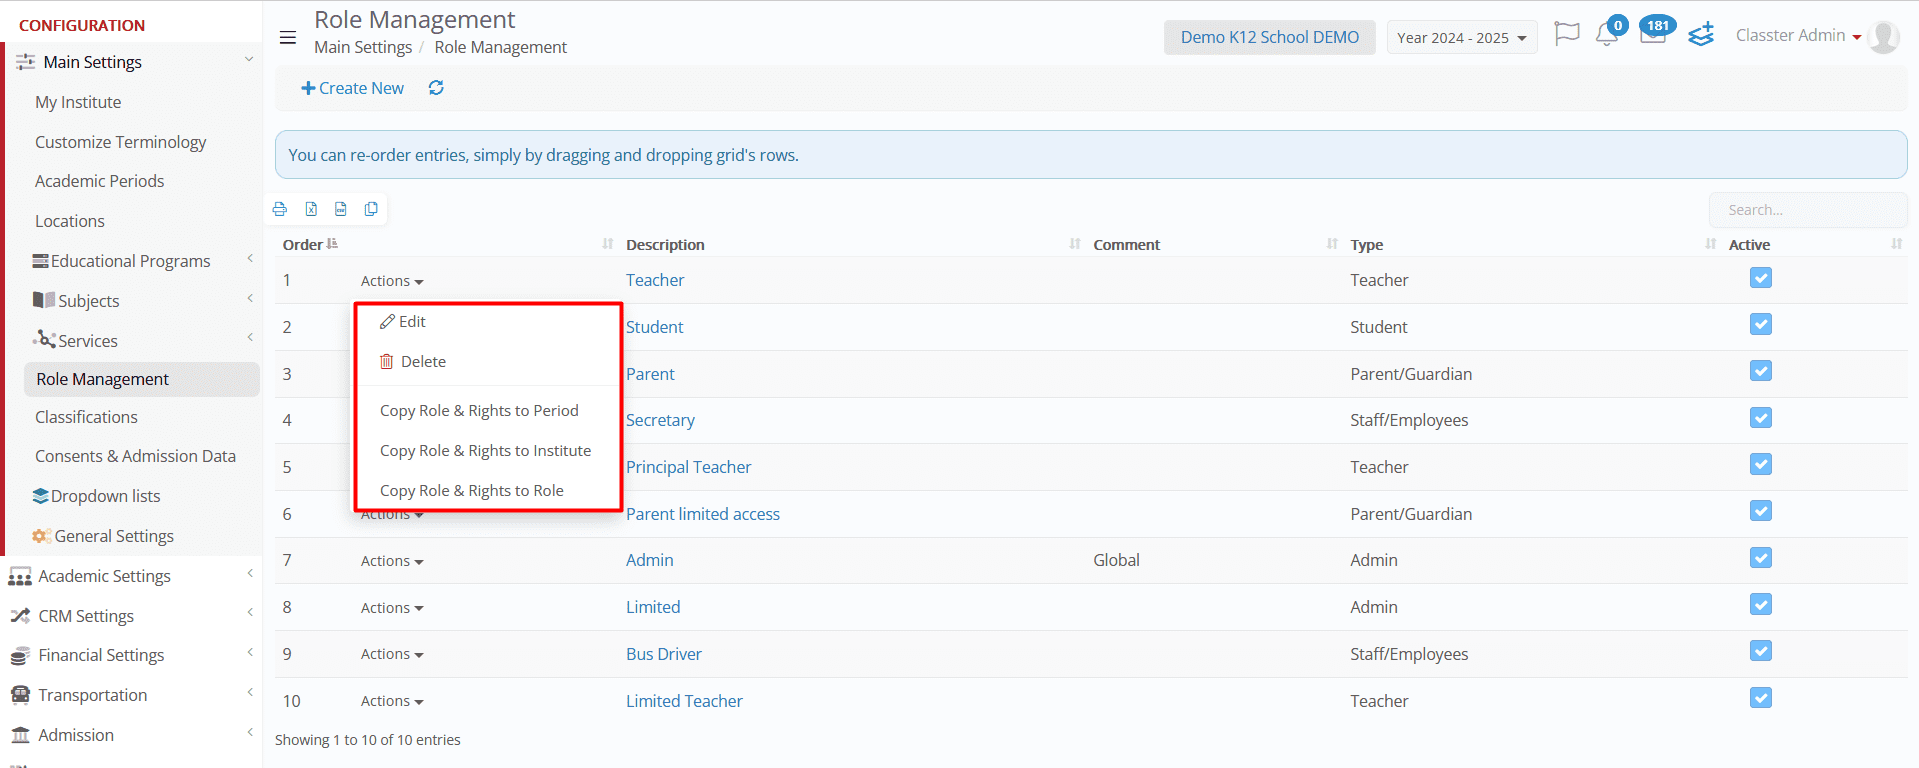
Edit Role
- Click Edit to modify an existing role’s settings.
- Allows adjustments to Modules, Menus, Privileges, Reporting, and Special Settings to refine user access.
- Selecting this option directs administrators to a detailed role configuration page.
Delete Role
- Click Delete to remove an existing user role from the system.
- This action is permanent and should be used with caution.
Copy Role & Rights
Administrators can duplicate an existing role’s settings and apply them to different academic periods, institutions, or user roles:
- Copy Role & Rights to Period – Transfers the selected role and permissions to a different academic period (e.g., from 2024-2025 to 2025-2026).

-
- A popup window will appear, allowing administrators to select the academic period where the role should be copied.
- Click Save to confirm the transfer.
- Copy Role & Rights to Institute – Copies the selected role and its permissions to another institution (e.g., St. Nicholas).

-
- A popup window will allow administrators to choose the target institution.
- Copy Reports Only (Optional)
- If enabled, only the report access settings of the role will be copied, without transferring other permissions.
- This option appears when copying roles to another institute or role.
- Copy Role & Rights to Role – Duplicates a role’s permissions and applies them to another user role (e.g., copying an Administrator role’s settings to a Staff role).

-
- A popup window will prompt administrators to select the destination role.
Important: Always click Save after making any changes to ensure the action is applied successfully.
This action can be accessed from the Actions button or by selecting the Role and choosing the desired copy action, including the Copy rights from another role option.

Role Configuration Per User Type
The system supports different role configurations depending on the user type. Below is a breakdown of role management for each category:

Employees/Staff & Admins
Employees and staff can be assigned various roles based on their responsibilities. However, only administrators have access to Advanced Settings. Staff roles may include access to academic data, HR, finance, or operational functionalities, depending on the institution’s structure.
_Students_
Students’ roles typically include access to academic records, schedules, learning materials, and financial information based on institution policies. Permissions may also include submission of assignments, exam registrations, and viewing announcements.
Parents/Guardians
Parents and guardians can have roles granting them access to _Student_ progress reports, fee statements, communication modules, and other relevant data. Their access can be limited based on predefined filters like linked student relationships.
_Teachers_
Teachers’ roles include permissions to manage student assessments, attendance, class materials, and other academic-related features. They may also have access to grading tools, syllabus management, and internal communication tools.
Partners/Employers
These users can have specific roles granting them access to _Internship_ reports, _Student_ performance overviews, or specific career services portals within the system.
Agents
Agents may have roles that allow them to manage admissions, applications, and recruitment data. Their permissions can be further configured based on regional access or specific programs they are assigned to handle.
Important Note!
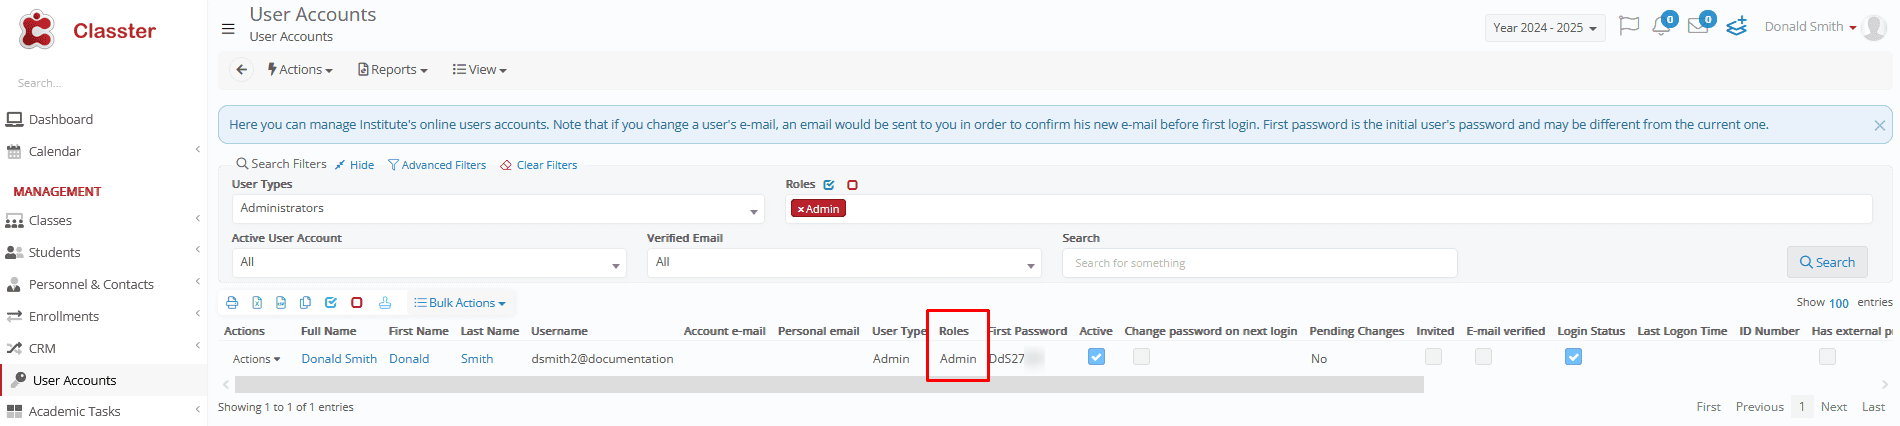
Additionally, the system allows administrators to define a default role per user type, which is automatically assigned upon account creation. This setting can be found under: Main Settings > General Settings > Security Rights > Accounts & Roles.
Role Management & User Role Privileges
Role management defines the permissions and access levels assigned to users within the system. Each role determines what functionalities users can access and control, ensuring a structured and secure environment. Role management is divided into several sections, each governing a different aspect of user access.

Modules
- Controls access to system modules such as Academics, Financials, HR, Admissions, and more.
- Disabling or enabling an entire system module will automatically affect all related privileges across other role tabs (e.g., if the Billing module is disabled, all billing-related privileges in other role tabs will also be disabled).
Menus
- Determines which menus and submenus are visible in the system interface.
- Allows administrators to open, hide, or rename menus based on role requirements.

Mobile Menus & Permissions
- Defines which menus and features are accessible on the mobile platform.
- Controls mobile-specific functionalities, such as notifications and data entry.
Privileges (Action-Specific Permissions)
- Controls permissions for specific actions—such as viewing, creating, editing, or deleting user rights within entities—even within an enabled menu. This also applies to actions like issuing payments, and similar operations.
- Includes advanced permissions, such as bulk operations, mass updates, and imports.
Example:
Bulk Add Educational Programs: This feature allows users to assign educational programs to up to 1,000 students at once, using filters and automated processes to ensure accuracy.

It enhances efficiency in _Student_ program management and is available through the Actions menu with or without pre-selecting students. (The example below showcases usage without selecting students.)

- Controls data exports and printing permissions across various modules (e.g., Student Lists, Transaction Lists).
Reporting
- Manages access to reports by controlling their visibility in specific sections and restricting access to sensitive or irrelevant data.
- Allows administrators to activate, rename, or hide based on role policies.
- If the multi-language option is enabled, reports will be accessible in multiple languages, provided corresponding versions exist in the system.

Special Settings
Special Settings help you control what each user role can see or do in Classter, based on their job and responsibilities. Here’s what you can manage:
- Program Filtering by School _Location_
Define default values to be used when filtering Educational Programs based on the Alternative Location property (e.g., Primary, High School, Faculty of Medicine). These defaults ensure that users only view the relevant academic structures based on the context of their assigned role.
➤ Optionally, allow end users to alter the filter options of the Educational Program’s Alternative Location, offering flexibility in how data is viewed depending on user needs and permissions.

- Student Route Exceptions
Choose which route changes (like Cancel Route or Change Address) are hidden from certain users.

- Wider Search Access
You can allow some users to search for _Students_ or data across all _Grades_ and _Locations_—no filters applied.

Users can choose whether they can search with or without _Location_/_Grade_ restrictions.

Important Note! The user must have a role assigned to him/her. Go to User Accounts > User (user type filtered) to add or edit a role from Bulk Actions.
- Custom Filters
Configure, at the role level, whether users should be restricted when applying filters or searching for entities. This applies specifically to _Location_, _Grade_, and Class filters. By enabling this restriction, you ensure users interact only with entities that fall within their designated parameters. - Voucher Access
Choose what kind of vouchers (e.g., financial aid or government subsidies) each role can access or manage.
Privileges Explanation
While many privileges are self-explanatory, some require additional clarification. Below are examples of permissions that may need further context:
- “Allow users to export/print list data” – Applies to all lists in the system, including the _Student_ List, Transactions List, etc. Users with this privilege will see an option on the list interface to export or print the data.
- “Mass Imports / Actions” – Users may have access to Advanced Configurations, but the Mass Imports option could be hidden to prevent bulk data changes.
These privileges help refine role-based security, ensuring that users have precisely the access they need without exposing unnecessary functionalities.
Conclusion
This manual provides an overview of Role Management settings within Classter, helping administrators effectively control user access and privileges. For more detailed instructions, please refer to the Classter Knowledge Base.
For additional examples of privileges, please refer to the manual titled User Roles Privileges – Examples.