

Educational Institutions issue all kinds of identification cards for _Students_, _Teachers_, Employees for a variety of reasons. Here we will take a look at how we can manage cards from the Classter platform.
We will be using an Employees Portal (Secretary), so we can see the functions available for the creation, management and printing of _Student_, _Teacher_, and employee cards.
Step 1: We will be looking at the editing of card templates.
Step 2: Issuing and Re-Issuing Cards.
Step 3: Use of QR codes in the system.
First step must be completed by the Administrator of the Educational Institution.
To create the card templates, you need to follow the path: Dashboard > Configuration > Advanced Configuration > Templates & Menus tab > Card Templates (Figure 1).
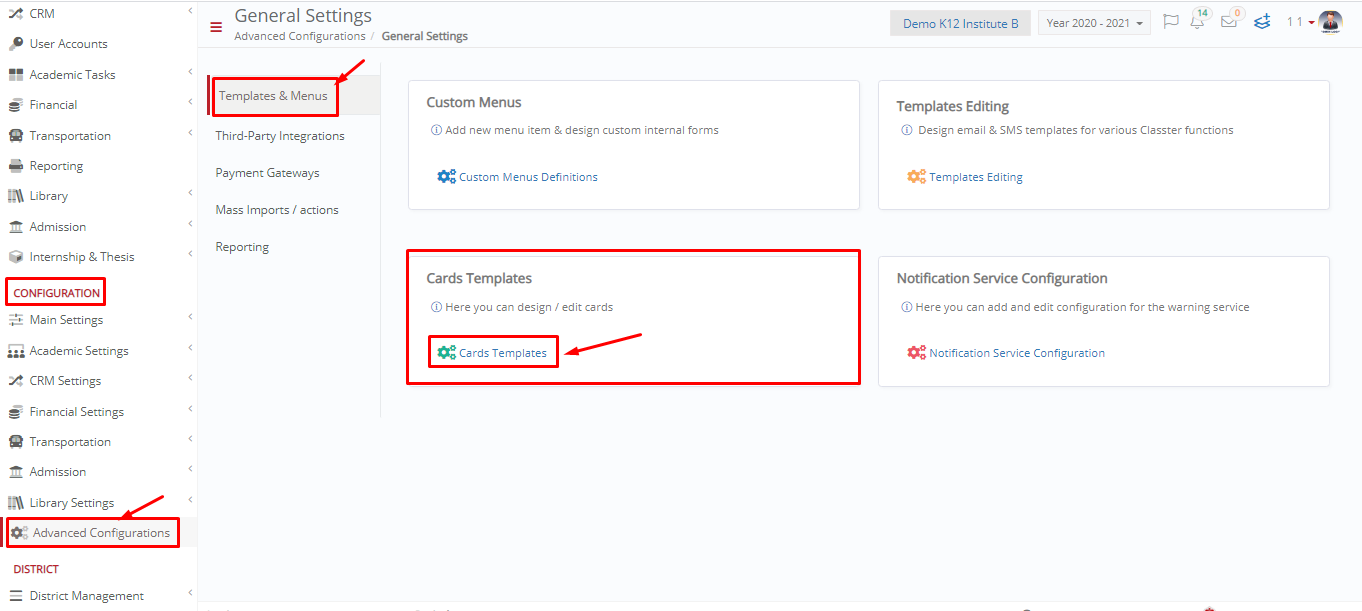 Figure 1
Card Templates
In this section you can design and edit _Student_, _Teacher_, and employee id cards (Institutionally issued). This section regarding cards is connected to student and teacher lists where once you have created the card templates you can begin issuing and re-issuing cards to _Students_, _Teachers_ and employees. You can choose to use RFID, QR Codes or bar codes on the id cards.
To reach this page you need to follow the path: Dashboard > Configuration > Advanced Configuration > Cards Templates (Figure 2).
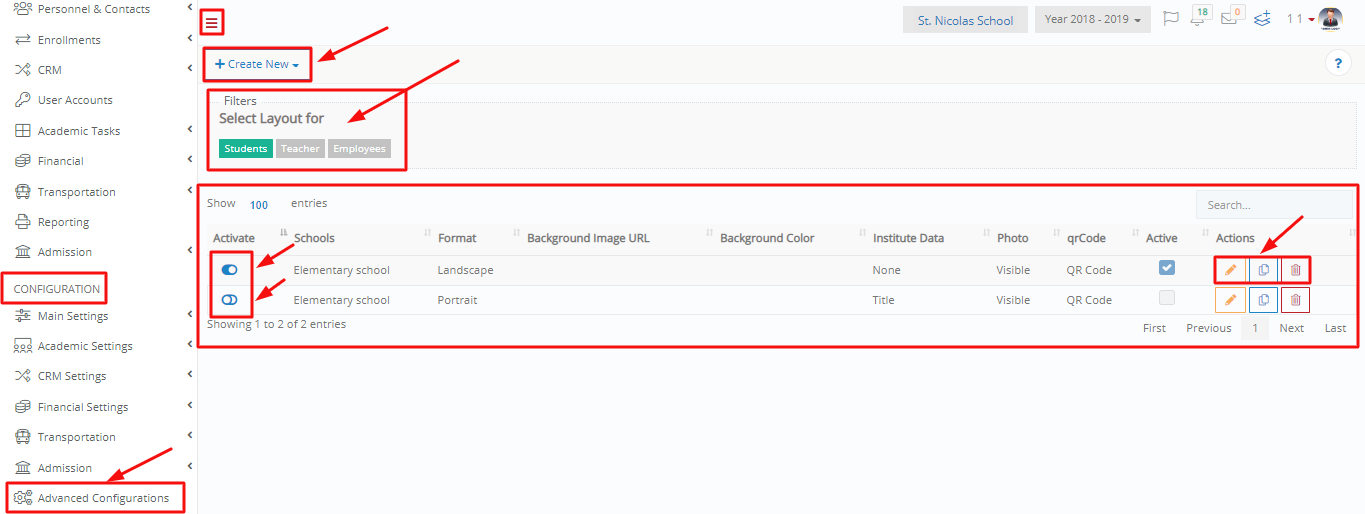 Figure 2
- By clicking on the student, teacher, and employee tabs you can see the cards that have been created for each user type.
- Click on the edit, copy, or delete buttons to edit a card, copy a card or delete a card.
- If you have more than one template for each type of card, you can click on the enable/ disable template switch next to each card entry on the list.
- Click on the ‘+Create New’ button to create a new _Student_, _Teacher_, or employee id card.
Create Student / Teacher / Employee Cards
Student Card
- Click on the ‘+Create New’ button and select _Student_ card, you will see the following pop-up window (Figure 3).
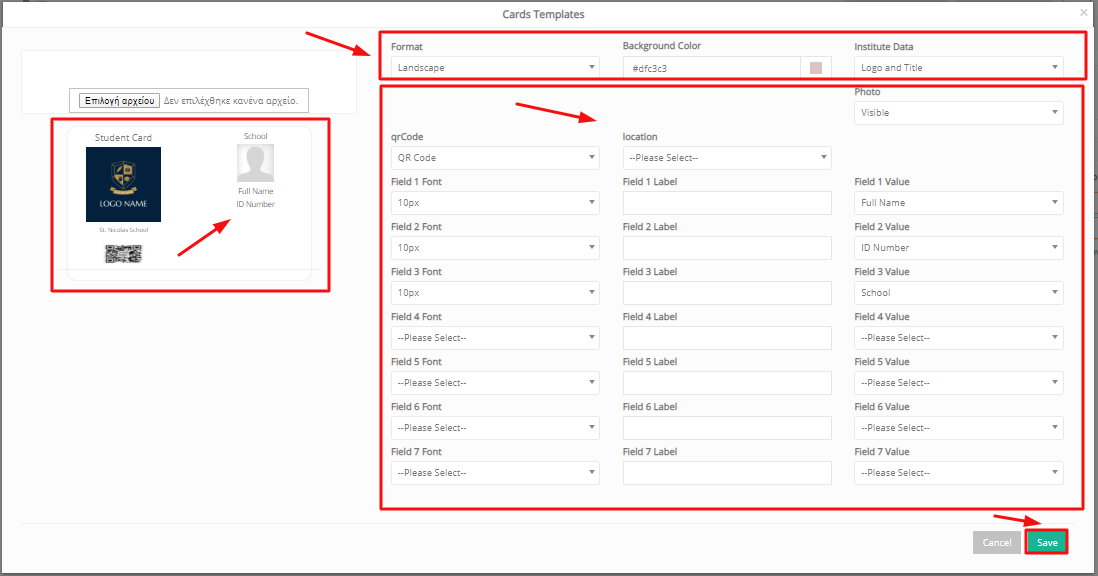 Figure 3
In this screen you can see the following (Figure 3):
- On the Left side of the screen you will see the card template.
- You can add a pre-designed card by uploading the file through the upload button.
- You can choose what format you want this card to be in Landscape or Portrait. The typical _Student_ card in most cases is landscape reminiscent of a credit card.
- You can choose a color for the template according to your institution’s guidelines.
- You can choose a single or combination of items to appear on the card. At the moment in the Institution Data option you can choose Logo, Title or both to appear on the card. Your institution logo will appear automatically you do not have to upload it here.
- You can choose to show students picture.
- You can choose what type of identification code you wish the id card to have. Available options are Barcode or QR Code. Each type can be scanned with specialized equipment. Either barcode reader or QR code scanner.
- From the _Location_ option you can add the _Location_/school this _Student_ belongs too. If applicable for your institution.
- Underneath the initial options you will see Font, Label and Value fields. You can use as many as you deem suitable, but no more than the card size can display. Choose the font size you wish the field to have e.g 10px. Choose if you wish a label (alternative name instead of the value). Choose a value for the field, this can be Name, Surname, Full Name, Date of Birth etc. The choices you make here will be displayed in the template on the left.
- Once you are done, click on the ‘Save’ button to save this Student Card Template.
Teacher Card
- Click on the ‘+Create New’ button and select _Teacher_ card, you will see the following popup window (Figure 4).
 Figure 4
In this screen you can see the following (Figure 4):
- On the Left side of the screen you will see the card template.
- You can add a pre-designed card by uploading the file through the upload button.
- You can choose what format you want this card to be in Landscape or Portrait. The typical _Student_ card in most cases is landscape reminiscent of a credit card.
- You can choose a color for the template according to your institution’s guidelines.
- You can choose a single or combination of items to appear on the card. At the moment in the Institution Data option you can choose Logo, Title or both to appear on the card. Your institution logo will appear automatically you do not have to upload it here.
- You can choose to show teachers picture.
- You can choose what type of identification code you wish the id card to have. Available options are Barcode or QR Code. Each type can be scanned with specialized equipment. Either barcode reader or QR code scanner.
- From the _Location_ option you can add the _Location_/school this _Teacher_ belongs too. If applicable for your institution.
- Underneath the initial options you will see Font, Label and Value fields. You can use as many as you deem suitable, but no more than the card size can display. Choose the font size you wish the field to have e.g 10px. Choose if you wish a label (alternative name instead of the value). Choose a value for the field, this can be Name, Surname, Full Name, Job Role, Parking Code etc. The choices you make here will be displayed in the template on the left.
- Once you are done, click on the ‘Save’ button to save this Teacher Card Template.
Employee Card
- Click on the ‘+Create New’ button and select employee card, you will see the following pop-up window (Figure 5).
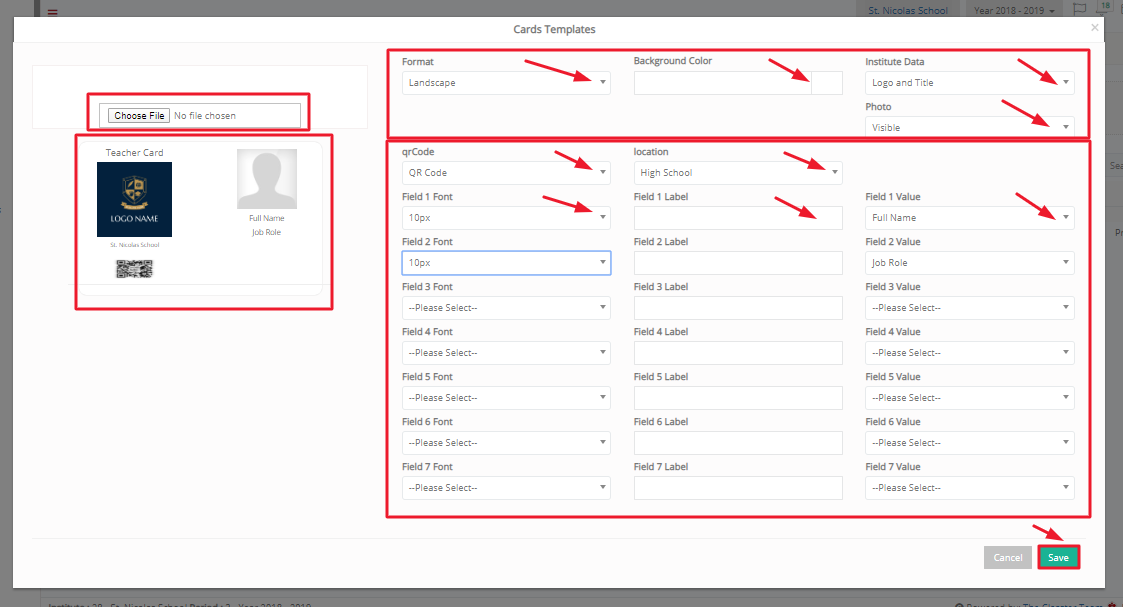 Figure 5
In this screen you can see the following (Figure 5):
- On the Left side of the screen, you will see the card template.
- You can add a pre-designed card by uploading the file through the upload button.
- You can choose what format you want this card to be in Landscape or Portrait. The typical _Student_ card in most cases is landscape reminiscent of a credit card.
- You can choose a color for the template according to your institution’s guidelines.
- You can choose a single or combination of items to appear on the card. Now in the Institution Data option, you can choose Logo, Title or both to appear on the card. Your institution logo will appear automatically you do not have to upload it here.
- You can choose to show employee’s picture.
- You can choose what type of identification code you wish the id card to have. Available options are Barcode or QR Code. Each type can be scanned with specialized equipment. Either barcode reader or QR code scanner.
- From the _Location_ option you can add the _Location_/school this _Teacher_ belongs too. If applicable for your institution.
- Underneath the initial options you will see Font, Label and Value fields. You can use as many as you deem suitable, but no more than the card size can display. Choose the font size you wish the field to have e.g 10px. Choose if you wish a label (alternative name instead of the value). Choose a value for the field, this can be Name, Surname, Full Name, Job Role, Parking Code etc. The choices you make here will be displayed in the template on the left.
- Once you are done, click on the ‘Save’ button to save this Employee Card Template.