

In this section. we will be seeing how you can configure Attendance Settings and the Dropdown Lists associated with Attendance. We will start from Attendance Settings and continue with Dropdown Lists.
Note: Info Tooltips are available next to every option (Figure 161).
The Path to this page is Dashboard > Configuration > Academic Settings > Attendance Settings > Attendance Settings (Figure 161,162,163).
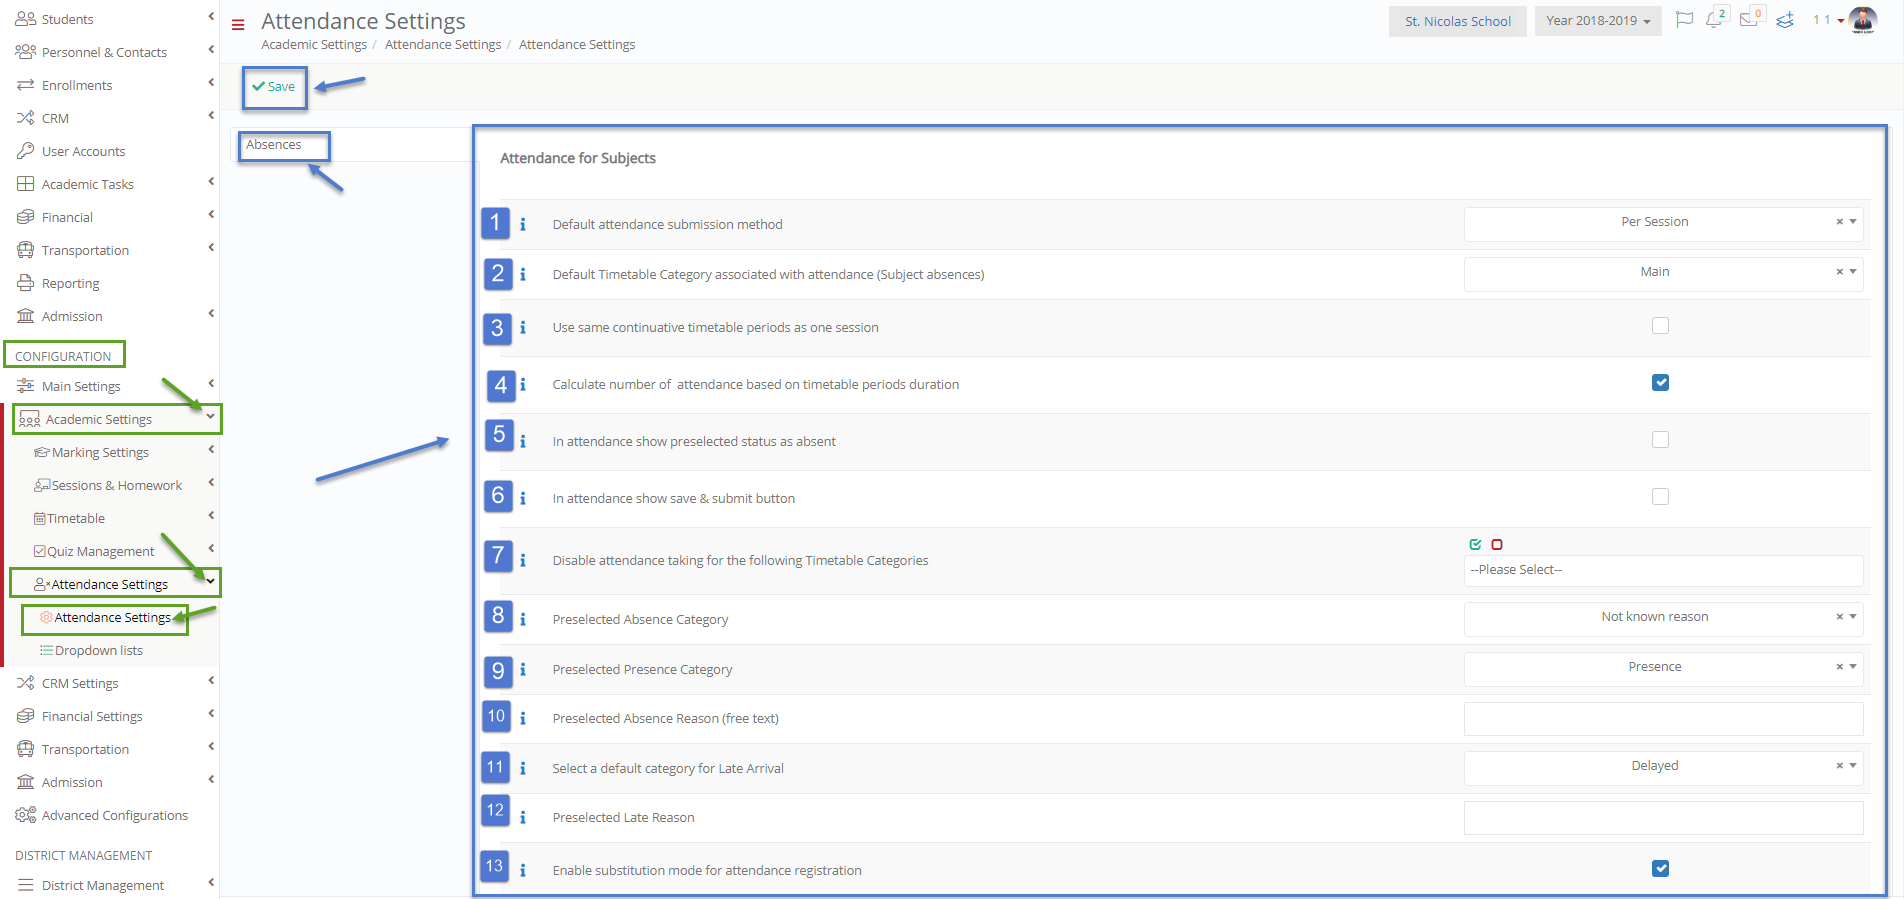
Figure 161
- ‘Default attendance submission method’ this option sets the default method of entering absences e.g Per Session (Figure 161).
- ‘Default Timetable Category associated with attendance (Subject absences)’ this option sets the default timetable which will be used to log subject absences e.g Main (Figure 161).
- ‘Use same continuative timetable periods as one session’ This option is used only in per timetable attendance submission and shows continuative timetable periods records as merged (Figure 161).
- ‘Calculate number of attendance based on timetable periods duration’ This option is used only in per timetable attendance submission way and allows Teachers to change the number of timetable periods using sessions (Figure 161).
- ‘In attendance show preselected status as absent’ this option will pre set absences to the status of absent until a teacher changes it to indicate that a student was present (Figure 161).
- ‘In attendance show save & submit button’ this option when checked will materialize the Save & Submit button in the attendance page. If it is unchecked the attendance page will only show the simple ‘Save’ button (Figure 161).
- ‘Disable attendance taking for the following Timetable Categories’ Here we can define if one or more timetable categories are not used in the attendance taking forms. Please note that we can create multiple timetable categories in Classter (e.g. Normal timetable and afternoon timetable or timetable for holidays period). When we register an absence in Classter, we always have to select a timetable category. Like that a Student may have multiple register absences per day or period (associated with different timetable categories). If we set one or more timetable categories here, when a user submits absences and selects a timetable category from a list, this list will not contain the timetable categories specified in this setting (Figure 161).
- ‘Preselected Absence Category’ in this option you can choose an absence category to make available to Teachers and Staff when logging in absences e.g Unknown Reason (Figure 161).
- ‘Preselected Presence Category’ When a user submits an absence for a group of Students then Classter will automatically submit a presence for all Students that are not absent. In this case the presence entry needs a presence category value. Here we define the default presence value to be used for this submission. Note that if we register presences instead of absences, then we need to select a presence category (e.g. Presence, Late but present etc.). In this case, here we define the preselected value to be selected during the presence submission (Figure 161).
- ‘Preselected Absence Reason (free text)’ this option allows you too create a preselected absence reason e.g Medical Emergency (Figure 161).
- ‘Select a default category for Late Arrival’ this option allows you to set a default category for students who are present but arrived late e.g Delayed (Figure 161).
- ‘Preselected Late Reason’ Here we define the default category to be used in we check that a Student is Late. So, when the users select the option Late then Classter will preselect the Late category defined here e.g. 5 min Late (Figure 161).
- ‘Enable substitution mode for attendance registration’ If this setting is enabled, then on the Subject absence taking form, a substitute checkbox is visible. If a Teacher selects this checkbox, then she/he can submit absences for a Class that she/he does not normally teach (Figure 161). Note: In order for a Teacher to be able to access a Class that she/he does not teach and submit absences as a substitute, it is necessary for an employee to firstly create a special lesson (session) for the particular Teacher, Class , Subject and for a specific day and timetable period. This is done via the session’s creation menu.

Figure 162
- ‘Allow Teachers to access/edit data for all Classes in substitution mode (CAUTION! This will decrease security level)’ If you enable this setting then a Teacher who switch on the “Substitution Mode” on the Subject Absences form (Teacher’s portal), will be able to access all Classes of the school. He/she will be able to view the names of all Students. This means that there is no need anymore for an employee to assign a special substitution Session for this Teacher before she/he can submit absences. CAUTION: By activating this option, you reduce system security. In reality, Teachers will be allowed to see all Student names and edit absences of the day of all Classes. If you enable this option, you actually accept that Classter security will be reduced and you accept this change (Figure 162).
- ‘Hide category selection from Teachers when submitting attendance’ if this option is selected then the Teacher entering absences will not be able to choose an absence category (Figure 162).
- ‘Enable Fast Attendance Entries’ this option enables the fast attendance entry button in the quick action area (Figure 162).
- ‘Absence Limit Control – Select Entity to check:’ When Classter checks the absences limits, it does so against the limits defines in a particular entity of the platform. Here you can select which entity is going to be used for doing such a control. The options are: (a) General Total: In this case, you define limits in the general application setting below. When Classter does an absence limit control, it will check all absences of each student against the limits defined in the settings here (b) Year : In this case, you need to go to the Year form and define the limits there. This means that depending on the Educational program of a Student, the limit will be different (as defined in the entity Year (c) Stream: This is similar to previous case but the limit here is defined in the entity Stream. So, you need to go to Stream form and define a limit for each Stream. The control will be done against the Stream absence limit. (d) Subject: In this case, the control is done per subject. This will work only if the attendance taking type is per Subject or using the timetable. Only in those 2 cases, Classter can summarise the total number of absences per subject. In this case, the control is done against the limit specified in each subject. You will need to go to each subject form and define there the limit of absences per subject. This option is usually used on a Higher Education configuration (Figure 162).
- ‘Set time period for absences limit control’ When Classter executes control for the total number of Student’s absences against defined limits, it needs to calculate the total number of absences for a given period of time. Here we define the time period used for calculating all students’ absences. It can be either all absences of the selected academic period (in this case all limits refer to the whole academic period) or it can be all absences for a marking period (in this case all limits refer to a marking period only) (Figure 162).
- ‘Overall absence limits’ in case we select general check for absences, then here we have to enter the number of absences that is the limit for failure e.g 200 (Figure 162).
- ‘Overall Unauthorised absences limit’ If there is a need to have a distinct limit only for Unauthorised absences, then we can define this limit here. As a result, the limit control is done against either the total limit or the limit set here e.g 170 (Figure 162).
- ‘Use Absence Limit in Percentage’ by clicking on this option all absences will be viewed as a percentage of the academic period (Figure 162).
- ‘Enable Attendance for Services’ Here you can enable the feature of attendance taking for services in general. Please note the following: 1. This feature provides only attendance submission – Absence submission is not supported for services. 2. All Students are initially absent. The user must check Students as a present. 3. Service is enabled for attendance taking only if the “Take Attendance” property is selected on the services form (Figure 162).
- ‘Default Timetable Category for service attendance’ Here you define the timetable category to be used as a default option in all attendance submissions related to service attendance (Figure 162).
- ‘Activate SMS Notification’ We can activate an automated SMS sending when an absence is registered. End users can unselect the option before submitting absences (Figure 162). Note: you must have an SMS plan set up with available credits.
- ‘Set Sender Name for SMS’ In this option enter the sender name used when Classter sends an absence SMS (Figure 162).

Figure 163
-
- ‘Select Default SMS Template for Absence notification’ this option selects a template for the SMS sent to inform about an absence (Figure 163).
- ‘Enable automatic sending of email’ By enabling this setting, Classter will automatically send an email when a Student is registered absent. The email is sent to the father or mother of the Student provided that they have the check “Guardian” (Figure 163).
- ‘Automatically suggest absences based on the previous session/lesson absences’ If this setting is selected then (on the Subject absences form) Classter will check if a Student had an absence registered in the previous session. If so, then the Student is automatically marked again as absent in the next session. In this case, Classter will display an asterisk next to the Student’s name. The Teacher must save the list of absences in order to save this automatically suggested absences (Figure 163).
- ‘Do not allow more than 1 absence per day or period’ This setting works only when the user registers attendance using the “Daily Attendance Method”. By clicking on this option you will not allow more than 1 absence per day or period to be entered (Figure 163).
- ‘Allow more than one absence category per day’ This setting works only when the user registers attendance using the “Daily Attendance Method”. If selected, the user may register more than one absence categories per day for each Student. If not selected, only one absence category is permitted per day for each Student (Figure 163).
- ‘Set for how many days a Teacher can modify non-approved attendance entries’ Here you can set up how many days after the initial absence submission, a Teacher can edit an absence. This refers only to non-approved/non-checked absences. If an absence is checked or approved by the institution management, then Teachers cannot edit it (Figure 163).
- ‘Attendance registration also updates the Students positioning calendar’ if you enable this option, then Classter will automatically register a check in the Classroom position for all Students that are registered as present in the attendance form (Figure 163).
- ‘Show position’s calendar status on attendance’ If enabled, then the {subjects} absences form will have an extra icon presenting the latest position where each {student} was checked in. The position is provided by the position calendar feature and only if the {student} had a check-in info for the date selected.
Dropdown Lists
On this screen, you can manage various systemic lists. Please select a Type(entity) and then the desired list (Figure 164).
The Path to this page is the Dashboard > Configuration > Academic Settings > Attendance Settings > Dropdown Lists (Figure 164).

Figure 164
- From the dropdown list choose ‘Annual Result Categories’ the list will be automatically loaded (Figure 164).
- Use the search text box to locate a specific category on this page (Figure 164).
- You can click on the Create Copy button to create a copy of a list entry (Figure 164).
- Edit or Delete a category by clicking on the respective buttons (Figure 164).
- Click on the +Add New button to add a new category (Figure 164).
Add New Category
Once you have clicked on the ‘+Add New’ button you will see a popup window (add page) (Figure 165).

Figure 165
- Fill in the Description and Short Description fields e.g Expelled, Bad Marks and Behaviour (Figure 165).
- Click on ‘Save’ button to save your new Annual Result Category (Figure 165).
Edit Annual Result Category
Once you have clicked on the ‘Edit’ button you will see a popup window (edit page) (Figure 166).

Figure 166
- Change the Description and Short Description fields (Figure 166).
- Click on ‘Save’ button to save your changes to this Annual Result Category (Figure 166).
Attendance Categories
From the Dropdown list box, choose Attendance Categories. These are the categories of absences which define the nature of each absence (Figure 167).

Figure 167
- Select Attendance Categories from the Dropdown list (Figure 167).
- You can use the search text box to find a specific category (Figure 167).
- You can click on the Create Copy button to create a copy of a list entry (Figure 167).
- Edit or Delete a category by clicking on the respective buttons (Figure 167).
- Click on the +Add New button to add a new category (Figure 167).
Add New Attendance Category
Once you have clicked on the ‘+Add New’ button the Creation popup window will appear (Figure 168).
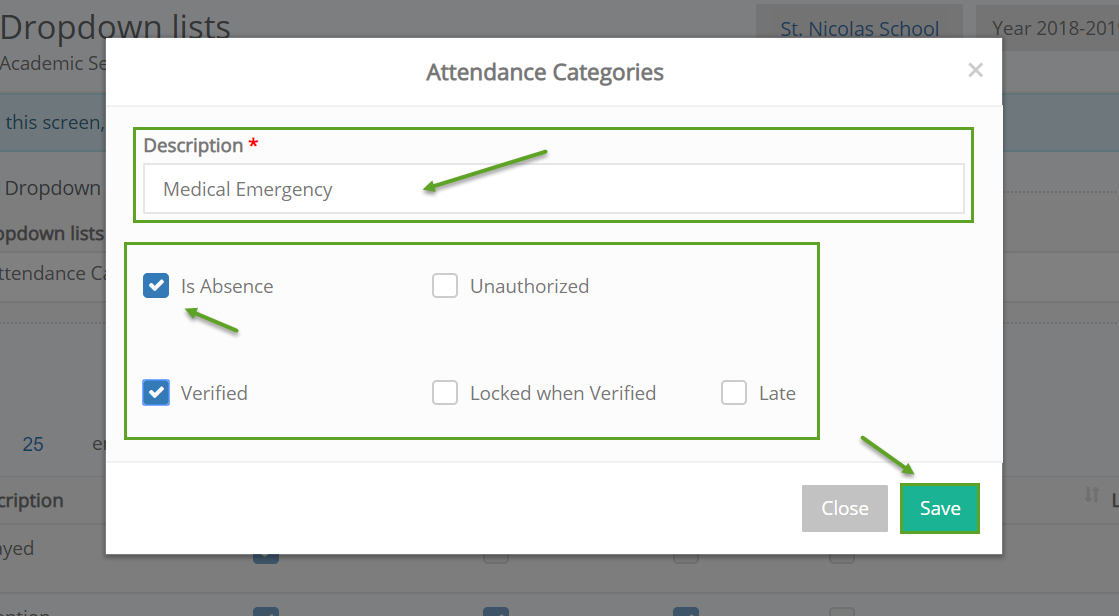
Figure 168
- Add the Description field e.g Medical Emergency (Figure 168).
- Check the options you want in order to signify what status the student in the category must have e.g Since it is a medical emergency the student will be Absent from class and this must be verified (Figure 168). You have the option unauthorized if this student’s absence was unauthorized this puts him in this new category. The option Lock after Verification refers to the Teachers or Employees right to change a verification after it has been done. The option Late is for if these students were not absent but simple Late.
- Click on ‘Save’ button to save your New Attendance Category (Figure 168).
Edit Attendance Category
Once you have clicked on the ‘Edit’ button the Edit popup window will appear (Figure 169).

Figure 169
- Change the Description field (Figure 169).
- Check the options you want in order to signify what status the student in the category must have e.g Since the student is delayed, he will not be Absent from class but Late and this is unauthorized (Figure 169). You have the option Absent if these students were absent. The option Lock after Verification refers to the Teacher’s or Employees’ right to change a verification after it has been done (for absences). The option Verified is for absent students who were indeed absent.
- Click on the ‘Save’ button to save your Changes to this Attendance Category (Figure 169).
General Note: All fields with a red asterisk next to them are Mandatory! You will not be able to save if these fields are empty.