

The Import Employees function in Mass Imports allows institutions to efficiently bulk import Employee records, Companies, and Agents data using an Excel file. This feature helps administrators to simultaneously create or update records, ultimately making it easy to manage Employees, Agents, and Companies.
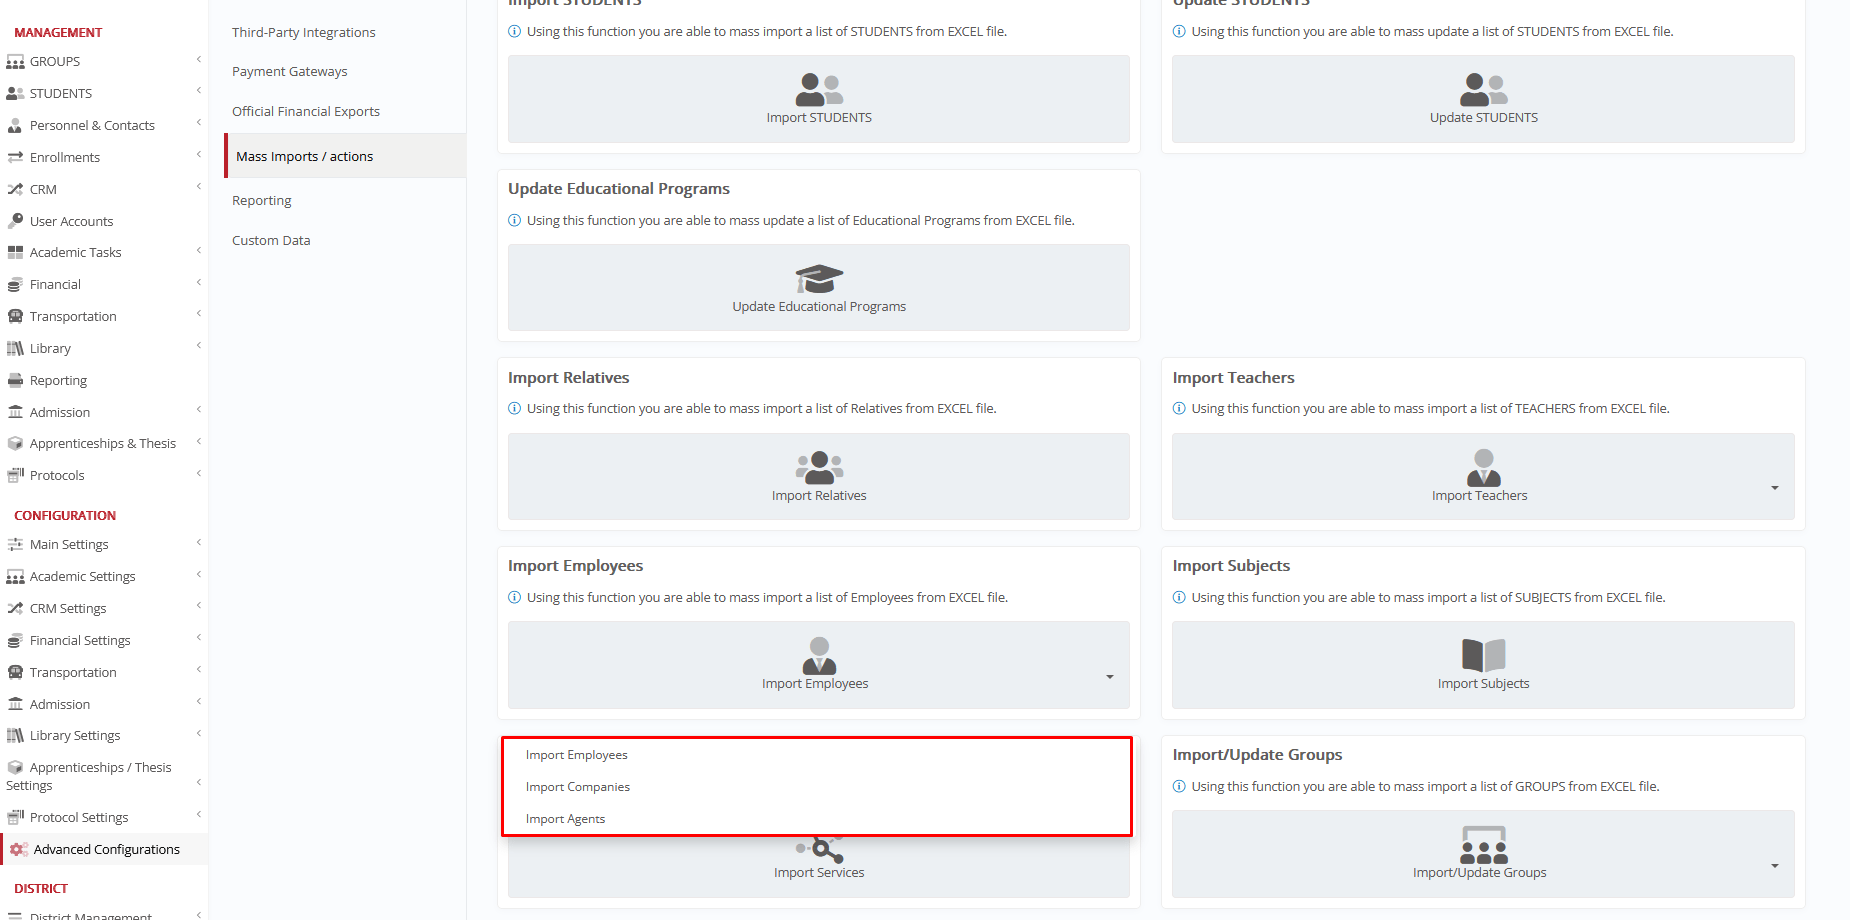
The Import Employees function consists of three sub-options:
- Import Employees: Used to import basic Employee information for the institution’s general personnel.
- Import Companies: Used to add Company records, including external partners such as _Internship_ providers and other collaborating organizations.
- Import Agents: Used to import Agent records, allowing institutions to manage external representatives involved in _Student_ recruitment, applications, and related financial processes.
Each of these options follows a structured process, including file selection, field mapping, data verification, and final import.
Key Considerations
Before proceeding with any of the import options, keep the following in mind:
- Ensure the Excel file follows the correct format, with headers in the first row.
- Classter allows the use of either Excel Values or User Values during mapping.
- Mandatory fields must be correctly mapped to proceed with the import.
- Column formats must match expected data types to avoid errors.
- Validate data before import to prevent mismatches or incorrect entries.
- Always verify the imported data in the relevant Employees, Agents, or Companies list.
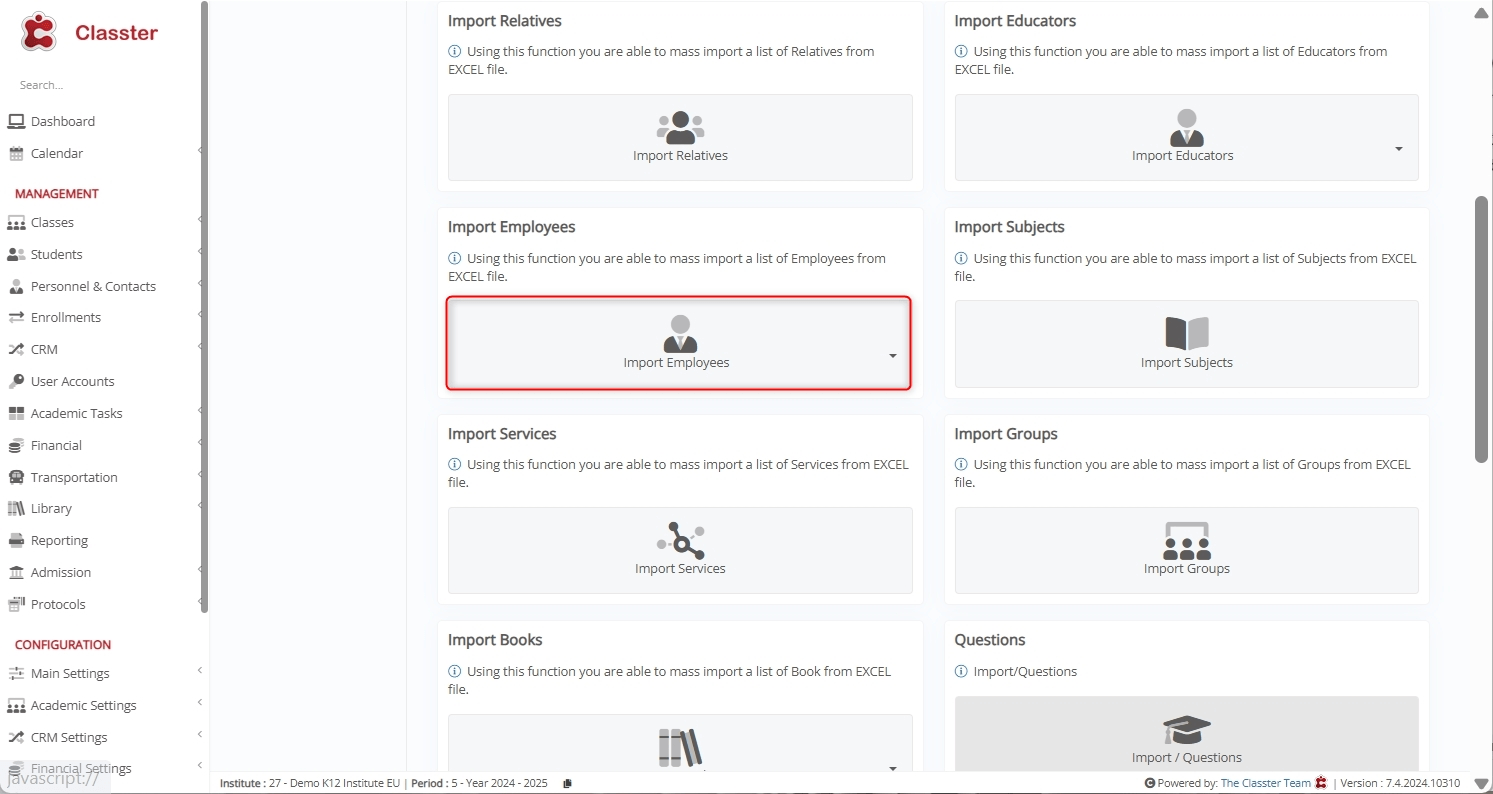
Import Employees
In this context, Employees refer to the institution’s general personnel, such as administrators, secretaries, principals/directors, sales personnel, internal doctors, school bus drivers, school cleaners, and other similar roles.
Note:
• Teachers are created as a separate Type in the system > _Teachers_.
• Administrators (Admins) are created as Employees, and their User Type is later updated through Role Management.
Follow the listed steps to import Employees in your Institute.
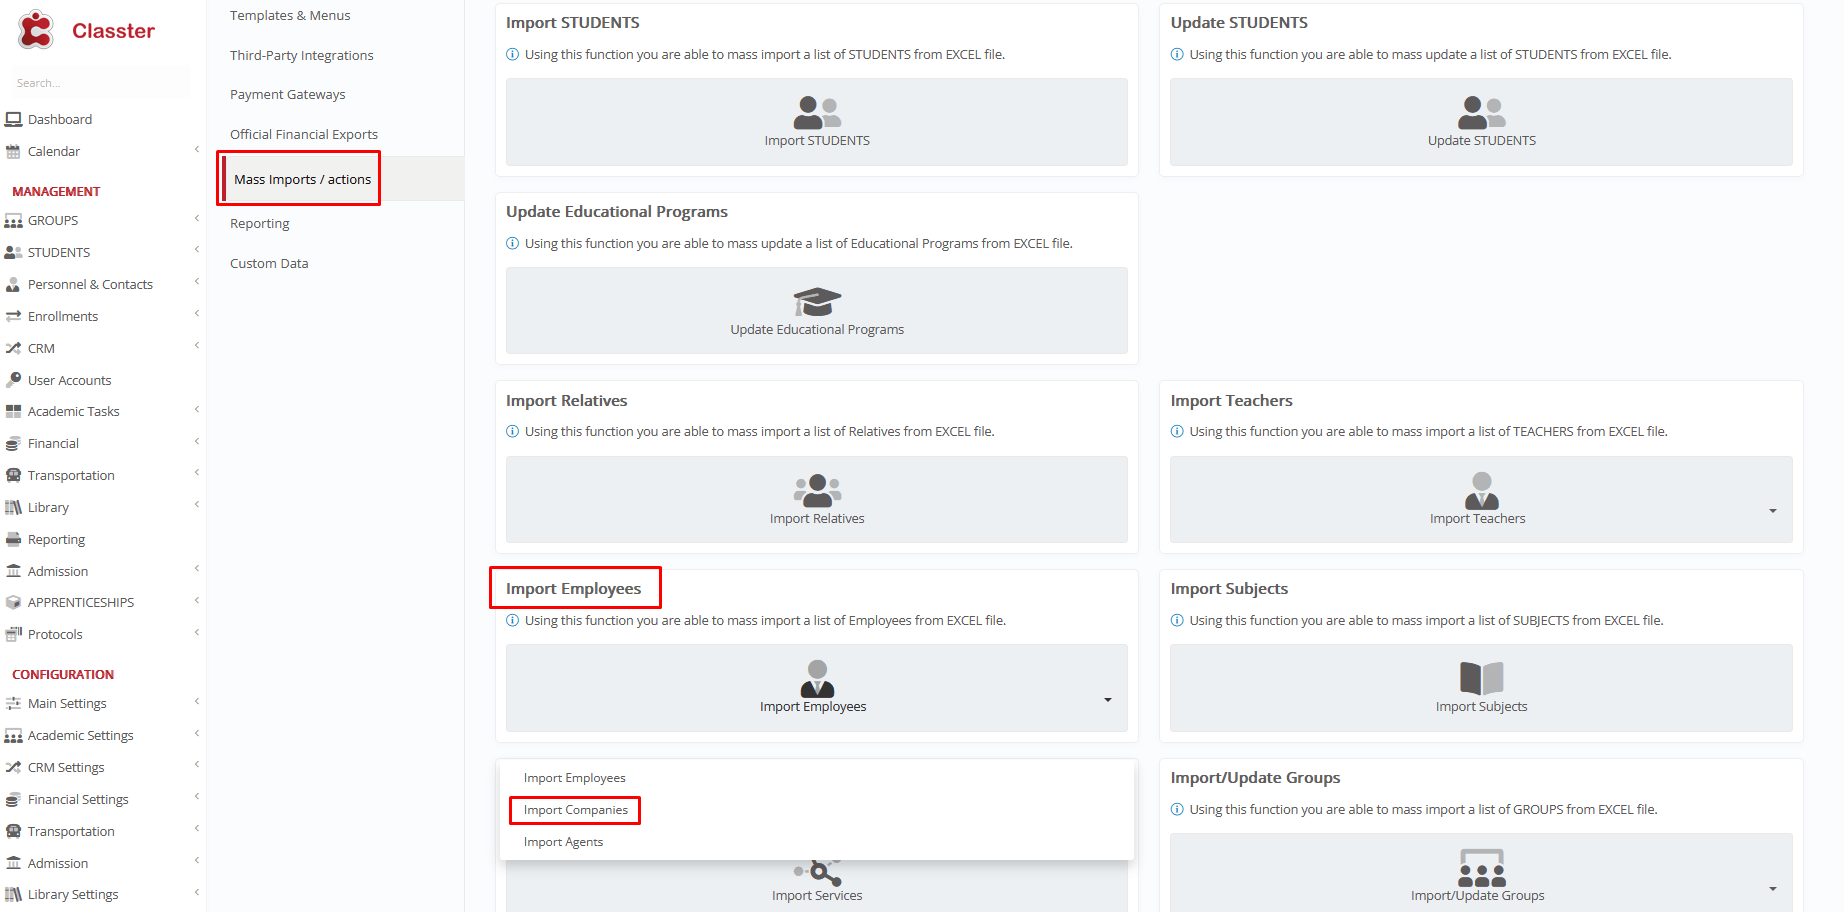
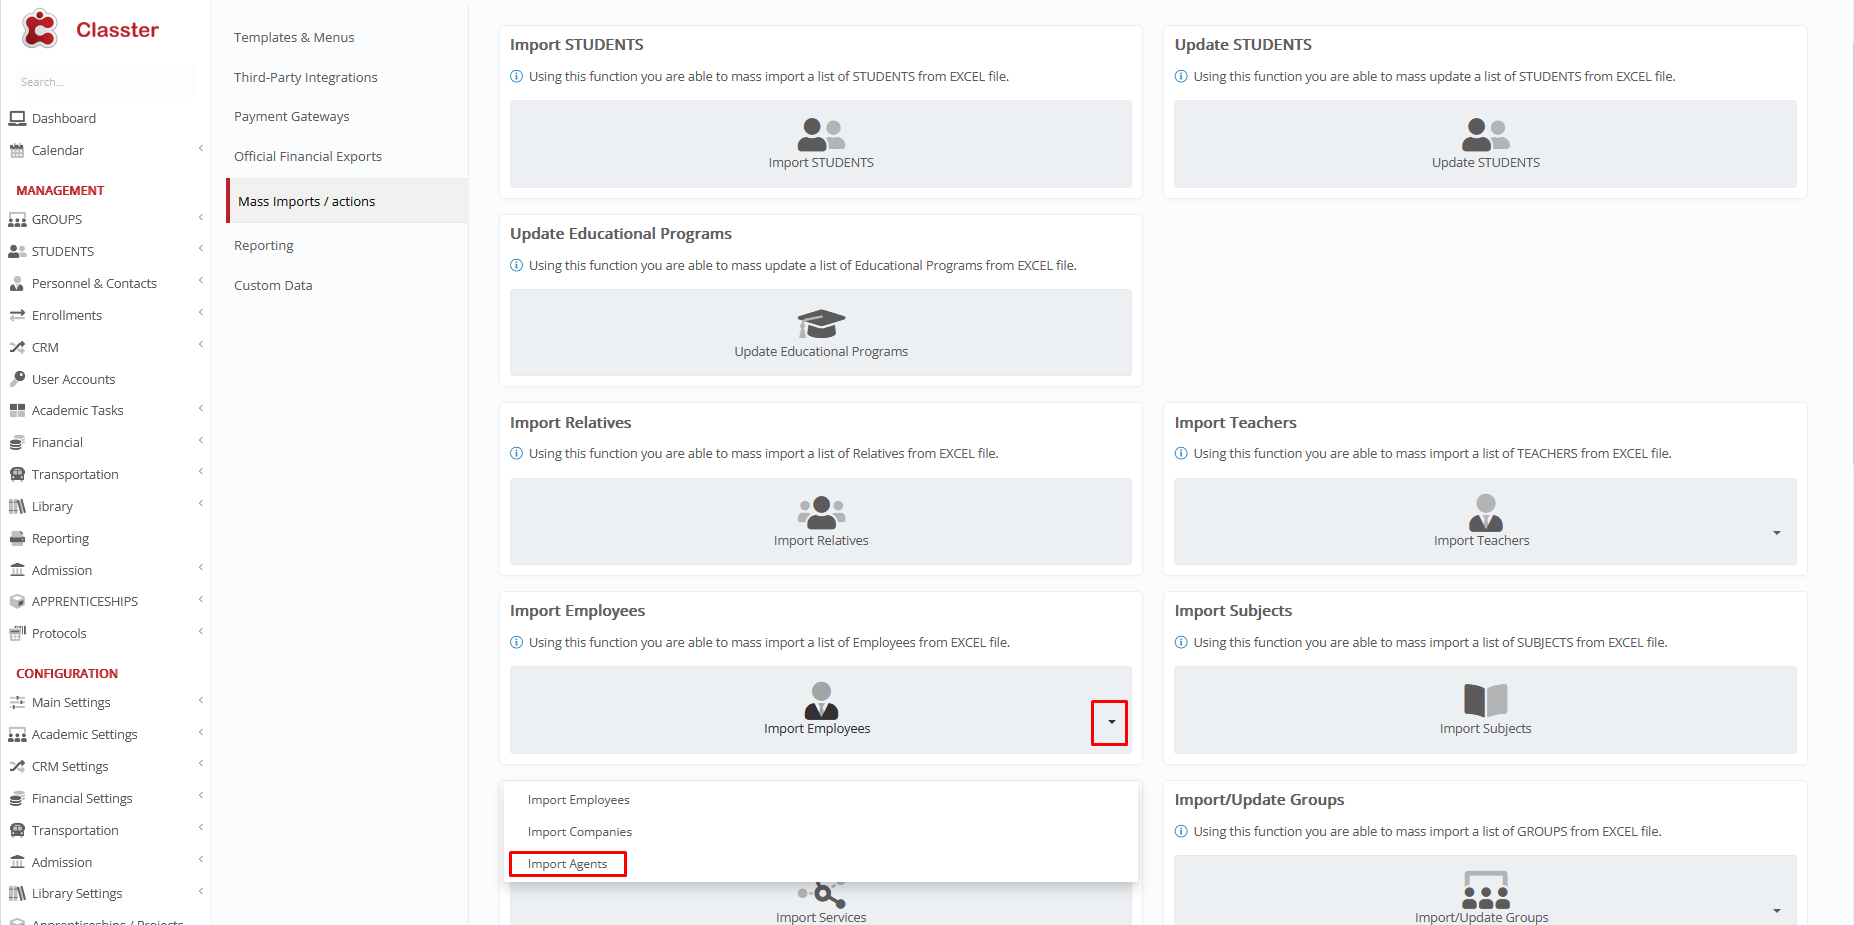
Navigate to Import Employees
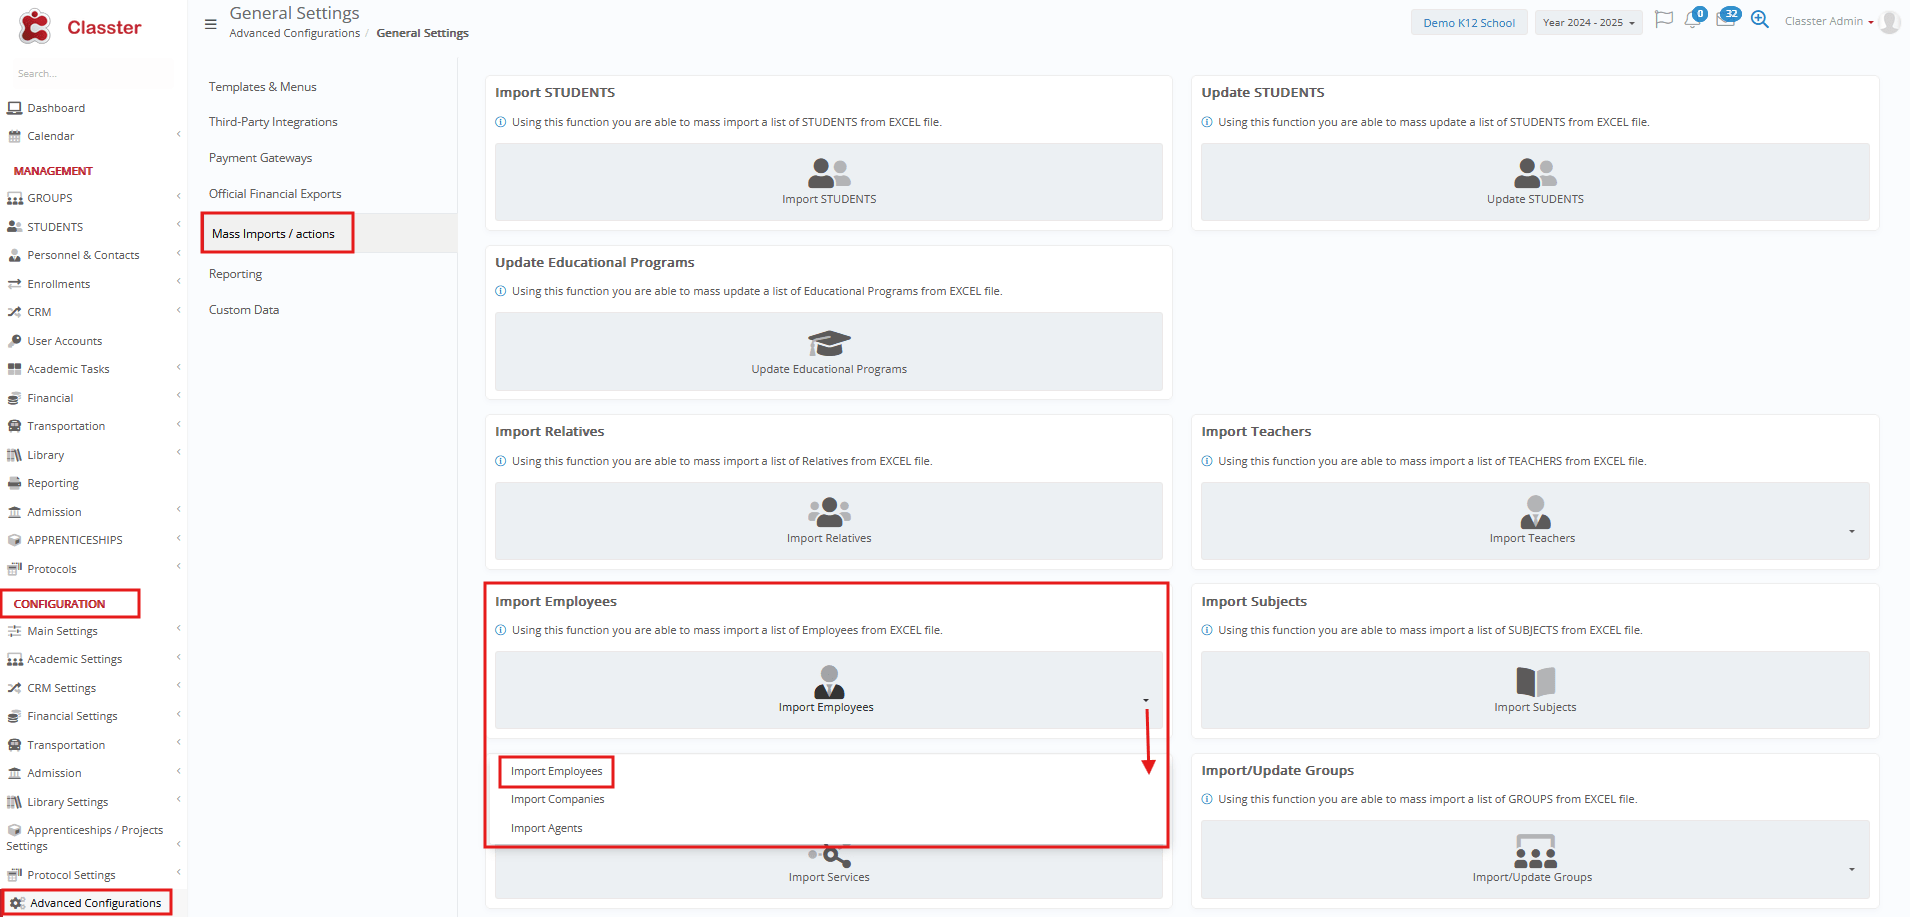
Log in to your Institute and navigate to: CONFIGURATION > Advanced Configurations > Mass Imports / Actions > Import Employees menu > Import Employees.
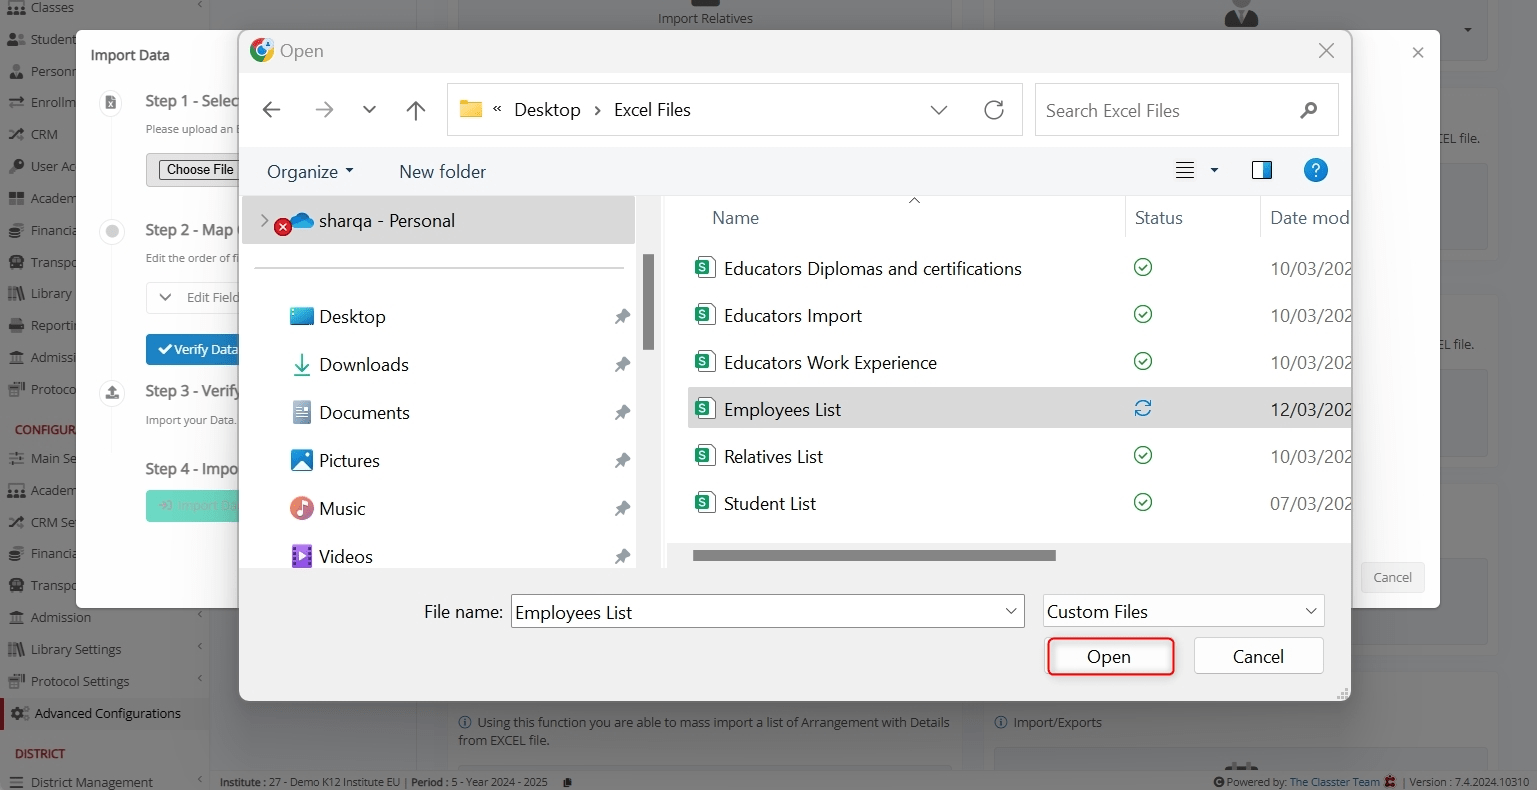
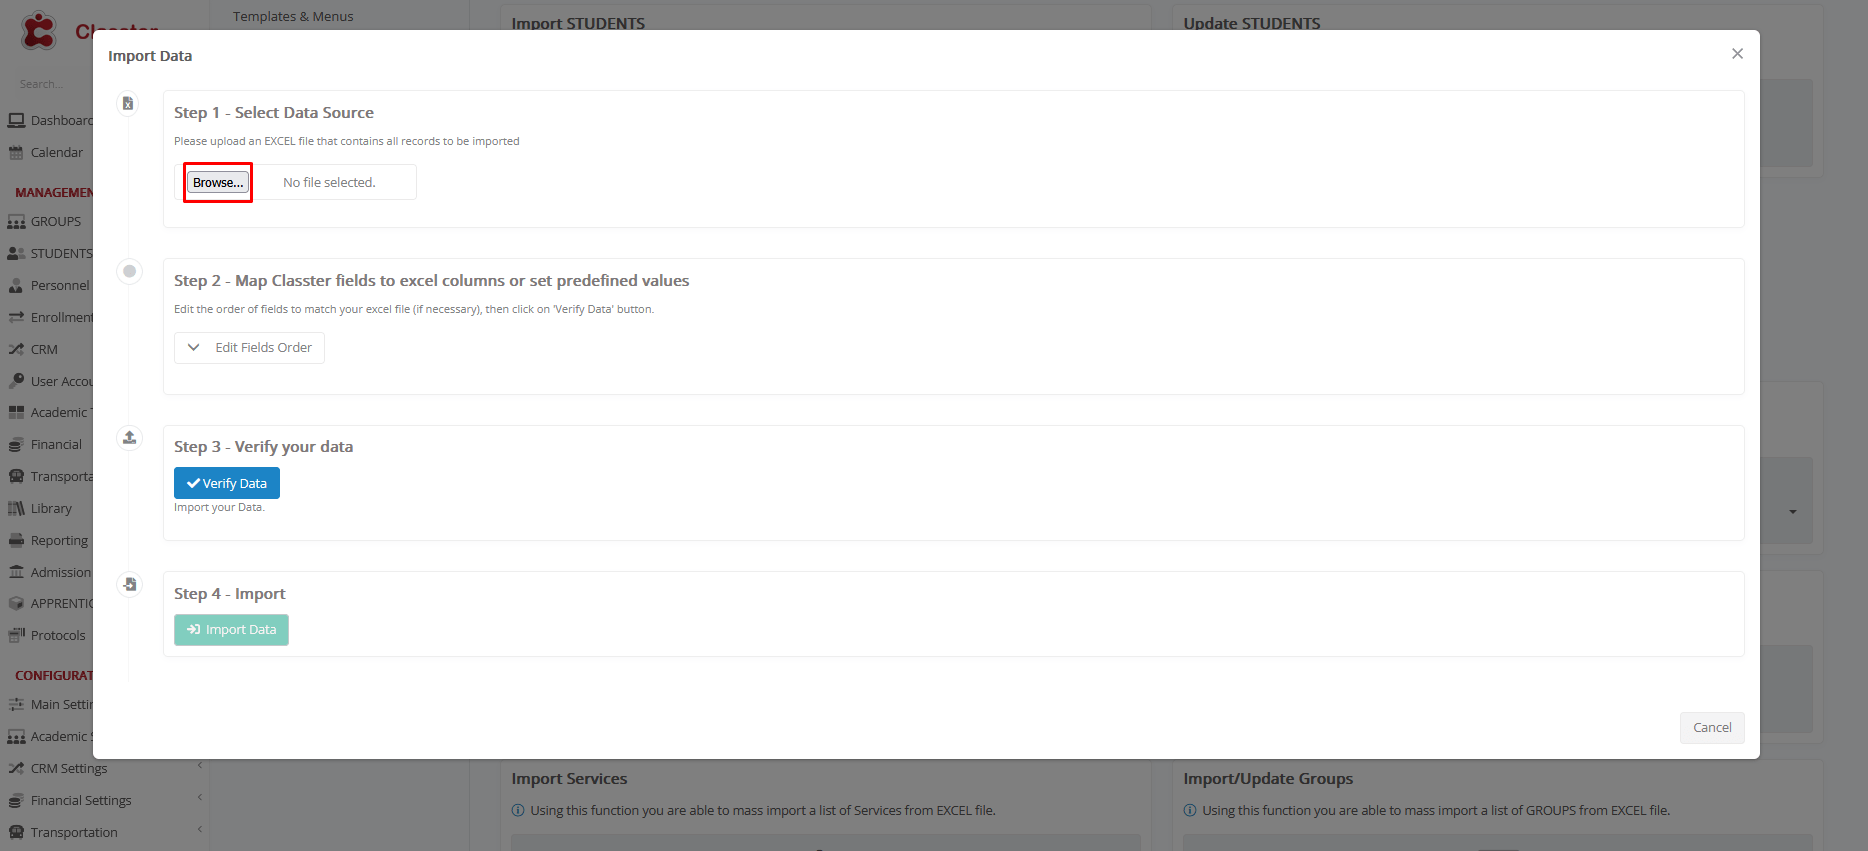
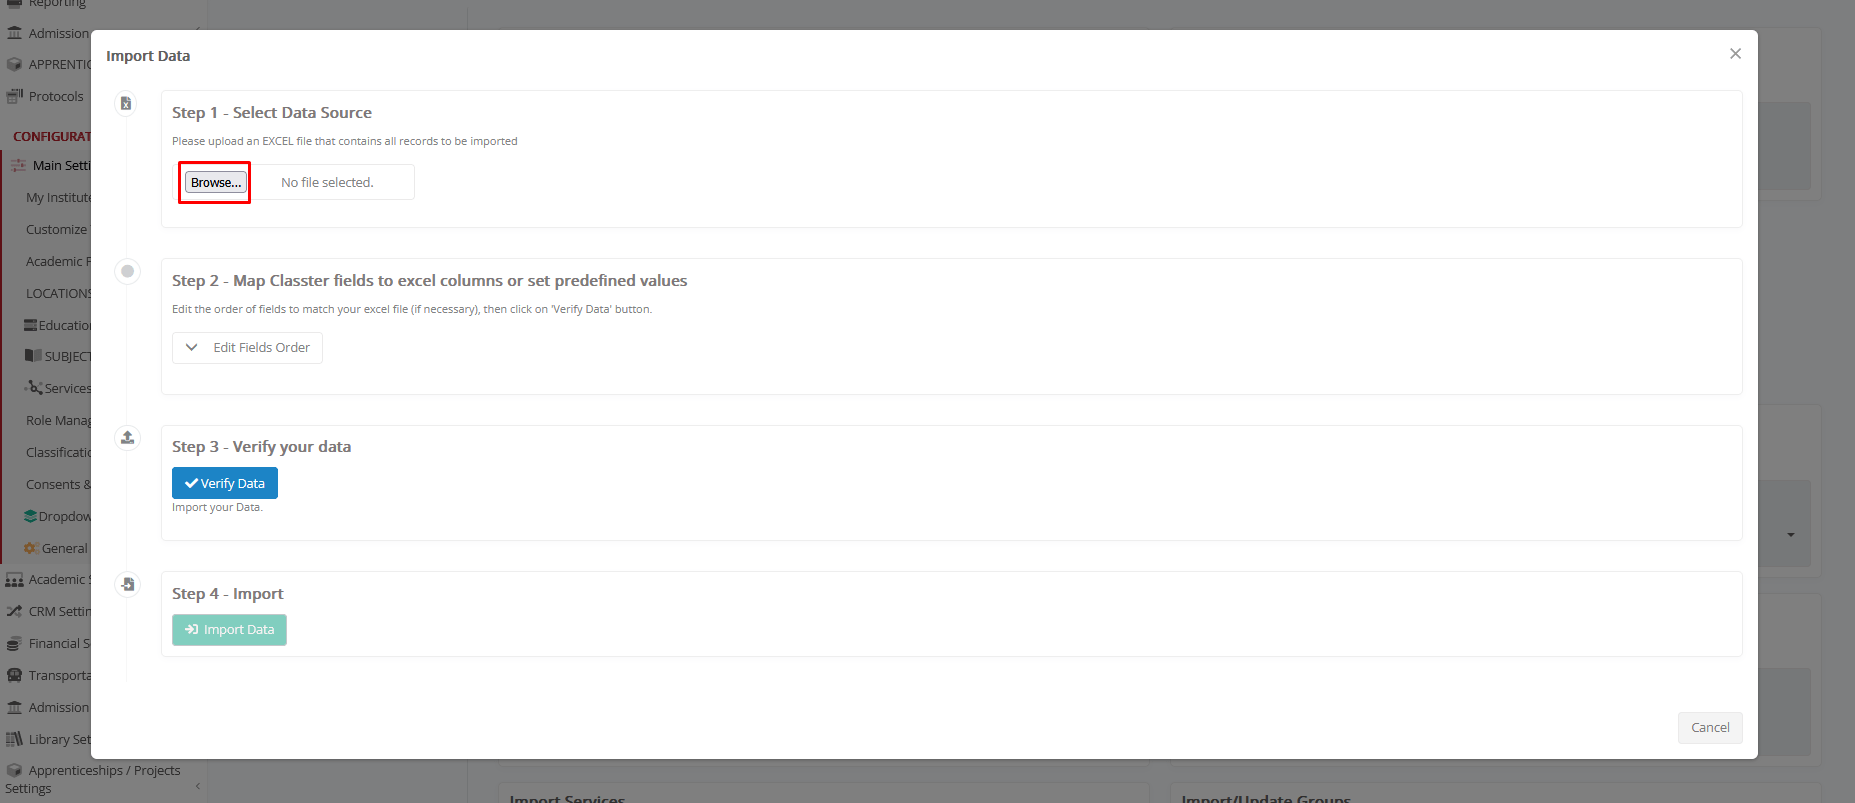
Select an Excel File to Import
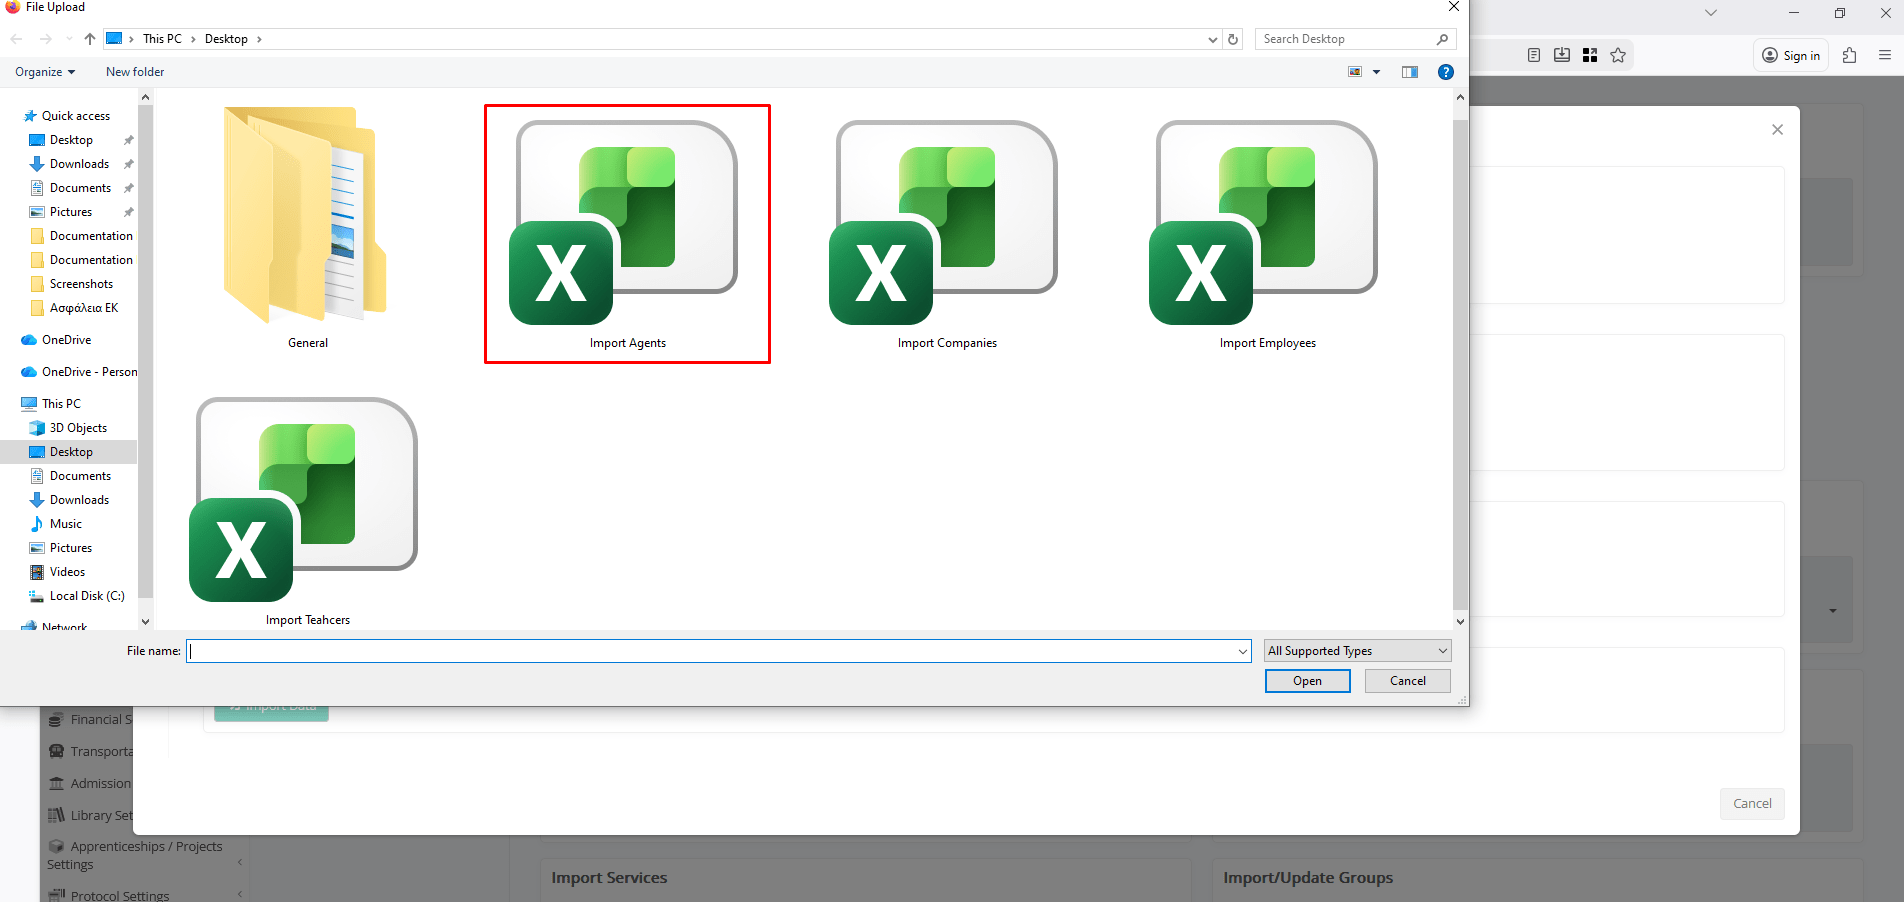
Click Choose File to upload an Excel file containing Employee records.
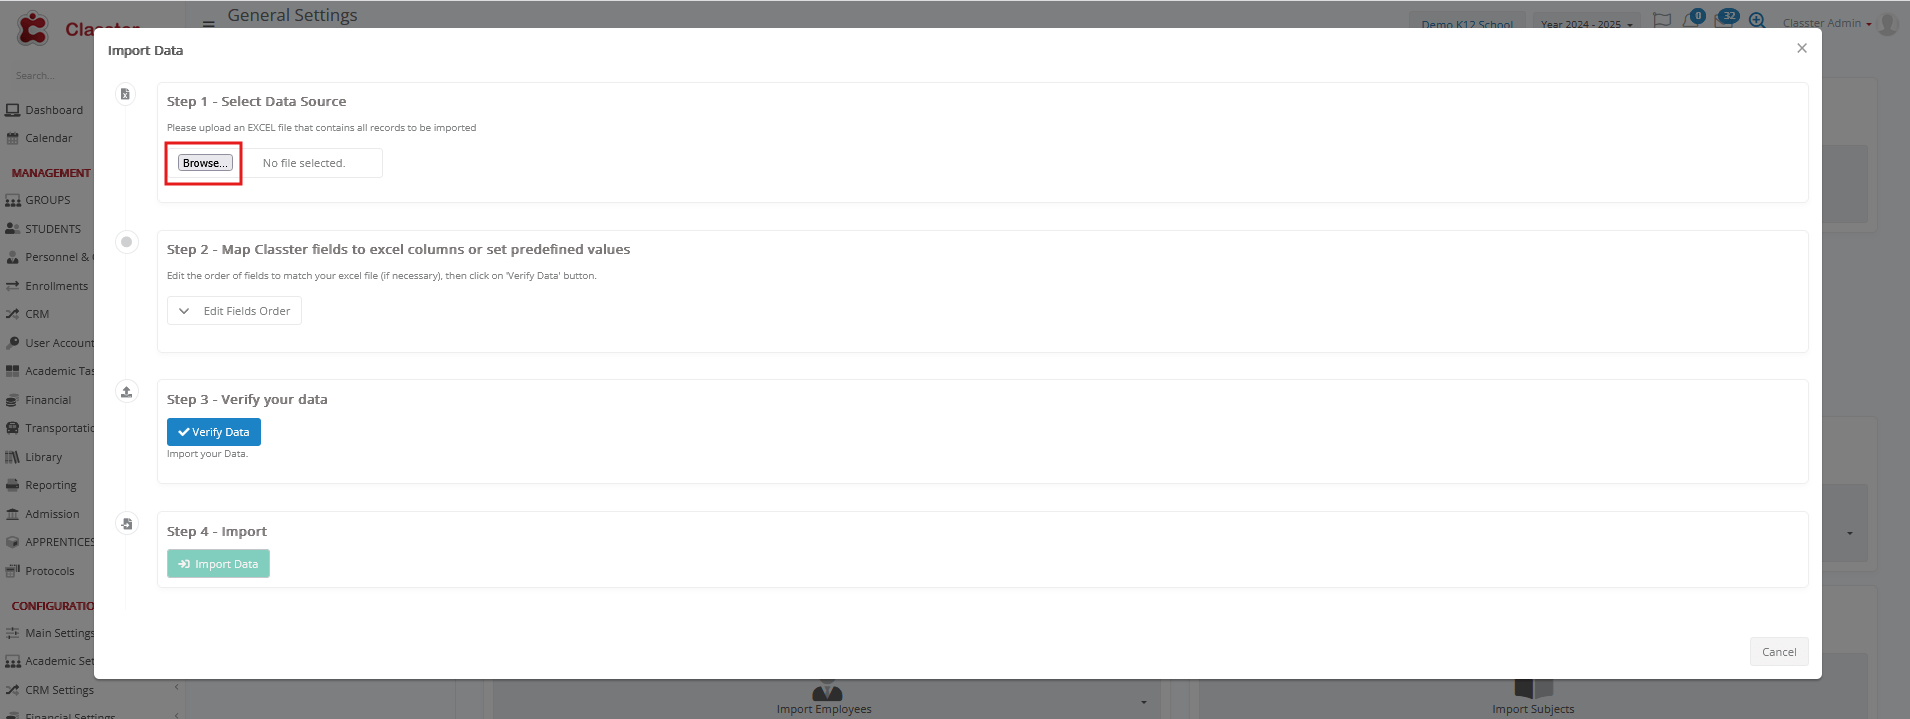
Select the related file from your system and click Open.
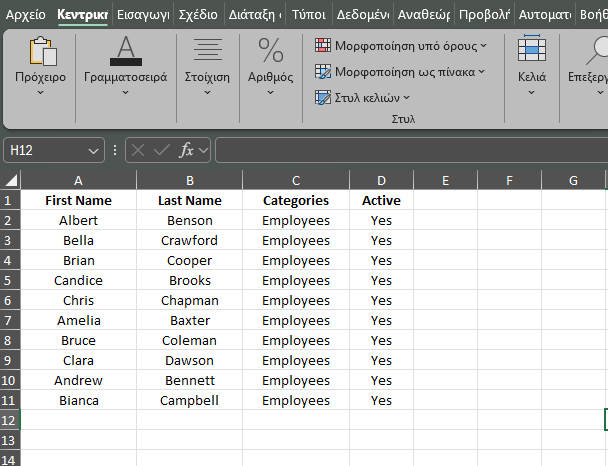
Here’s how the uploaded Excel file data looks like.
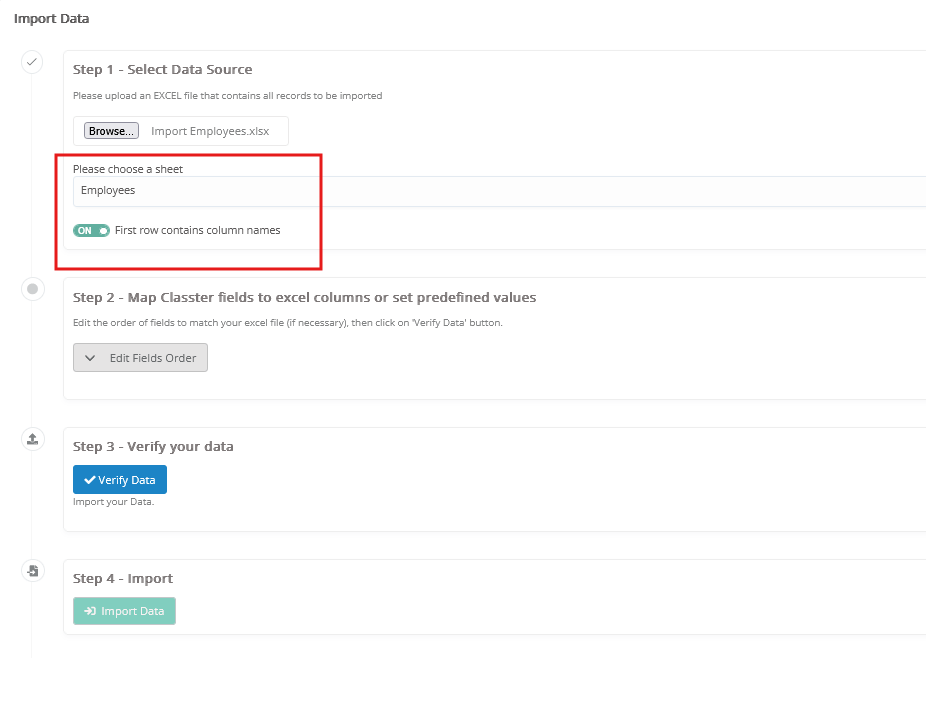
File Selection Options:
- Choose a Sheet: Select the correct sheet from the uploaded Excel file.
- First Row Contains Column Names: Ensure the first row is used for headers to simplify mapping.
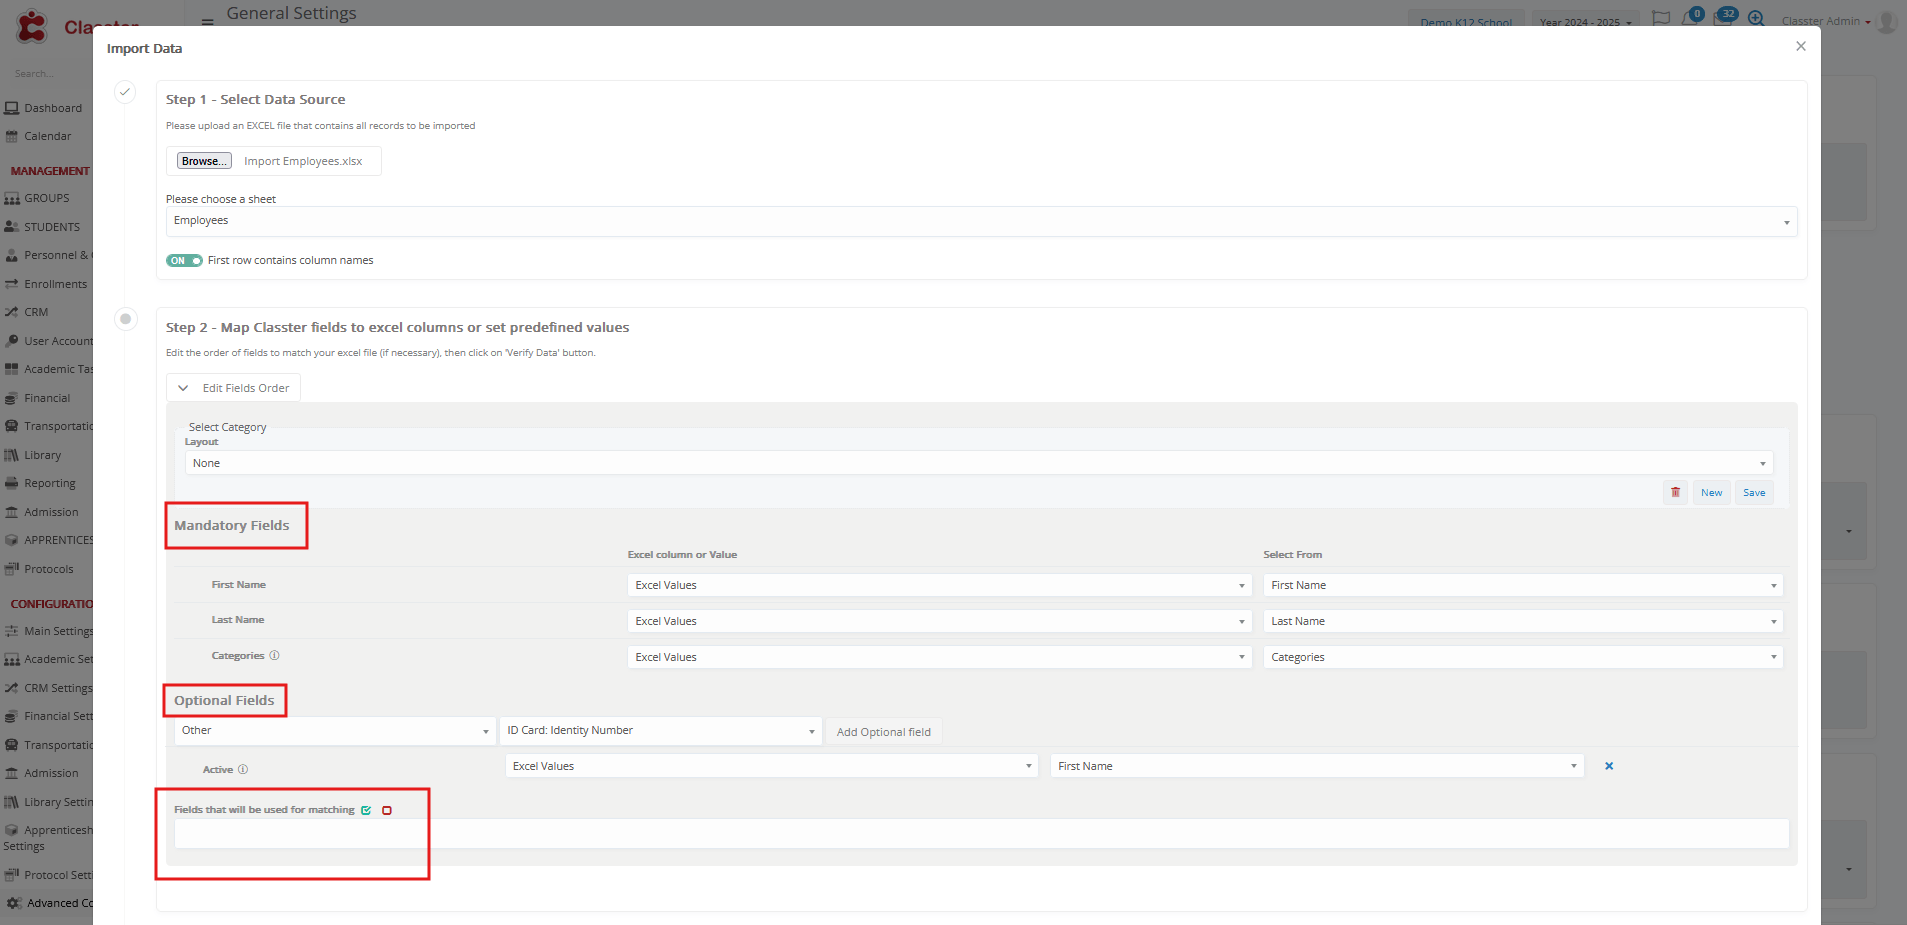
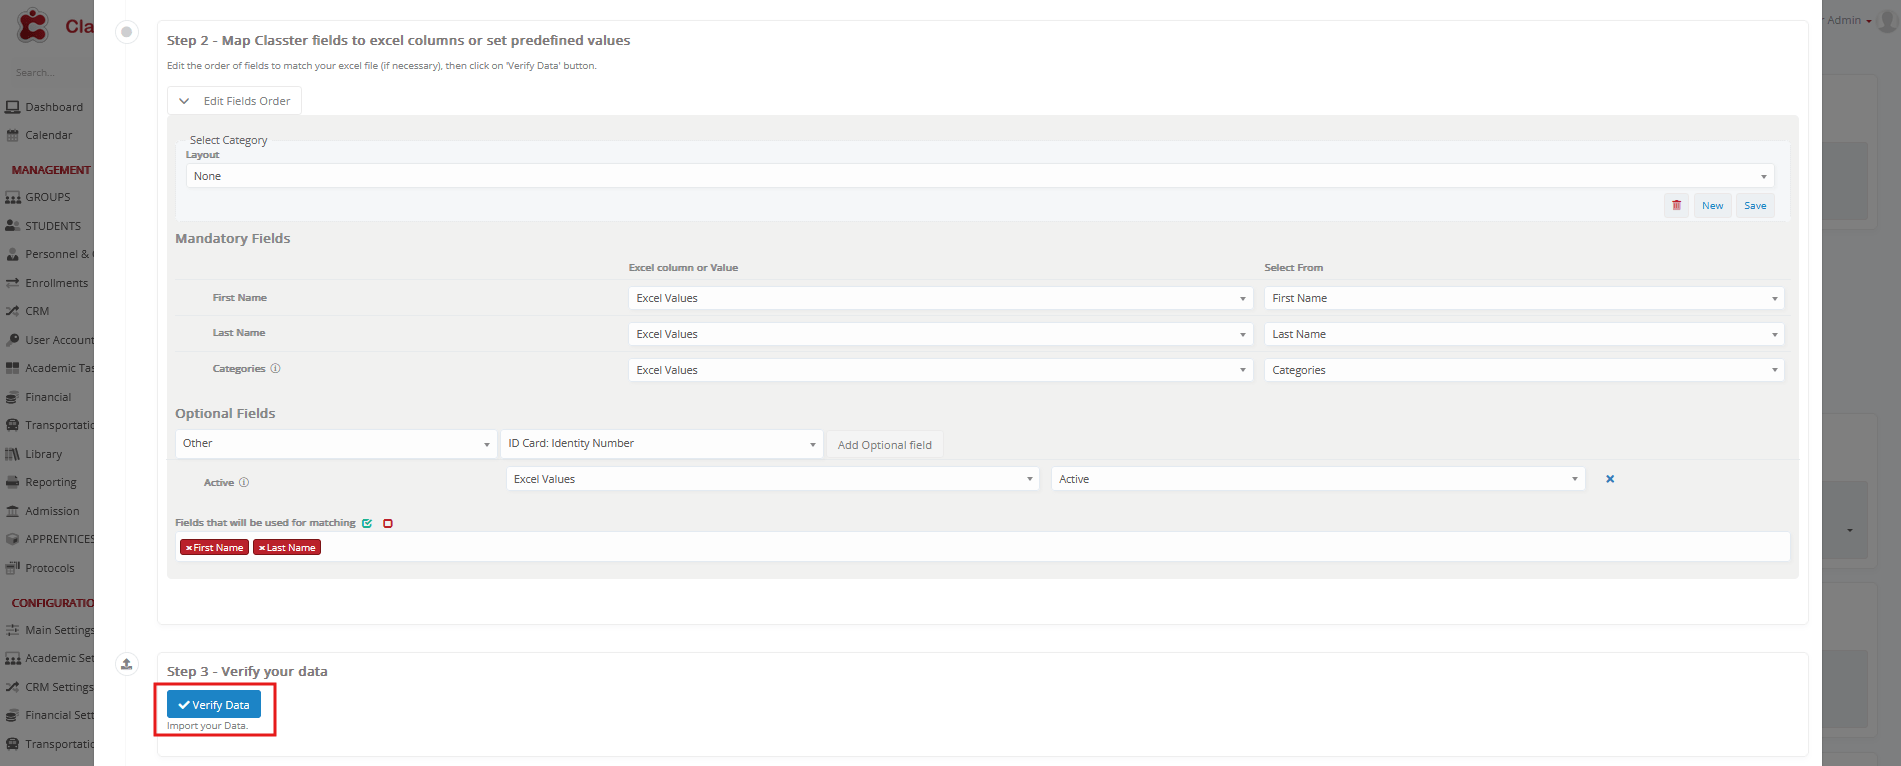
Map Classter Fields to Excel Columns or Set Predefined Values
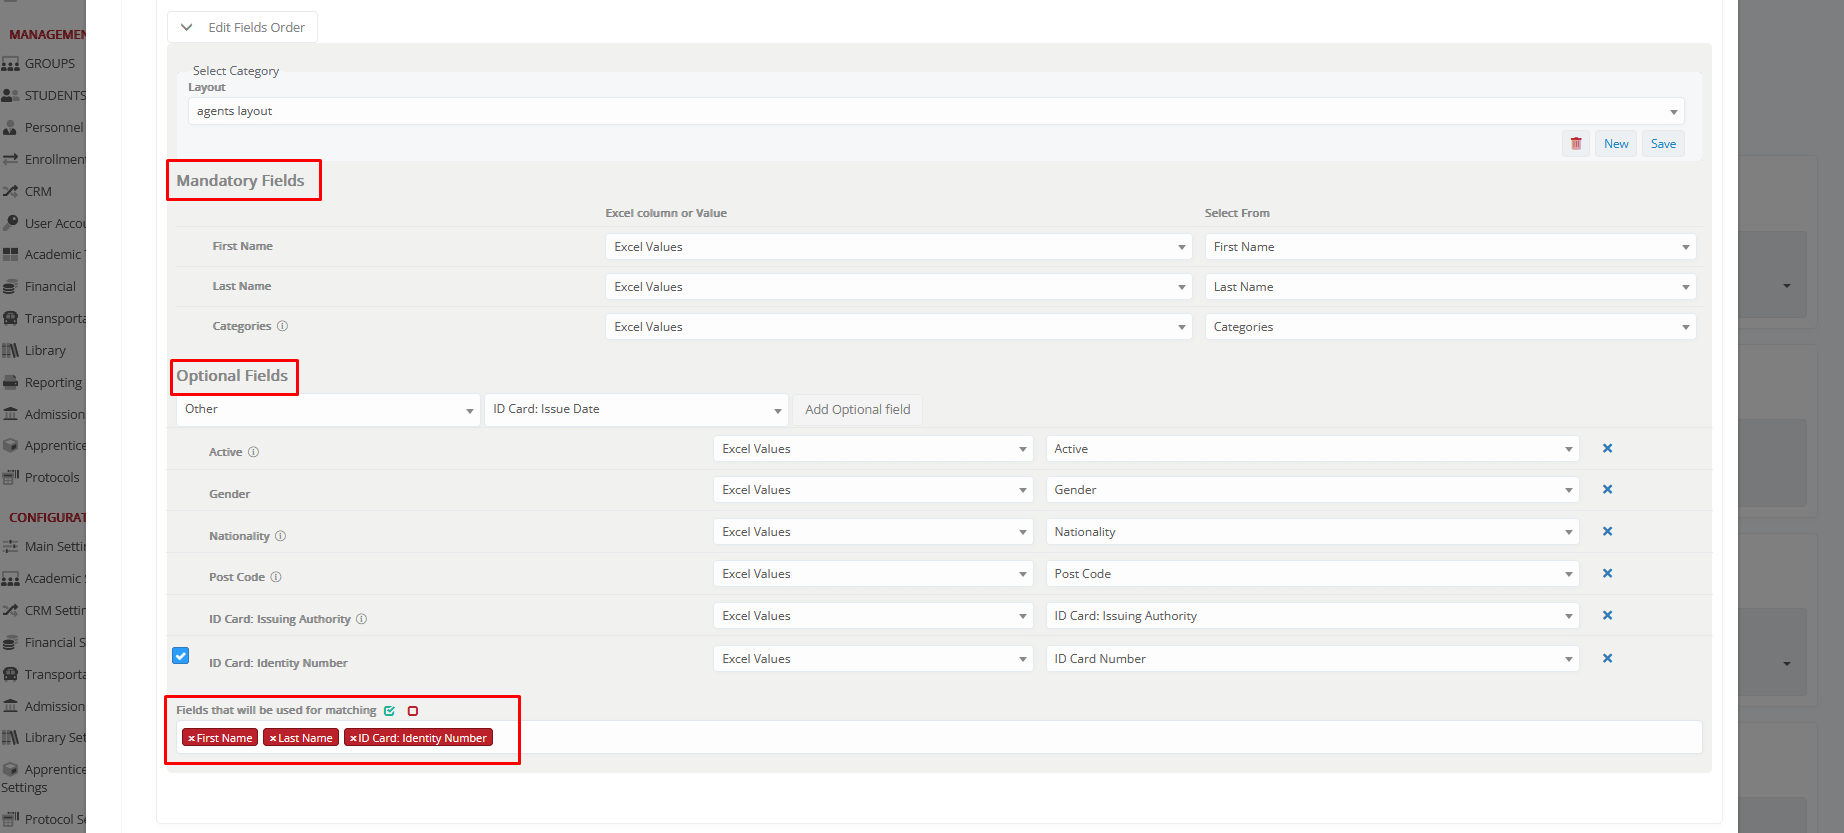
Before proceeding, click Edit Fields Order and configure the layout. You can either select an existing saved layout or create a new one for mapping fields.
Mandatory Fields:
These fields must be mapped correctly to proceed. Notably, Classter provides the option to use either Excel Values or User Values for mapping:
- First Name: The given name of the Employee.
- Last Name: The surname of the Employee.
- Categories: Must be set as “Employees” as User Value or in Excel file, categorizing the record correctly.
Optional Fields:
You can additionally map the following optional fields to enrich Employee records:
- Basic: Active, Maiden Name, Title, Middle Name, Gender, Father’s Name, Mother’s Name, Birthdate, Work, Work Phone, Nationality, Citizenship, Religion, Abbreviation, E-mail Account, Mentor, Date of Contact, Date of Work, Deactivation Date, Medical, Parking Number, Comments
- Contact: Address, City, Post Code, Area/State, 2nd Address Line, Country, E-mail, Mobile Phone, Home Phone, In Case of Emergency: Contact Name, Contact Phone, Contact Mobile, Contact Relationship
- Other: ID Card (Identity Number, Issue Date, ID Expiration Date, Birthplace, Status, Municipality, Issuing Authority), Passport (Passport Number, Issuing Date, Expiration Date, Birthplace, Issuing Authority), Tax Data (Tax ID, Tax Office, Social Security Number, Insurance Number)
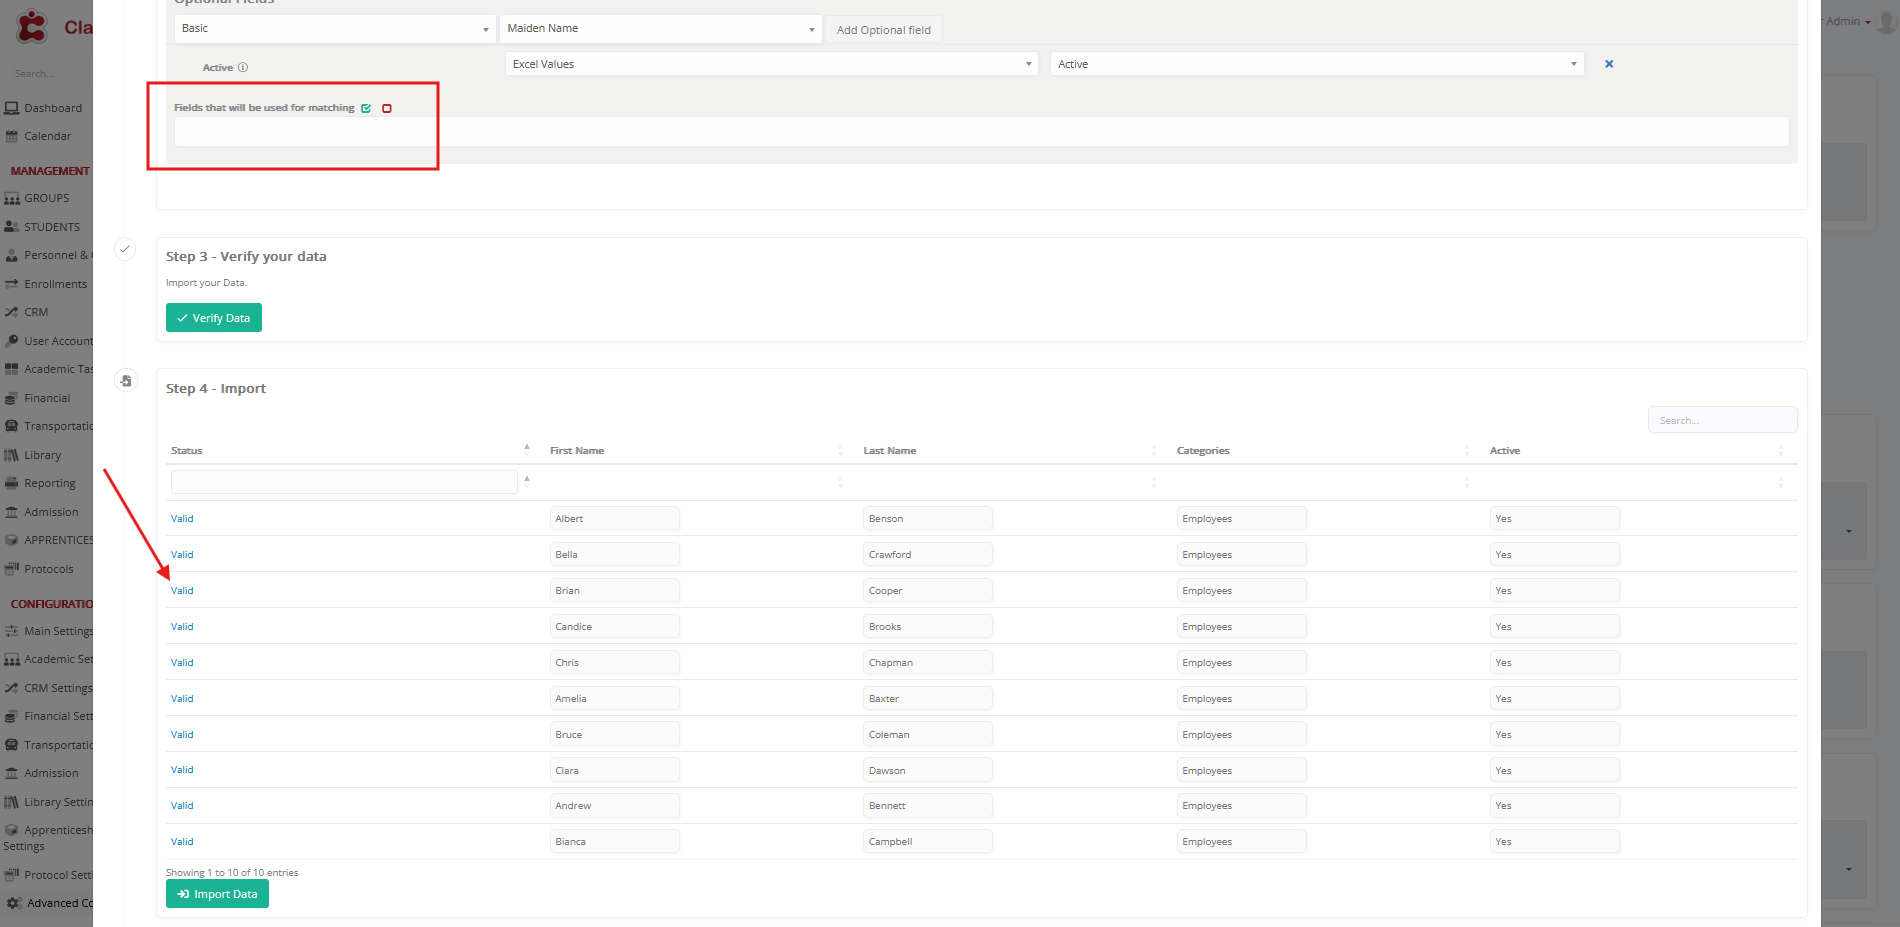
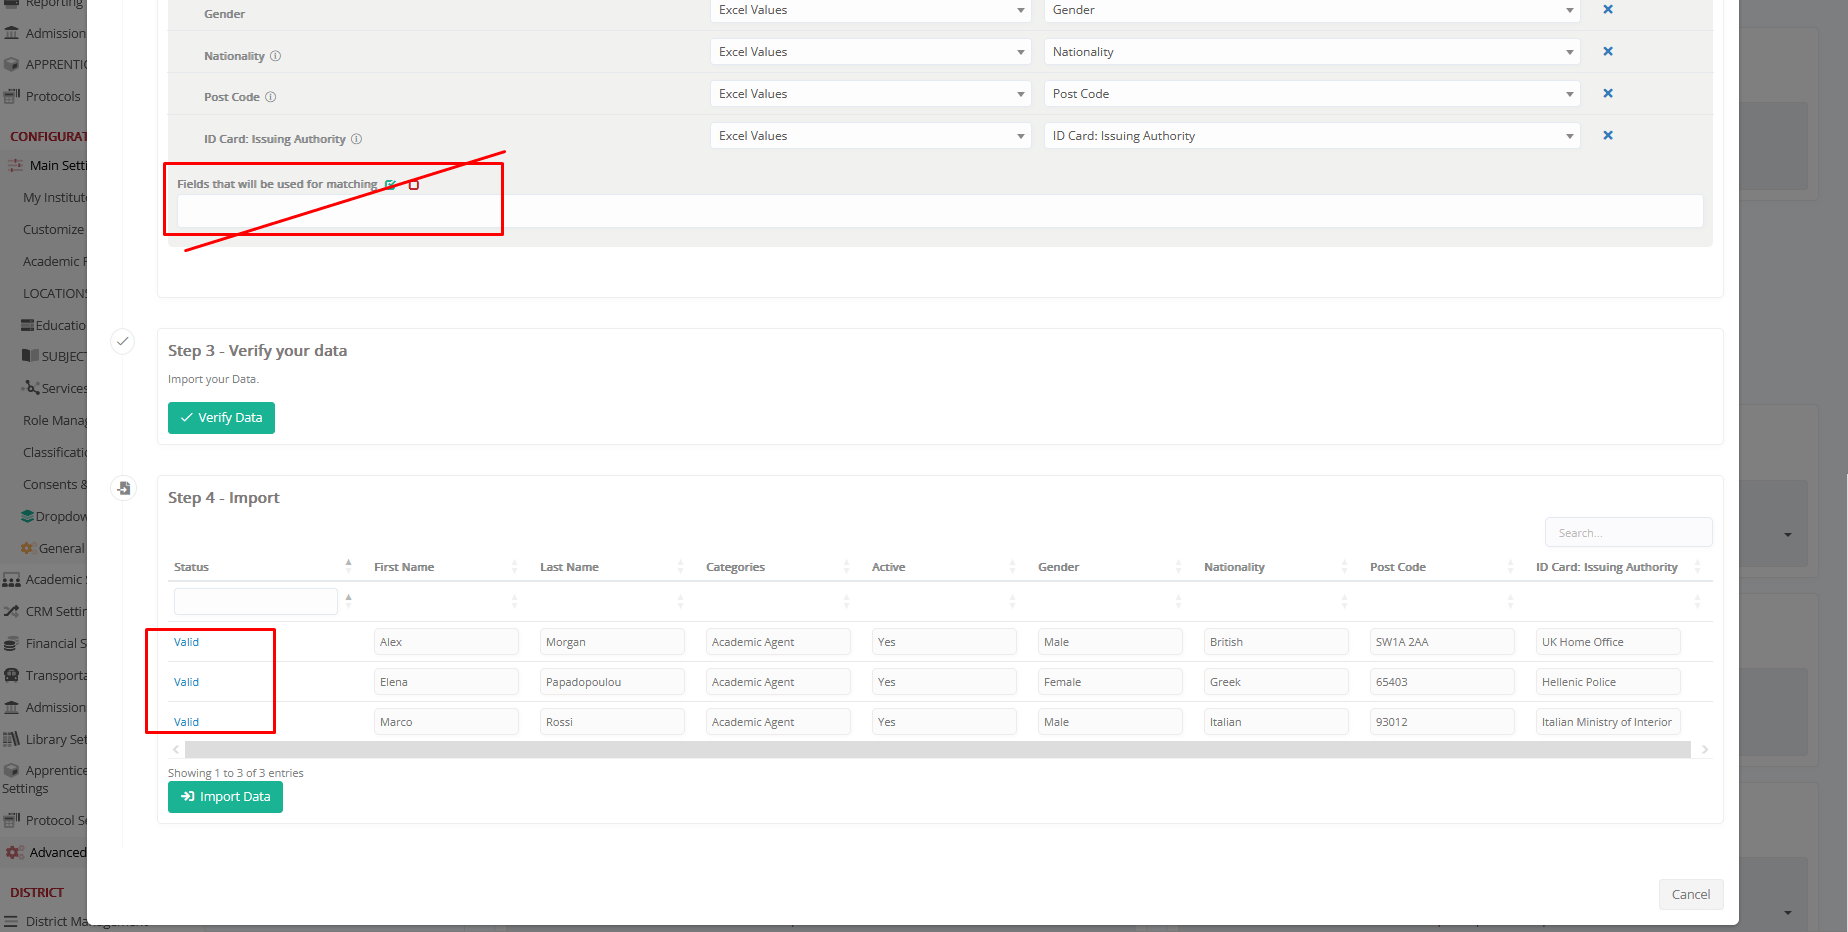
Fields Used for Matching:
This option is recommended to help prevent duplicate Employee records during the import process.
When matching fields are selected, the system uses these fields to check whether an Employee already exists. If a match is found, this row will not be imported.
Note:
Updating existing Employee fields is not supported within this import function. The matching mechanism prevents duplicates but does not overwrite or modify existing records.
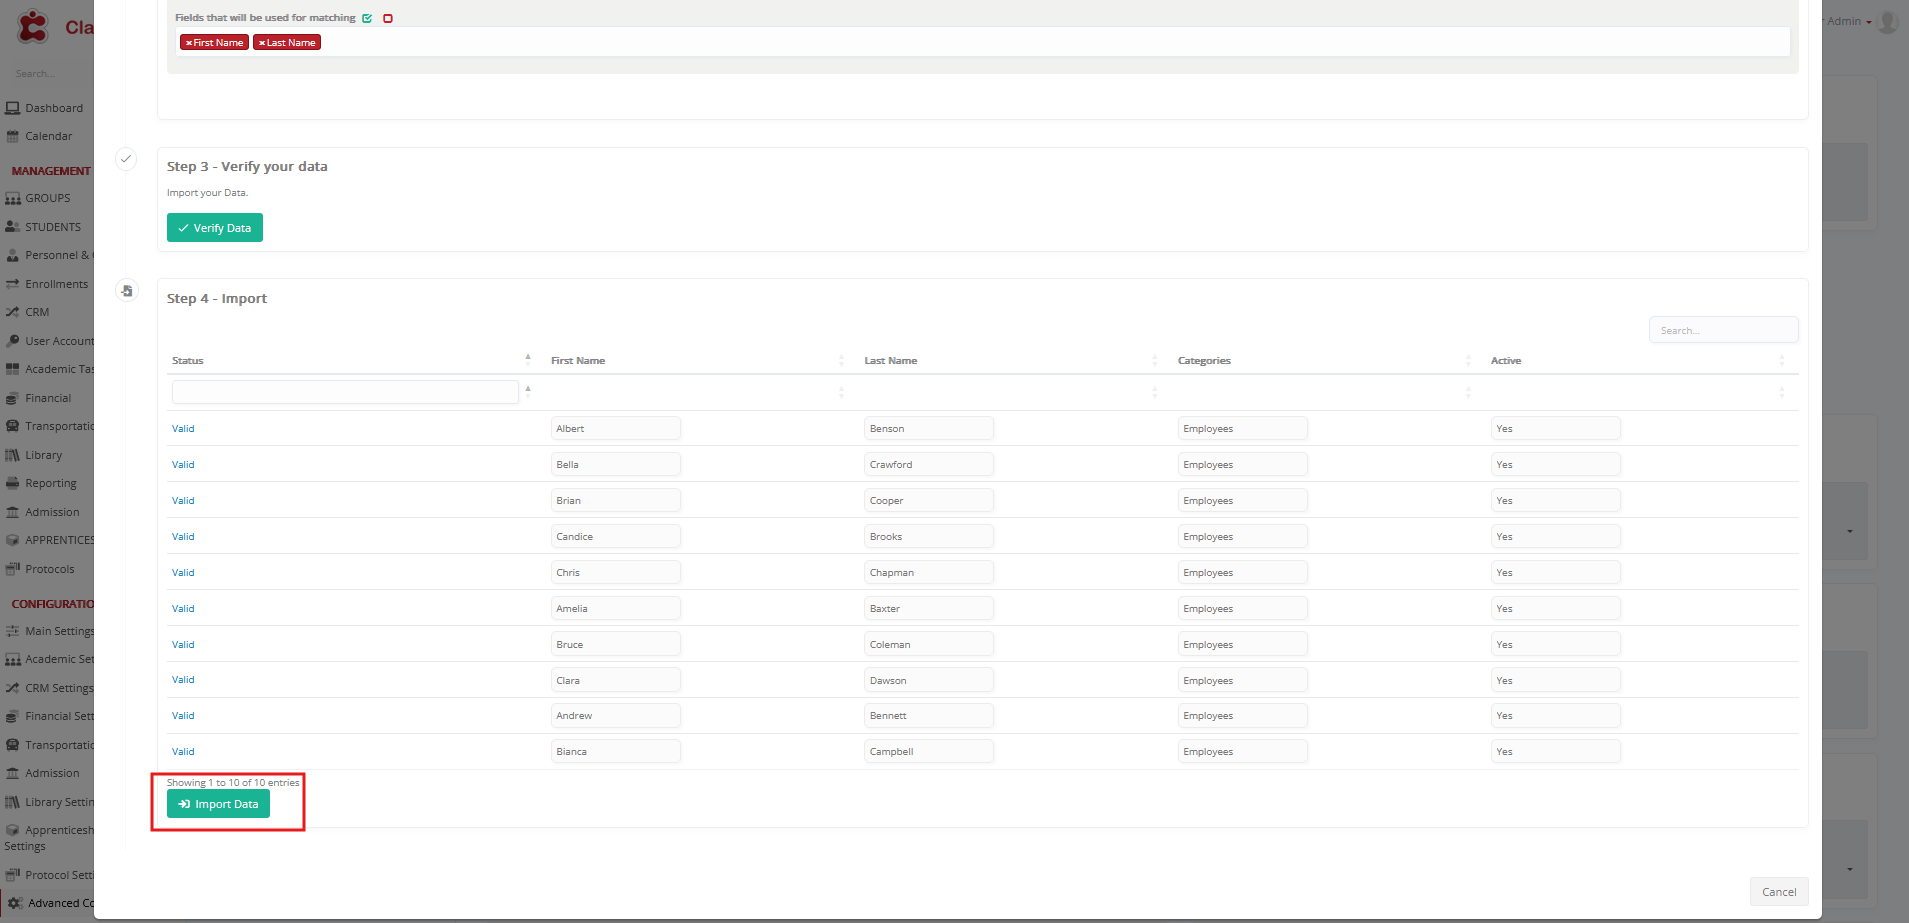
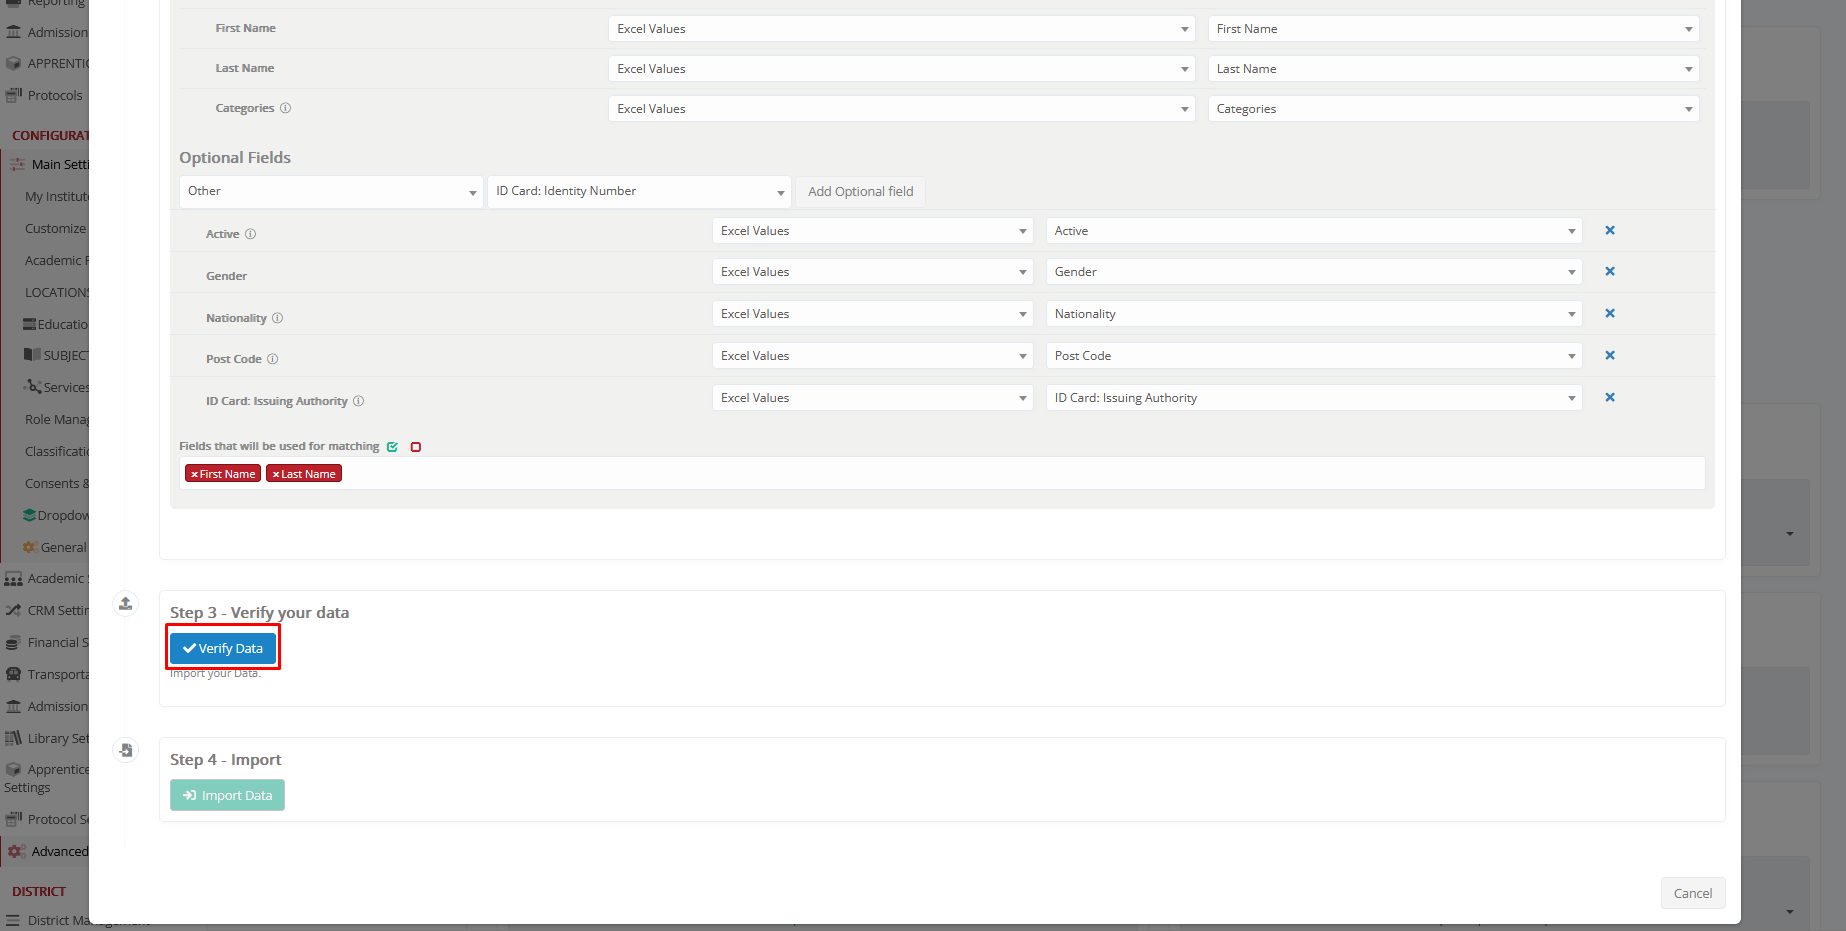
Verify Data
After completing the field mapping, click Verify Data.
Import Data
Once mapping is complete:
- Classter validates the data.
- If the data is correctly aligned, a preview of the records appears.
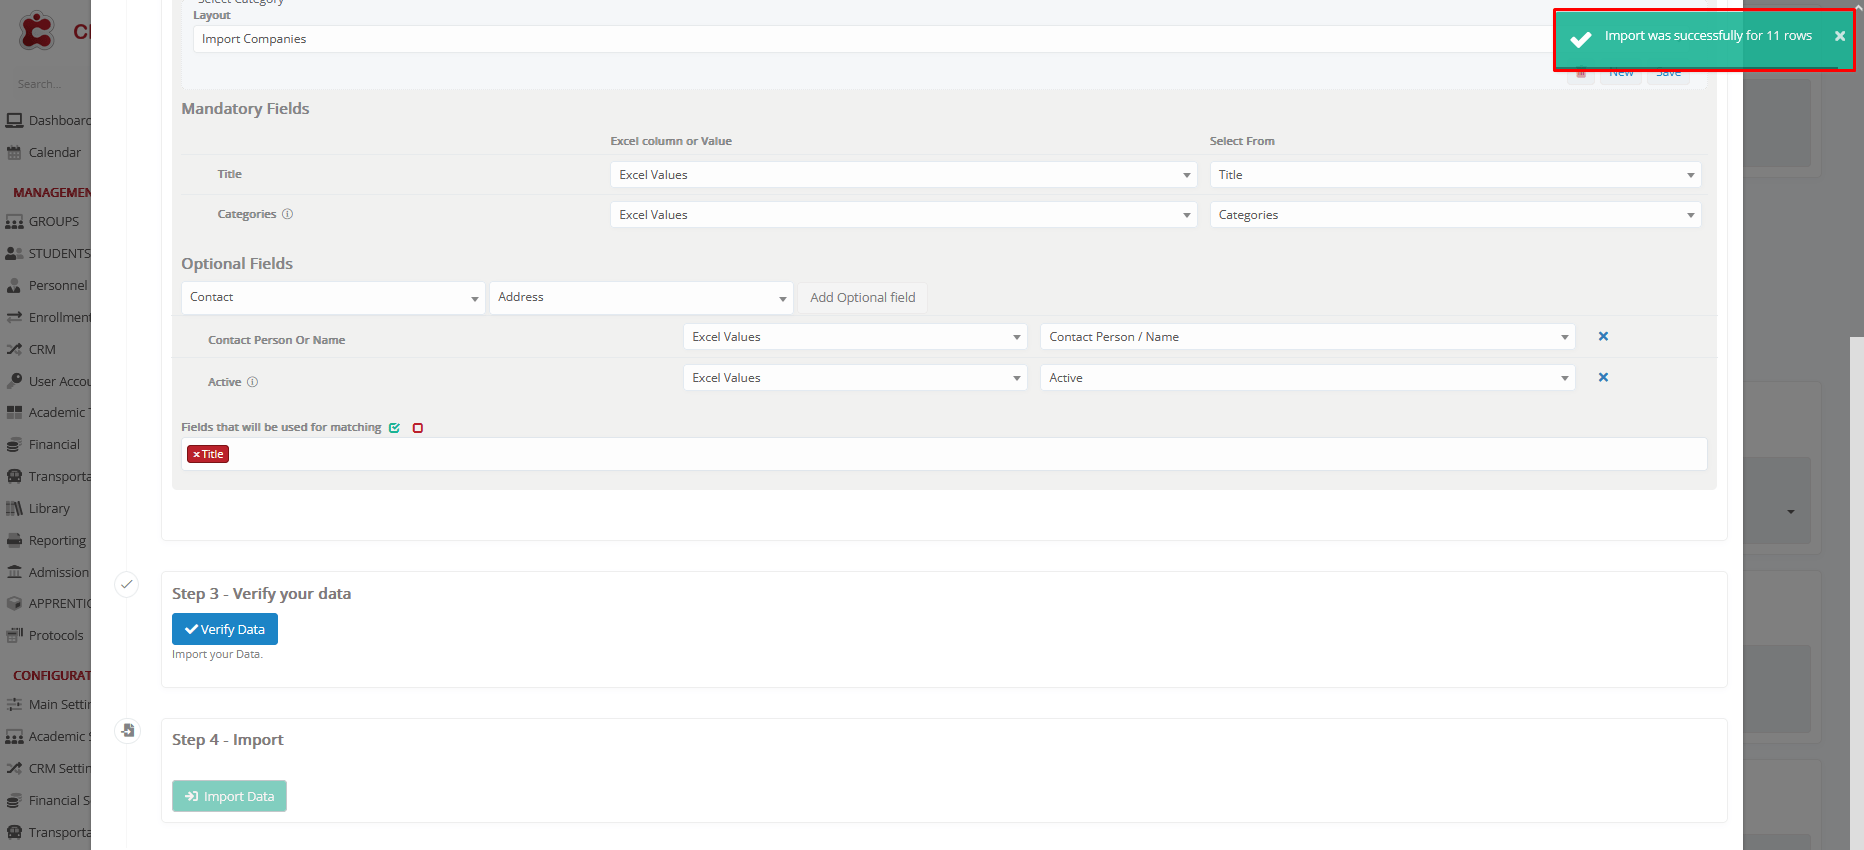
- Click the Import Data button to complete the process.
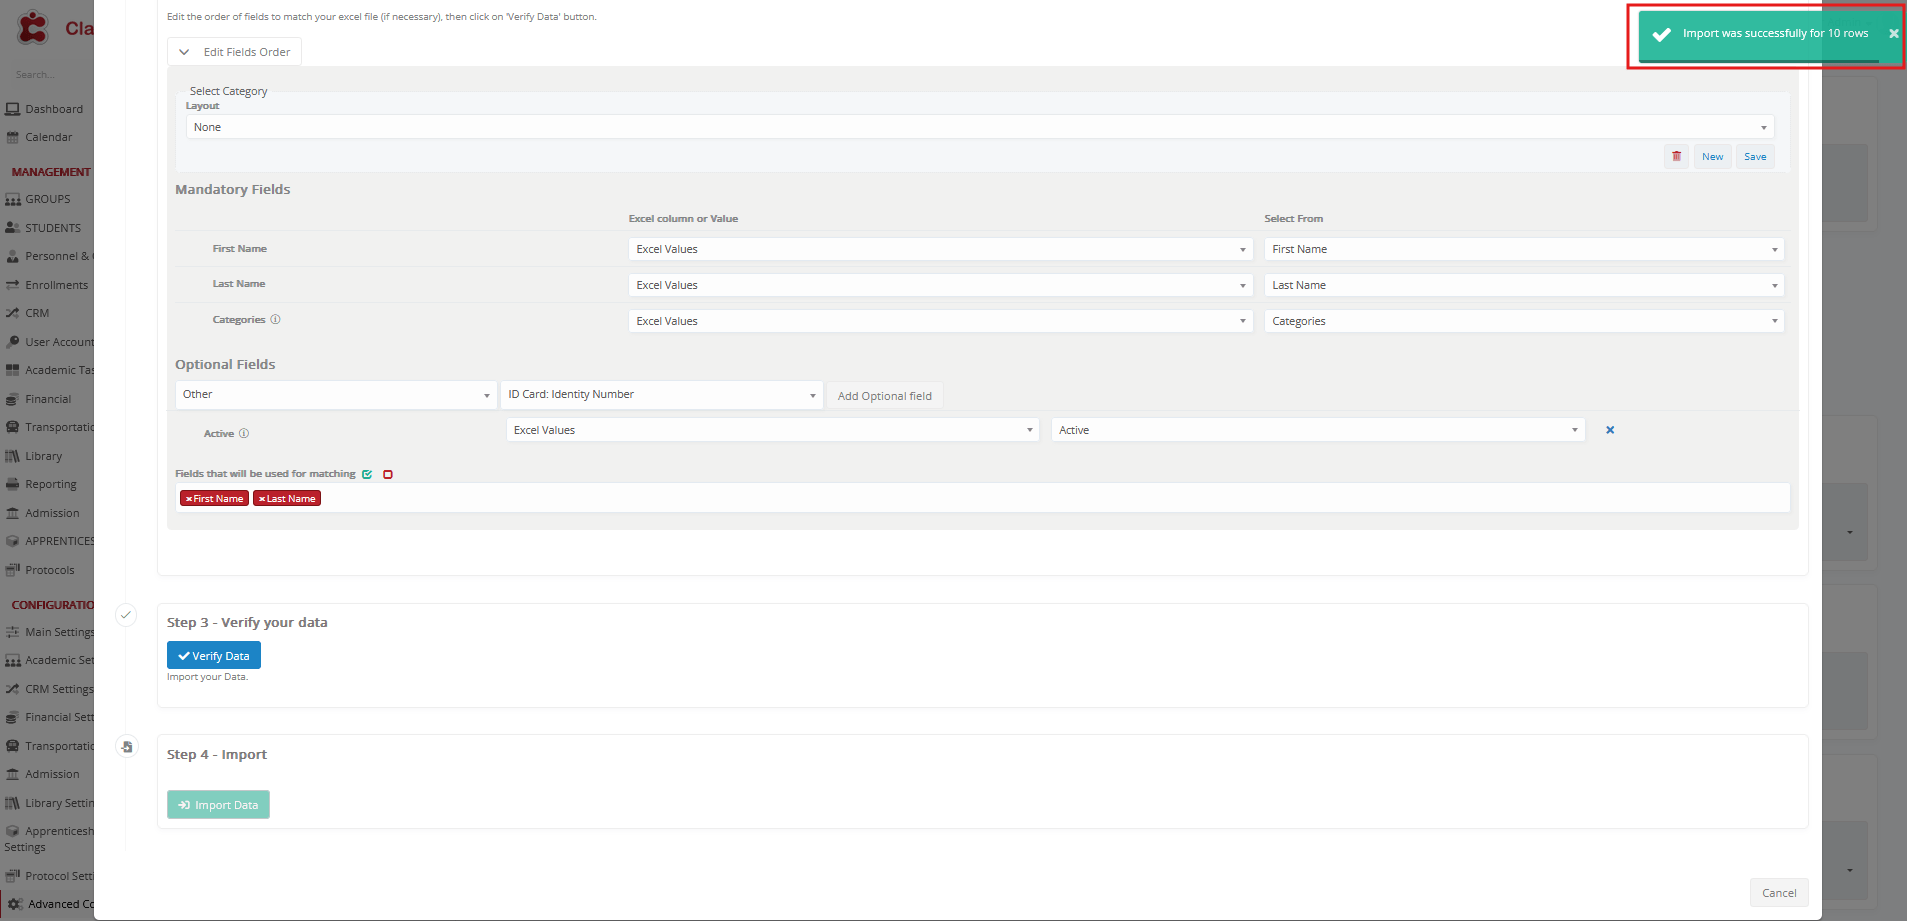
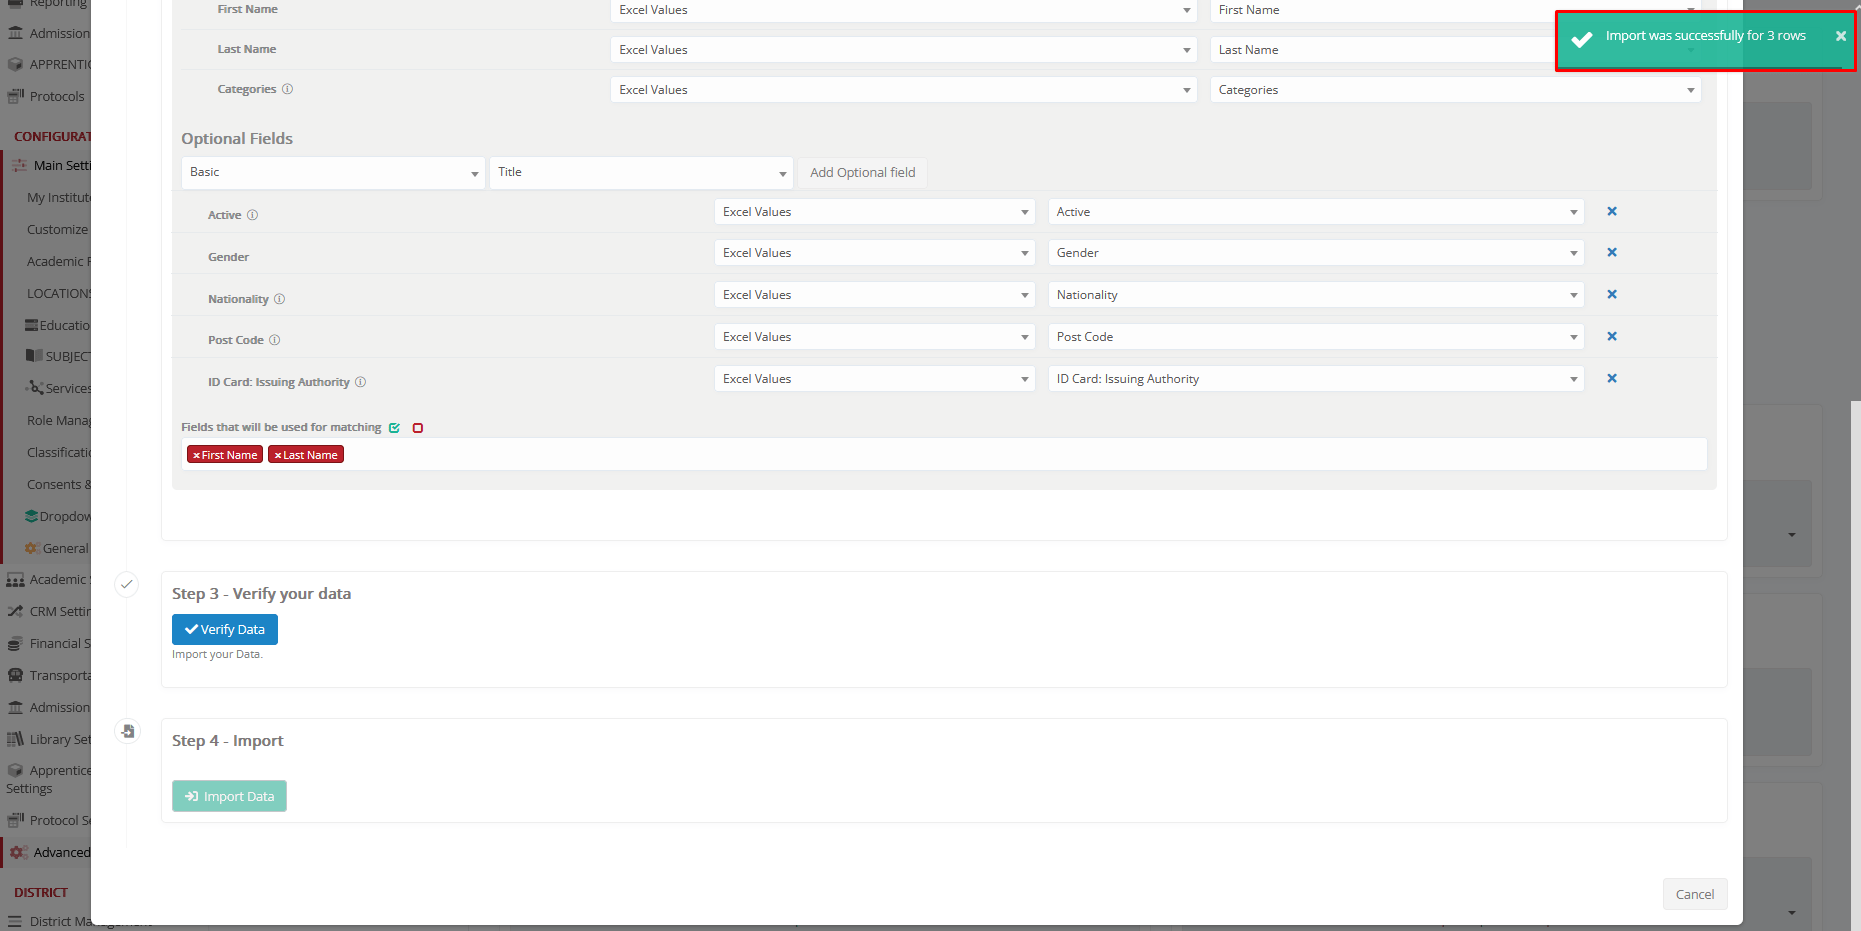
A confirmation message appears once the import is successful.
Output
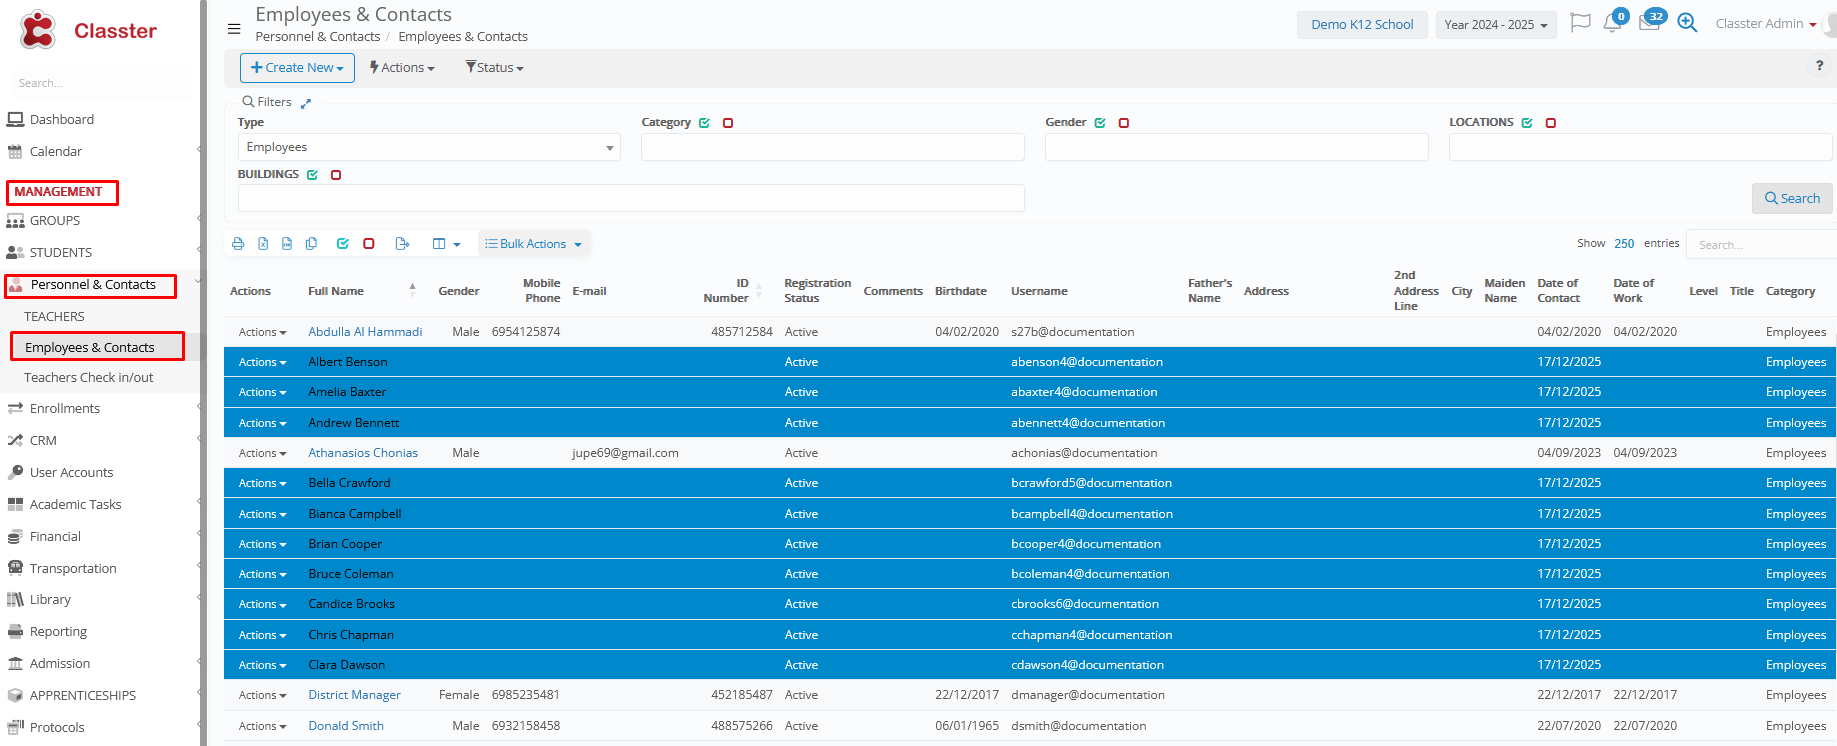
To view Imported Employees list, navigate to: MANAGEMENT > Personnel & Contacts > Employees & Contacts > Type: Employees > click Search.
Handling Errors
No matching fields used
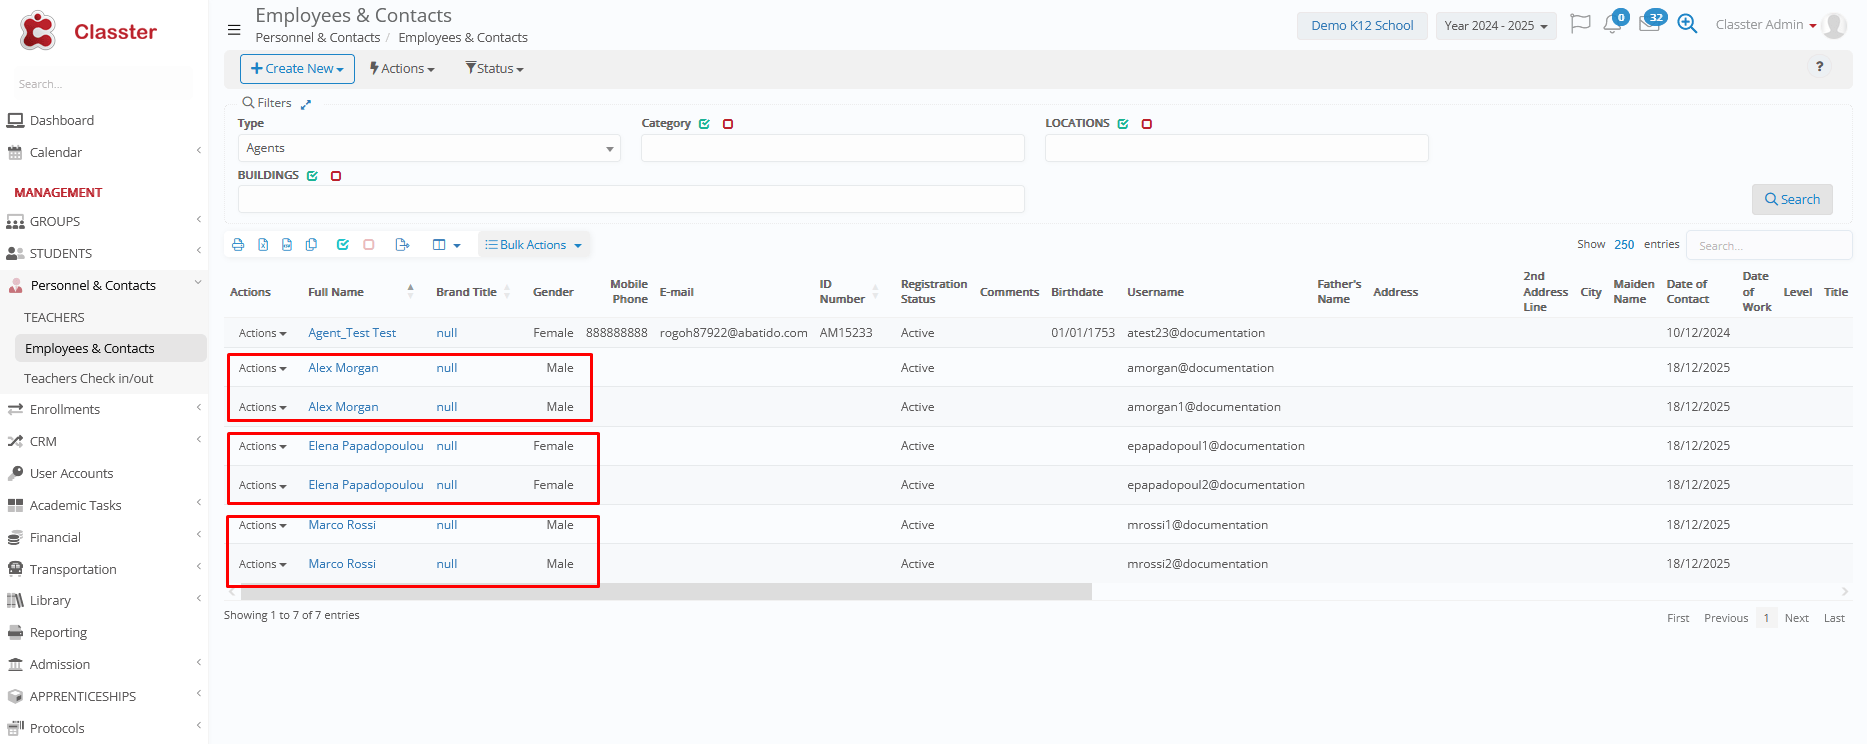
In this example, we attempt to import the same Employee list for a second time. Since no matching fields are selected, the system cannot identify existing records.
As a result, the import passes validation without warning, and duplicate entries are created.

To avoid this issue, it is strongly recommended to use Fields Used for Matching during every import.
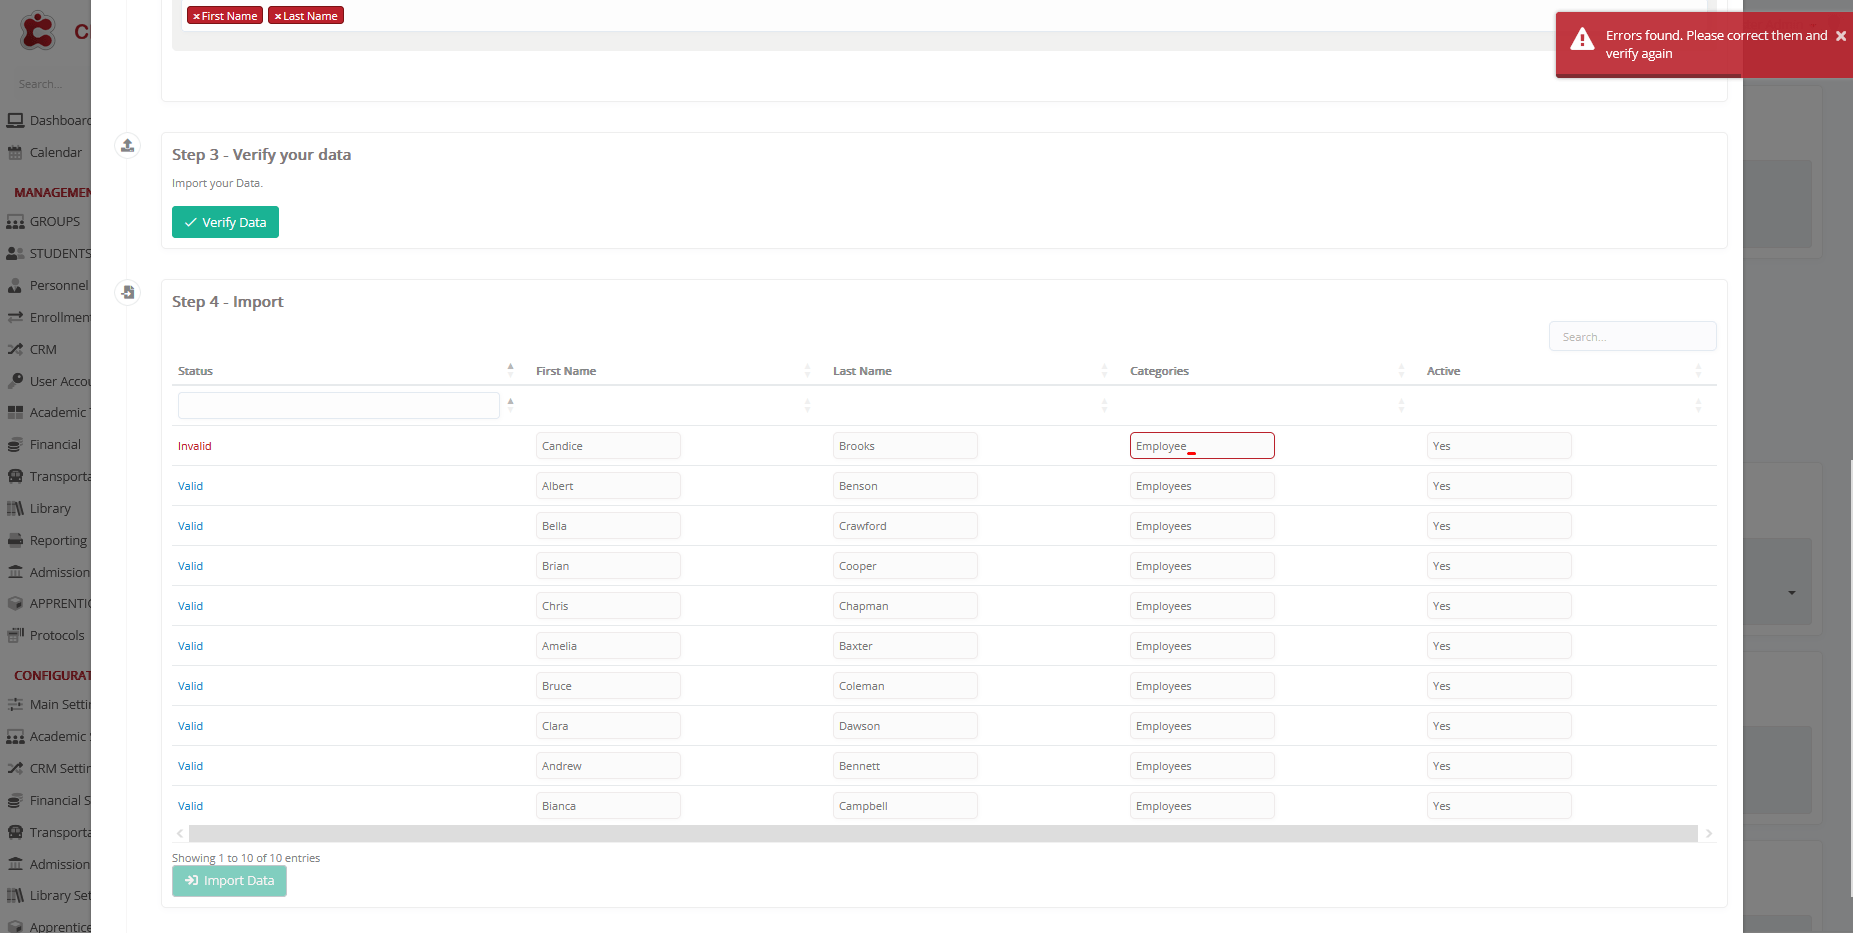
Spelling Mistake
In this example, the Categories field is misspelled by using “Employee” instead of the correct value “Employees”.
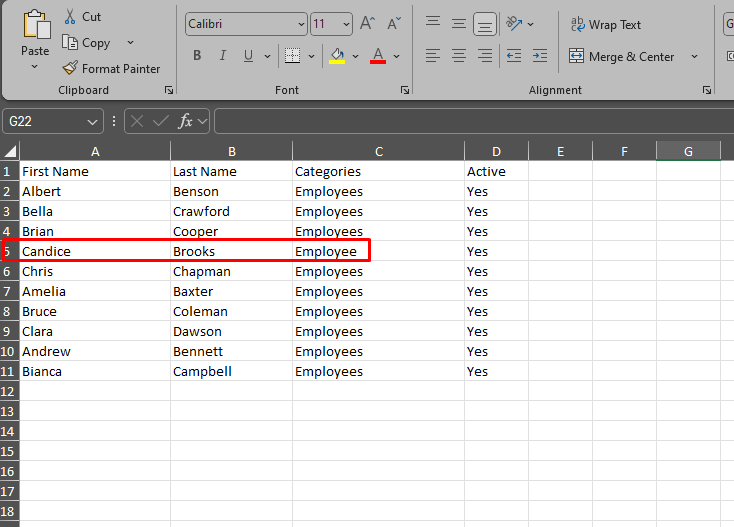
Because the value does not match the predefined system category, the import fails validation and cannot proceed.
To avoid this, ensure that all predefined values are spelled exactly as required before importing.
Import Companies
In this context, Companies refer to external organizations that the institution collaborates with. These may include _internship_ providers, companies involved in bulk _Student_ enrollments and payments, sponsors, and other external partners associated with the institution.
Follow the steps below to import Company records into Classter.
Navigate to Import Companies
Log in to your Institute and navigate to: CONFIGURATION > Advanced Configurations > Mass Imports / Actions > Import Employees menu > Import Companies.
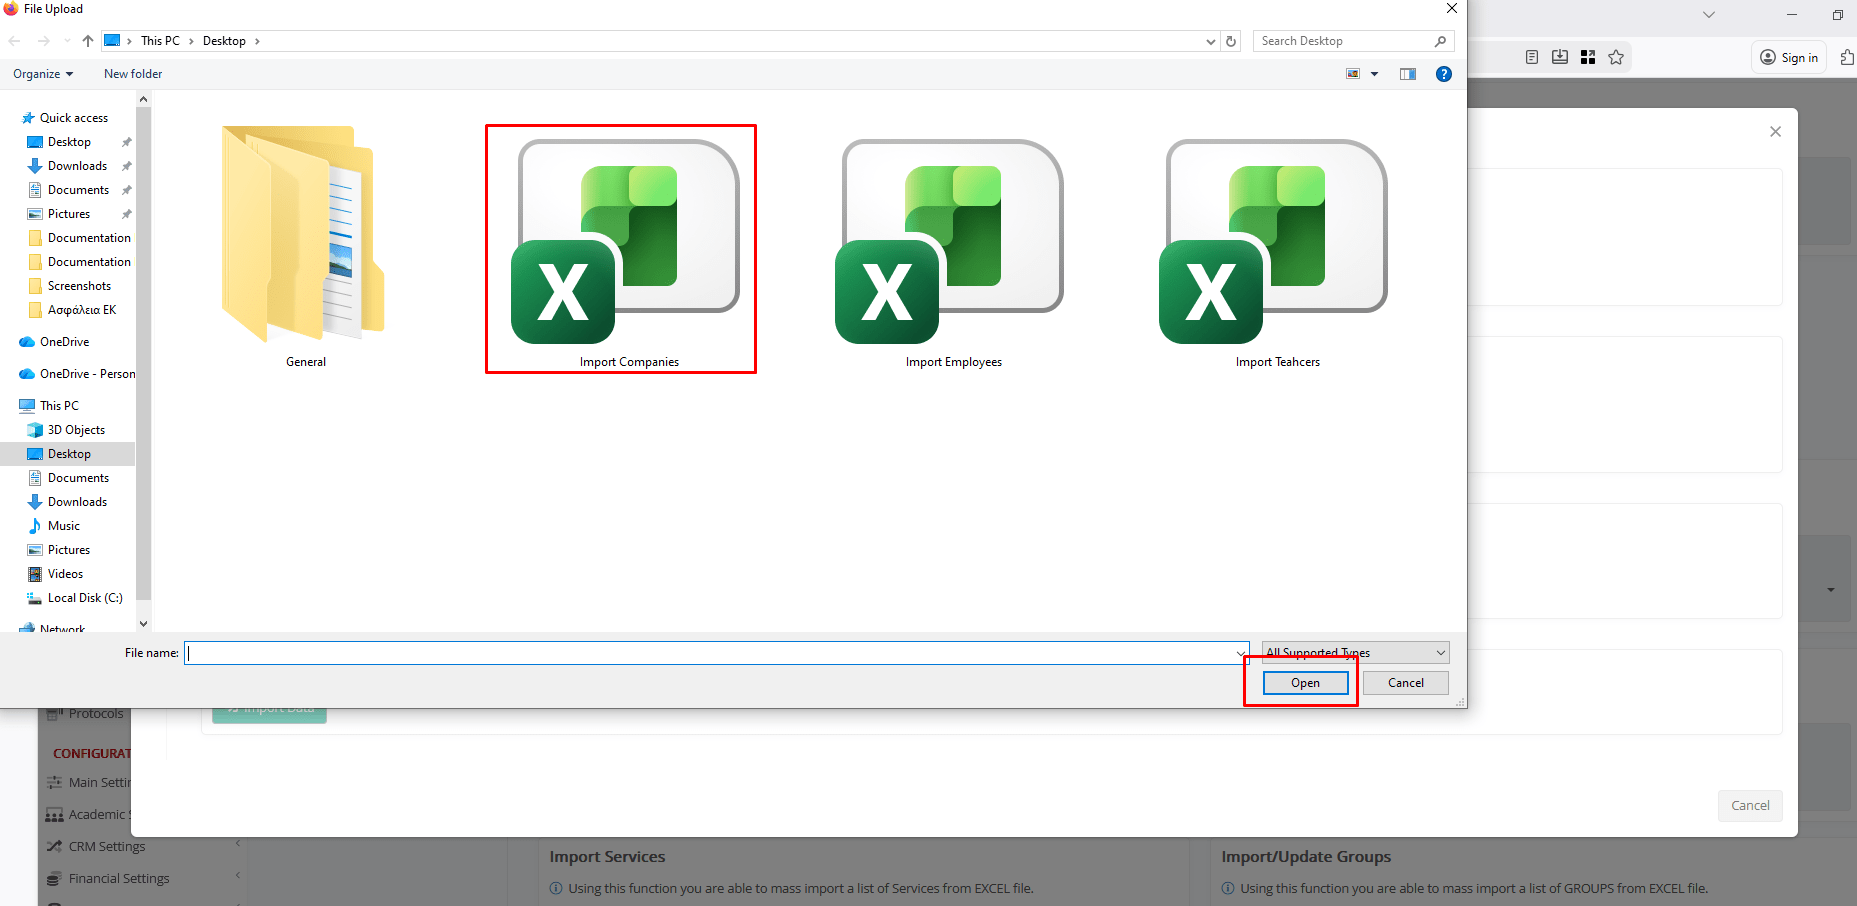
Select an Excel File to Import
Click Choose File to upload an Excel file containing all the required Company records.
Select the desired file and click Open.
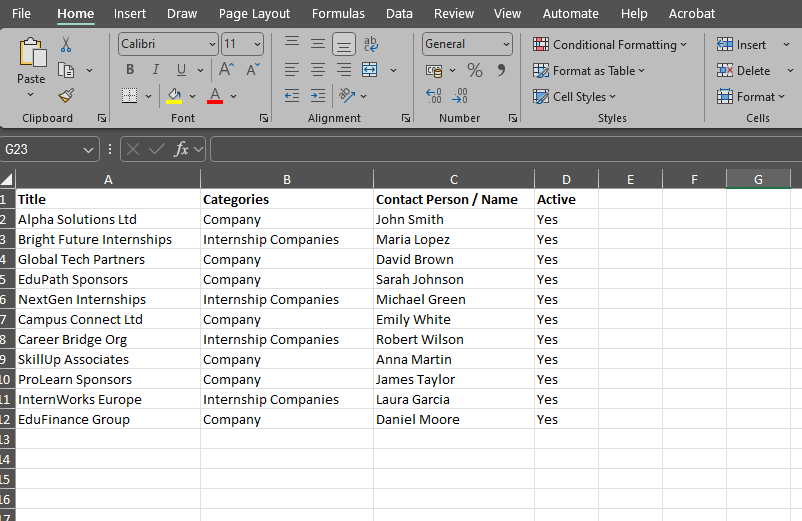
Here’s how the uploaded Companies List looks like.
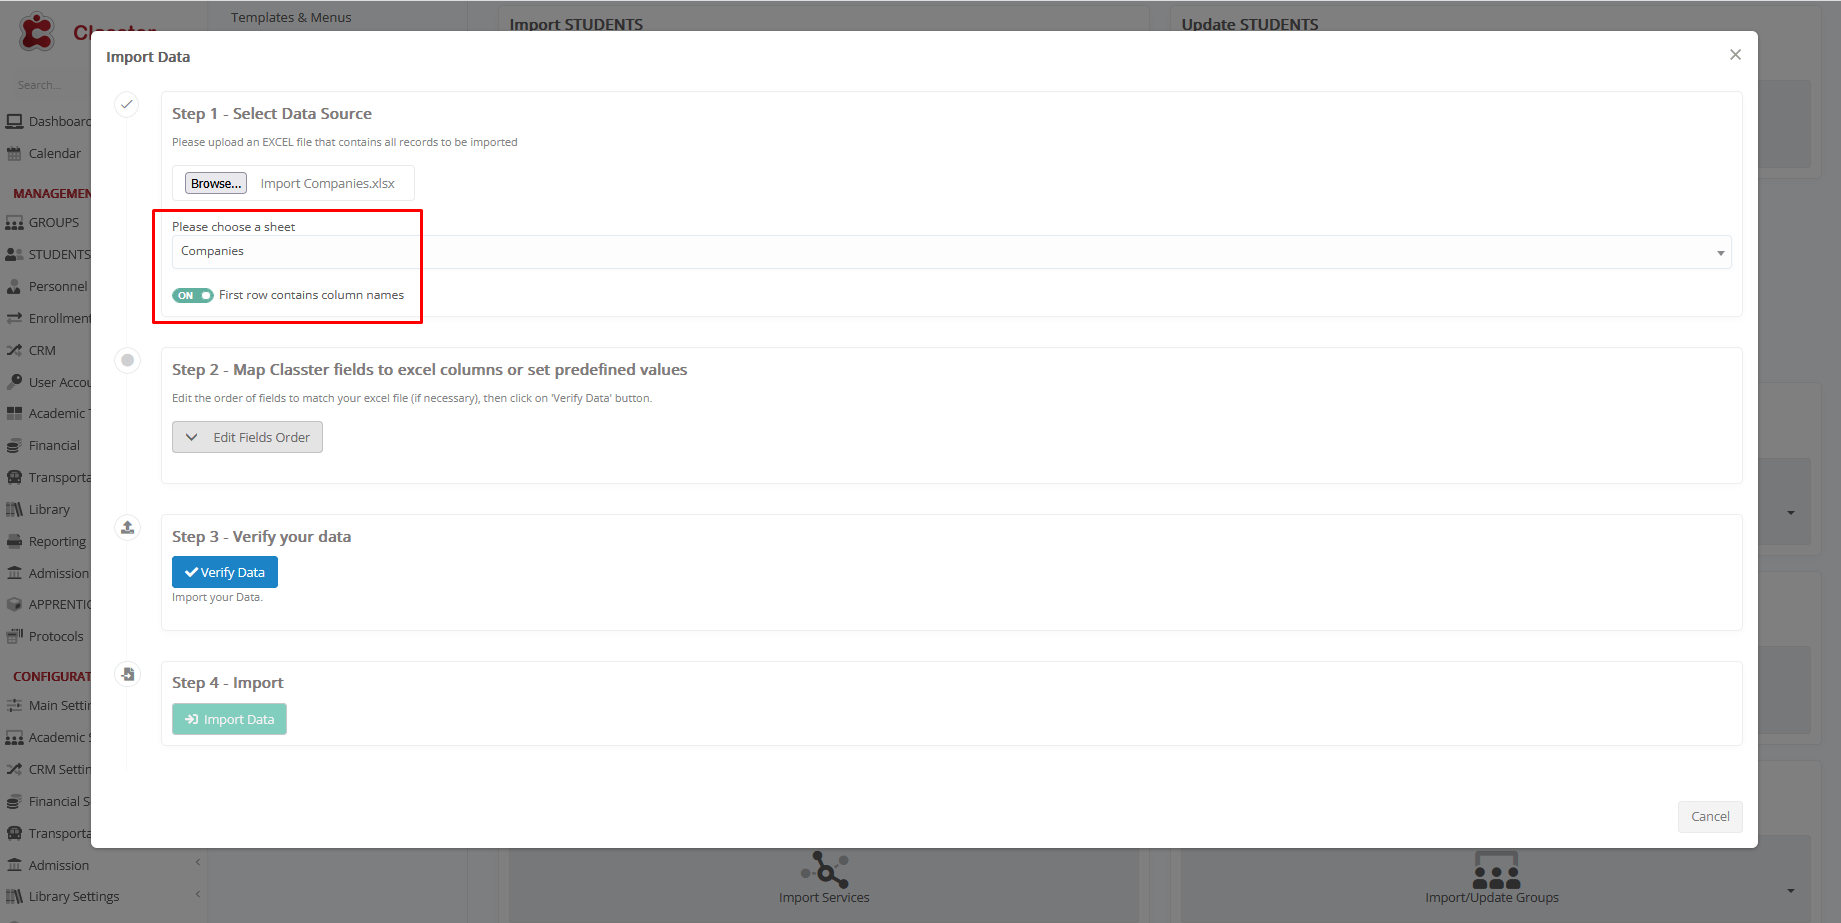
File Selection Options:
- Choose a Sheet: Select the correct sheet from the uploaded Excel file.
- First Row Contains Column Names: Ensure the first row is used for headers to simplify mapping.
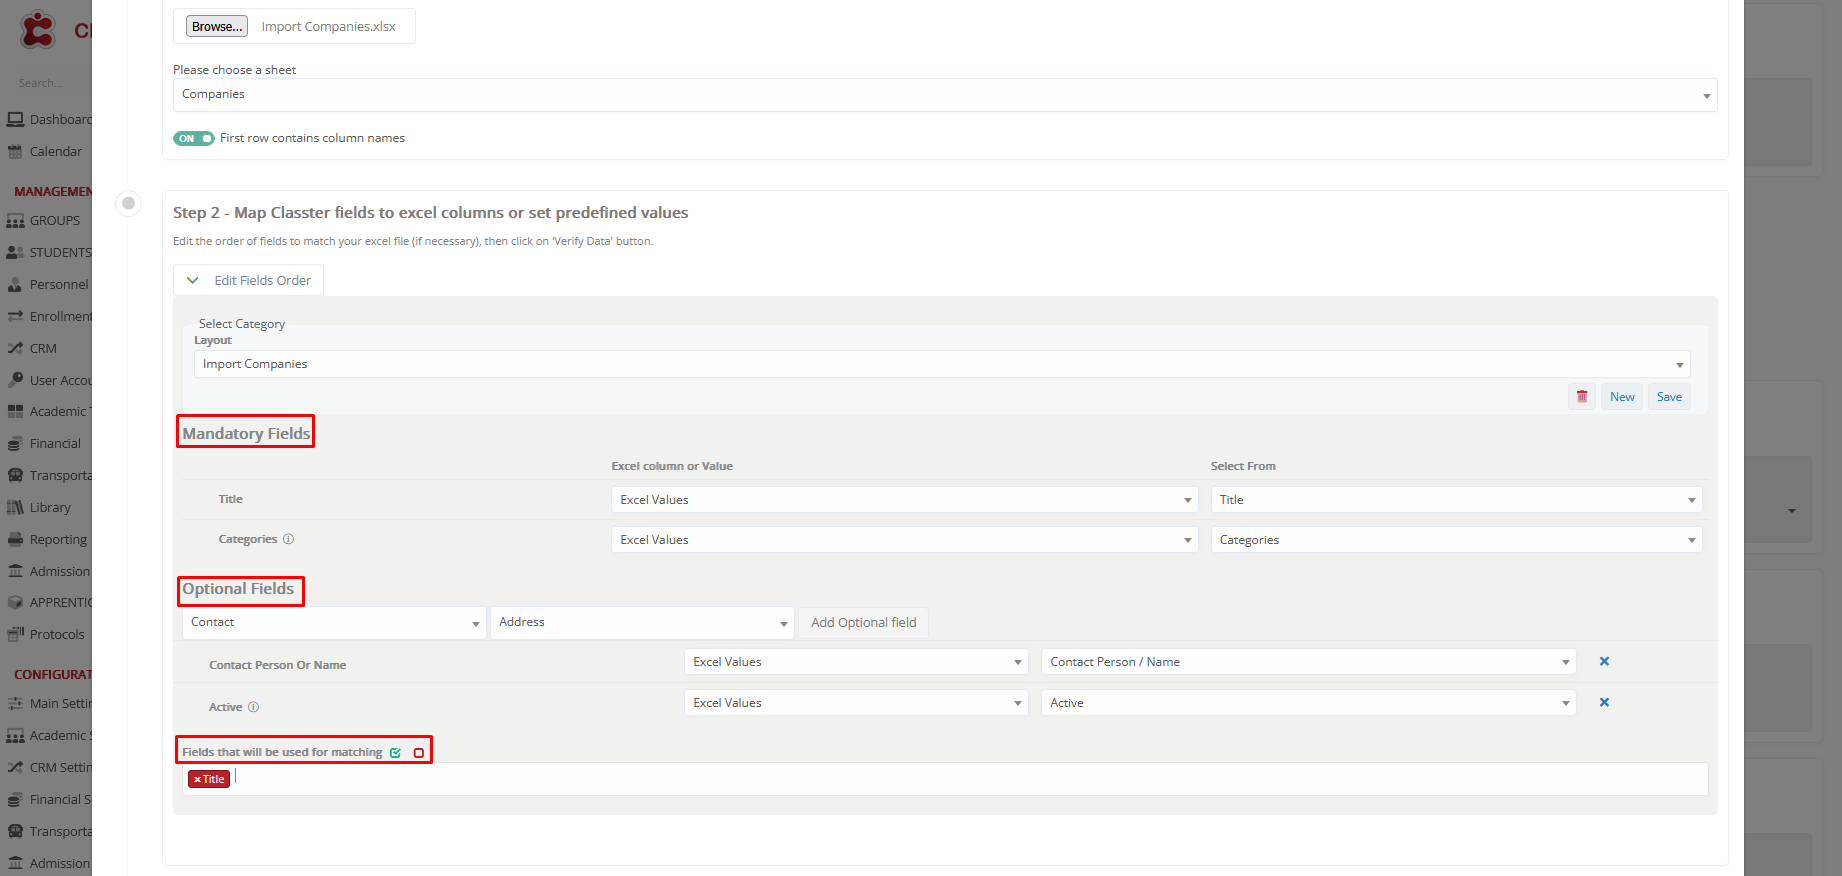
Map Classter Fields to Excel Columns or Set Predefined Values
Before proceeding, click Edit Fields Order and configure the layout
Mandatory Fields:
- Title: The official name of the company.
- Categories: This field is mandatory and must match exactly one of the available values from the system’s Categories dropdown list.
The selected value defines how the Company record is categorized and used within Classter. Categories may include a generic option such as Company, or more specific categories like _Internship_ Companies, depending on your institution’s configuration and workflows.
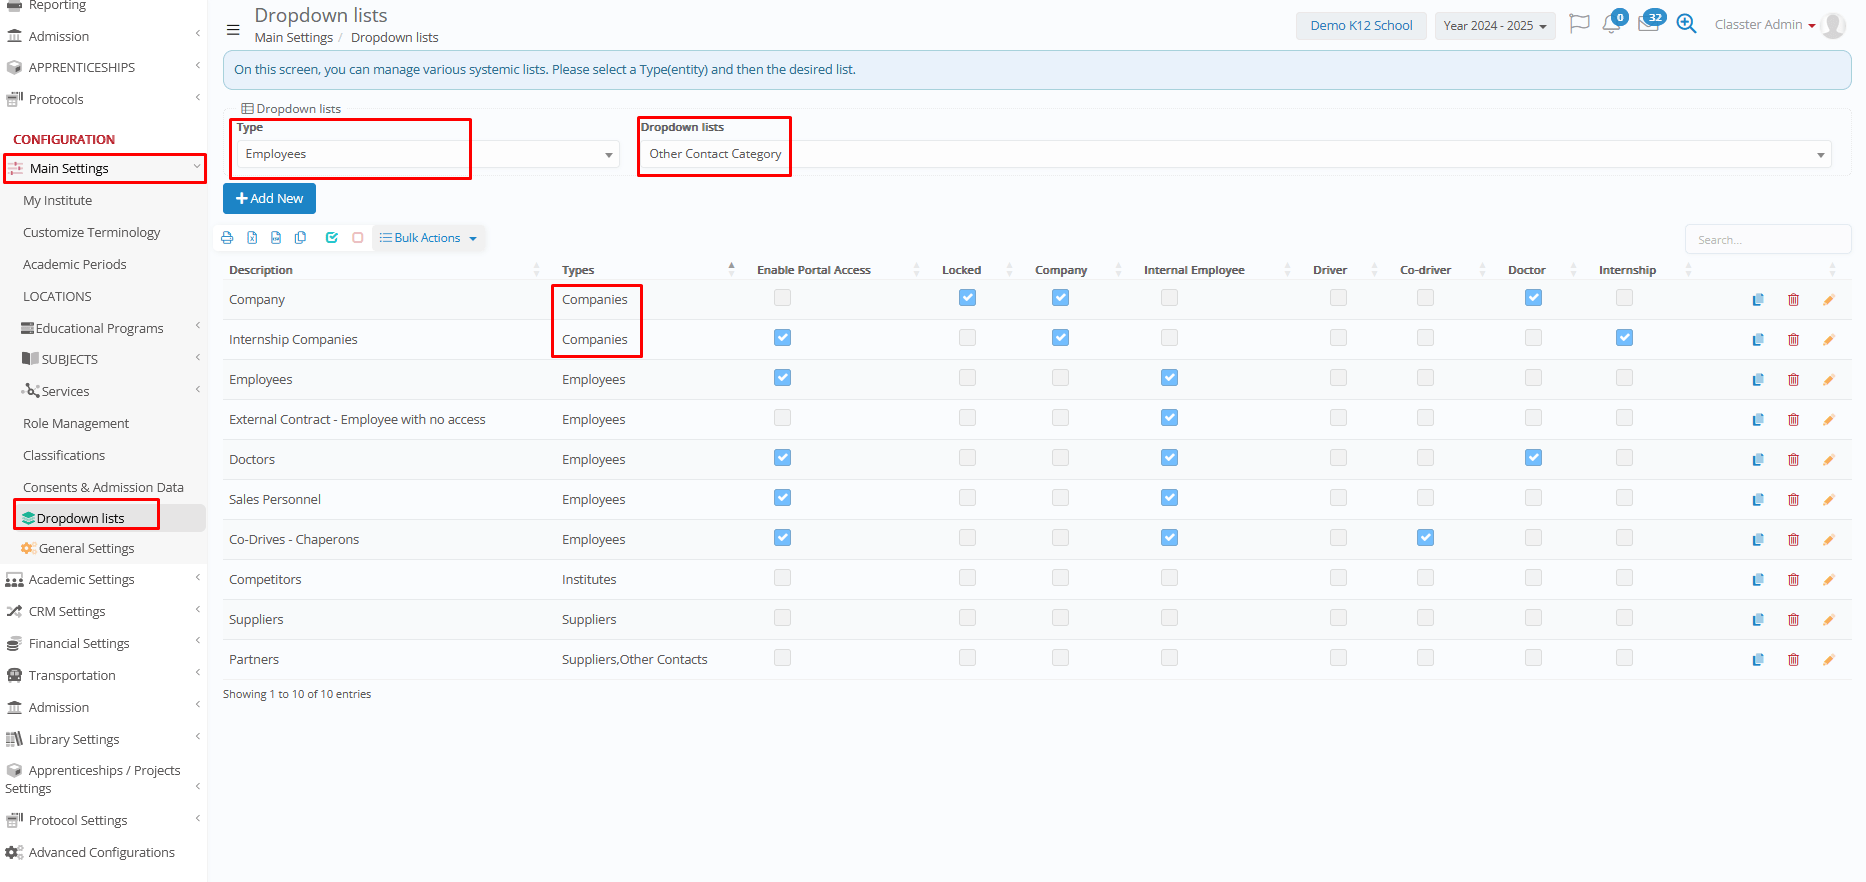
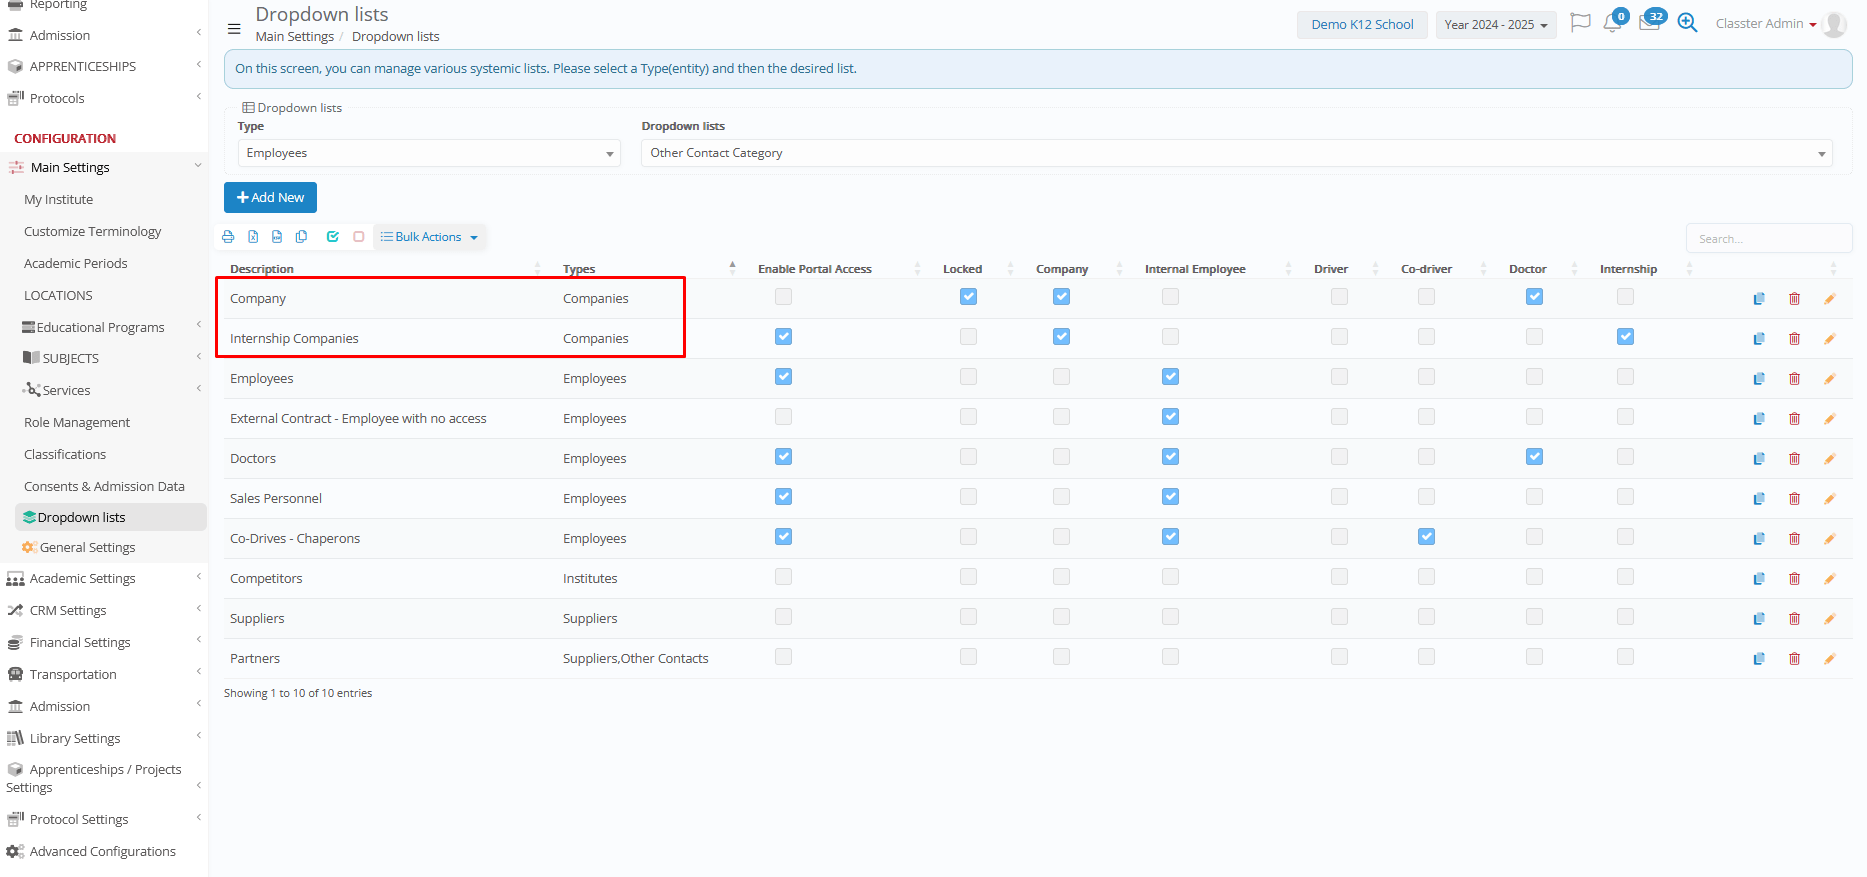
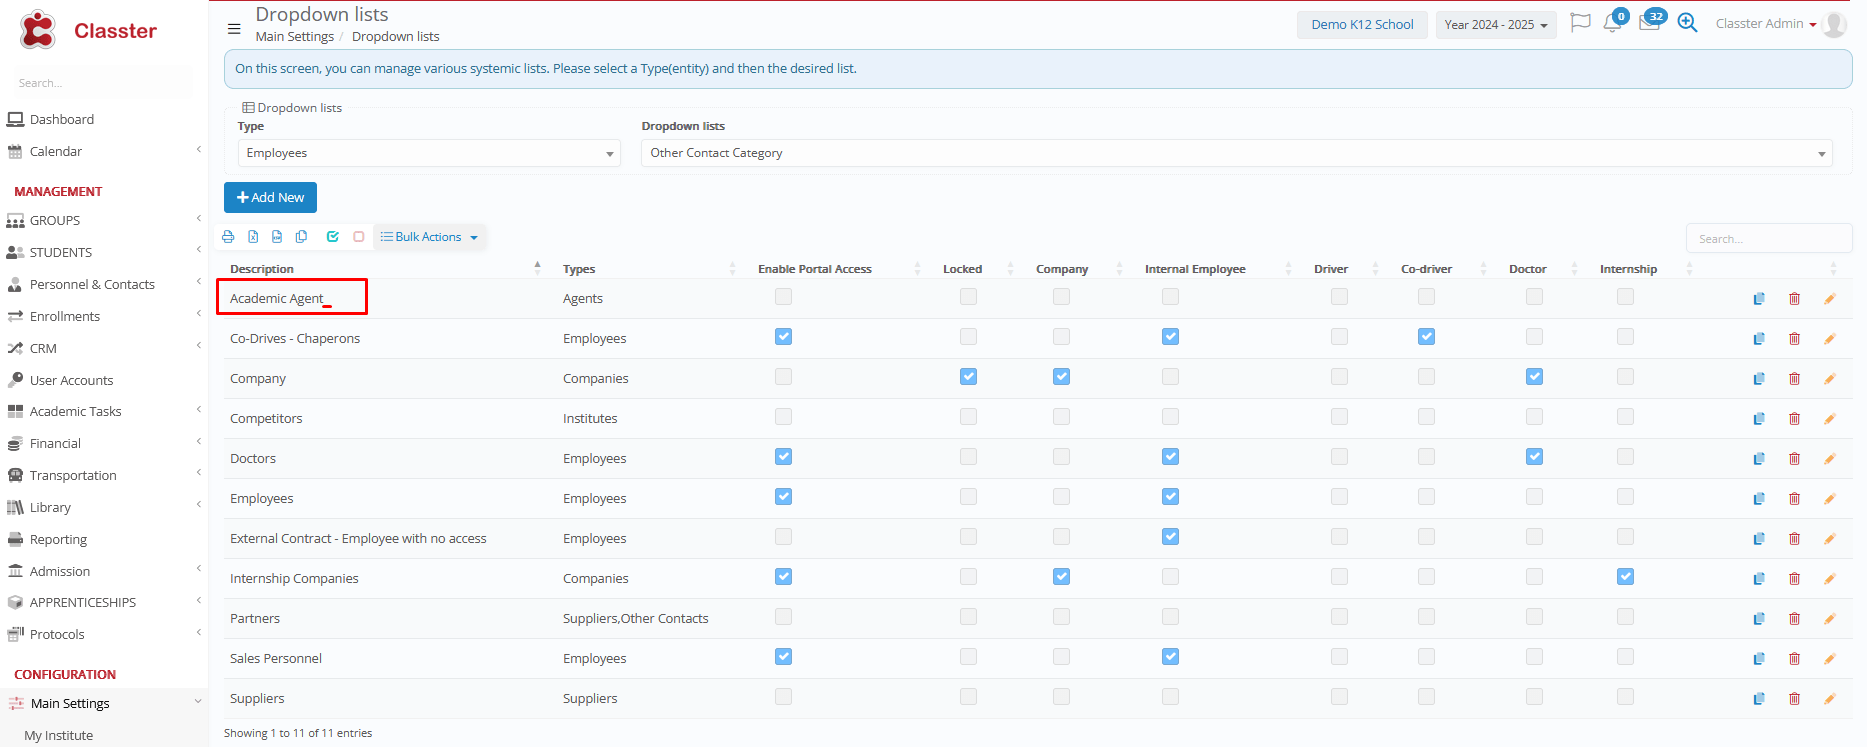
The available Company Categories can be found at: Main Settings > Dropdown Lists > Type: Employees & Dropdown Lists: Other Contact Category
Ensure that the value used in the Excel file corresponds precisely to one of the predefined dropdown values. Any custom Company Categories configured in the system can also be used, provided they already exist in the dropdown list.
Optional Fields:
The following optional fields can be mapped to enrich Company records:
- Basic: Contact Person/Name, Active, Specialty, Work, E-mail Account, Date of Contact, and Comments
- Contact: Address, City, Post Code, Area/State, 2nd Address Line, Country, E-mail, Mobile Phone, and Home Phone
- Other: Tax Data: Tax ID, Tax Office, Social Security Number, Insurance Number, Foreign Company
- Custom Fields: Any custom Company fields configured in the system, such as COMPANIESLOOKUP1
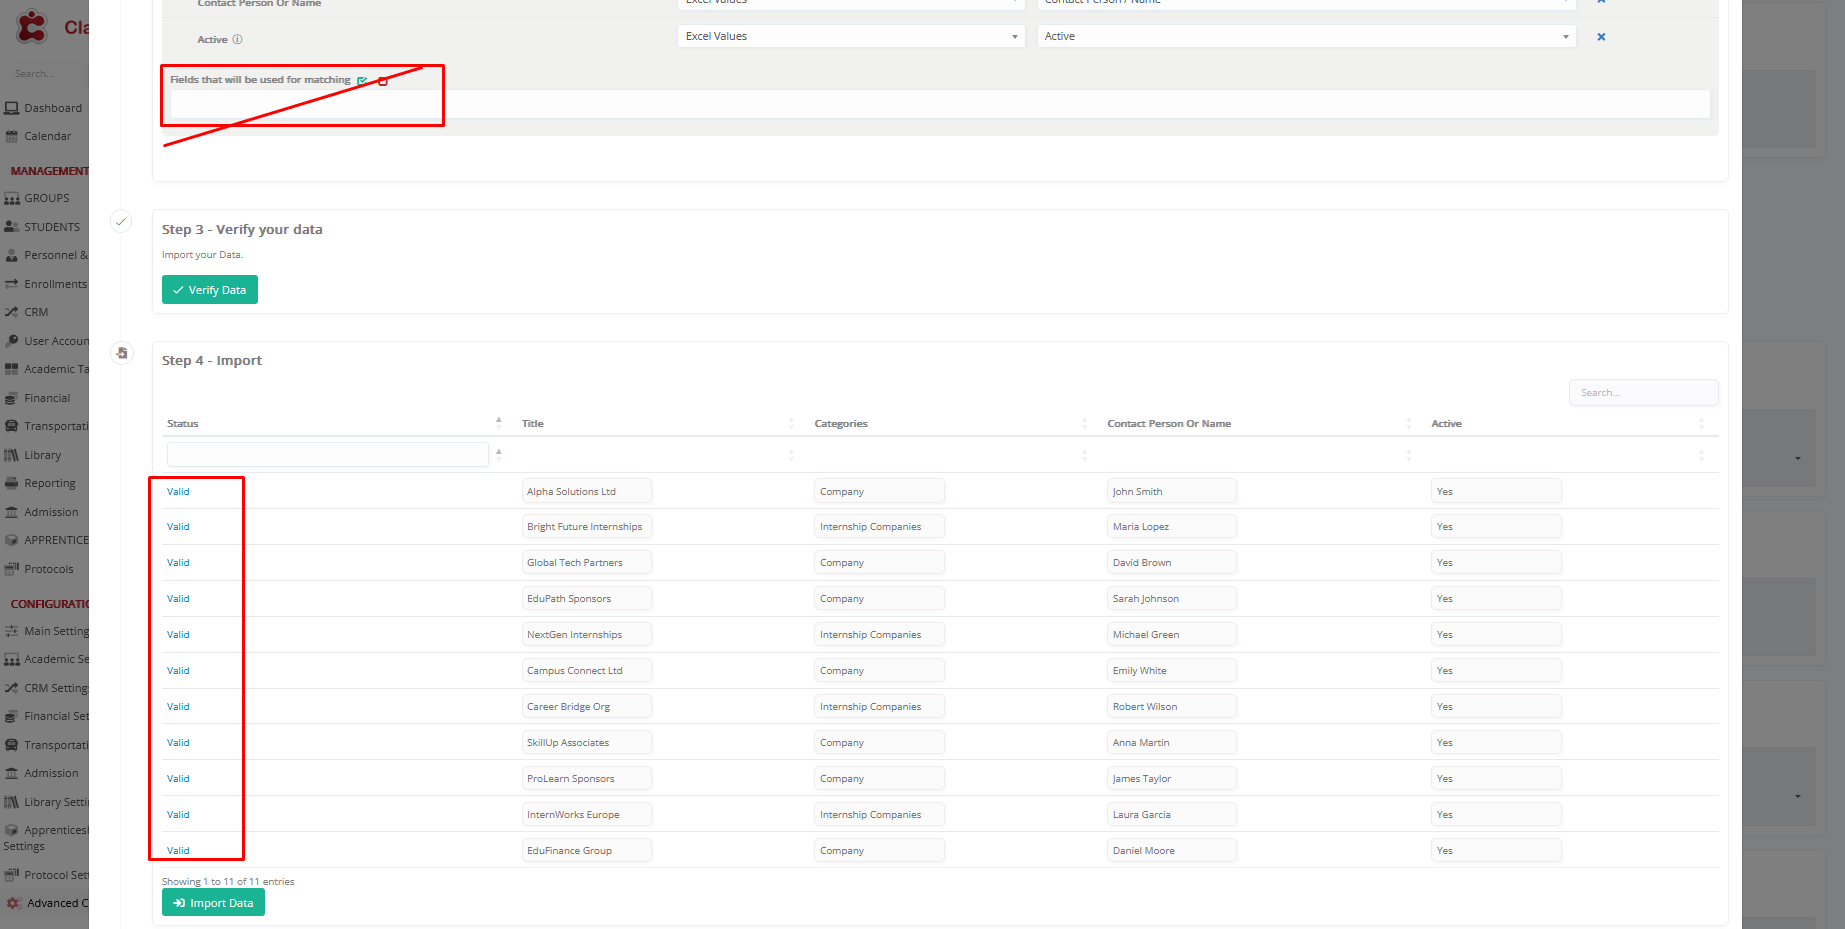
Fields Used for Matching:
This option is recommended to help prevent duplicate Company records during the import process. When matching fields are selected, the system uses these fields to check whether a Company already exists. If a match is found, the Company will not be uploaded again.
Note: Updating existing Company records is not supported within this import function.
Verify Data
Once mapping is complete, click Verify Data.
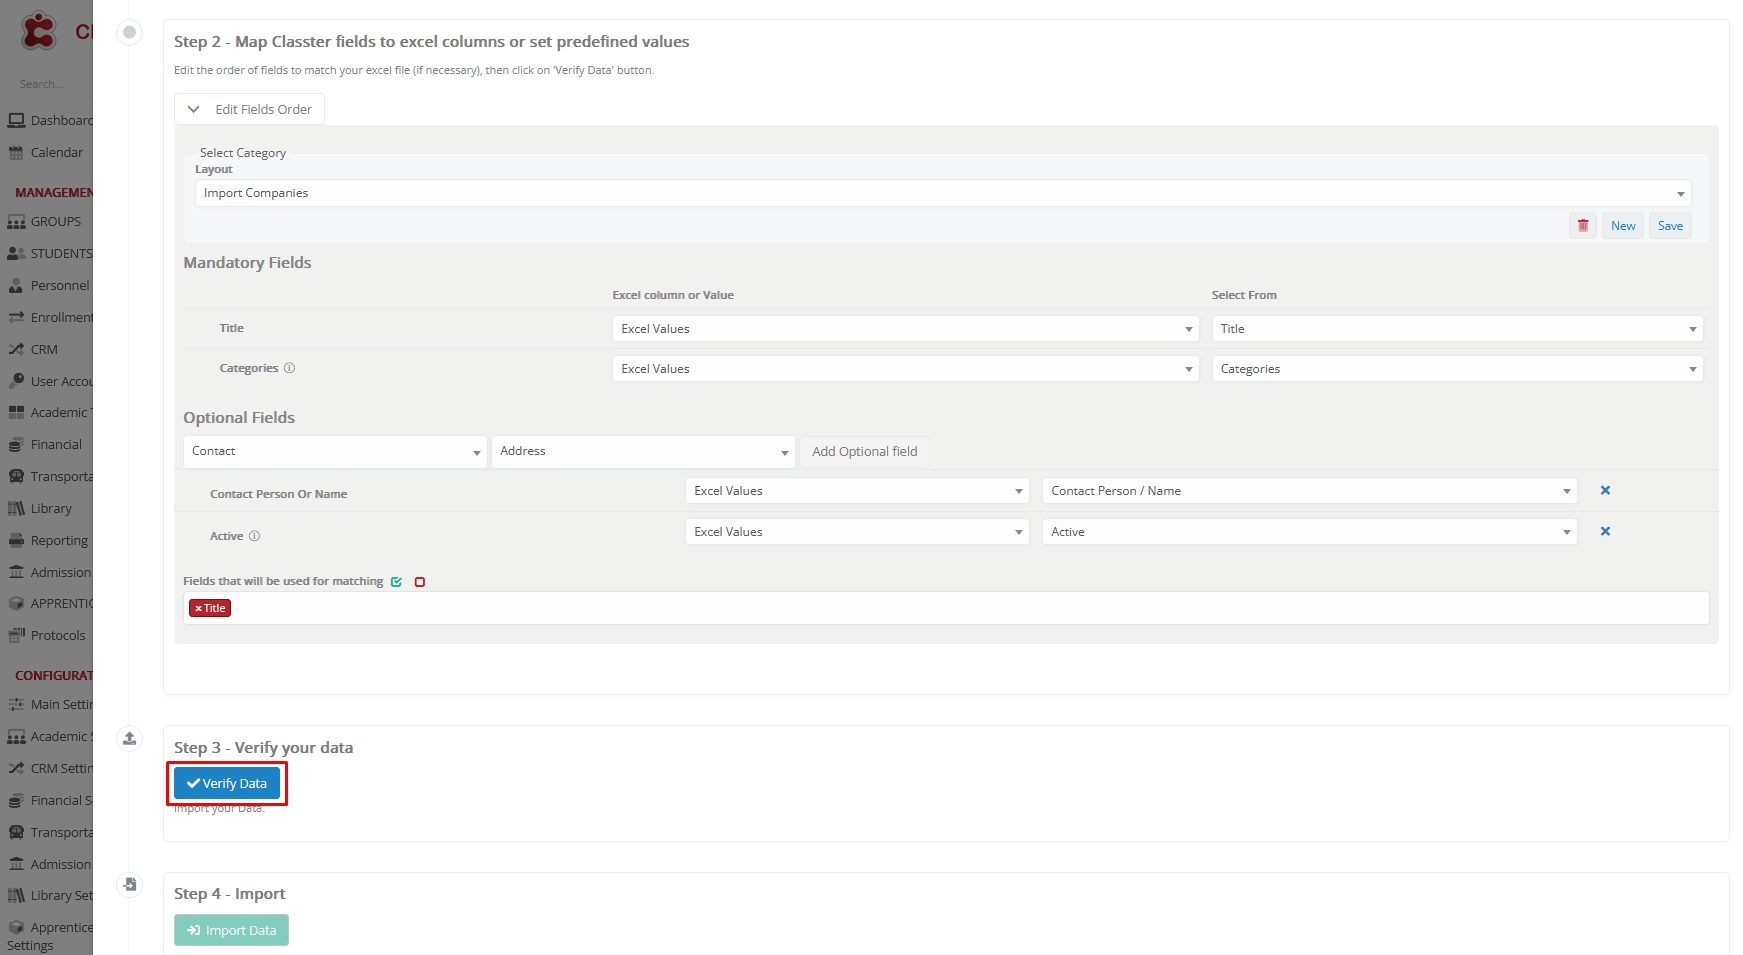
Import Data
After completing the mapping:
- Classter validates the data.
- If the data is correctly aligned, a preview of the records appears.
- Click on Import Data to finalize the process.
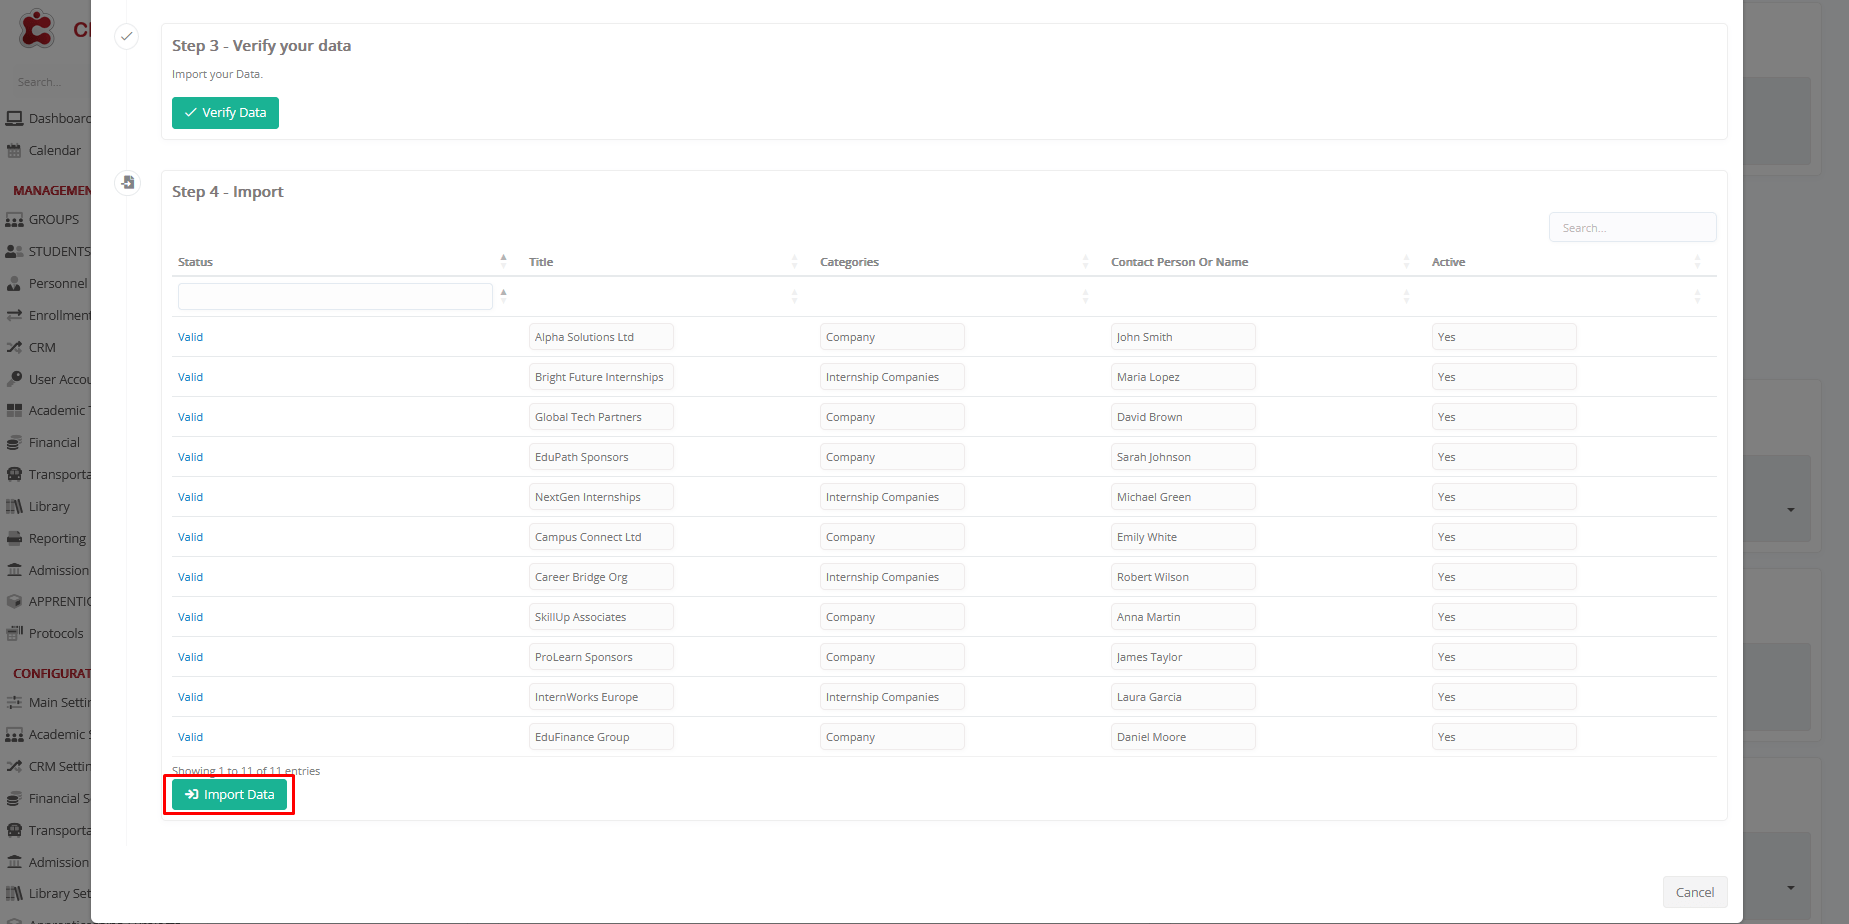
A confirmation message appears once the import is successful.
Output
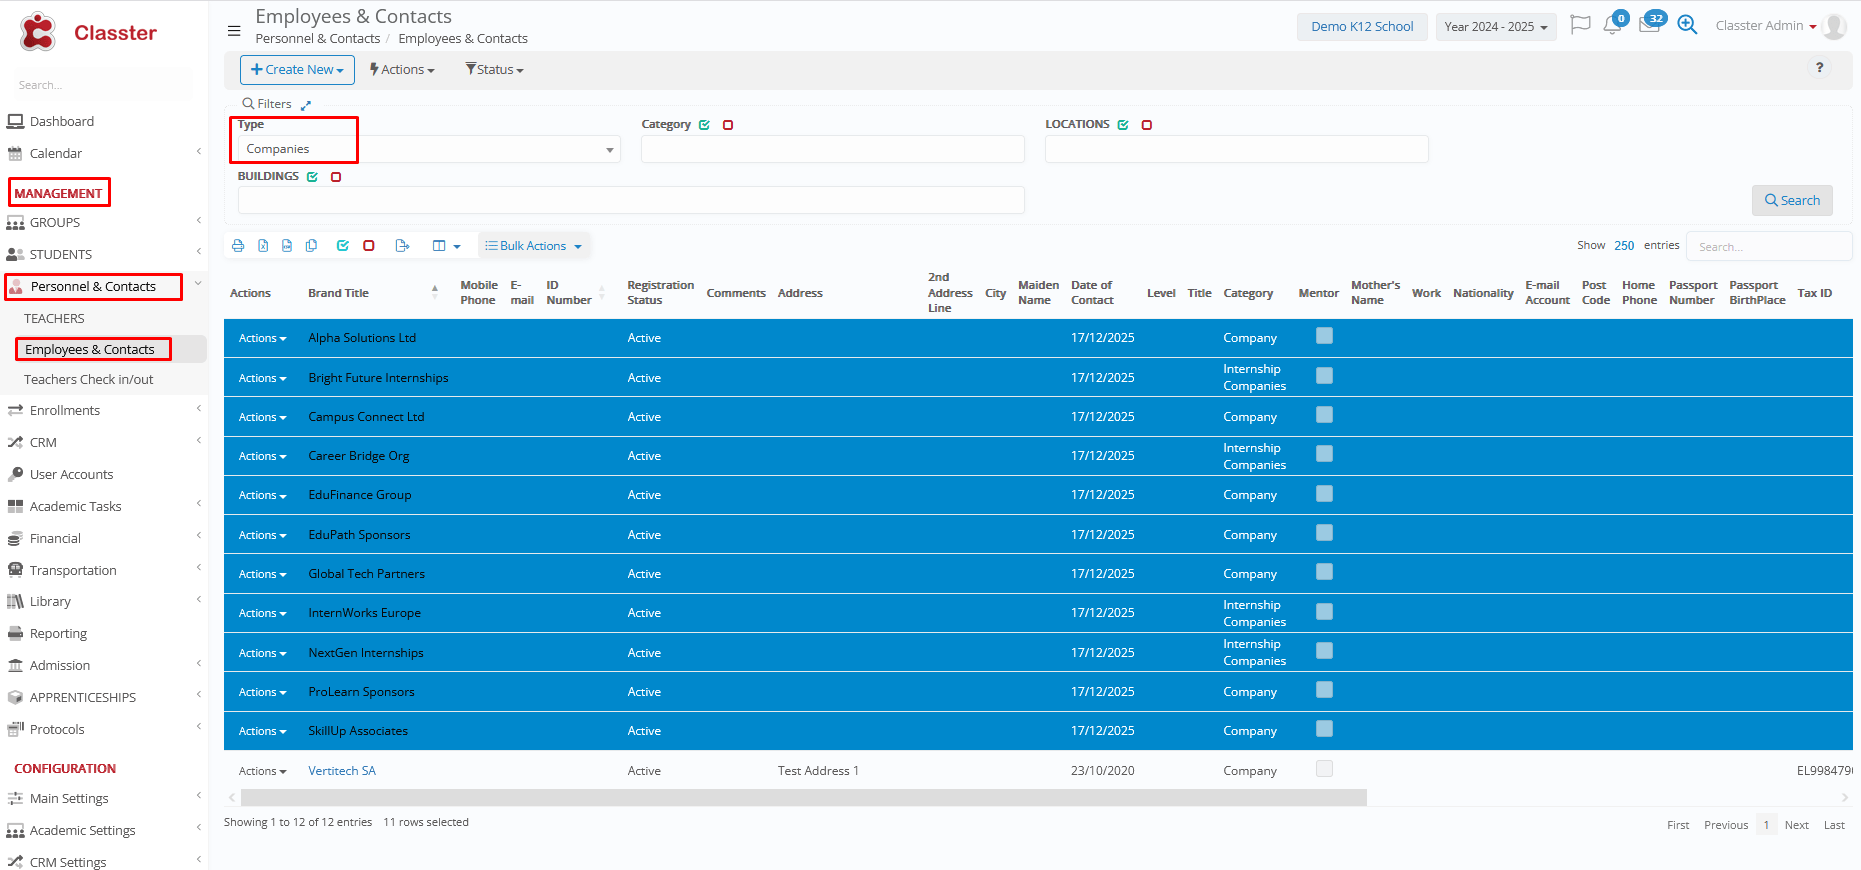
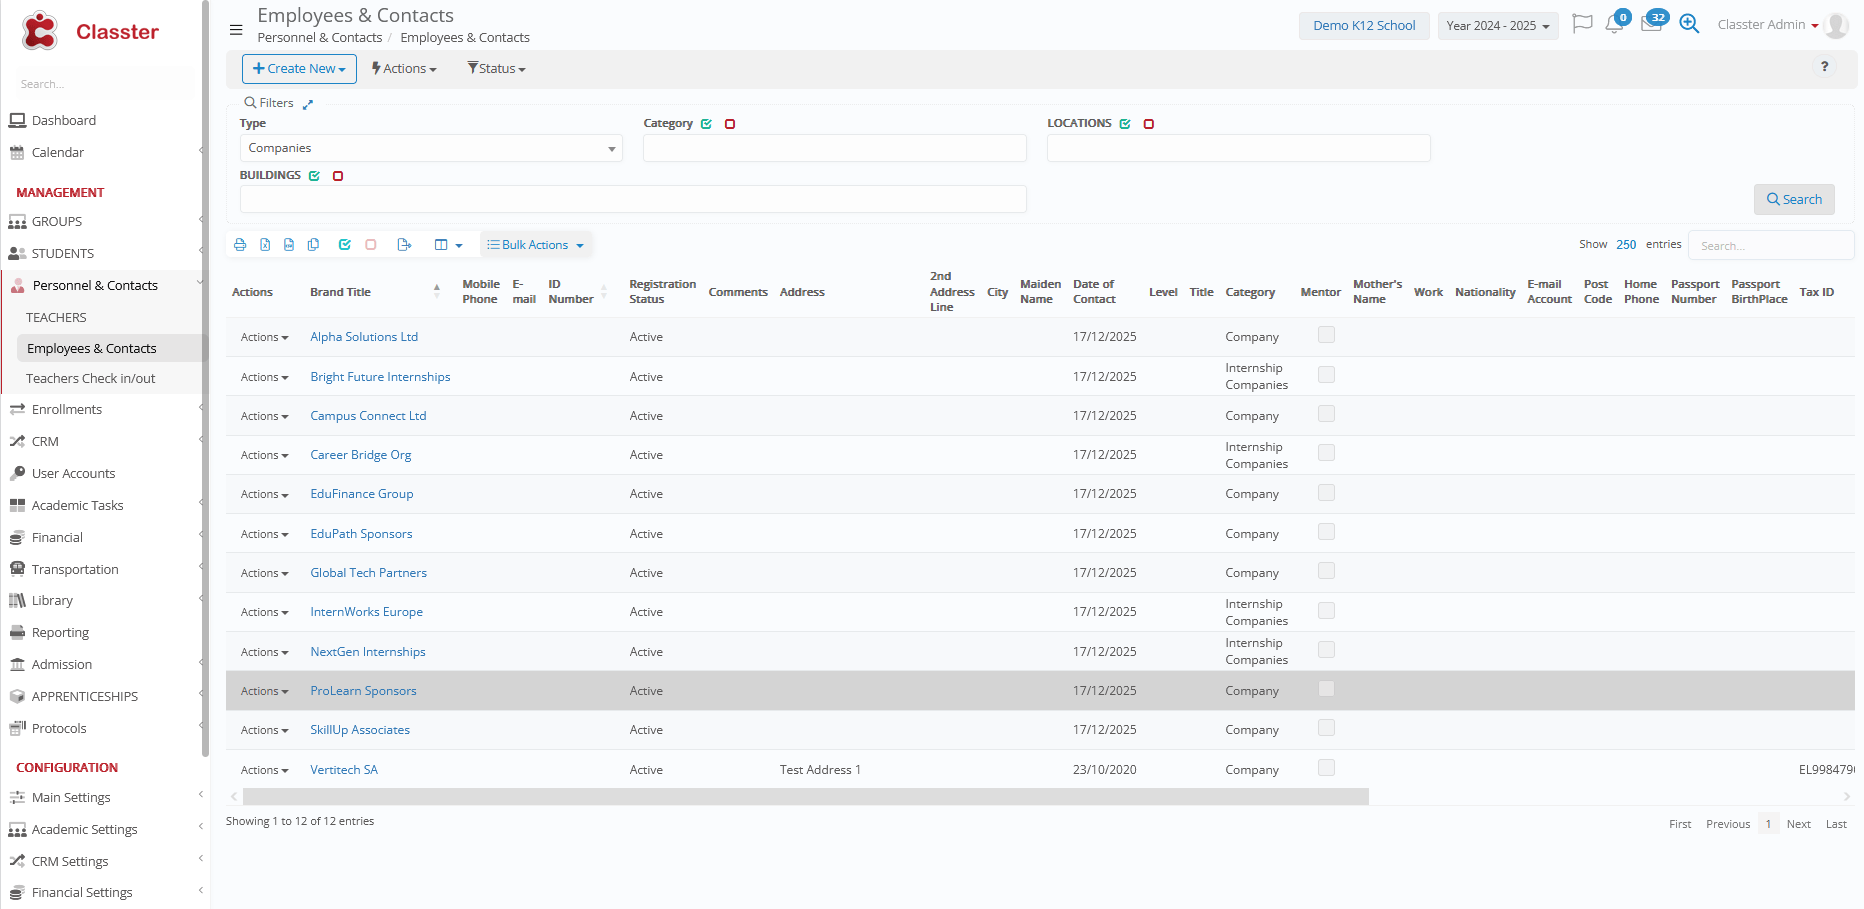
To view Imported Companies, navigate to: MANAGEMENT > Personnel & Contacts > Employees & Contacts > Type: Companies > click Search.
Handling Errors
If errors are detected (e.g., missing fields or incorrect column formatting), Classter highlights the corresponding fields in red for correction.
Ensure that:
- All fields contain valid values, according to the field type in the system.
- There are no duplicate entries causing conflicts.
Duplicate Import (no matching fields)
In this example, the same Company list is imported again, even though these Companies already exist in the system. Since no matching fields are selected, the system cannot identify existing records.
As a result, the import passes validation and the Companies are imported again as duplicate entries.
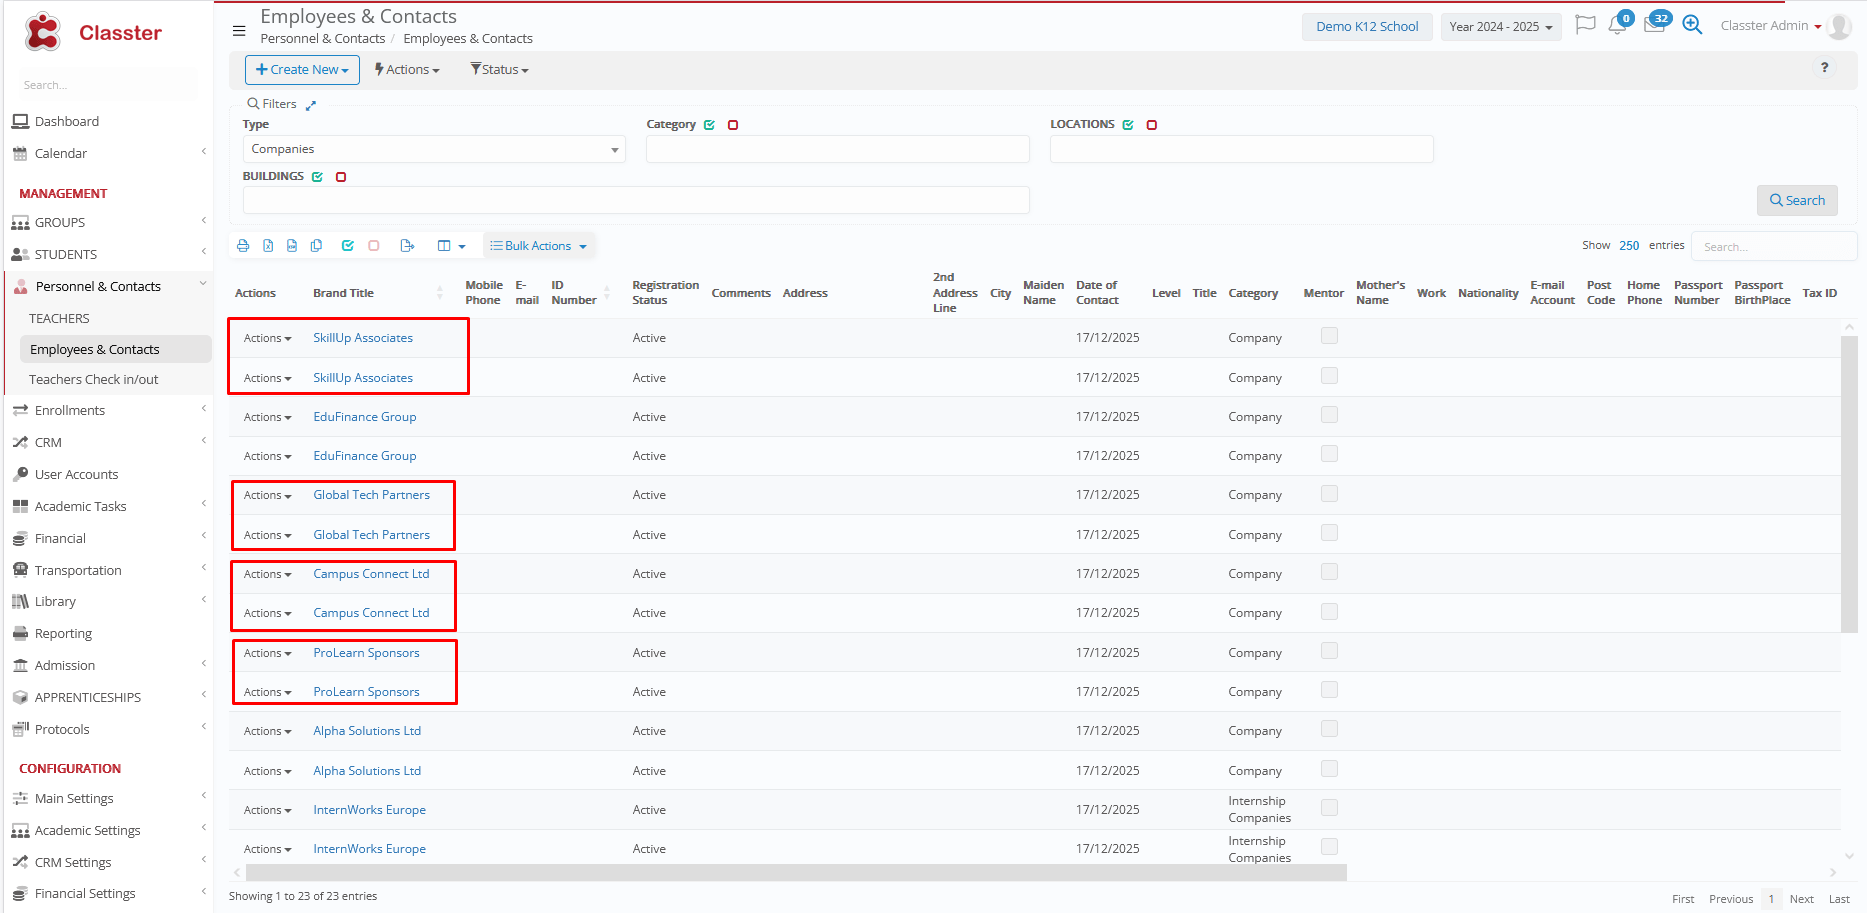
To prevent this, it is strongly recommended to always use Fields Used for Matching during Company Imports.
Invalid Category Value
In this example, we imported three new Companies using Categories such as “Psychology Services”, “Pediatric Services”, and “Summer Camp Organizers”.
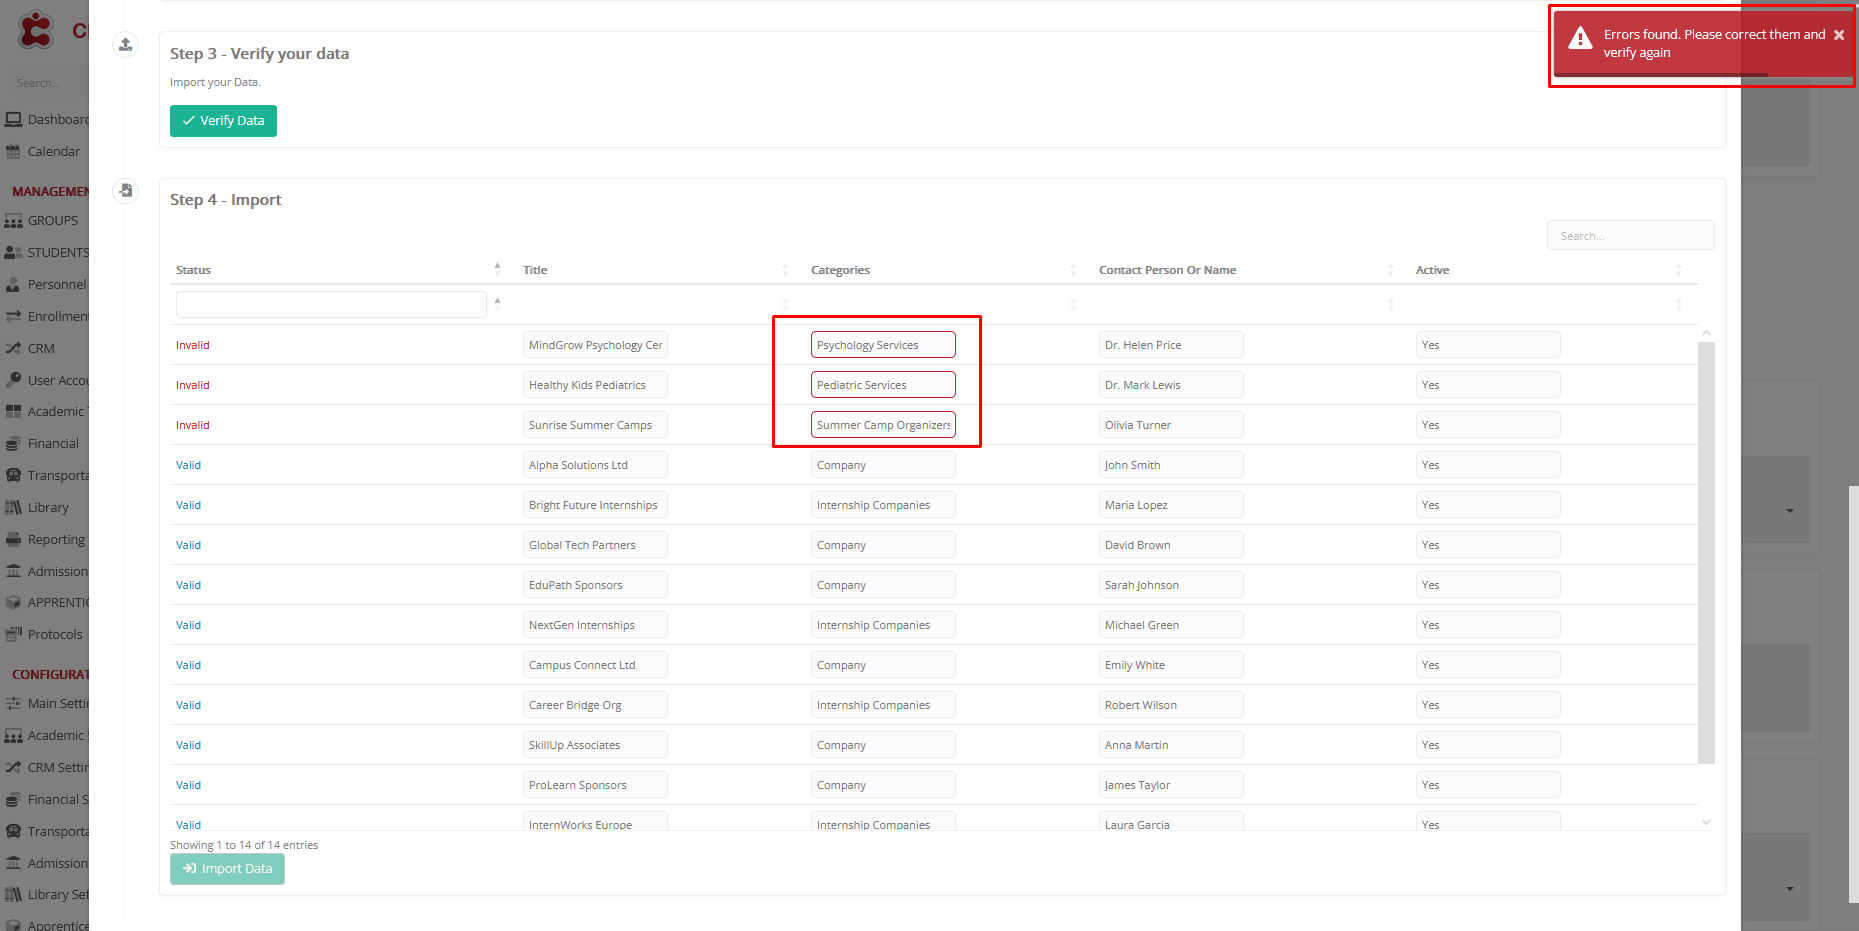
However, these values do not exist in the system’s Categories dropdown list.
As a result, the import fails validation and cannot proceed until the Categories value is corrected to an existing option (e.g., Company or _Internship_ Companies) or until the missing Categories are first configured in the system.
The available Company Categories can be found at: Main Settings > Dropdown Lists > Type: Employees & Dropdown Lists: Other Contact Category
Spelling Mistake (Extra Blank Space)
In this example, the Categories field is written as “Internship Companies” (with an extra blank space at the end) instead of the correct value “Internship Companies” as it exists in the system.

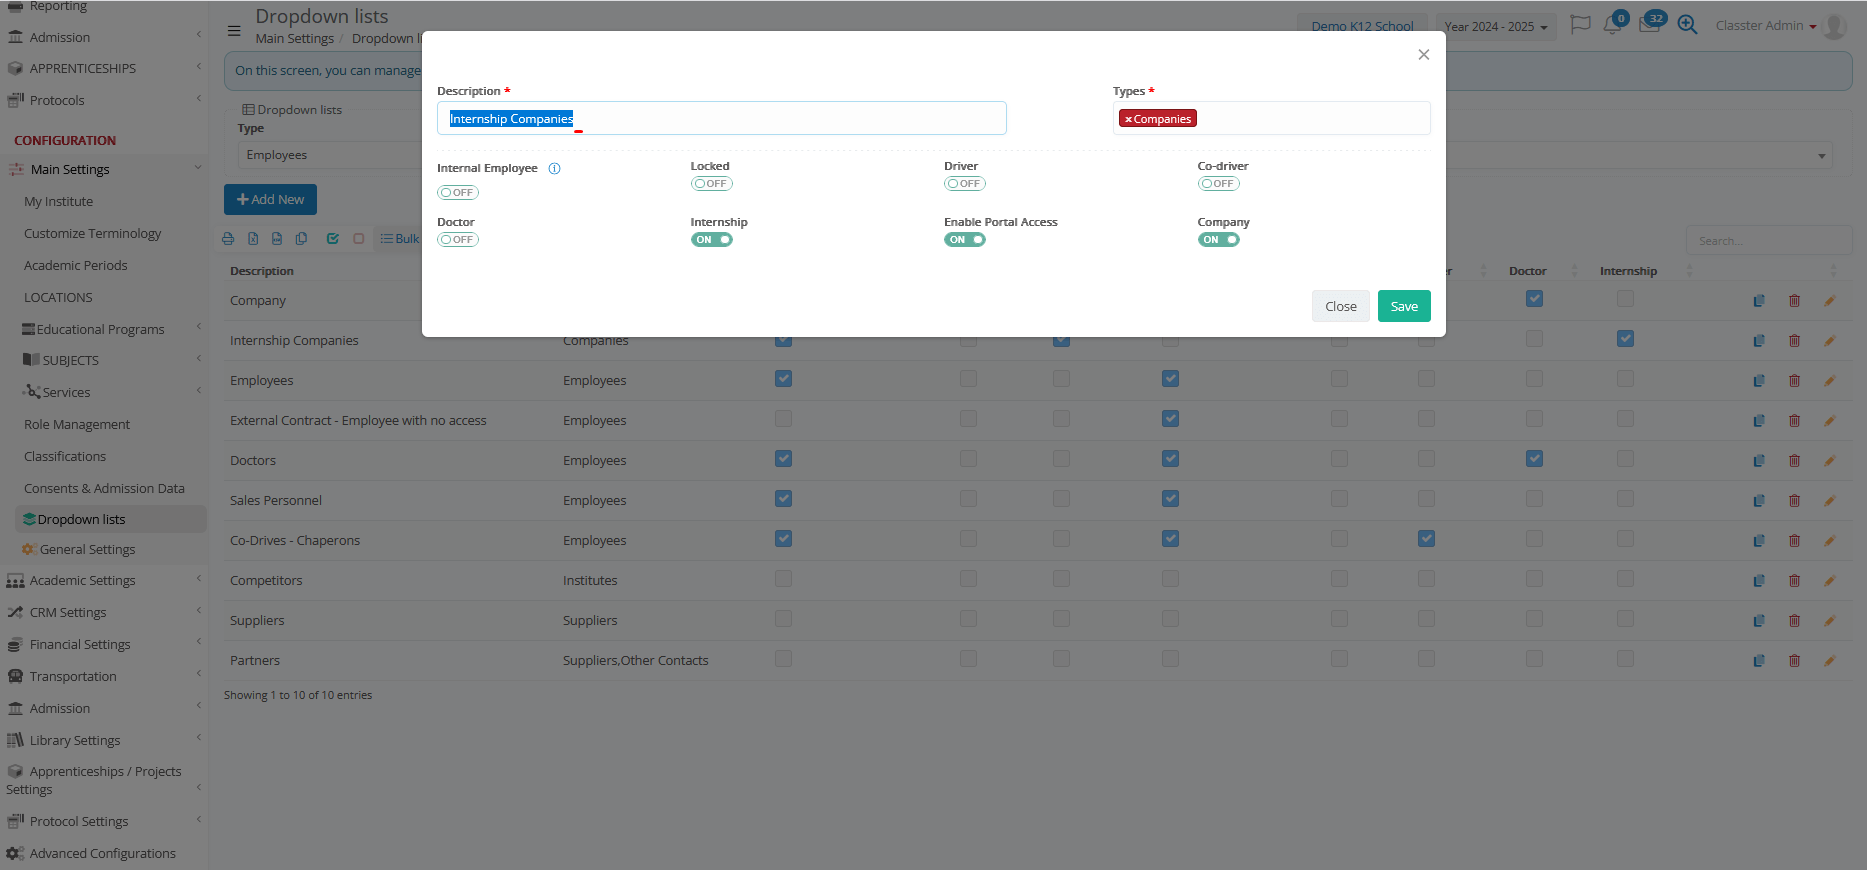
Although the value looks identical, the extra space causes a mismatch with the predefined dropdown value. As a result, the system fails validation and the import cannot proceed.

Import Agents
In this context, Agents refer to external representatives or organizations that collaborate with the institution to recruit, submit, and manage Student applications, and in many cases handle financial processes on behalf of _Students_ or Applicants.
Follow the steps below to import Agent records into Classter.
Navigate to Import Agents
Log in to your Institute and navigate to: CONFIGURATION > Advanced Configurations > Mass Imports / Actions > Import Employees menu > Import Agents.
Select an Excel File to Import
Click Choose File to upload an Excel file containing all Agent records.
Select the desired file and click Open.
Here’s how the uploaded Agents List looks once imported.

File Selection Options
- Choose a Sheet: Select the correct worksheet from your uploaded Excel file.
- First Row Contains Column Names: Enable this option to simplify field mapping and ensure headers are recognized properly.

Map Classter Fields to Excel Columns or Set Predefined Values
Click Edit Fields Order to start the mapping process. You can either select a previously saved layout or create a new one to map the Excel columns with the corresponding Classter fields.
Mandatory Fields
The following fields must be mapped correctly in order to proceed with the import:
- First Name: The Agent’s given name.
- Last Name: The Agent’s surname.
- Categories: Must be set to a Category with User Type = Agent.
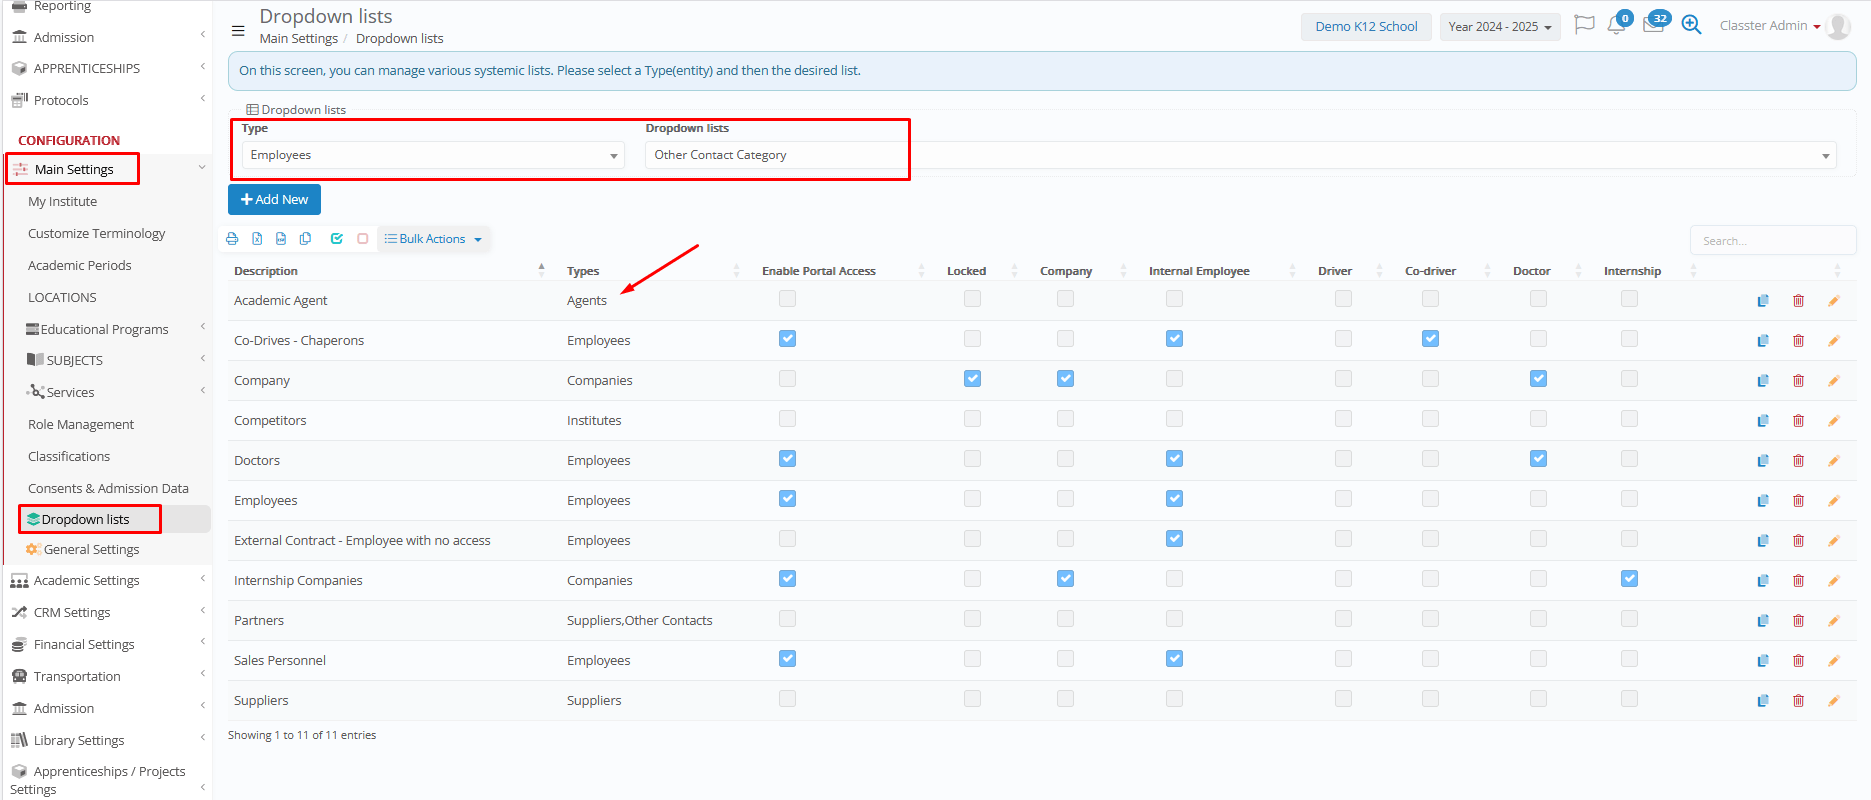
Categories in Classter include a User Type property, which defines the standard system behavior (e.g. Company, Agent, Employee). Ensure that the Category used during the import belongs to the Agent User Type; otherwise, the import will fail validation.
Optional Fields
The following optional fields can be mapped to enrich Agent records.
- Basic: Active, Title, Middle Name, Gender, Birthdate, Work, Work Phone, Nationality, Citizenship, Religion, Abbreviation, E-mail Account, Allow agent to access financial data and online payments, Agent can only register installment payments, Date of Contact, Comments, Website, Pricing Category
- Contact: Address, City, Post Code, Area/State, 2nd Address Line, Country, E-mail, Mobile Phone, and Home Phone
- Other: ID Card: Identity Number, Issue Date, ID Expiration Date, Birthplace, Status, Municipality, Issuing Authority. Passport: Passport Number, Issuing Date, Expiration Date, Birthplace, Issuing Authority. Tax Data: Tax ID, Tax Office, Social Security Number, Insurance Number.
Fields Used for Matching
This option is recommended to help prevent duplicate Agent records during the import process.
When matching fields are selected, the system uses these fields to check whether an Agent already exists. If a match is found, the Agent will not be imported again.
Note:
Updating existing Agent fields is not supported within this import function. The matching mechanism prevents duplicates but does not overwrite or modify existing records.
Typical matching fields include combinations such as First Name, Last Name and ID Card: Identity Number.
Verify Data
Once field mapping is completed, click Verify Data to validate the uploaded records.
Classter will check for missing mandatory fields, invalid formats, or duplicate entries.
Import Data
After successful verification:
- Review the data preview to confirm accuracy.
- Click Import Data to finalize the process.

Classter processes the import and displays a confirmation message once completed.
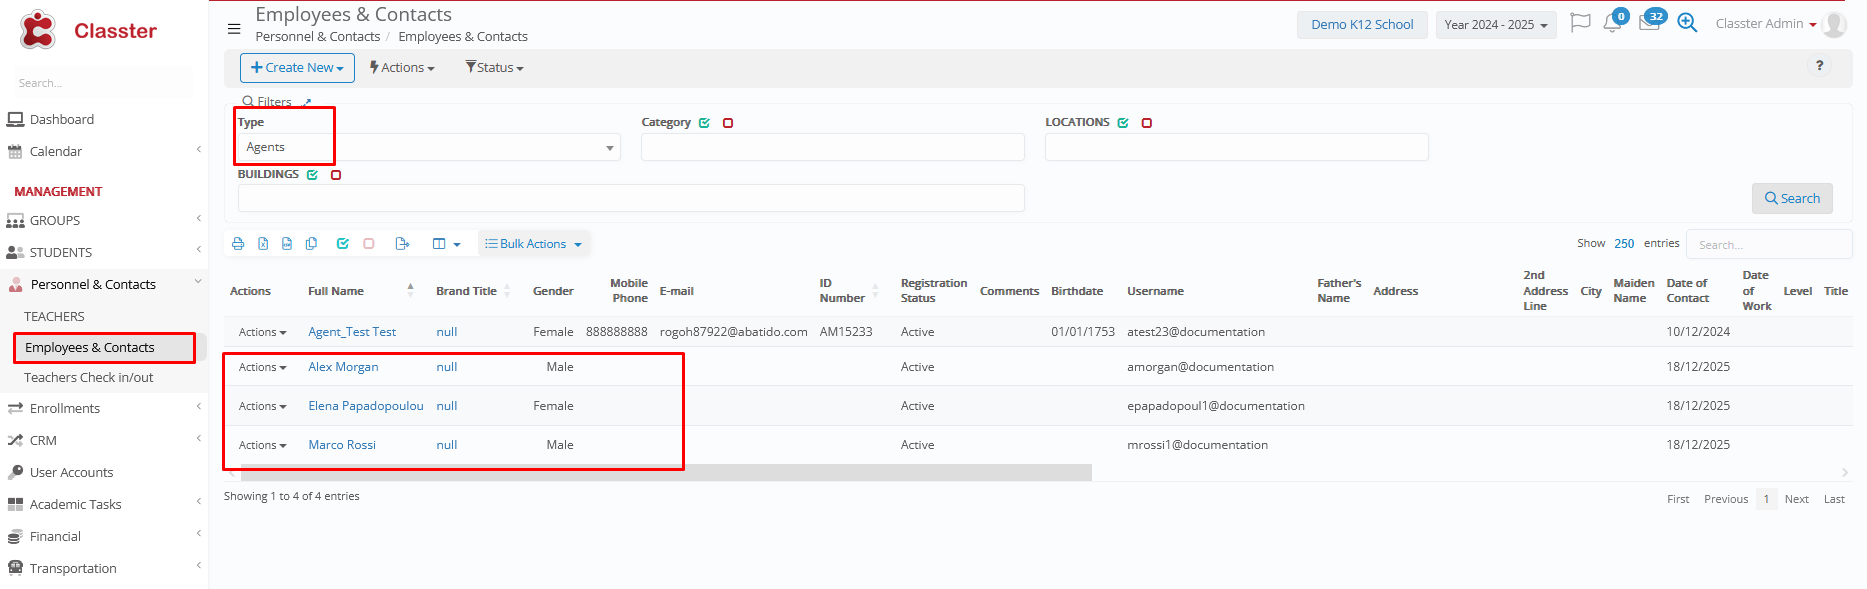
Output
To view the imported Agent records, navigate to: MANAGEMENT > User Accounts > User Type: Agent and Role: Agents > click Search.

or
To: MANAGEMENT > Personnel & Contacts > Employees & Contacts > Type: Agents and search
Handling Errors
Duplicate Import (no matching fields)
In this example, the same Agent records are imported again, even though the Agents already exist in the system. Since no matching fields are used, the system cannot identify existing Agent records. As a result, the import passes validation and the Agents are imported again as duplicate entries.
To prevent duplicate Agent records, it is strongly recommended to always define Fields Used for Matching during the Agent import process.
Invalid Category Value
In this example, the Category configured in the system is “Academic Agent”, while the Excel file uses the value “Agents”. Since the value in the Excel file does not exactly match an existing Category, the system fails validation and the import cannot proceed.
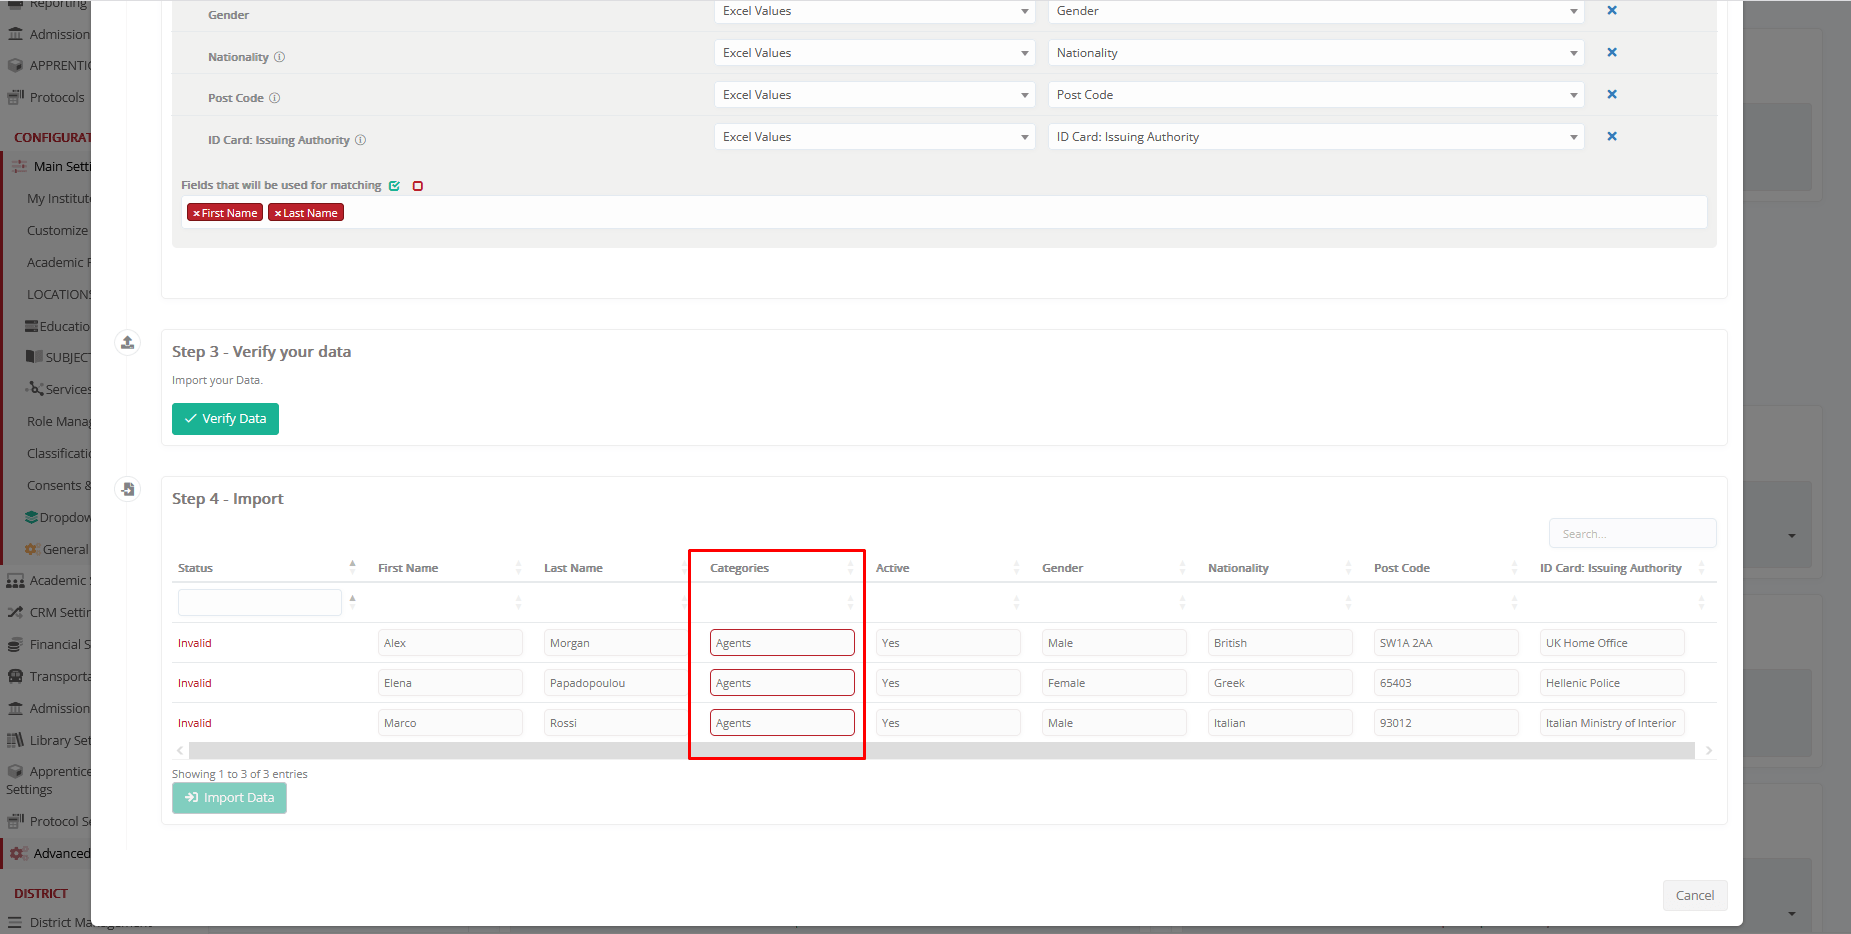
To resolve this issue, either:
- Update the Excel file to use the exact Category value configured in the system, or
- Modify the system Category to match the value used in the Excel file.

Ensure that the Category value always corresponds precisely to an existing Category with User Type = Agent.
Spelling Error
In this example, the Category is misspelled in the Excel file as “Academic Agents” (extra “s”) instead of the correct value “Academic Agent” configured in the system.
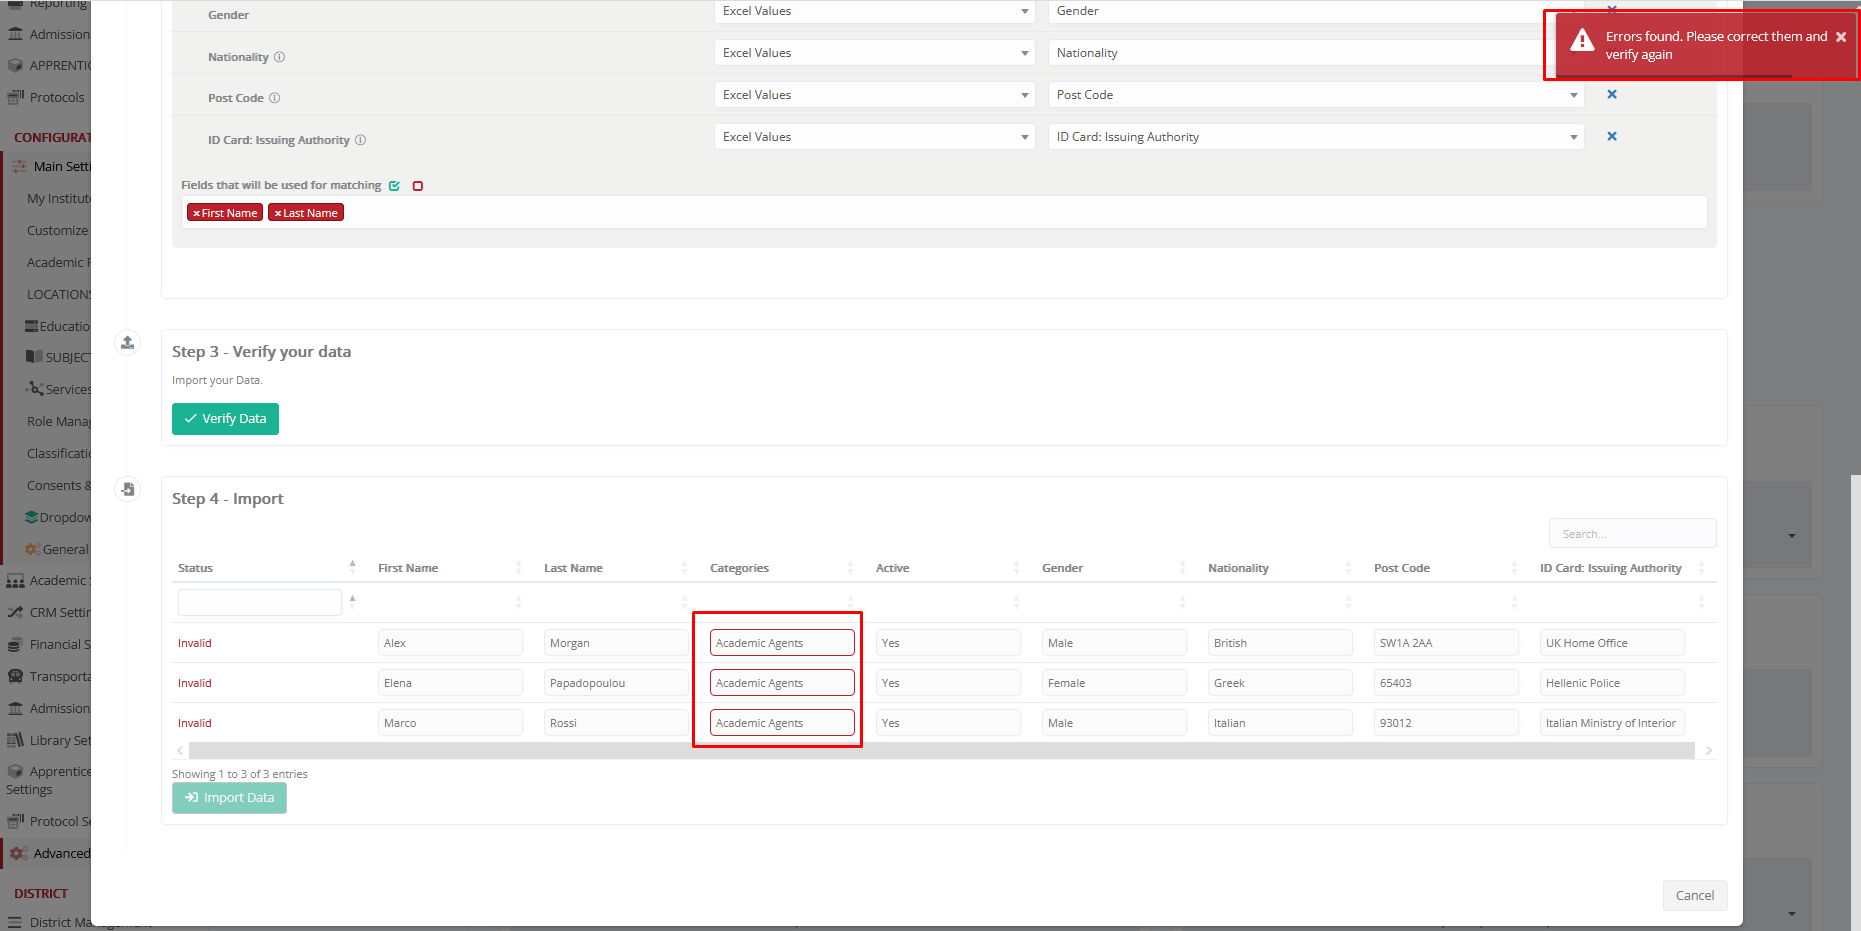
Because the value does not exactly match an existing Category, the system fails validation and the import cannot proceed.
To avoid this issue, ensure that Category values in the Excel file are spelled exactly as they appear in the system, without any additional characters.
Summary
By following these steps, institutions can efficiently import Employees, Companies, and Agents into Classter, ensuring accurate and smooth record management. Proper field mapping, data verification, use of matching fields, and effective error handling help minimize mistakes, prevent duplicate records, and save significant administrative time through bulk import capabilities.