Overview
Classter includes a smart Check-in/Check-out system that helps track when teachers start and finish work. Both teachers and back-office staff can record working time either manually or automatically (e.g., through session start/stop or by scanning a QR code).
The system works with different types of activities, like:
- Lessons (Sessions)
- Meetings
- Exams & Invigilation
- Events & Services
- Private Lessons
All check-in/out records are used for payroll, attendance tracking, and HR reports, making the process clear and reliable.
Configuring Check In – Check Out
To configure this process:
Go to Main Settings > General Settings > HR Management > Settings for Check-in/Out
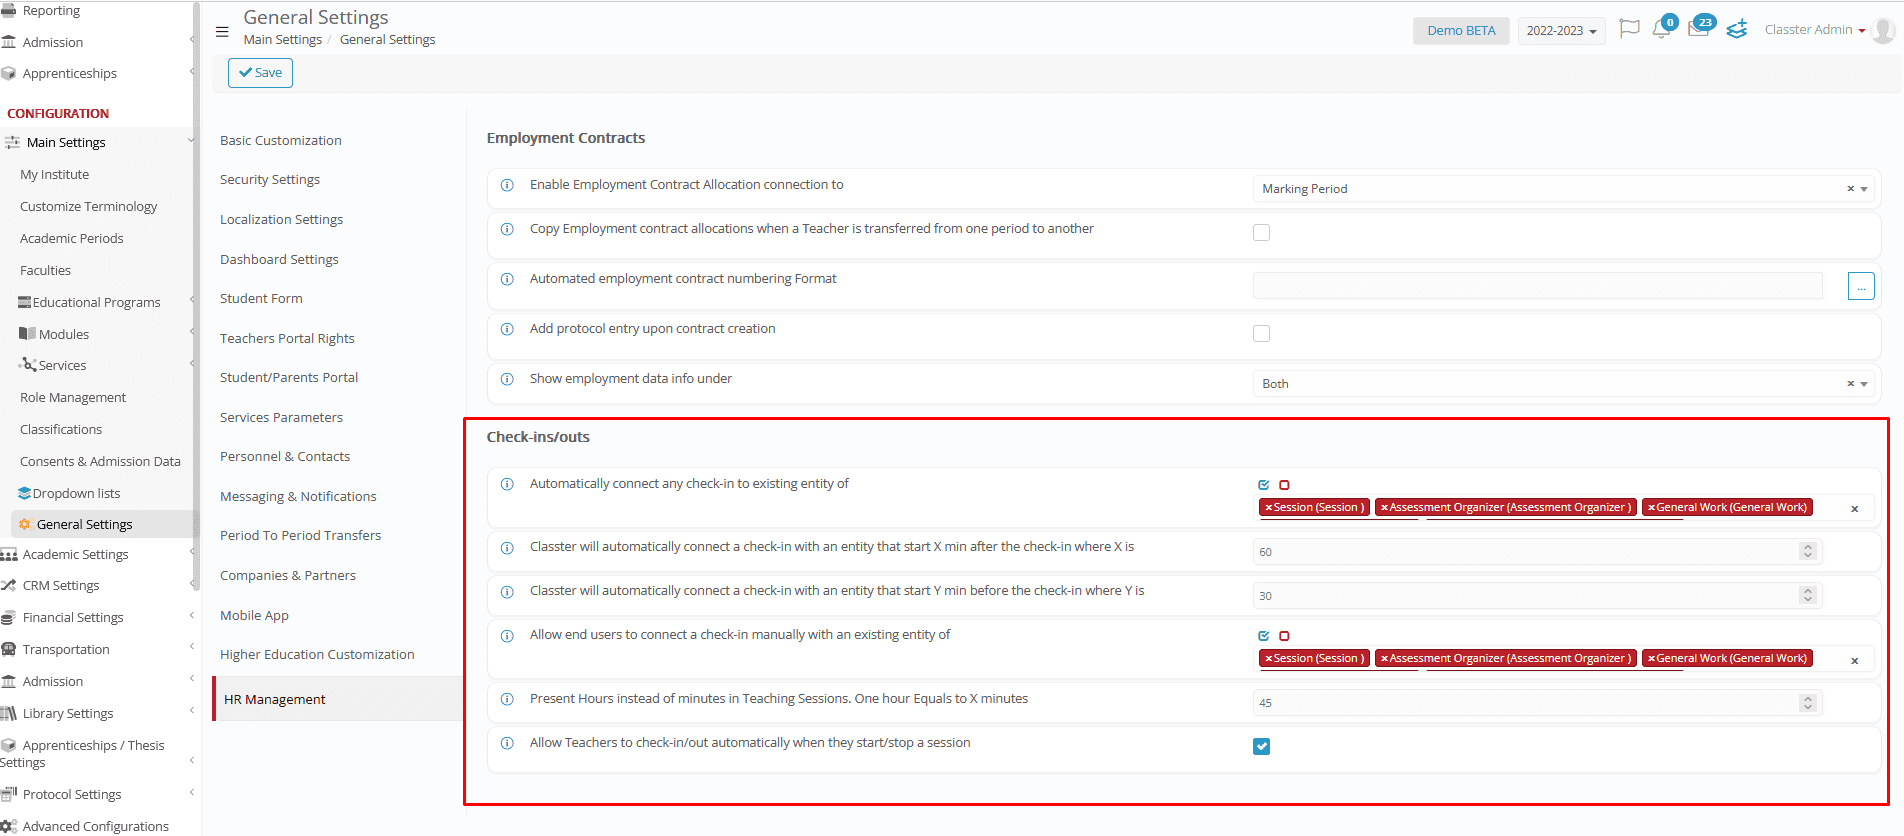
1. Automatically connect any check-in to existing entity of
A check-in/out can be optionally linked to one of the following educational entities:
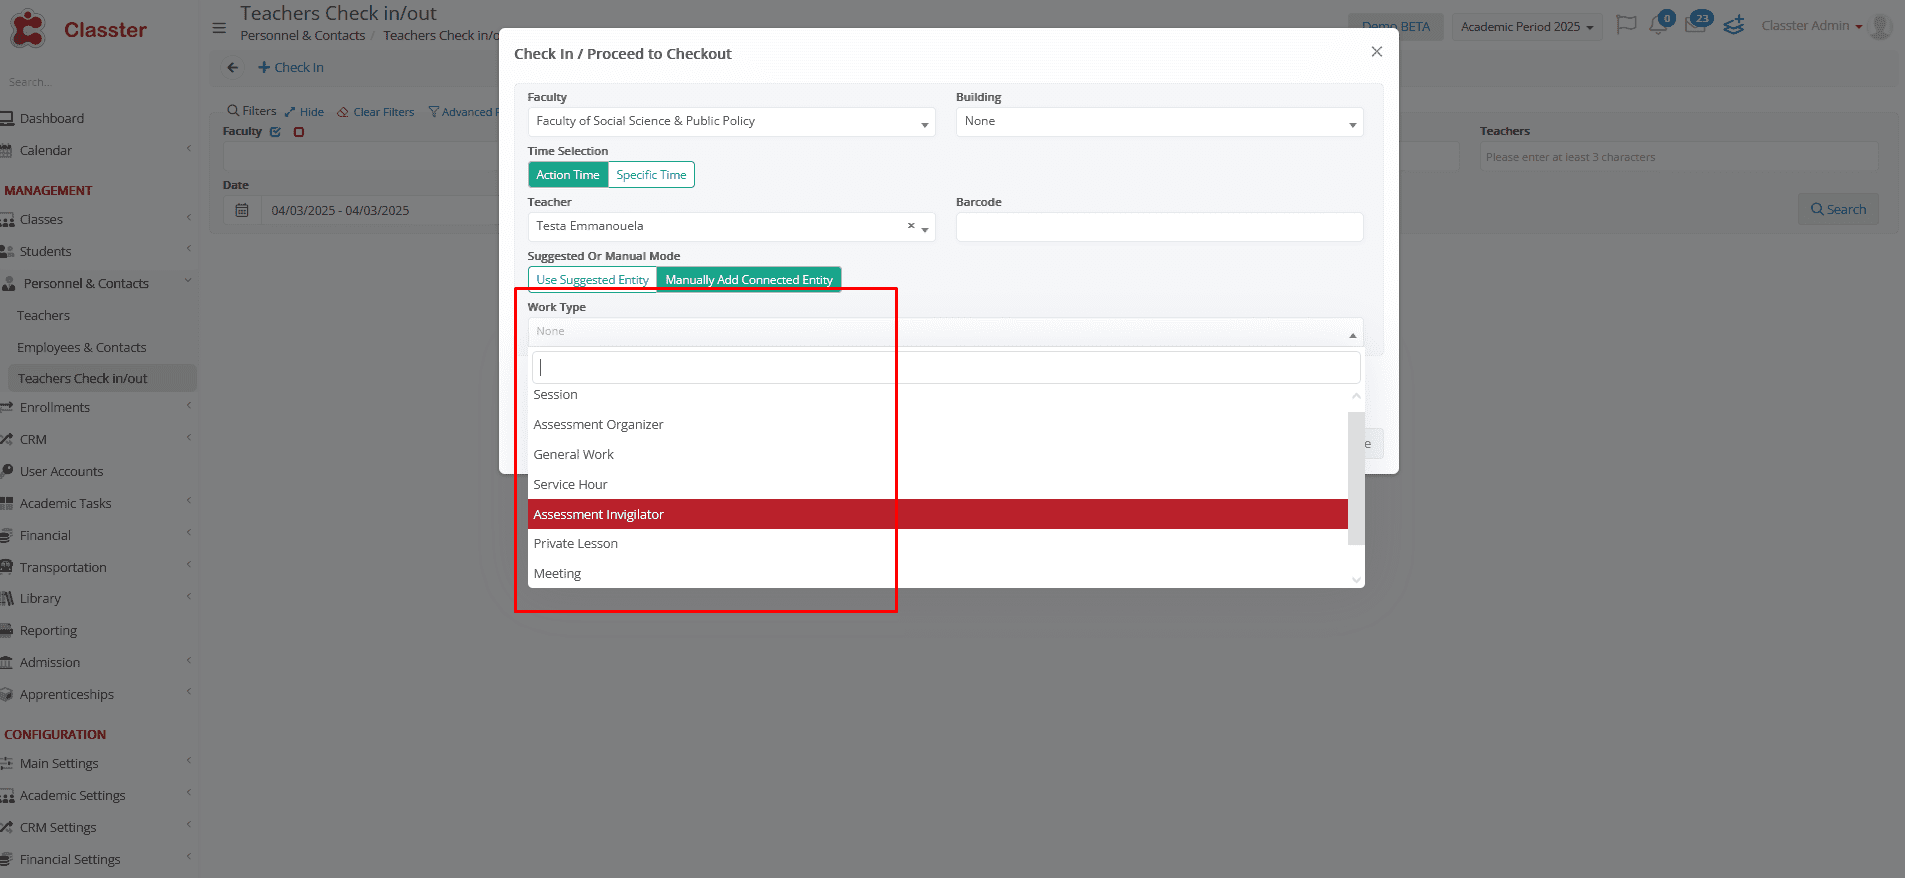
| Entity Type | Description |
| Session | Teaching lesson |
| Meeting | Parent or student meeting |
| Event | Participation in school events |
| Exam | Acting as an exam teacher |
| Exam Invigilation | Acting as an invigilator |
| Service | Delivering services or activities |
| Private Lesson | Teaching private sessions |
| General Work | Non-linked general duties |
Example:
A teacher checks in at 10:45, and there’s a session starting at 11:00. The system will automatically connect the check-in to that session.
2. Automatically connect a check-in with an entity that starts X minutes after the check-in
✅ Recommended Value: 45 min
Explanation:
Covers early check-ins up to 45 minutes before an activity starts.
Example:
Teacher checks in at 11:15 → Session starts at 12:00 → ✅ Valid match (within 45-minute window)
3. Automatically connect a check-in with an entity that started Y minutes before the check-in
✅ Recommended Value: 20
Explanation:
Allows slightly late check-ins to be accepted and linked to the intended activity.
Example:
Teacher checks in at 12:18 → Session started at 12:00 → ✅ Still accepted
4. Allow end users to manually connect check-in with a task of type
✅ Recommended Value: Select All
Example:
If auto-detection fails, the system will prompt:
“There is no scheduled related task for this teacher. Please select type of work and related task manually.”
5. Present hours instead of minutes in teaching sessions. One hour equals to X minutes
✅ Recommended Value: 45
Explanation:
Most institutions define 1 teaching hour as 45 minutes. This setting ensures working durations are shown in consistent, familiar units.
Example:
A session of 90 minutes will be displayed as 2 hours.
6. Allow teachers to check-in/out automatically through session Start/Stop
✅ Recommended Value: Yes
Explanation:
Enables seamless automation of check-in when clicking Start Session and check-out when clicking Stop Session.
Improves user experience and ensures consistency.
Example:
- Teacher clicks Start Session at 10:55 → Auto check-in created
- Teacher clicks Stop Session at 12:01 → Auto check-out recorded, and duration calculated
Methods of Check-in/Check-out
Teachers may Check-in/Check-out using the following methods:

1. Manual Entry
School Filters
Location
Select the appropriate school location (e.g., Campus or Department) where the check-in is taking place.
Building
If buildings are enabled, select the relevant building. If not, this will be hidden.
Time Selection
Action Time
This is the time the check-in or check-out is taking place. By default, it’s set to the current time.
Specific Time
If you want to enter a different time (e.g., for a check-in that happened earlier), you can set it manually — only if you have permission.
Teacher Filters
(Visible only if the action is performed by a back-office employee)
Teacher name
Search and select the teacher. You can type at least 3 characters to bring up results.
Barcode
Enter the barcode number to auto-fill the teacher’s details, pressing the ENTER button on your keyboard.
Suggested Or Manual Mode
Use Suggested Entry
The system will try to find a matching activity (e.g., lesson, meeting, event) based on the time and teacher’s schedule. If it finds one, it will auto-connect the check-in to that activity.
Manually Add Connected Entity
If no scheduled task is found, or you want to override the suggestion, you can manually choose the type of work (e.g., General Work, Event, Private Lesson) and link the check-in to that activity.
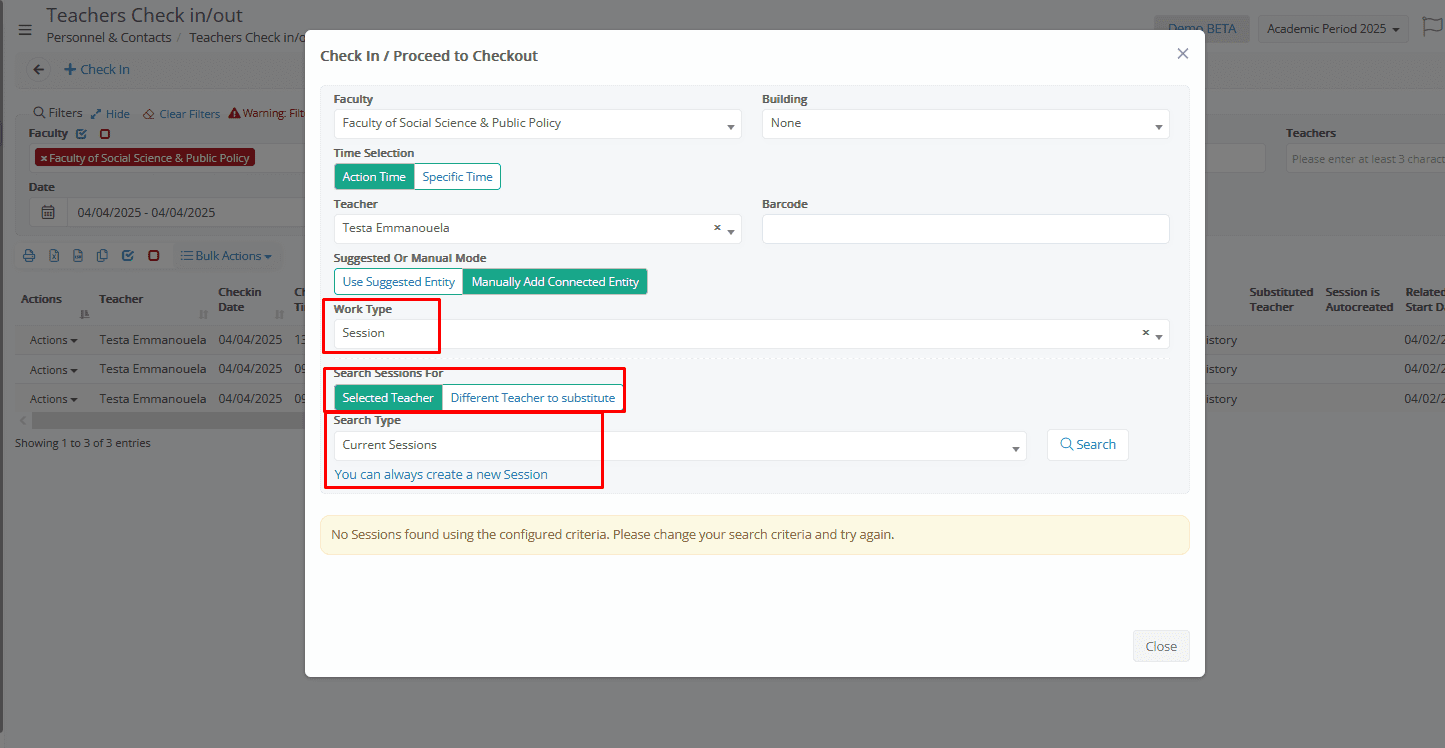
Work Type
Choose the appropriate type of work the teacher is performing.
Options may include:
- Session (Search and select from the teacher’s scheduled sessions – Current, Passed, or Future)
- Event
- Meeting
- Exam
- Exam Invigilation
- Service
- Private Lesson
- General Work (For non-scheduled activities; a pop-up window will prompt you to enter a description, select a classroom, and optionally add a comment)
This list is controlled by system settings and may vary depending on school policy.
Selected Teacher or Substitute
If the selected work type is Session, you’ll be asked to choose one of the following:
- Teacher’s own sessions
- Substitute for another teacher – In this case, you can search and select the teacher being substituted.
Only back-office users and authorized teachers will see the substitution option.
Session Type
After selecting the teacher, you can filter available sessions by:
- Current Sessions – Sessions happening right now
- Passed Sessions – Earlier sessions not yet completed or not checked-in
- Future Sessions – Upcoming sessions the teacher wants to begin earlier than scheduled
If no suitable session appears, you may also create a new session (based on permissions) or select General Work instead.
Example
The teacher initiates the check-in process by selecting the + Check-in (upper left corner) button.
This action opens a pop-up window, allowing the teacher to select the appropriate session from their scheduled activities.
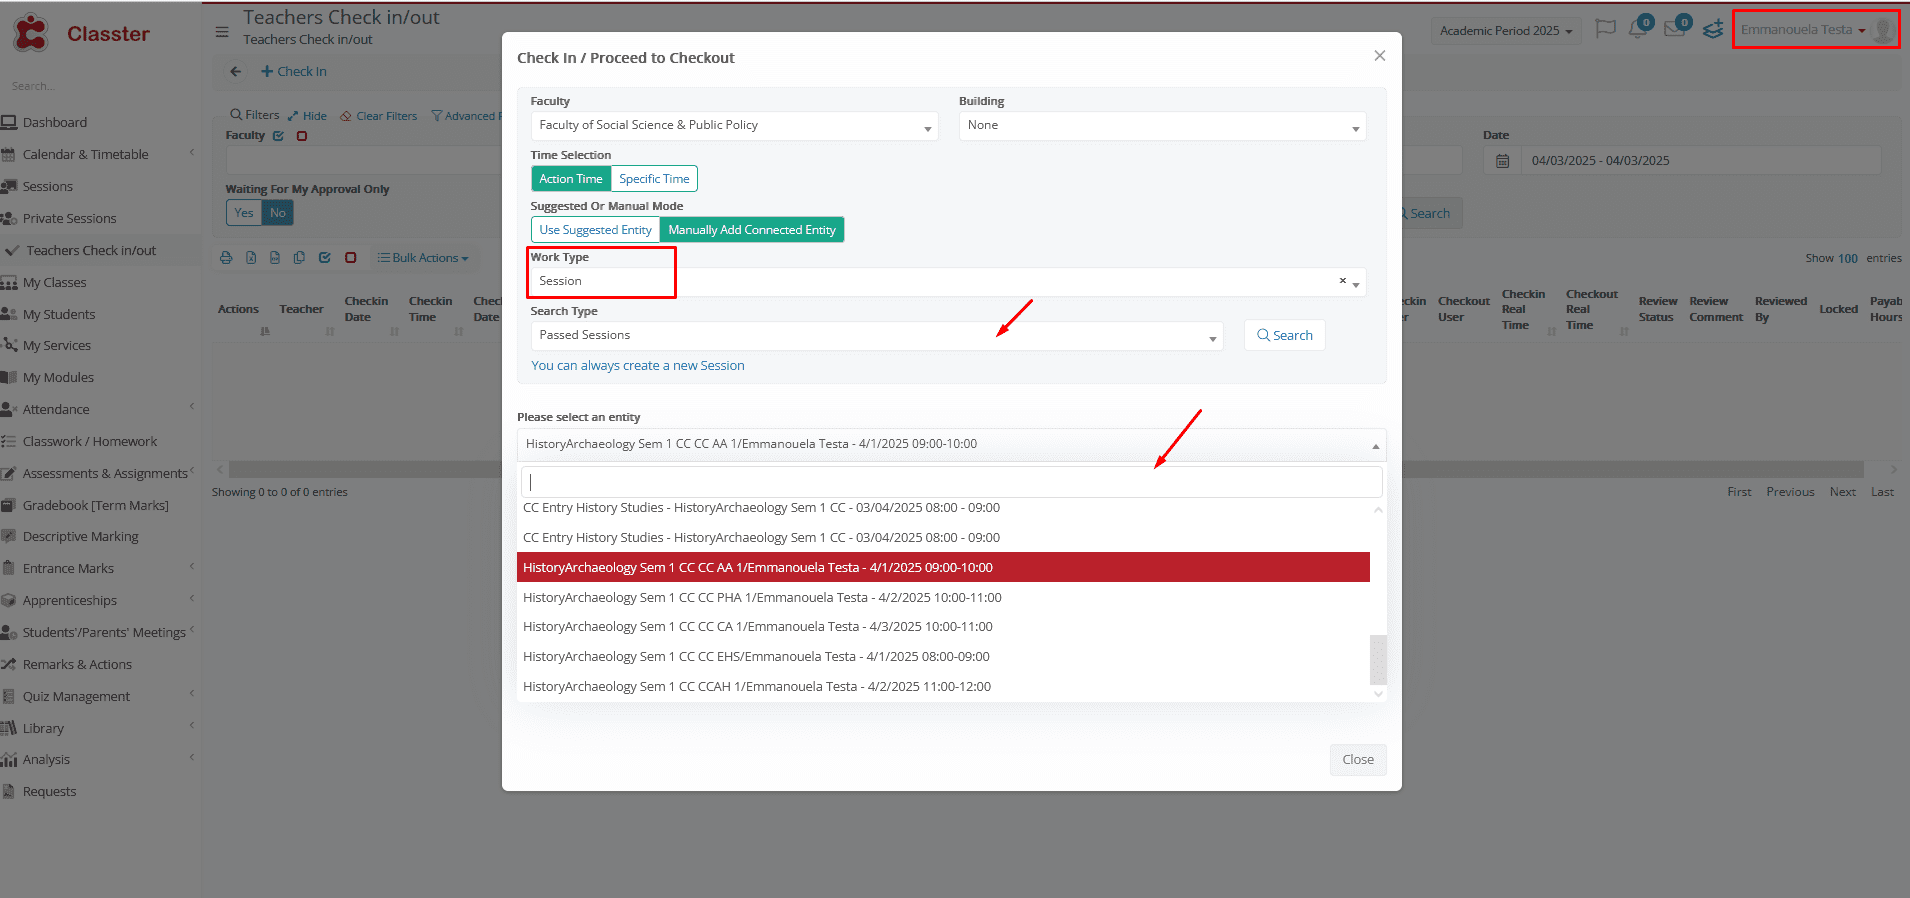
In this case, the teacher chooses to check in for a passed session. They select the session from the list and then press the Check-in (lower right corner of popup window) button to complete the process.
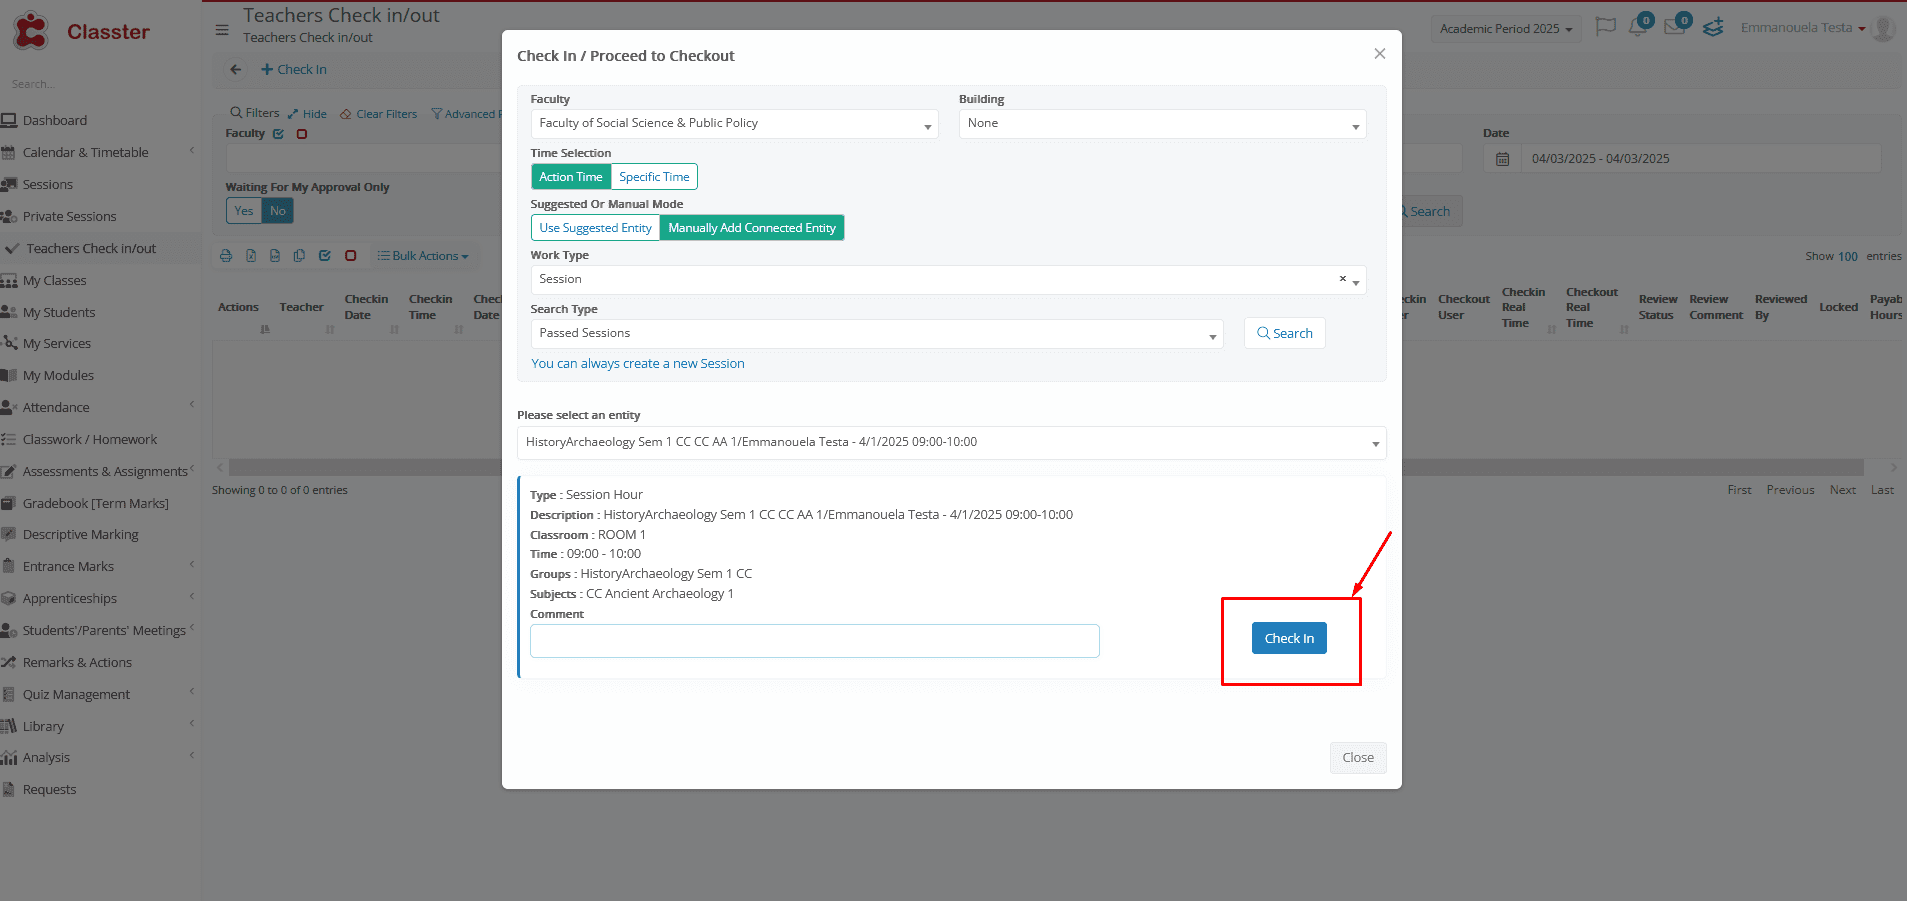
Afterwards, reopens the check-in process, displaying the same session so the teacher can proceed with the check-out.

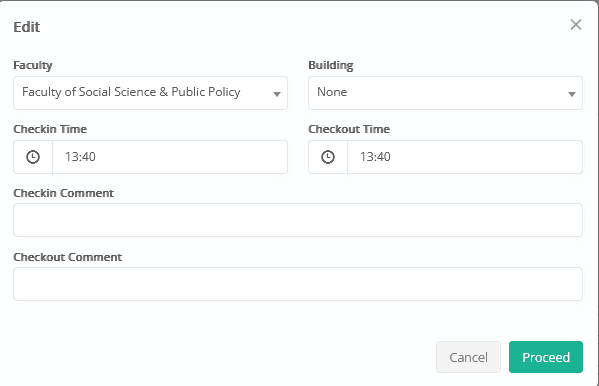
For a passed session, the check-in time is initially set to the current time, but it can be manually adjusted if the user has the necessary permission.

A pop-up window appears, allowing the user to edit the check-in or check-out time and optionally add a comment explaining the delayed action. This ensures transparency and accurate tracking for belated entries.

2. QR Card or Mobile App QR code
Scan the teacher’s physical card or mobile app QR code, or manually enter the QR code number and press Enter. This will automatically fill in the teacher’s details.
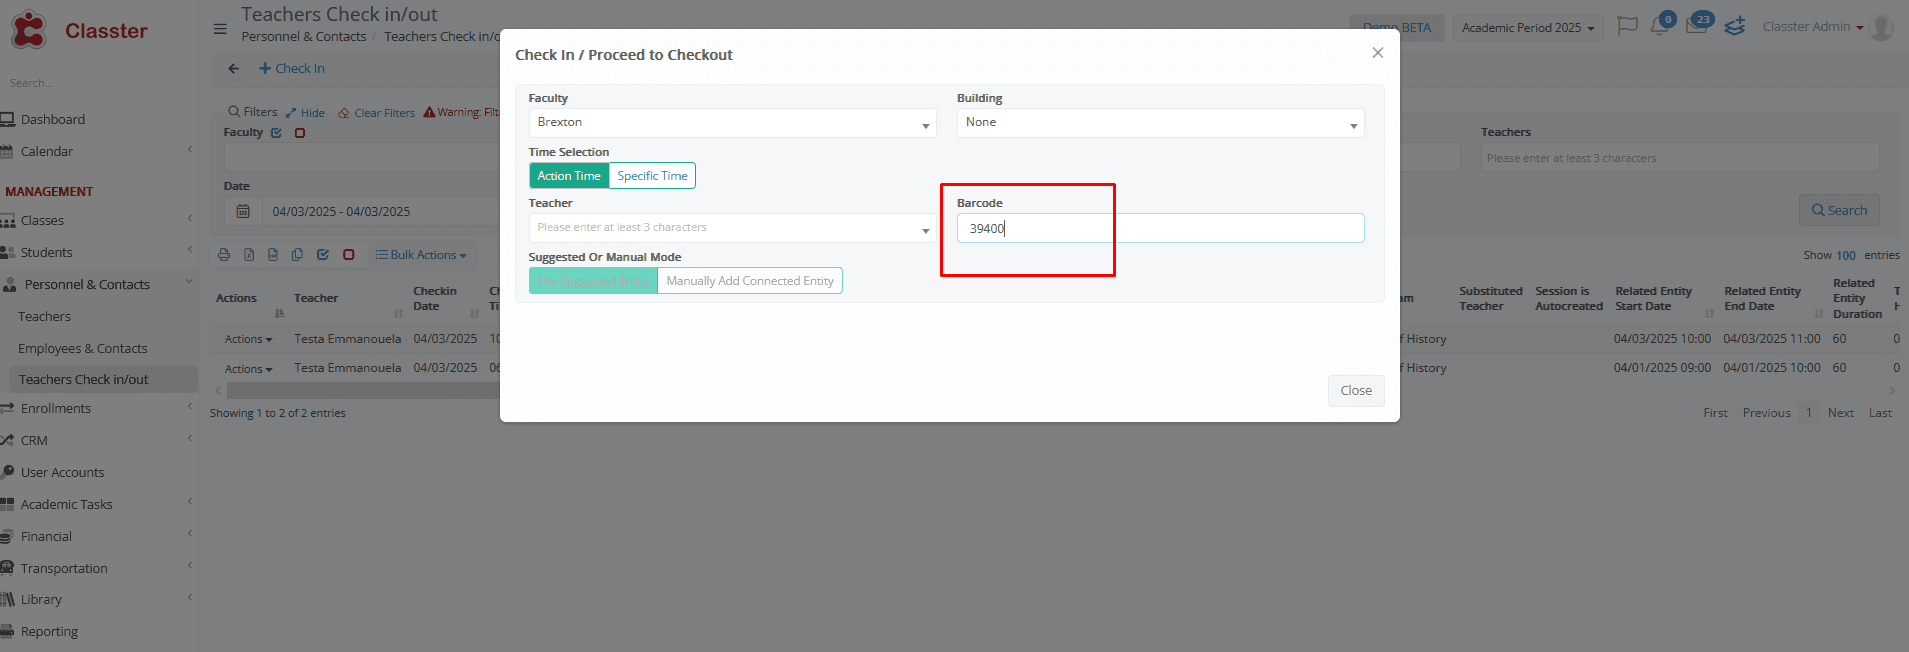
Once the teacher is identified, they are ready to proceed with check-in or check-out, just like in the manual process.

This method can be used by both teachers (self-service) and back-office staff.
3. Start/Stop Session Actions
Teachers can check in and out automatically by using the Start and Stop buttons available on their Session Dashboard.
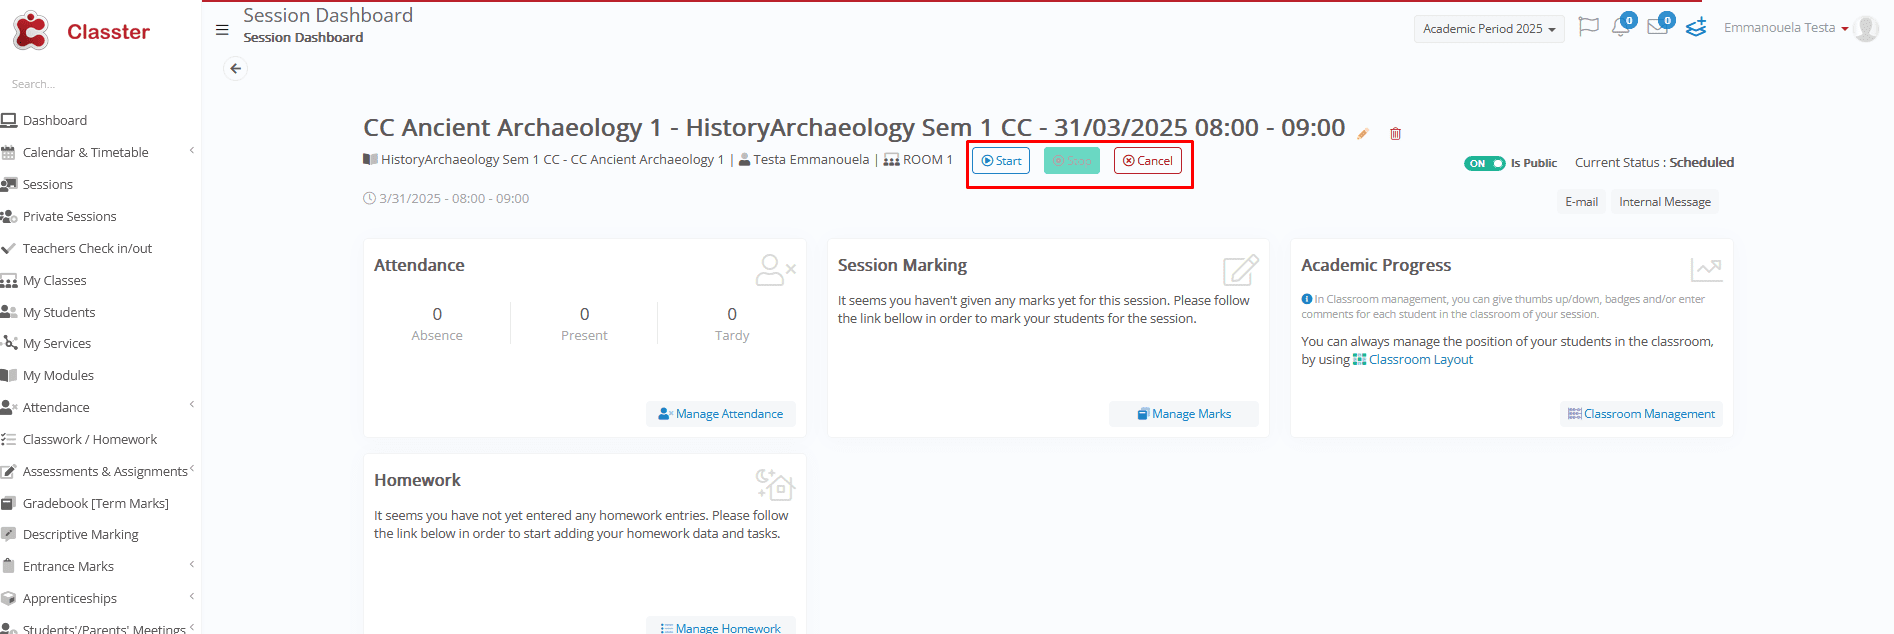
- Clicking “Start Session” will automatically check in the teacher and update the session status to Undergoing.
- Clicking “Stop Session” will automatically check out the teacher and mark the session as Completed.
This process is enabled when the setting:
“Allow teachers to check-in/out automatically through session Start/Stop” is turned on.
✅ Ideal for scheduled sessions with accurate timing — no manual entry required.
For more information on how teachers start, stop, or cancel a session, visit: Classter Help Center – Classroom Booking
Bulk Actions
Bulk actions allow authorized users to perform updates on multiple check-in/out entries at once — saving time and ensuring consistency.

Manual or Auto Checkout
Manual Checkout:
Lets you manually set a check-out time for selected entries.
➕ Useful when a teacher forgot to check out.
Auto Checkout:
The system automatically fills in the check-out time based on the end time of the related session/event/exam and calculates duration.
➕ Ideal for entries missing a checkout but linked to a scheduled task.
Calculate Payable Time
Allows you to set or update the payable hours for multiple entries. You can choose:

- Whether to calculate based on session or actual check-in/out time
- Whether to round the result (up, down, or not at all)
- Whether to replace all values or only those that are still empty
Send for Approval
Sends selected entries to the appropriate person (e.g., Supervisor or Manager). You can also:

- Set review status to “Reviewed OK”
- Lock entries (optional)
- Set calculated hours as payable (if not yet set)
⚠️ Entries must have checkout times to be sent for approval.
Review / Lock / Unlock / Set Approved / Set Paid
- Review: Mark entries with a review status and add comments

- Lock/Unlock: Prevent or allow further changes to entries
- Set Approved: Approve for inclusion in payroll

- Set Paid: Mark entries as paid, including payment date and user

Each of these is allowed only if the user has the required permission.
Delete Entries
Deletes selected check-in/out records permanently.
➡️ This action is logged for auditing purposes.
⚠️ Available only to users with the Delete privilege and entries must be unlocked.


