

The Protocols Module in Classter provides institutions with a structured way to assign protocol numbers—custom-formatted, incremental identifiers—used to track official documents and administrative actions. These protocol entries function as a digital logbook, enabling users to manage files, record key communications, and maintain a reliable audit trail.
Protocols can include uploaded PDFs (e.g., contracts, letters, signed agreements), but may also be used without attachments to log internal approvals, incoming emails, or phone calls.
It supports versioning, appendices, and document control, improving traceability and compliance across departments. Protocols can be created with distinct rules and applied in various workflows, including manual uploads, automated report generation, or digital signature workflows.
⚠️ NOTE: License Required to open the module.
Getting Started
Each protocol defines its own number format and can be set to reset periodically (e.g., annually or monthly). Protocols are linked to specific entities (such as Students, Employees, or Contracts), companies, locations, and grades, and can be designated for incoming, outgoing, or both types of communication.
Protocol entries can represent either official documents or administrative actions. These entries assign a unique protocol number whether or not a file is attached. For example, you may record an incoming email, a phone call, or internal approval without a document.
Protocols are commonly used in workflows involving:
- Contracts (student enrollment, service agreements, private lessons)
- HR documentation (employment contracts, evaluations)
- External and internal correspondence (invoices, announcements)
- Digitally signed documents (via Signatures module)
- Administrative records without attached documents (e.g., logging an incoming call or submission)
Protocols can be submitted in the following ways:
- Manually: Create an entry with or without a PDF (e.g., phone call, email, approval).
- Generated via reports: Generate a report, convert to PDF, and auto-assign a protocol number.
- Through Signature Workflows: Once a document is signed digitally via the Signatures module, it is automatically stored under a protocol.
For more details on combining Signatures with Protocols, refer to the Signatures & Protocols documentation.
Configuration Overview
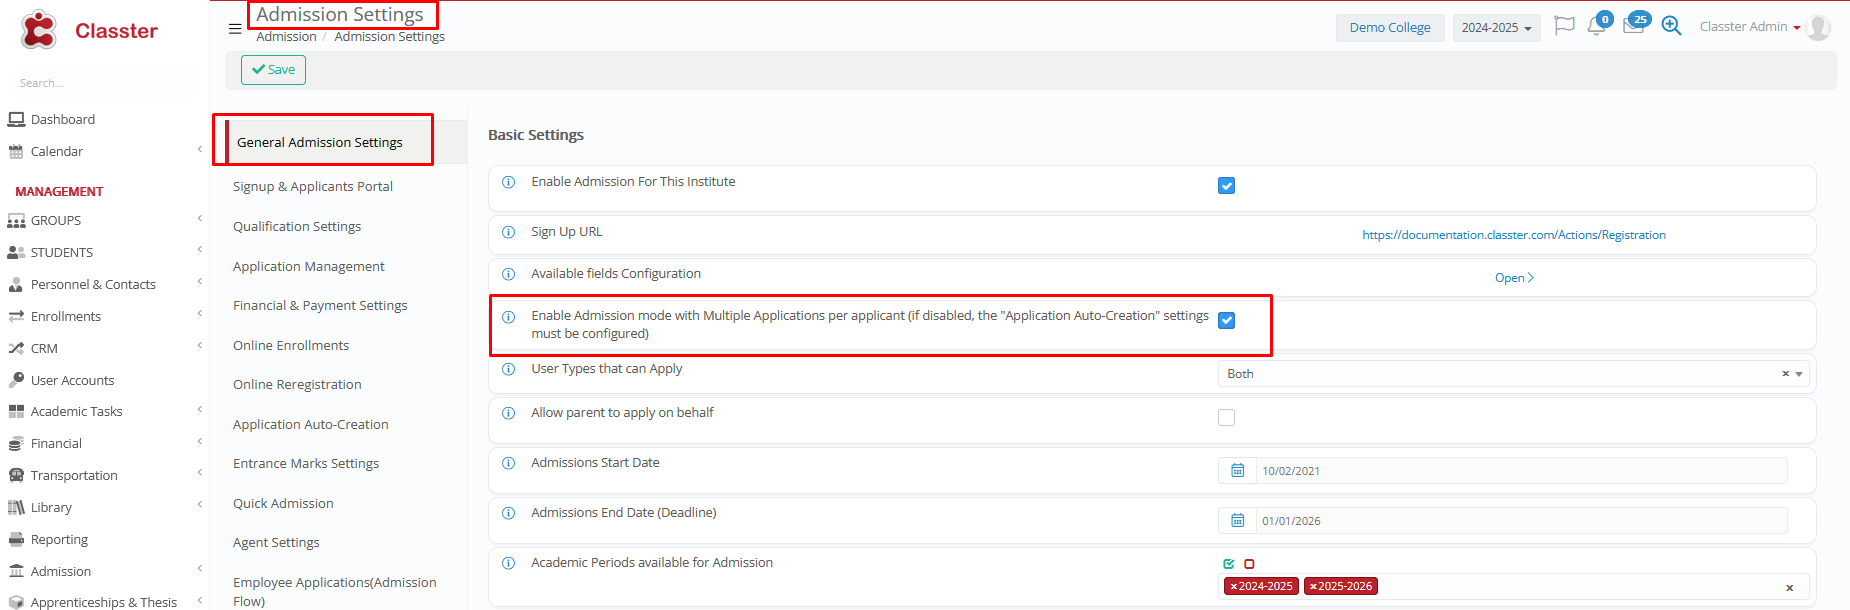
1. Enable the Module
Navigate to: Configuration > Protocol Settings > Protocol Settings (License Required to open the module)
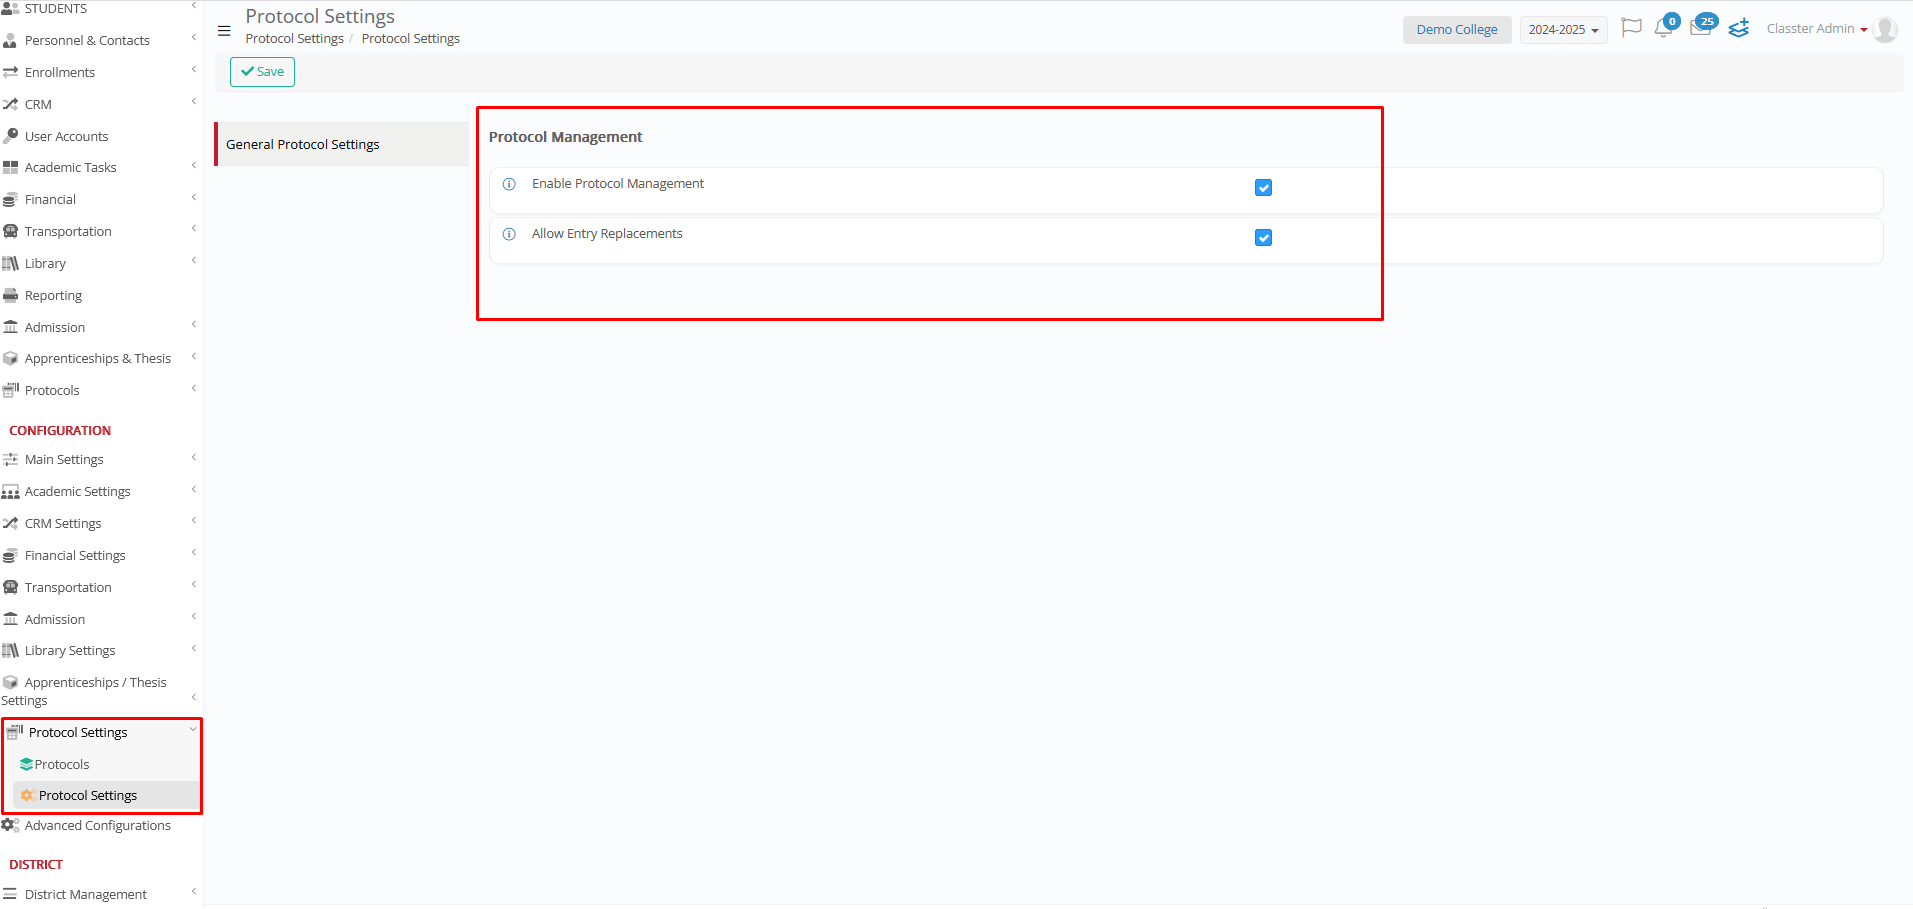
Activate the following:
- Enable Protocol Management: Turns on the protocol module.
- Allow Entry Replacements: (Optional) Enables full replacement of existing protocol entries without retaining history. Use with caution.
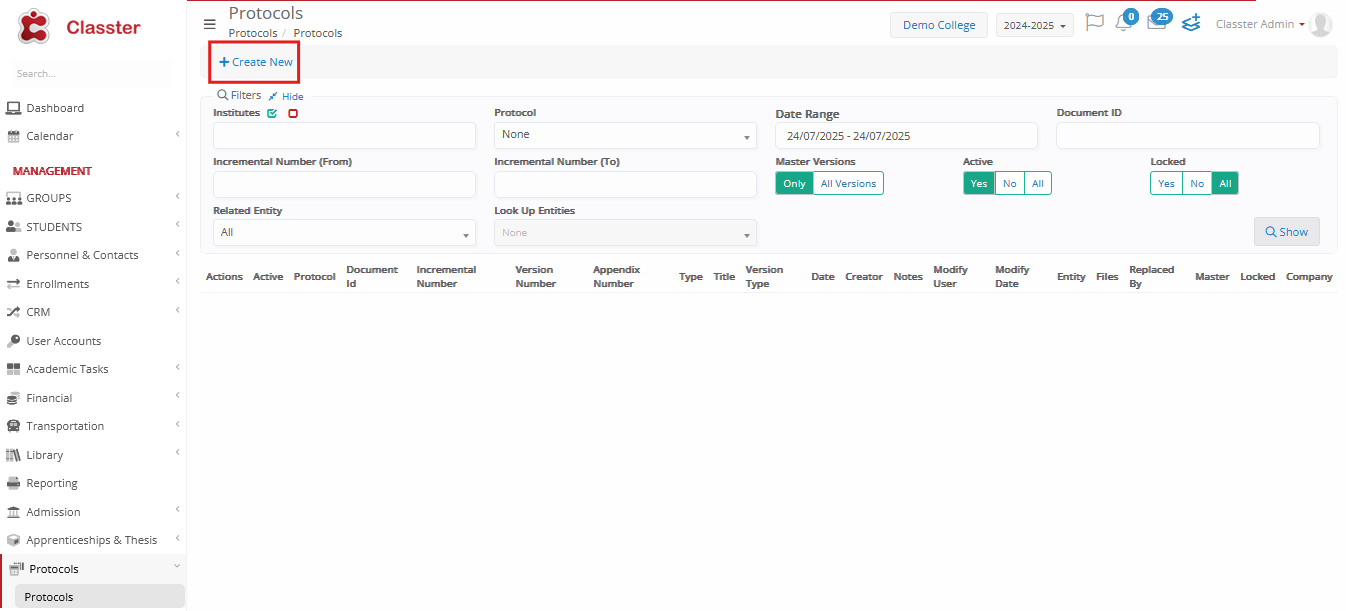
2. Create a New Protocol
Navigate to:
Configuration > Protocol Settings > Protocol > Create New
Fill in the following fields:
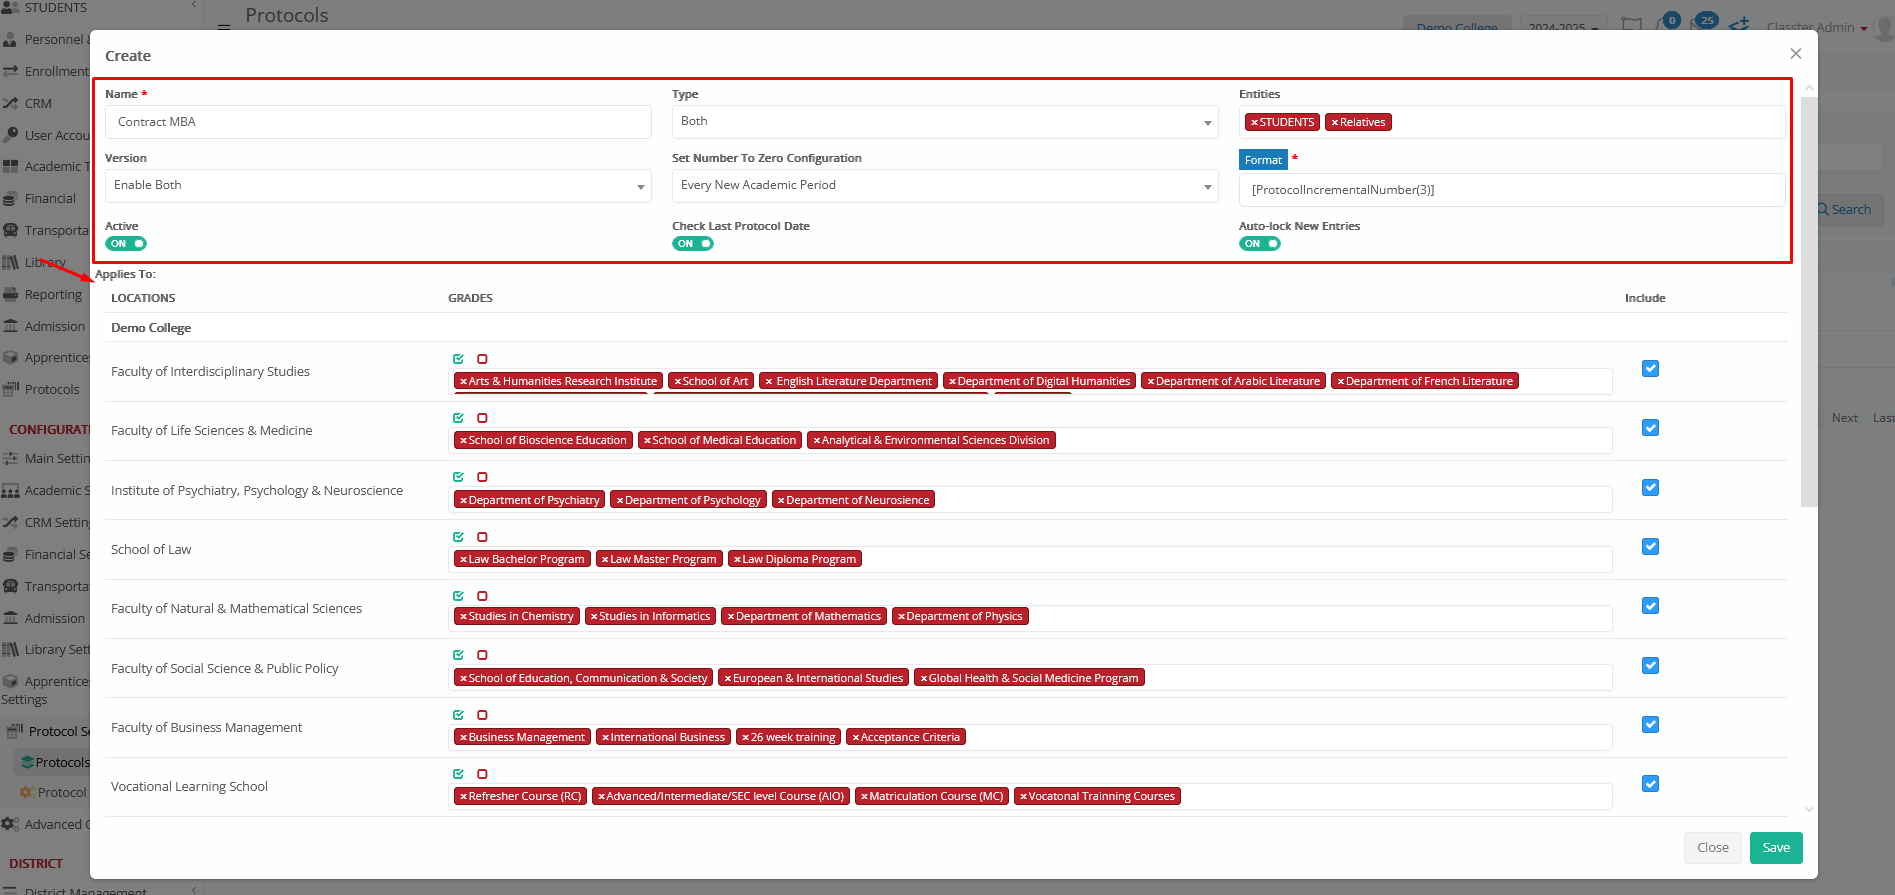
- Name: Enter a meaningful title for the protocol (e.g., Incoming Official Letters, Outgoing Contracts).
- Type: Define the direction of the protocol:
- Incoming: For received documents
- Outgoing: For sent documents
- Both: Covers both incoming and outgoing traffic
- Entities: Select the applicable entities this protocol will be associated with (e.g., Students, Relatives, Employees, Suppliers, Groups, Contracts).
- Version: Define how the system will handle protocol updates:
- Disabled: No version tracking
- Add Document Appendix: Allows supplemental files
- Add New Versions: Enables version history
- Enable Both: Allows both appendices and versioning
- Set Number to Zero: Determine when the protocol numbering should reset:
- Never: Continuous numbering
- Each Academic Year: Resets every academic year
- Each Calendar Year: Resets every calendar year
- Each Calendar Month: Resets every calendar monthly
- Format: Specify the structure for the protocol number (e.g., YY/0001 or PREFIX/YYYY-###).

-
- Type (Numbering Base): Choose how the protocol number is constructed:
- Protocol Incremental Number: Sequential numbering only
- Creation Year: Prefixes based on year (e.g., 2025/001)
- Creation Date: Full date included in format (e.g., 2025-06-16/001)
- Creation Month: Year and month included (e.g., 2025-06/001)
- Digits: Set the number of digits in the incremental part of the protocol number (e.g., 3 = 001, 4 = 0001).
- Type (Numbering Base): Choose how the protocol number is constructed:
- Active: Toggle to enable or disable this protocol configuration.
- Check Last Protocol Date: If enabled, ensures new entries are registered after the most recent protocol date.
- Auto-lock New Entries: If enabled, newly created entries will be locked automatically to prevent editing.
- Applies to: Select the applicable Locations and Grades that this protocol will be available for (multi-select field).
Once saved, this protocol can be linked to reports and file categories to support automated document archiving.
3. Create a Files Category
To organize documents meaningfully, you must define one or more Files Categories. These categories help group protocol documents based on their type or purpose and are essential for linking documents and reports to the appropriate protocol settings.
Navigate to: Configuration > Main Settings > Dropdown Lists
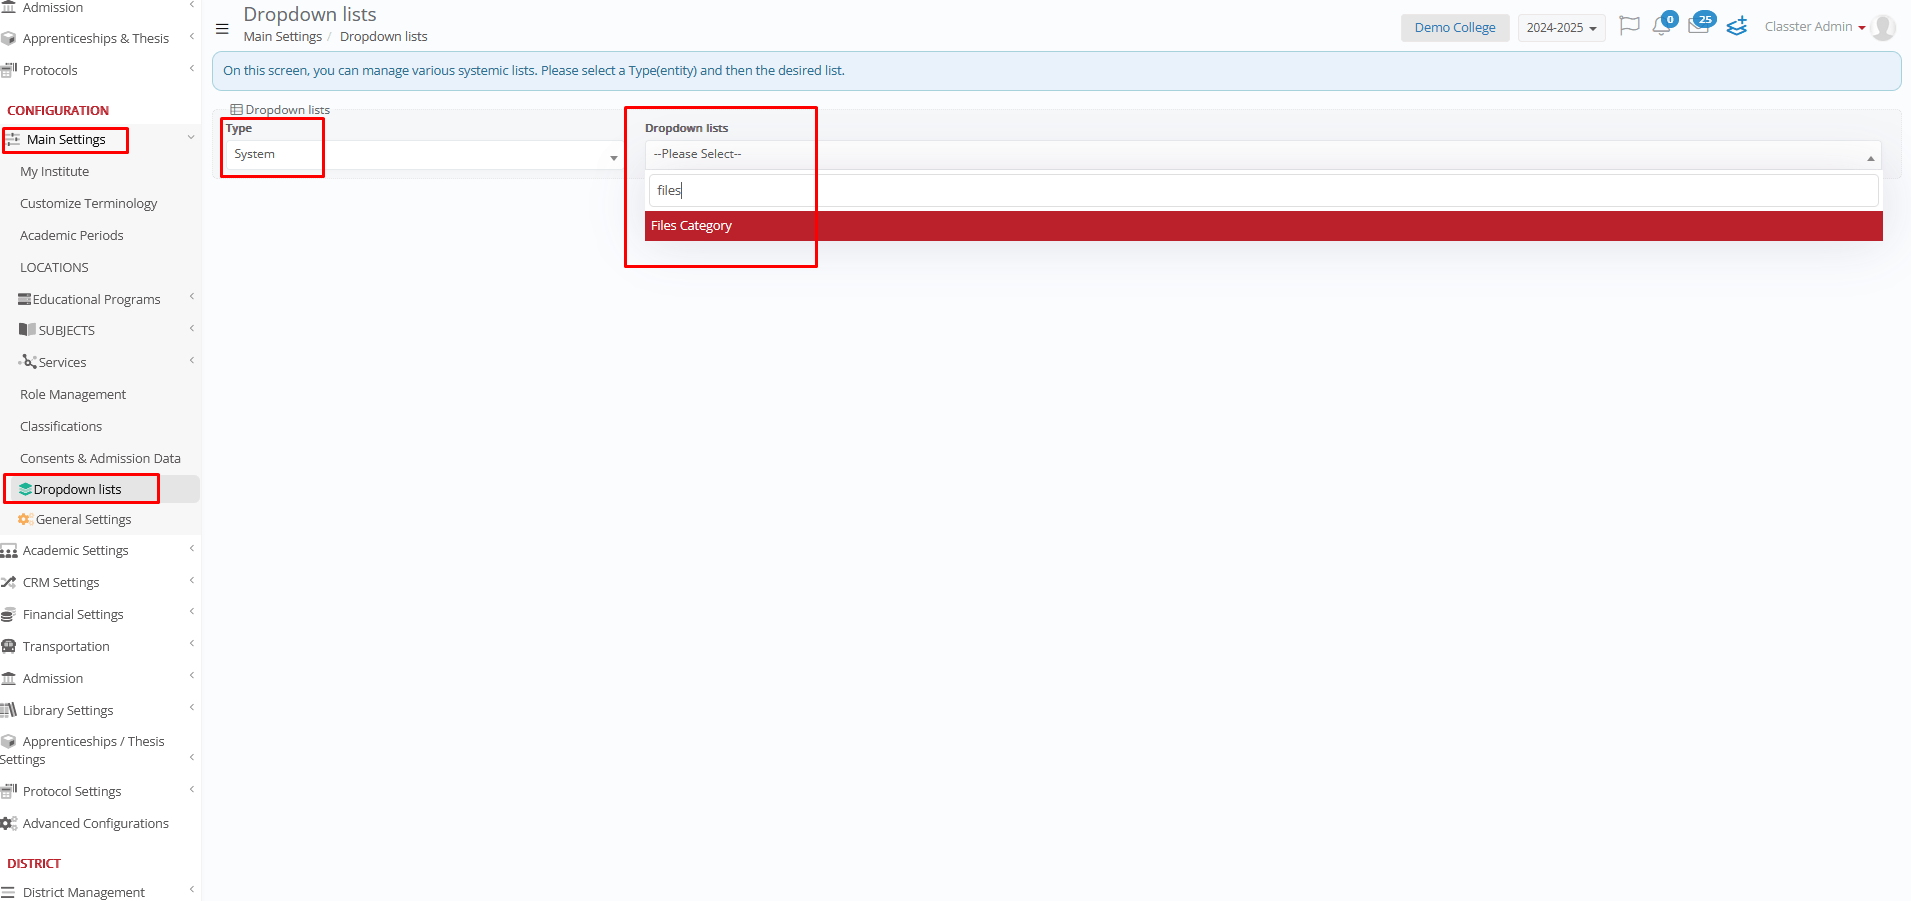
- Set Type: System & Select the list: Files Category
- Click Add New and define:
- Description: Enter the name of the file category.
- Type: Select the related entity type. Options include: Students, Relatives, Employees, Suppliers, Groups, Contracts, etc.
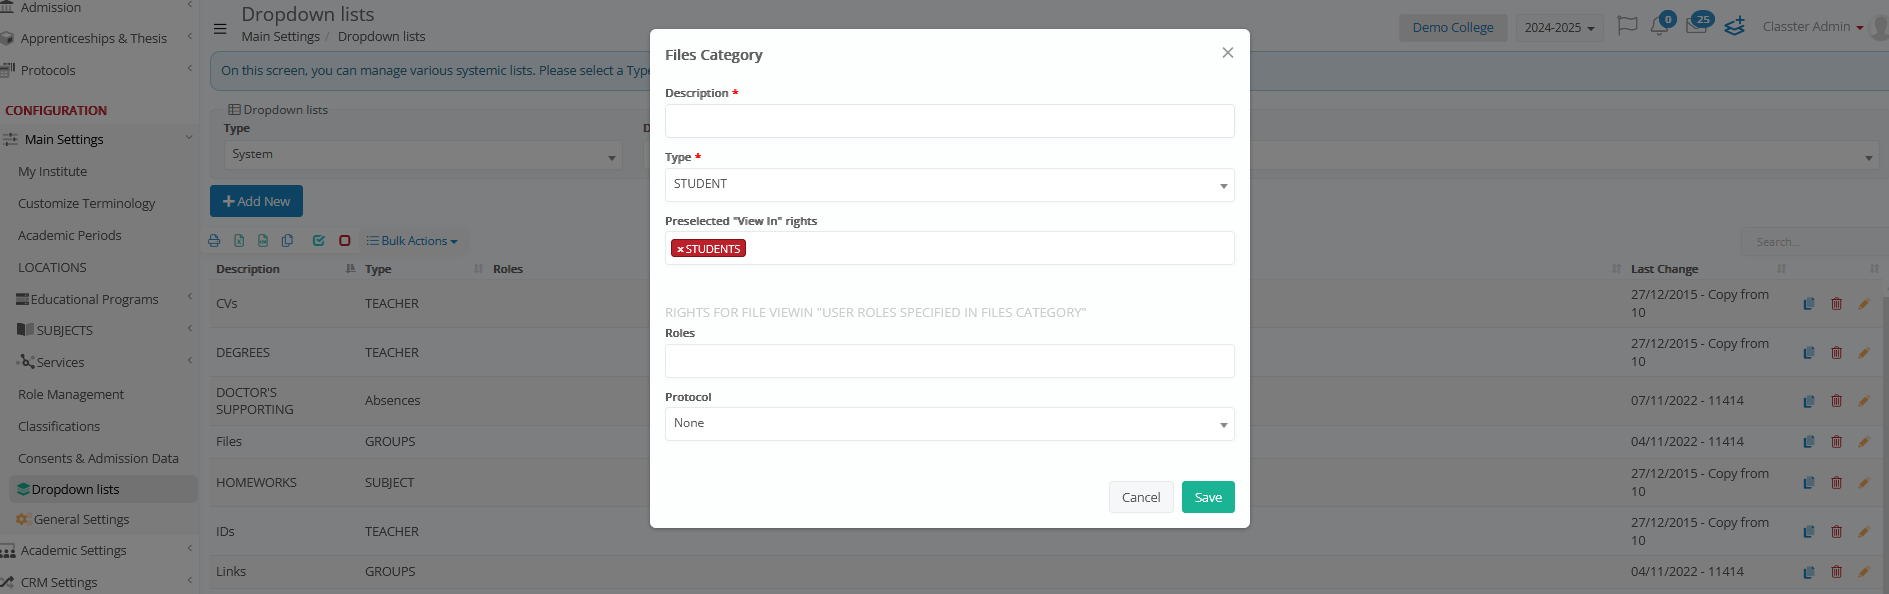
- Preselected “View In” Rights: Specify which user roles can view documents in this category. These rights are managed via the “USER ROLES SPECIFIED IN FILES CATEGORY” dropdown.
Rights for File View In “User roles specified in files category”
- Roles: This field appears under the ‘USER ROLES SPECIFIED IN FILES CATEGORY’ section. Choose which user roles are allowed to view this file category based on the assigned rights.
- Protocol: Link this file category to the appropriate protocol definition.
4. Link Reports to Protocols
To automatically archive documents created from reports:
Navigate to: Advanced Configurations > General Settings > Reporting > Report Designer
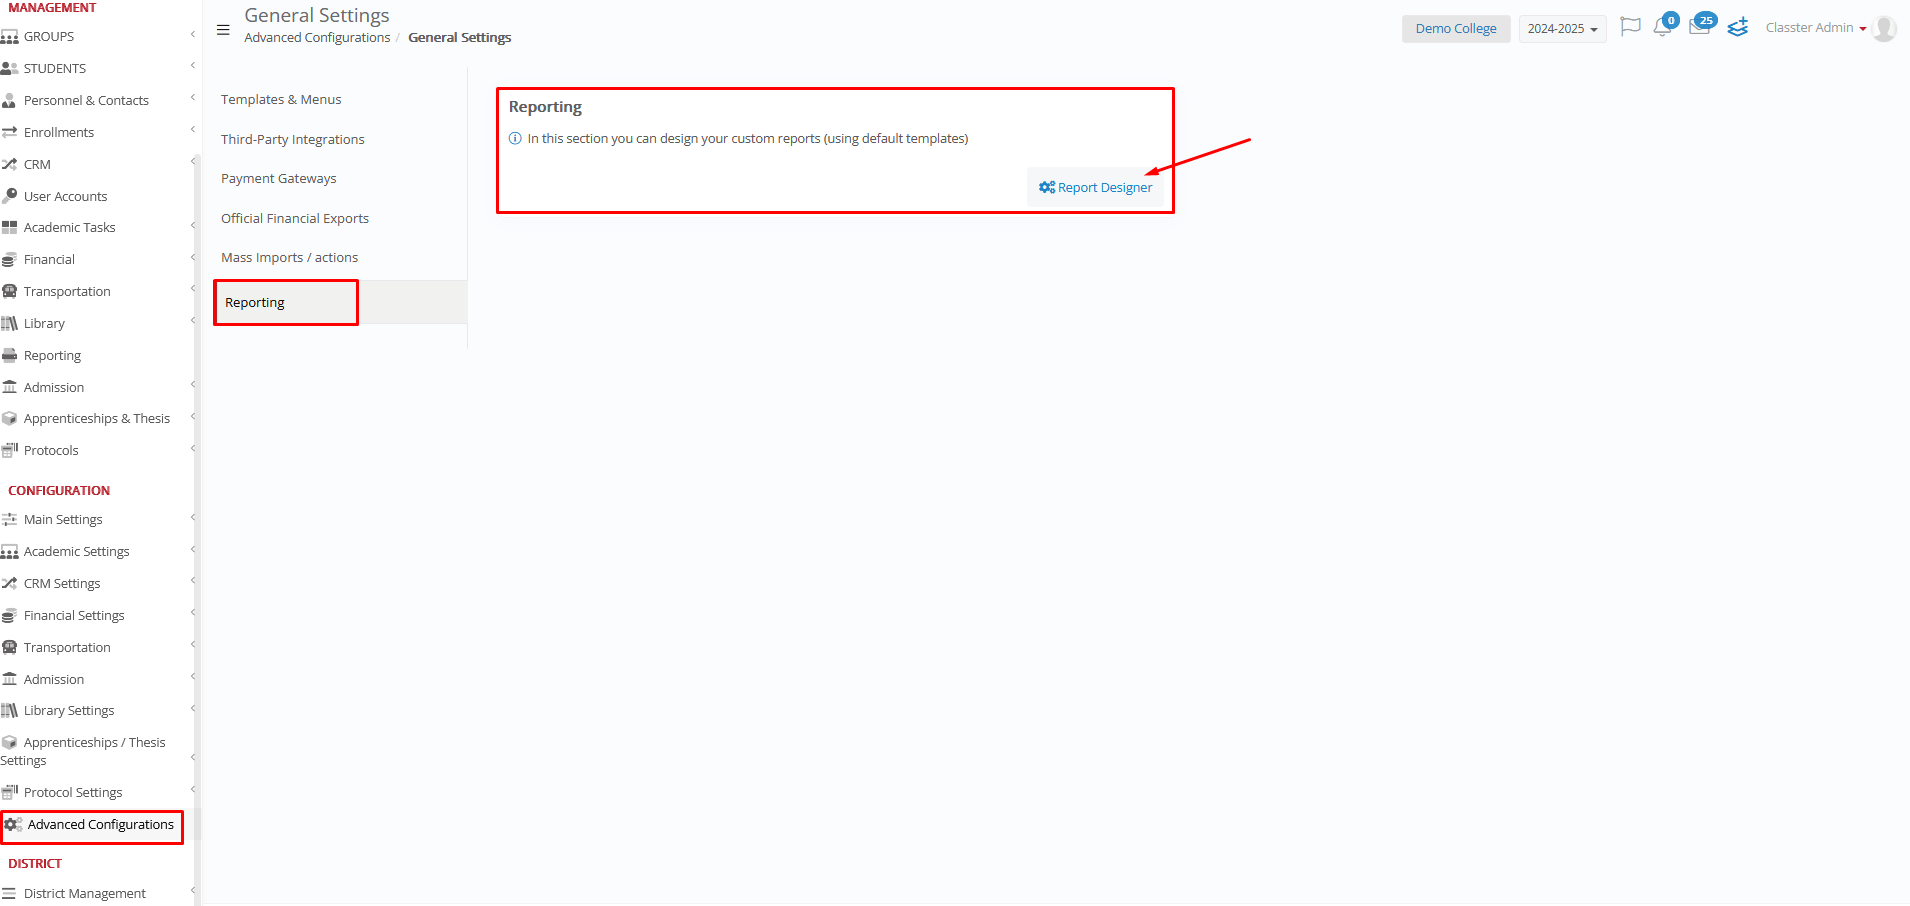
- Find the target report
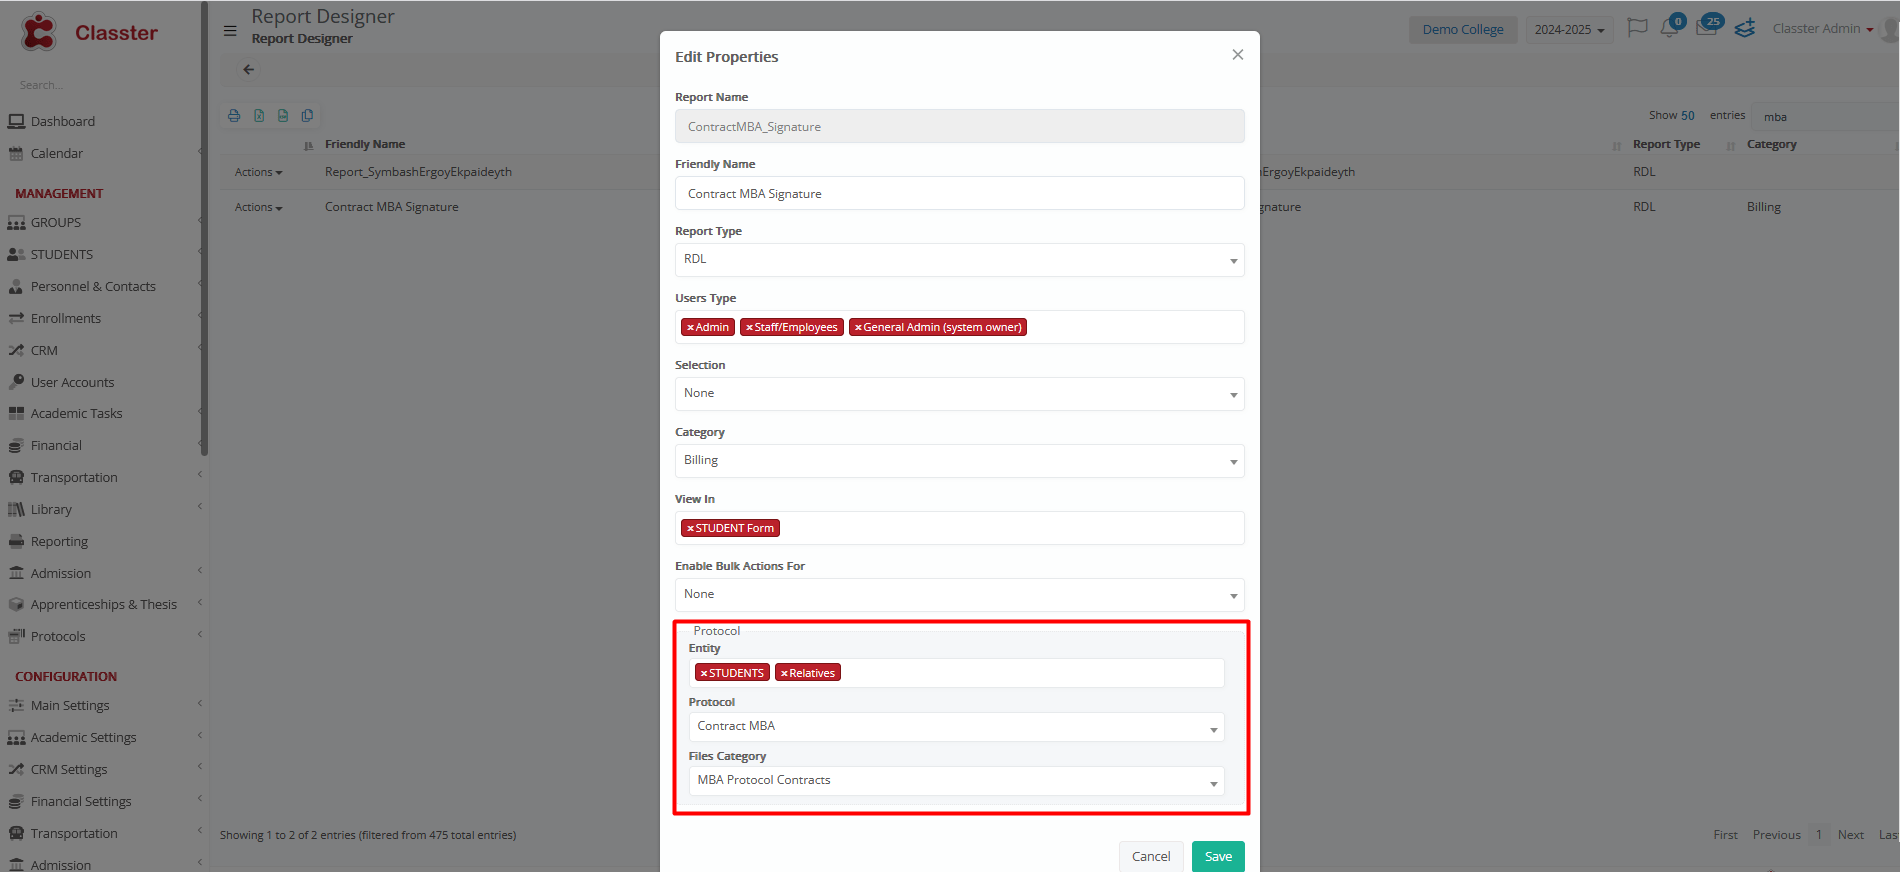
- Use: Action > Edit Properties > Protocol
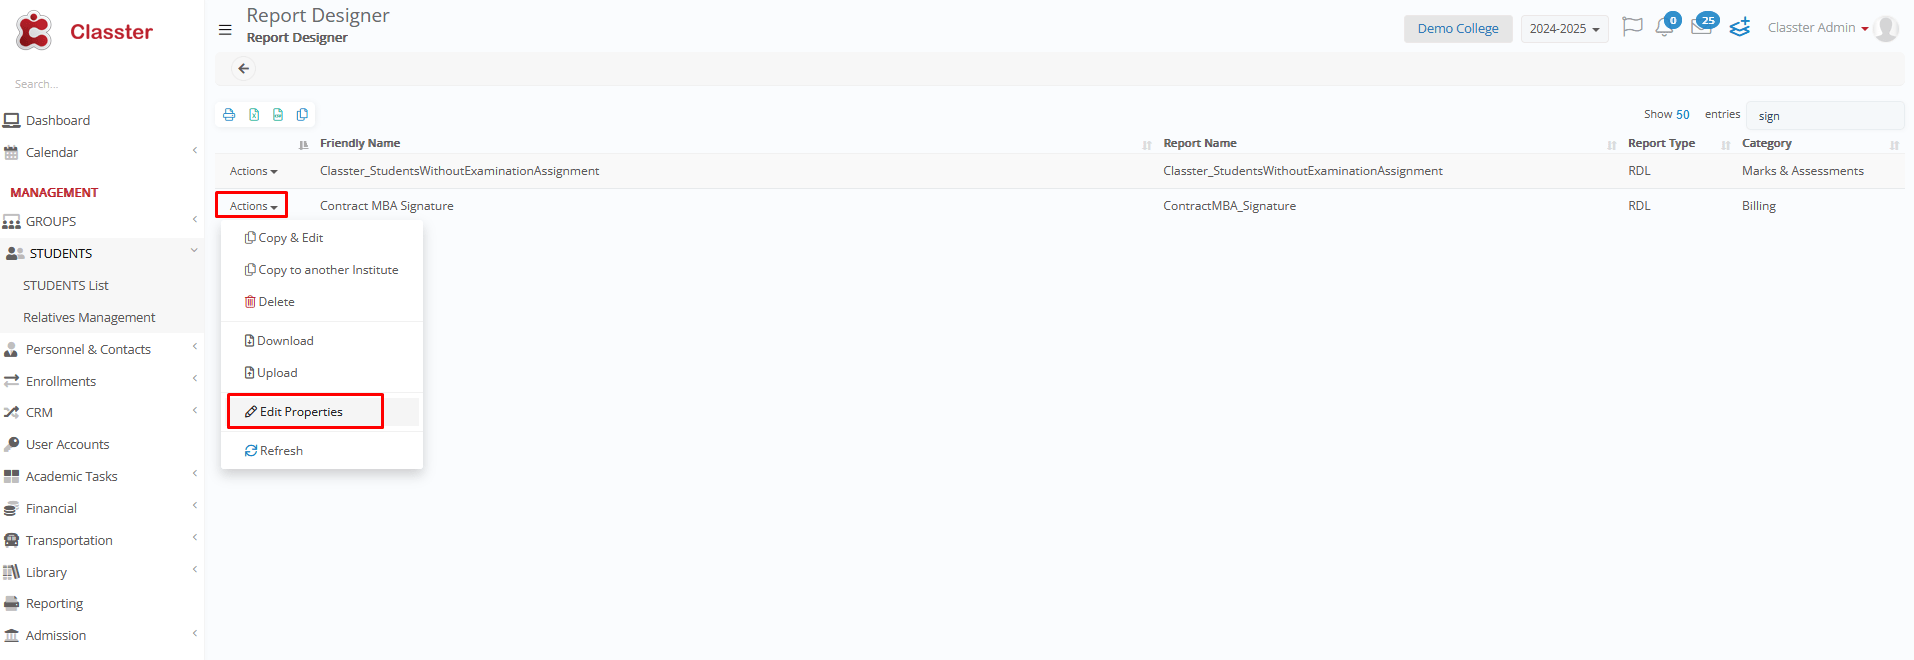
3. Assign the correct Entity/ies to whom the report refers, along with the appropriate Protocol and File Category.
Create a Protocol Entry
Manual Creation
Creating a Protocol Entry in Classter means registering either an official document—such as a contract, letter, or signed agreement—or a communication or administrative action into the institution’s digital logbook. Each entry:
- Assigns a unique protocol number based on a predefined format.
- Can involve a document (uploaded manually, generated via report, or attached through a signature workflow) or no document (e.g., a phone call, email, or verbal submission).
- Captures metadata such as type, date/time, title, entities involved, and notes.
- Links one or more entities (students, employees, contracts, etc.).
- Supports version control (if enabled).
- May be auto-locked to prevent further edits.
This ensures consistency, auditability, and a full trace of official communications—regardless of whether a file is present.
To manually create a new protocol entry:
- Navigate to: Management > Protocols > Protocol Entries
- Click “Create New Protocol Entry”
3. Fill out the form with the following:

-
- Select Protocol to create a new entry: Choose the protocol this entry should follow.
- Type: Incoming or Outgoing entry (shown only if the protocol supports both).
- Date and Time: By default, this is set to present time and date (editable if permissions allow). ️ If the selected protocol has Check Last Protocol Date enabled, you must choose a date equal to or later than the latest entry in that protocol.
- Title: A brief description of the document. If left blank, it’s auto-generated (e.g., Incoming – No 145 – 24/07/2025).
- Notes: Add context or comments (optional).
- Attach File(s): Upload one or more PDF files to link to this protocol entry (optional).️ If no file is uploaded, the entry is still valid and useful for administrative transparency.
- Associated Entities: Link one or more entities (e.g., Student, Employee, etc.) relevant to this entry.
4. Click Save to register the entry.
-
- A unique protocol number is auto-generated based on the protocol’s format.
- If versioning is enabled, future updates to this entry can be logged as new versions or appendices.
- If Auto-lock is active, the entry becomes read-only after saving.
Example
Submitting a Protocol entry via Reports
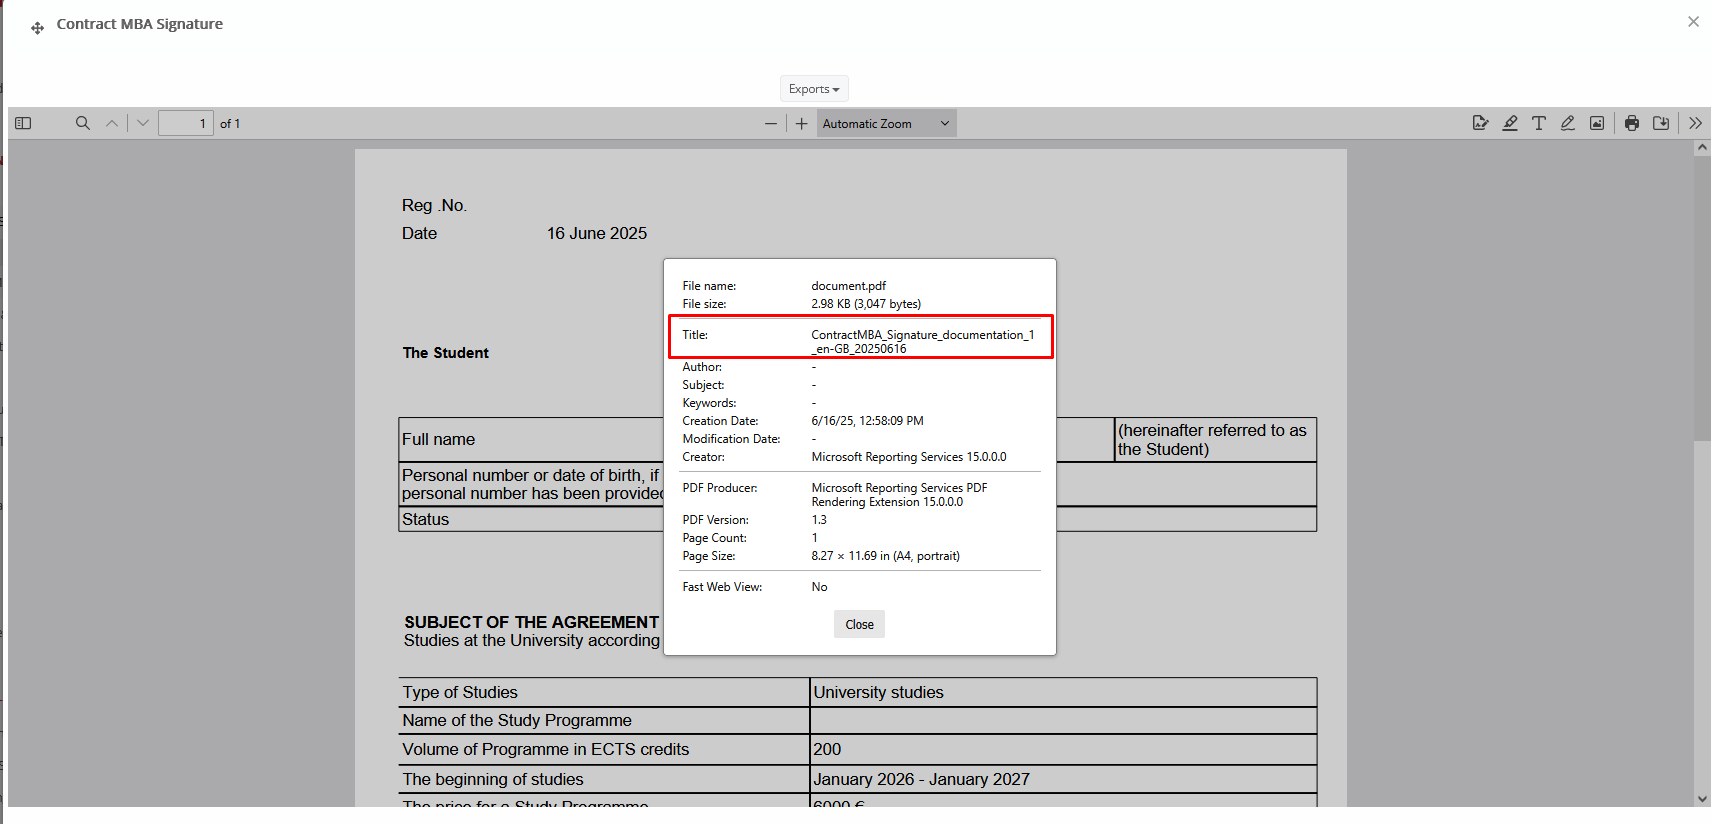
From Students > Student List > [Select Student] > Reports > Billing, click the title to identify the report.
Then, open the document properties.
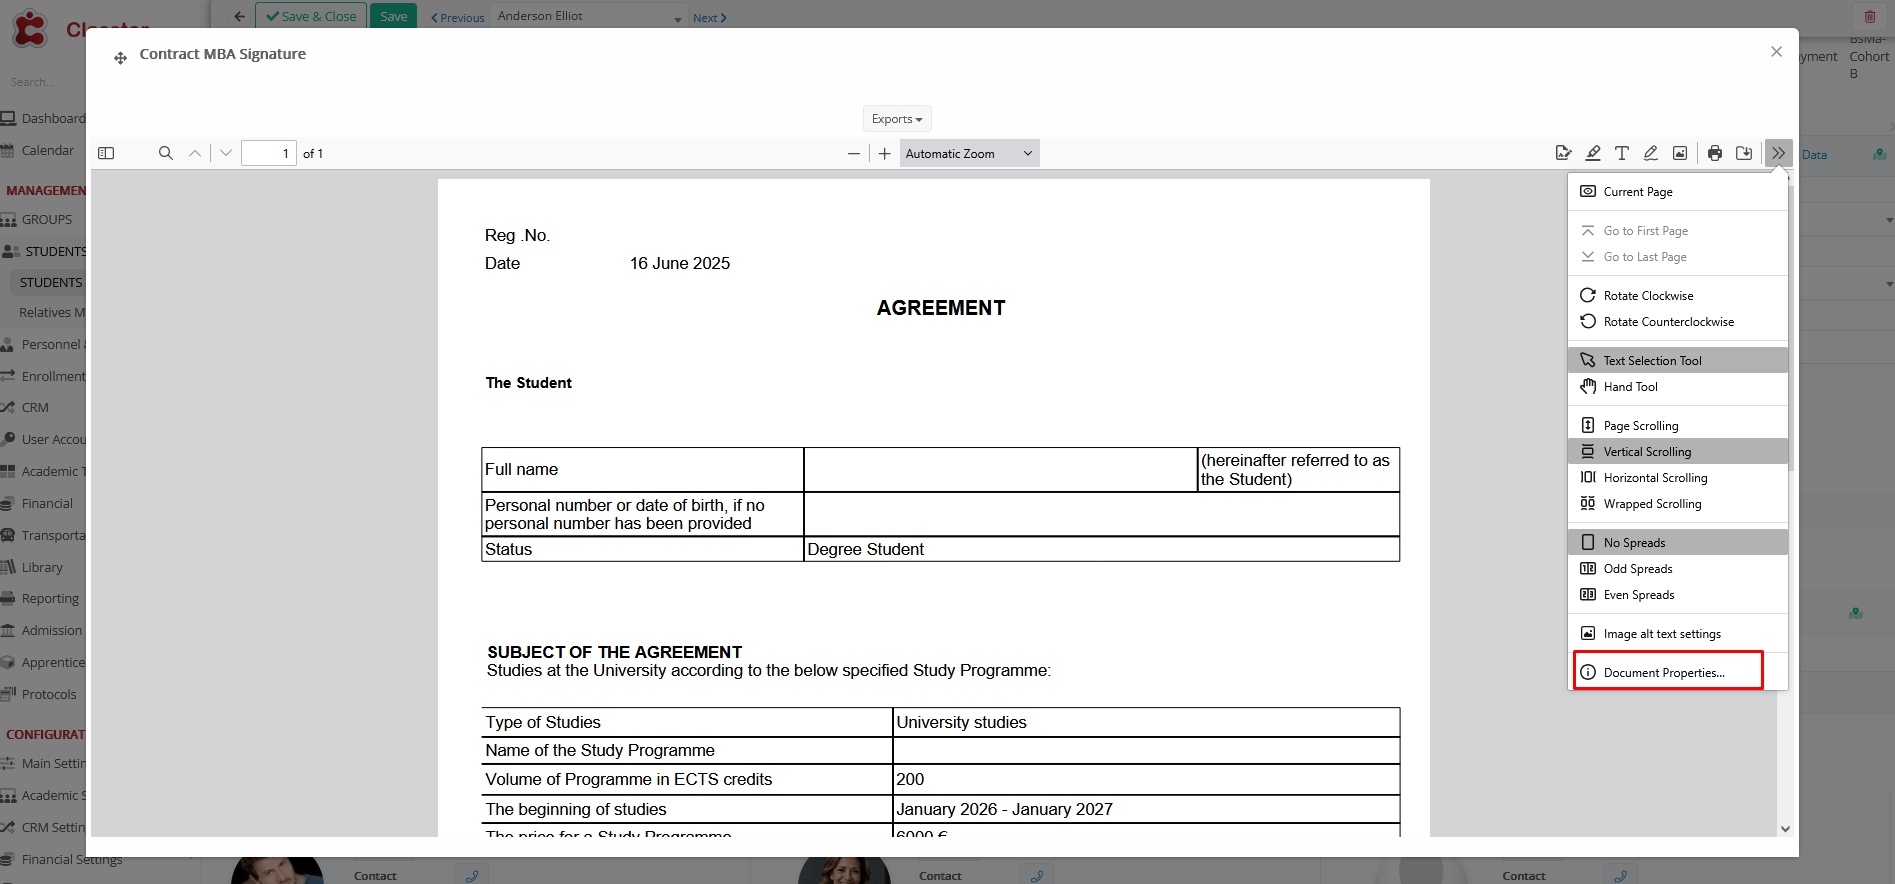
There you will find the Protocol Number displayed in the format you configured under the selected protocol.
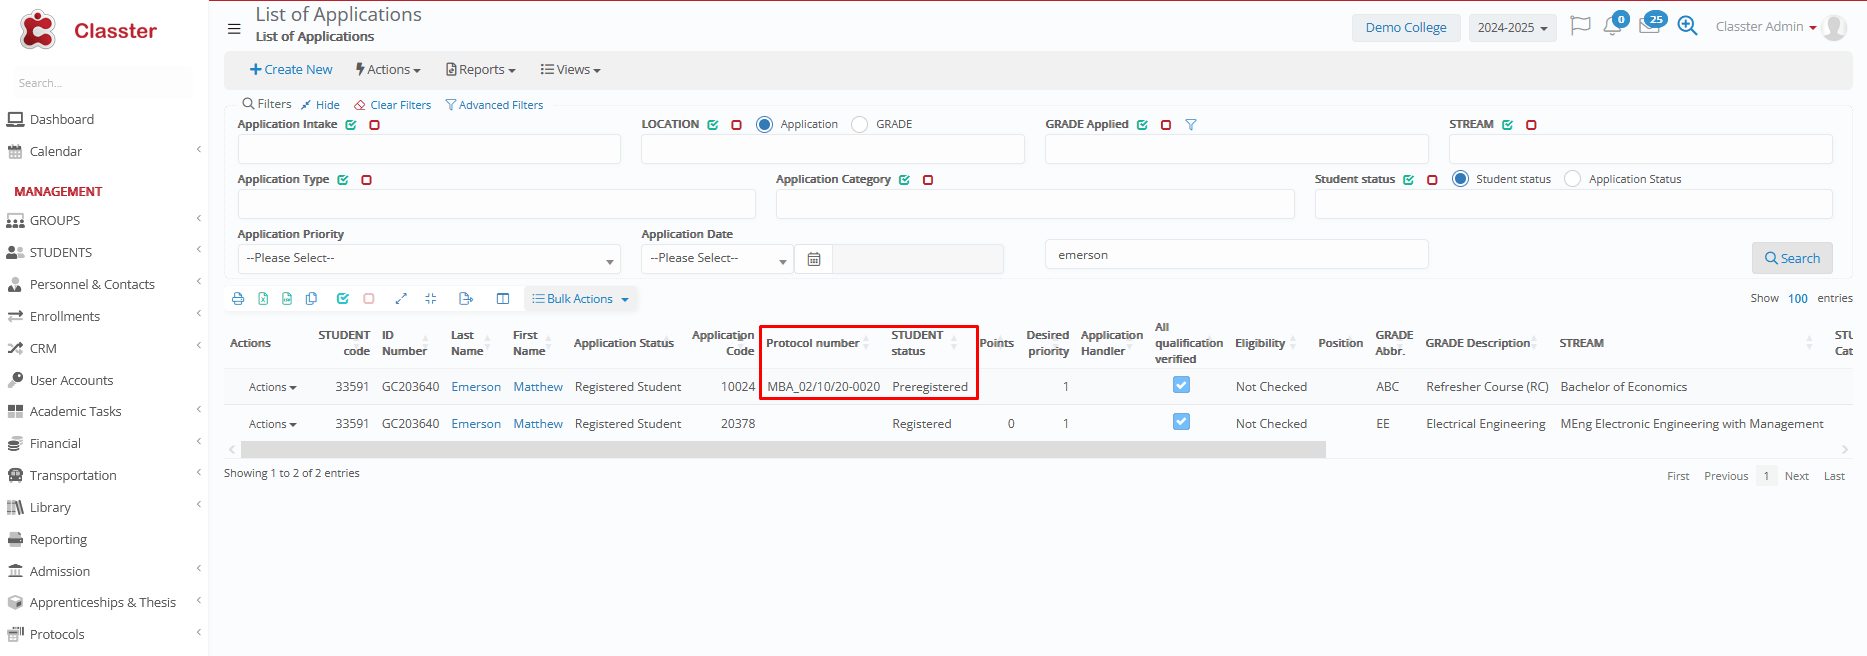
Using Protocols for Applications
Classter lets you use the Protocols Module for application tracking. Each student application can get a unique protocol number based on your rules. This makes applications official, traceable entries—even without documents.
> Application as a Protocol Entity
A new protocol type “Application” is introduced, allowing applications to function as protocol-enabled records.
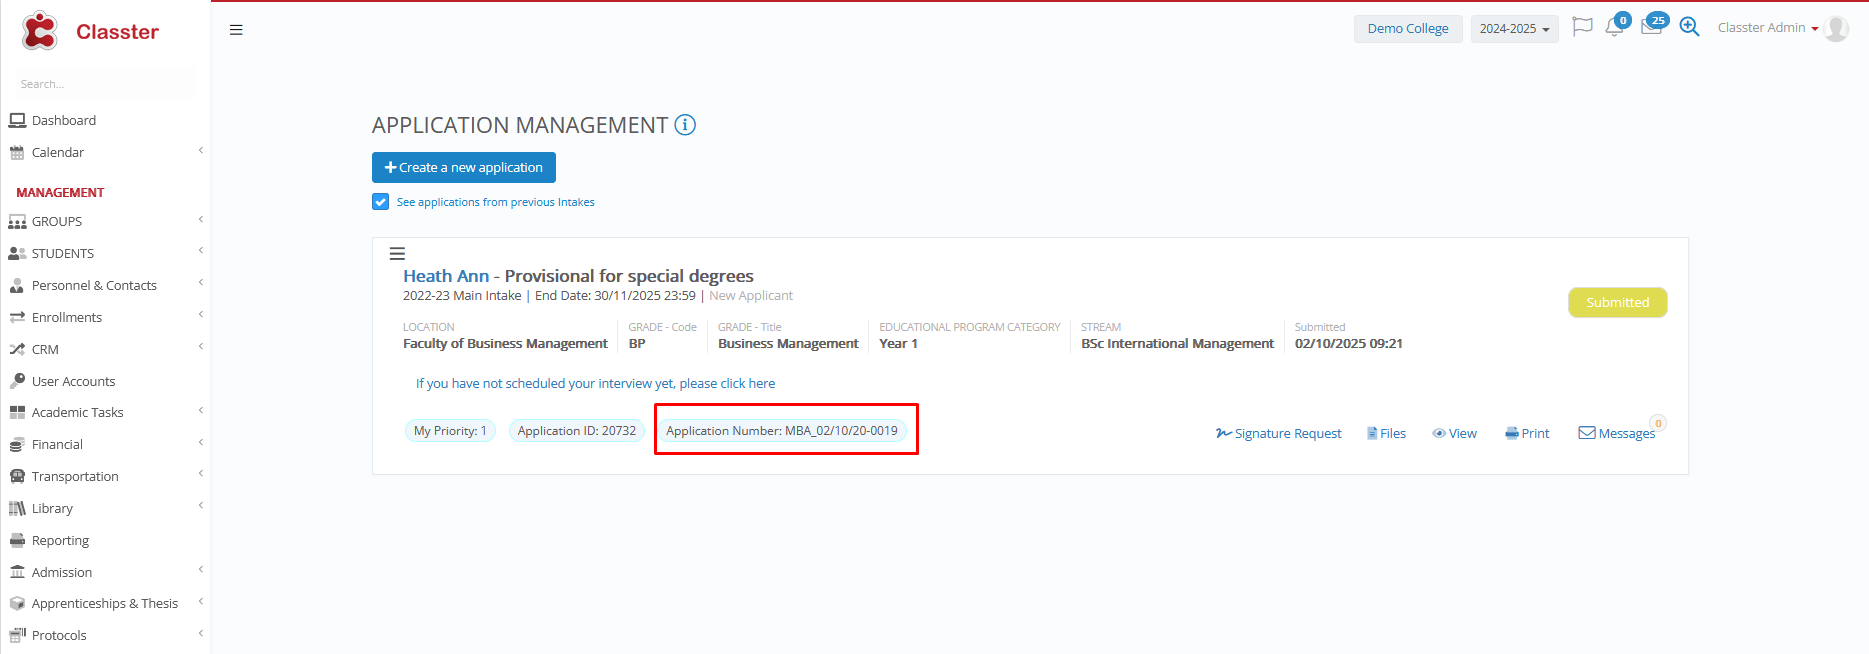
Note: This is visible only when multiple applications are enabled for this institute. (image below)
> Auto-Creation Triggers
- On Creation: A protocol entry can be generated immediately when an application is created, based on a selected protocol category. (screenshot from application with tags above)
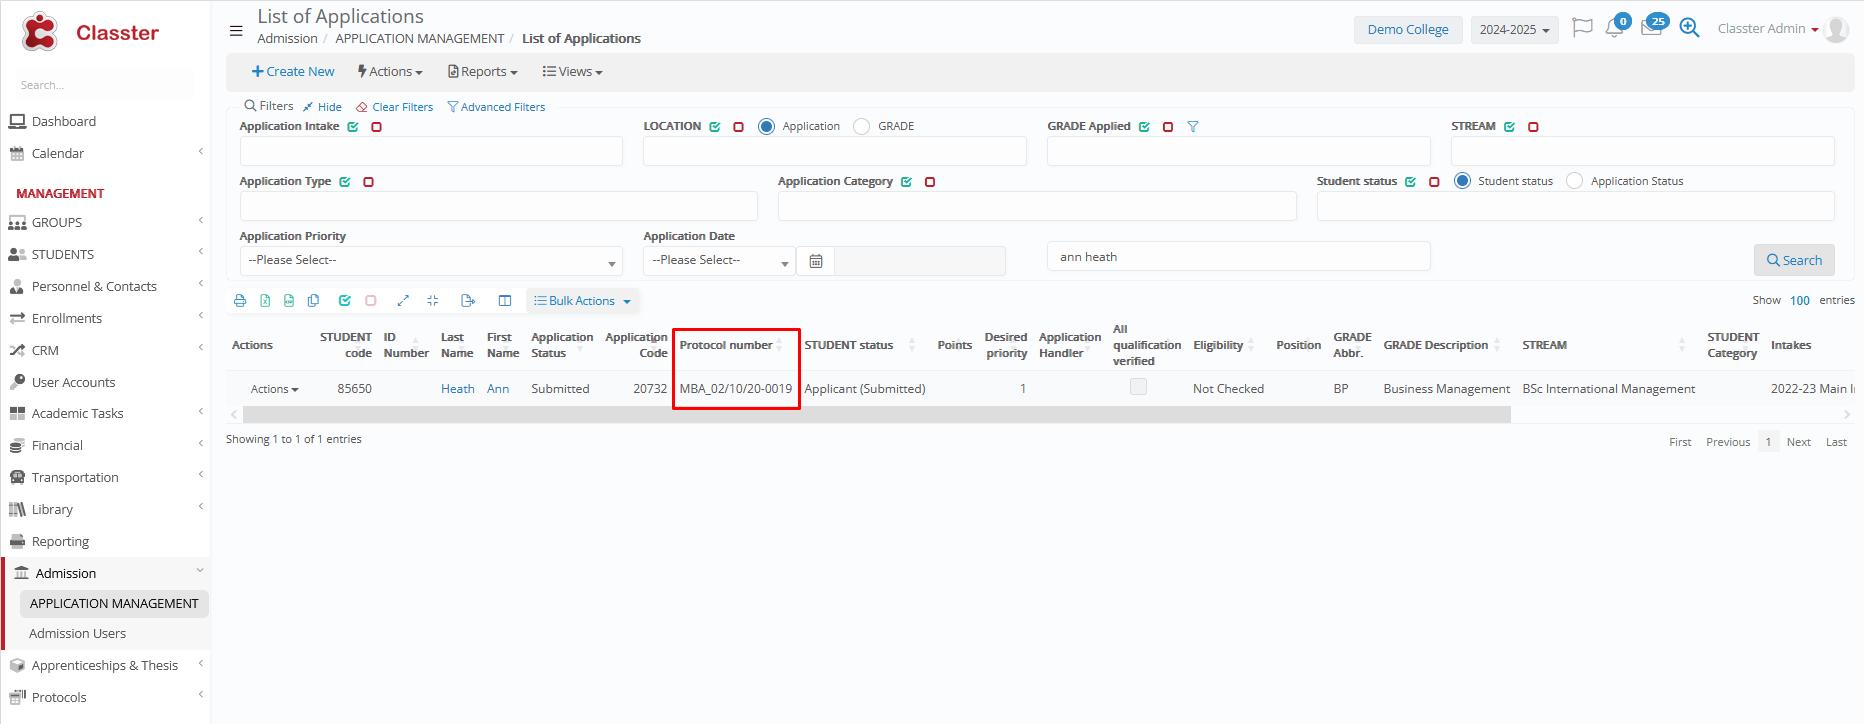 (Application List – Protocol Number)
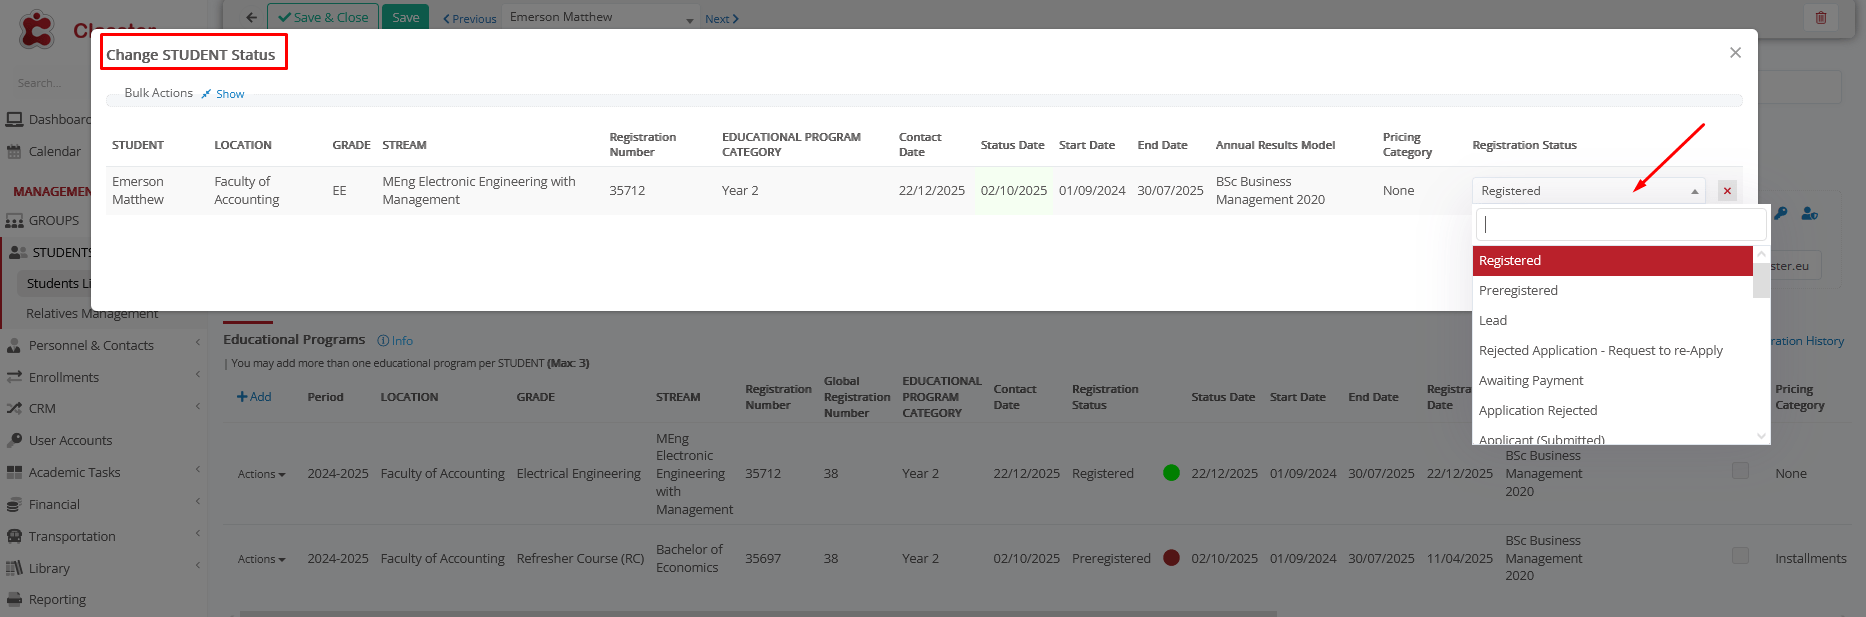
- On Status Change: Protocol entries can also be triggered when the application status is updated to configured values.
> Support for Re-registrations
When an application is linked to a re-registered educational program:
- The original protocol number is kept (no new number is created).
- The system marks this entry so it doesn’t count in numbering.
- This way, the overall sequence of protocol numbers stays correct and uninterrupted.
Application Protocol Settings (Admin Settings)
Admins can configure the following:
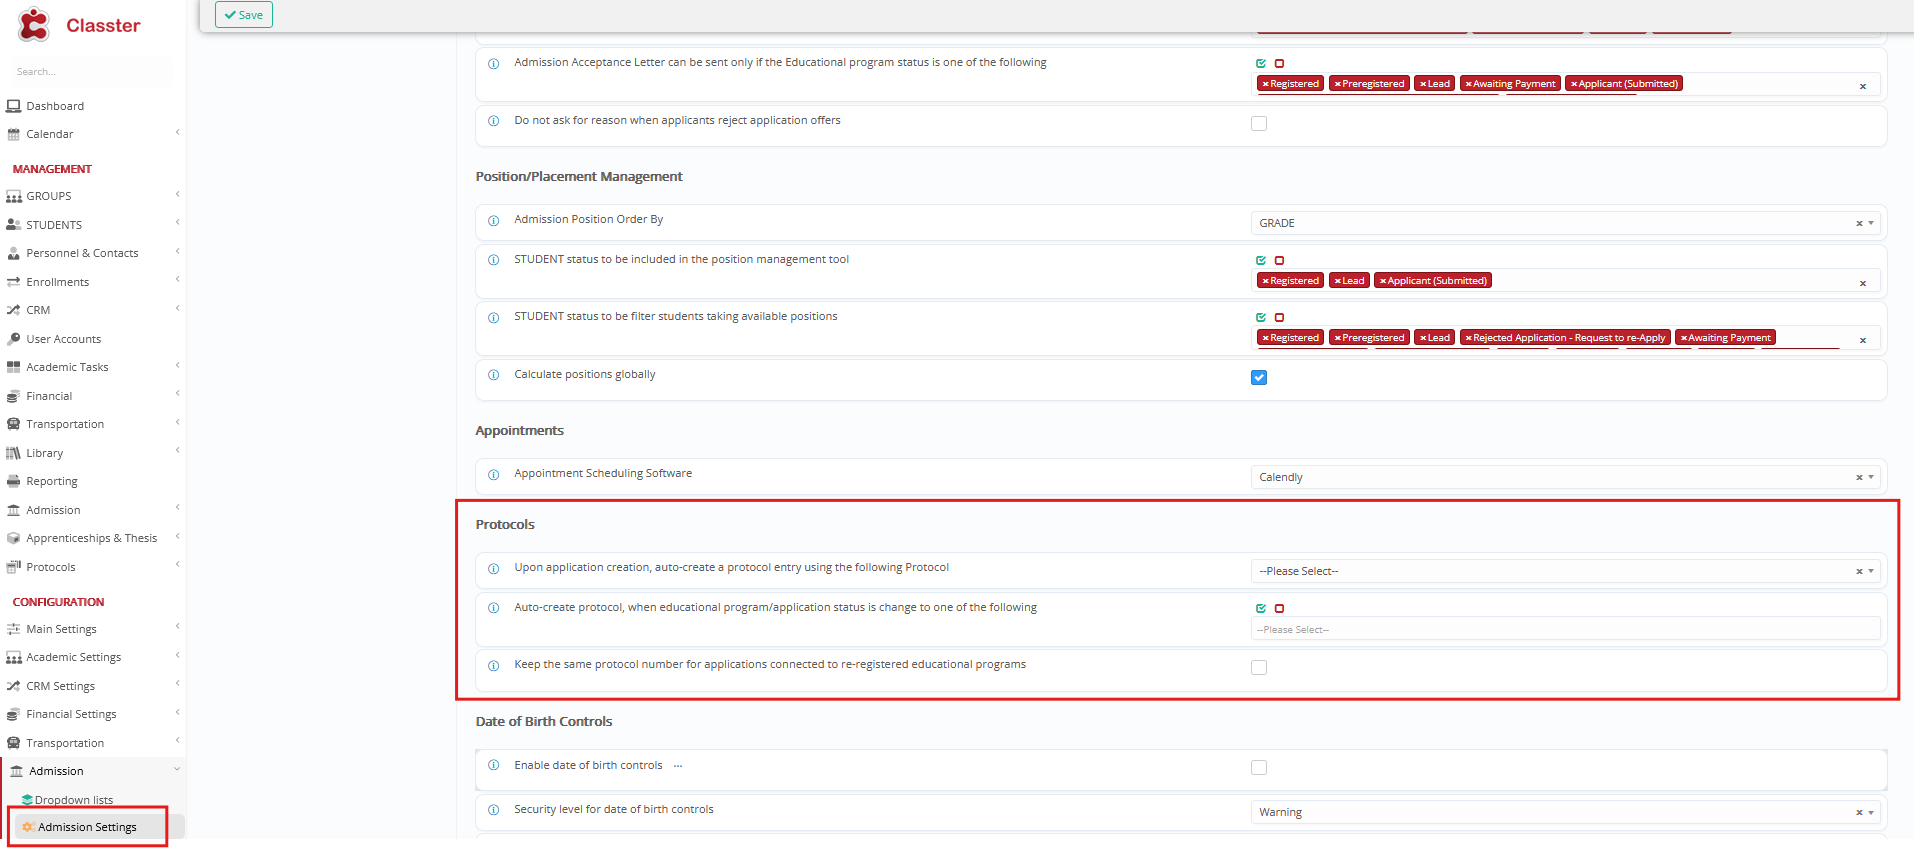
- Auto-create protocol on application creation
Generates a protocol number when the application is saved - Auto-create protocol on status change
Generates a protocol number only for chosen statuses - Keep protocol for re-registered programs
Reuses the same protocol number for returning students
Templates and Reporting
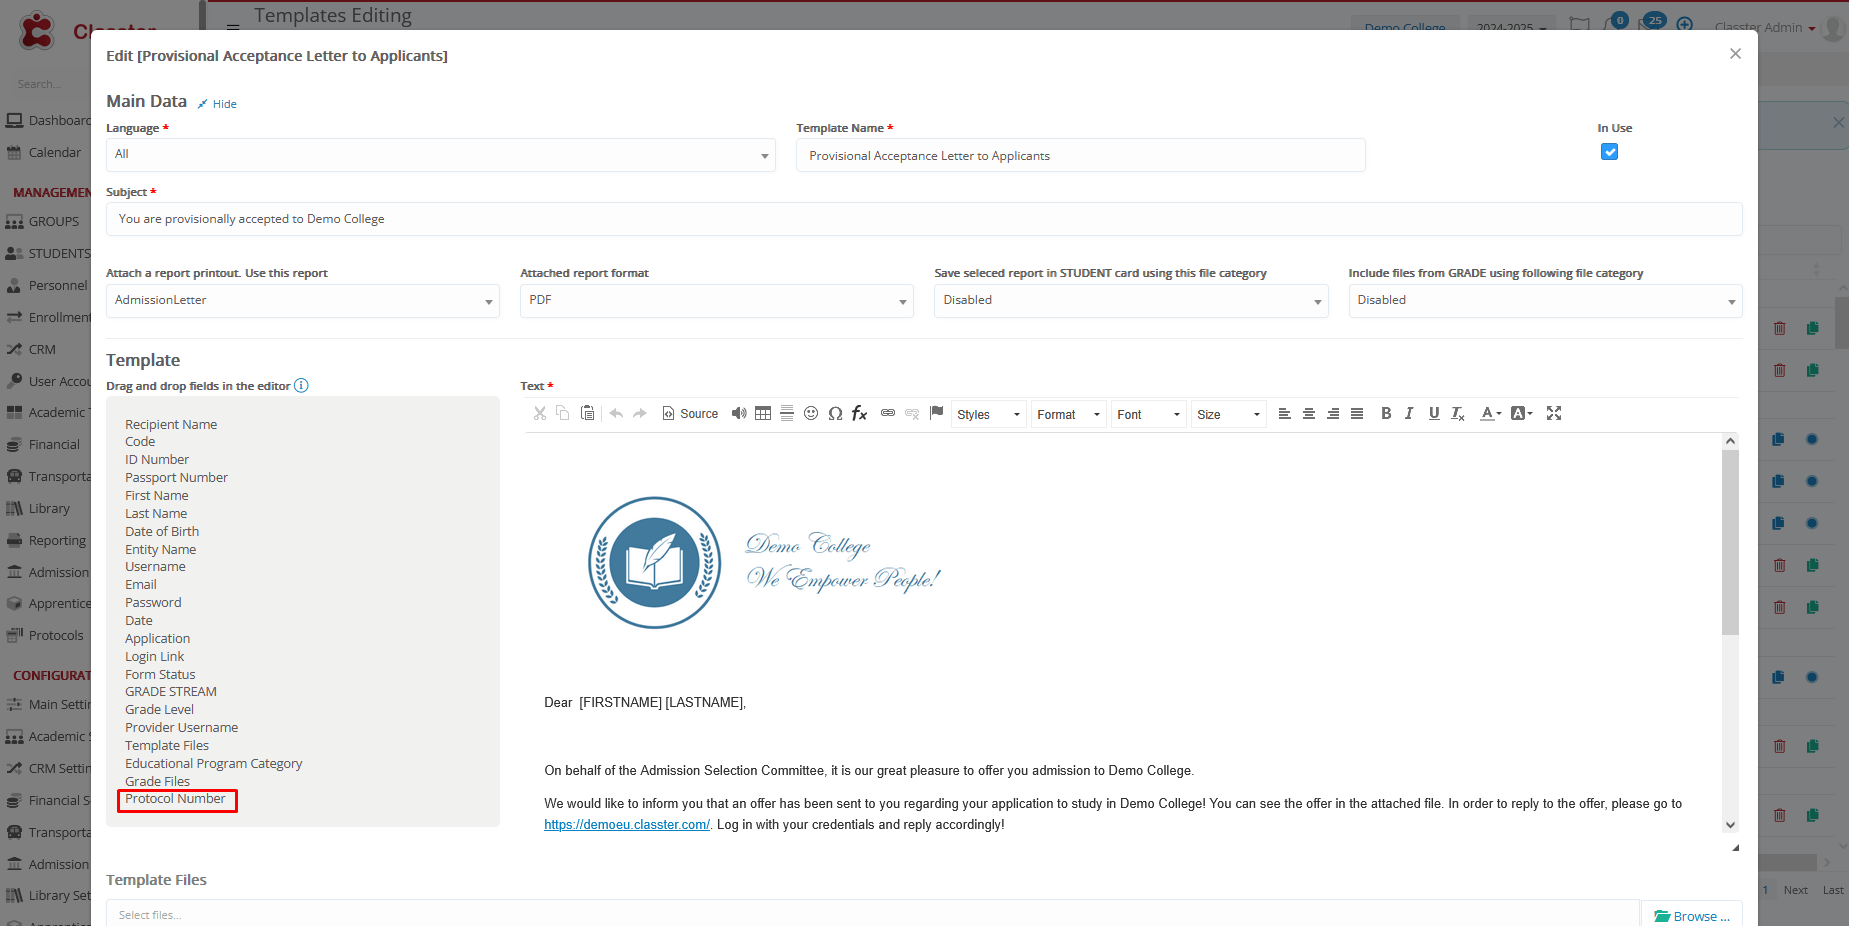
Add the protocol number to templates with [PROTOCOLNUMBER]
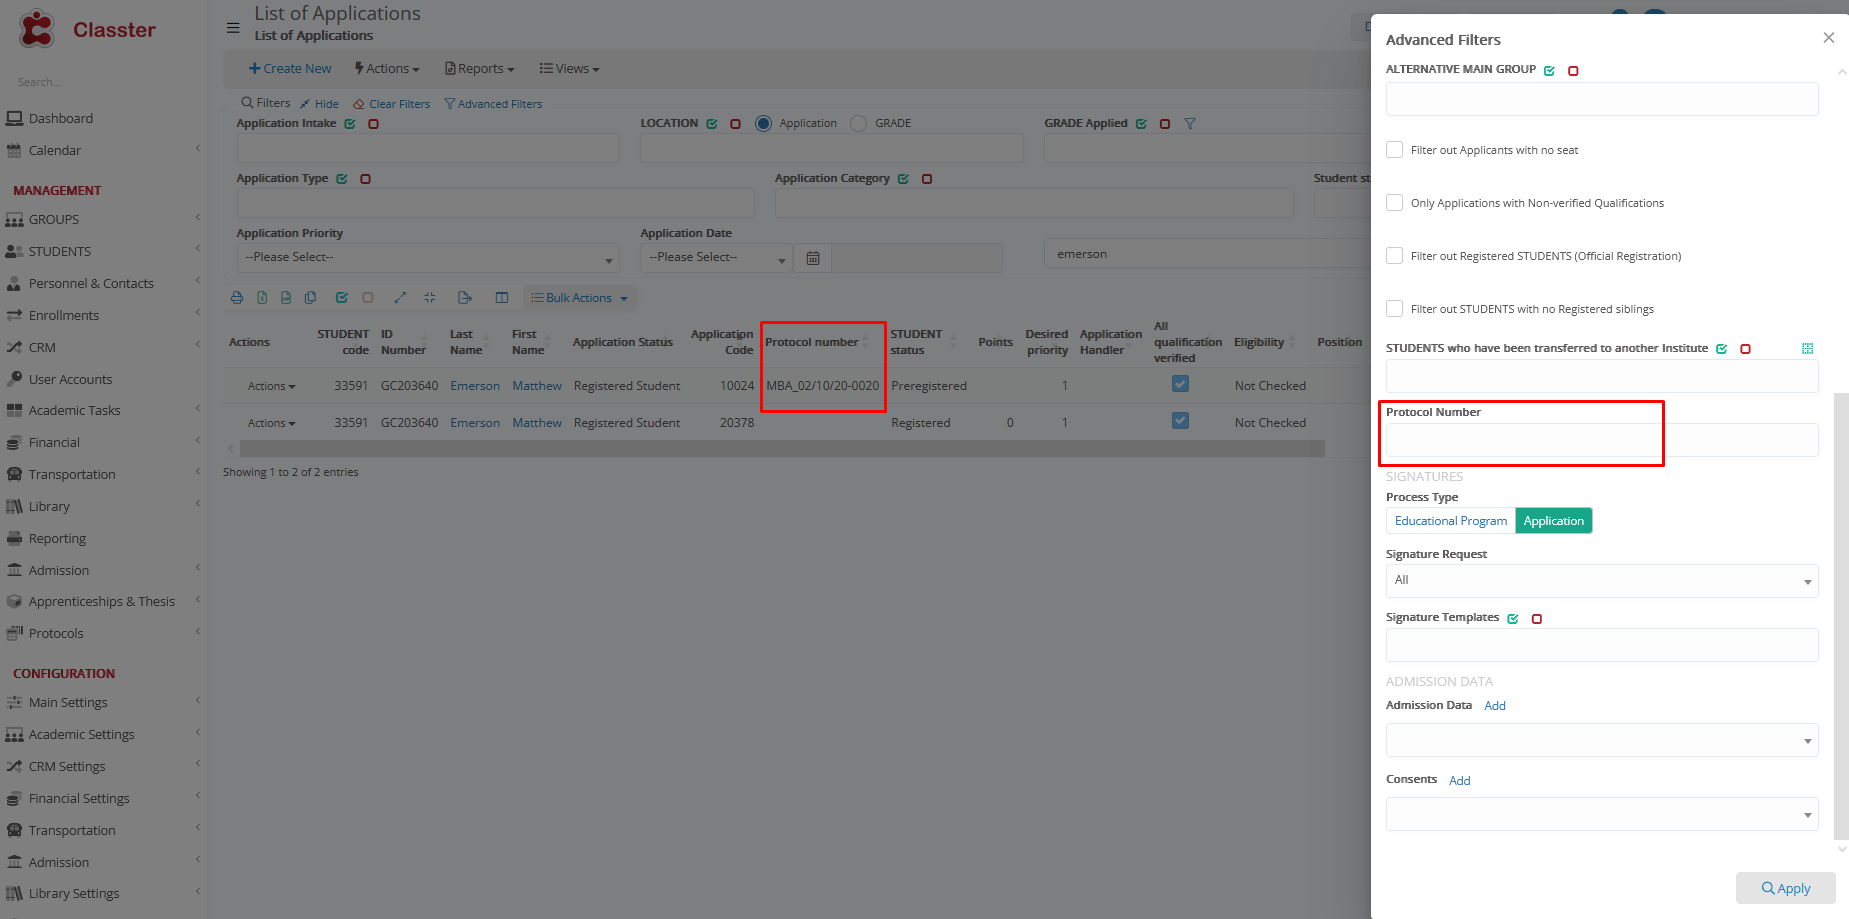
Find it also as:
- Application list column
- Advanced filters (searchable)
Maintenance Rules
- Deleting an application also deletes its protocol entry
- Linked educational programs don’t change protocol entries
Understanding Versioning and Replacements
Classter supports multiple ways to handle document updates. These are controlled by a combination of per-protocol version settings and global replacement permissions.
Versioning Options (Protocol-Level)
When creating a new protocol, the Version field defines how document changes will be managed:
- Disabled: No version control.
- Add Document Appendix: Add supplementary documents.
- Add New Versions: Create updated versions while keeping history.
- Enable Both: Support both appendices and versioning.
Configure in: Configuration > Protocol Settings > Protocol > Create New > Version
Replacement Setting (Global)
Defined in: Configuration > Protocol Settings > Protocol Settings > Allow Entry Replacements
- Enabled: Users can fully replace existing entries. Original is deleted.
- Disabled (Recommended): Prevents deletion. Encourages use of appendices or new versions to preserve history.
Example 1
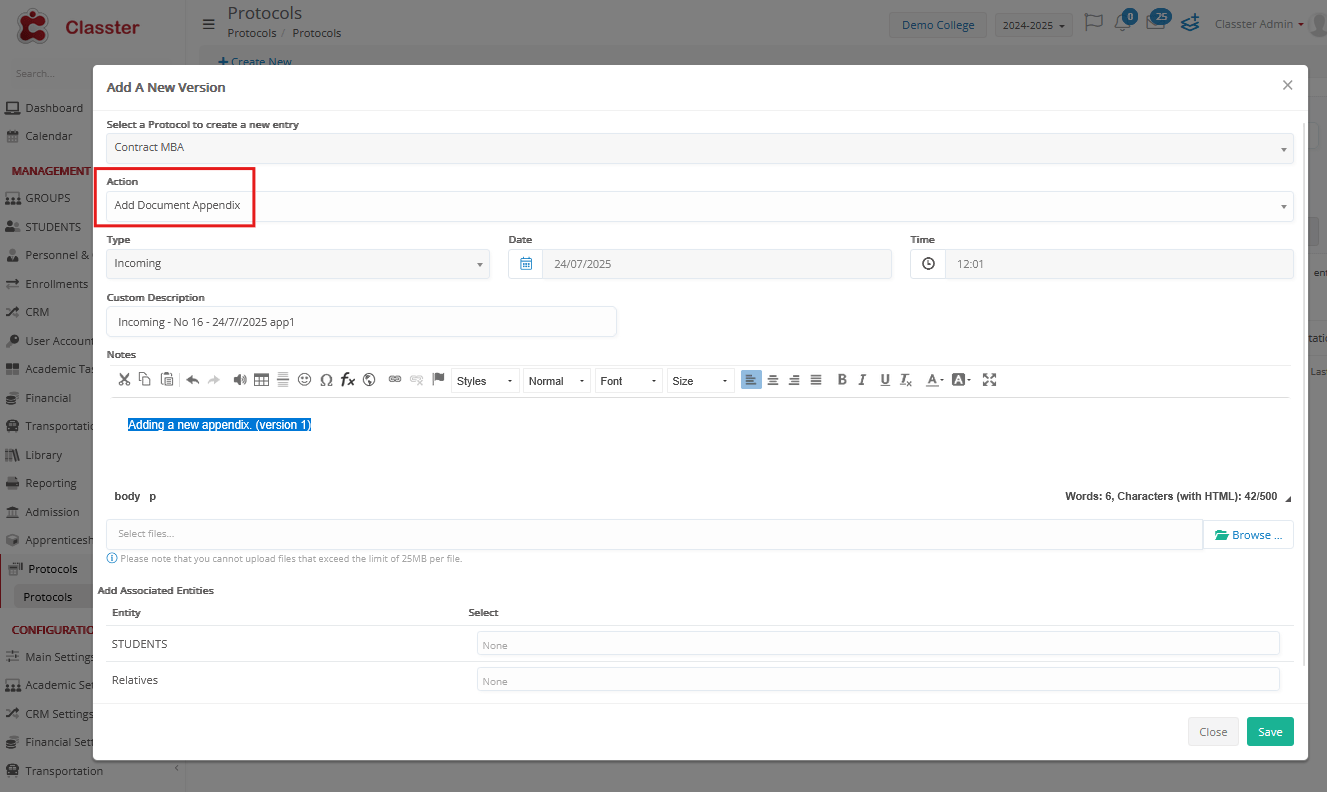
Adding a Document Appendix
Here we are in the Protocols list, and we can decide if we want to:
- Add A New Version: Add a Document Appendix to an existing protocol entry or Add a New Version to the entry
- Replace Entry: Replace the entry entirely
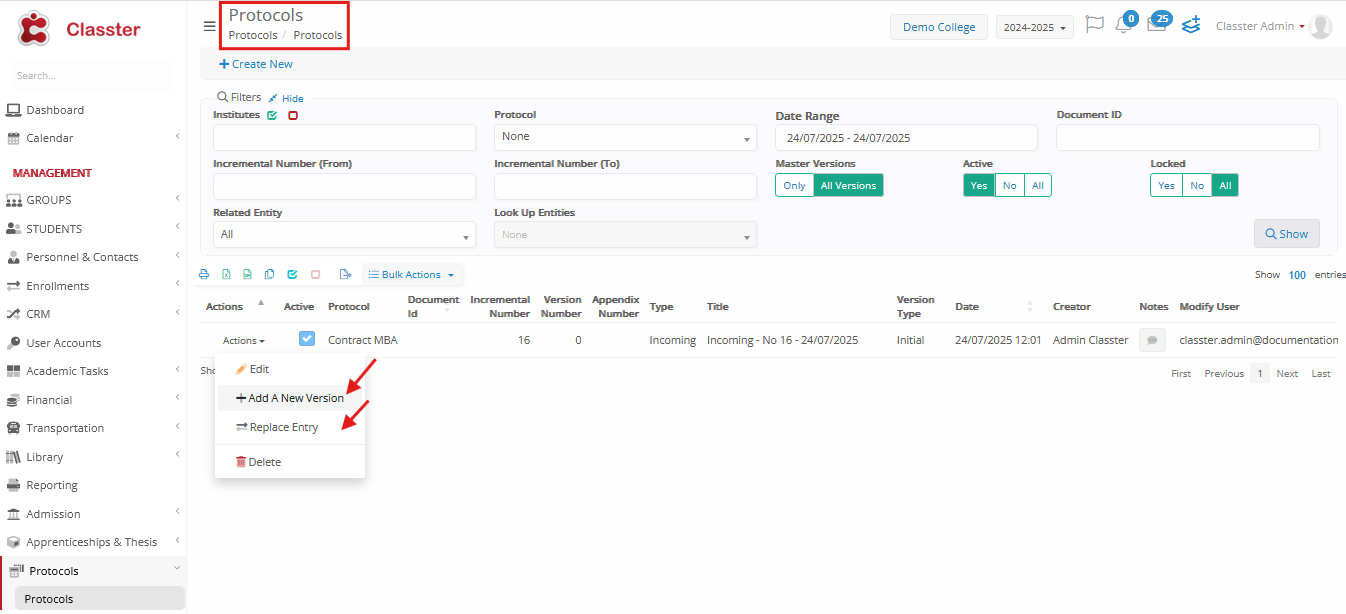
In this example, we choose the action Add a New Version – Document Appendix, which supplements the existing protocol entry with an additional version while maintaining history.
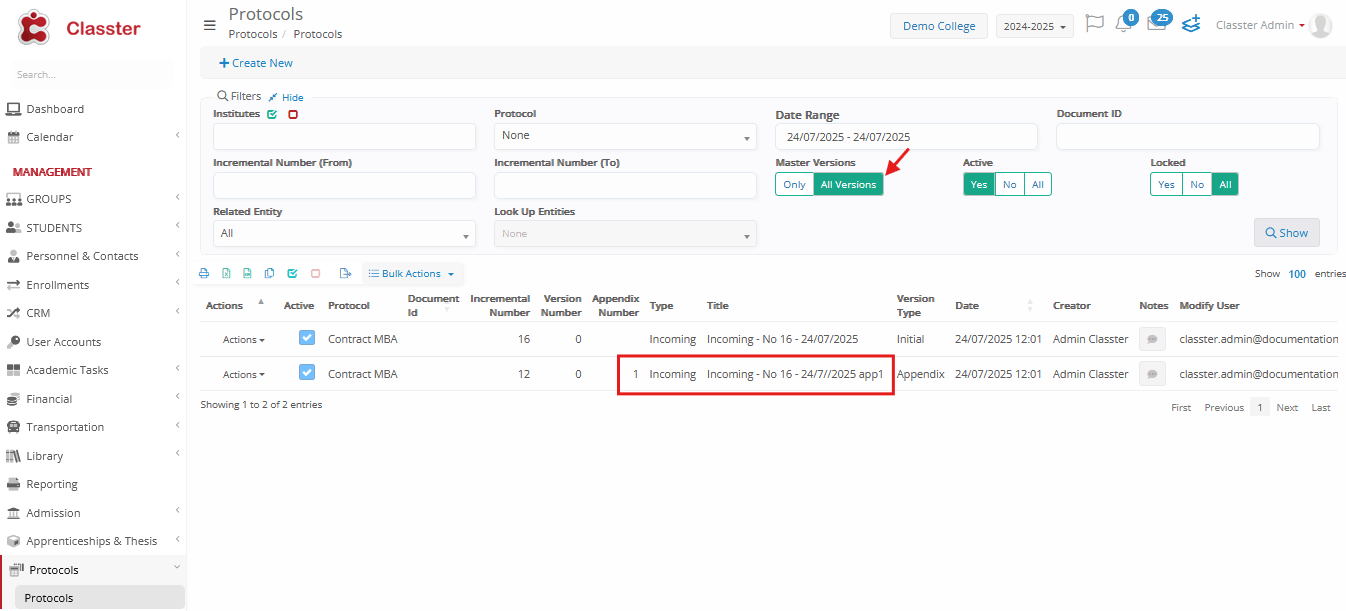
Here is the updated list, showing both the initial version and the newly added appendix.
Example 2
Protocol Versioning in Reports
Users can assign protocol numbers and manage protocol entries directly from student reports.
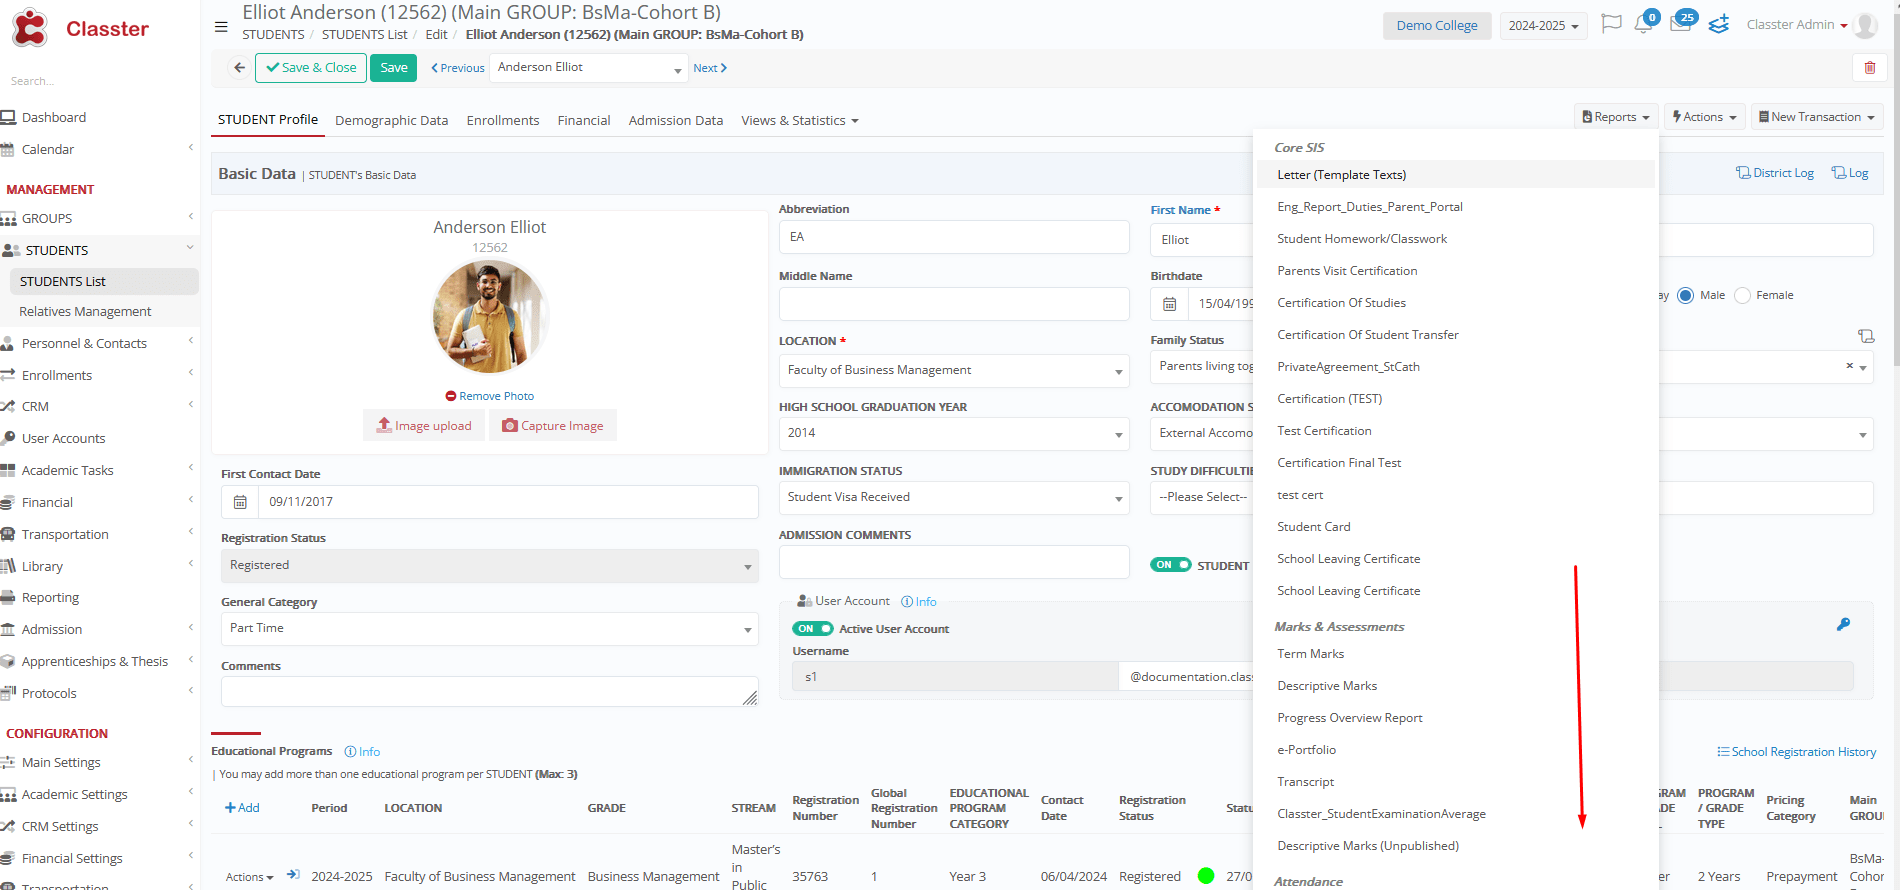
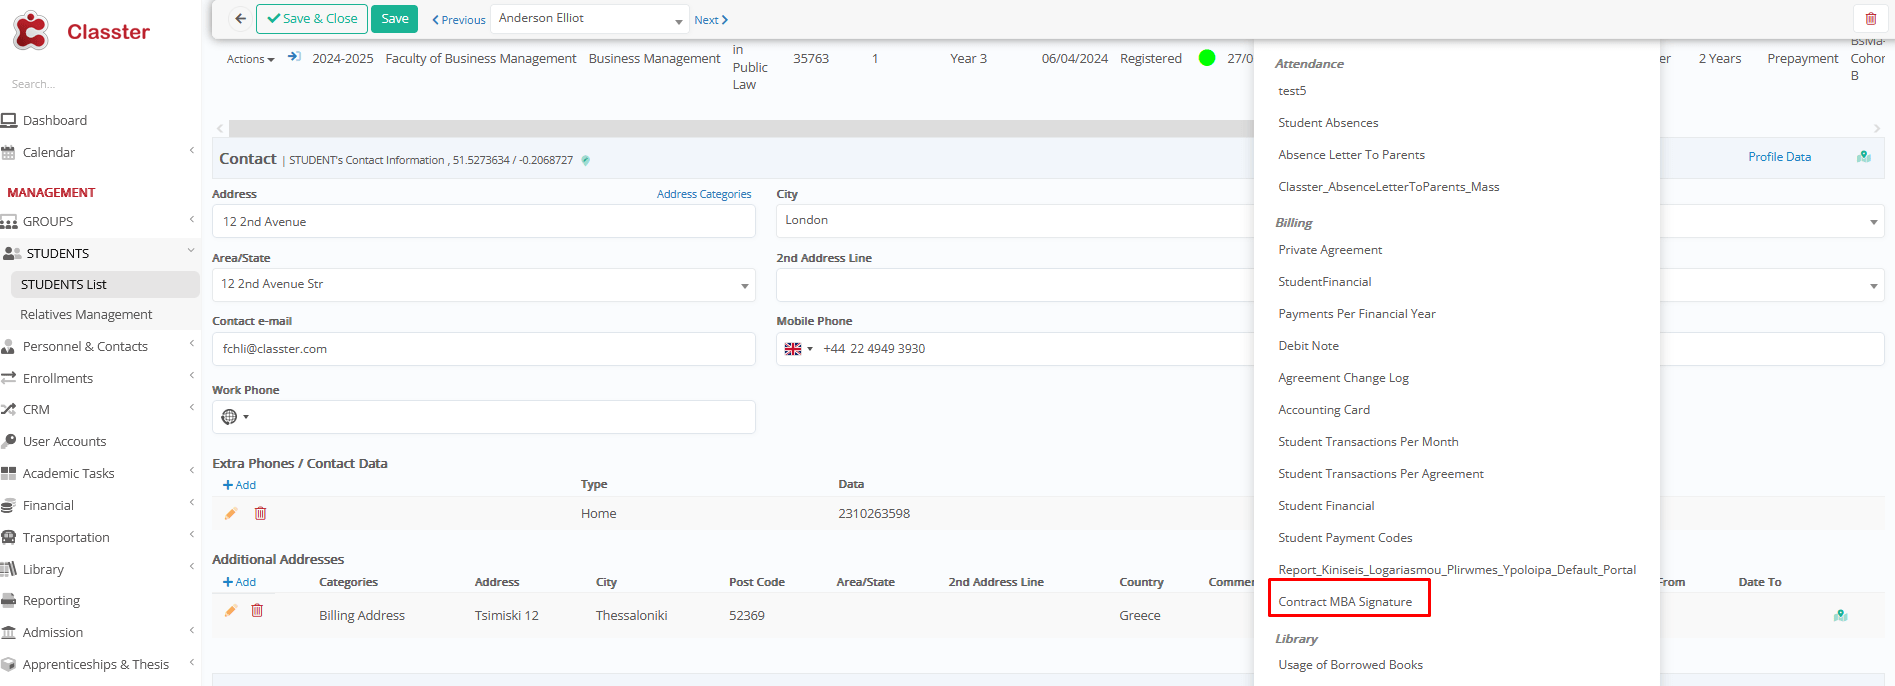
For example, navigate to: Students > Student List > [Select Student] > Reports > find the report you are interested in: Contract MBA Signature > Protocol to access protocol-related actions.
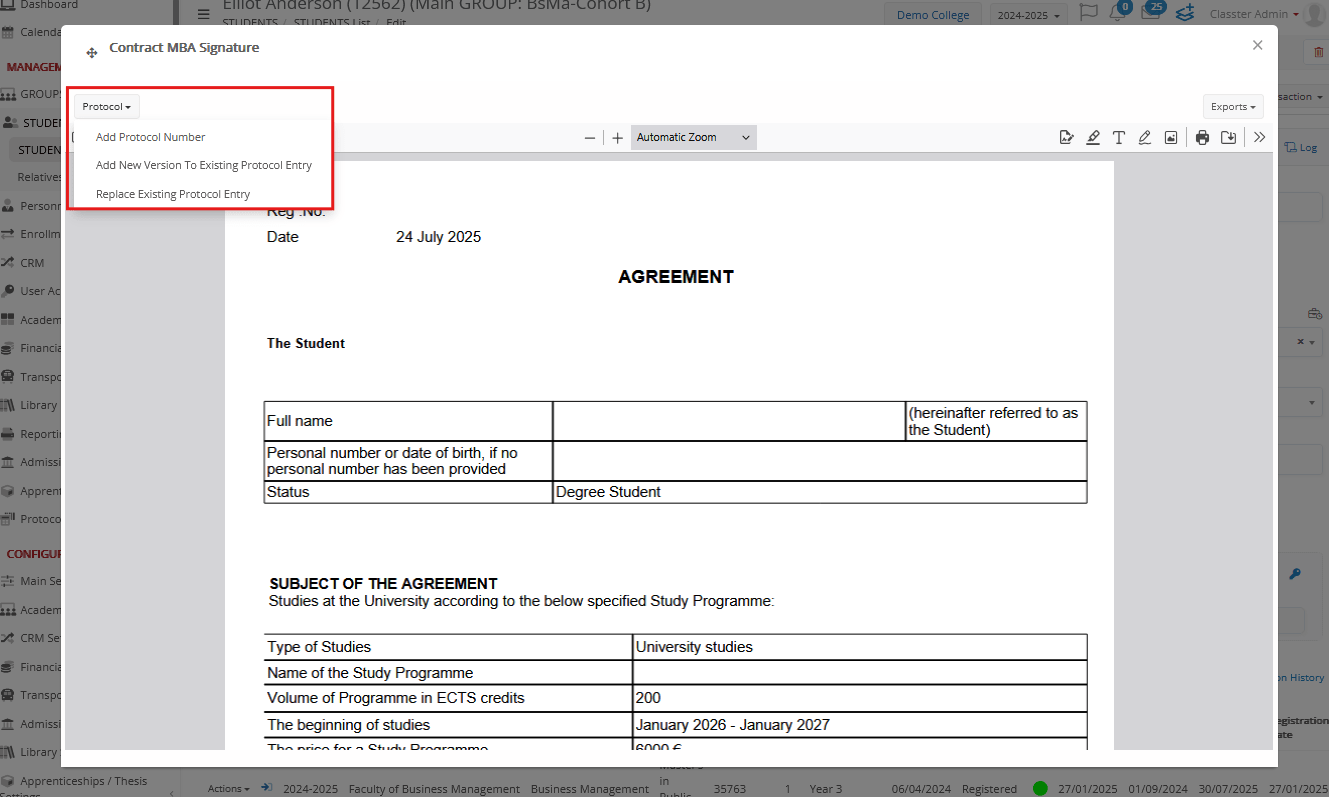
Available actions:
| Action | Purpose |
| Add Protocol Number | Create a new protocol entry |
| Add New Version to Existing Entry |
|
| Replace Existing Protocol Entry | Overwrite entry (if enabled) |
Select an action and save to apply it to the selected protocol.
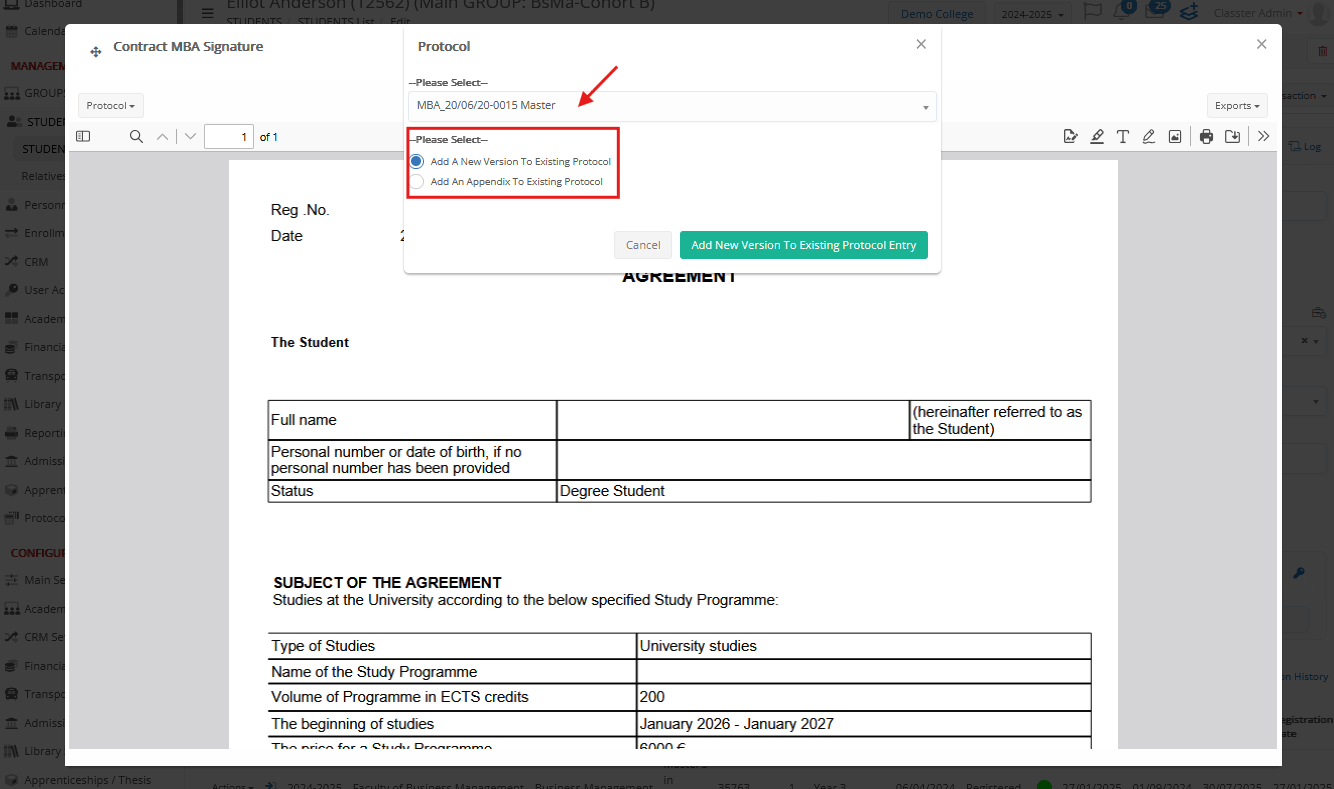
These options allow users to maintain full traceability and version control directly from reports.
Tips & Best Practices
- Prefer versions or appendices to preserve document history.
- Use clear naming conventions and numbering formats.
- Always validate report-to-protocol links for accuracy.
- Assign protocols only to relevant locations and grades for clarity.
- Disable Allow Entry Replacements unless a full overwrite is absolutely necessary.