This section allows you to register for classes and activities offered by the institution in the beginning and during the Academic year. This section is available in higher education institutions or institutions that have enabled this section for students. Parents have access to this in most K12 institutions.
Online Registration
- On the Menu you click on Registration & Enrollment (Figure 16).
![]() Figure 16
Figure 16
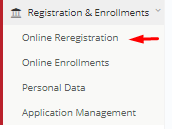
- Next click on Online Registration (Figure 16b)
 Figure 16b
- Once you click on the “Online Registration” button you will see the following (Figure 16c):
 Figure 16c
- You will arrive on the Educational Programs tab.
- Choose the “Year”, “Stream” and add a comment if you like (Figure 16c).
- Click on the “Next Step” button to continue to the next Tab (Figure 16c).
Fill in the following tabs Contact Details, Family and Medical Data, Enrollments, Financial and then click on the “Submit Application” button to complete the process. Note: To move to the next tabs click on the “Next Step” button in the bottom right corner.
Online Enrollment
- On the Menu you must click on Registration & Enrollment (Figure 16d).
![]() Figure 16d
Figure 16d
- Next you must click on Online Enrollment (Figure 17).
 Figure 17
Once you have clicked on Online Enrollment you will see the following page (Figure 18).
 Figure 18
- By clicking on the Services tab, you will be presented with options i.e Sport Activities, Trips & Excursions (Figure 19).
 Figure 19
- Follow the rules for each category of services e.g select 1 of 4 options (Figure 19).
- Click on the Enroll button under the service you want to enroll in (Figure 19).
- By clicking on the Subjects tab you will be presented with various Academic course options as well as other related academic activities (Figure 20).
 Figure 20
- Follow the rules for each category of subjects e.g select 2 of 2 options (Figure 20).
- Click on the Enroll button under the subject you want to enroll in (Figure 20).
Enroll / Unenroll
To get to this point, you must click on the Online Enrollment button in the menu area and you will be directed to the Online Enrollment page.
Once there, you will be able to see all the offered Classes/Sport Activities/School Trips.
- To enroll a student in a class/sport activity/school trip you need to click on the enroll button located underneath the description of said choice (Figure 21).
 Figure 21
- Click on the “Enroll” button (Figure 21). Once you do that you will be asked to confirm the enrollment by clicking on “Yes” (Figure 21a).
 Figure 21a
Personal Data
- On the Menu you click on Registration & Enrollment (Figure 22).
![]() Figure 22
Figure 22
- Next click on Personal Data (Figure 22a)
 Figure 22a
Once you have clicked on Personal Data you will see the following page (Figure 22b).
 Figure 22b
On this page you can (Figure 22b):
- Change or add Identification data and Basic data.
- This is the same as in the Admission portal (Personal data tab).
- Once you are done filling in data, click on “Save and Next” button to complete the rest of the tabs.
Application Management
- On the Menu you click on Registration & Enrollment (Figure 23).
![]() Figure 23
Figure 23
- Next click on Application Management (Figure 23a)
 Figure 23a
Once you have clicked on Application Management you will see the following page (Figure 23b).
 Figure 23b
- Here you can create a new application by clicking on the “+Create a new application” button. You can use the top left one or the center button (Figure 23b).
- You will be able to see any existing draft or submitted application (Figure 23b).
- This page is exactly the same as in the Admissions portal (See Admissions portal manual).


 Figure 21a