

Introduction
Services are activities and offerings that an institution provides alongside its core academic program. A service is usually something students need to enroll in, and it is often billable (e.g., can be chargeable extra services).
Examples per Institution type:
- K–12: Chess Club, Choir, Sports Club, School Trip, Lunch Plan, Late Book Fee
- Higher Ed: Application Fee, Housing Fee, Gym Membership, Library Access Fee, Transportation Pass, Orientation Seminar.
Service Card
- Go to Services > Manage Services > +Create New to create a new service. Use Create to define the service’s core information: what it is, when it runs, its billing information and timetable placement.
- From Services > Manage Services, use the row action Edit to open an existing service. Edit is organized into tabs so you can manage the service’s identity, billing, timetable placements, participants, and related content.
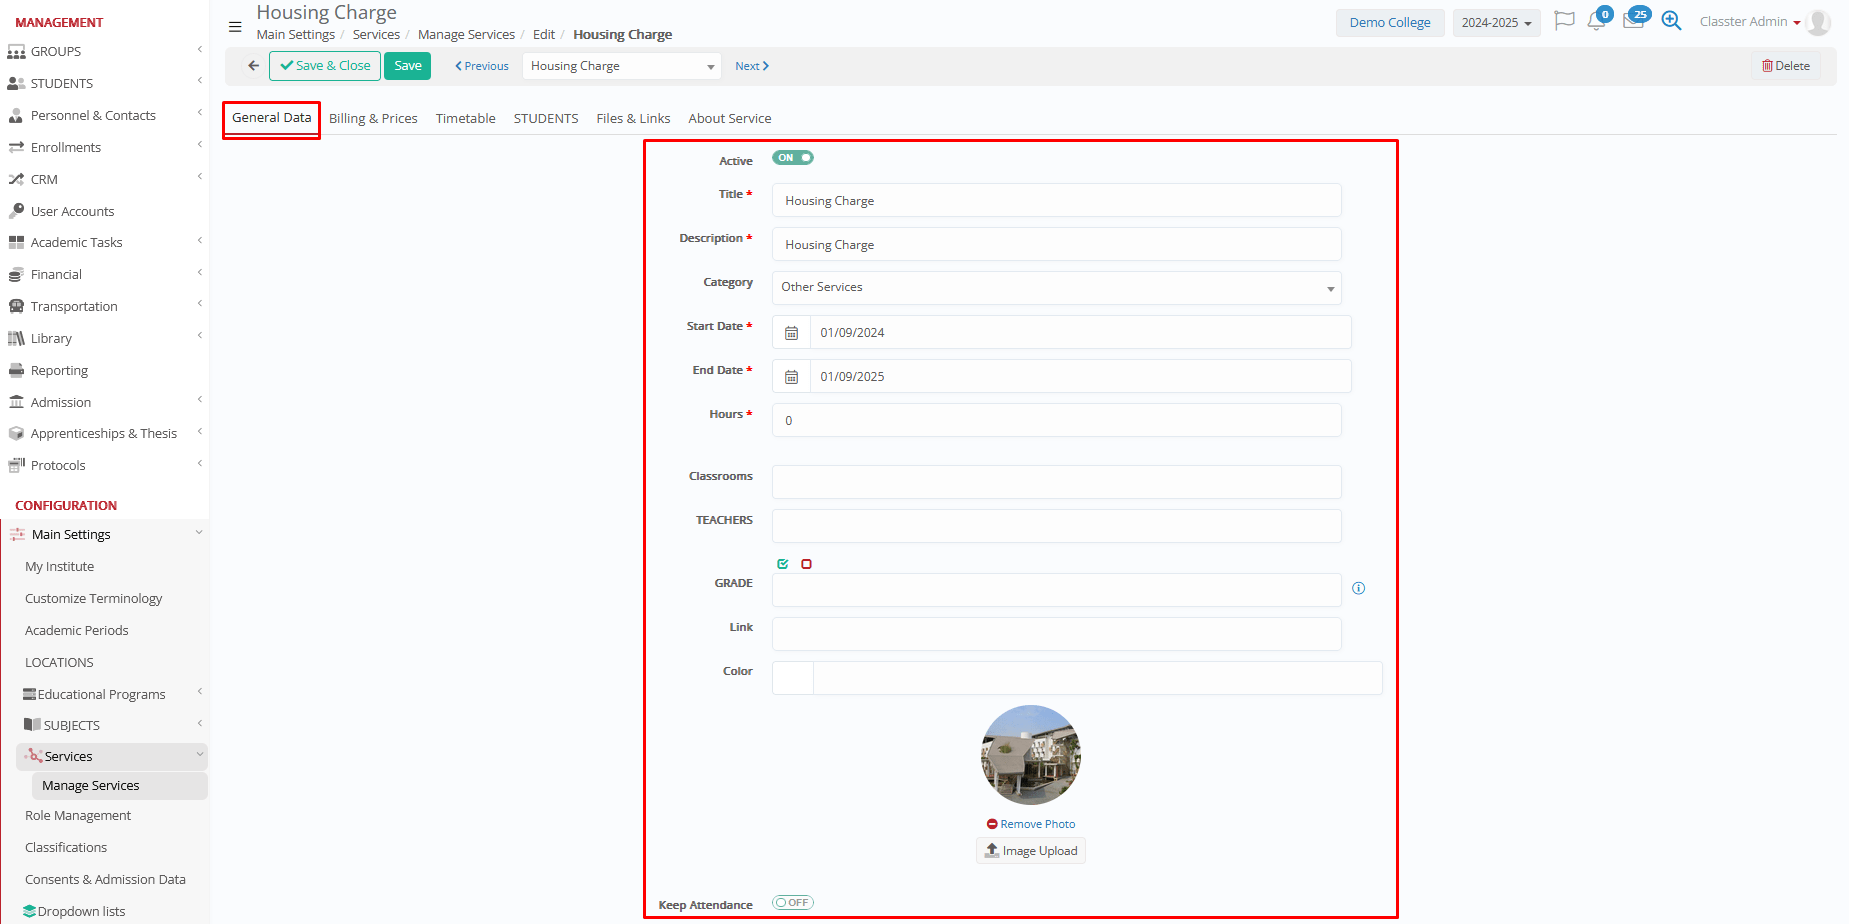
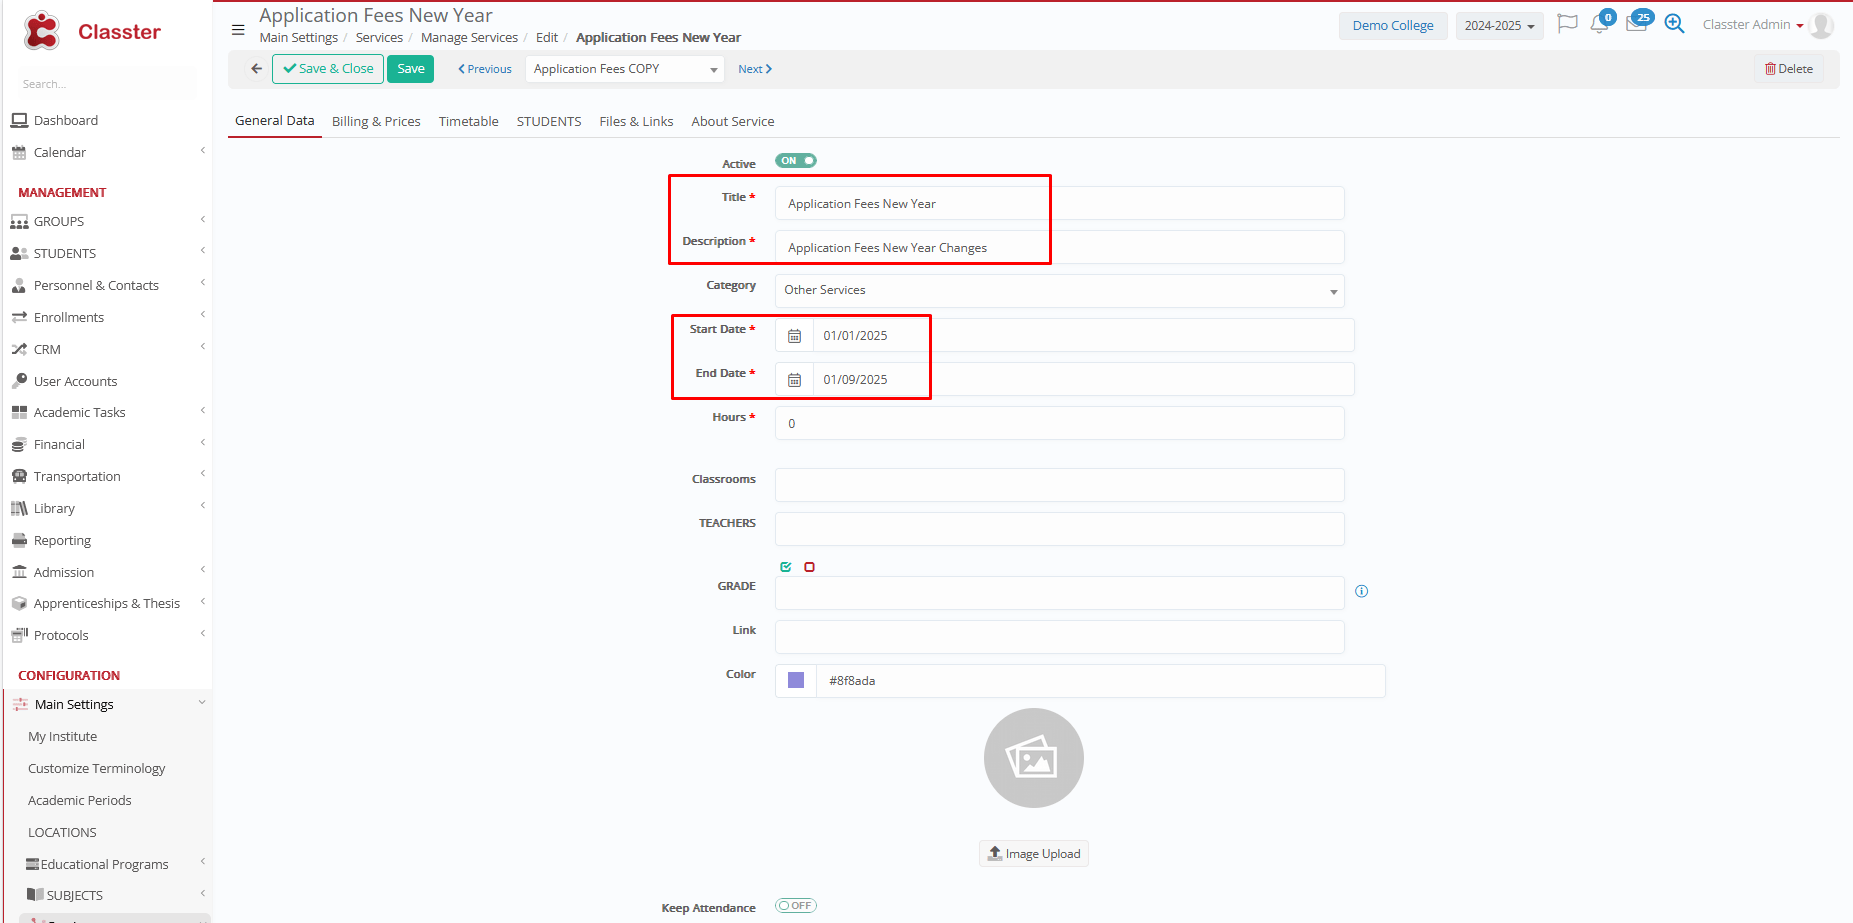
General Data
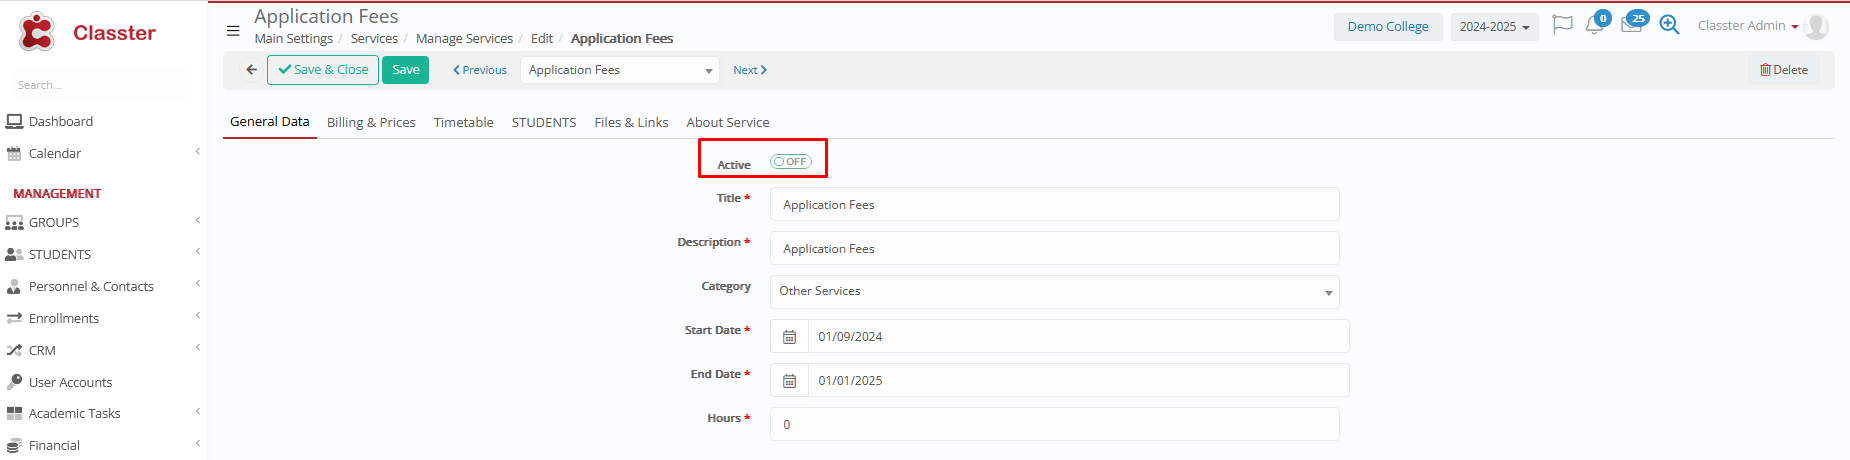
Use this tab to define the service’s core information. This tab is available in both Create and Edit.
Active (switch): Enables/disables the service so it can be used (shown in lists, available for enrollment, billing etc.).
- Title: Service name shown across the platform (lists, enrollments, timetables, financials). Example: “Chess Club”, “Transportation Pass”, “Application Fee”.
- Description: Full Description or short explanation of the service and who it is for. Example: “After-school club for Grade 4–6. Meets twice per week.”
- Category: Groups the service for organization/filtering (and may support financial mapping depending on configuration). Example: “Tennis” → Sport Clubs, “Lunch Plan” → Food.
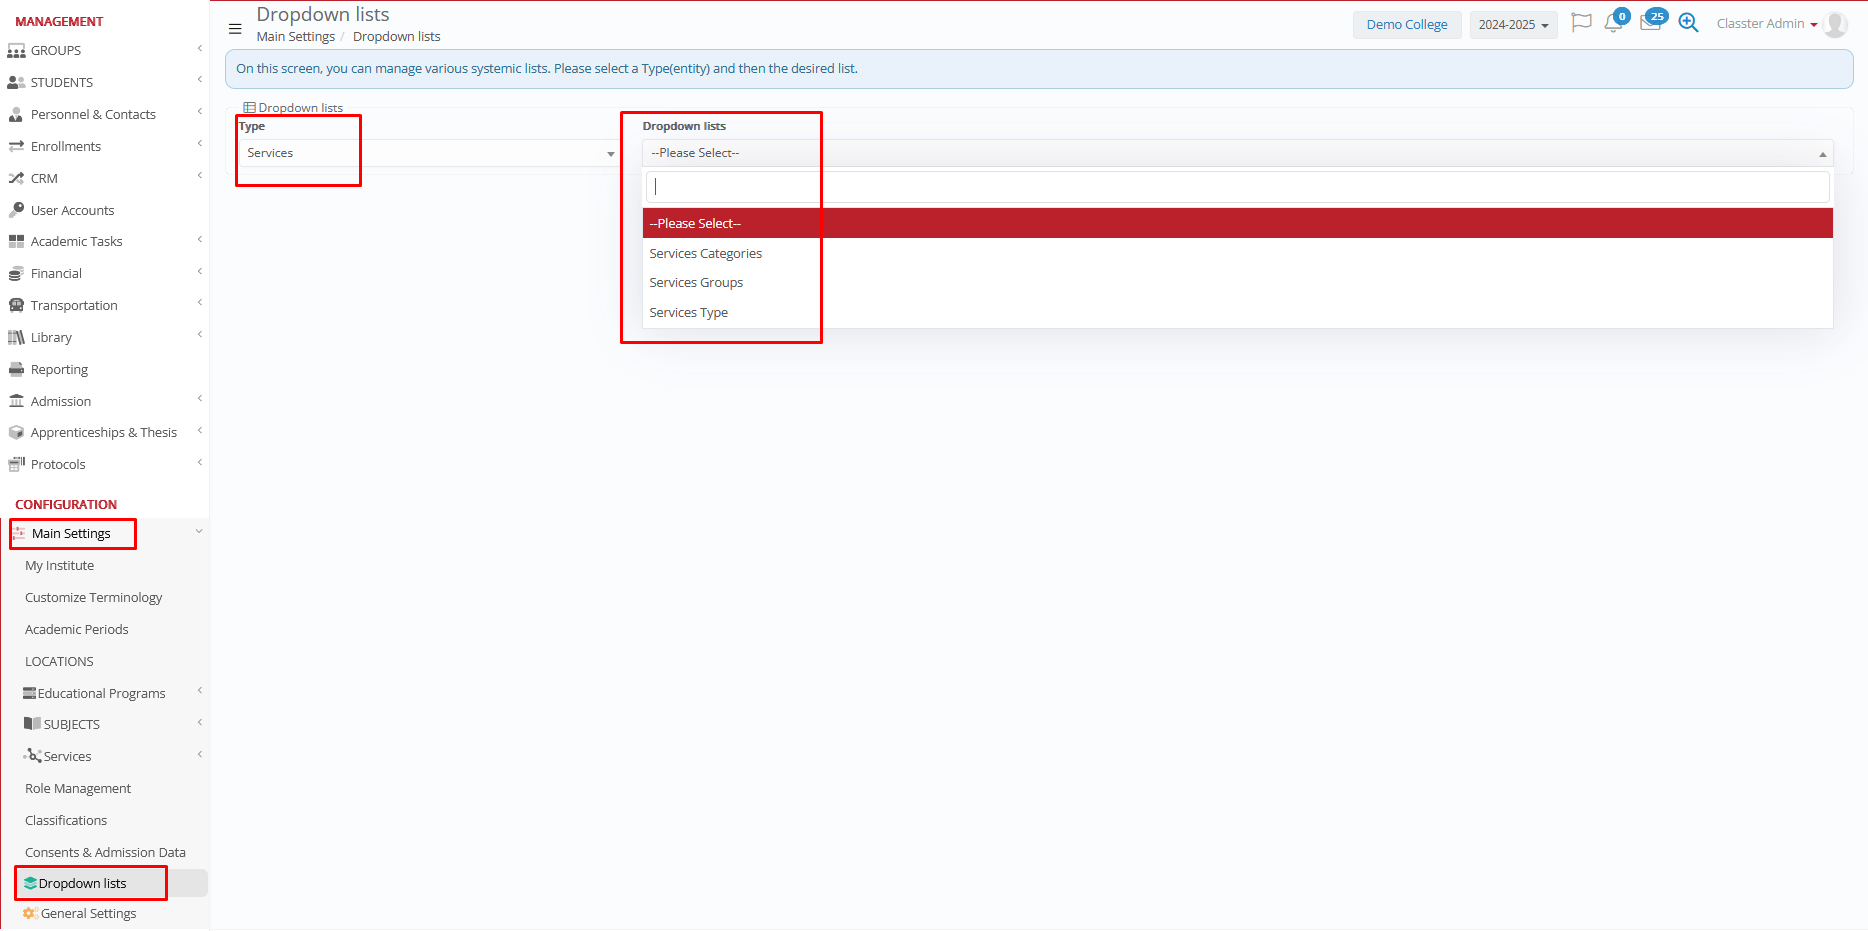
Service categories must be pre-configured at CONFIGURATION > Main Settings > Dropdown Lists > Type: Services, List: Service Categories
- Start Date / End Date: Set the period when the service is valid. In most cases, use the current Academic Period dates. If the service does not have real dates (e.g., a fee), still set these to the Academic Period dates so the service remains available in that period.
- Hours: Set the service’s expected weekly hours. This is used in activities-services with timetable schedule. If the service is a fee-only service, leave this empty.
- Classrooms: The default classroom for the service timetable. Used in activities-services with timetable schedule. If the service is a fee-only service, leave this empty.
Classrooms must be pre-configured at CONFIGURATION > Academic Settings > Timetable >Classrooms
- _Teachers_: Assigns responsible teachers for the timetable. Example: “Choir” → Music Teacher. If the service is a fee-only service, leave this empty.
- _Grade_: Connects eligible Grades to the service and filters which services are available during enrollments, based on the student’s Grade. Example: “School Trip (Grade 6)” appears only to Grade 6 students.
- Link: Optional external link for additional information.
- Color: Visual indicator used to distinguish the service in the lists.
- Image Upload: Optional image/icon representing the service.
- Keep _Attendance_ (switch): Enables attendance tracking for the service (typically used for activities, not fees). Example: ON for “Chess Club”, OFF for “Application Fee”.
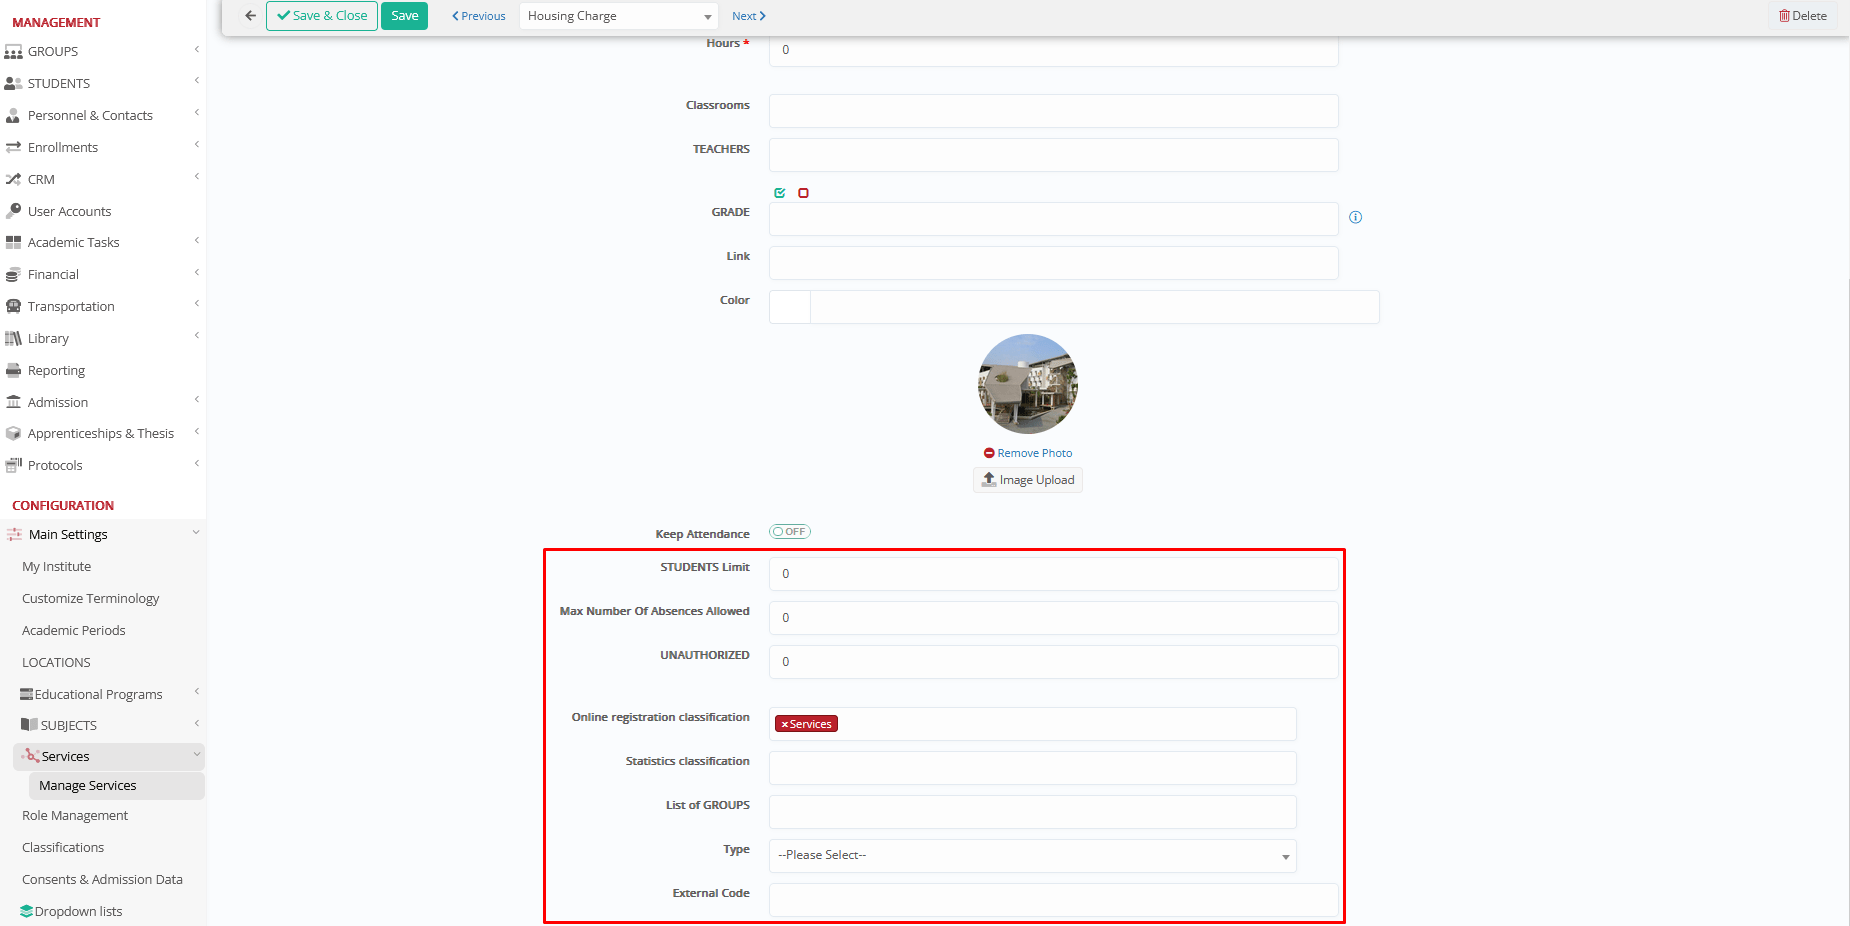
- _Students_ Limit: Maximum number of students that can enroll. Example: limit 12 seats.
- Max Number Of Absences Allowed: For services-activities with timetable, sets allowed absences (used when attendance tracking is enabled).
- Unauthorized absences: For services-activities with timetable, sets/limits unauthorized/unexcused absences (if used by the institution).
- Online registration classification: Used in online enrollments. Select the online registration classification(s), where the enrollment srules are defined and the service will appear.
Classifications must be Pre-configured at CONFIGURATION > Main Settings > Classifications.
- Statistics classification: Used in Institution’s statistics. Select the statistics classification(s) where this service will be included.
Classifications must be Pre-configured at CONFIGURATION > Main Settings > Classifications.
- List of Groups: For services-activities with timetable. Sets availability to specific service groups.
Service groups must be pre-configured at CONFIGURATION > Main Settings > Dropdown Lists > Type: Services, List: Service Groups
- Type: Service type (configurable dropdown used for consistency). Example: Once, Weekly, Twice per week.
Service types must be pre-configured at CONFIGURATION > Main Settings > Dropdown Lists > Type: Services, List: Service Types
- External Code: External/reference code for integrations/migrations or just mapping.
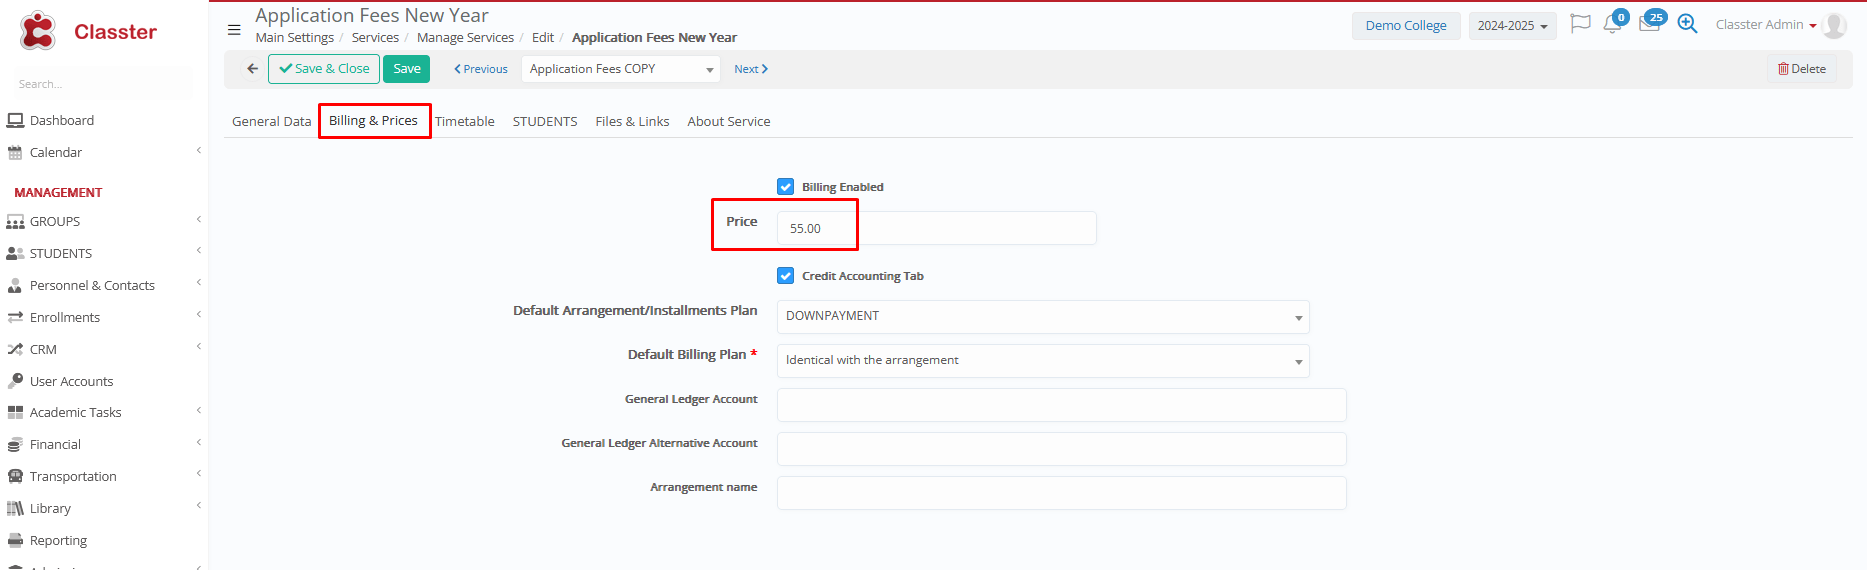
Billing & Prices
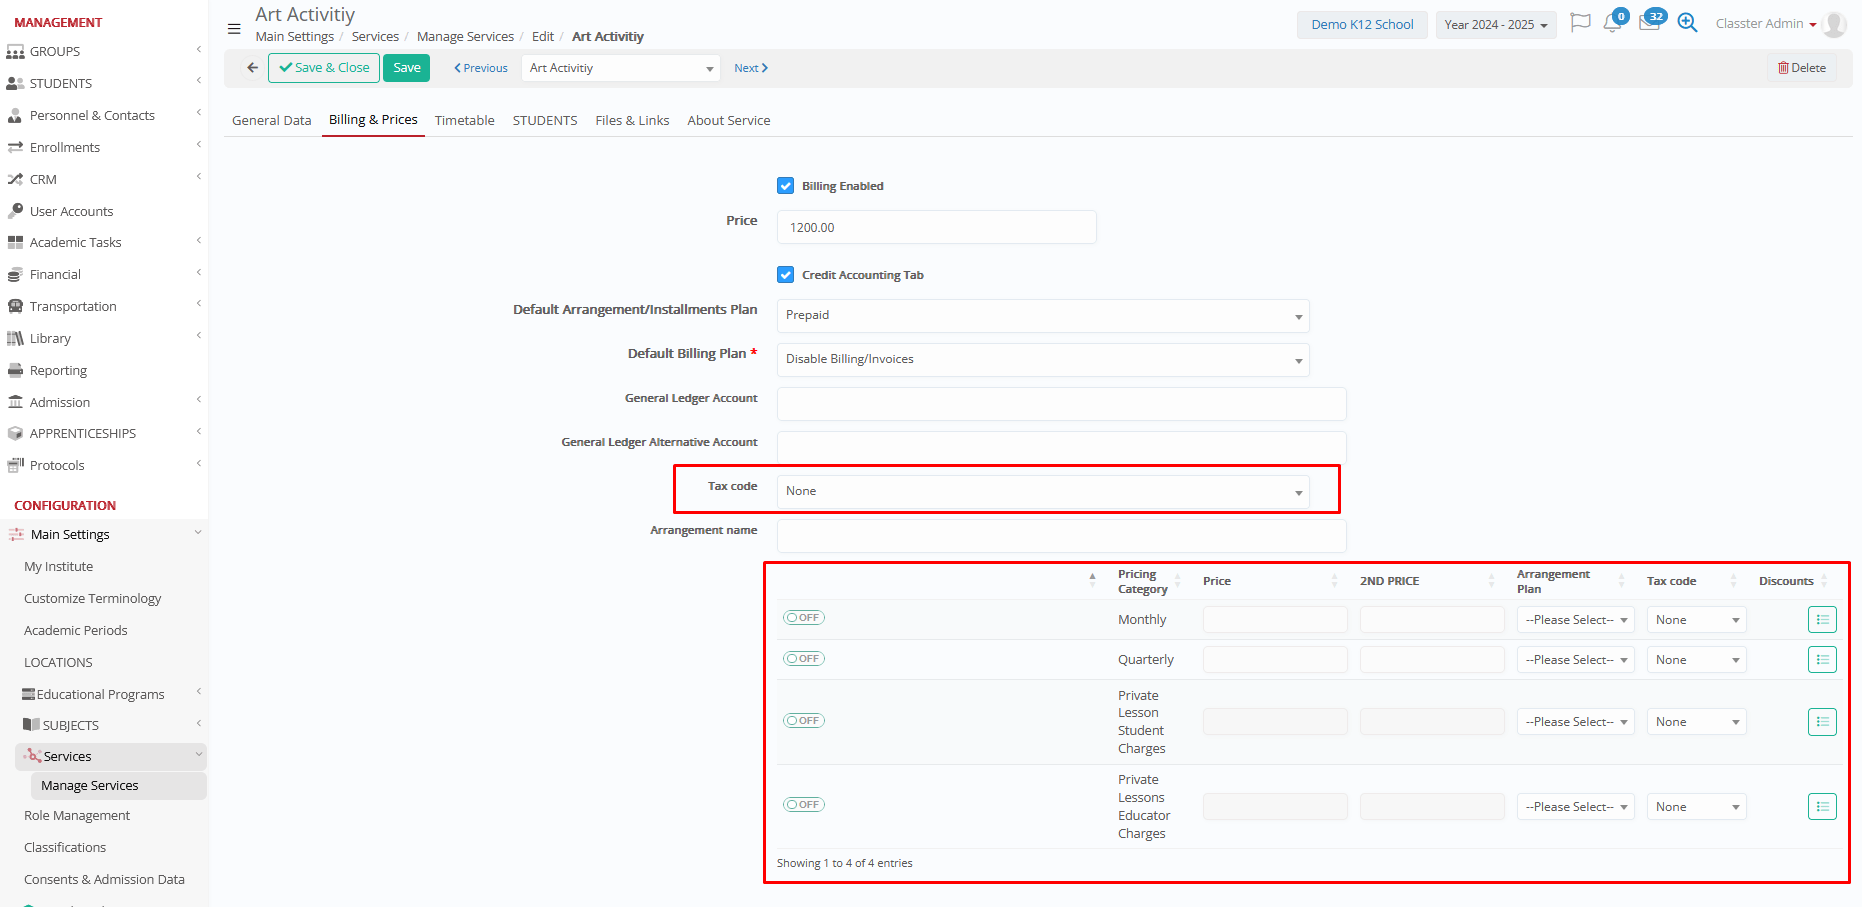
Use this tab to enable billing and configure pricing, accounting, and tax settings for the service. This tab is available in both Create and Edit.
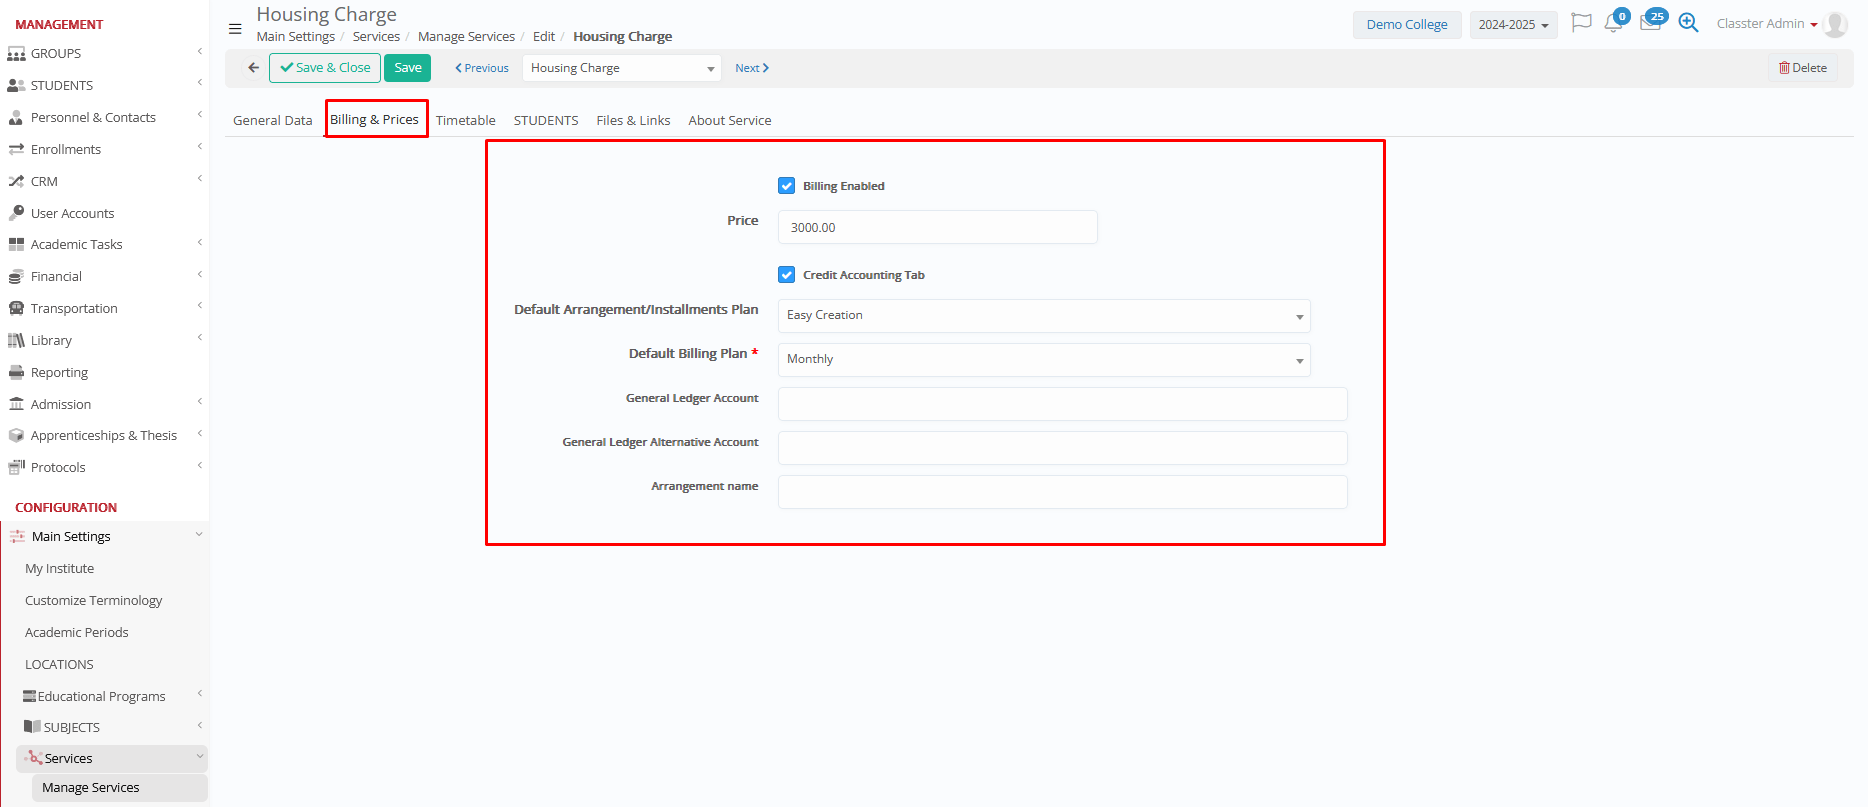
- Billing Enabled: When enabled, a financial arrangement command will be created to the students enrolled. (please note that a general financial configuration/settings is also pre-requisite, like the “Enable financial arrangement creation only for the following STUDENTS status “ setting) Examples ON for “Lunch” or “Application Fee”.
- Price: The default/starting price of the service. Example: Lunch Plan = 120.00, Gym Membership = 40.00.
- Credit Accounting (switch): ON by default. If disabled, then the charges will be hidden from the students’ cards.
- Default Arrangement / Installments Plan: Preselected installment or payment arrangement (e.g., downpayment or 6 equal installments).
Arrangement Plans must be pre-configured at CONFIGURATION > Financial Settings > Dropdown Lists > Arrangement Plan. Pre-payments, number of installments and due dates, amounts/percentages are defined within the plans configuration)
- Default Billing Plan: Sets the default billing plan (if used by the institution). Default option: Identical with the arrangement plan. Other options may be “40% first year of the academic period and 60% second year of the academic period” for special billing cases.
Billing Plans must be pre-configured at CONFIGURATION > Financial Settings > Dropdown Lists > Billing Plan.
- General Ledger Account: Enter the GL account the institution uses to map and post this service’s charges/fees. Example: “Lunch Revenue”, “Student Services Fees”.
- General Ledger Alternative Account: Enter a secondary GL account used when the institution needs this service to post to a different account for specific posting/reporting rules. Example: Use a different GL account for “Transportation Pass” charges for a specific campus or payer type.
- Arrangement name: Optional custom title for the Arrangement, used in payer views and reporting (e.g. transaction reports).
Otherwise, the default description is taken from the subject title.
Depending on your Financial Configuration, you might also use Taxis and/or Pricing Categories:

- Tax code (optional): Apply the relevant tax code for pricing and billing (e.g., VAT 20%). If taxation is not used in your configuration, this field may be ignored.
Setting CONFIGURATION > Financial Settings > Price Lists, Fees and Taxes Tab > Fees & Taxes > “Use tax” is pre-requisite.
Please note that if the above setting is enabled for Services and there is a Tax Code set as Default, the system will still calculate taxes. If you wish to exclude a service in this case, you can create a Tax code with 0% taxes.
Tax Codes must be pre-configured at CONFIGURATION > Financial Settings > Dropdown Lists > Tax Codes.
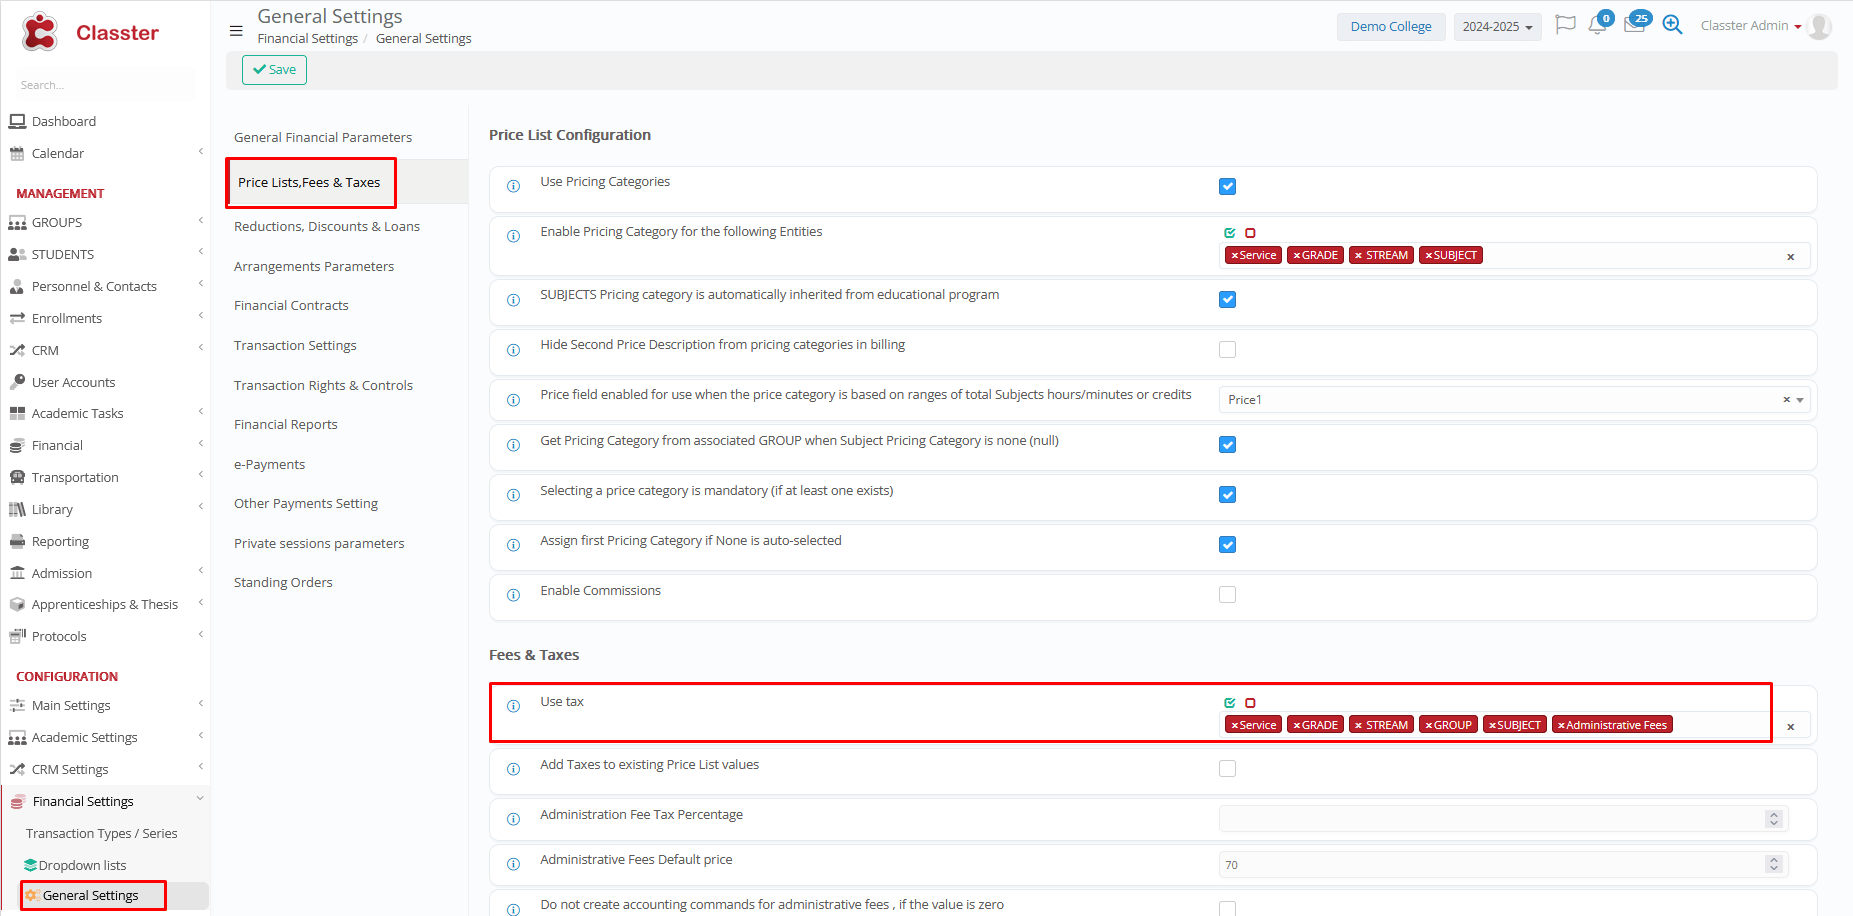
(Enable it navigating to: Financial General Settings > Price Lists, Fees & Taxes > Fees & Taxes > Use Tax > for Services)
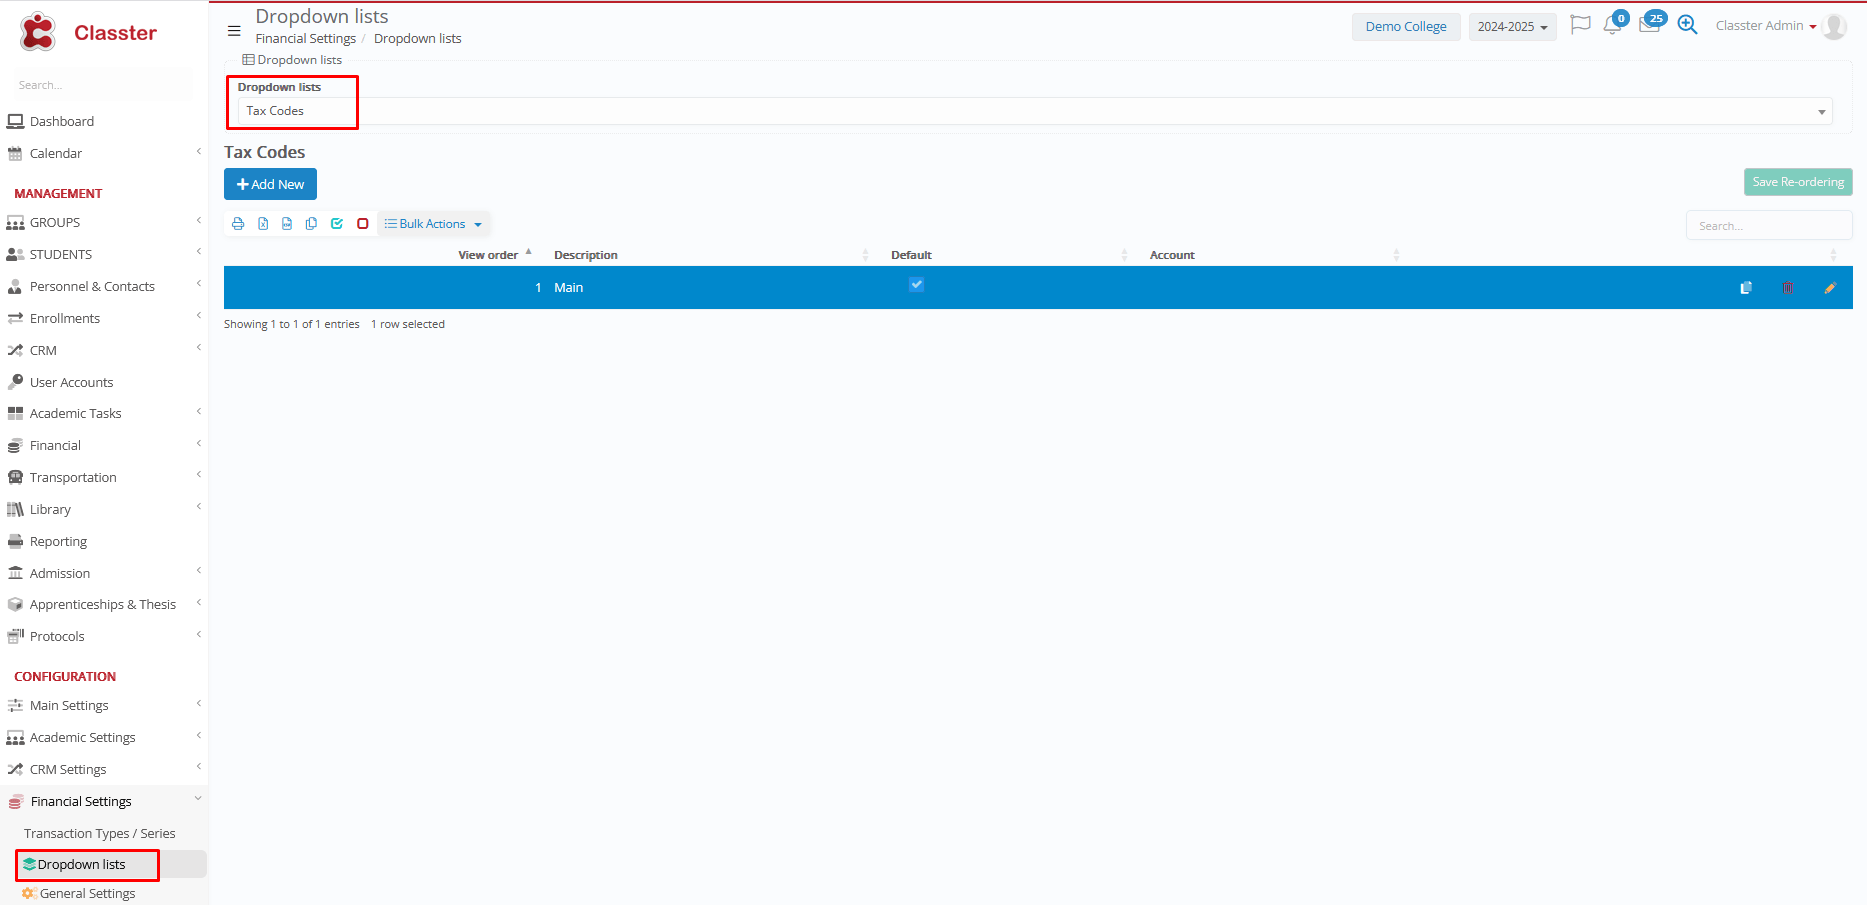
(Configure the Tax Code Dropdown List navigating to: Financial Settings > Dropdown Lists > Tax Codes > Add your Tax Code Values)
AND
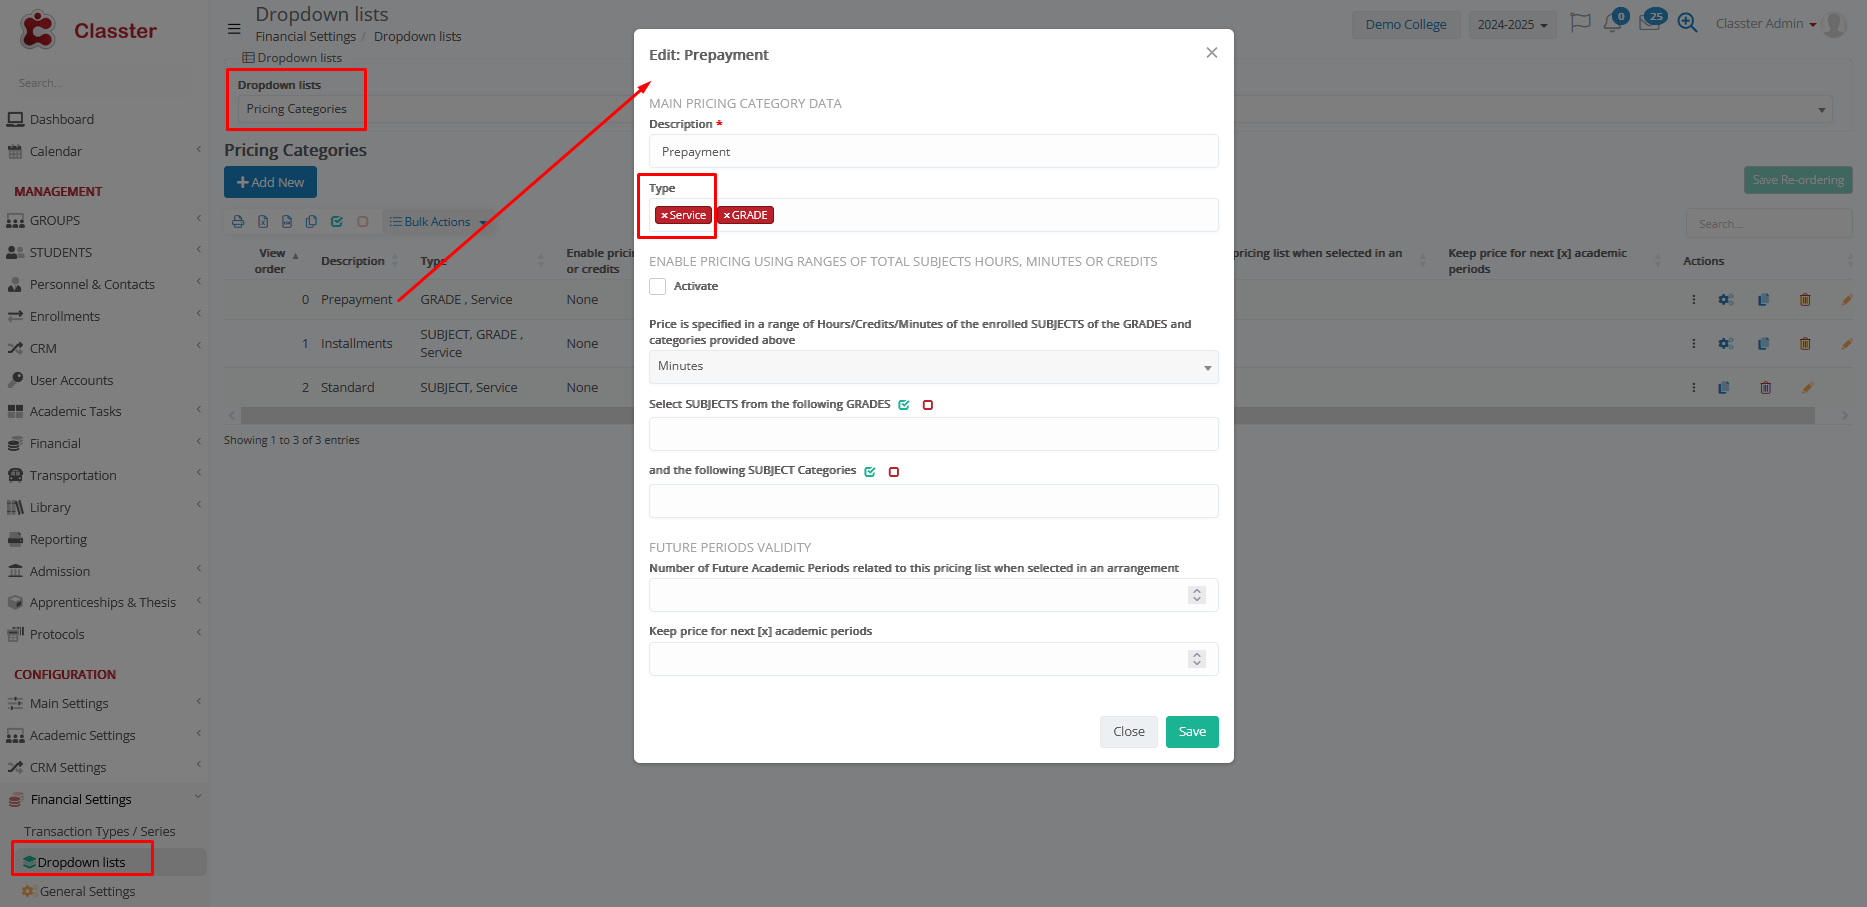
Pricing grid (per pricing category): Use the grid when the same service needs different pricing per pricing category (e.g., prepayment vs installments). Each row can be enabled/disabled depending on whether it applies.
To enable pricing categories, navigate to: Financial Settings > Dropdown Lists > Pricing Category and select for which entity types you want this feature enabled.
- Row Enabled (On/Off): Turns the entire pricing row on or off for the selected pricing category.
- Pricing Category: Preselected value that identifies which pricing category the row refers to (e.g., Prepayment, Installments).
- Price: Sets the main price for this pricing category.
- 2nd Price: Sets a secondary price for this row (if enabled in your setup).
- Arrangement Plan: Selects the arrangement/installments plan applied for this pricing category.
- Tax code: Selects the tax code applied for this pricing category (if used).
- Discount: Opens/applies discount settings for this pricing category (if used).
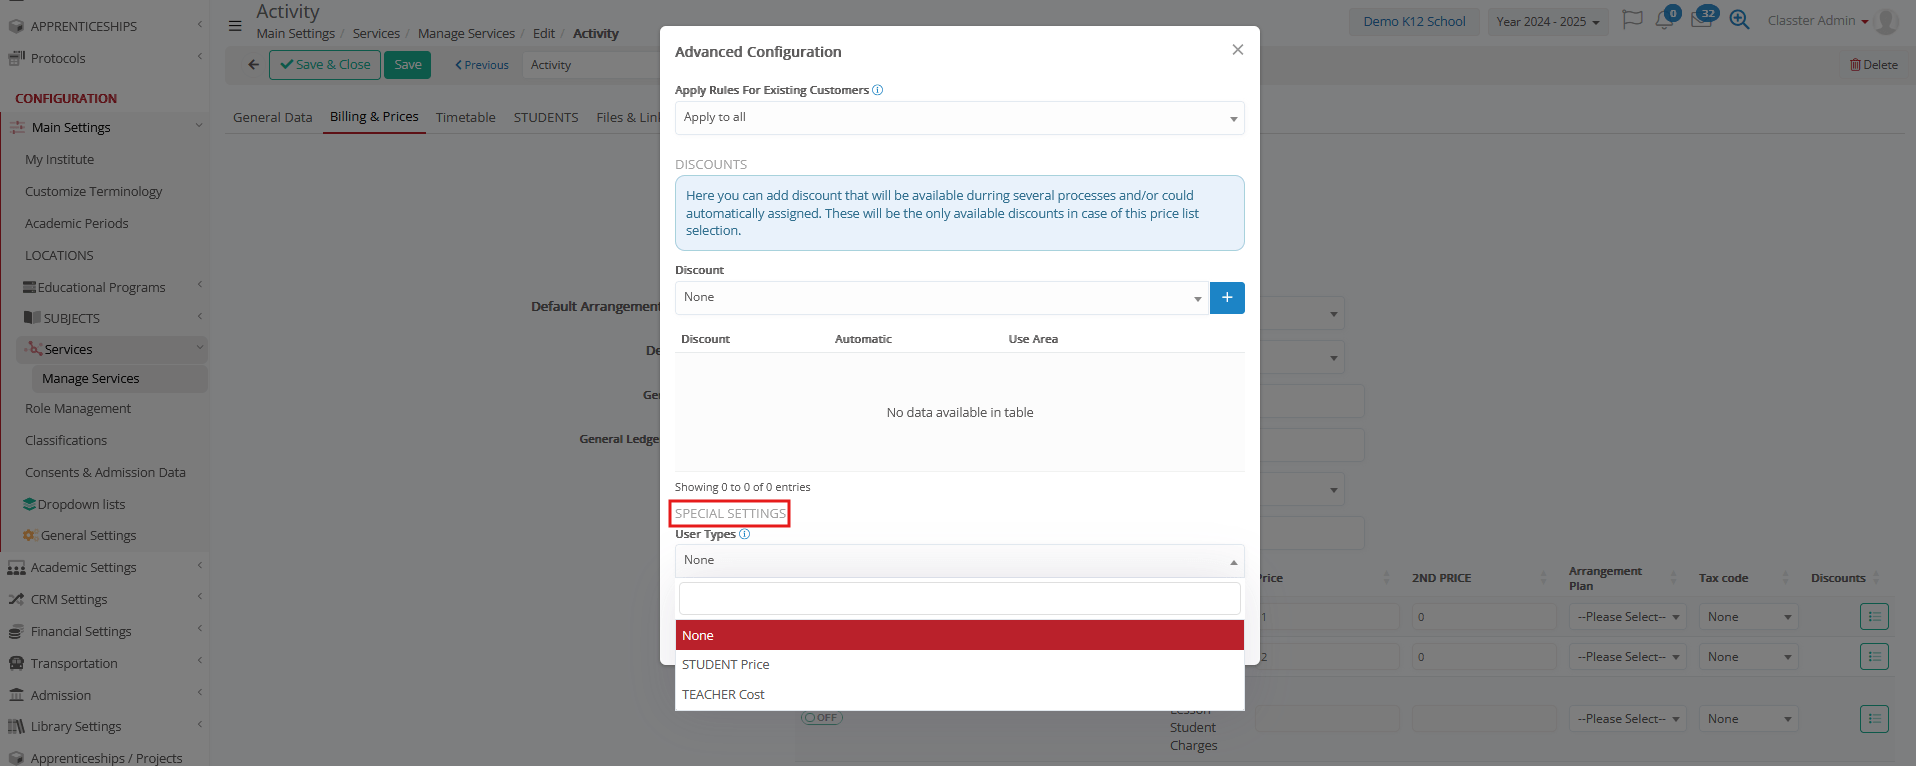
Advanced Configuration: If you wish to apply discounts, open the pop-up (bulleted list icon on discounts) where you can apply discount rules. You can select from a dropdown to define if discounts should apply only to new customers, only to existing customers, or to all. Additionally, you can choose which discounts will be available for this Service and for which user types they will apply.
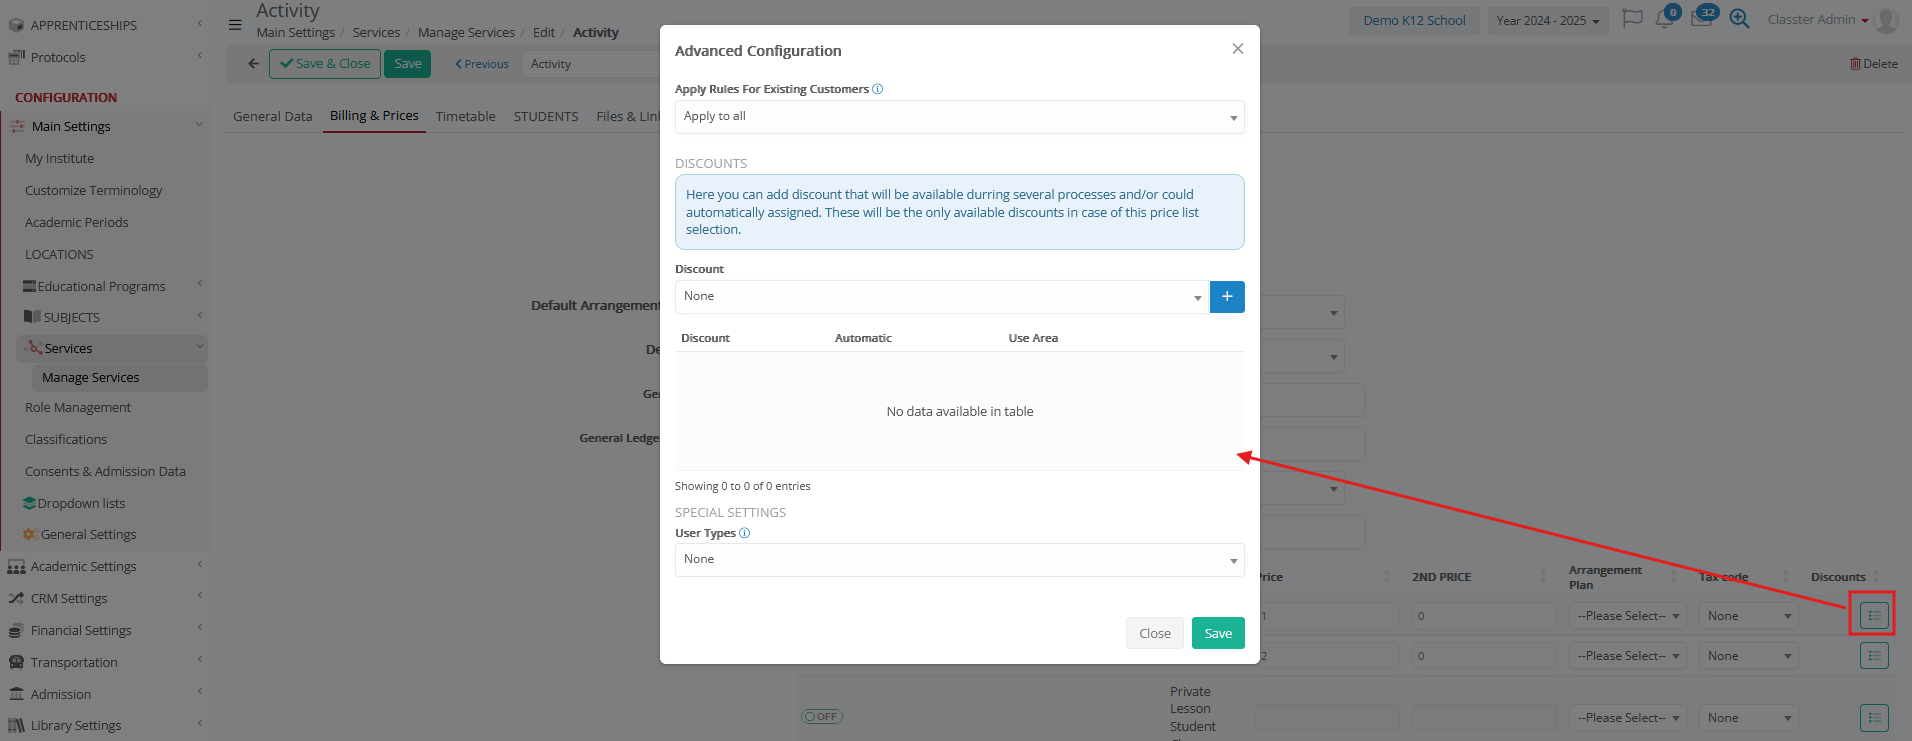
Special Settings: You can configure whether each Pricing Category is applicable at Private Session level. If enabled, further specify whether it applies to the _Student_ Price or _Teacher_ Cost. This filtering ensures appropriate charges across session types.
Timetable
Use this Tab to schedule when the service takes place. The selected timetable placements will be visible to students on their general timetable screen. The timetable can be used at Activities services like afternoon Football, or other cases like Seminars for example.
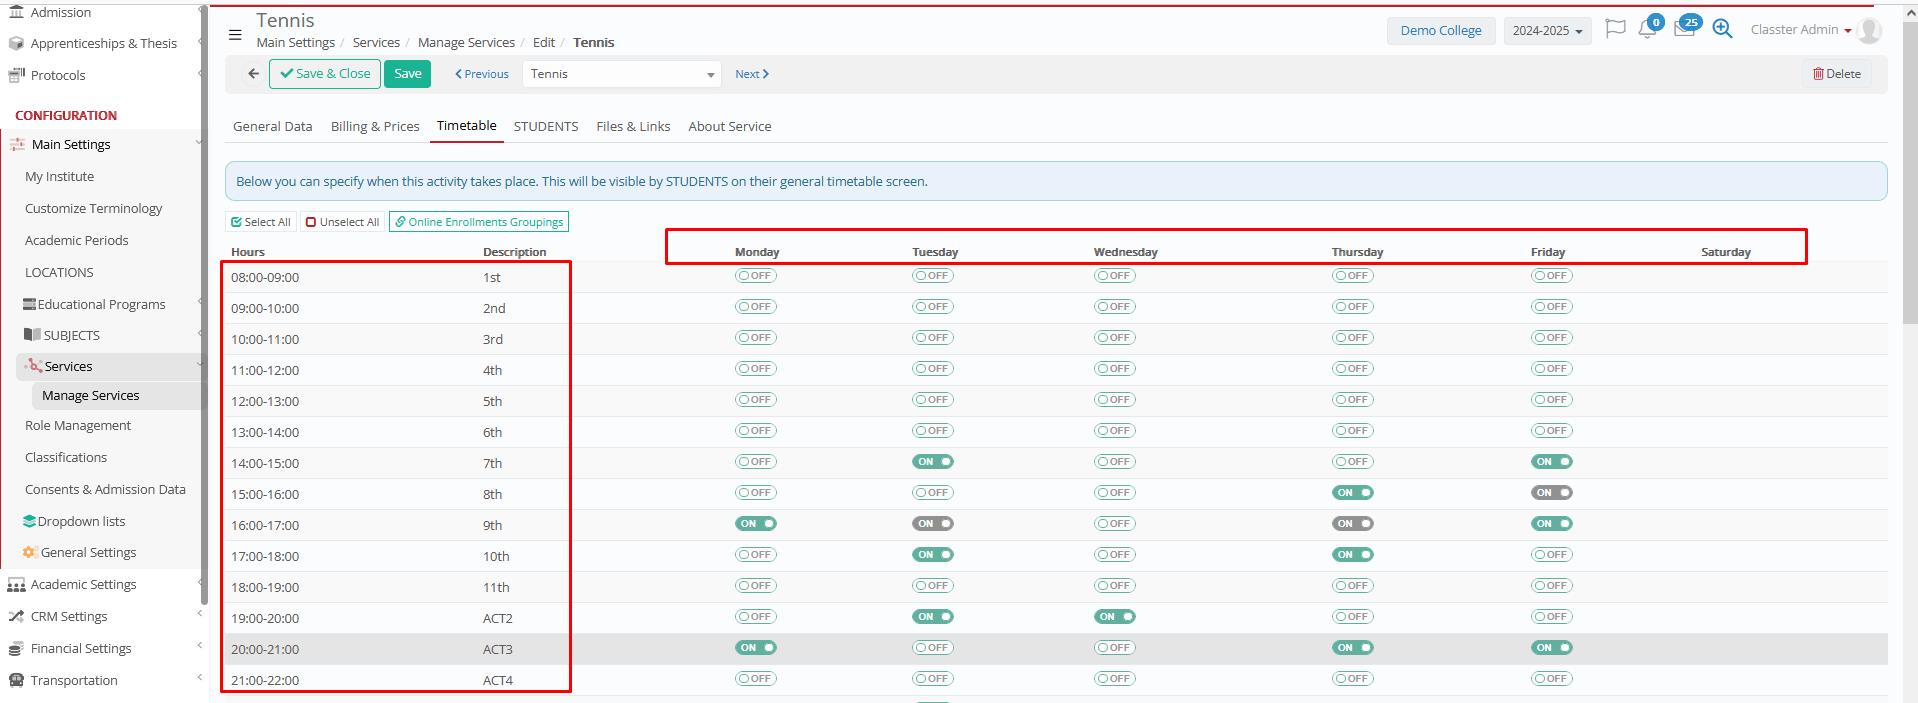
Timetable periods/hours, will be loaded automatically based on the relevant configuration at CONFIGURATION > Academic Settings > Timetable > Timetable Periods.
(The timetable periods with the “ Type of Timetable Period” field including the option “Services” and the Days of the Week included at the field “Days”)
- Switch on/off the scheduled hours at the correct days.
- The selected placements will appear on student timetables.
Disabled/grey options will be not editable because of students’ existing enrollments (You need to remove the enrollments first. You can find them from the Student List – Views – Students per Services, or other reports)

*Please note that this is a generic weekly timetable for the academic period.
“Online Enrollments Grouping” button
Here you can configure availability groups/sections, for the Online/Self Enrollments to Services, for the Students/Parents/Agents etc.
These groupings are used to force the users to select a combination of hours together.
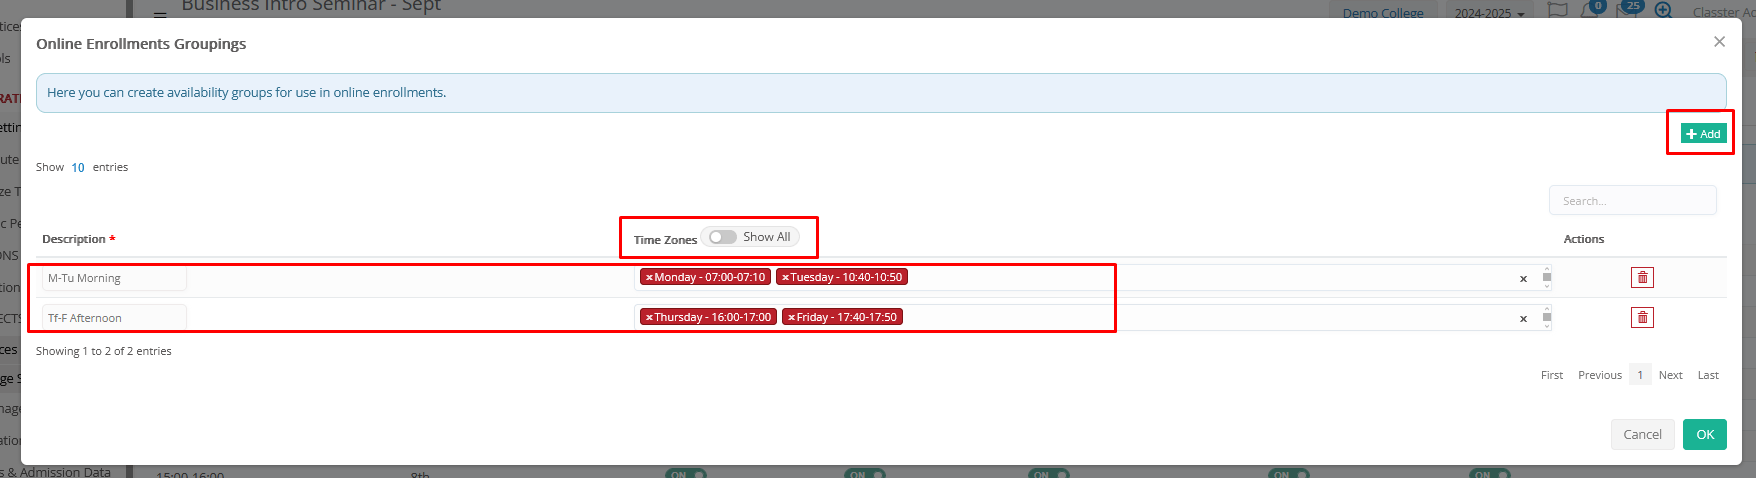
Time Zones switch: If disabled, then it shows only combinations of selected timetable periods/hours – Days, in the service timetable Tab. If enabled, it will list all the available combinations of Timetable periods – Days.
Groupings: Click on ‘Add’ button to create one or more groupings for the service in online enrollments. Here you will configure the available combinations.
How this affects the online enrollments’ process:
If at least one grouping is configured, then an info will appear at the self-enrollments: “Please note that this service operates on a predefined schedule, with predefined session groups.”
And if the setting CONFIGURATION > Admission > Admission Settings > ‘Online Enrollments’ Tab > ‘Online Enrollments – Services’ Section > “Do not allow users to enroll in services with overlapping timetable schedule” is enabled for the relevant enrollments functionality, then the system will not only check the normal enrollments overlapping, but it will restrict according to combinations added at the groupings.
Students
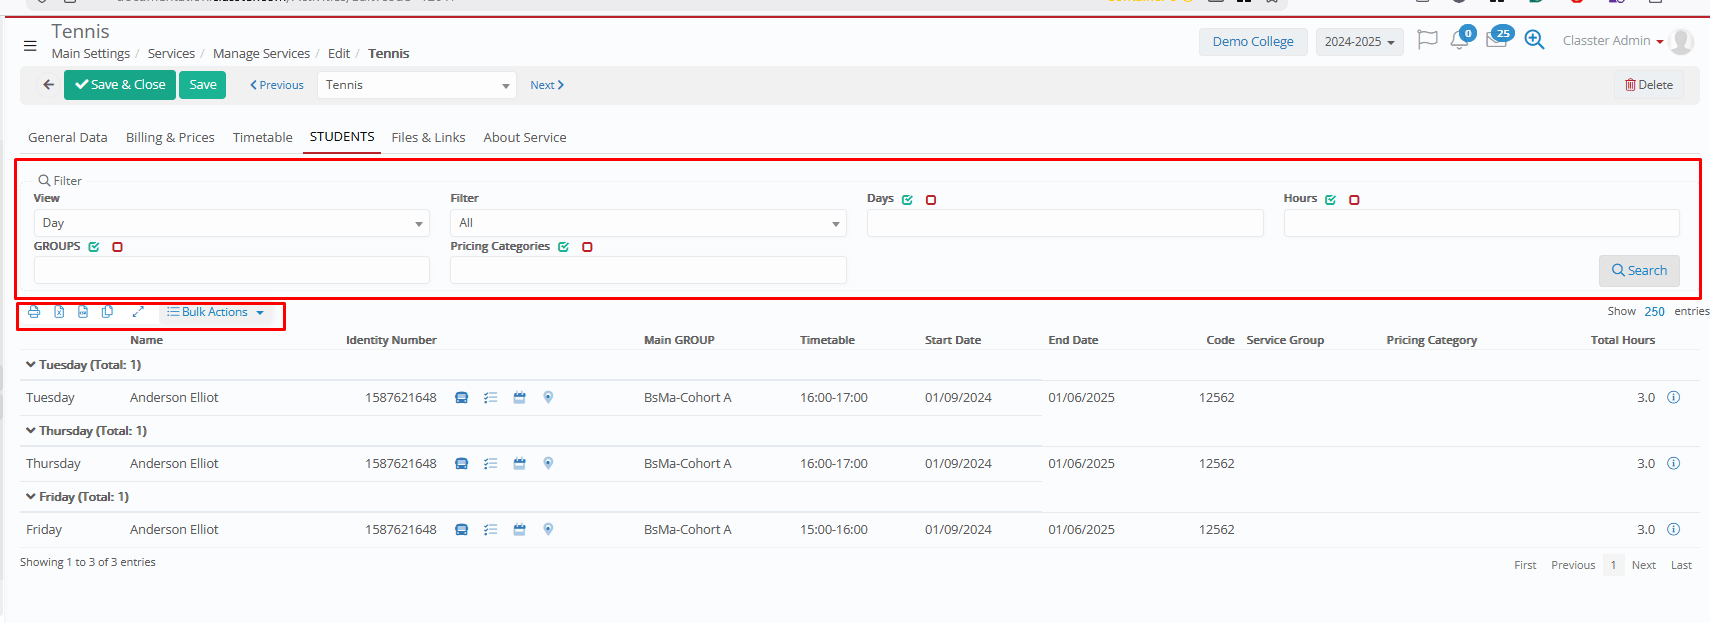
Displays the list of students participating in the service and lets you filter, export, and apply actions in bulk.
Filters
- View*: Changes how participation data is displayed (Per Day / Per Student / Day-Timetable). Example: Use Day-Timetable to see participants grouped per day, based on their enrollments.
- Filter: Use to restrict participation status (All / Active / Stop). Enrollments to services have their own standard statuses: Active and Stopped.
- Days Of The Week: Select specific days, to restrict the results.
- Hours / Timetable Slots: Select specific timetable slots to restrict the results.
- _Groups_: Filters students by their group on the service.
- Pricing Categories: Filters students by their pricing category on the service enrollment (e.g., Prepayment, Installments).
Grid tools
- Print: Prints the participant list.
- Export (Excel / CSV): Exports the participant list for external use.
- Copy: Copies the list data for quick pasting.
- Expand/Collapse: Expands or collapses grouped results (when grouping is applied).
- Search: Searches within the participant list by keyword.
- Bulk Actions: Applies actions to multiple selected students at once.
Bulk Actions
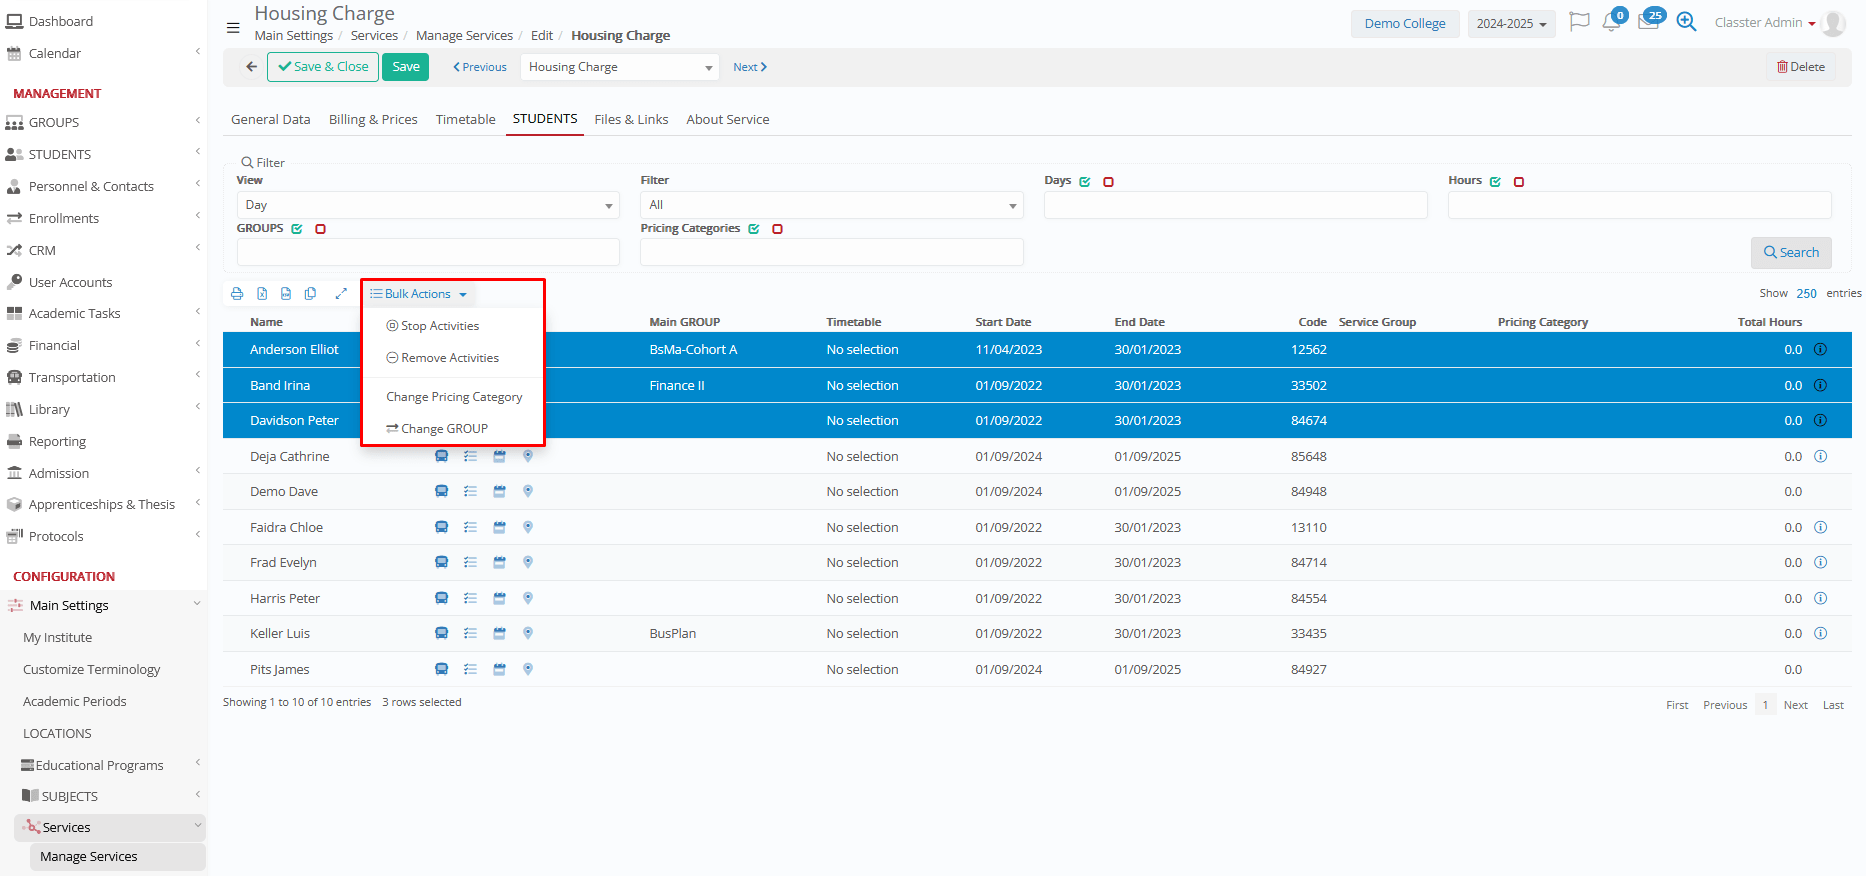
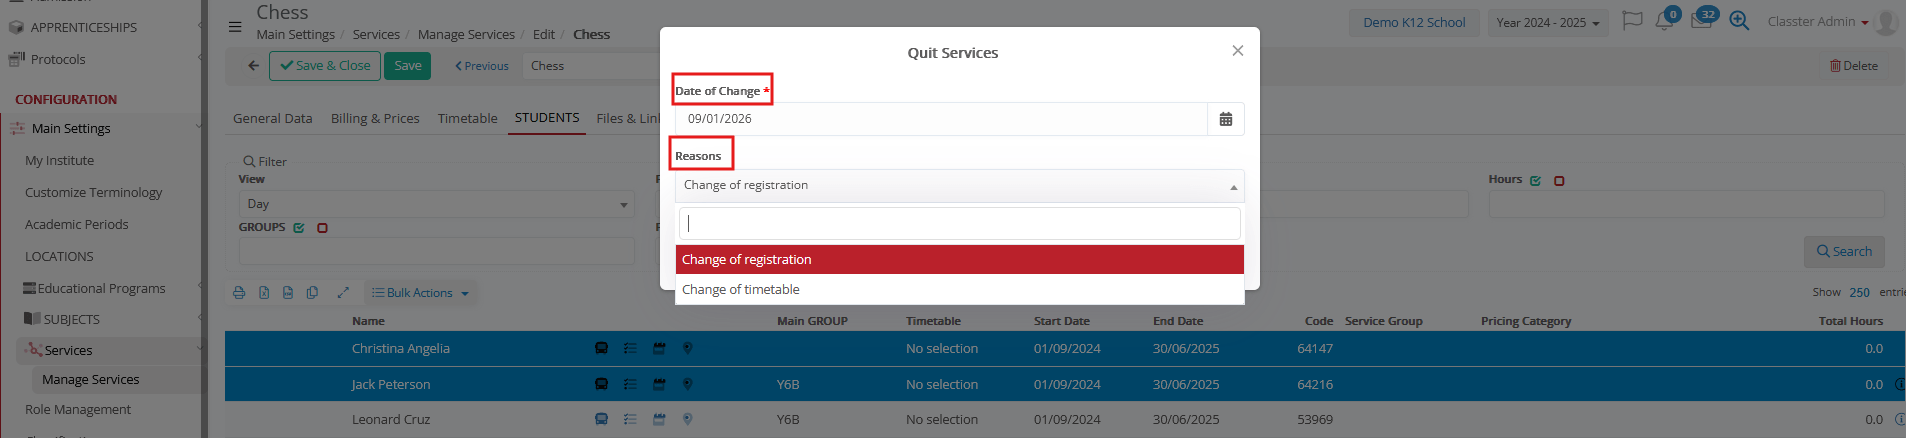
- Stop Activities: Sets participation to Stopped for the selected students and requires you to enter a date and reason.
- Remove Activities: Completely removes the selected students enrollments to the service. (Recommended mainly for mistaken enrollments. If the student started and stopped, then Stopping the activity is recommended for historical reasons).
If there are any connections to the enrollments, such as a connected financial arrangement, then the deletion will not be allowed until all connections have been removed.
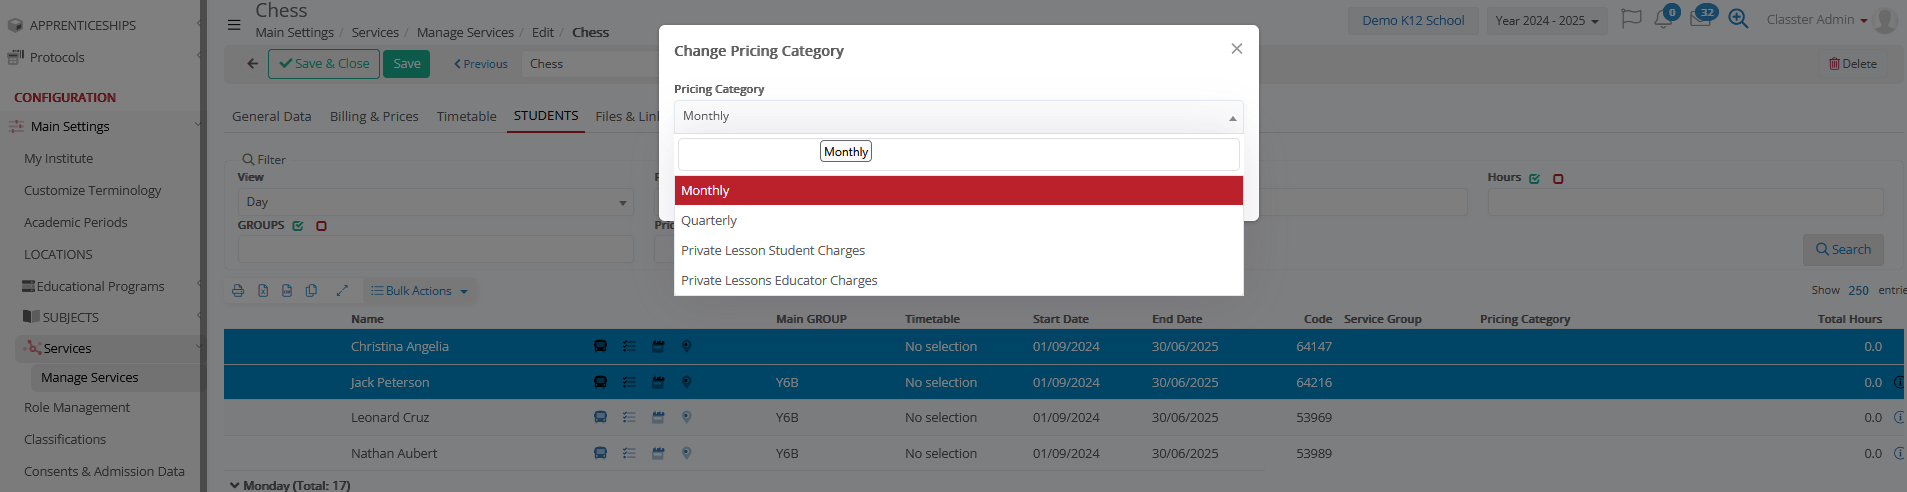
- Change Pricing Category: Updates the pricing category for the selected students’ enrollments to the service and requires you to select the new category.
- Change _Group_: Assigns the selected students to a different service group.
List columns
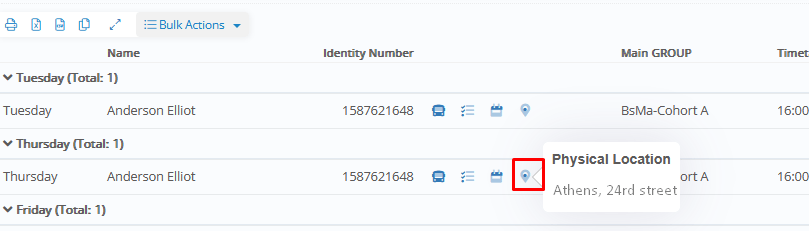
Based on the selected View, you will see the students grouped accordingly.
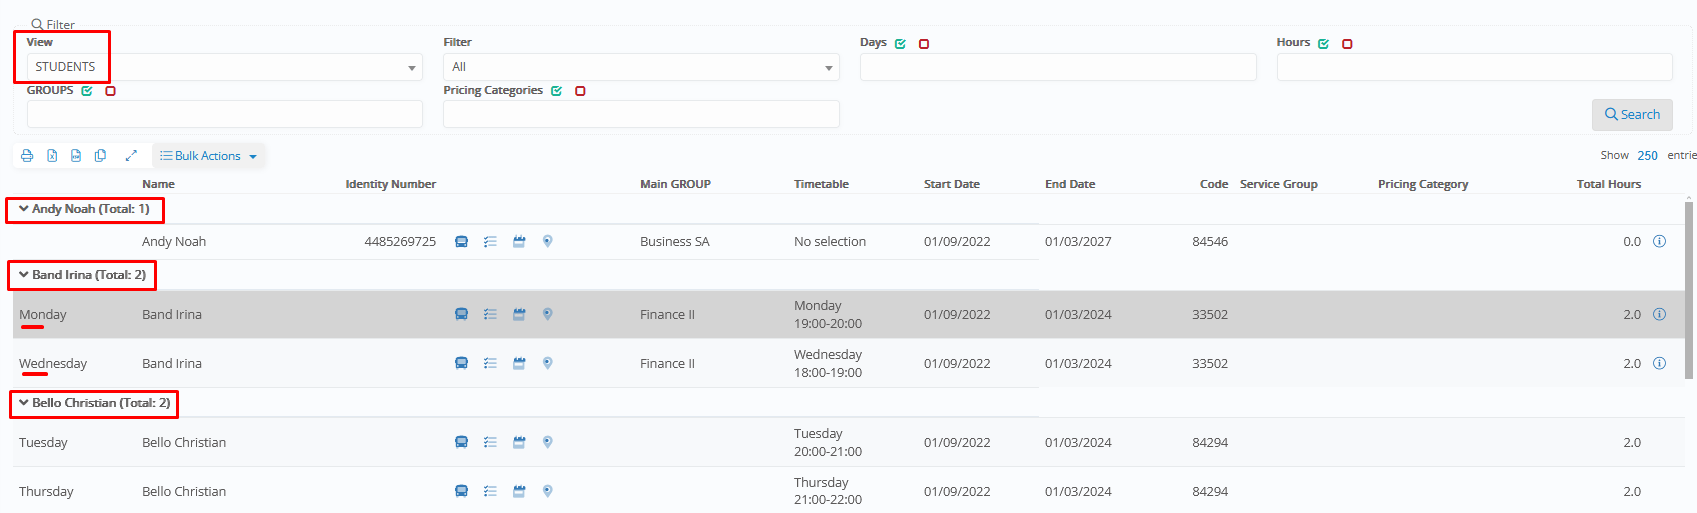
Columns: Name of the Student, ID card number, Main _Group_ (of subject enrollments), Start-End dates of the enrollment to the service, Classter Student Code, Pricing Category of the enrollment to the service and Total Hours of the student enrolled at the service.
The info (i) at the last column will show all the student’s enrolled services

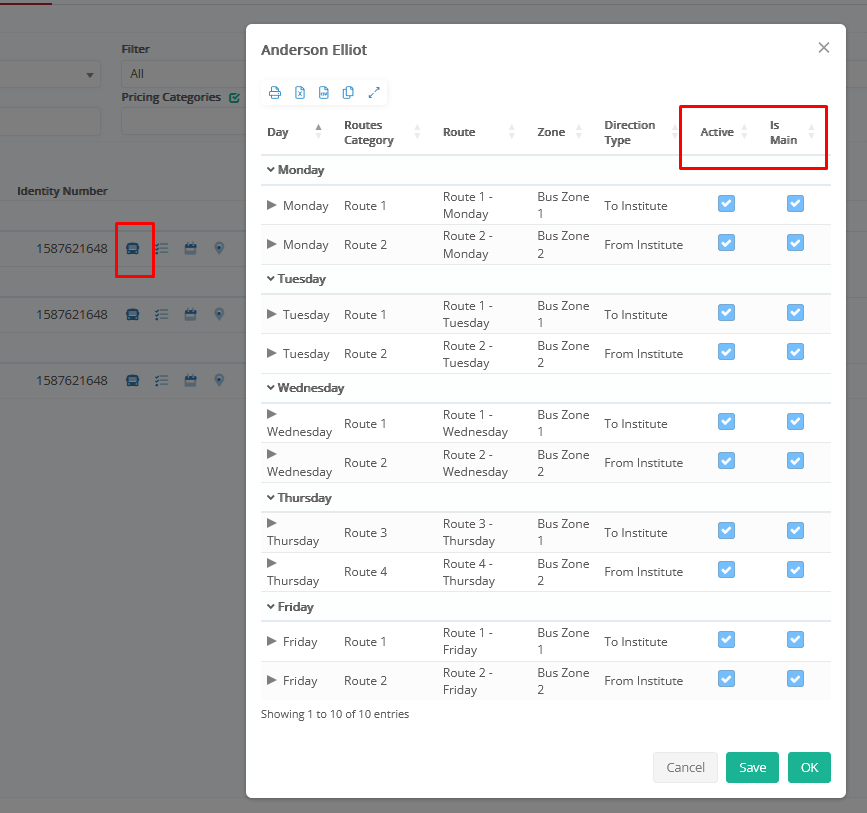
Row options
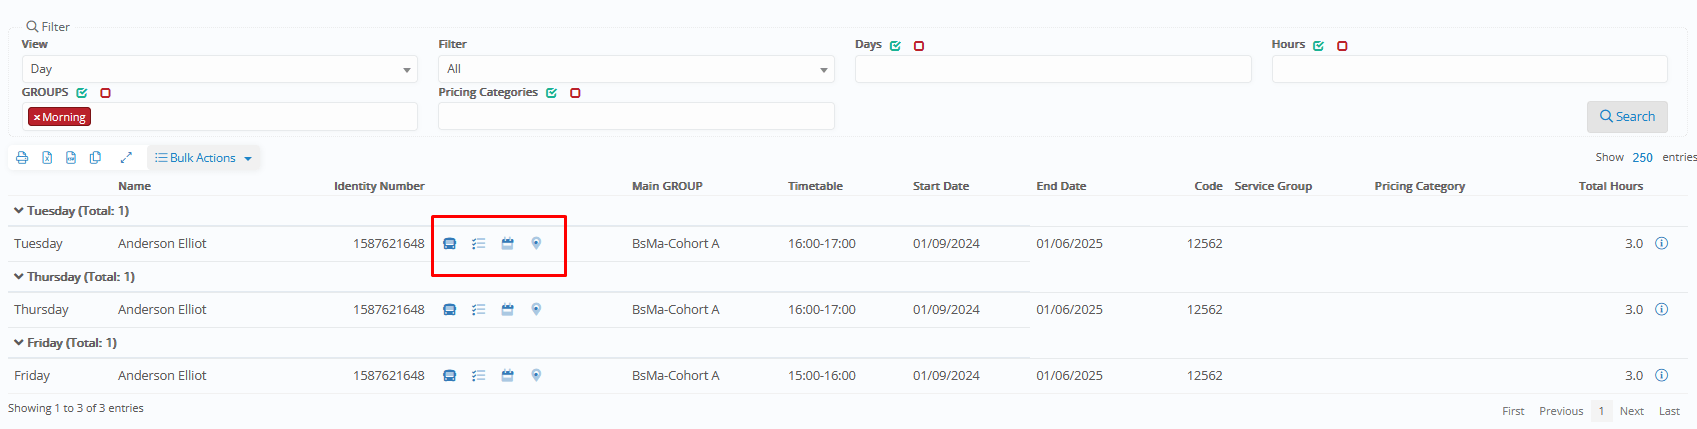
Routes (1st option): This option is designed mainly for services relevant to Transportation fees. It will open a pop-up window with the existing enrollments of the student to Routes and will give you the option to disable them if needed.
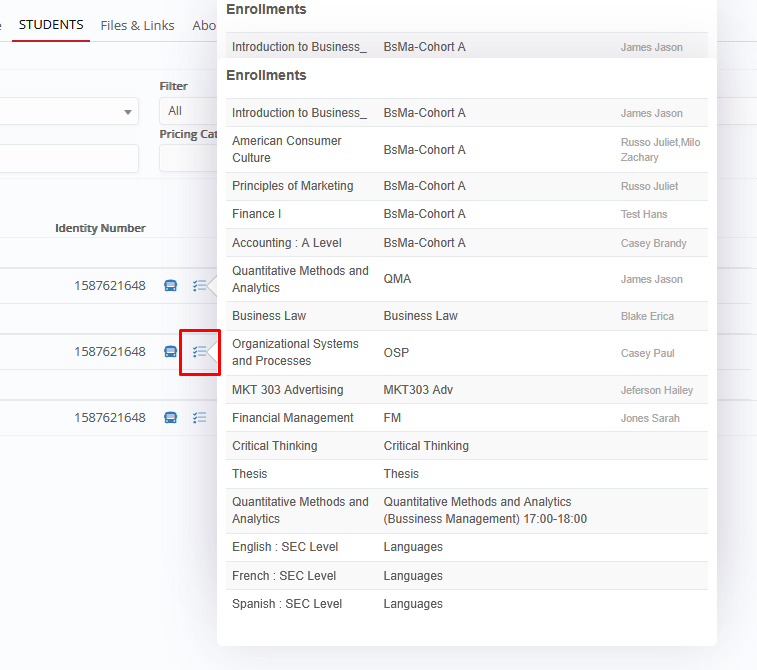
Enrollments (2nd option): This option will open a pop-up window with the student enrollments to _Subjects_ (and their allocated _Groups_ and _Teachers_). View only.
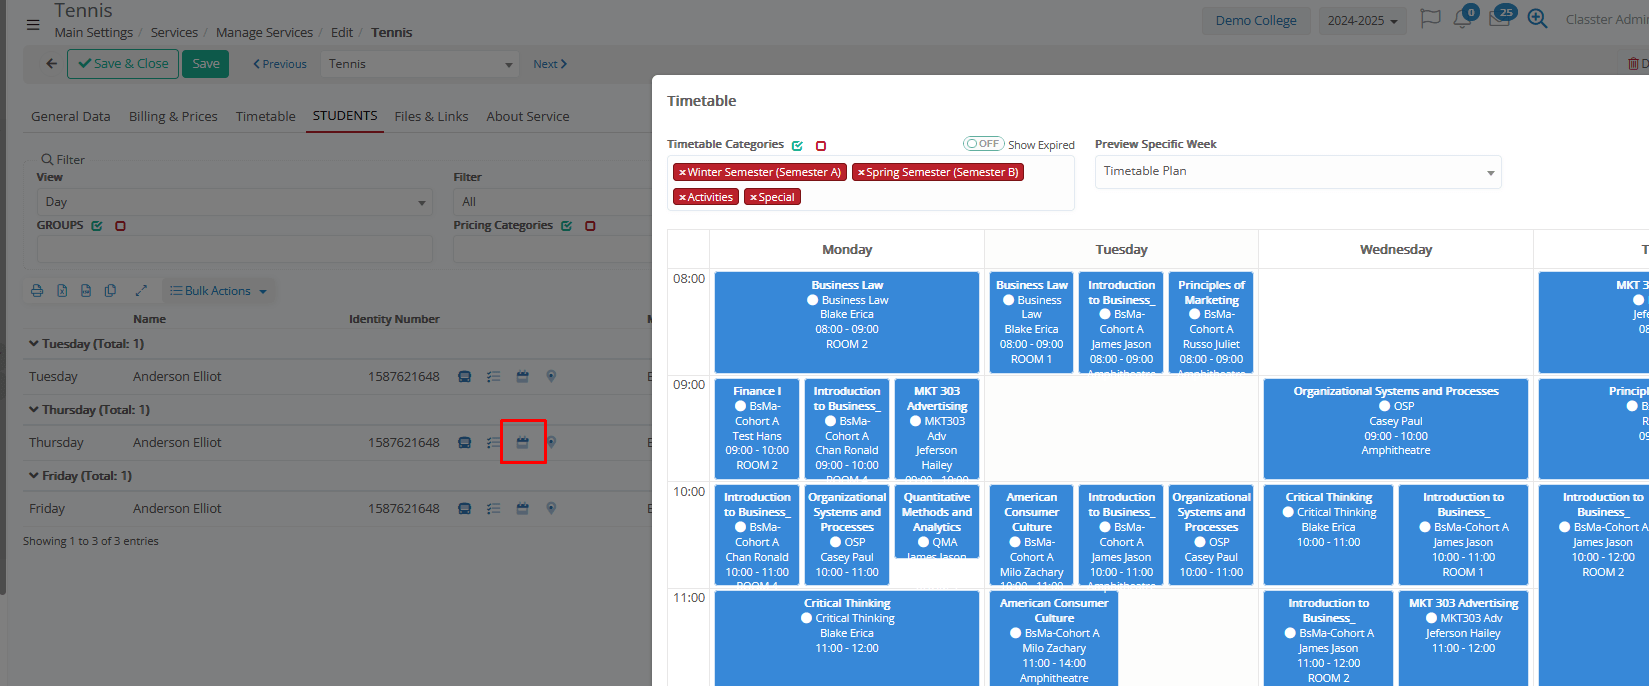
Timetable (3rd option): This option will open a pop-up window with the Student’s generic timetable, in order to check their entire schedule and make changes to their enrollmen if needed.
Physical location (4rth option): This option is designed for services relevant to Transportation. It refers to the student’s live location using GPS.
Files & Links
Use this Tab to attach any content for the service, related to general info, official documents, academic info, pricing info and any other category you may need.
The files can be made visible to different user types and categorized for easy access.
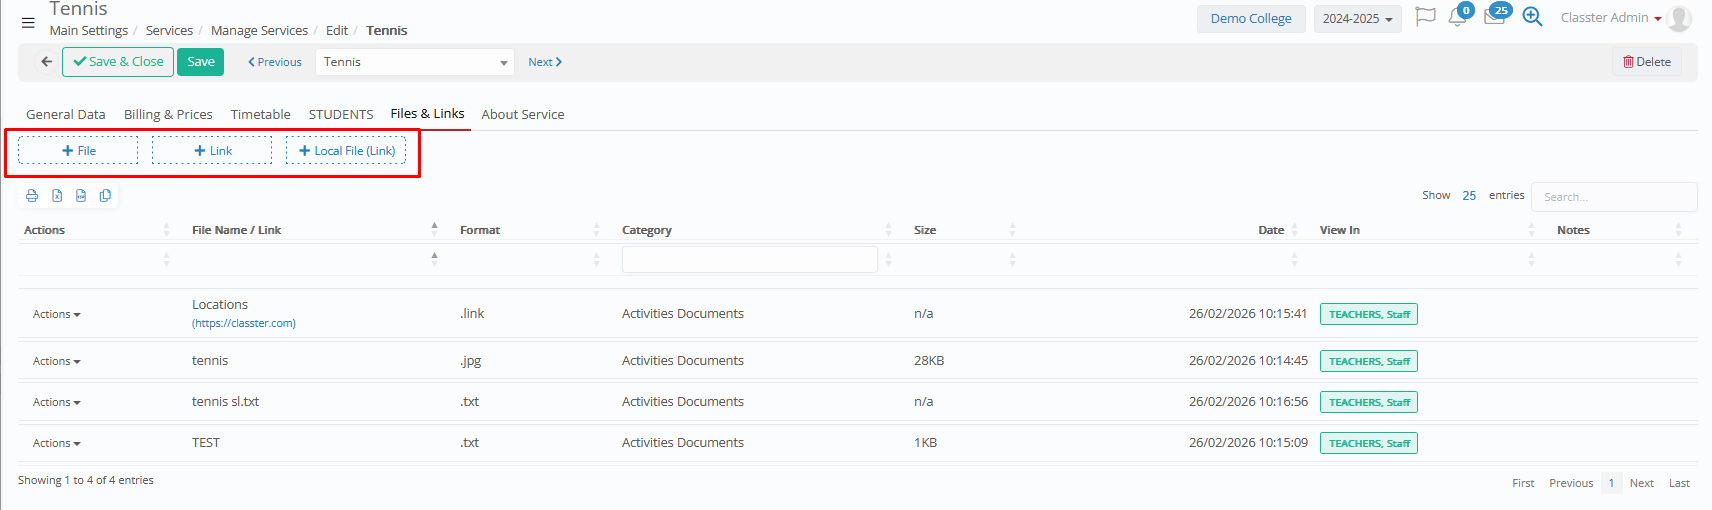
There are 3 options to attach data:
- Files: Upload/attach documents related to the service (e.g., consent forms, schedules, notices, instructions).
- Links: Add URLs/resources related to the service (e.g., external information pages, online material, forms).
- Local file (link): Add a local path that points to a file stored at your own machine.
! Please note that no other users will be able to see these files even if you open the view at the privileges, since this option will not upload a file, but saves only the path, so you will open the file quickly from your machine.
Adding a new file:
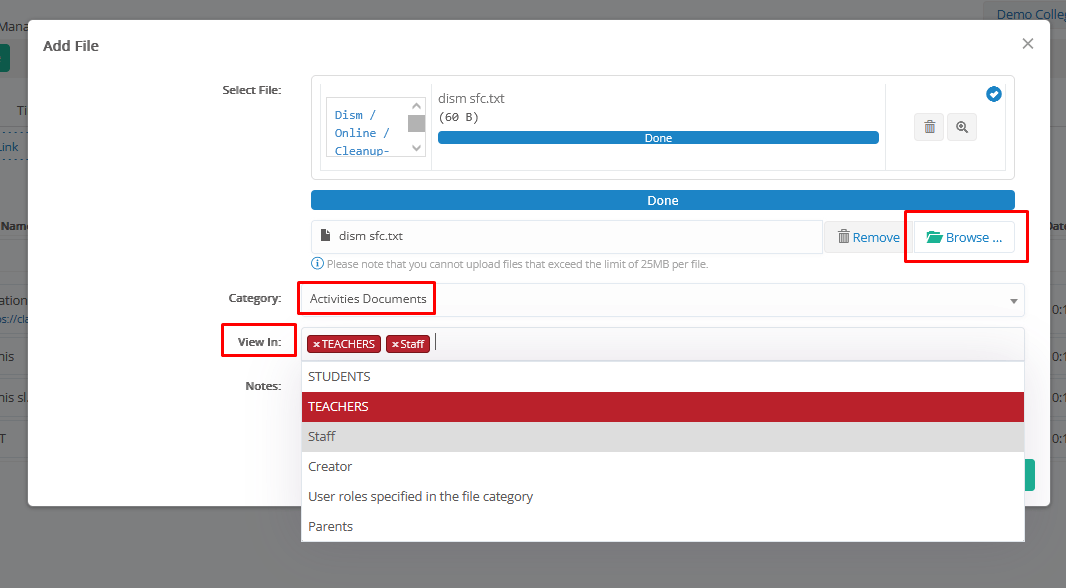
Based on the Type of file you will select (File, Link or Local File), a pop-up window with the relevant fields will open.
Select File: Click on Browse to select the file to attach or add the link/URL or Path of your machine.
Category: You can organize your documents per category, such as ‘Activities Documents’, ‘Images’, ‘Official Documents’, ‘Notices’ and any other option you may need. If you don’t need a special categorization, please just keep a generic category for all.
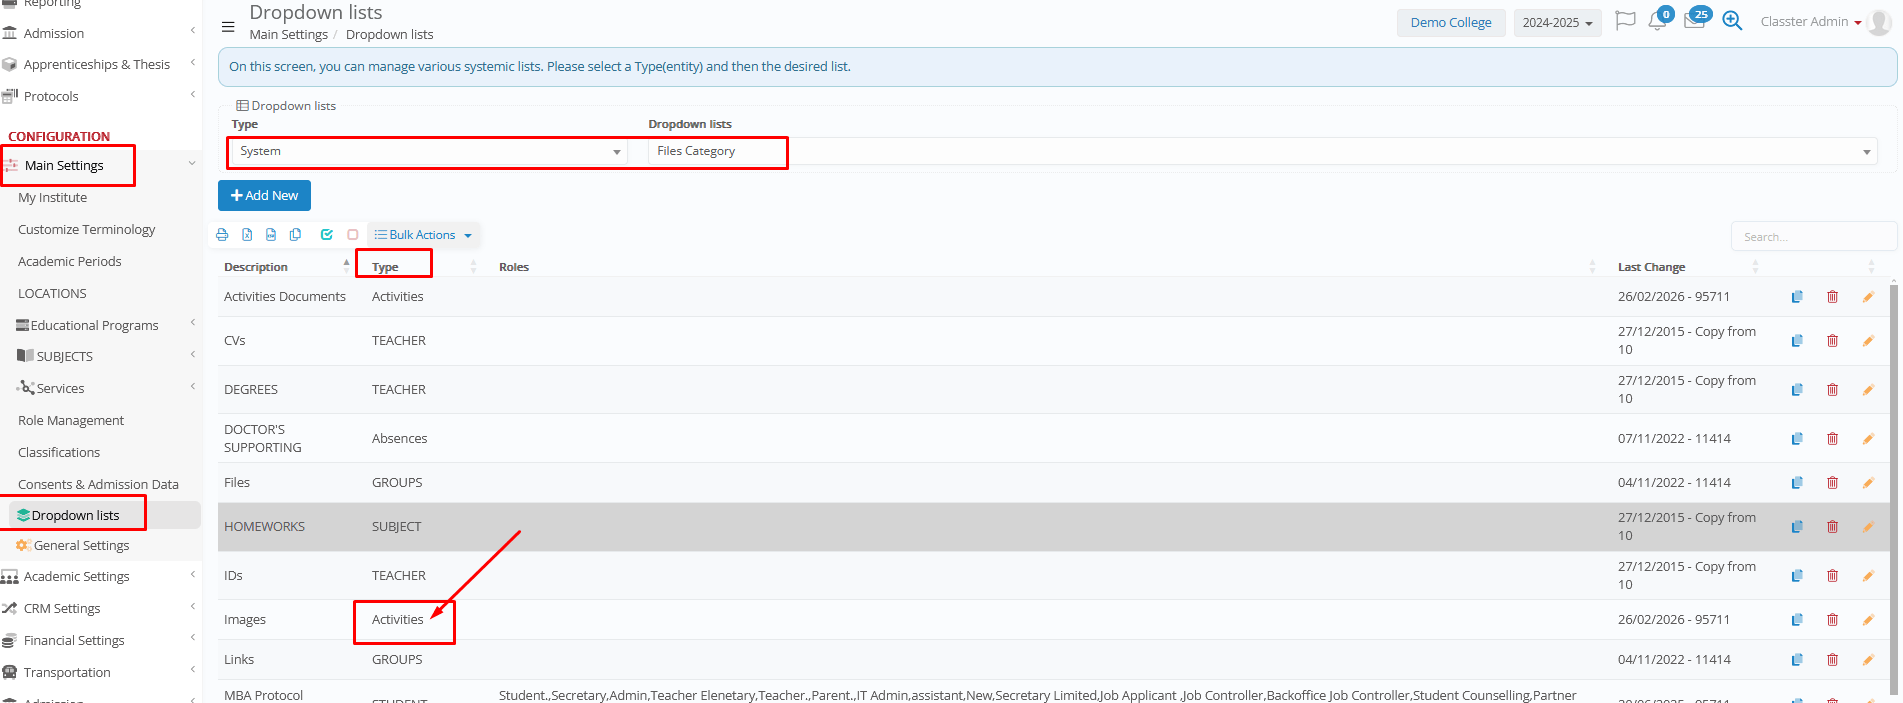
Service Categories can be configured from CONFIGURATION > Main Settings > Dropdown Lists > Type: System, Dropdown list: Files Category.
View in: Make the file visible to other users. You can select the file to be visible at _Students_, _Teachers_, Staff, Parents, the Creator, and/or specific user roles (as defined in the file category).
Notes: Any notes, comments, clarifications related to the file.
About Service
The About Service Tab stores general descriptive information and presentation details for the service. This information is often used in portals, catalogs, or online enrollment views.

Sections and Fields
Translatable info about the Subject. Info can be added translated in various languages and presented accordingly in reports or student/parent portals.
Basic Data Tab
- Language: (Current user language selected by default). Can enter all info per language, so they will be displayed according to the users’ language at their Portals.
- Title: Title of the service (e.g., Tennis).
- Short Description: Brief subject service.
- URL / WordPress URL → External or institutional link to more information.
About Tab
- Free text field → Used to add a detailed description or overview of the _Subject_ (e.g., learning objectives, outcomes, syllabus summary).
*All above info is displayed at the Students’/Parents’ and Teachers’ Portal > My Subjects > view or edit subject.
Online Enrollments Info Tab
- Free text field → Extra information shown to Students/Parents during online self-enrollment to subjects, (e.g., general notes, promoting notes like “Limited seats—first come, first served”). Presented as info (i) at the service.
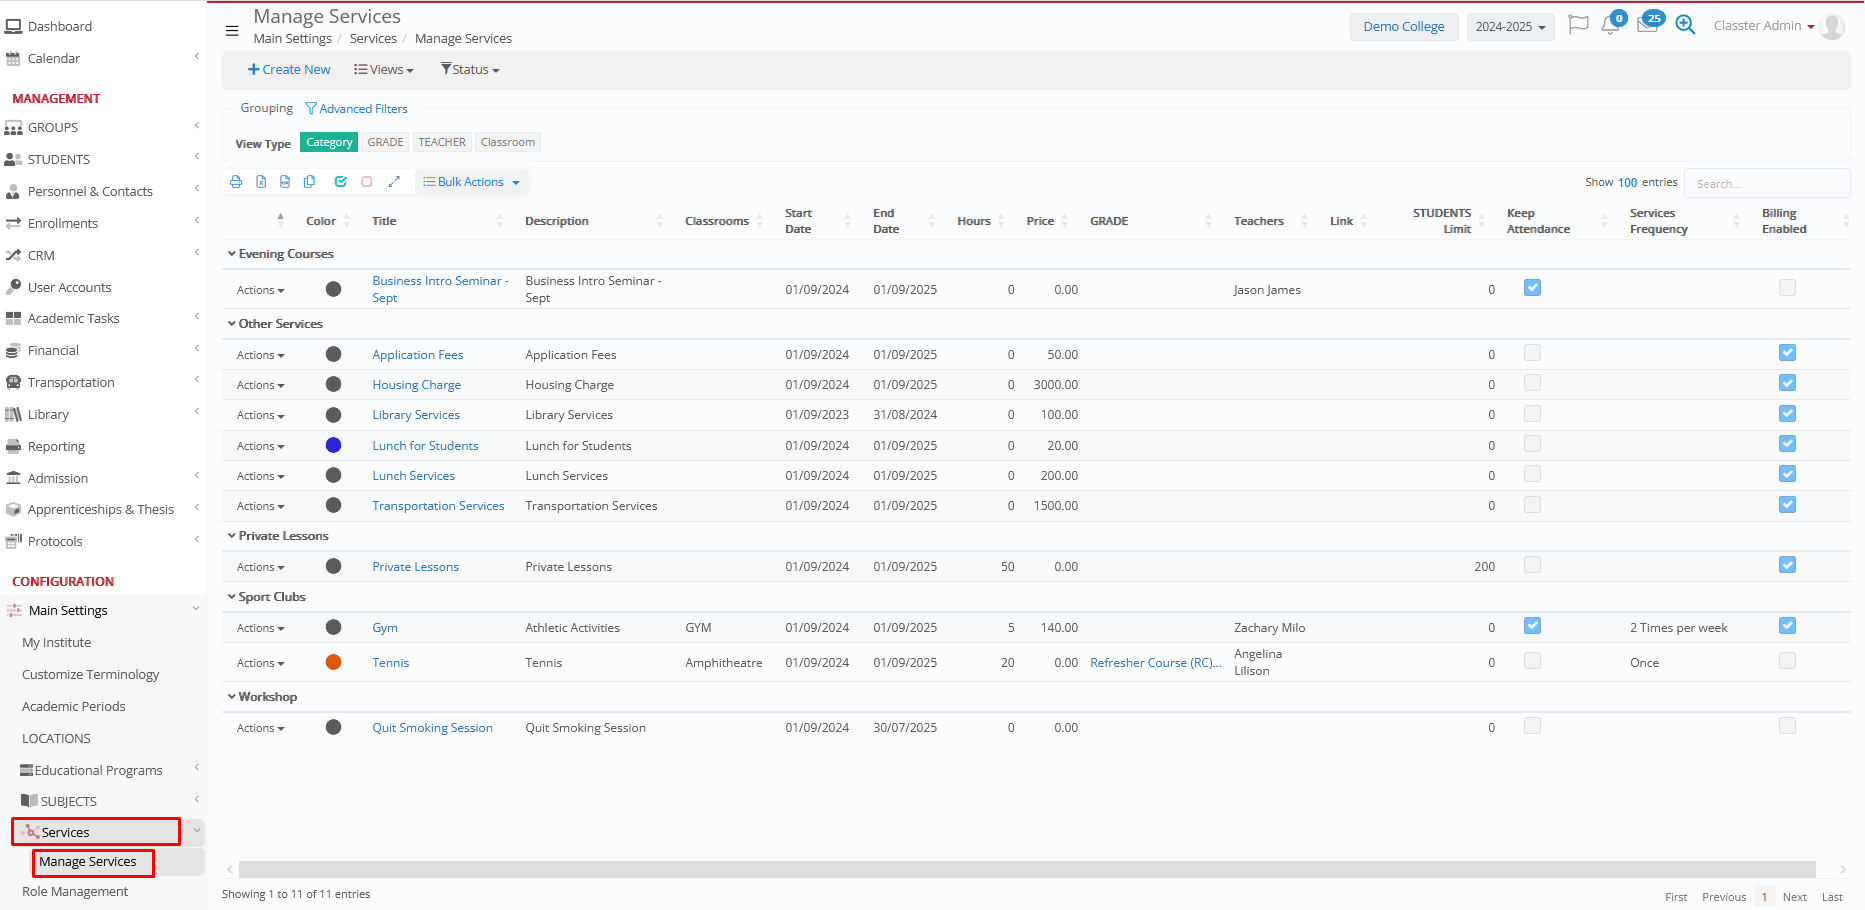
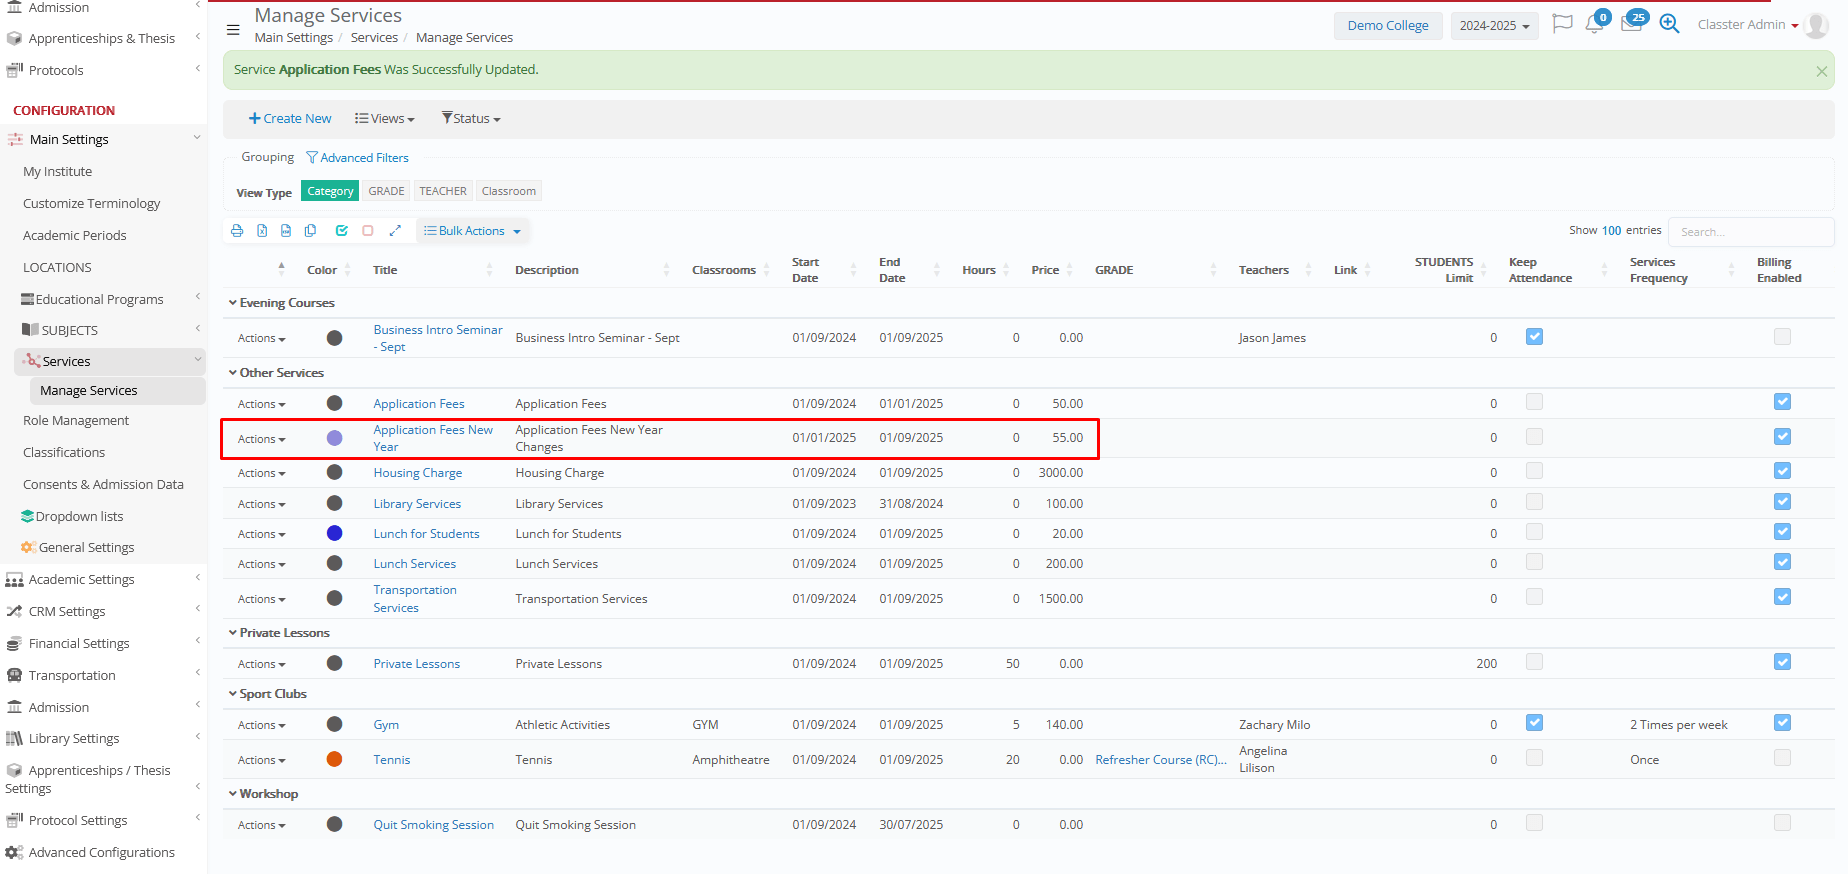
List of Services
Navigate to: Configuration > Main Settings > Services > Manage Services
This is the main screen where you create, view, filter, and manage all services.
Main Actions & Views
On the Manage Services page you can:
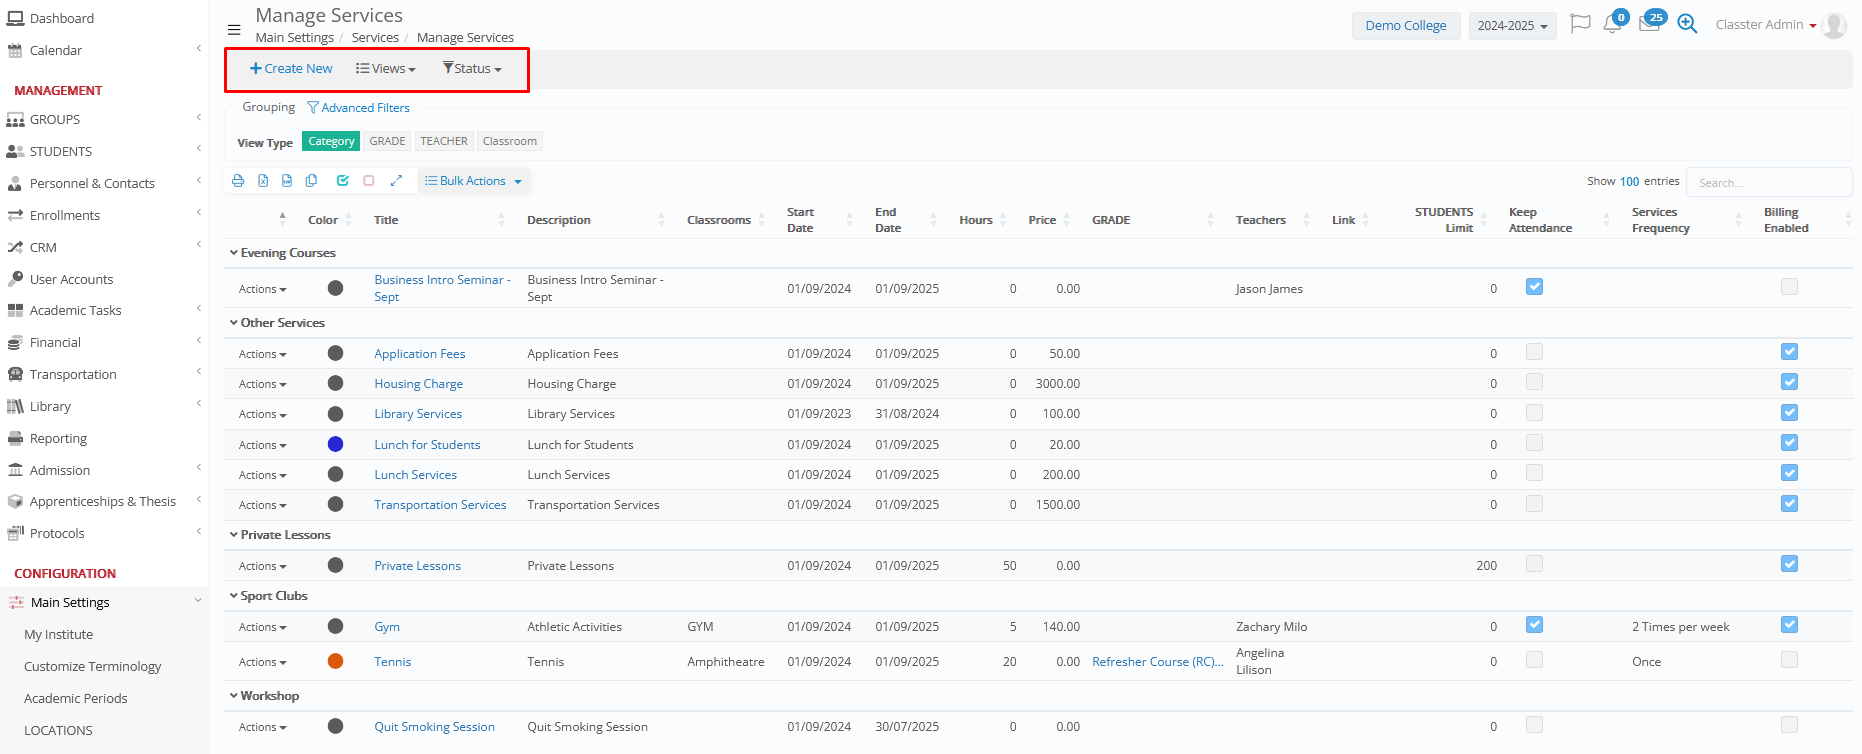
- Create a new service using +Create New
- Select between default and predefined views (e.g., Services – Week View).
- Switch between Active, Inactive, and All services using the Status dropdown
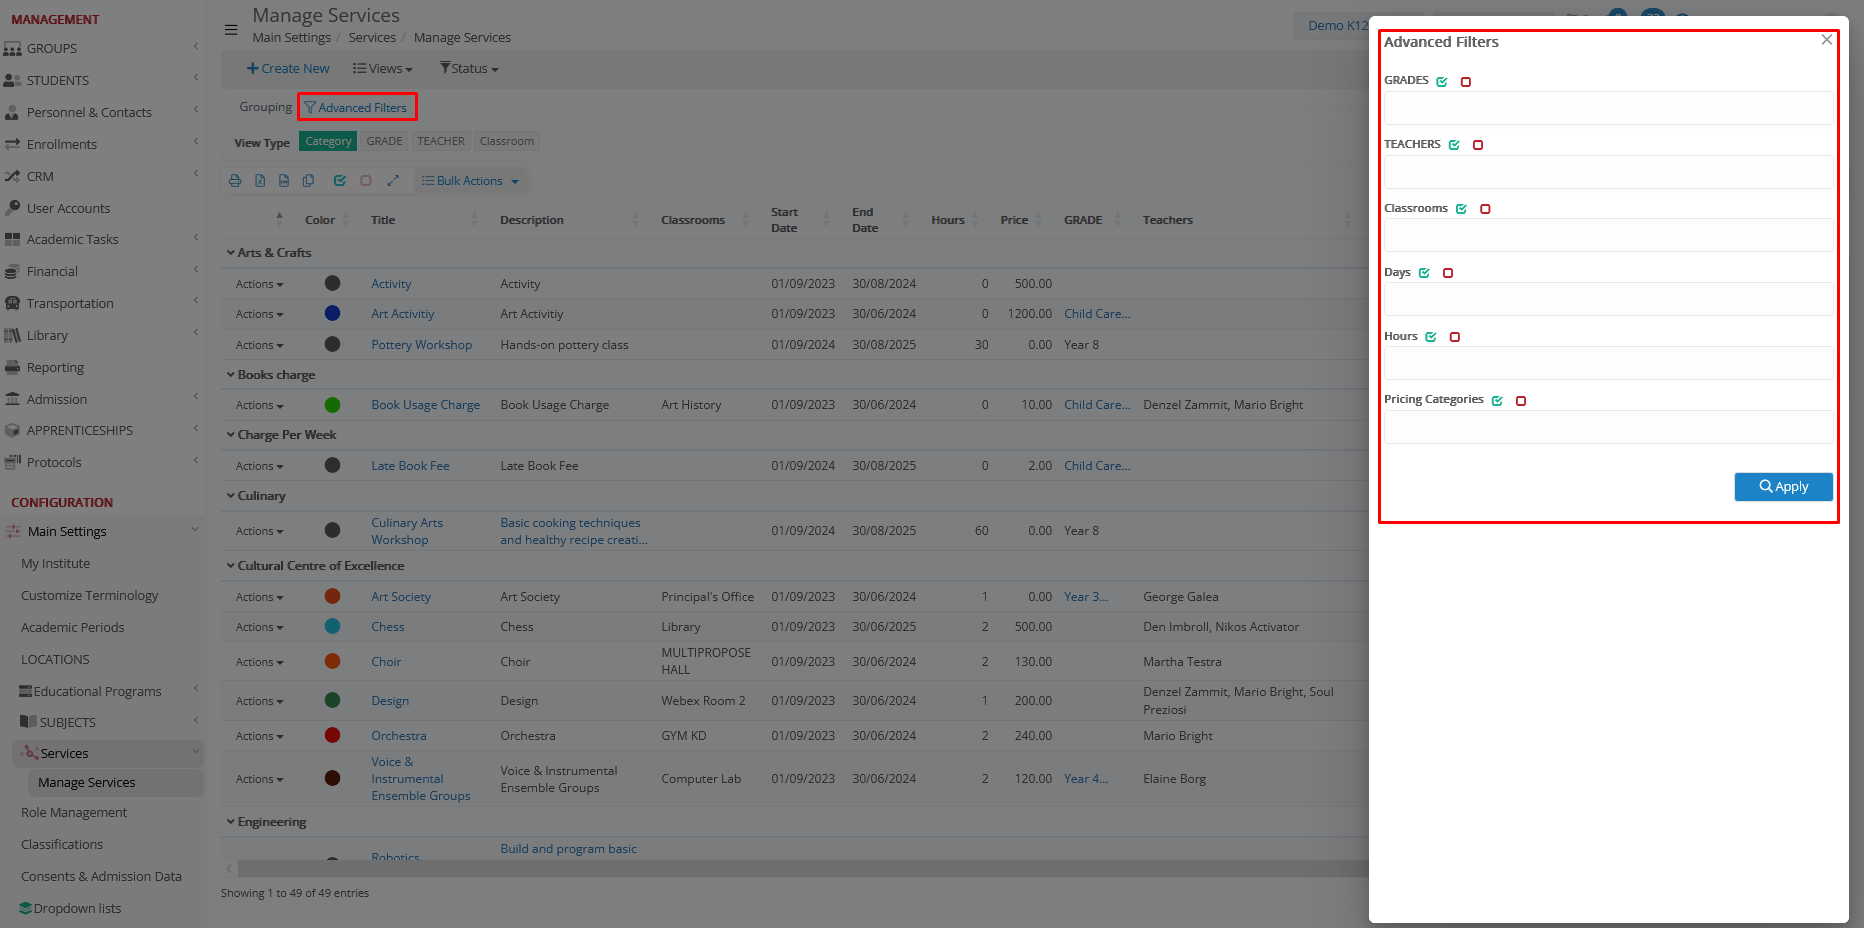
Filters
Use Advanced Filters to narrow results by:
- _Grades_
- _Teachers_
- Classrooms
- Days of the week
- Hours / Timetable Slots
- Pricing Categories
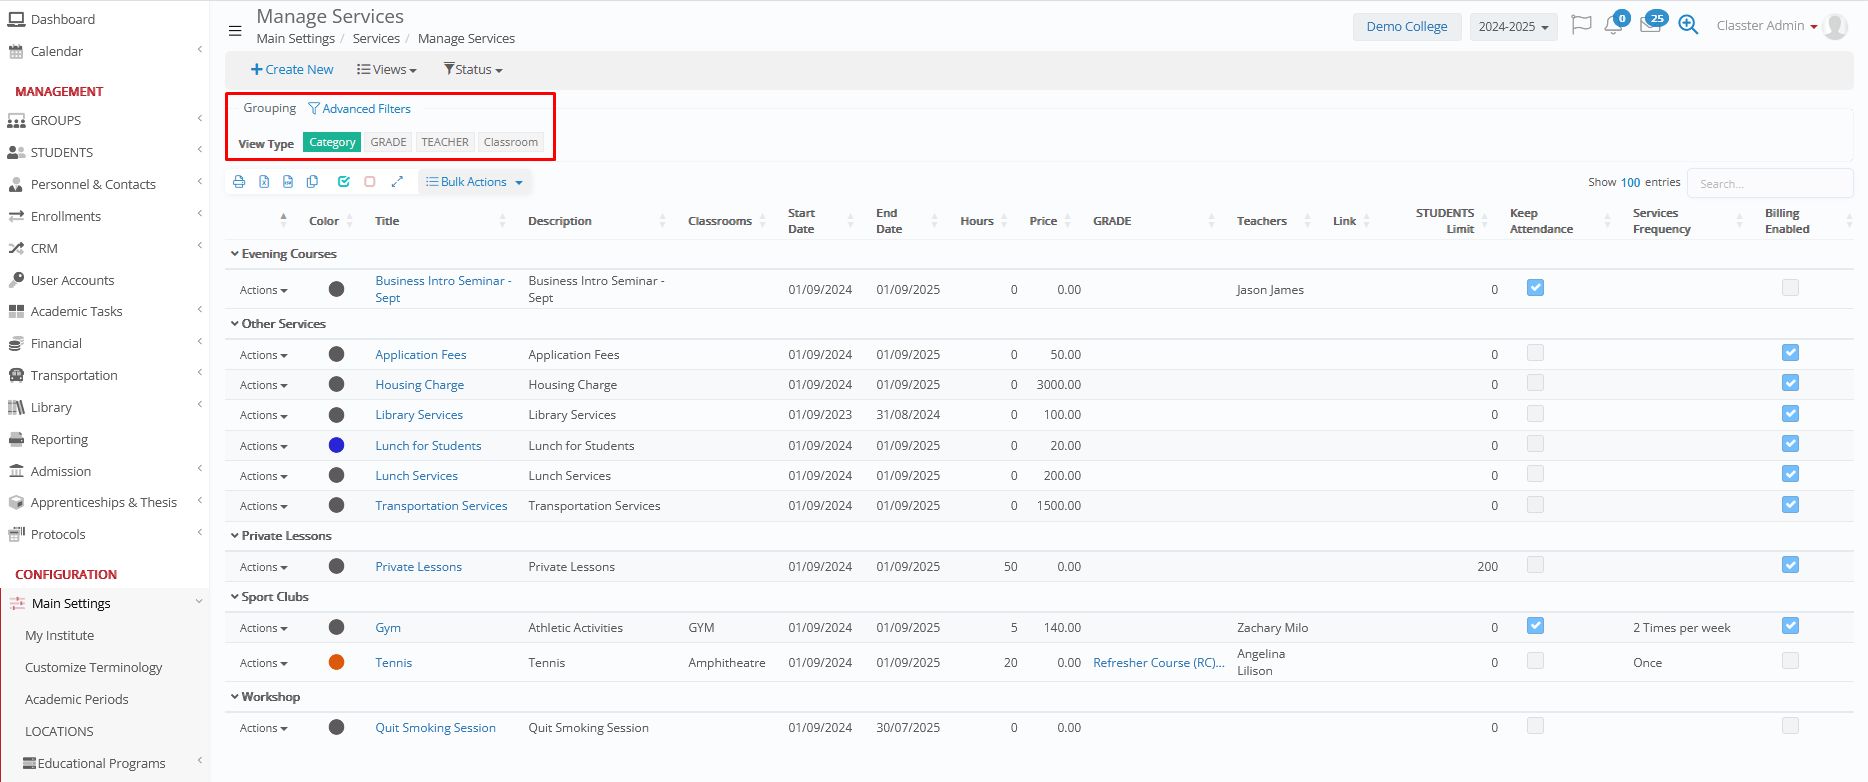
Change the way services are displayed using grouping by View Types:
Grid Tools
Above the grid, you can use the table tools to:

- Print the list
- Export the list (Excel / CSV)
- Copy the list
- Select or unselect all
- Run Bulk Actions (Bulk Edit, Copy to institutes, Copy to periods, Delete services)
- Search services by keyword
Row Actions
Each service row includes actions that allow you to:
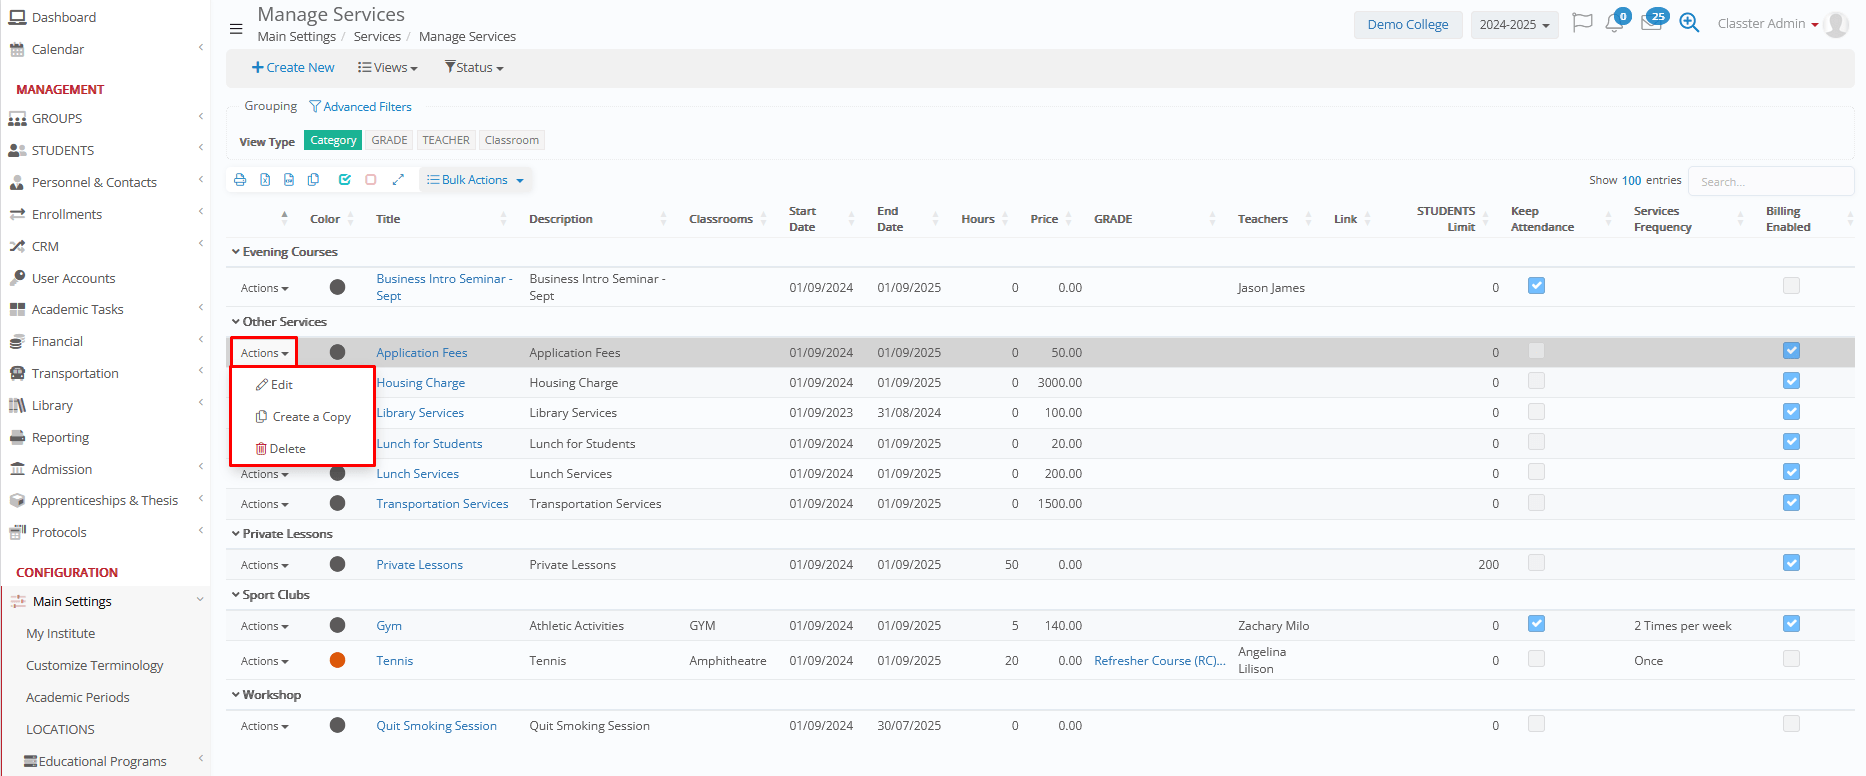
Create a copy
Use Create a copy when you want a new service based on an existing one. (recommended for similar activities with small changes).
- Click Create a copy on the service row.
- The system will ask you to confirm that you want to continue.
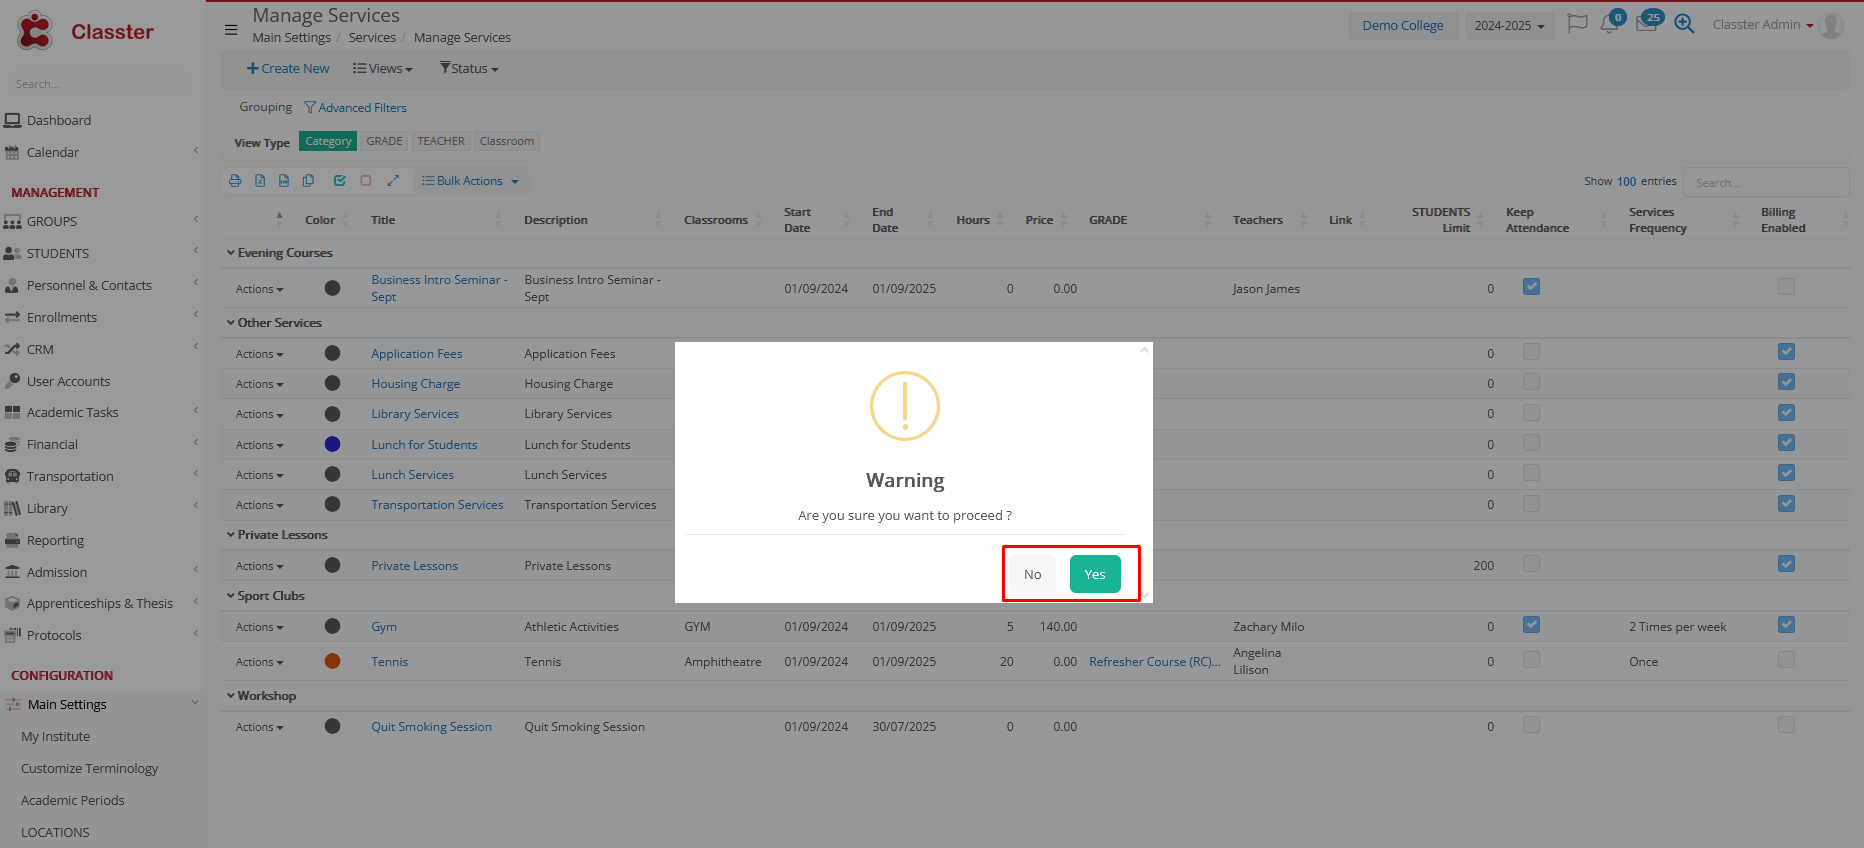
- A new service record is created based on the selected service.
What the copy typically copies
- Everything from the original service (all tabs and settings).
What you probably need to change after copying
- Title: to avoid confusion with the original service.
- Start Date / End Date: update to match the new service period.
- Timetable placements: update if the schedule differs.
- Pricing: update if the new version has different fees.
- Capacity / Attendance rules: update if needed (e.g., limits or absence rules).
- Delete a service: Use Delete to permanently remove a service. If the service has already been used (e.g., students enrolled or financial records created), deletion may be blocked.
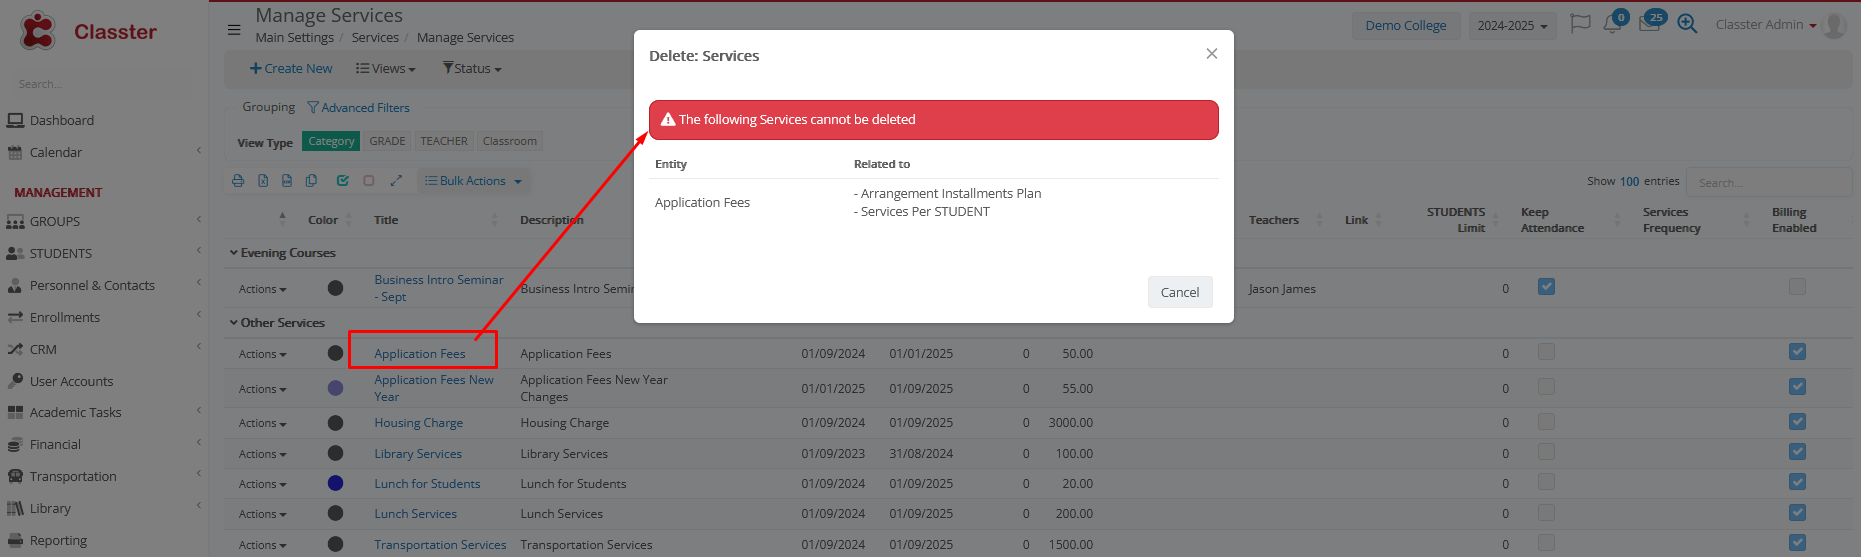
When deletion is not allowed
You cannot delete a service if it is connected to other active data, such as:
- Student enrollments/participants (students already assigned to the service)
- Financial connections (e.g., connected arrangements, charges, application fees, billing plans)
- Other system connections to the service (depending on your configuration)
What you must do first
- Remove the related connections (e.g., remove enrolled students from the service, delete/clear connected financial arrangements/charges, and any other linked records).
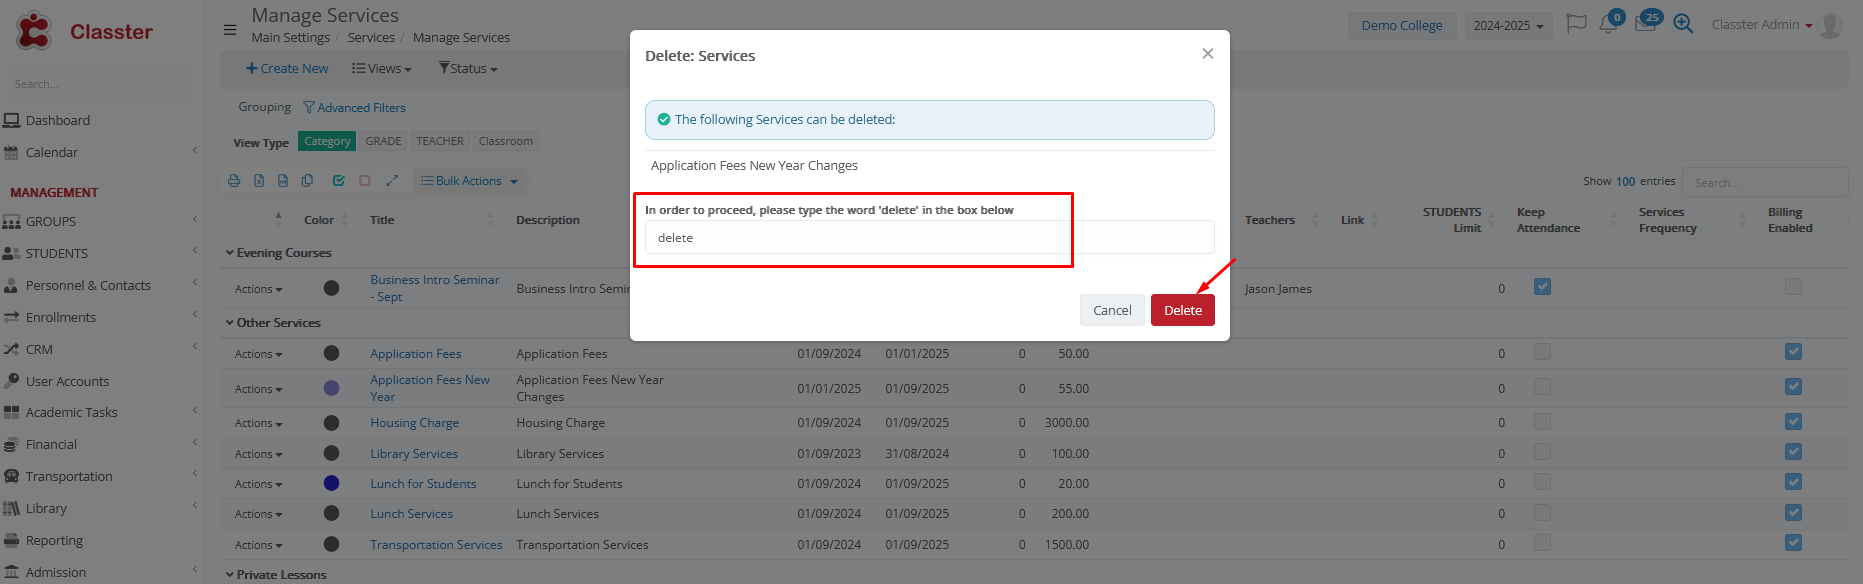
- Then return to Manage Services and try Delete again. The system checks for any existing connections (e.g., enrollments, financial arrangements, or other linked records).
- If no connections are found, you will be asked to type DELETE to confirm, and the system proceeds with the deletion.
Tip: If you only want to stop using the service but keep its history, set it to Inactive instead of deleting it.
Tip!
While working on a specific Tab-section, or updating various info at your Services, you can easily switch between the services using the following options:
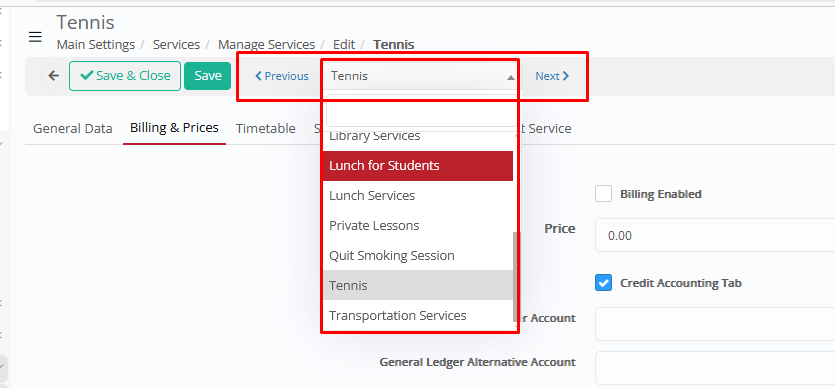
The system will automatically open the selected (or previous/next subject from the list), at the current working Tab.
Dropdown Lists
Below you will find a quick view of the Settings and Dropdown Lists related to Services configuration.
Services’ Dropdown Lists:
And File Categories dropdown list, used in relevant Tab explained above:
Services Categories
Examples: Application Fees, Food, Transportation, and Sport Clubs.
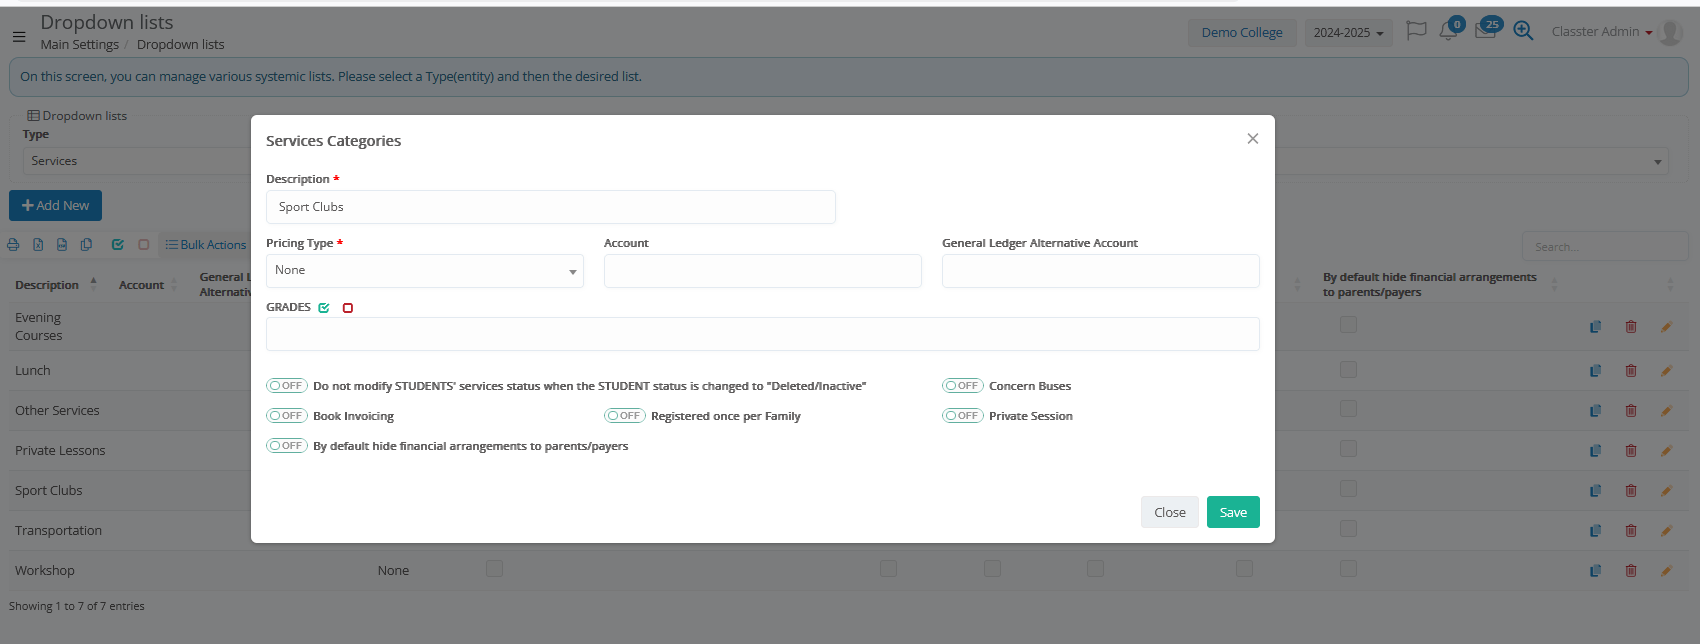
Configuration fields:
- Description: Title of category (e.g. Application Fees, Sports Club)
- Pricing Type: Defines the method of calculating the price (if billing applies to the service). E.g. Hourly, Monthly etc. Used in Students’ billing.
- Account: The general ledger account, for billing purposes (if billing is needed for the service). Added in transactions and ability to be used at financial integrations.
- General Ledger Alternative Account: The secondary general ledger account, for billing purposes (if billing is needed for the service). Can be used under special custom rules in transactions. Ability to be used at financial integrations.
- _Grades_: Limits where the services of this category are applicable by Grade/Program. If empty, then there is no restriction.
Example: For Transportation only for Kindergarten, select only Kindergarten.
On/Off switches:
- Do not modify students’ service status when the student status is changed to “Deleted/Inactive”: Keeps service records unchanged for historical tracking.
- Concern Buses: Flags the category as transportation-related (used for services related to transportation, mainly for billing, used in the relevant module, for students who are enrolled in buses routes).
- Book Invoicing: Flags the category as fees for library module.
- Registered once per Family: Allows only one registration per family (useful for family-level services). Example: one Transportation Fee per family.
- Private Session: Flags services under this category as private-session type services (used in private sessions module).
- By default hide financial arrangements to parents/payers: Parents/payers do not see the arrangements related to this category by default (useful when the institution wants admin-only visibility unless explicitly shared).
Services Groups
Used in services’ timetable or students’ grouping. Examples: Morning, Evening, Sports, Tennis Group A.
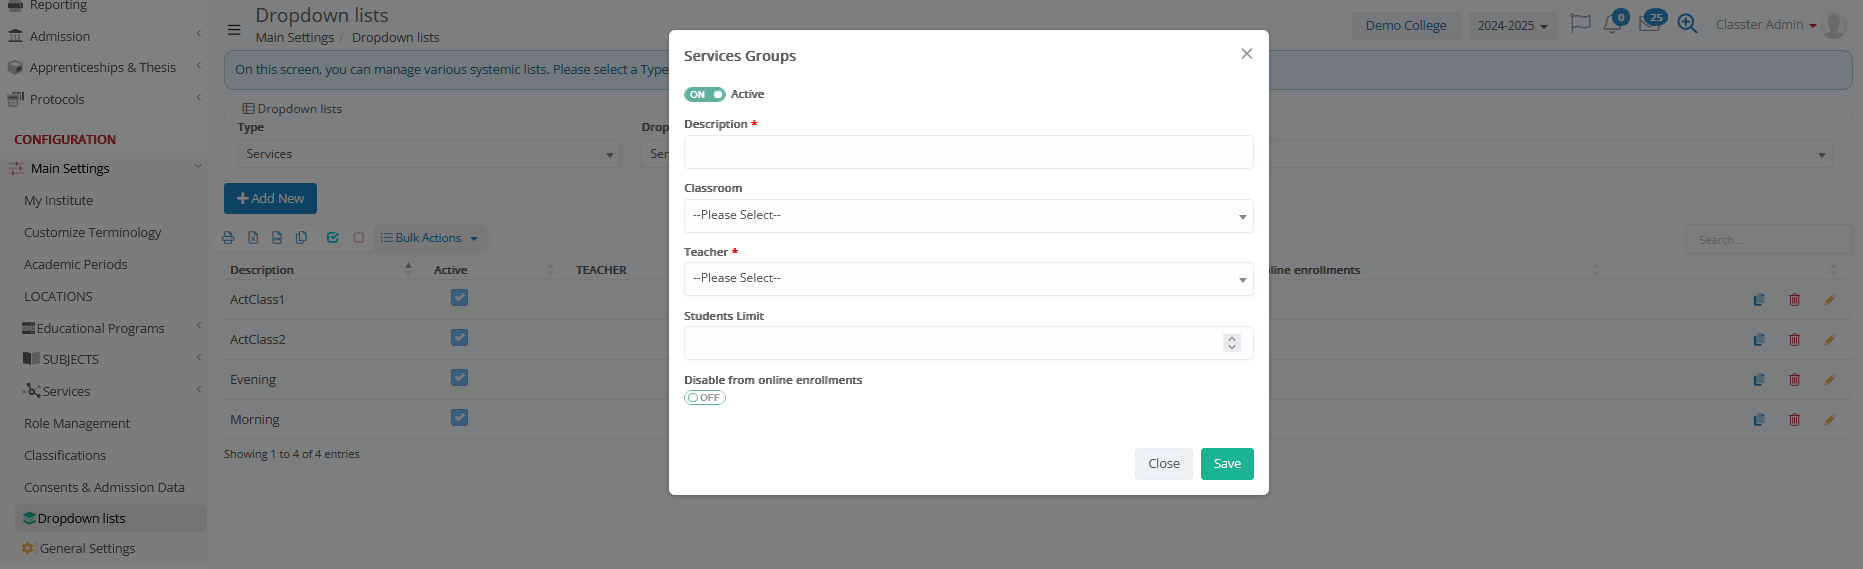
Configuration fields:
- Active (switch): Makes the group available for selection in services.
- Description: Group Title (e.g. Morning, Evening, Tennis Group A)
- Classroom: Default classroom applied to the current service timetable group.
Classrooms configuration: CONFIGURATION > Academic Settings > Timetable > Classrooms.
- _Teacher_: Default teacher applied when the service uses this group. Example: “John Smith”.
- Students Limit: Limits the Students’ enrollments to this group-service.
- Disable from online enrollments (switch): Hides this group from online services self-enrollments.
Services’ Types:
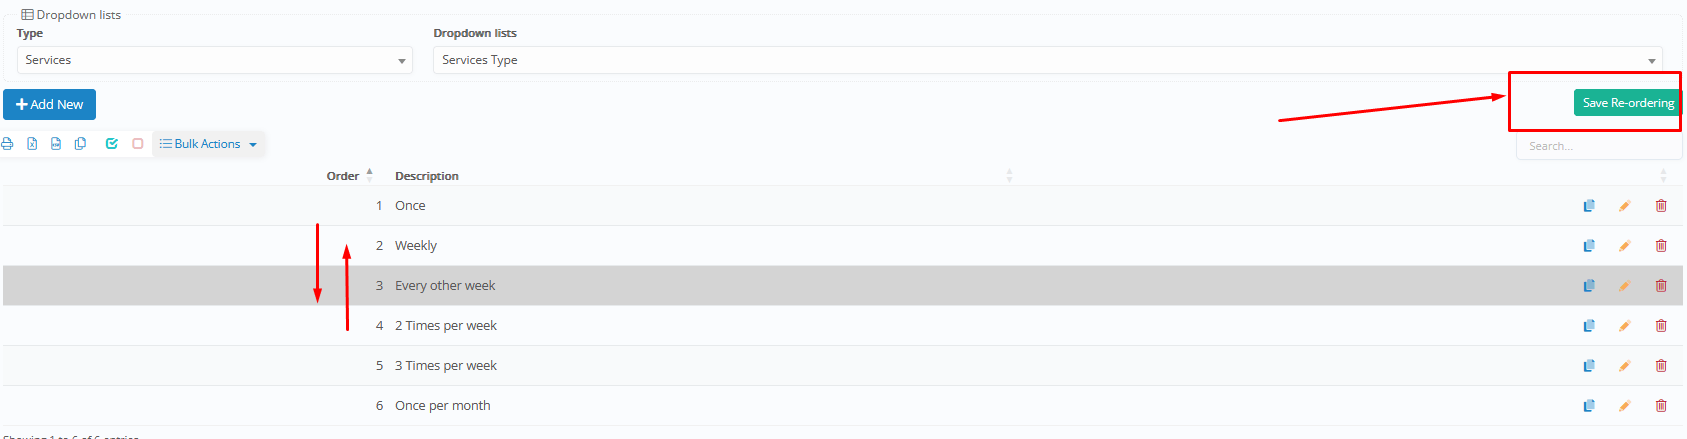
Create service types as per your structure. Examples: Once, Once per Week, Twice per week etc. Here you can also drag and drop the options, to edit the order used in views and lists of services.
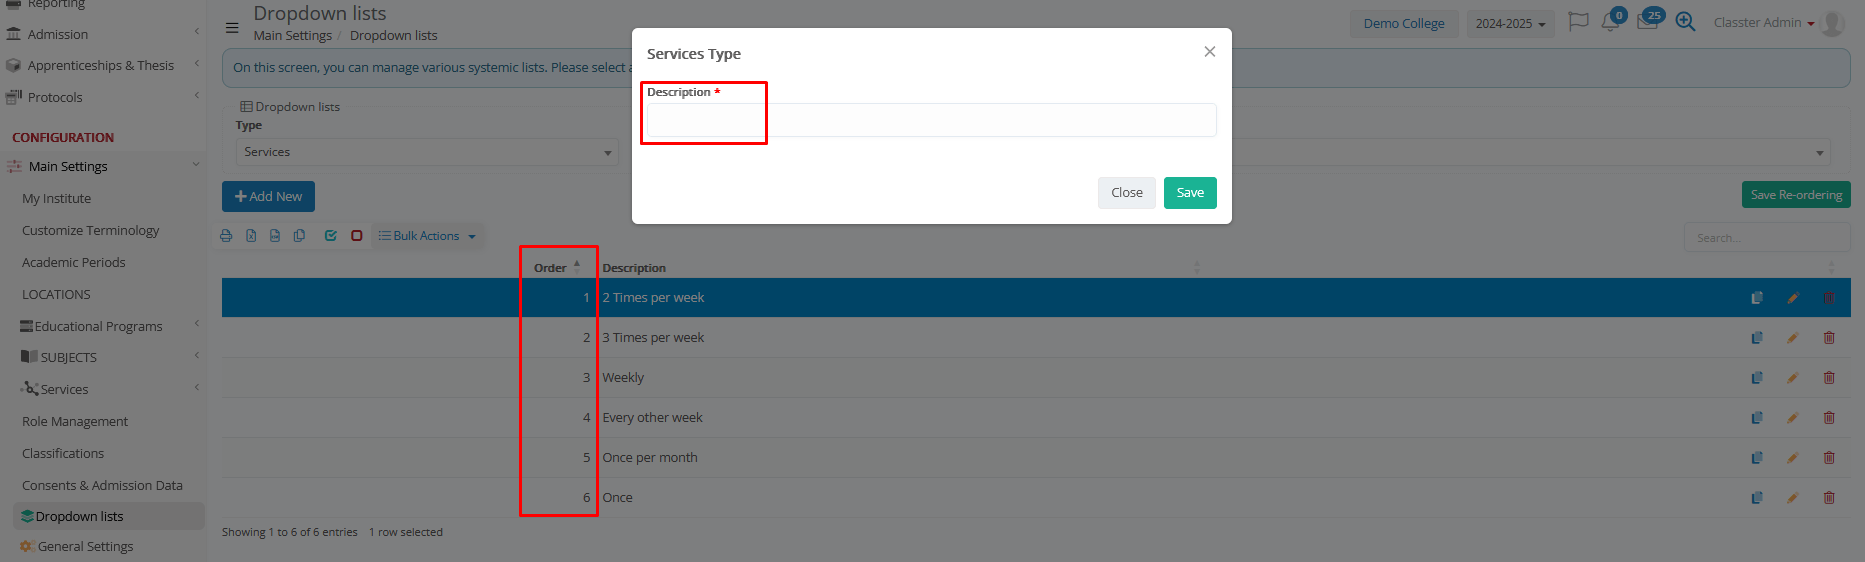
Configuration fields:
- Description: Title of the type (e.g. “Weekly”)
- Order: Controls how types appear in the dropdown list, so the institution can keep common types at the top. Example: set Weekly as 1st, Twice per week as 2nd. Drag drop and then save re-ordering to edit:
Note: You will also find related Settings to Services at: CONFIGURATION > Main Settings > General Settings > ‘Services Parameters’ Tab.