Introduction
The Consents and Admission Data module in Classter allows administrators to manage and customize digital consent or extra data forms required for various administrative or any academic, financial and other purposes.
Consents are used to get permissions from:
- Students (or parents, relatives, guardians if the student is minor)
- _Teachers_
for
- Various needs such as Institution’s terms and any extra need like consent for using their personal information for educational purposes, consents for photos, trips etc.
Signatures are also supported during submission.
Admission data are used for any custom/extra information, document required from:
- Students or Parents/Guardians
- _Teachers_
For
- Entry requirements, data, documents upload, for the admission management (students) or any other information, documents needed after registration (students and teachers). Examples: CVs, previous certifications, work experience, health information, recommendation letters, citizenship information, and others.
Consents
Consents are used to collect explicit approvals or acknowledgements from users as part of academic, legal, or administrative processes. They can be enforced as mandatory, filtered by academic or demographic criteria, and may require digital signatures.
Consents focus on agreement and confirmation, not on data completeness.
Consents in Classter are customizable forms that support flexible field types, visibility filters, and mandatory (forced) configurations for targeted users.
List of Consents
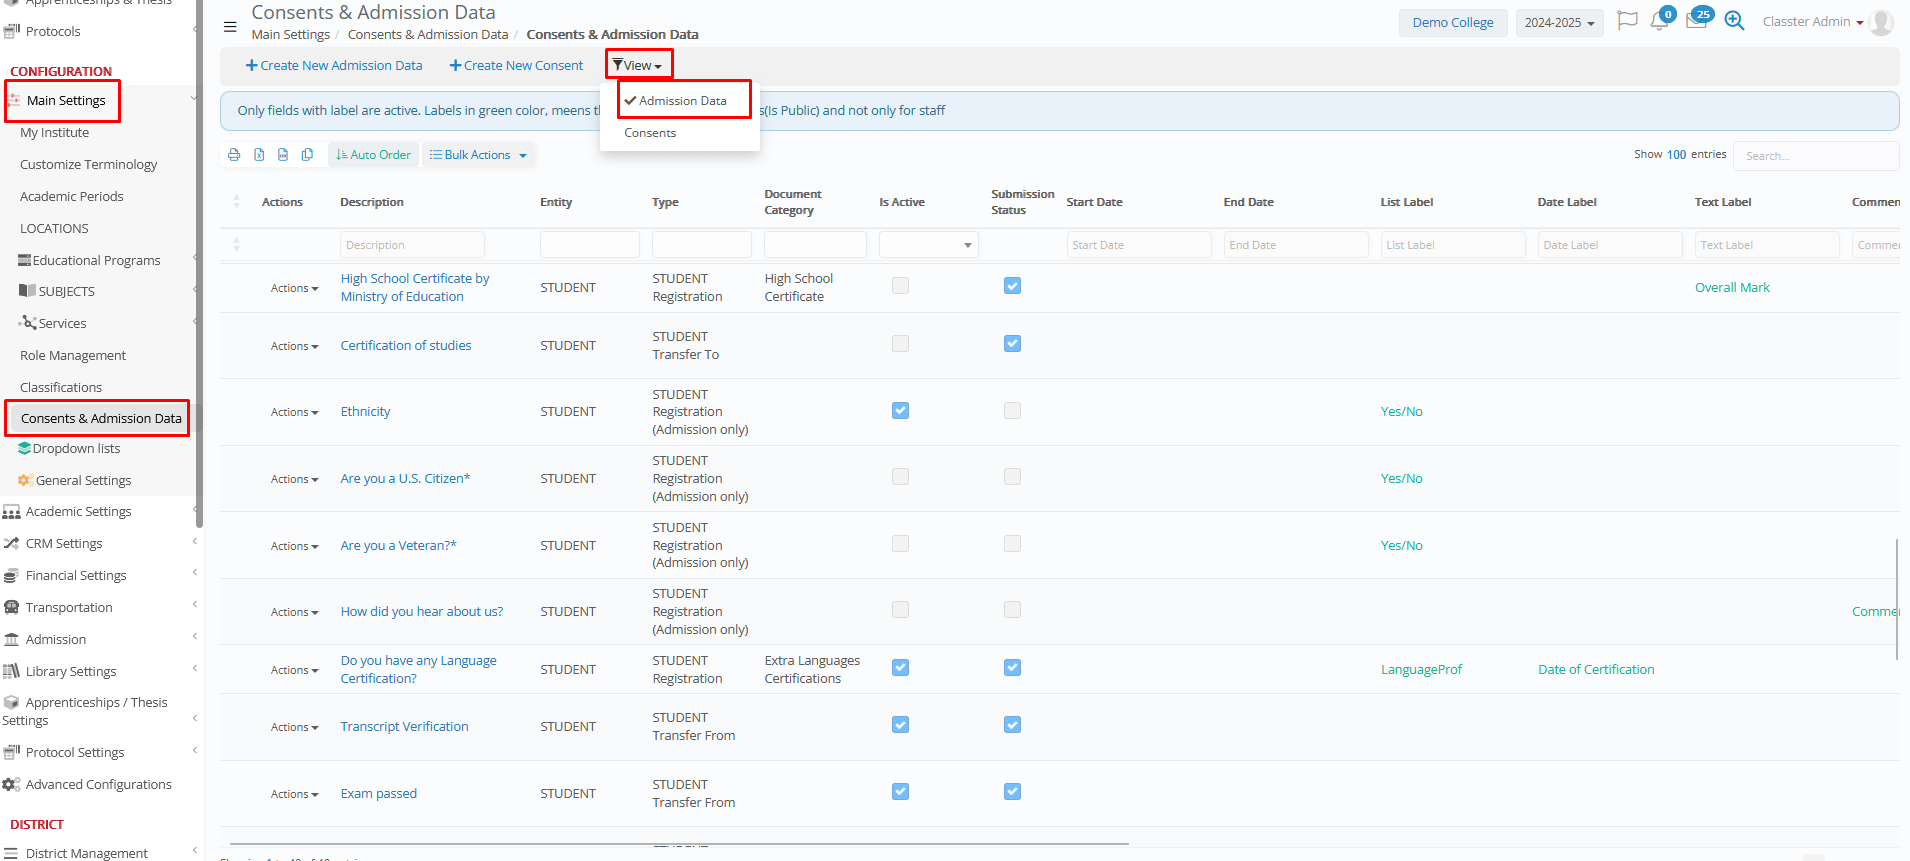
To view the list of Consents, navigate to: CONFIGURATION > Main Settings > Consents & Admission Data >
and change the View to > Consents.
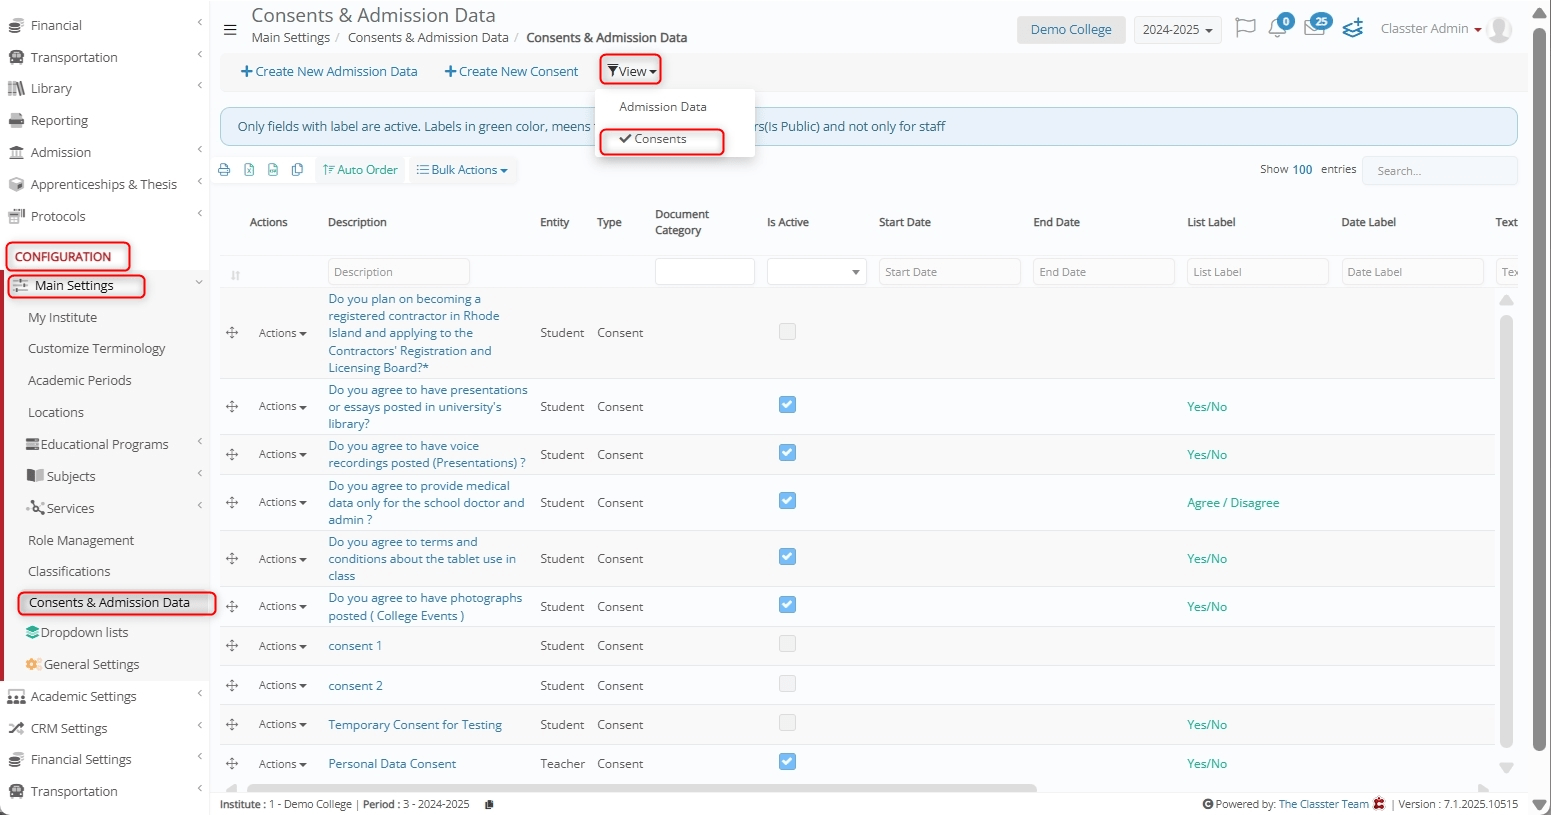
The list provides high-level data of the consents such as: Description, Used for Entity (e.g., Student, Teacher), Category, Active status etc.
Consent Form
To create a new consent form, click on the + Create New Consent button.
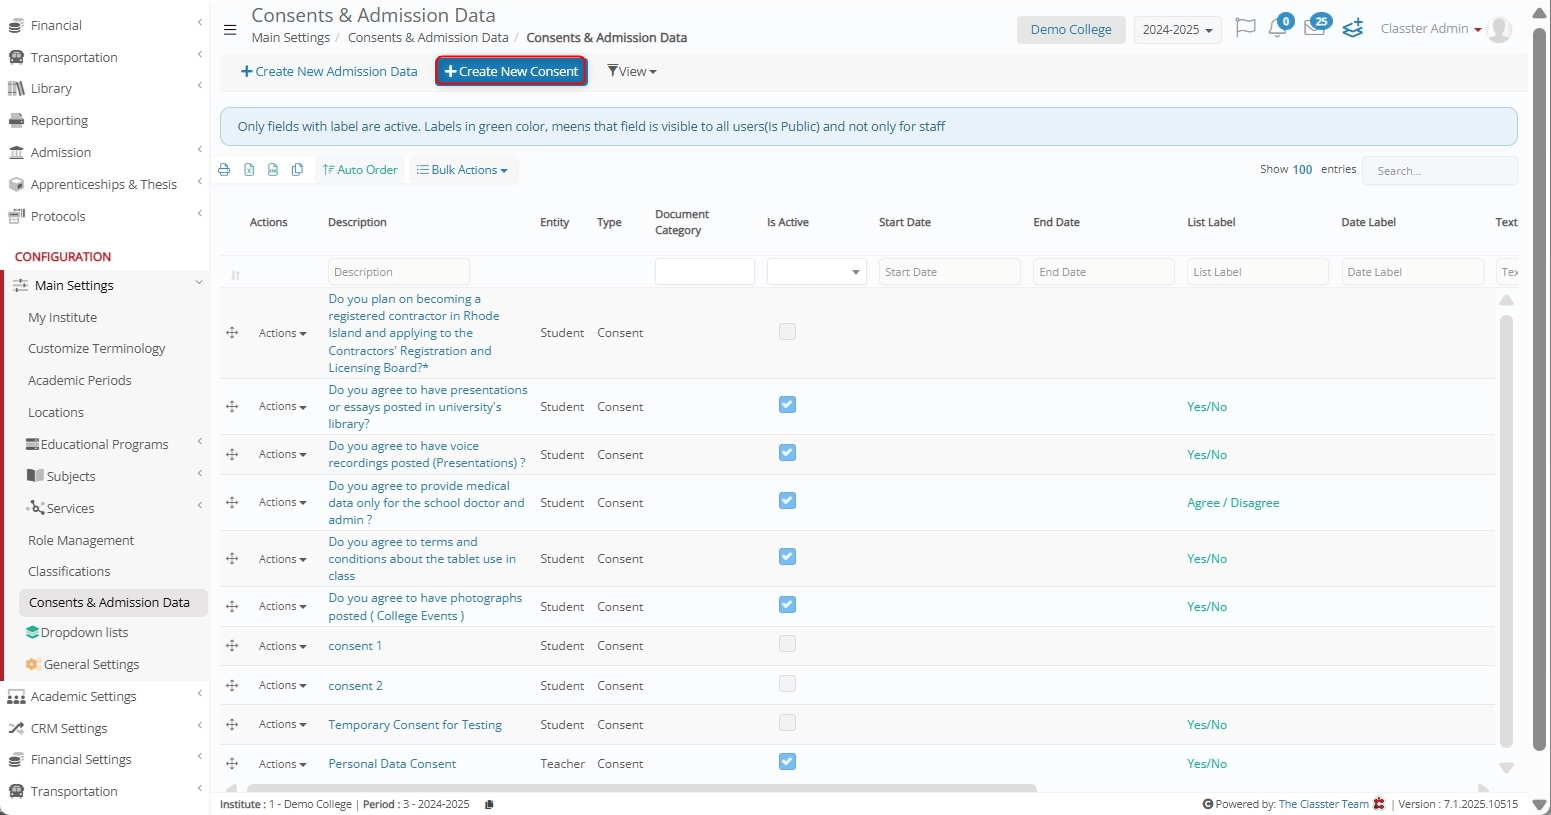
As a result, a new form interface will open, categorized into sections:
- Main Data (consent settings)
- Filters (consent limitations)
- Fields (the consent, questions, extra data)
- Additional Data (additional fields for questions, data if needed)
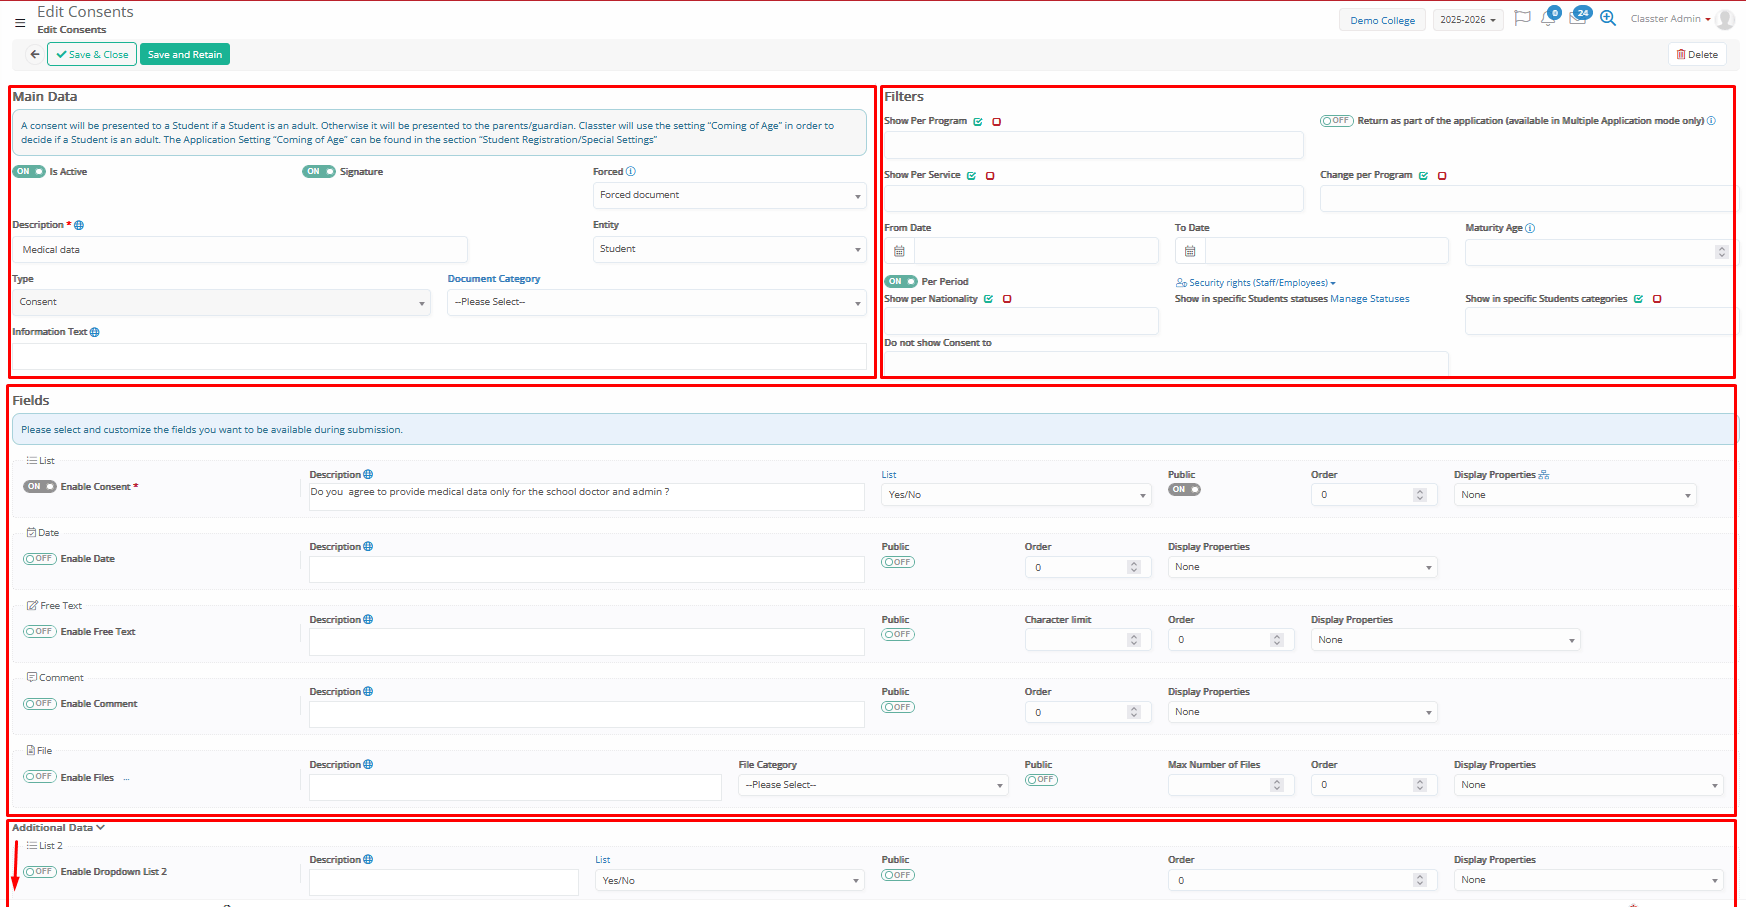
Main Data
This section defines the core properties that define the functionality and audience of the consent.
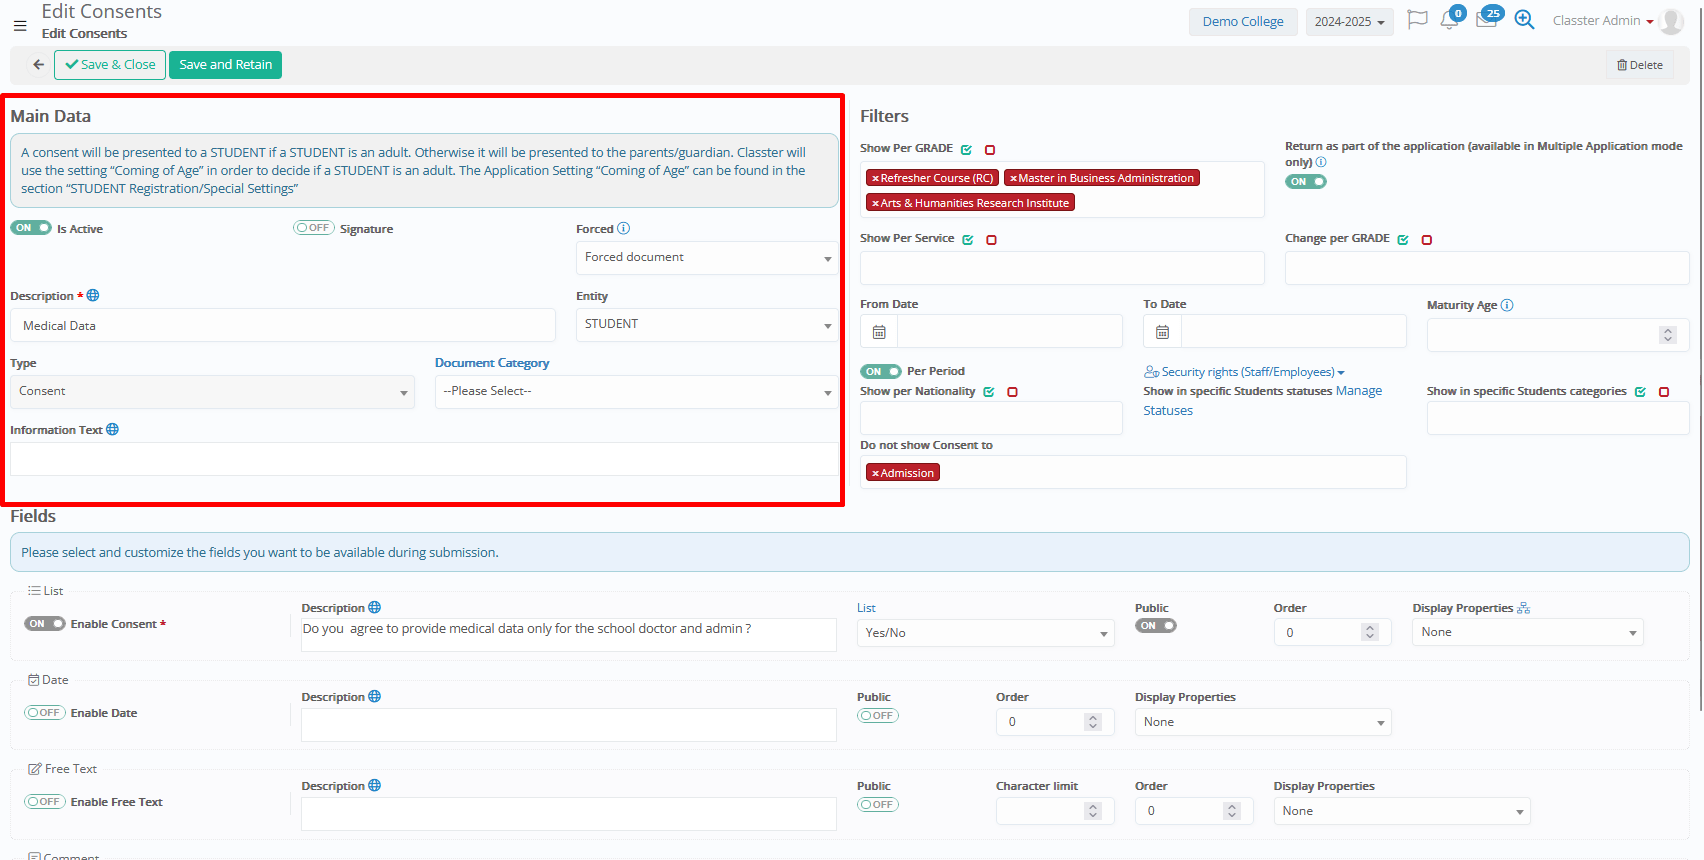
Fields
- Is Active: Toggle this ON to activate the consent for display and collection.
Please note that inactive consents retain the submissions but will not appear for new submissions in portals. Also, inactive consents will not appear in lists (such as students per consent).
- Signature: Enables a required digital signature upon submission.
- Forced: Defines how the consent is enforced:
- Not Forced: Users may optionally submit the consent.
- Forced Document: Users must answer the consent (cannot skip).
- Forced Per Student Status: Refers to consents connected to students. Students must answer the consent upon every status change (cannot skip). (Consent must be answered again for each status the student passes)
- Description (Recommended): A title for the consent. (The full consent description will be added at a later field). Appears as title at the consent form, and also as filter while searching for consents.
- Entity: Select the type of user for the consent. Options: Student, Teacher. (Parent/Guardian will automatically be the user in case the student is minor)
- Type: Not editable. Type is ‘Consent’ by default.
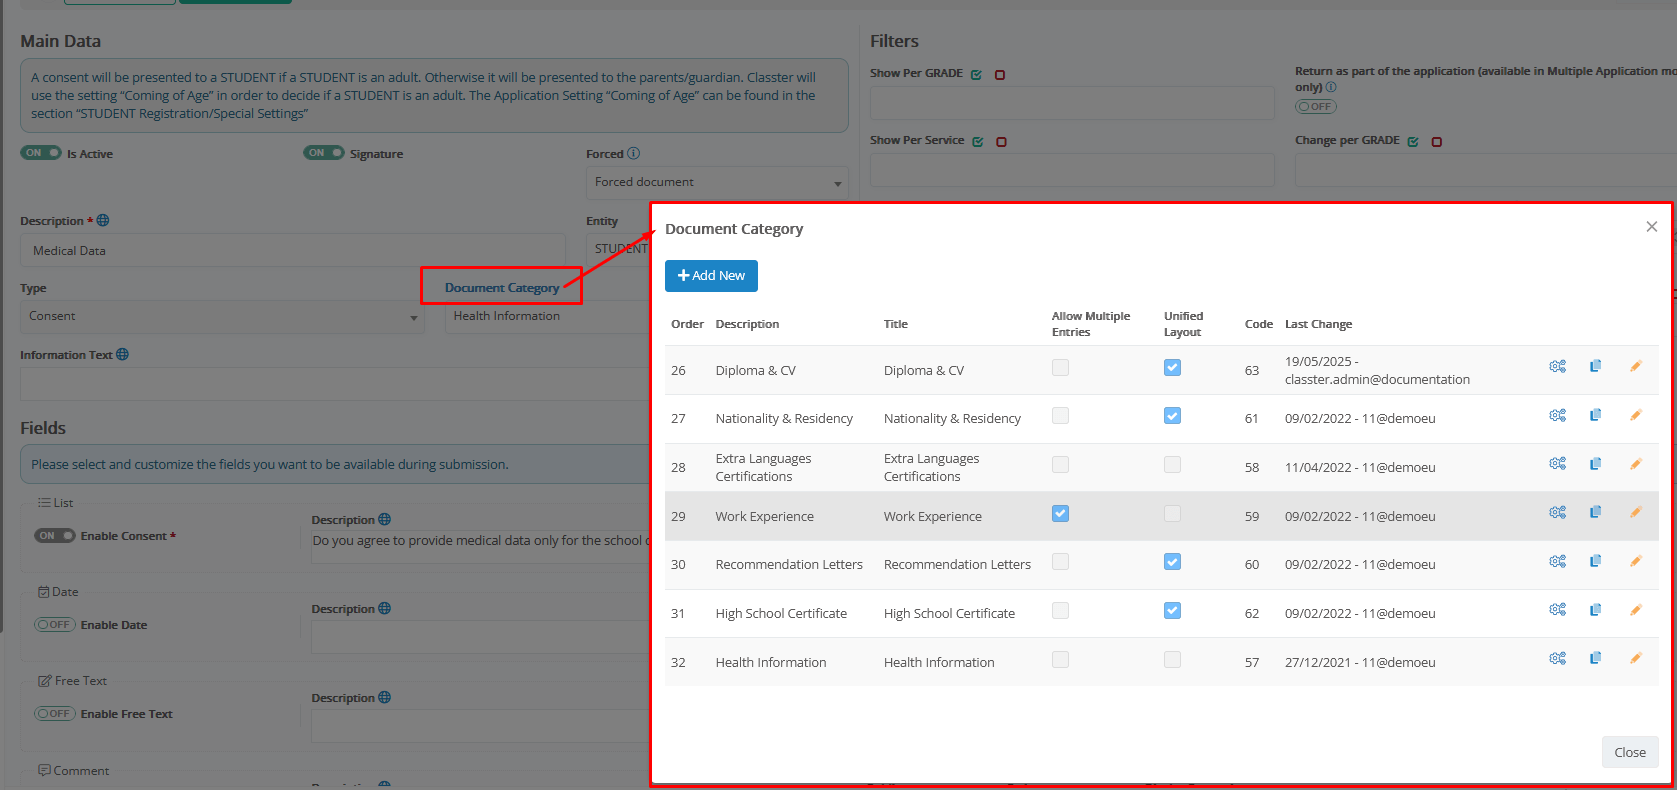
- Document Category: Organize your consents using the document categories. You can connect multiple consents under the same document category, so they will appear in the same section in the consent forms (design). E.g. ‘Personal Data consents’ including consents for contact data and consents for photos.
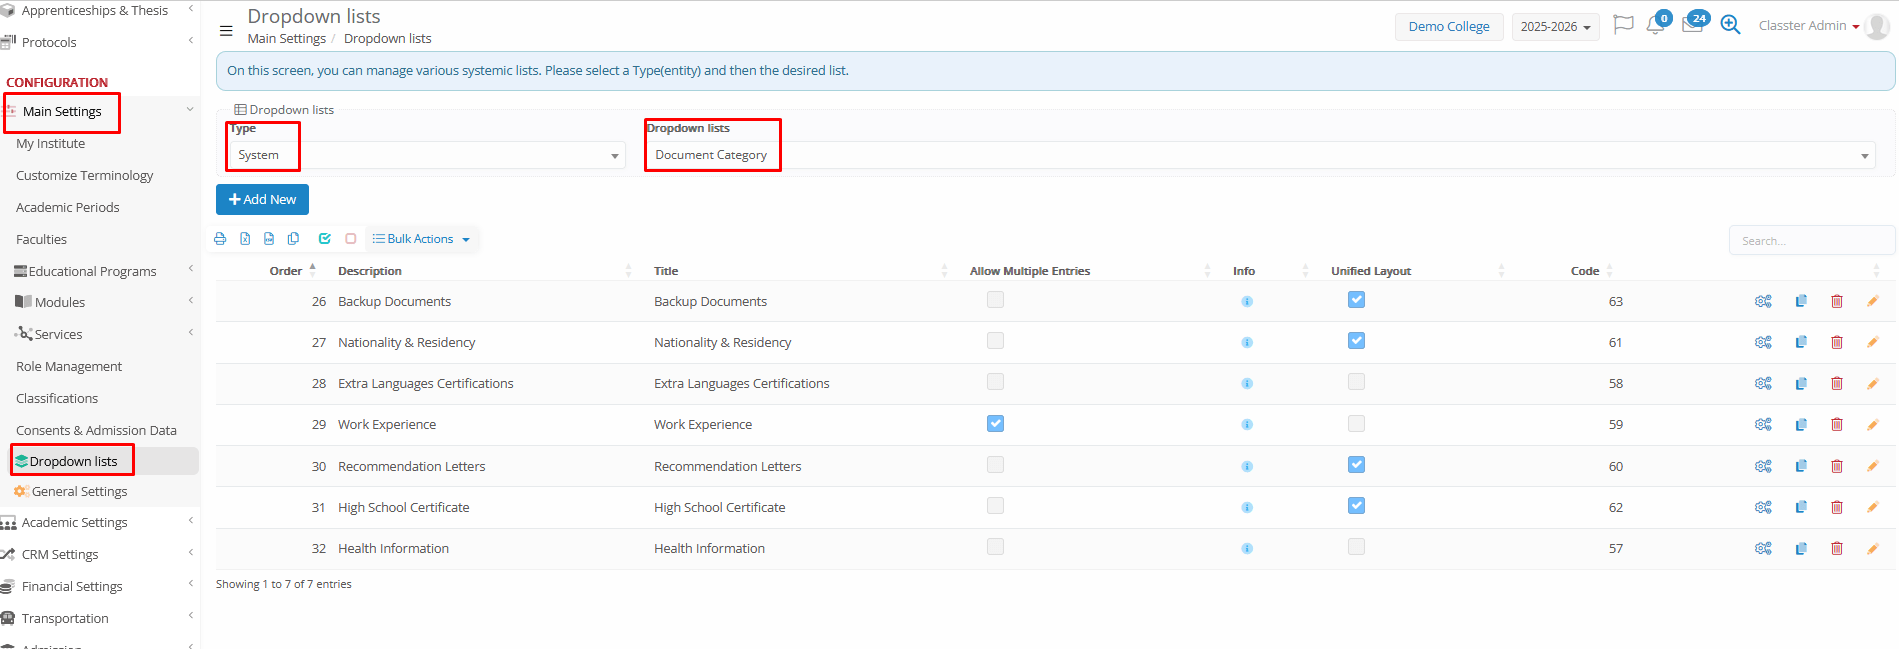
Document Categories are configured from CONFIGURATION > Main Settings > Dropdown Lists > Type: ‘System’ & Dropdown list: ‘Document Categories’. (Used for both consents and admission data)
Or by clicking on the Document Category Label in the consent form:
Filters
Filters determine the visibility and availability of the consent form to different user segments.
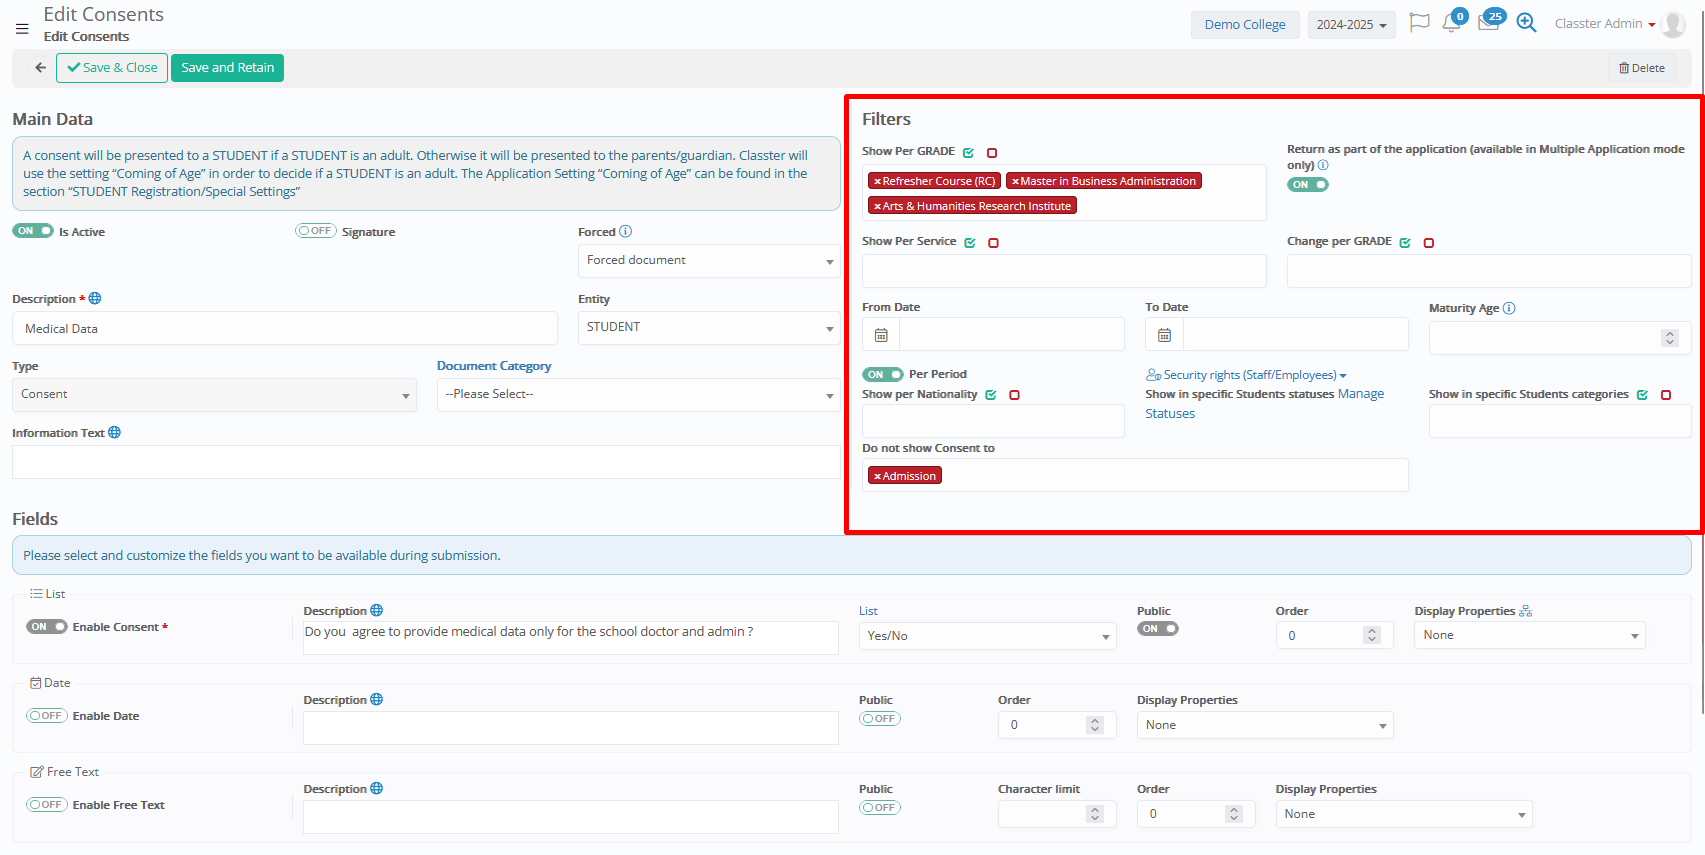
Fields
If you enable this filter, then the consent will only be visible to students enrolled in the selected _Grades_. If you leave the filter empty, then no filter will be applied (visible to all _Grades_).
- Return as part of the application (available in Multiple Application mode only): : If enabled, in case of admission mode with Multiple Applications per applicant
(setting: CONFIGURATION > Admission > Admission Settings > ‘General Admission Settings’ Tab > ‘Enable Admission mode with Multiple Applications per applicant (if disabled, the “Application Auto-Creation” settings must be configured)’ setting)
The consent will be returned as part of the final step of the application submission (after the _Grade_/Program selection and not in the first steps of personal data/consents Tabs).
- Show Per Service: Enable the consent only for Students enrolled in selected services/activities (e.g., Transportation, Library).
If you leave the filter empty, then no filter will be applied, and no check will be done to the students’ services.
- Change per _Grade_: Enable the filter for specific _Grades_/Programs, to ask for submission for each relevant educational program of the student. With this property, the consent will be (repeated) asked and submitted separately for each _Grade_/Program the student is enrolled or applying for.
- From / To Date: Set the validity window for the consent. Outside these dates, the form will not be shown to the users.
- Maturity Age: Define a minimum age for the user to be shown/submit the consent (this filter overwrites the general maturity age setting at CONFIGURATION > Main Settings > General Settings > ‘Student Form’ Tab > ‘Checks & Controls’ section > ‘Coming of Age’ setting) The general setting is always applied if exists, and the age is calculated from the student date of birth.
- Per Period (Toggle On/Off): Activate this to configure consents that are repeated in every academic period. With this property, the consent will be asked and submitted separately for each academic period (e.g. year, semester).
- Security Rights (Staff/Employees): Apply view privileges for the consent submissions (if no filter applied, then all users with relevant Role permissions, will be able to see the submissions):
- Visible only by admins
- Visible to _Teachers_
- Show Only To Specific Roles (with an additional pop-up window to select the Roles)
- Show per Nationality: Target specific nationalities for which the consent is relevant (e.g., local vs international students). If you leave the filter empty, then no filter will be applied, and no check will be done to the students’ nationalities.
- Show in Specific Student Statuses: Select specific Student statuses where the consent applies. If you enable the filter, then the system will check the students’ statuses from their educational program(s), whereas if you leave the filter empty, then no filter will be applied and the consent will appear in any status in the students’ portal (admission statuses, registered statuses, alumni)
- Show in Specific Student Categories: Select specific student categories where the consent applies (adults, minors, locals, internationals, normal, special, etc.).
Student categories are configured from CONFIGURATION > Main Settings > Dropdown lists > Type: Student & Dropdown list: General Category.
- Do Not Show Consent To: Exclude the consent for specific users and portals. If you don’t use this filter, then the consent will appear to all students/portals (parents only based on the maturity age). Options include:
- Re-registration
- Admission
- Parents
- Students
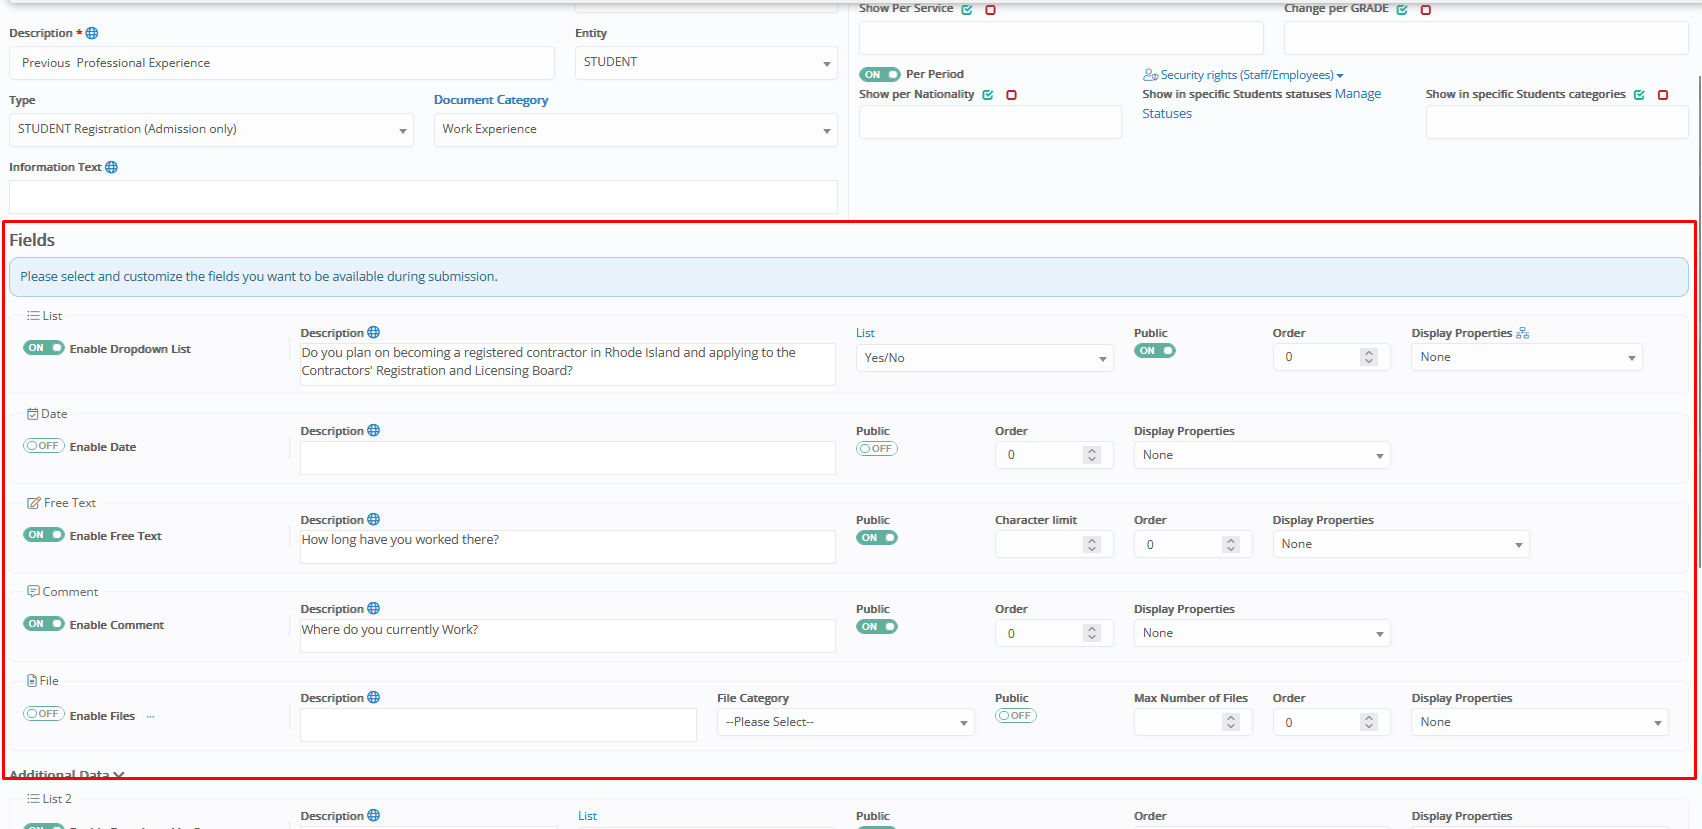
Fields & Additional Data
In this section, define the exact consent, questions and data, the users must answer/provide during the consent submission.
Main Fields
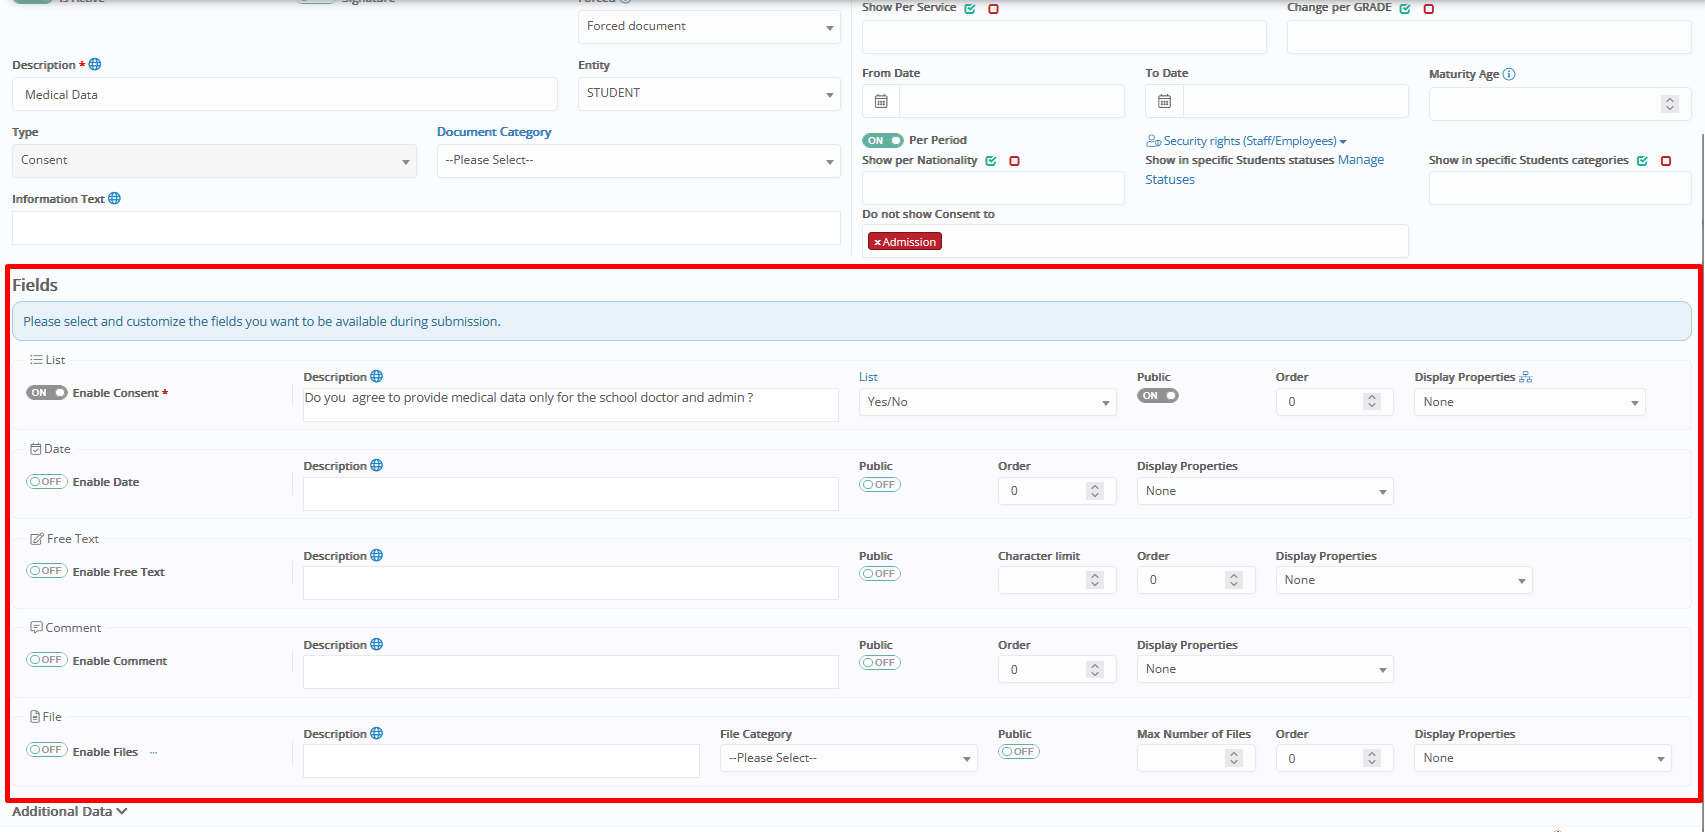
You will find different field types to enable, such as
- dropdown list questions
- date fields
- free text fields
- upload files/documents
The first field: ‘List’ is required for the consents.
The other fields (dates, free text, comments, files) are optional for additional information to be asked during the submission (such as comments, files related to the consent such as doctor documents etc.).
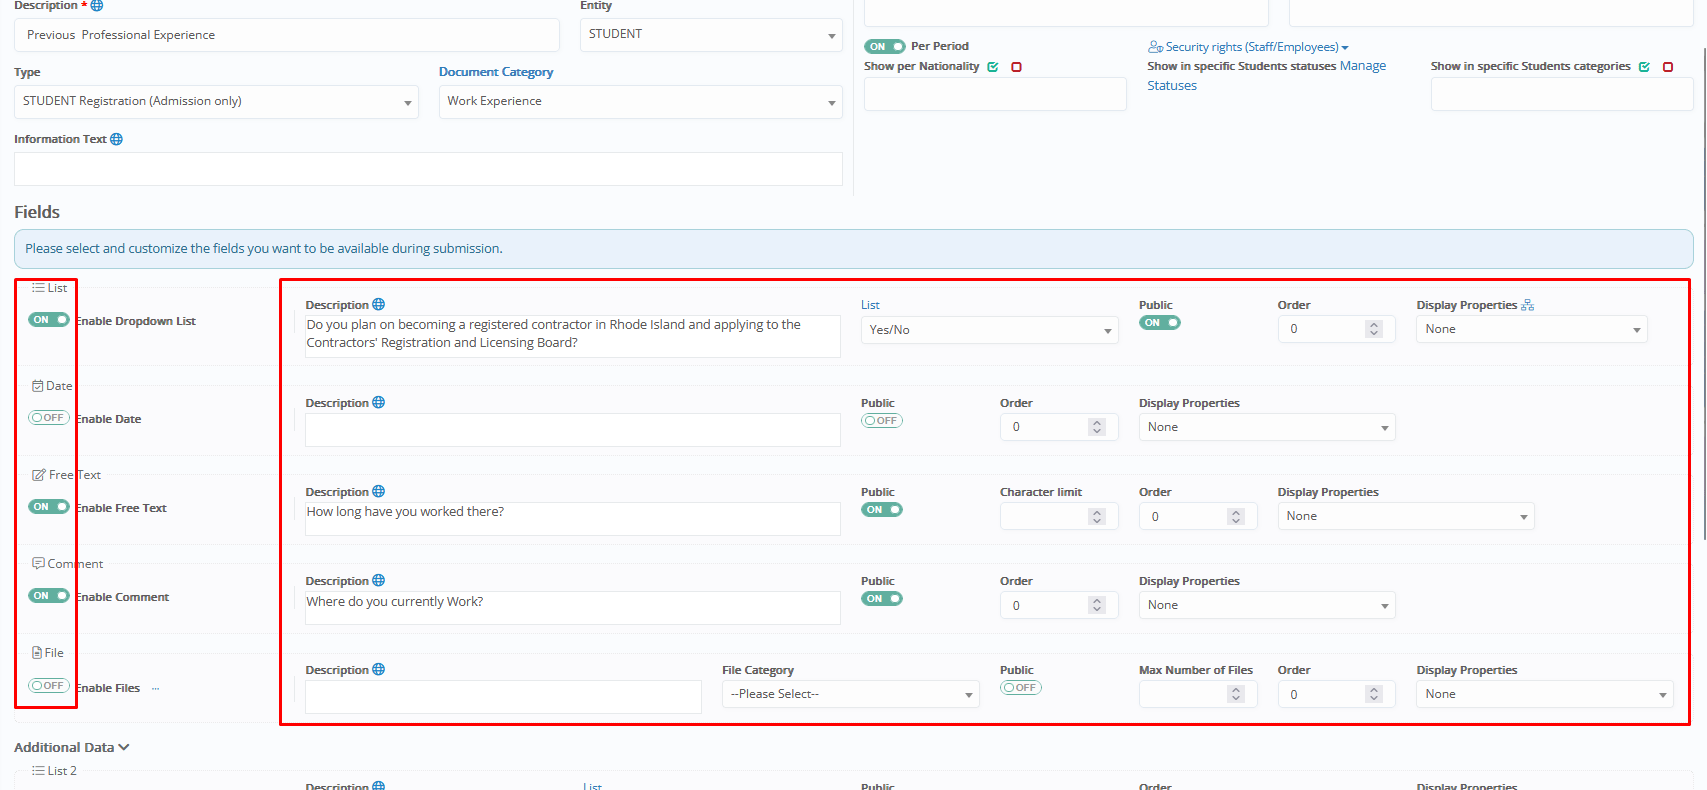
Fields configuration
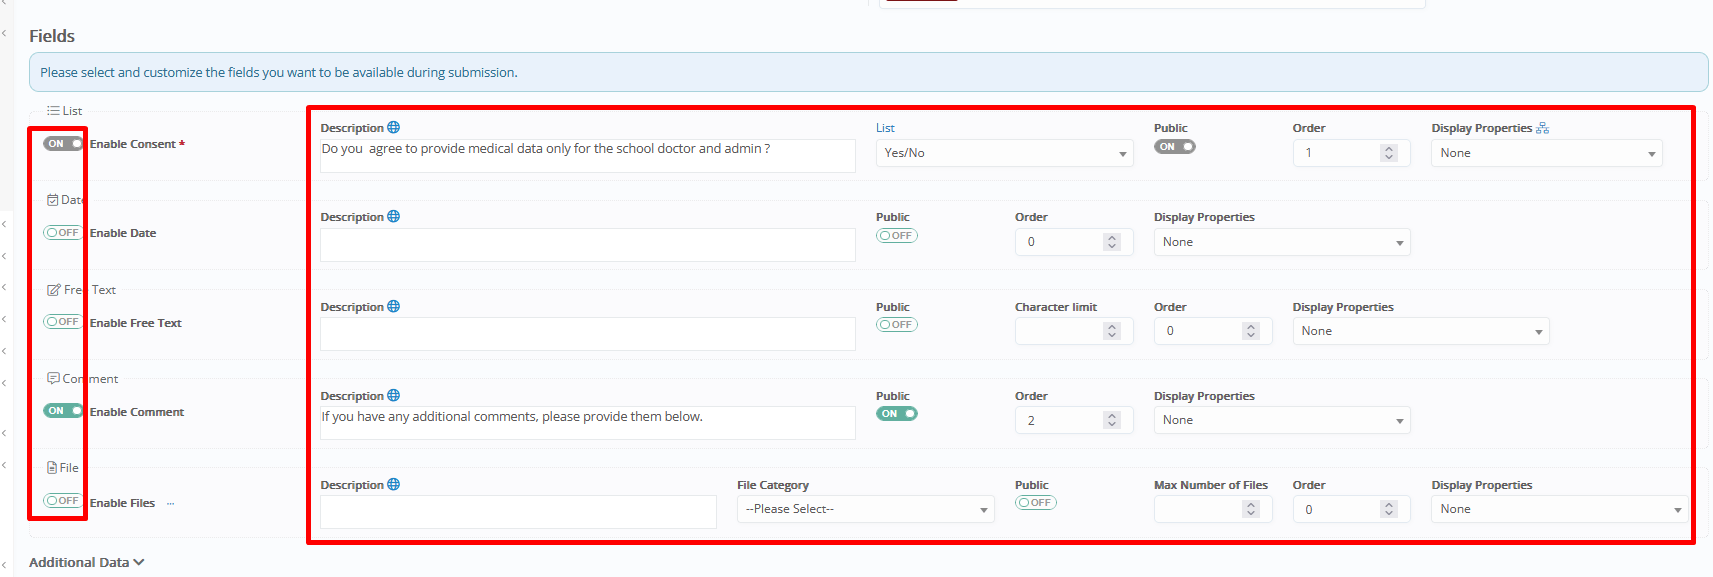
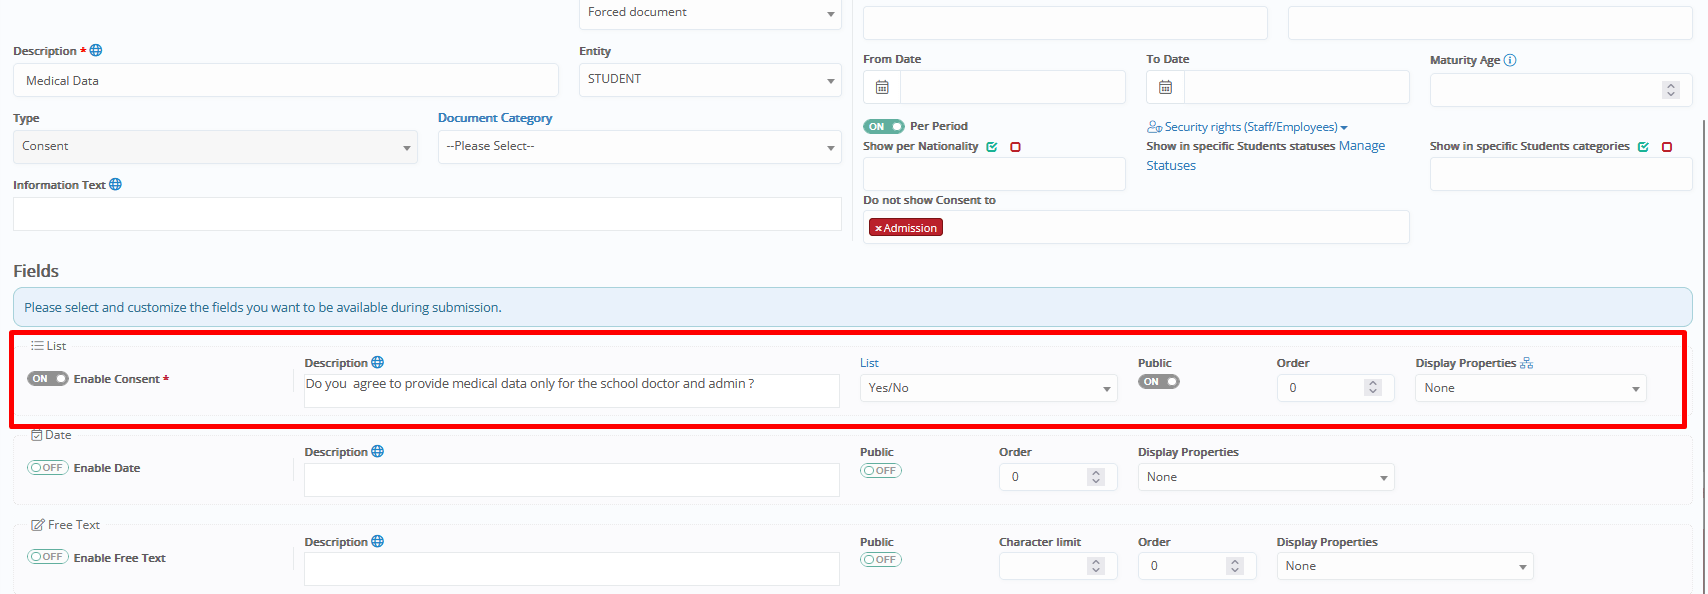
- Enable field (toggle): Activates the field. First field ‘List’ is required/enabled by default for the consents and this is where you must provide the full main question of the consent.
Please note that in order to make the field visible to end users’ portals, you must enable the property ‘Public’ as well. Otherwise, the field will only be visible to admins/back-office.
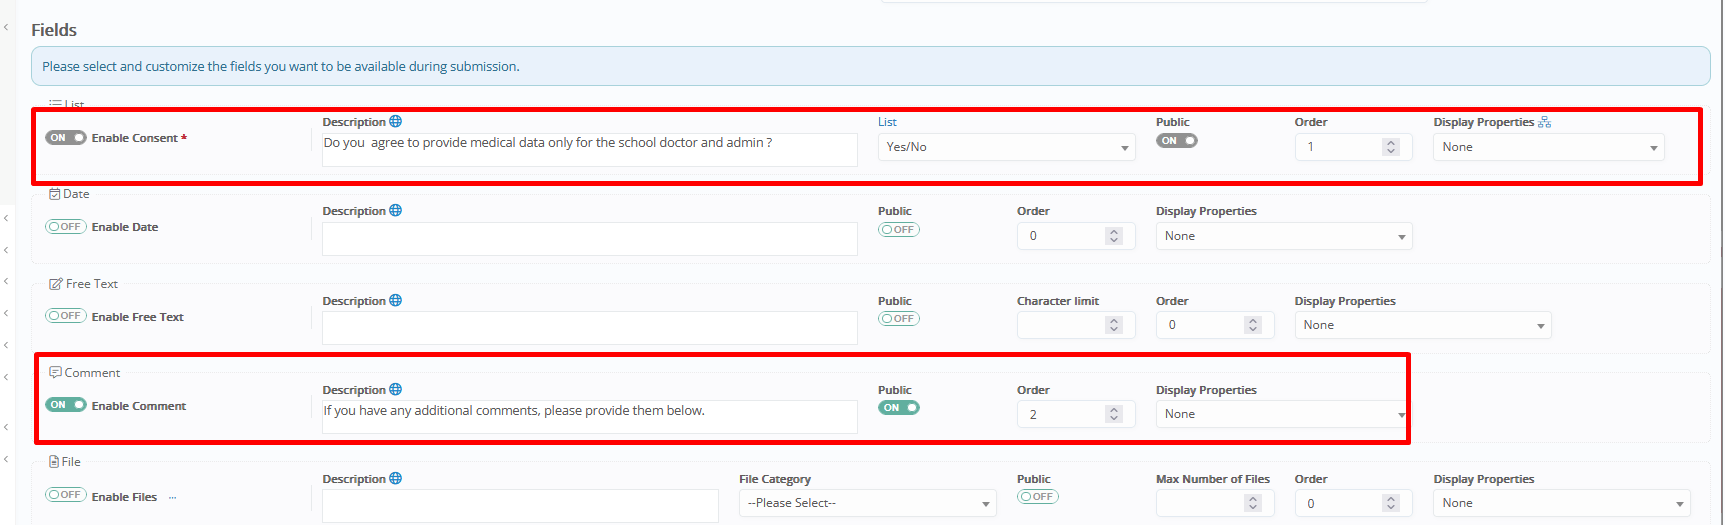
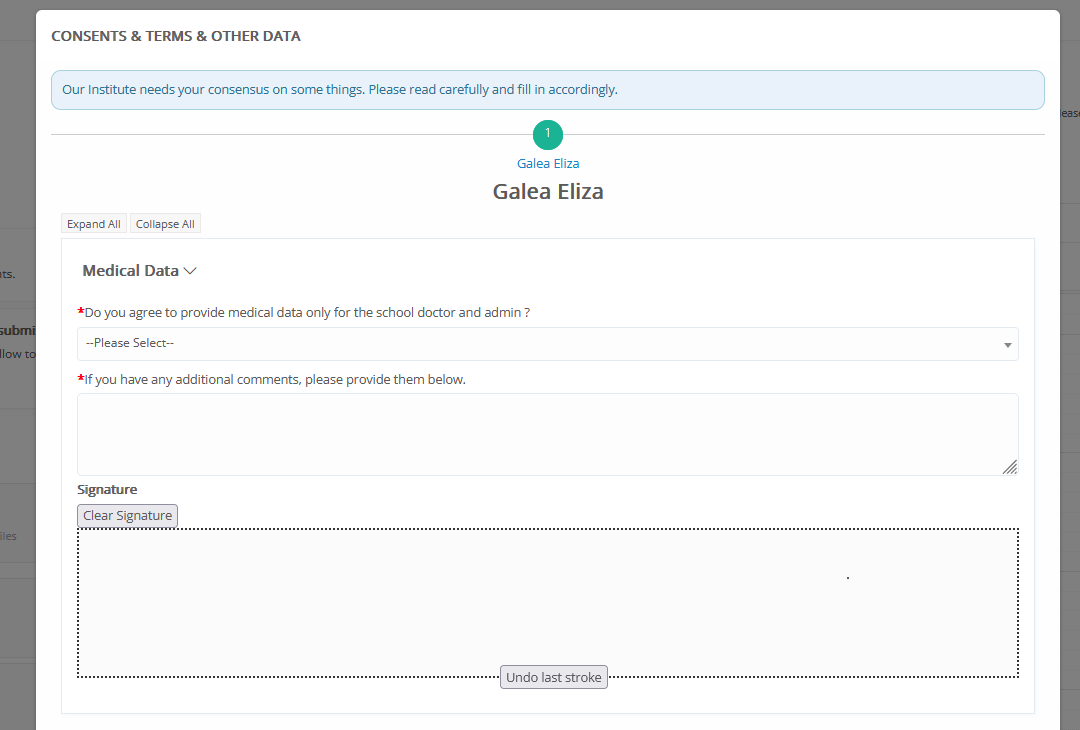
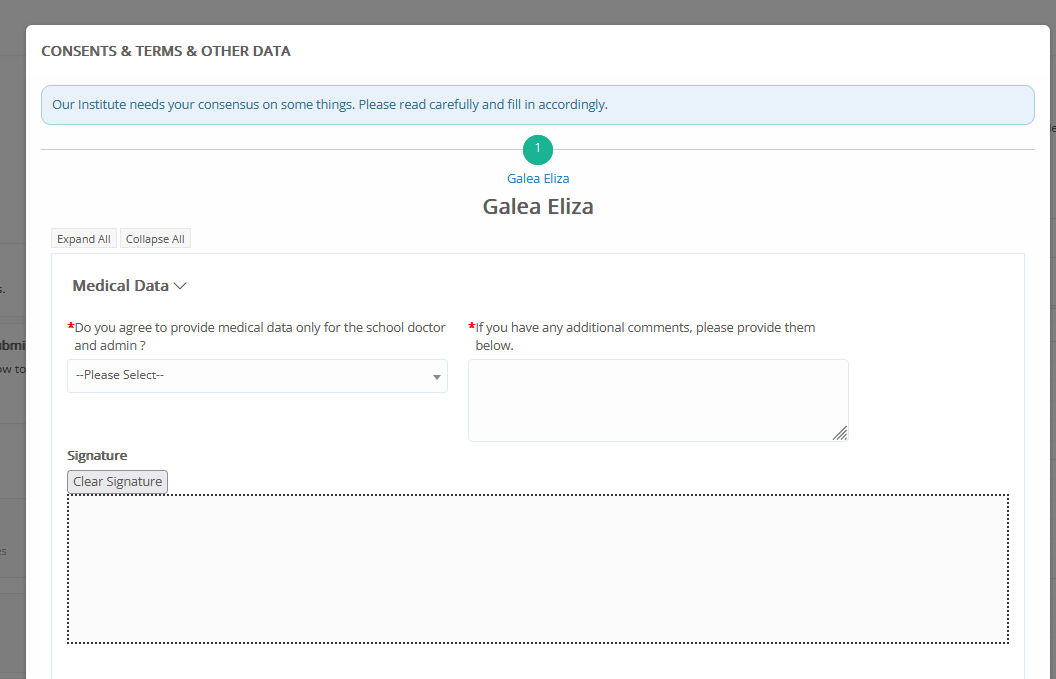
- Description: Here you type the question(s) for the end users.
For example, ‘Do you consent to provide medical data only for the school doctor?’, or ‘Please provide additional comments below’ or ‘Please upload the doctor’s document here’ etc.
The type of field you choose depends on the type of the question (e.g. the answer must be an option from a dropdown list? Free text, date or file upload?)
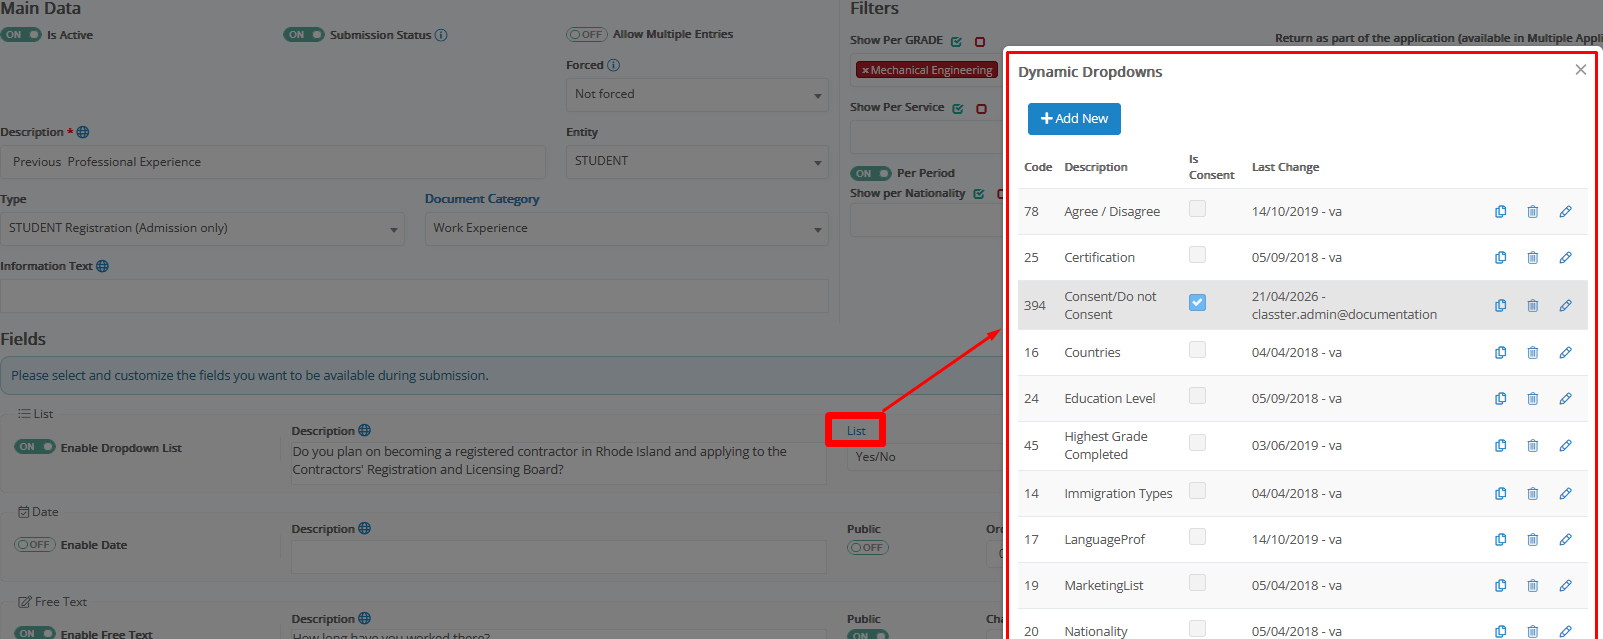
- List (only for dropdown list answers): Select the dropdown list of answers for this question.
If you click on the Label of this field, a pop-up window will open to configure any custom dropdown answers you may need:
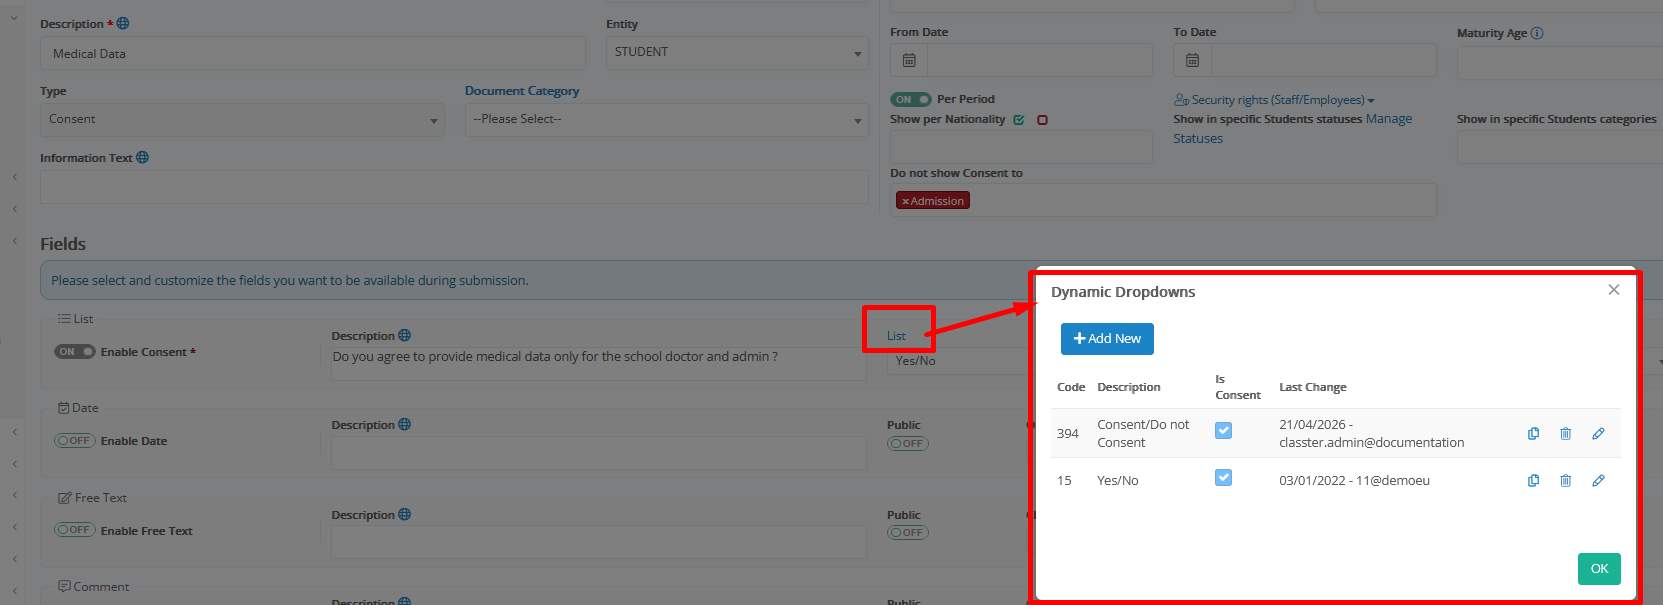
From this window you can manage the available dropdown lists and their values.
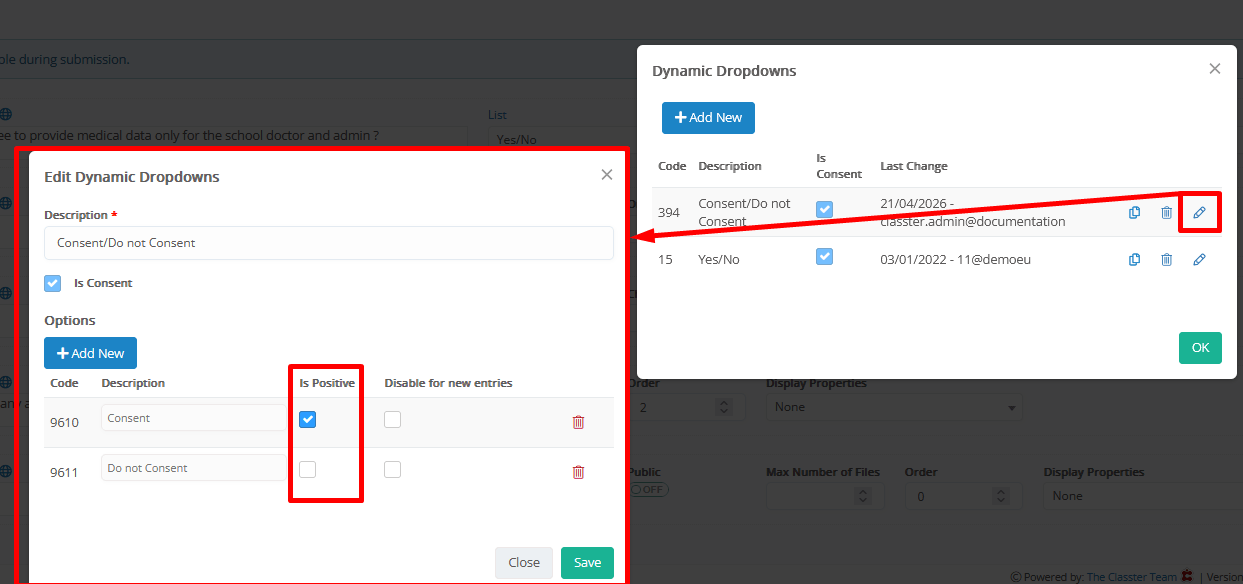
Please note that for the main consent question dropdown list, it is highly recommended to define the correct ‘Positive’ answer with the relevant property.
Tip!
For consents that are necessary for the users to continue studying/working with your institution, you can create dropdown answer lists, which will include only one and positive answer. By making the consent also ‘forced’, the users will be enforced to consent in order to continue using the Classter portal/app.
- Public: Determines whether this field is visible to the end users’ portals (Students, Parents, Teachers etc.). If you leave this field disabled, then the question will only be visible to admins/back-office users.
- Order: When you have multiple questions enabled, you can set the desired display order of the questions, at the users’ portal form.
- Display Properties: Select the display property, such as 1/12 Columns, 2/12 Columns, Full row, etc. for the users’ portal form.
Examples:
Option: ‘None’, ‘Full row’
Option: ‘5/12 Columns’
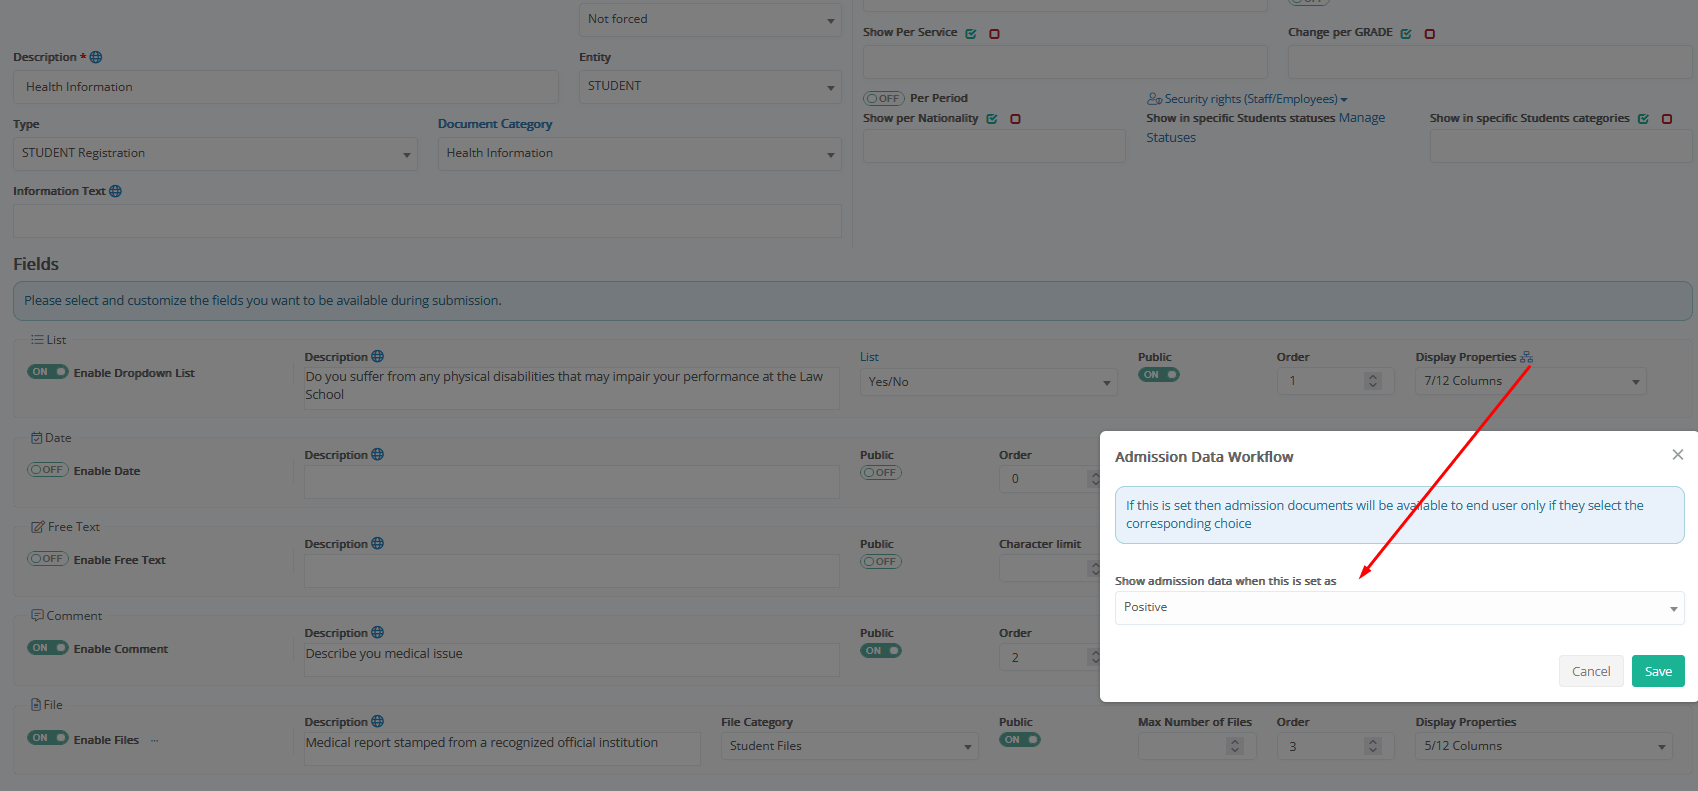
Advanced settings in Display properties: Available only in the first dropdown list question. Here you can define all the other questions’ visibility rule.
Based on this question’s dropdown list of answers (e.g. Yes/No, Consent/Do not Consent, with the correct answers set as ‘Positive’), if you select for example the ‘Positive’ answers here, the system will have all other questions hidden by default, and only when the user submit the first answer and if the answer is Positive, then all other questions will dynamically open for submission as well.

- File Category (only for File fields): Select the file category, under which all the uploaded files/documents for this question will be saved.
File categories are configured from CONFIGURATION > Main Settings > Dropdown lists > Type: Student & Dropdown list: Files Category, where you can also set visibility rules for users.
- Max number of Files (only for file fields): The system will allow multiple fields upload by default, for a single question. We recommend to limit this as per your needs to a maximum number of files allowed.
Additional Data Fields
In case the main data fields are not enough for your required questions/data, you can open the additional data fields, to open for fields for the consent.

Here you will find more fields of
- Dropdown
- Free Text
- Date
And the configuration is the same as explained in the main fields above.
Order is common between the two sections.
Settings & Dropdown Lists
Relevant General Settings can be found at the following paths:
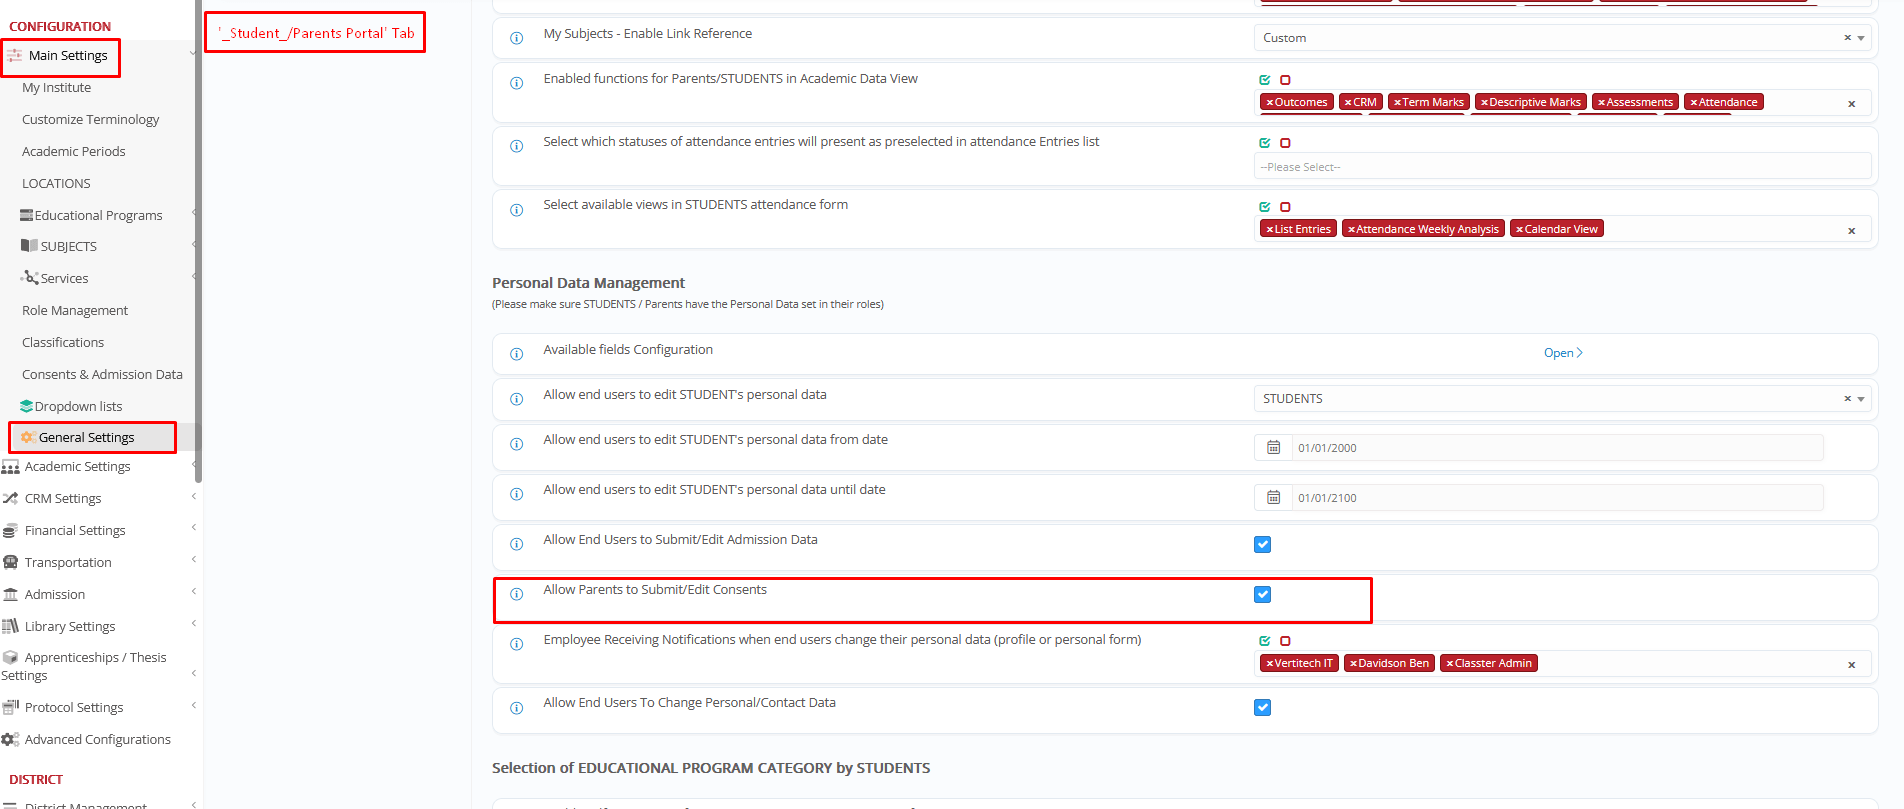
CONFIGURATION > Main Settings > General Settings > ‘_Student_/Parents Portal’ Tab > ‘Personal Data Management’ section
Setting to enable consents to registered students’ parents
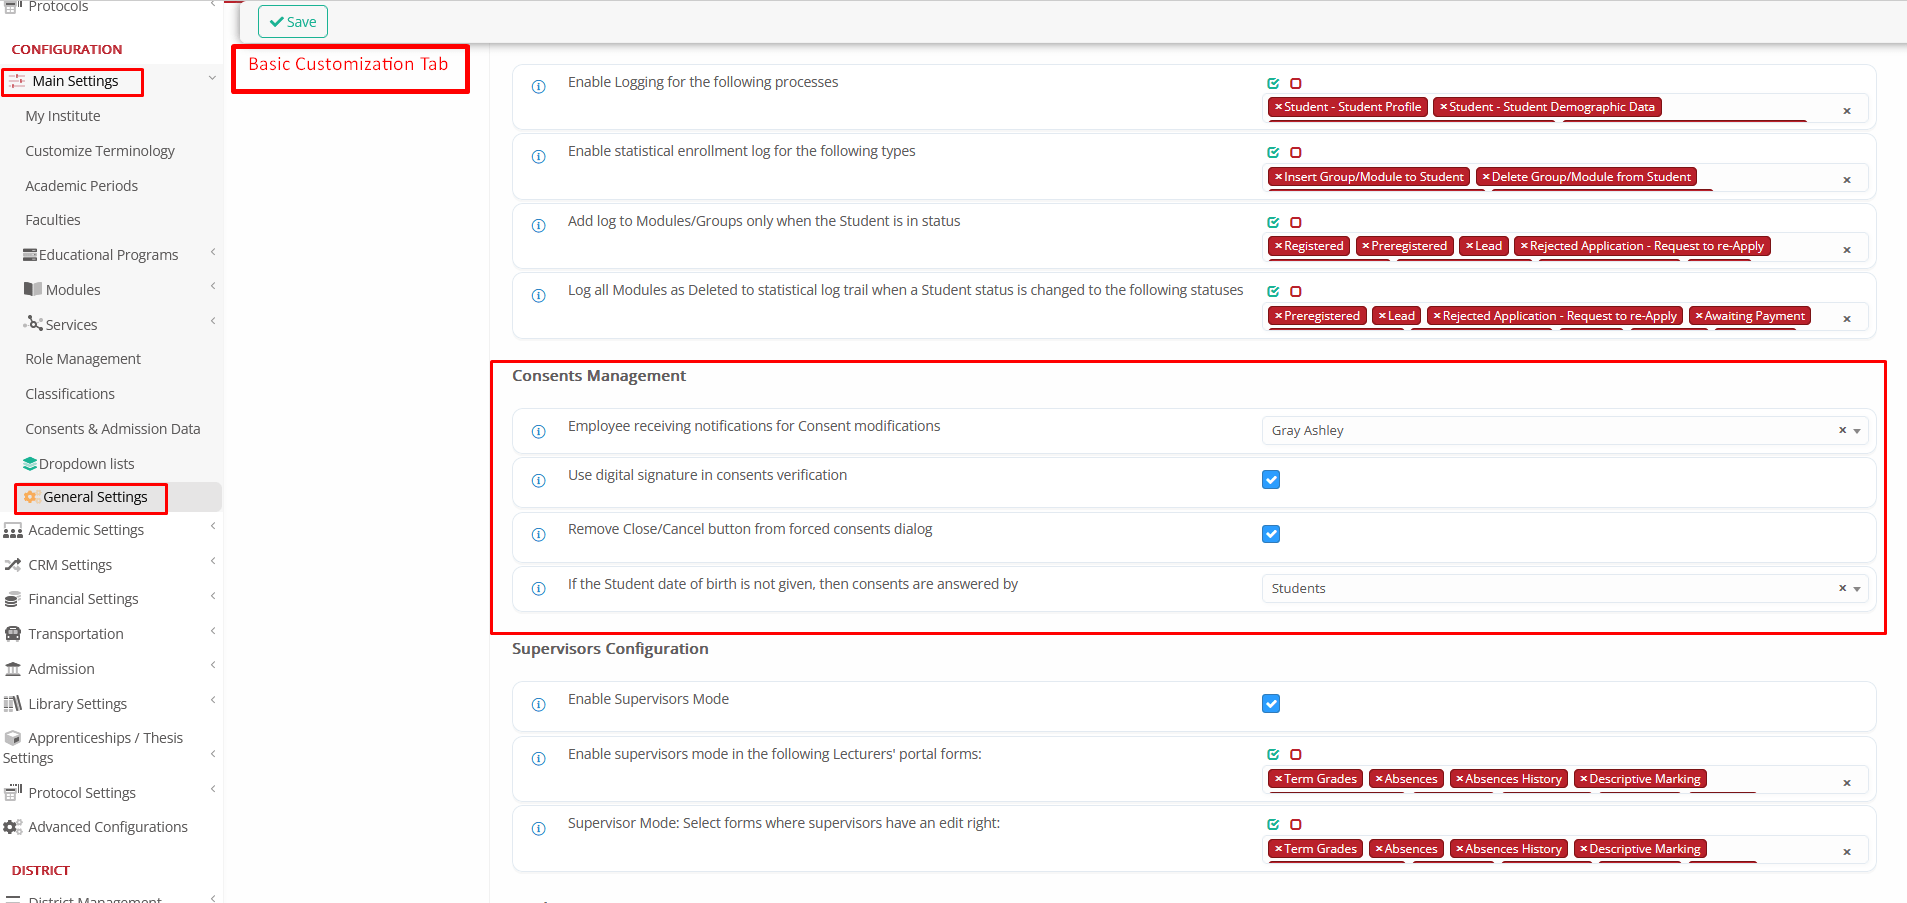
CONFIGURATION > Main Settings > General Settings > ‘Basic Customization’ Tab > ‘Consents Management’ section
Settings for internal notifications, signatures, hide close button from forced consents & signatory person when student’s date of birth is not provided.
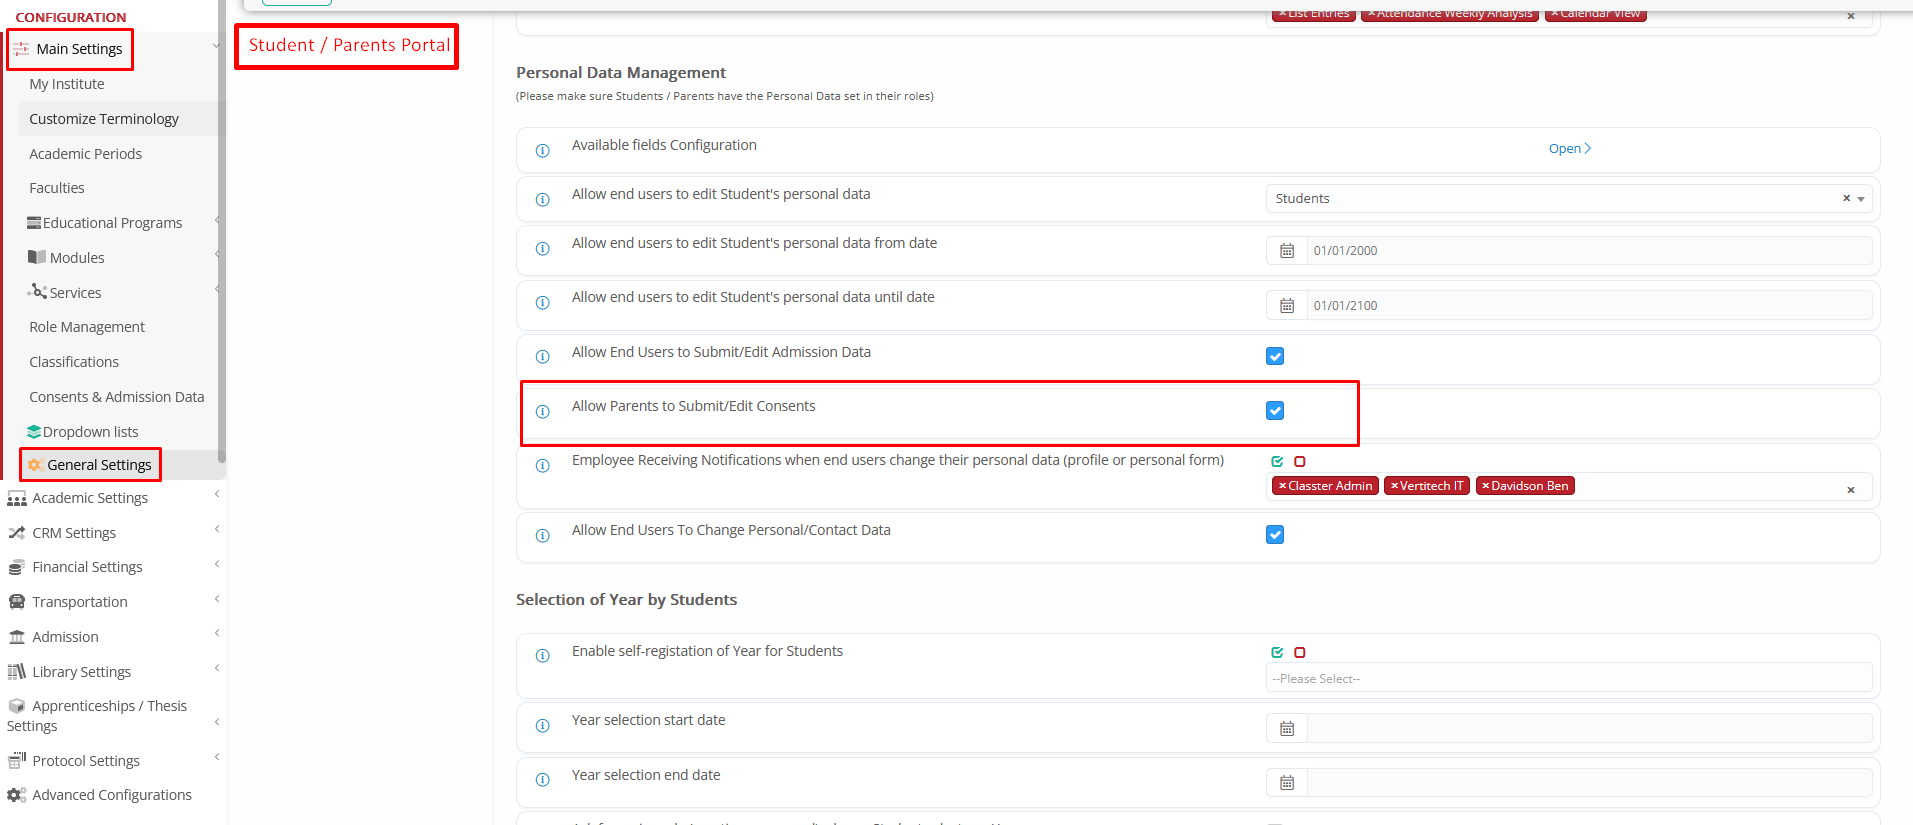
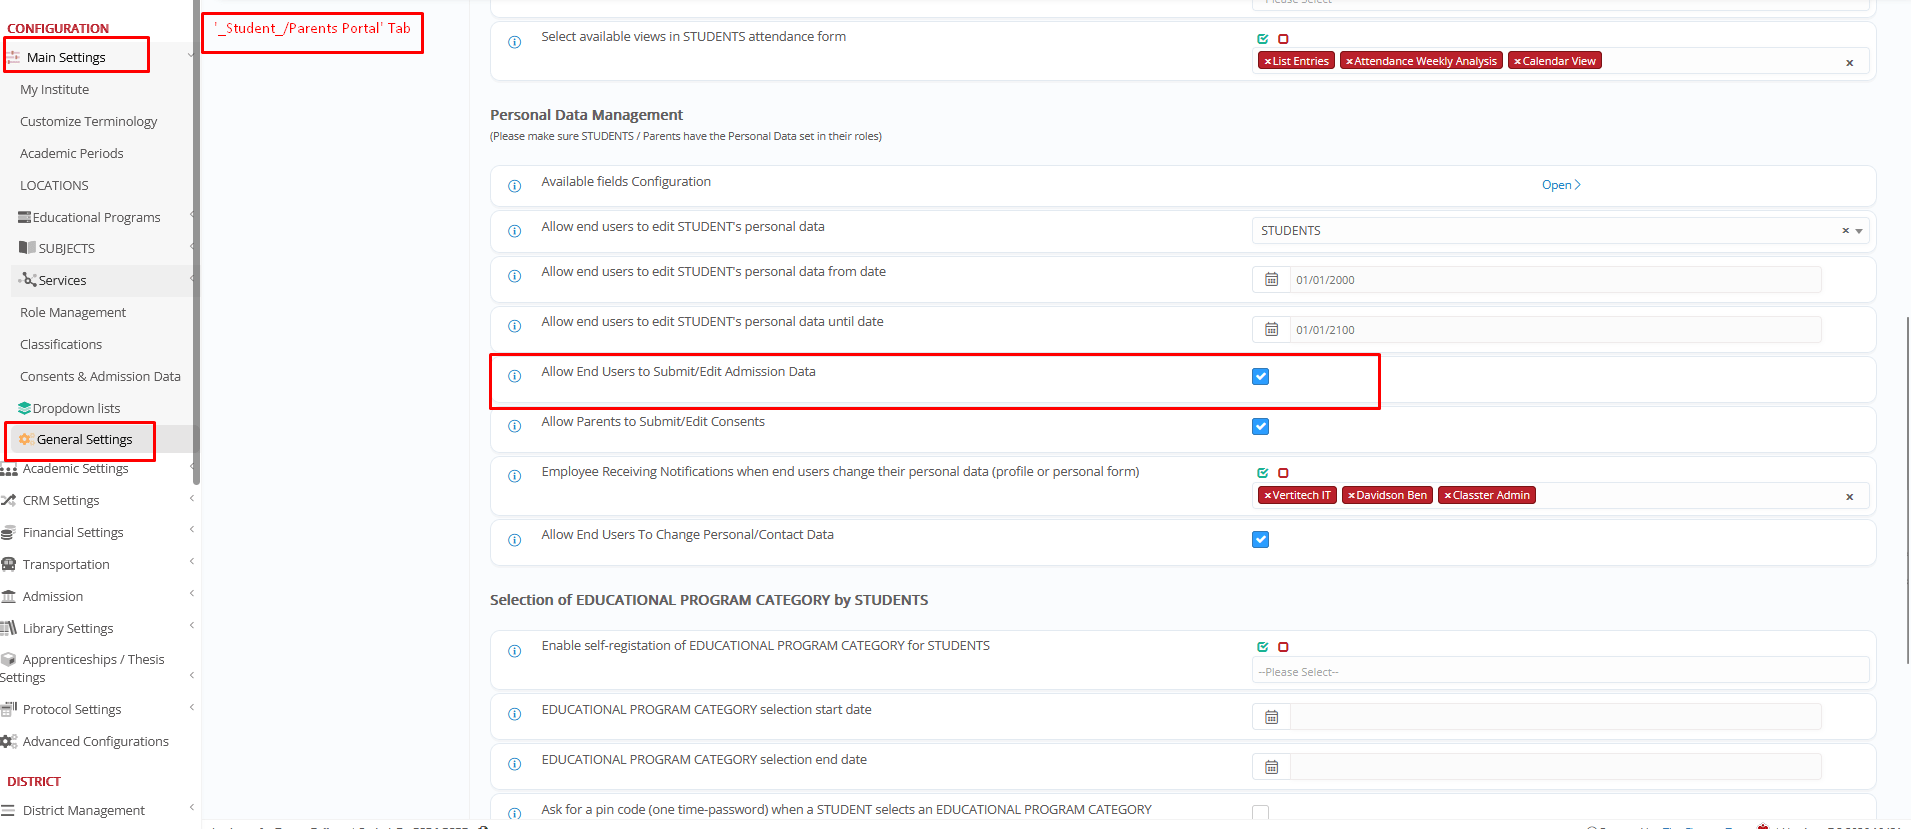
CONFIGURATION > Main Settings > General Settings > ‘Student / Parent Portal’ Tab > ‘Personal Data Management’ section
Setting for allowing parents’ submission
Relevant Admission Settings can be found at the following paths:
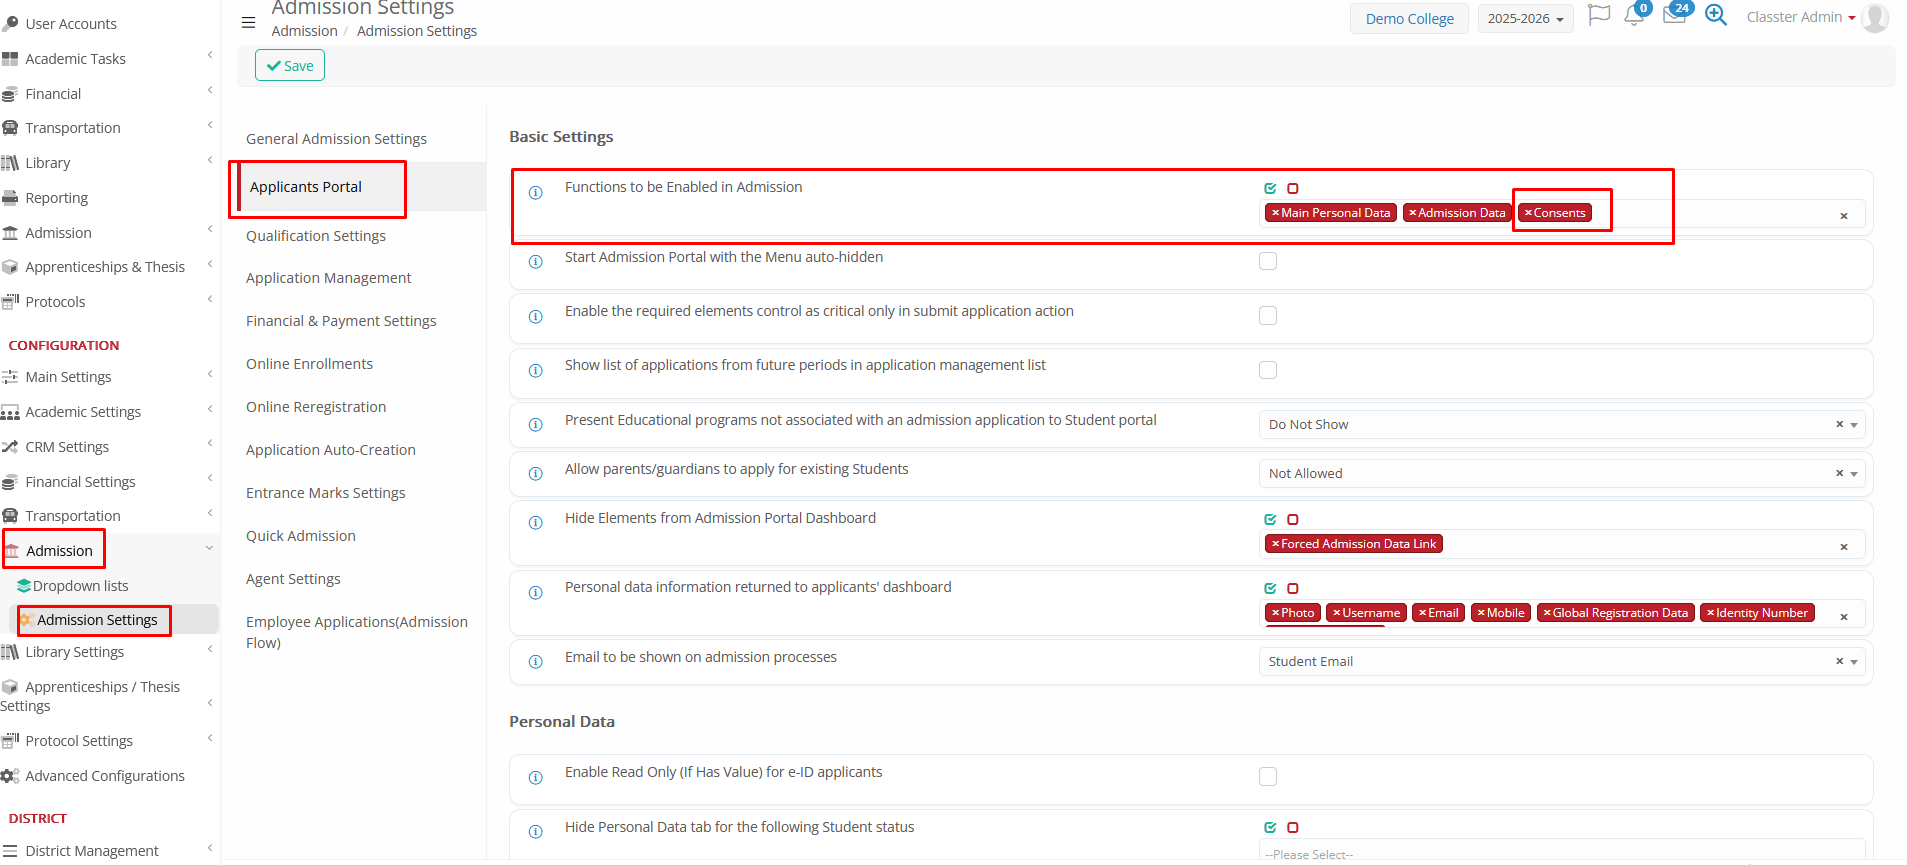
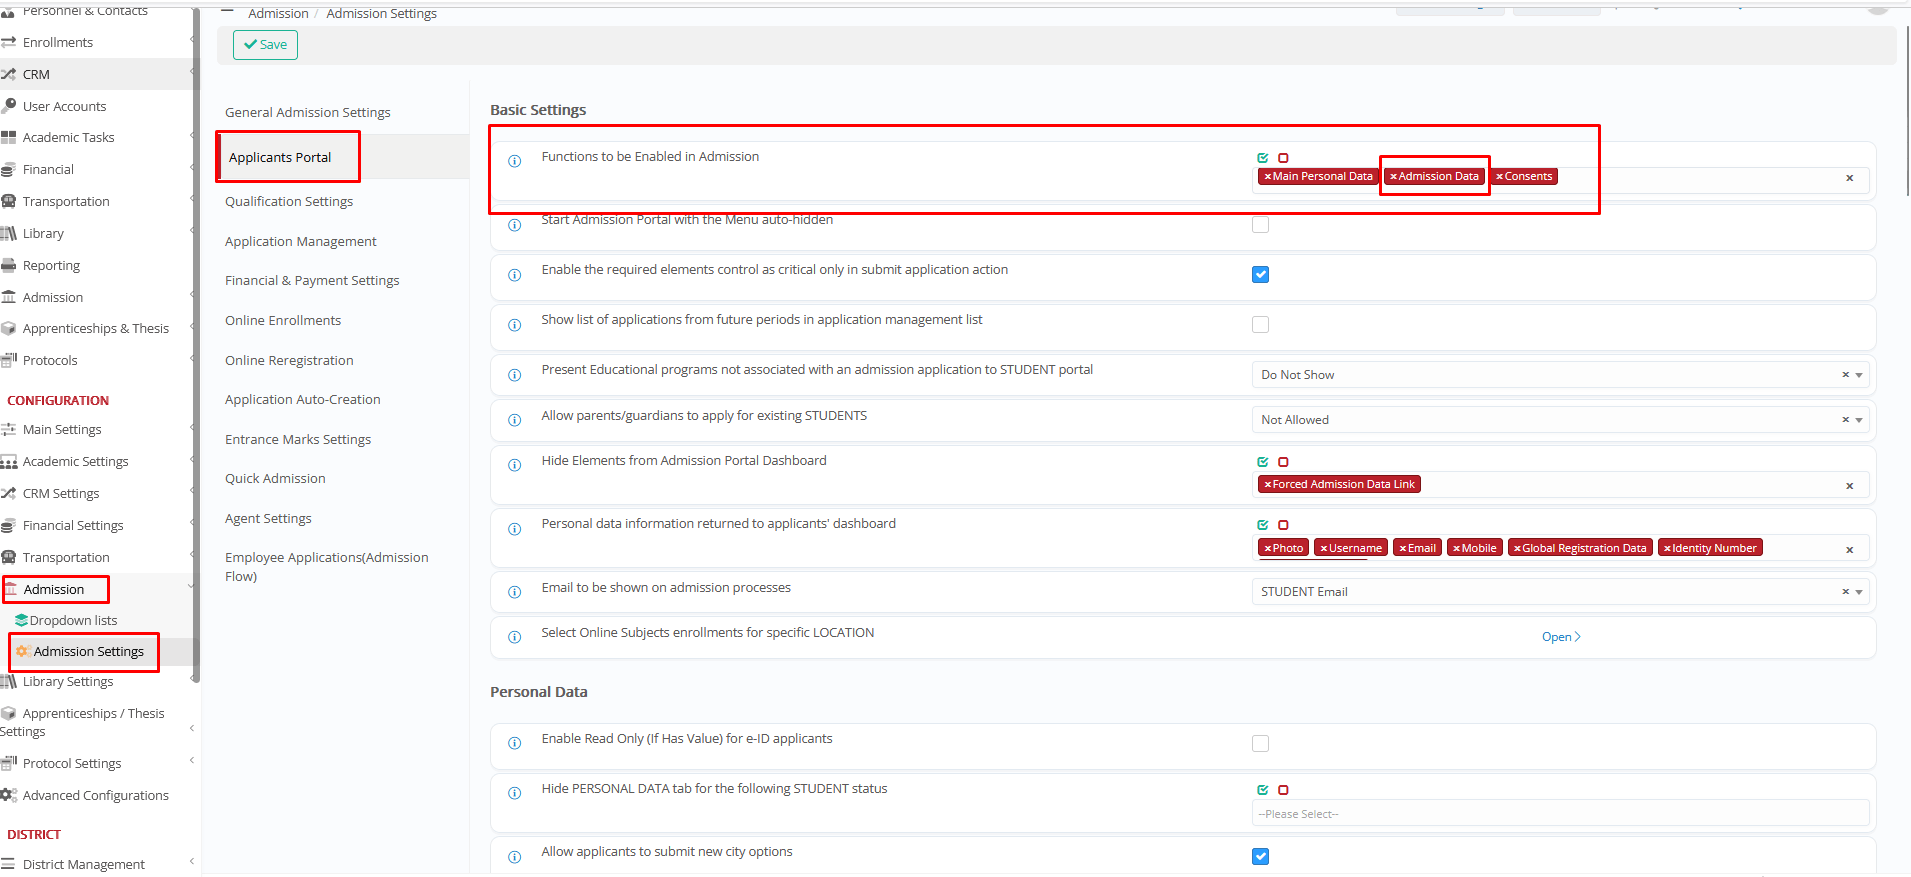
CONFIGURATION > Admission > Admission Settings > ‘Applicants Portal’ Tab > ‘Basic Settings’ section
Setting for enabling consents functionality during application submission.
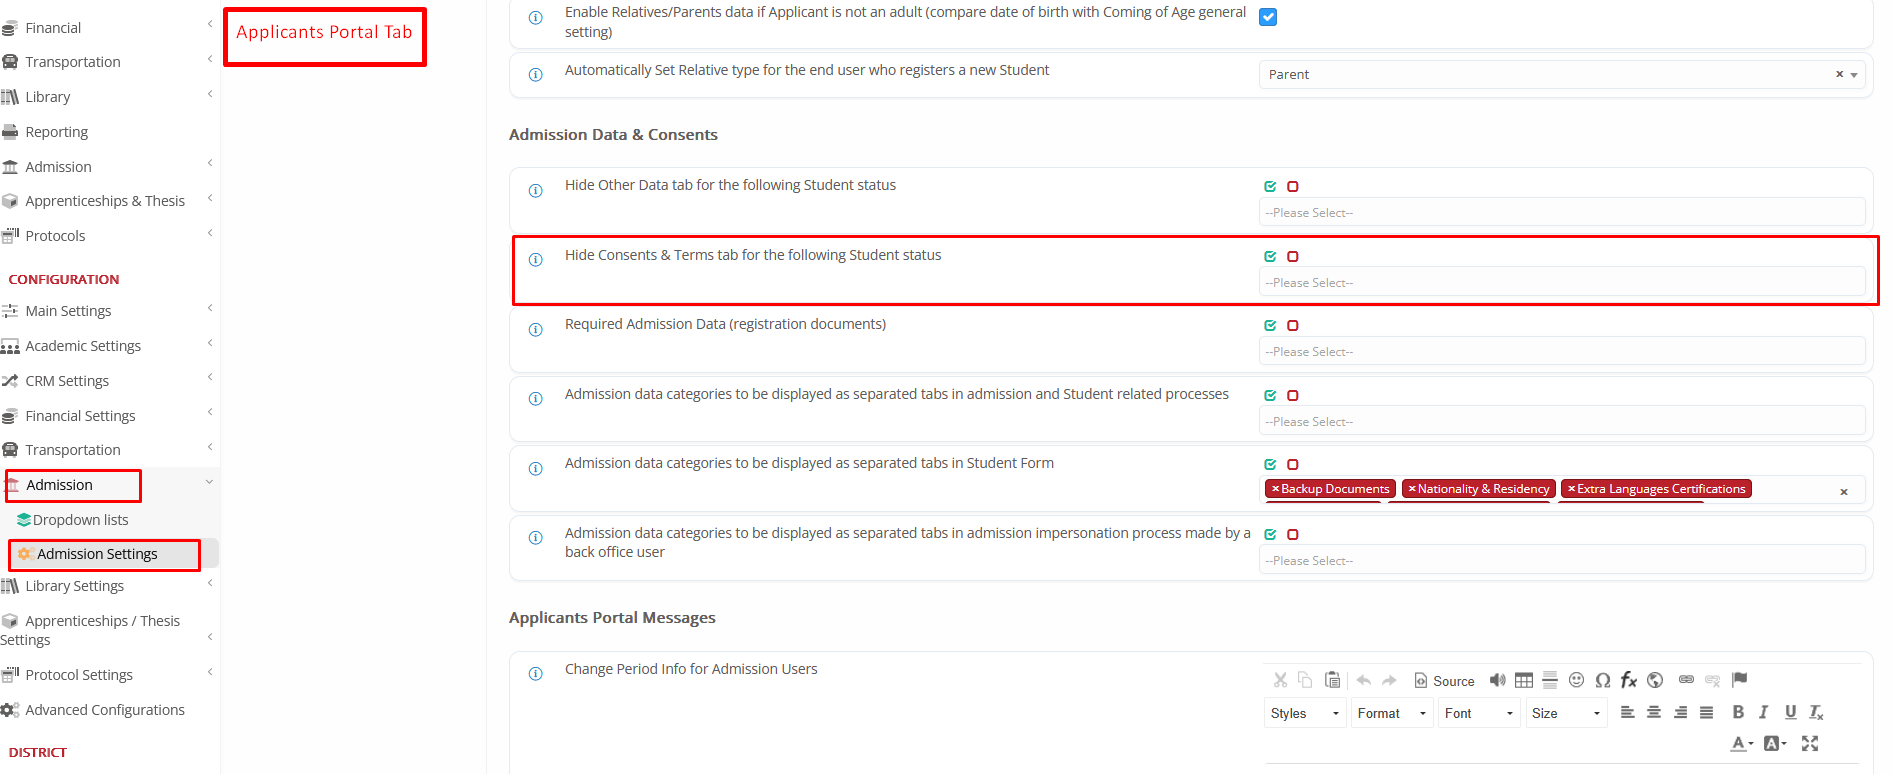
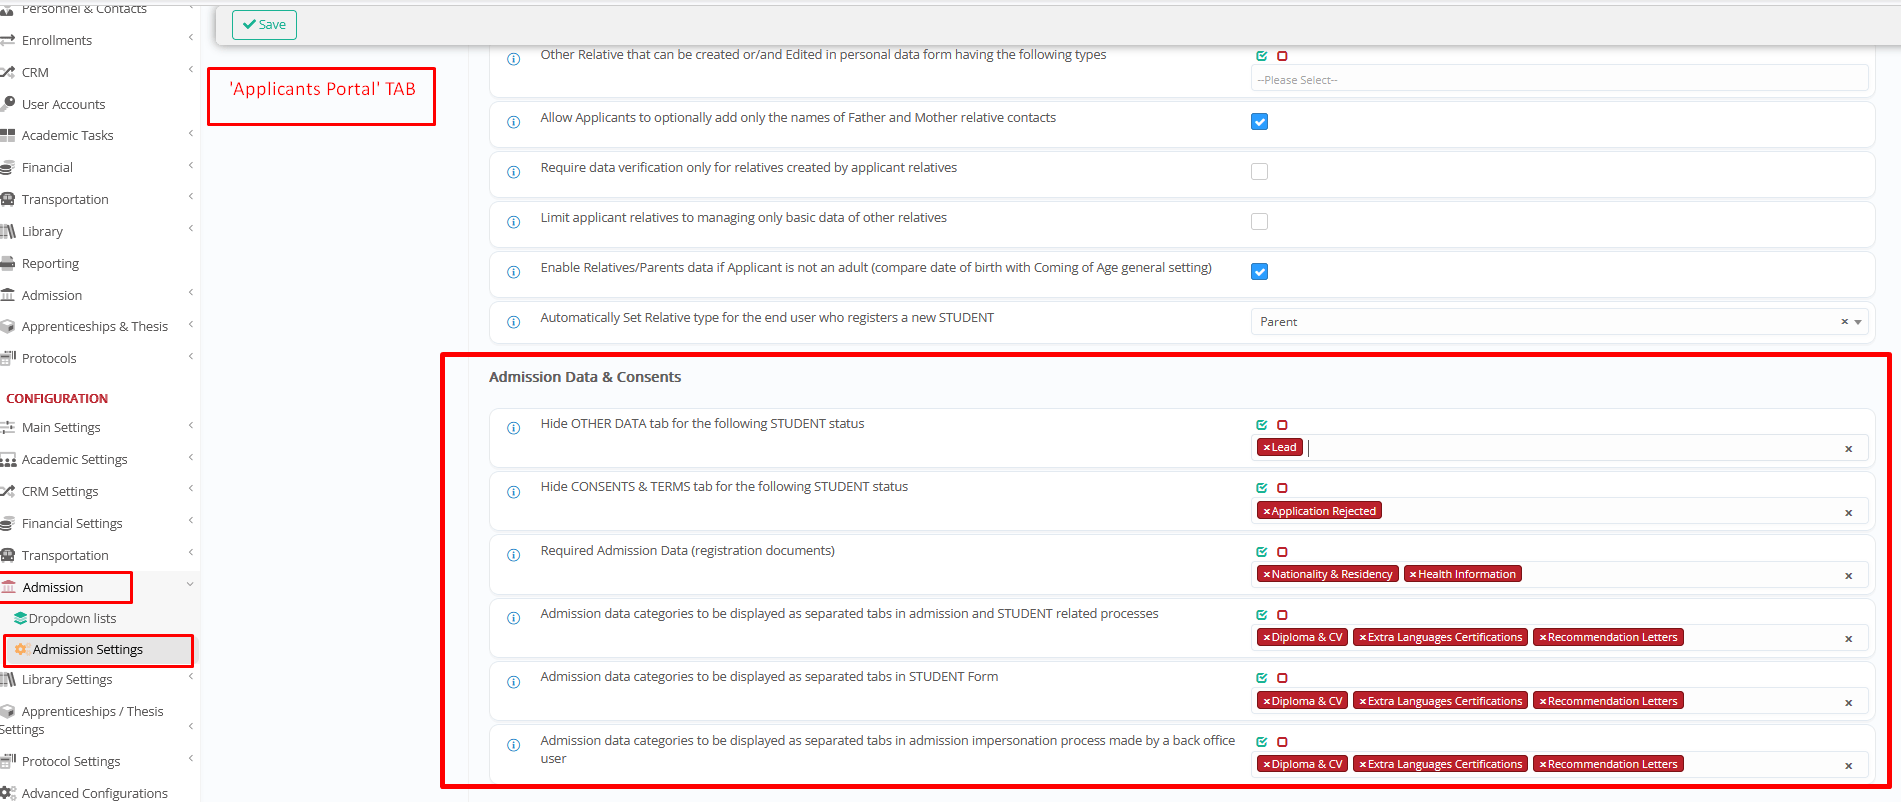
CONFIGURATION > Admission > Admission Settings > ‘Applicants Portal’ Tab > ‘Admission Data & Consents’ section
Setting for hiding consents from specific admission statuses.
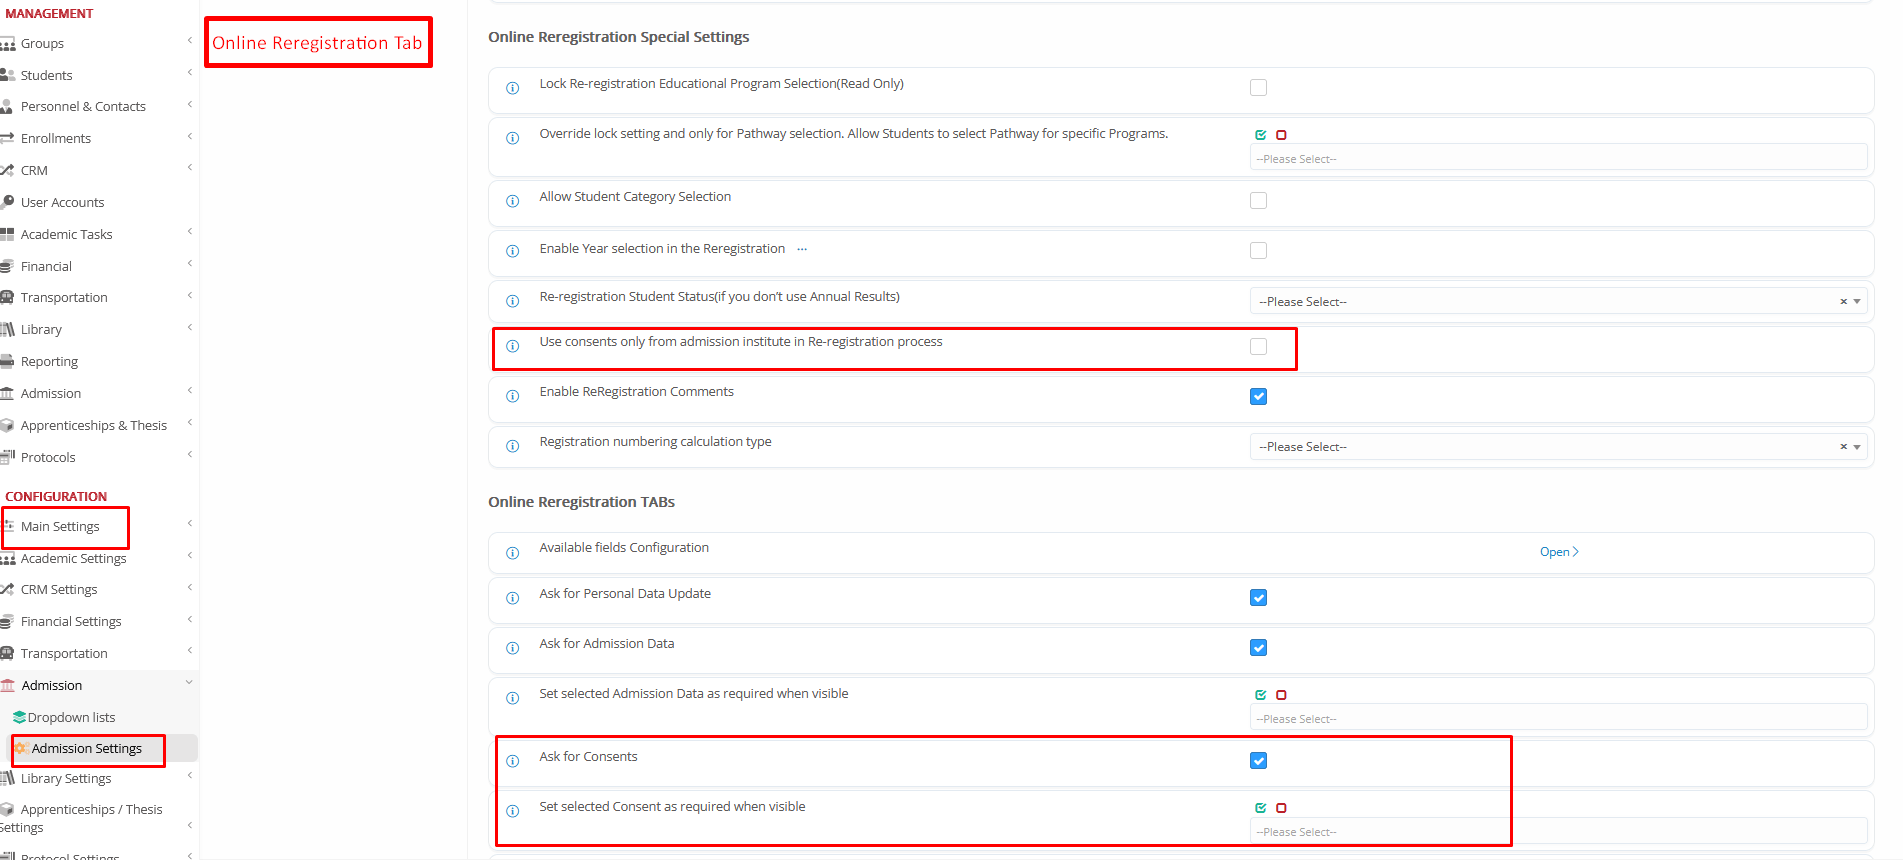
Relevant Reregistration Settings can be found at the following paths:
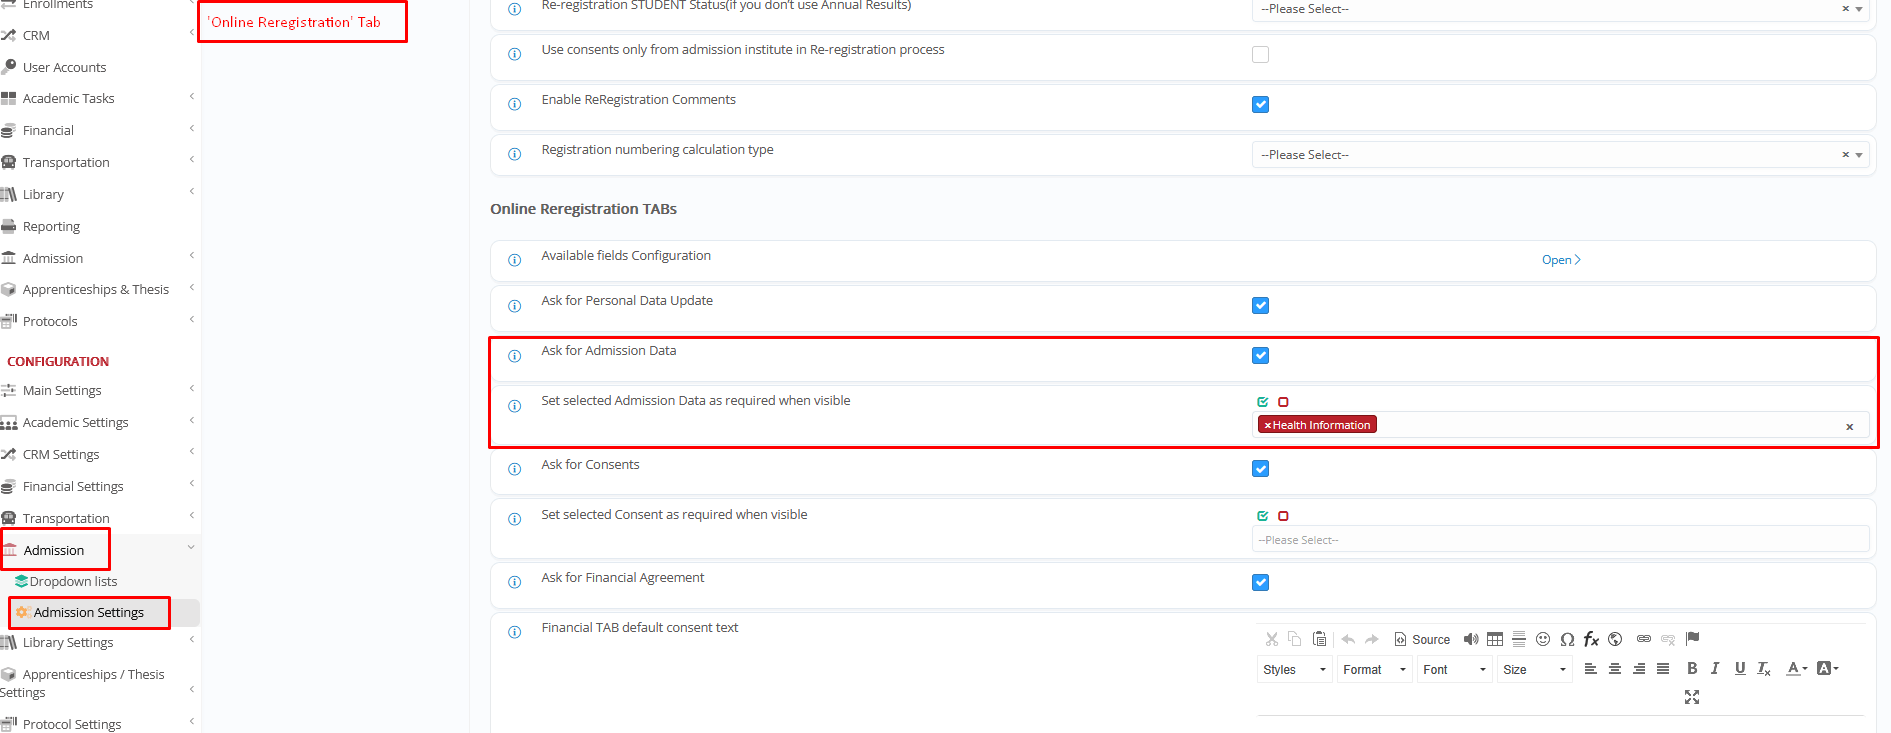
CONFIGURATION > Admission > Admission Settings > ‘Online Reregistration’ Tab > ‘Online Reregistration Special Settings’ section
Settings for admission institutes in Classter (multiple institutions using a central institute for admission/reregistration), enable consents and/or set as required during reregistration.
Relevant Dropdown List can be found at CONFIGURATION > Main Settings > Dropdown Lists > Type: ‘System” & Dropdown list: ‘Document Categories’
Document Categories to organize/group the consents per category (layout usage).
Case Examples
Example A:
Forced consent with signature for all applicants (admission) and registered students who have not answered already (re-registrations excluded), regarding the personal data provided. Maturity age is set to ‘18’, so in a minors’ school/training/language center, the consent will appear to parents (or other relatives/users who will complete the application for the student).

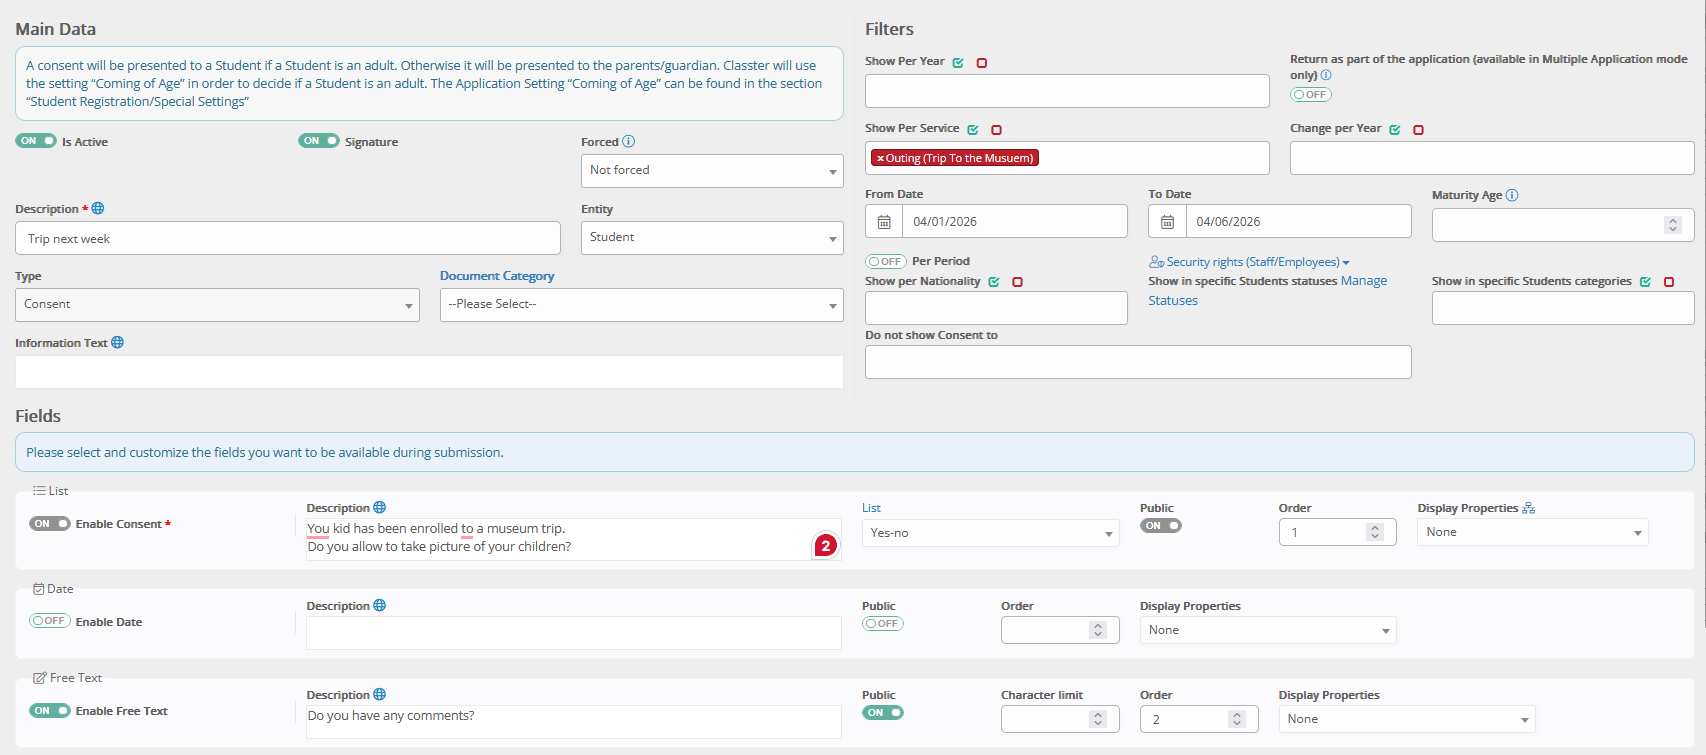
Example B:
Consent for registered students enrolled in a specific school trip (based on relevant service enrollment).
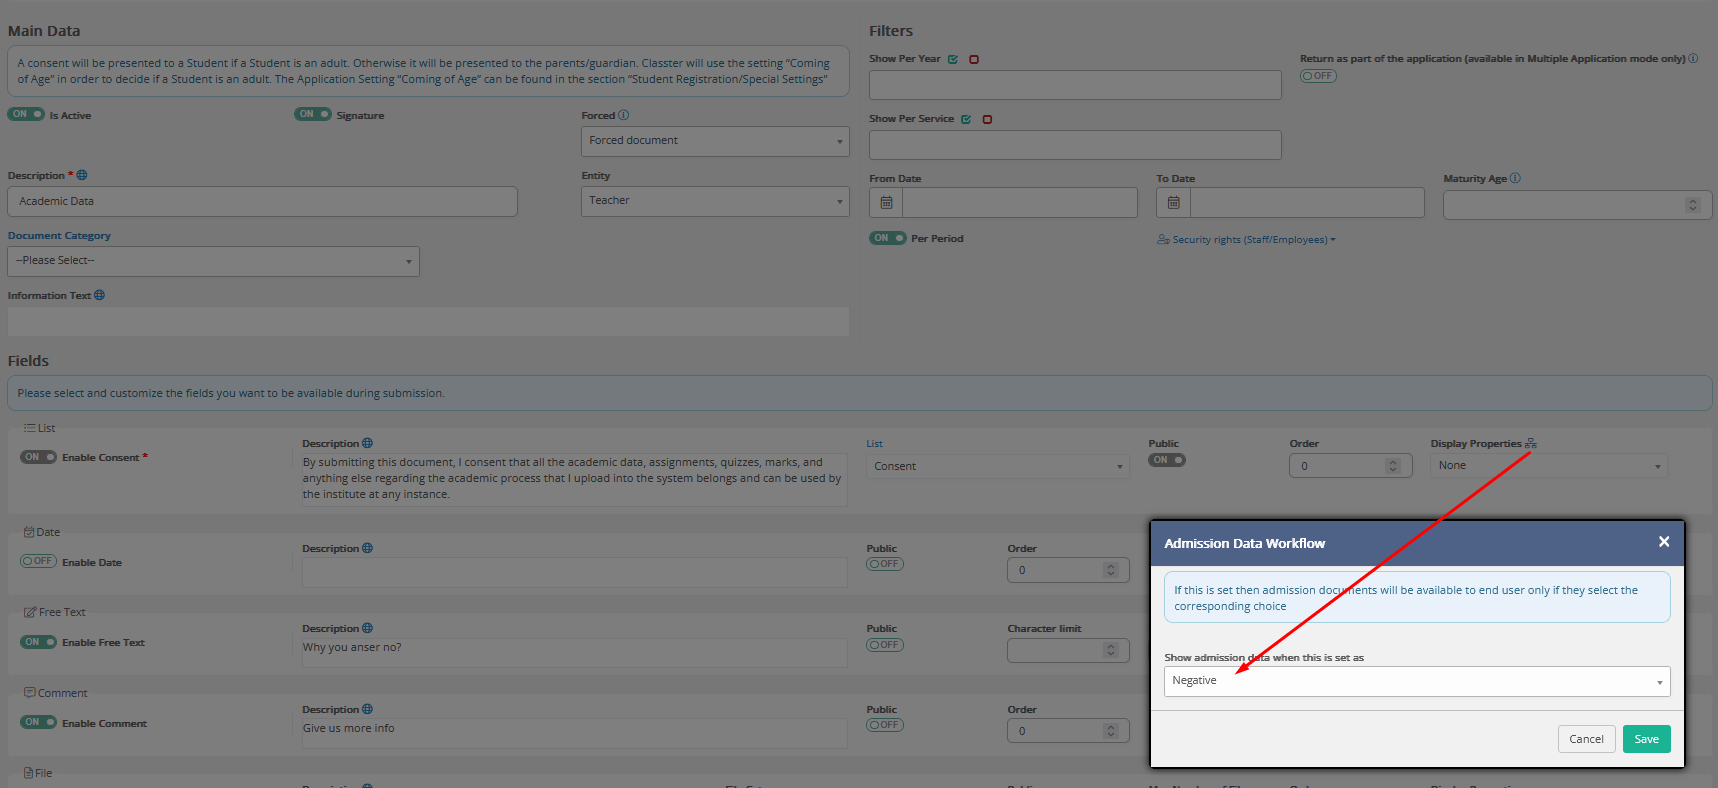
Example C:
Consent for Teachers, regarding the academic data uploaded by them, and asking for details if they do not consent.
Admission Data
Admission Data is used to collect structured and verifiable data and files, using
- customizable fields/questions/files
during
- admission
- re-registration
- onboarding
- or at any time during the academic period
from
- students
- parent, guardians, agents
- teachers
Unlike Consents, Admission Data focuses on data submission and validation rather than approval.
Admission Data may allow multiple entries, internal verification statuses, and repeated submissions per academic period.
Examples:
Custom / extra required data (not existing as standard fields already), such as
- special questions related to the admission, like entry requirements, previous certifications
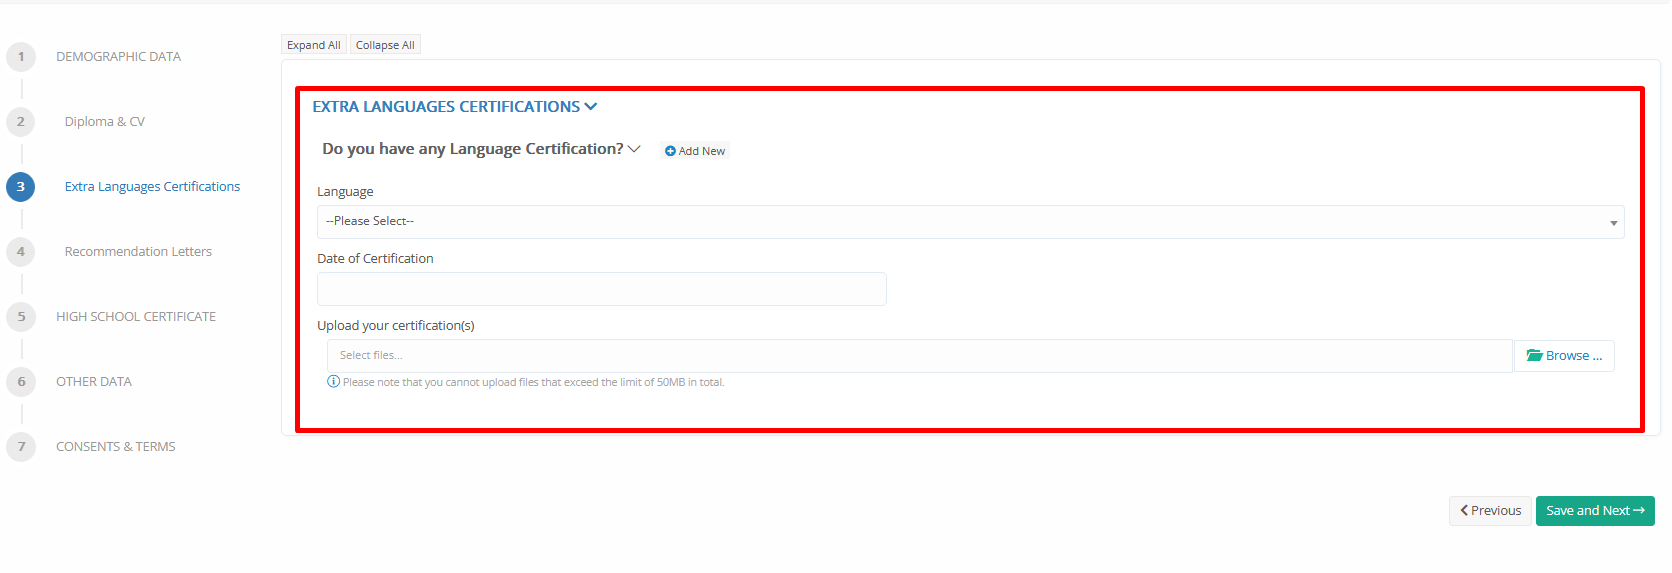
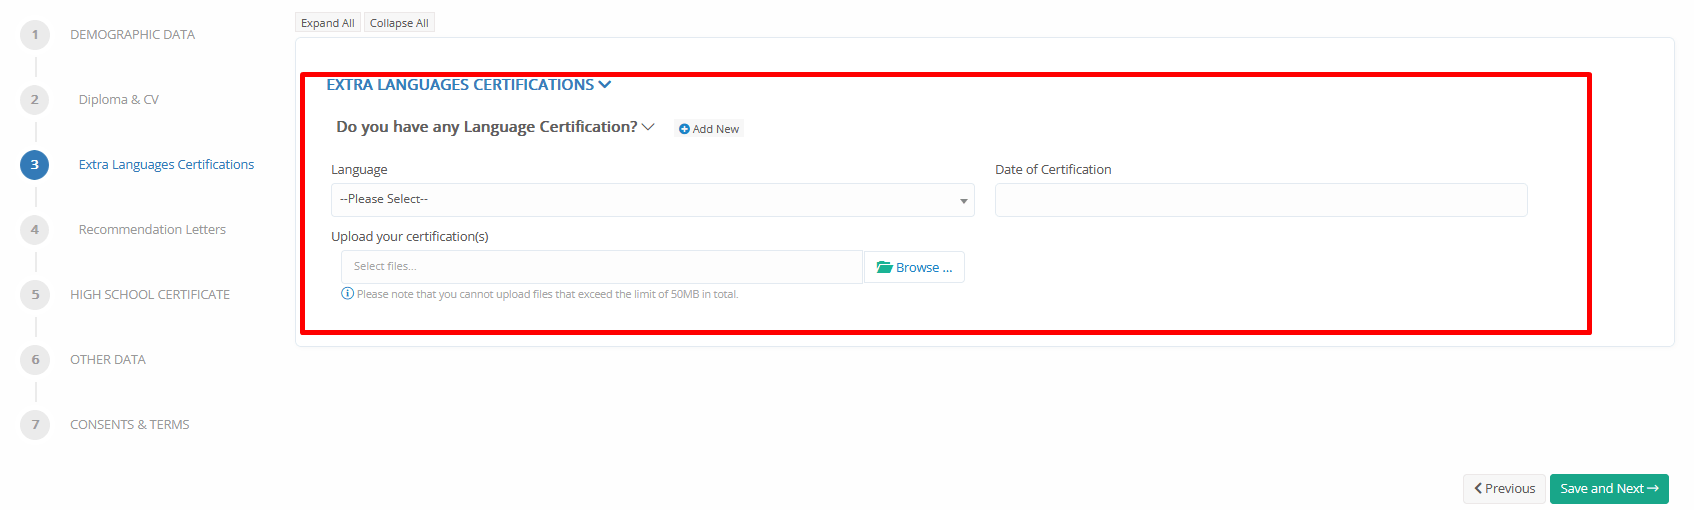
- extra languages certificates
- medical data and documents
- secondary education
- academic distinctions/awards
- work experience
- copy of documents (such as diplomas, transcripts for masters)
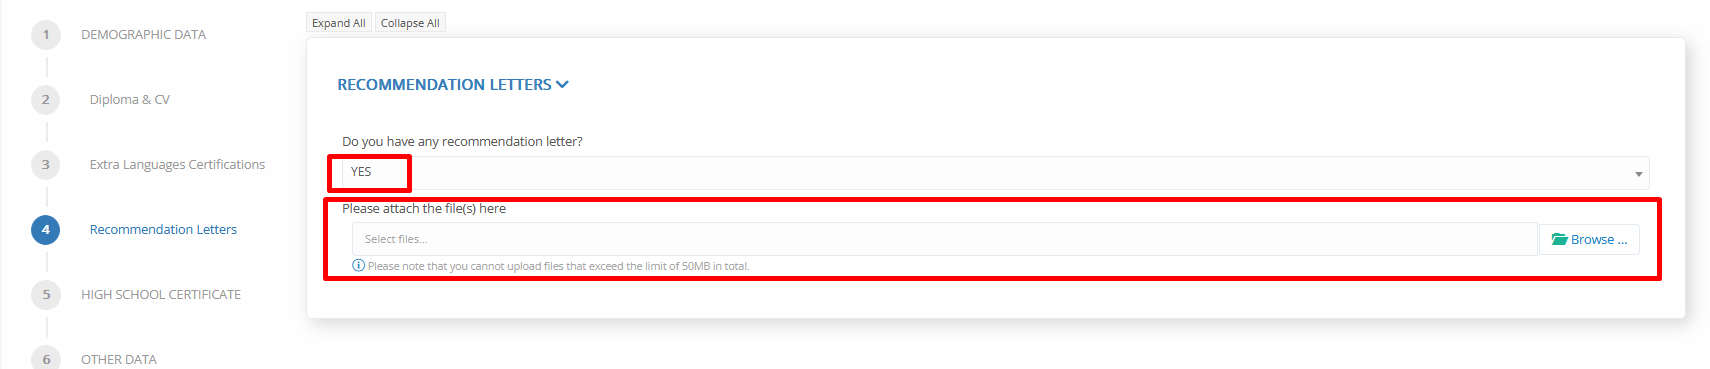
- recommendation letters
- bibliography / CV
- any question like how they have heard about the institution
and any other custom question / field is needed from the institution.
The system also supports dynamic extra questions, visible only when the answer for the main question is positive/negative. For example: “Are you an EU-citizen?” If the answer is No (negative), then 3 extra questions (data, files) will open for submission.
List of Admission Data
To view the list of Admission Data, navigate to CONFIGURATION > Main Settings > Consents & Admission Data > default View > Admission Data.
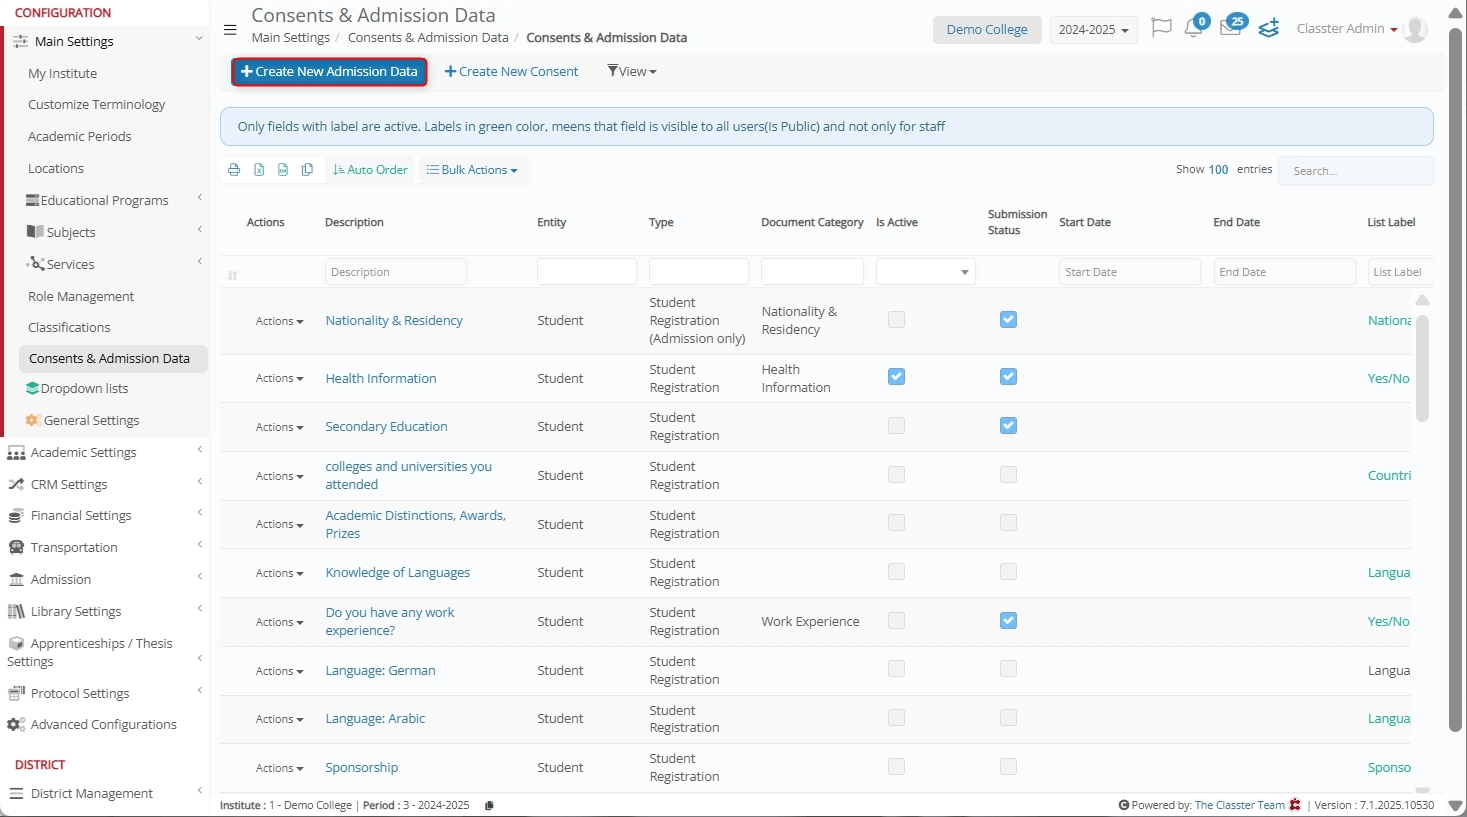
Admission Data Form
To define a new Admission data, click on + Create New Admission Data.
As a result, a new form interface will open, categorized into sections:
- Main Data (consent settings)
- Filters (consent limitations)
- Fields (the consent, questions, extra data)
- Additional Data (additional fields for questions, data if needed)
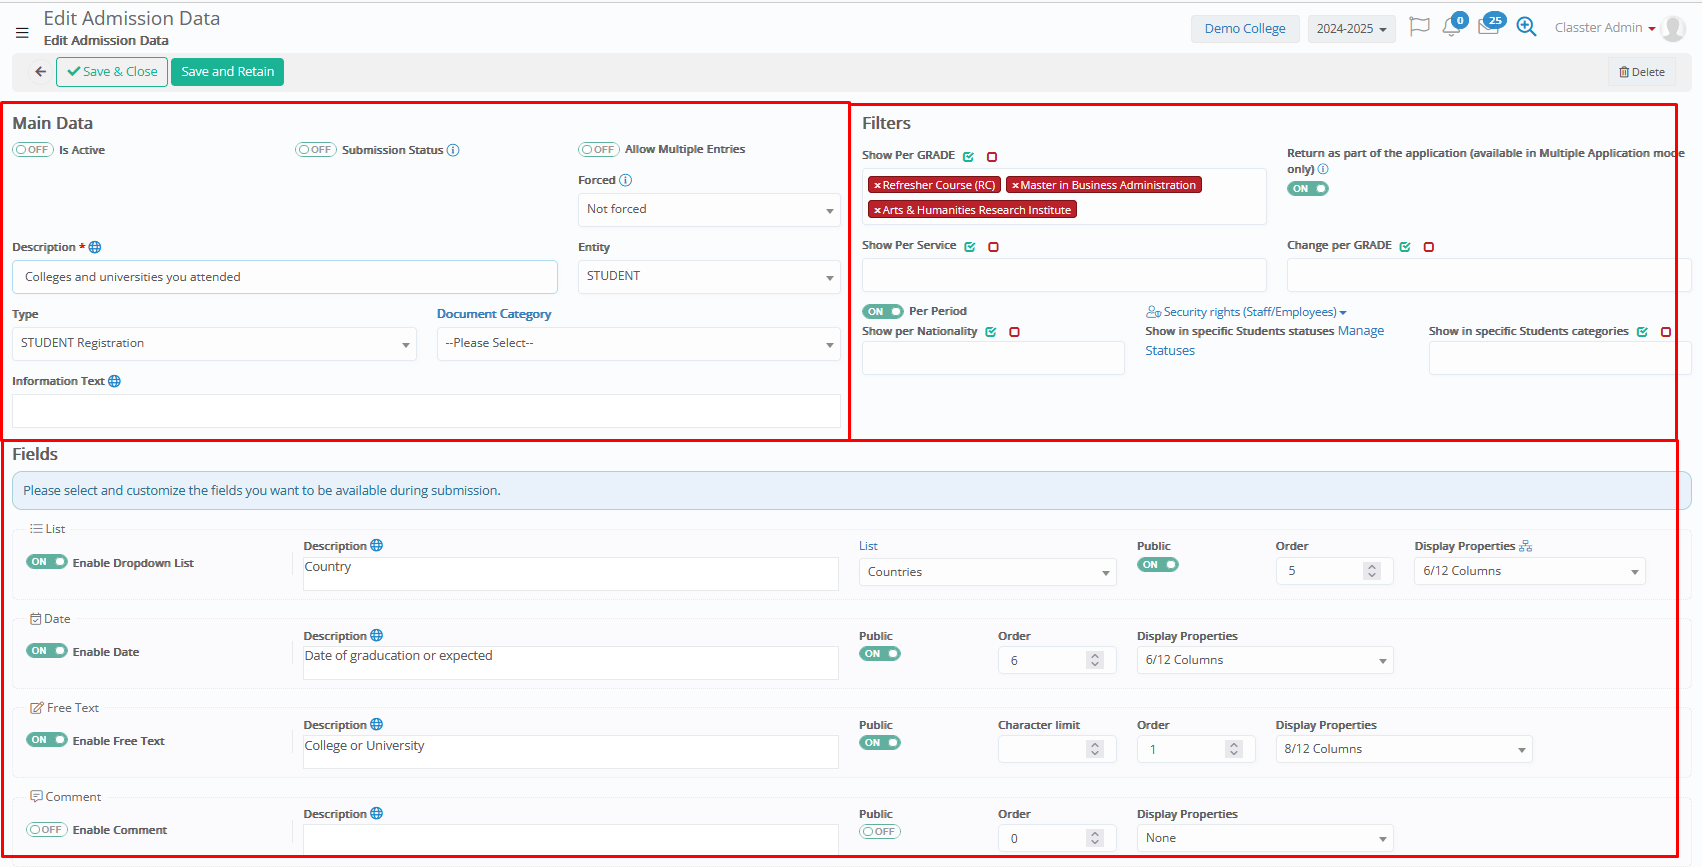
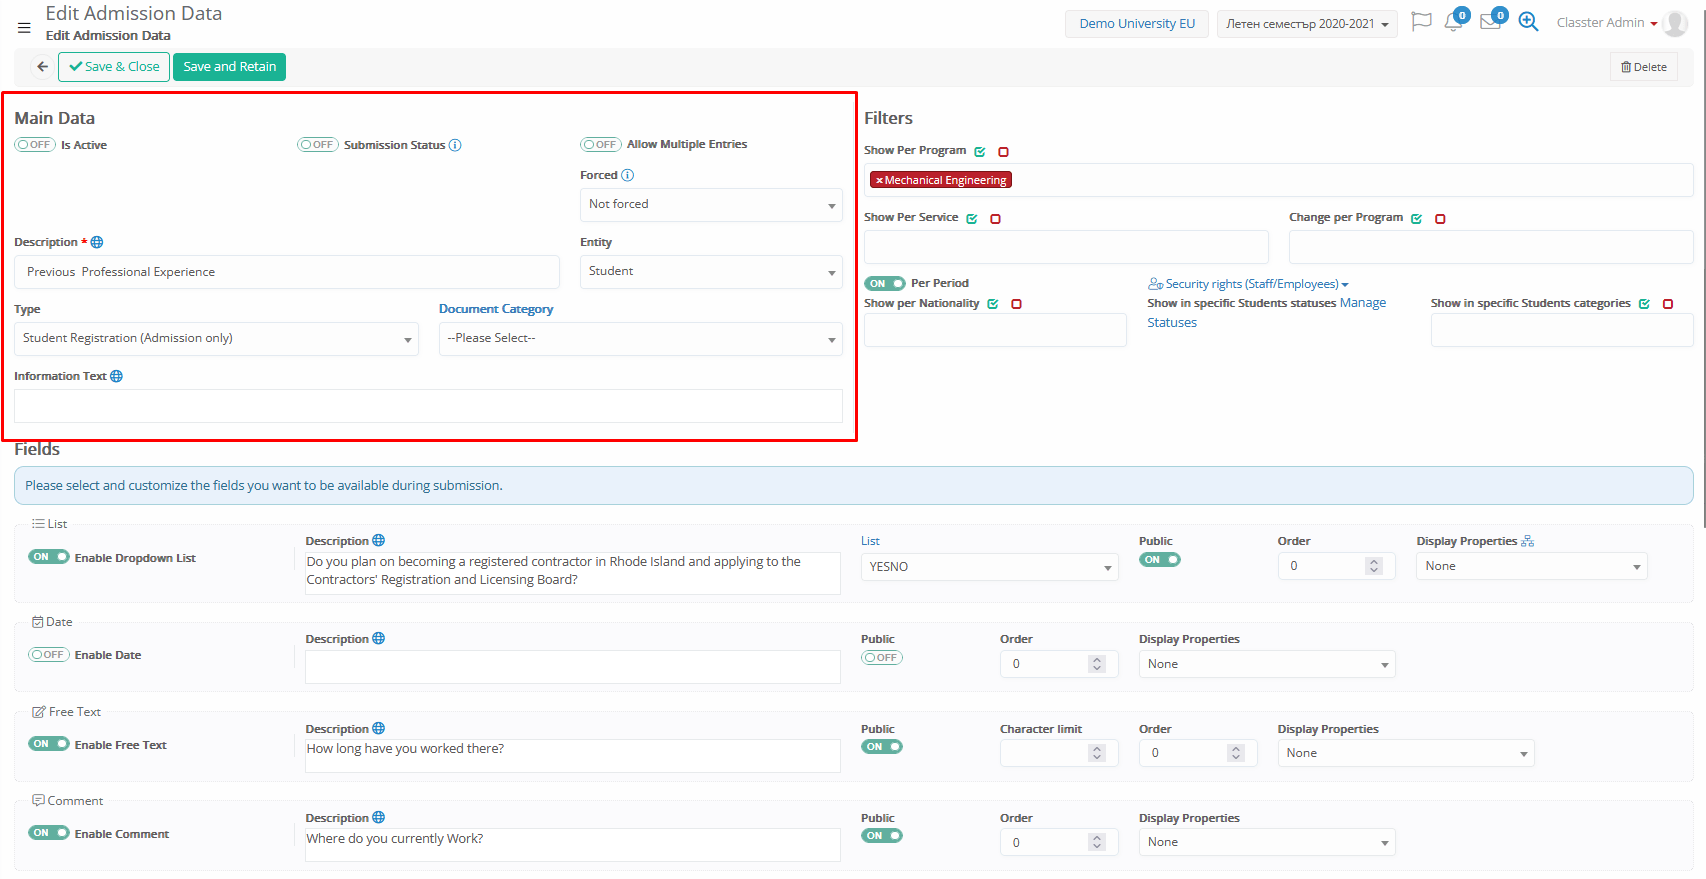
Main Data
This section defines the core properties that define the functionality and audience of the admission data.
Fields
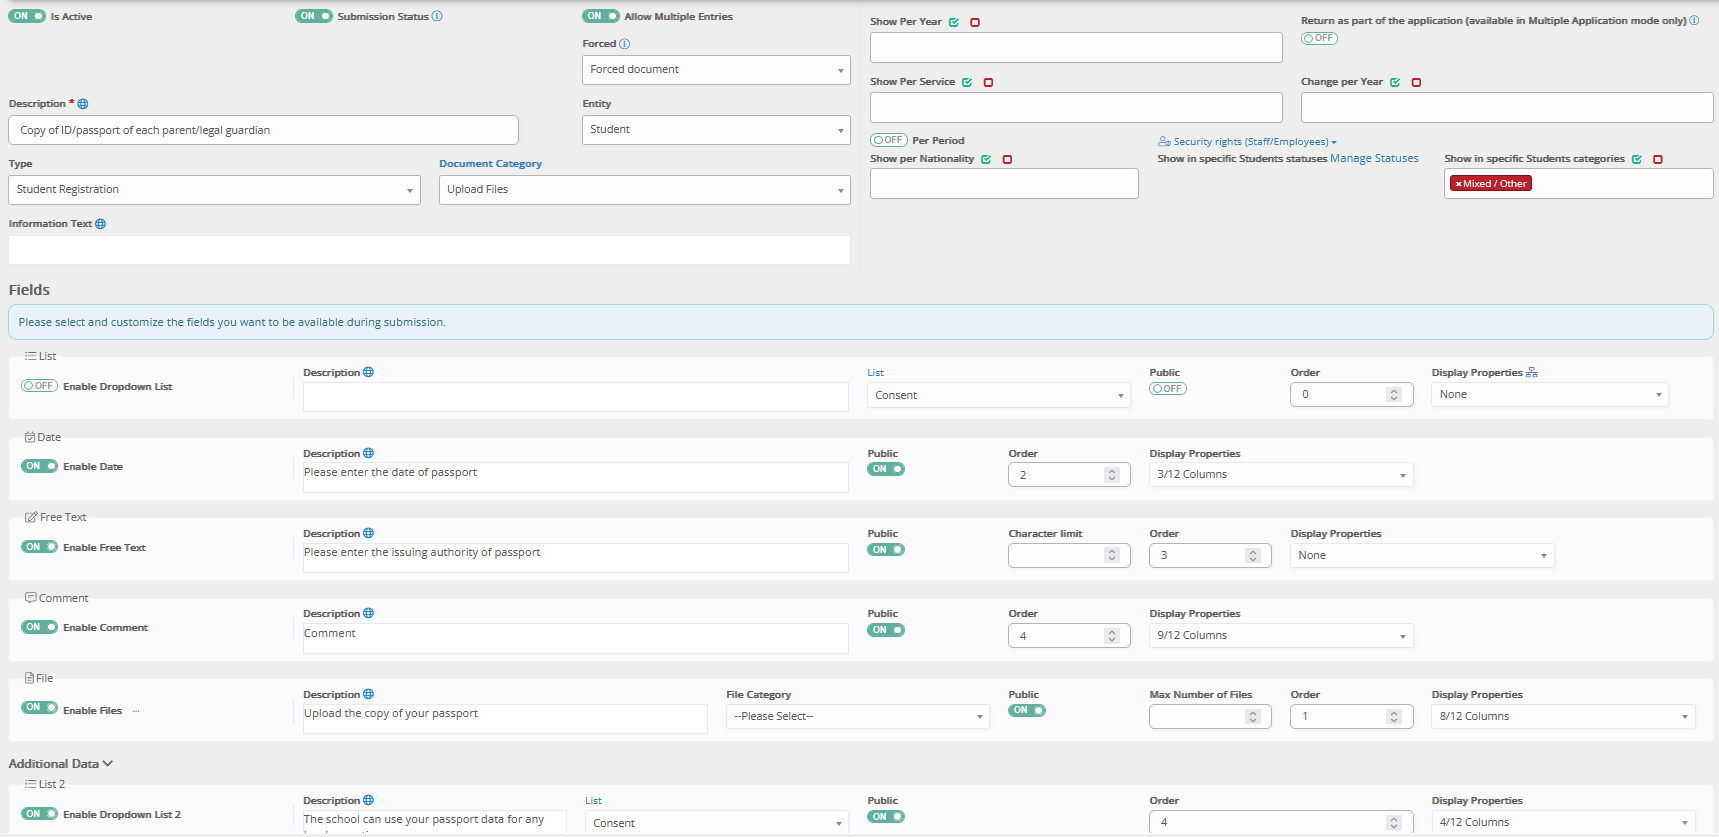
- Is Active: Toggle this ON to activate the data form for display and collection.
Please note that inactive data retain the submissions but will not appear for new submissions in portals. Also, inactive consents will not appear in lists (such as students per consent).
- Submission Status: Only for admins/back-office users. This property will enable a toggle for internal review of the submitted data:
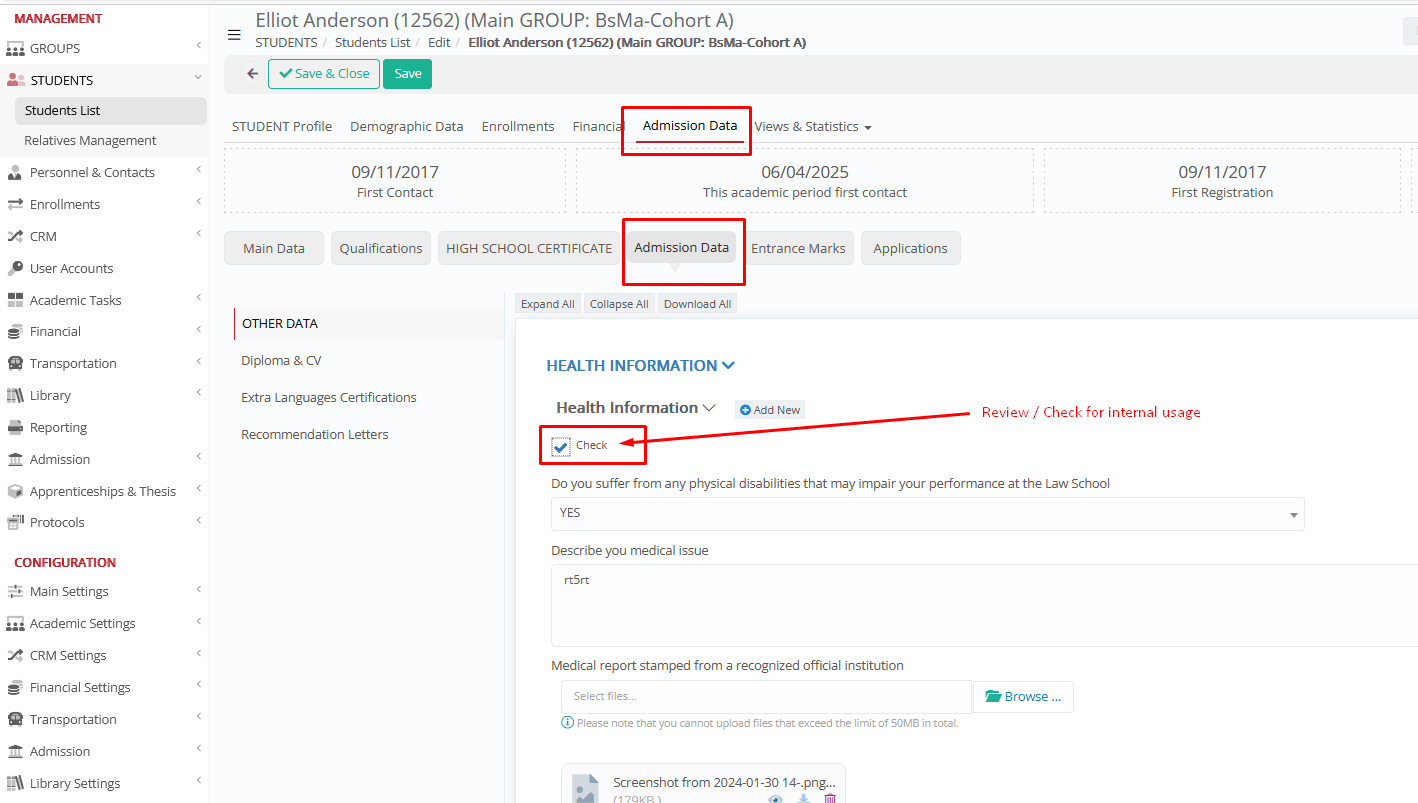
- Allow Multiple Entries: Enable this if users should be allowed to submit this admission data more than once (for multiple possible answers, such as multiple separate work experiences, health information etc.).
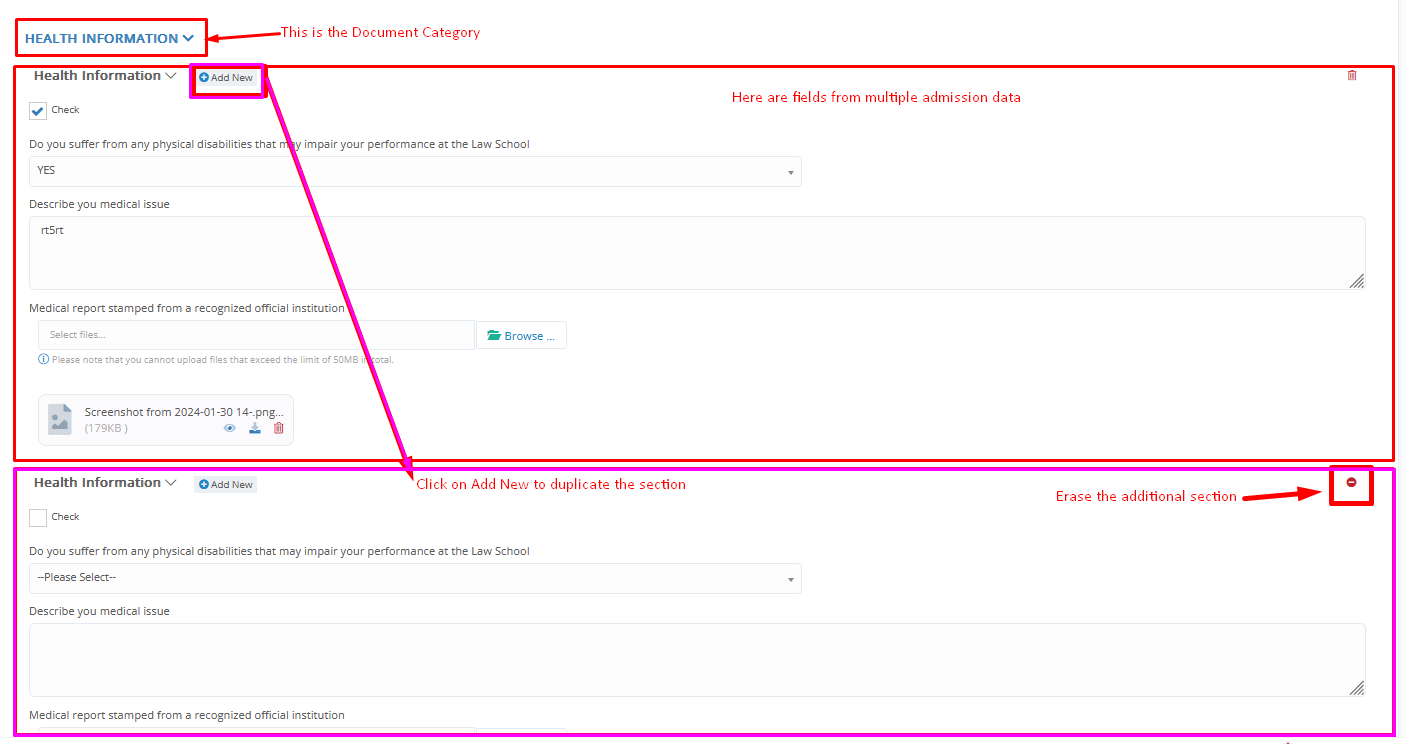
Please note that if you are using the ‘Document Category’ grouping/section, with unified layout, you must enable this property through the Document Category, so the entire section will be duplicated.
- Forced: Defines how the data form is enforced to enrolled users’ portal.
- Not Forced: Users may optionally submit the data.
- Forced Document: Users must answer the data (cannot skip).
- Forced Per Student Status: Refers to consents connected to students. Students must submit the data upon every status change (cannot skip). (Data must be answered again for each status the student passes)
Please note that for the Admission process, there is a separate setting for the enforced documents, at CONFIGURATION > Admission > Admission Settings > ‘Applicants Portal’ Tab > ‘Admission Data & Consents’ section > ‘Required Admission Data (registration documents)’ setting.
- Description (Recommended): A title for the admission data form/section. Questions will be added in the fields below.
- Entity: Select the type of user for the data to collect. Options: Student, Teacher. (Parent/Guardian will automatically be the user in case the student is minor)
- Type: Define where the admission data will be shown. Options:
- Students Registration: Data form will appear during admission process and statuses for both the applicants’ portal and the back-office portal in the student card.
- Students Registration (Institute only): Data form will appear during admission statuses, only for back-office users at the student card. (Used in admission data that must be submitted from the institute)
- Students Registration (Admission only): Data form will appear during admission process in the applicants’ portal.
- Students Registration (Re-registration): Data form will appear during re-registration to next academic period only.
- Document Category: Organize your admission data using the document categories. You can connect multiple admission data forms under the same document category, so they will appear in the same section in the consent forms (design) – (using the ‘unified layout’ property in the category). E.g. ‘Work experience’ including admission data forms for ‘previous work experience’ and ‘current work position’.
Additionally, you can set the ‘Allow Multiple Entries’ property in the category, so the users will be able to submit multiple times the entire same section of data, to add multiple answers:
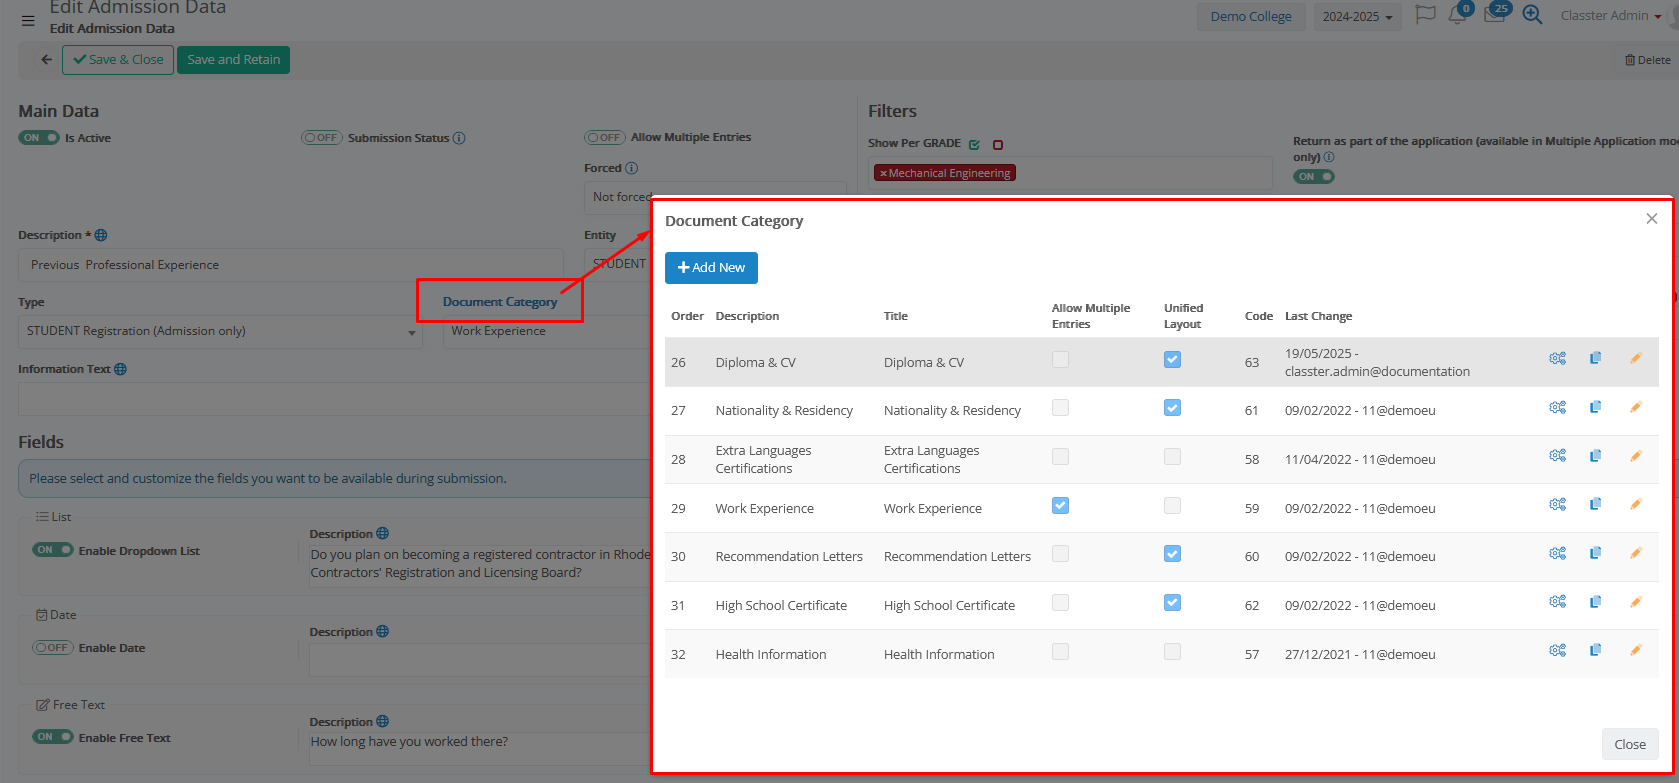
Document Categories are configured from CONFIGURATION > Main Settings > Dropdown Lists > Type: ‘System’ & Dropdown list: ‘Document Categories’. (Used for both consents and admission data)
Or by clicking on the Document Category Label in the admission data form:
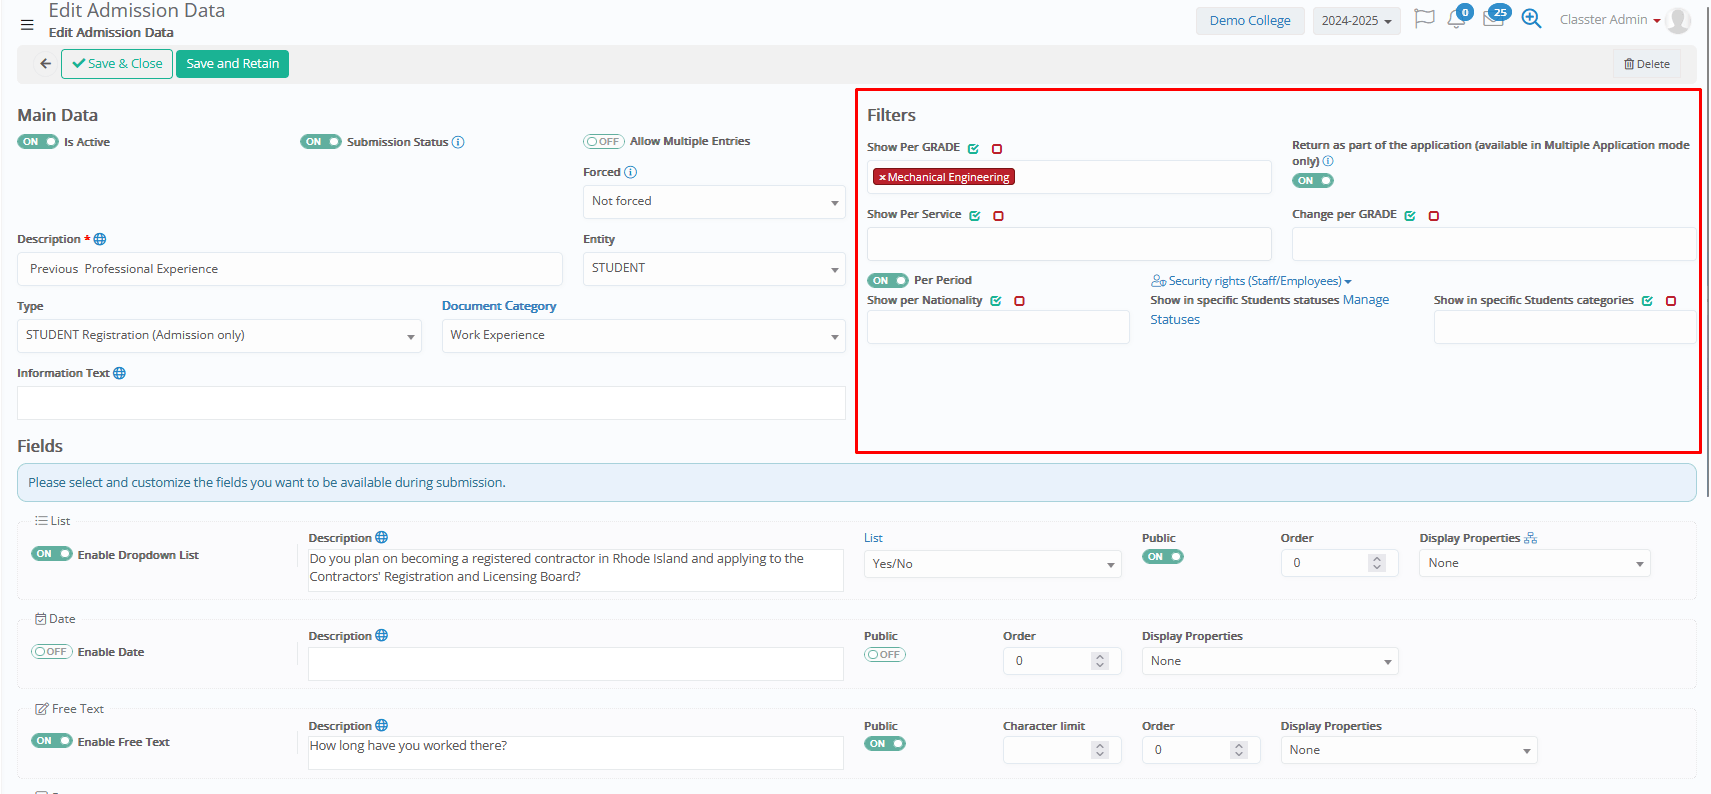
Filters
Filters determine the visibility and availability of the admission data form to different user segments.
Fields
If you enable this filter, then the data will only be visible to students enrolled or applying to the selected _Grades_. If you leave the filter empty, then no filter will be applied (visible to all _Grades_).
Please note that in the Admission process, in case of admission mode with Multiple Applications per applicant
(setting: CONFIGURATION > Admission > Admission Settings > ‘General Admission Settings’ Tab > ‘Enable Admission mode with Multiple Applications per applicant (if disabled, the “Application Auto-Creation” settings must be configured)’ setting)
this filter will affect the place where the data will appear: if this filter is enabled, the document will be returned as part of the final step of the application submission (after the _Grade_/Program selection and not in the first steps of personal data Tabs).
The exact next property can also overwrite this filter, even if this filter is empty.
- Return as part of the application (available in Multiple Application mode only): If enabled, in case of admission mode with Multiple Applications per applicant
(setting: CONFIGURATION > Admission > Admission Settings > ‘General Admission Settings’ Tab > ‘Enable Admission mode with Multiple Applications per applicant (if disabled, the “Application Auto-Creation” settings must be configured)’ setting)
the document will be returned as part of the final step of the application submission (after the _Grade_/Program selection and not in the first steps of personal data Tabs).
- Show Per Service: Enable the data only for Students enrolled or applying to the selected services/activities (e.g., Transportation, Library).
If you leave the filter empty, then no filter will be applied, and no check will be done to the students’ services.
- Change per _Grade_: Enable the filter for specific _Grades_/Programs, to ask for submission for each relevant educational program of the student. With this property, the consent will be (repeated) asked and submitted separately for each _Grade_/Program the student is enrolled or applying for.
Please note that in the Admission process, in case of admission mode with Multiple Applications per applicant
(setting: CONFIGURATION > Admission > Admission Settings > ‘General Admission Settings’ Tab > ‘Enable Admission mode with Multiple Applications per applicant (if disabled, the “Application Auto-Creation” settings must be configured)’ setting)
this filter will affect the place where the data will appear: if this filter is enabled, the document will be returned as part of the final step of the application submission (after the _Grade_/Program selection and not in the first steps of personal data Tabs) and for each application submission.
- Per Period (Toggle On/Off): Activate this to configure data that are repeated in every academic period. With this property, the data will be asked and submitted separately for each academic period (e.g. year, semester).
- Security Rights (Staff/Employees): Apply view privileges for the data submissions (if no filter applied, then all users with relevant Role permissions, will be able to see the submissions):
- Visible only by admins
- Visible to _Teachers_
- Show Only To Specific Roles (with an additional pop-up window to select the Roles)
- Show per Nationality: Target specific nationalities for which the data are relevant (e.g., local vs international students). If you leave the filter empty, then no filter will be applied, and no check will be done to the students’ nationalities.
- Show in Specific Student Statuses: Select specific Student statuses where the data apply. If you enable the filter, then the system will check the students’ statuses from their educational program(s), whereas if you leave the filter empty, then no filter will be applied and the consent will appear in any status in the students’ portal (admission statuses, registered statuses, alumni)
- Show in Specific Student Categories: Select specific student categories where the data apply (adults, minors, locals, internationals, normal, special, etc.).
Student categories are configured from CONFIGURATION > Main Settings > Dropdown lists > Type: Student & Dropdown list: General Category.
Fields and Additional Data
In this section, define the exact questions and data, the users must answer/provide during the consent submission.
You will find different field types to enable, such as
- dropdown list questions
- date fields
- free text fields
- upload files/documents
Main Fields
Fields configuration
- Enable field (toggle): Activate/Use the field.
Please note that in order to make the field visible to end users’ portals, you must enable the property ‘Public’ as well. Otherwise, the field will only be visible to admins/back-office.
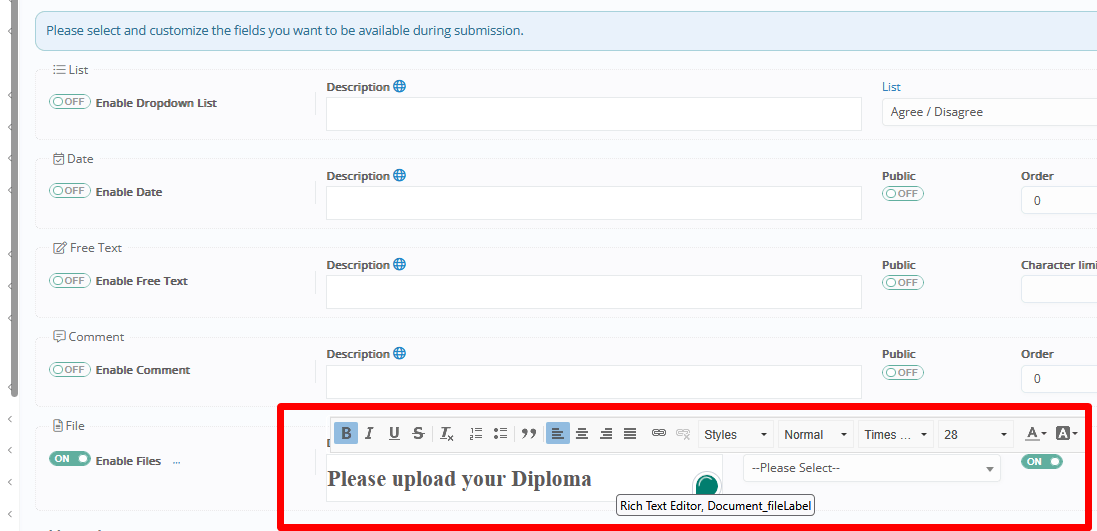
- Description: Here you type the question(s) for the end users.
For example, ‘Where do you currently Work?’, or ‘Please upload your Certifications’ etc.
The type of field you choose depends on the type of the question (e.g. the answer must be an option from a dropdown list? Free text, a date or file upload?).
Please note that you can also edit the text format of the questions, like below:
- List (only for dropdown list answers): Select the dropdown list of answers for this question.
If you click on the Label of this field, a pop-up window will open to configure any custom dropdown answers you may need:
From this window you can manage the available dropdown lists and their values.

Example: A standard drop-down list of certification levels (bachelor, master etc.), or Countries, supported Sponsorships etc.
- Public: Determines whether this field is visible to the end users’ portals (Students, Guardians, Agents etc.). If you leave this field disabled, then the question will only be visible to admins/back-office users.
- Order: When you have multiple questions enabled, you can set the desired display order of the questions, at the users’ portal form.
- Display Properties: Select the display property, such as 1/12 Columns, 2/12 Columns, Full row, etc. for the users’ portal form.
Examples:
Option: ‘None’, ‘Full row’
Option: ‘6/12 Columns’
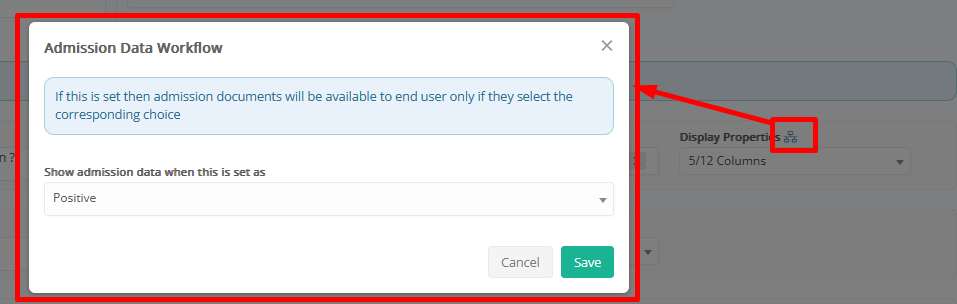
Advanced settings in Display properties: Available only in the first dropdown list question. Here you can define all the other questions’ visibility rule.
Based on this question’s dropdown list of answers (e.g. Yes/No, Local/International, with the relevant answers set as ‘Positive’), if you select the ‘Positive’ (or negative based on your setup) answers here, the system will have all other questions hidden by default, and only when the user submits the first answer and if the answer is Positive, then all other questions will dynamically open for submission as well.
Example:

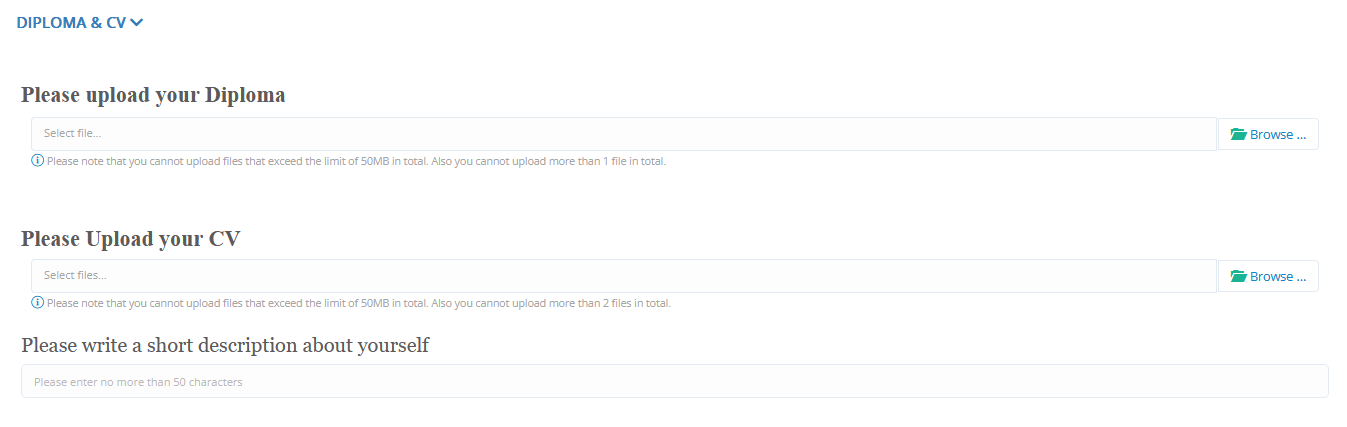
- File Category (only for File fields): Select the file category, under which all the uploaded files/documents for this question will be saved.
File categories are configured from CONFIGURATION > Main Settings > Dropdown lists > Type: Student & Dropdown list: Files Category, where you can also set visibility rules for users.
- Max number of Files (only for file fields): The system will allow multiple fields upload by default, for a single question. We recommend to limit this as per your needs to a maximum number of files allowed.
Additional Data Fields
In case the main data fields are not enough for your required questions/data, you can open the additional data fields, to open for fields for the current section.
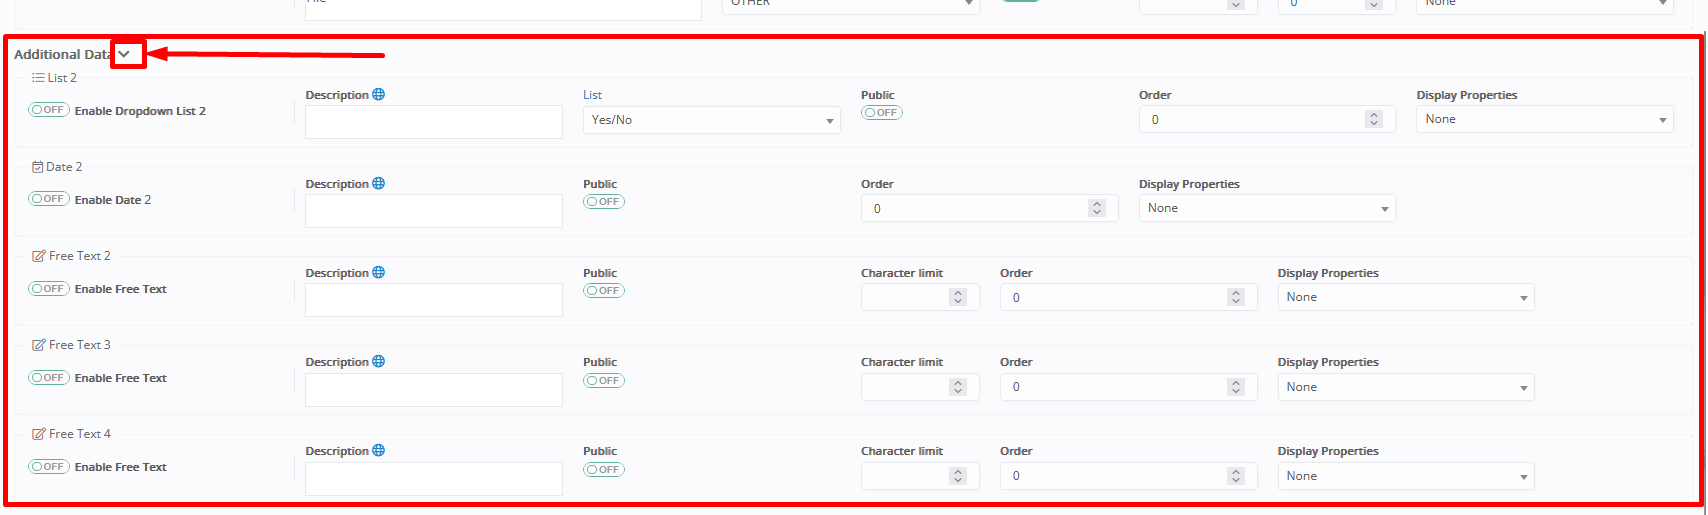
Here you will find more fields of
- Dropdown
- Free Text
- Date
And the configuration is the same as explained in the main fields above.
Order is common between the two sections.
In addition to this solution, creating multiple admission data forms, under the same document category (with unified layout), will also result in a common section with multiple questions/fields.
Settings & Dropdown Lists
Relevant General settings can be found at the following path:
CONFIGURATION > Main Settings > General Settings > ‘_Student_/Parents Portal’ Tab > ‘Personal Data Management’ section
Setting to enable admission data to registered students’ users’ portals
Relevant Admission Settings can be found at the following paths:
CONFIGURATION > Admission > Admission Settings > ‘Applicants Portal’ Tab > ‘Basic Settings’ section
Setting for enabling admission data functionality during application submission.
CONFIGURATION > Admission > Admission Settings > ‘Applicants Portal’ Tab > ‘Admission Data & Consents’ section
Settings for required data upon admission, layout/design of data and categories, and status related rules.
Relevant Online Re-registration Settings can be found at the following paths:
CONFIGURATION > Admission > Admission Settings > ‘Online Reregistration’ Tab > ‘Online Reregistration Tabs’ section
Settings to enable admission data in re-registrations, and set data as required
Case Examples
Example A:
Ask for passport documents and data from all guardians, for specific student categories, upon registration (admission), and allowing multiple submissions for the same data section (for each guardian).
Example B:
Ask for medical information for everyone through admission, and if disabilities exist (positive answer), then open new extra questions/files for the disability.