

Introduction
With the entity _Group_ at Classter, we refer to the group of people who have their lessons together (per _Subject_). A group may also be referred to as Class, Cohort, Section, Team, Club, etc.
The connection is triple: _Student_-Group-Subject, _Teacher_-Group-Subject, and the above definition applies to the triple connection (people have their lessons together for each enrolled group-subject combination).
Groups are at the core of Classter and are essential for:
- Enrollments/Linking Subjects: All _Subject_ enrollments must be connected to a group as well (Students/Teachers).
- Academic Features: Most of the academic features are based on the Student/Teacher connection to Groups and Subjects. Timetables, sessions, marking, assessments, etc. are for each group-subject combination.
- Connecting Teachers with their Students: The connection between a Teacher and his/her Students is based on their enrollments in Groups and Subjects.
- Organizing Integrations: Organize your users and their connections to the correct external LMS platforms’ courses, such as Moodle, Canvas, or Brightspace.
Terminology
You can change the terminology of _Groups_ from CONFIGURATION > Main Settings > Customize Terminology > search for ‘group’.
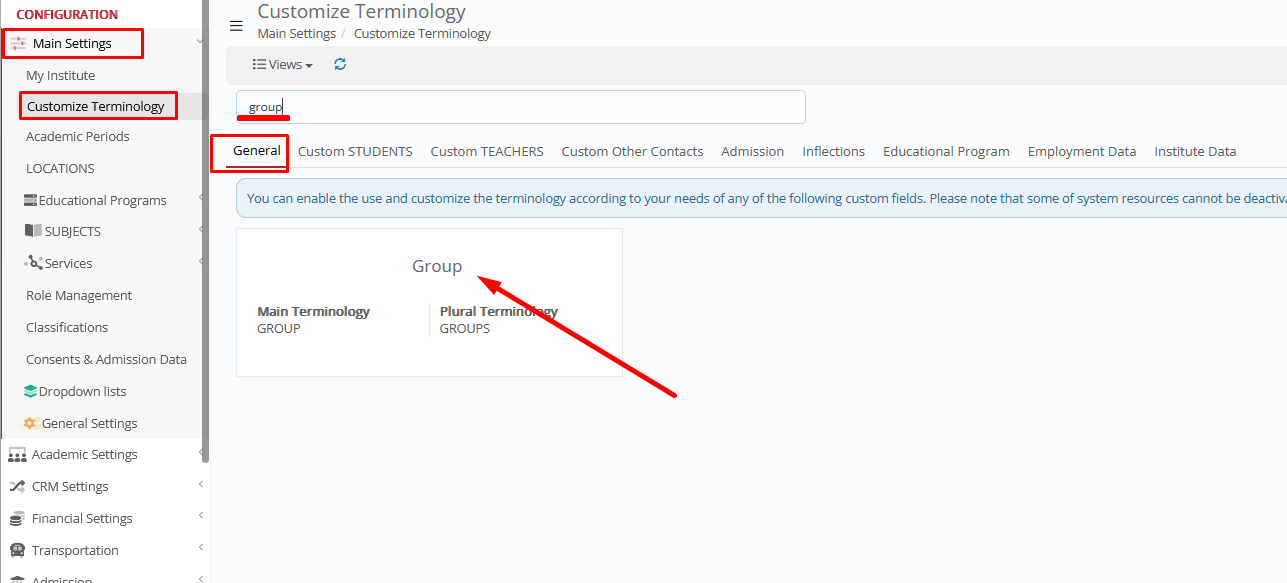
Change for every user language you have enabled in your installation.
Rights & Privileges
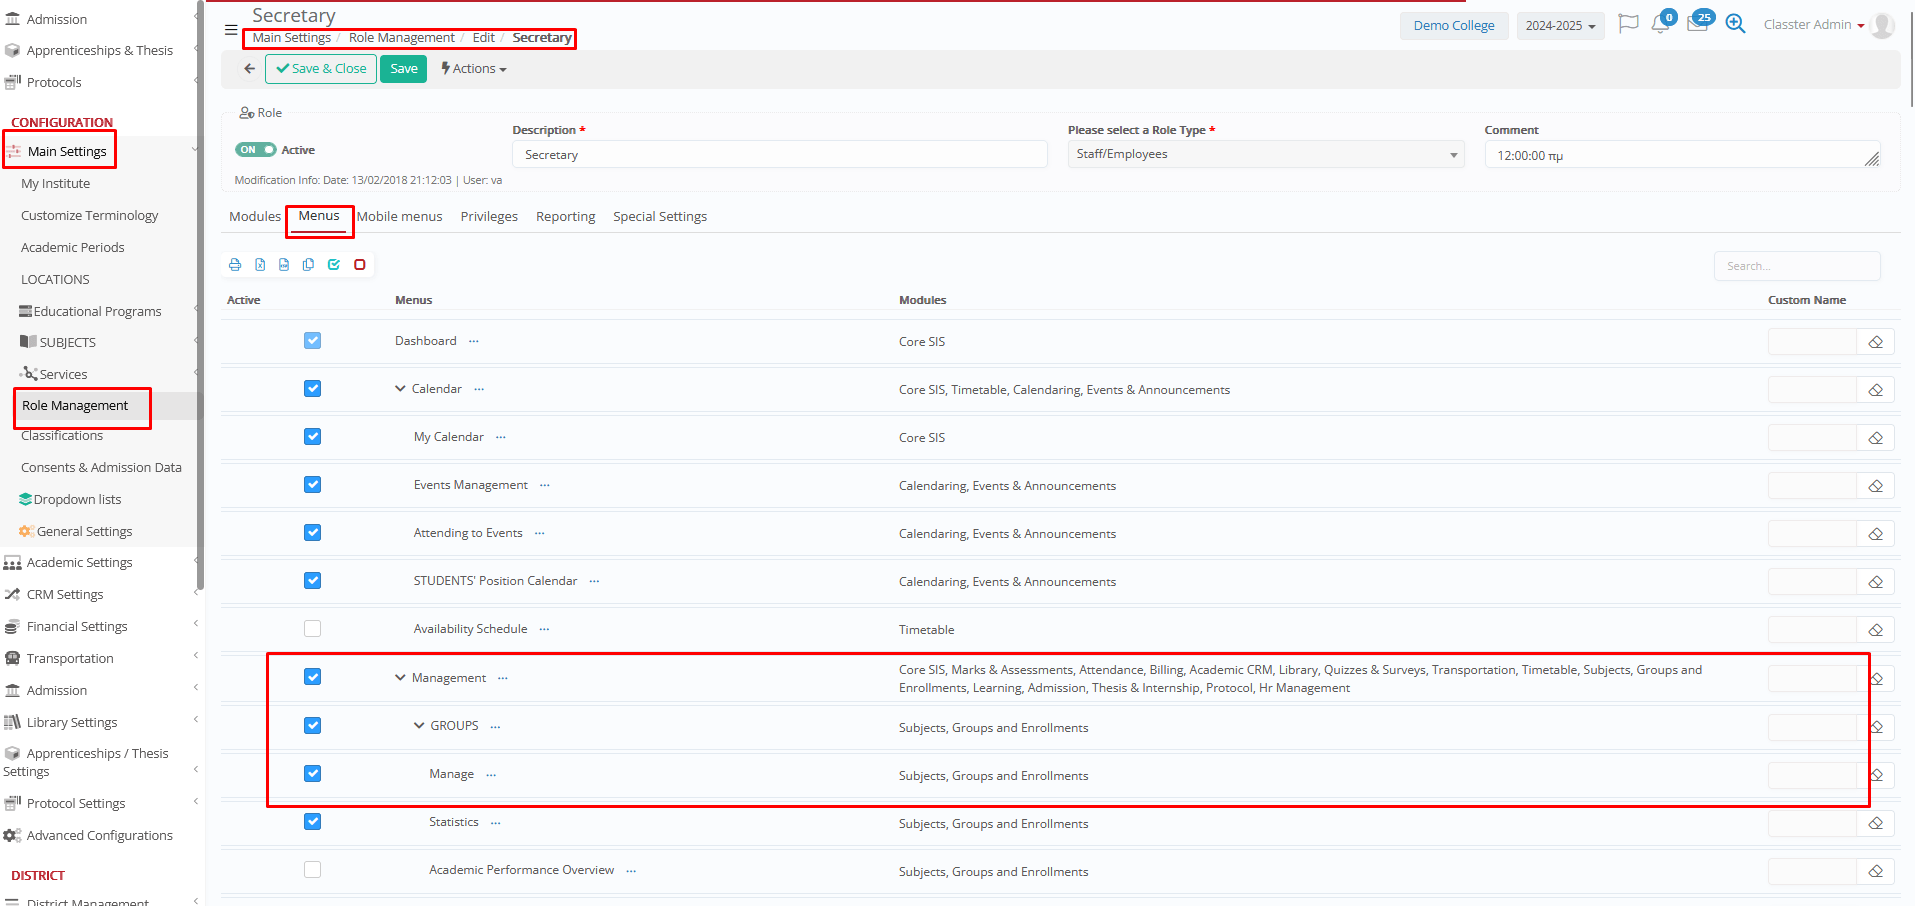
Administrators can control who can manage Groups and which actions they can perform by configuring Roles & Rights.
Navigate to: CONFIGURATION > Roles Management, select the role to configure (e.g., Secretary).
You will find relevant privileges as follows:
Note: You can search for _Group_ settings as per your terminology.
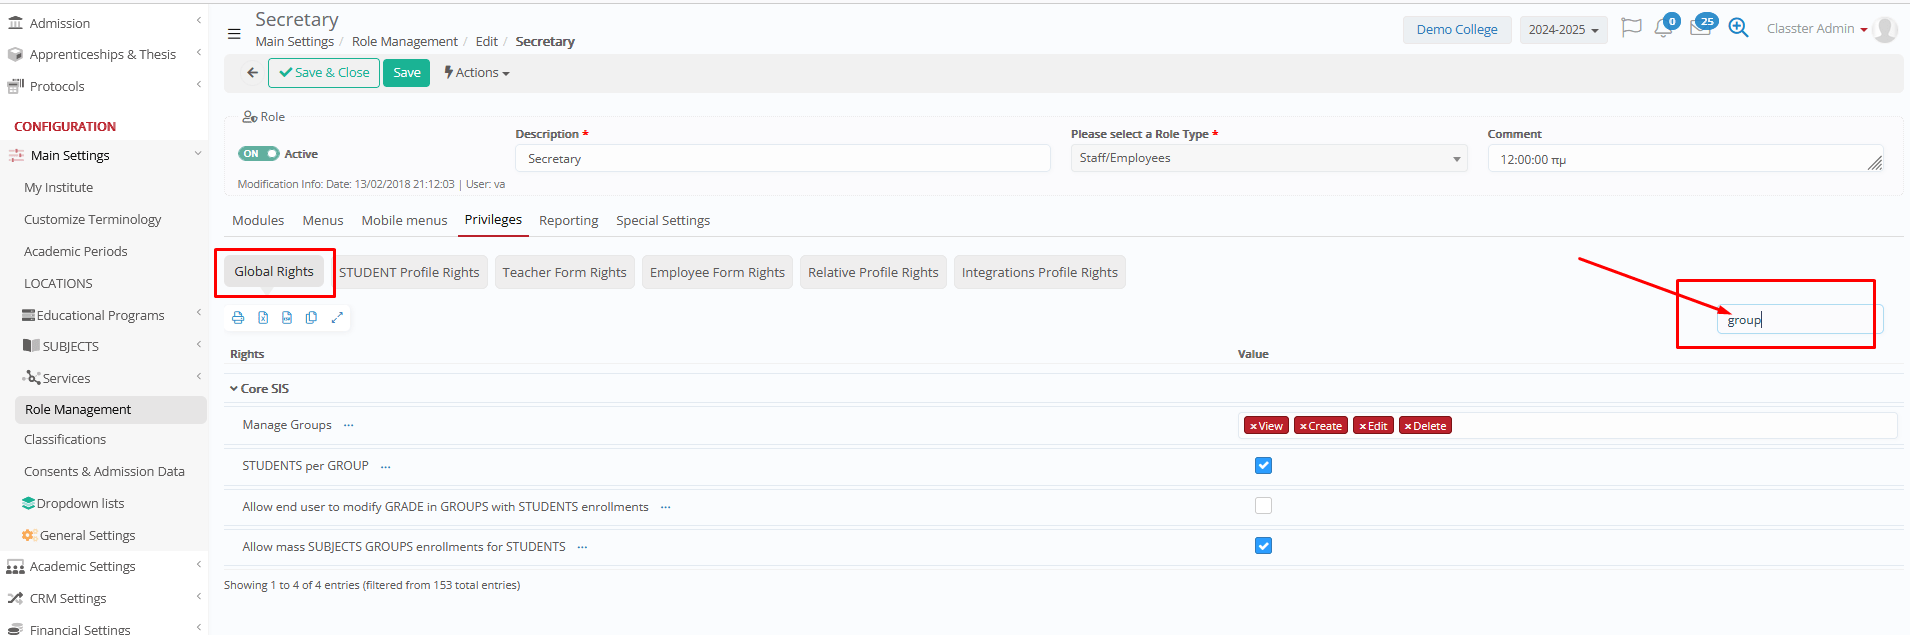
Recommendation: For data protection and system integrity, restrict “Delete Groups” and “Mass Enrollments” to administrators or coordinators only.
_Group_ Card
The Group Card is organized into multiple Tabs, based on the systemic module and content.
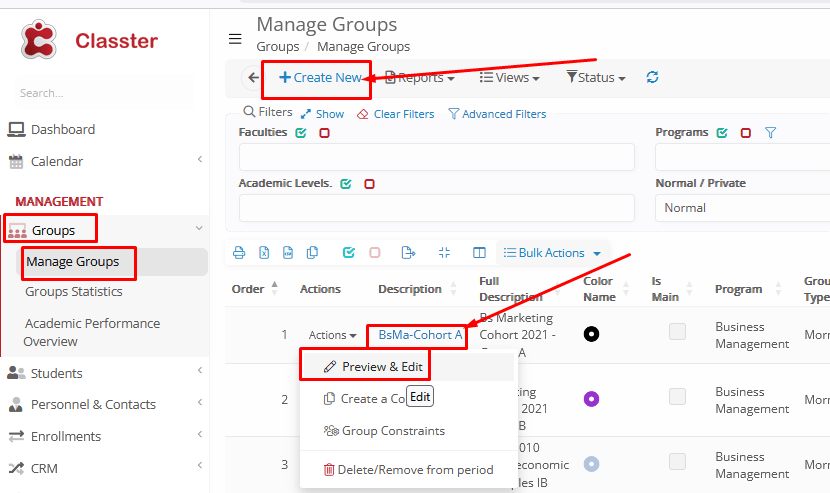
You can create a New _Group_ using the relevant option at the top of the list of groups, or edit existing groups by clicking on their Title in the list (or using the option: Actions > Preview & Edit.
Notes:
- When creating a new group, the option ‘Actions’ and the tabs: ‘Timetable’, ‘Sessions’, and ‘Students’, will not appear until you save/create the group.
- When editing an already saved group, all options will be available.
Reports & Actions
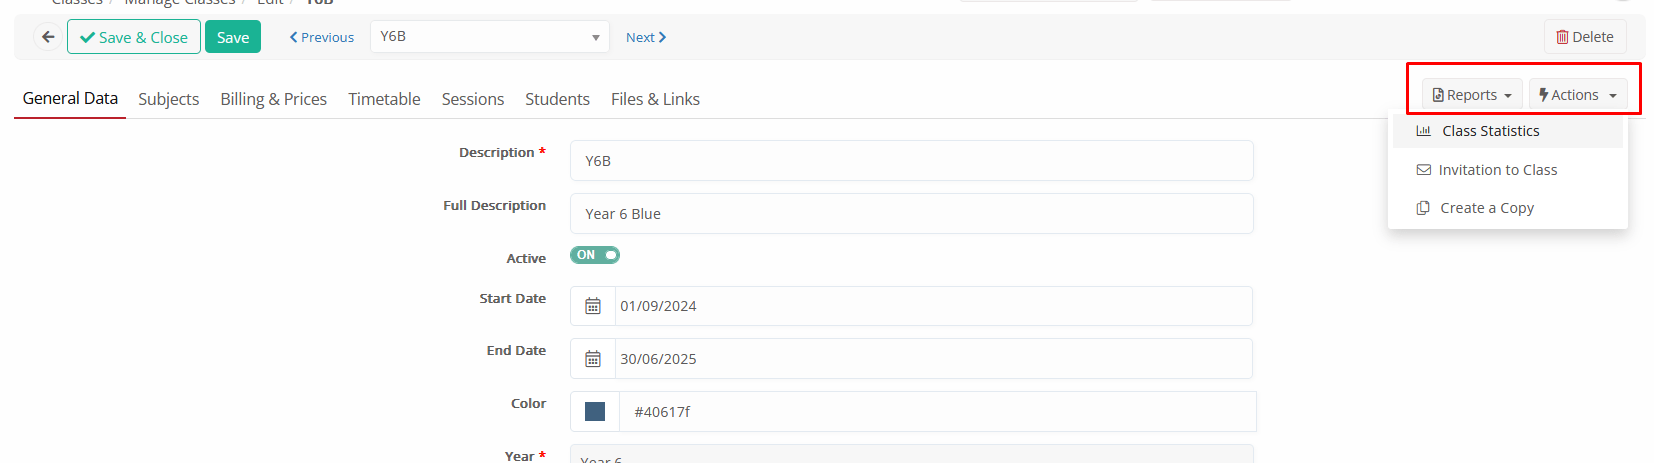
Reports
- List of available group reports, based on the User’s Role privileges (enabled reports). A list of default custom reports will be available, generating printable or exportable reports related to the Group (e.g., enrollment reports).
Actions
*Available in already saved groups.
- Group Statistics: Displays important info of enrolled people (students with contact-medical info, teachers, etc.), Statistics related to assessments, Gradebook marks, Attendance, etc. (Same view as in menu MANAGEMENT > _Groups_ > _Groups_ Statistics)
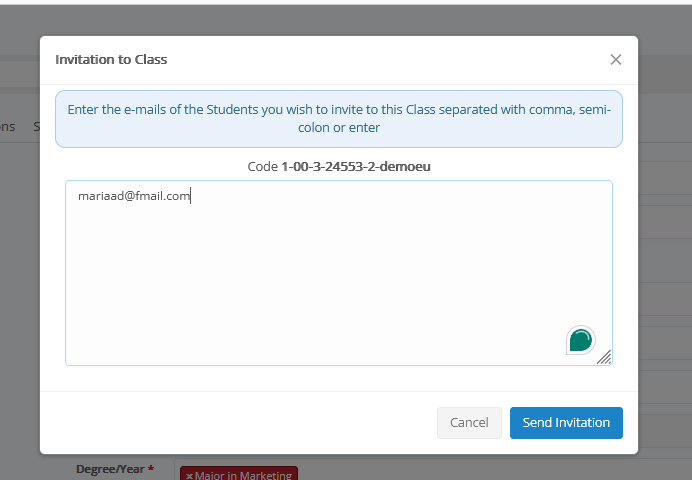
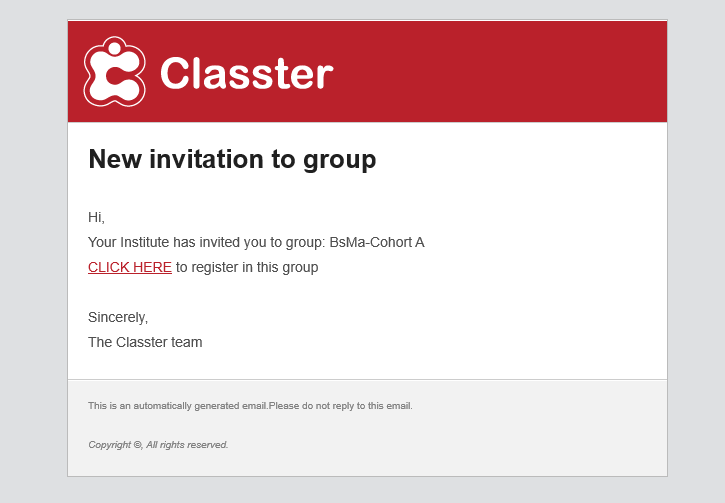
- Invitation Groups: Invite New Students by entering their e-mail addresses, to self-enroll in the Group. This is a special functionality for non-existing students, with the following process:
- Back-office User invites new students by entering their e-mail addresses.
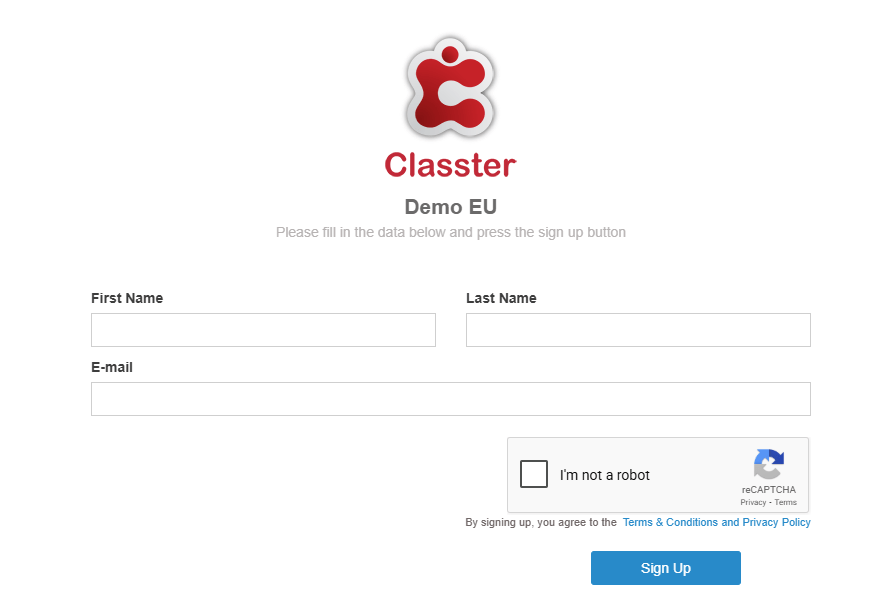
- The students receive an invitation e-mail with a link to sign up and enroll in the group.
- After they complete the Sign-up using this link, they will receive an email with their personal credentials to verify their Account
- After the Verification, they are saved in the system as Registered Students, automatically enrolled in the default _Grade_/Program and _Stream_ of the group, and added to the group.
- Create a Copy: Opens the ‘Create New’ card, with all fields at ‘General Data’, ‘_Subjects_’, and ‘Billing & Prices’ Tabs prefilled as per the group copied. You can make the required changes before Saving/Creating.
For similar groups, like ‘Main Group A1’ and ‘Main Group A2’ of ‘Grade/Year A’, or ‘MBA Cohort 2026’ and ‘MBA Cohort 2027’.
General Data
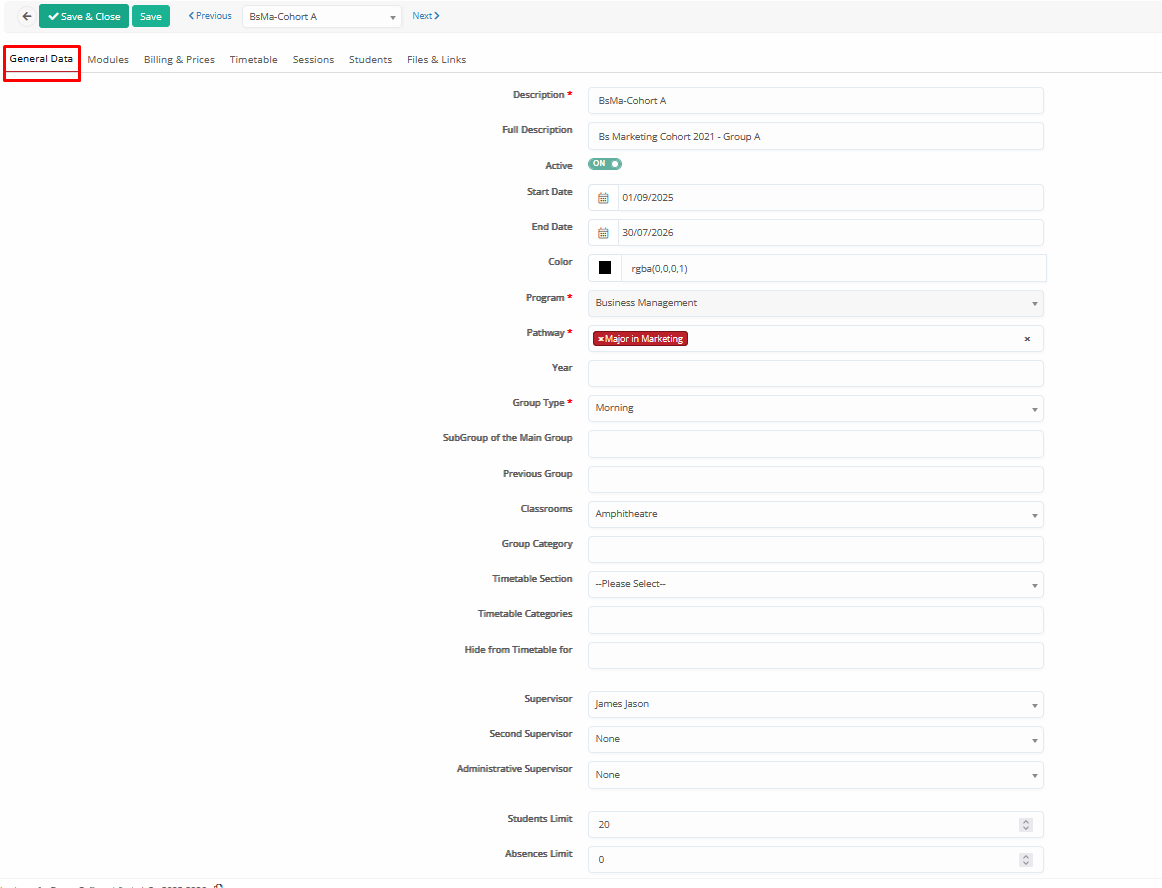
This tab contains the core information and settings for the Group:
- Description: Short name, label, or code for the Group (e.g., ‘Y1 A’, ‘MBA Feb26’)
- Full Description: Full descriptive group title (e.g., ‘Year 1 – Class A’, ‘Cohort MBA February 2026’)
- Active: Indicates whether the Group is active in the current period.
- Start Date / End Date: Defines the active timeframe of the Group in the current academic period (no limitations, just informative, you can simply use the start-end dates of the academic period)
- Color: Assigns a color for visual identification in various lists (e.g., list of groups, timetable special views, custom reporting)
- _Grade_: The default associated _Grade_/Program.
At K-12 mode: The default _Grade_/Year is usually the one that limits the allowed enrollments to students, but you can still skip the rule as admins if needed.
At College/HE mode: In case the group is associated with one _Grade_/Program, then we define it here. In case the same group is associated with multiple _Grades_/Programs, we define one (random) _Grade_/Program as the default one here, and then we set up the others in the ‘Additional _Grades_’ field. The final configuration and structure are set in the Curricula.
At K-12 mode: The default _Stream_ is usually the one that limits the allowed enrollments to students, but you can still skip the rule as admins if needed.
At College/HE mode: In case the group is associated with one _Stream_/Year-Semester etc., then we define it here. In case the same group is associated with multiple streams, we define one random option as the default one here. The final configuration and structure are set in the Curricula.
- _Educational Program Category/Specialization_: Same as above. The default associated Educational Program Category/Specialization.
At K-12 mode: The default category is usually the one that limits the allowed enrollments to students, but you can still skip the rule as admins if needed.
At College/HE mode: In case of the group associated with one category, then we define it here. In case the same group is associated with multiple categories, we define one random option as the default one here. The final configuration and structure are set in the Curricula.
*You can find more information about the above three entities in the Basic Institution’s Setup manuals.
- _Group_ Type: Organize your groups per type, such as Main, Foreign, Morning, Afternoon, Distance Learning, Private Lesson, etc.
From the Type, you can define which groups are set as ‘Main’, with the relevant property set.
Group types are configured from CONFIGURATION > Main Settings > Dropdown Lists > Type: System & Dropdown list: _Group_ Type
‘Main’ Groups are based on the Property “Is Main” in the Types.
*Main groups of students are used mainly in filtering.
- Sub_group_ of Main _Group_: Since the current group is set as ‘Main’ (property at the group type explained above), we can set one or more subgroups under this group. Subgroups are used at the ASC Timetable imports, at supervisors’ mode (when they supervise the main groups, they can also see the subgroups), as well as at the timetable constraints when the main/parent group is occupied.
Example: The main group includes all the core subjects, and the sub-groups include extra subjects such as extra languages. Students from main groups may be split into subgroups, and the subgroups may include students from multiple main groups.
So, we have the Main groups “A1” and “A2”, and both include the subgroups “French1”, “French2”, “German1”, “German2” (different time slots). When we create the Timetable in Classter, in case we have a slot for subgroup “French1”, for example, the system considers the main groups “A1” and “A2” occupied as well (since, based on the configuration, at least one student is assigned to the subgroup).
- Previous _Group_: References to the previous academic periods’ group, such as ‘Year 2’ group with the previous group ‘Year 1’. Used in academic period transfers for automatic enrollment to the next main group and subjects, based on the current student’s main group.
- Classroom: Set a classroom as the default for the group. Used in timetable, sessions, etc., as preselected during creation.
CONFIGURATION > Academic Settings > Timetable > Classrooms.
- _Group_ Category: Categorizes the Group for organizational purposes (e.g., On-Campus, Online).
CONFIGURATION > Main Settings > Dropdown Lists > Type: System & Dropdown list: _Group_ Categories.
- Timetable Section: Connect a specific timetable section-zone to the group, such as “Afternoon 15:00-17:00”. The sections are also connected to timetable periods and students-per educational program, and are used for group filtering, and also at College mode during students’ enrollments (online or manual from back-office), limiting their options based on the timetable.
CONFIGURATION > Academic Settings > Timetable > Dropdown Lists > ‘Sections’ and ‘Zones’.
- Timetable Categories: Connect specific timetable categories (such as ‘Semester A’, ‘1st Trimester’, etc.) where the group will be allowed for timetable scheduling.
CONFIGURATION > Academic Settings > Timetable > Timetable Categories.
- Hide from Timetable For: Allows hiding this Group’s timetable from the selected user types’ Portal. Standard options by the system: Student/Parent portal, _Teacher_ Portal.
- Supervisor: Assigns a supervising _Teacher_ with extended access to marks and assessments across all _Subjects_ of the _Group_ (and subgroups). The supervisor mode must be enabled, and relevant settings can be found at CONFIGURATION > Main Settings > ‘Basic Customization’ Tab and ‘_Teachers_ Portal Rights’ Tab.
Supervisors must exist as _Teachers_ in the system.
- Second Supervisor: Assigns a secondary supervisor, with the same access as above. Supervisors must exist as _Teachers_ in the system.
- Administrative Supervisor: Assigns a non-academic supervisor (existing as ‘Back-office user in the system) for administrative responsibilities. This field is only informative.
- Students Limit: Defines the maximum number of students allowed for enrollment in the group. Used in enrollment processes (online or not) with the ability of admins to skip the rule if necessary.
- Absences Limit: Sets the maximum number of absences allowed in the group (from any associated subject). Can be used in reporting calculations.
- _Unauthorized_ Absences Limit: Sets the maximum number of unauthorized/unexcused absences allowed in the group (from any associated subject). Can be used in reporting calculations.
Advanced section:
- External ID: Identifier for integrations/migrations with external systems.
- External Timetable Code: Identifier for integration with external timetable systems such as the ASC timetable.
- Disable External Sync: Stops syncing this Group with external LMS systems.
- External Group Name: A custom group title for integrations with external systems (if empty, then the standard title-description fields are used).
- Comments: Any comment/note for the group.
- Enable Cross-Institute Teaching: For installations with multiple Institutes in Classter, the group can be used in cross-institute teaching (timetable, enrollments, etc.). With this functionality, the group is copied to the other institutes and (systemically) connected with a cross-institute code.
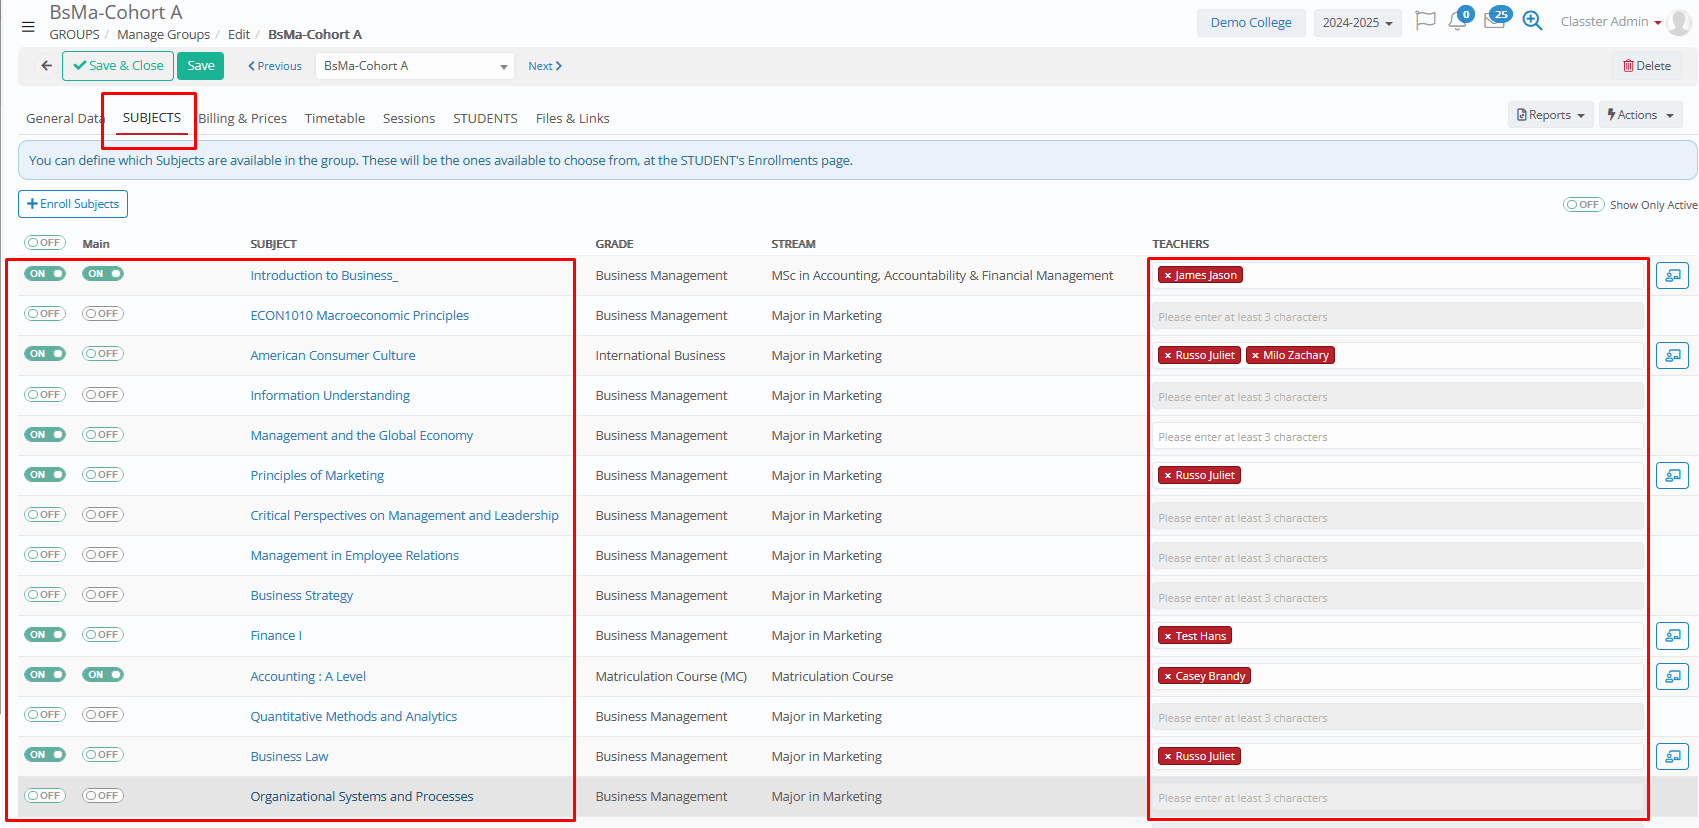
_Subjects_
Connect _Subjects_ to the _Group_ as available/predefined selections upon enrollment:
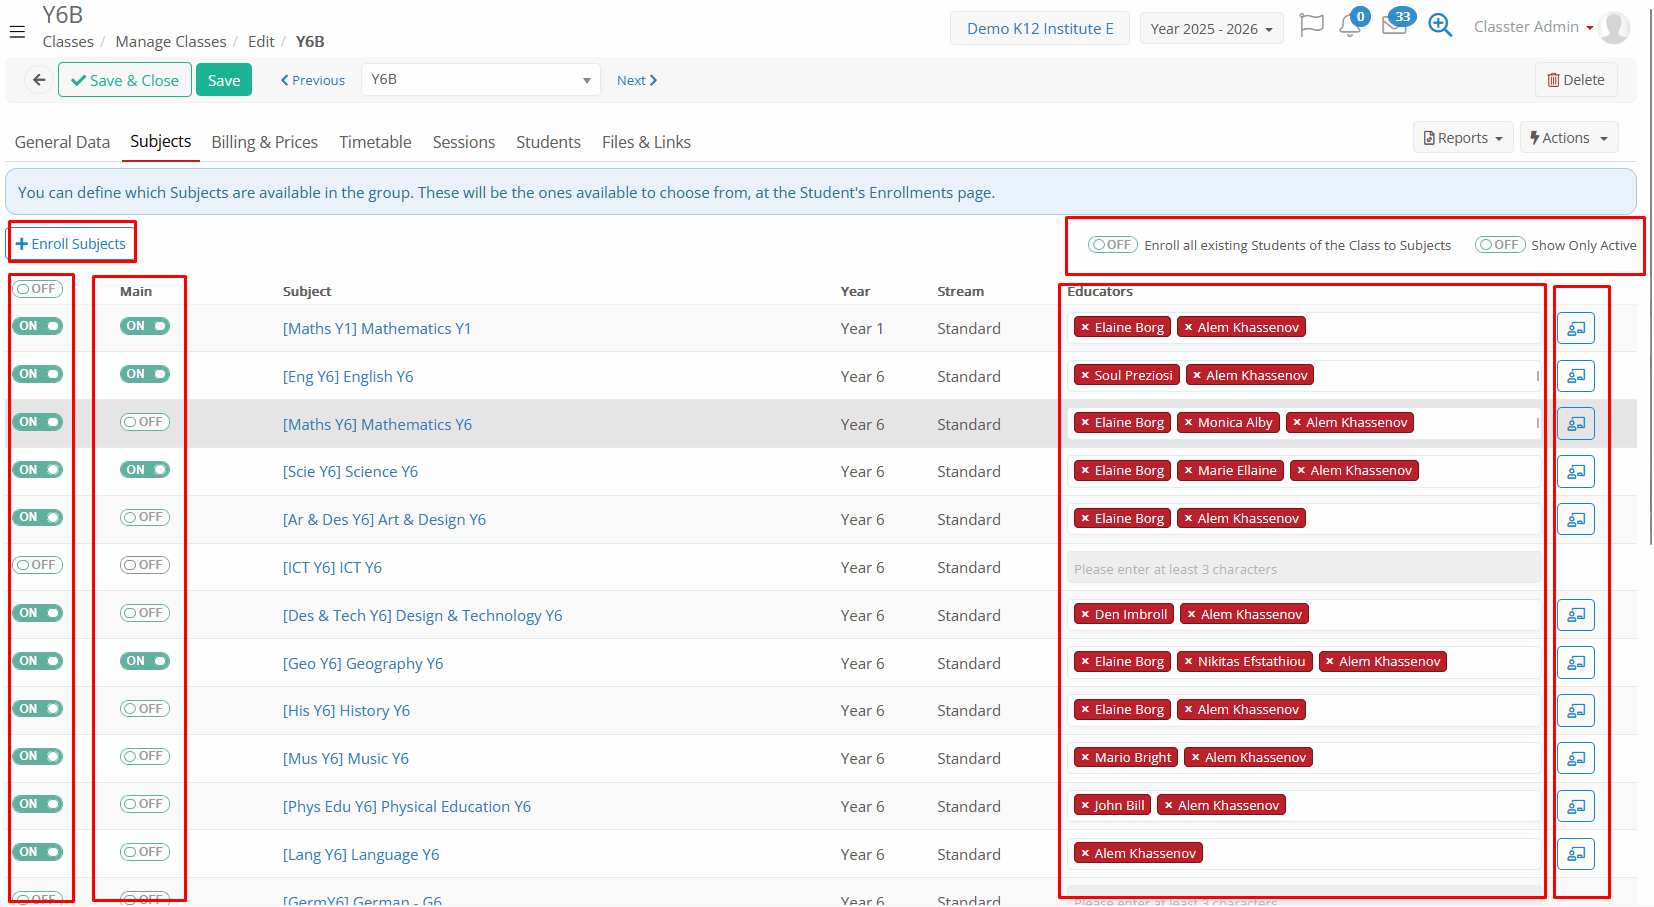
The system will automatically inherit all the subjects found, which are active and connected to the same _Grades_/Programs and _Streams_ with the group.
Options on the top:
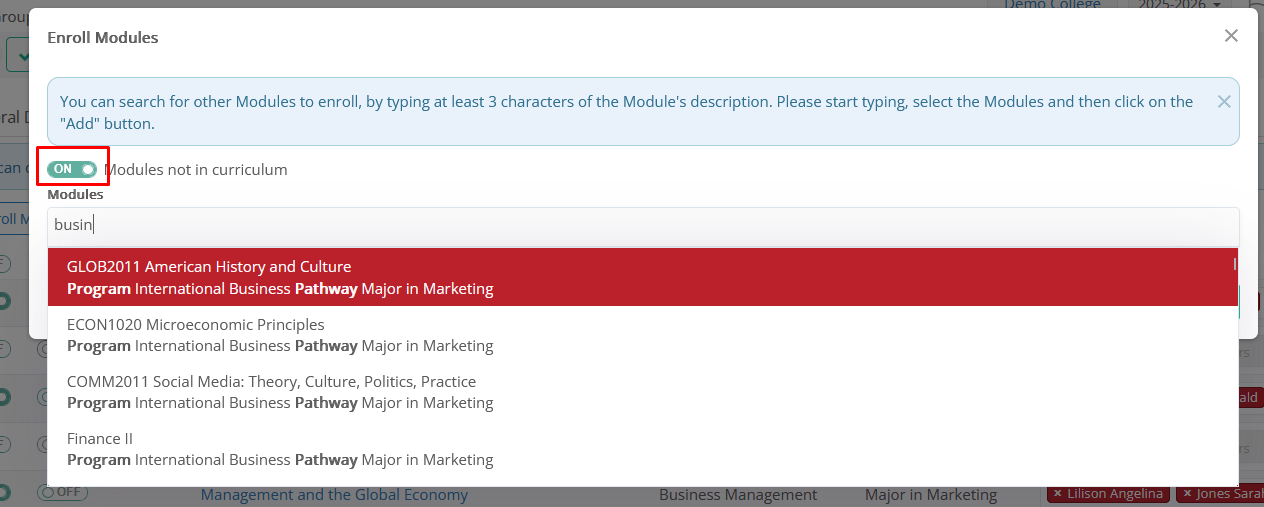
- + Enroll Subjects: Use this option to add subjects that are not automatically shown in the list (mainly are not connected to the same default _Grades_ & _Streams_). Start typing the subject title/description, and the system will fill in the dropdown with the relevant options.
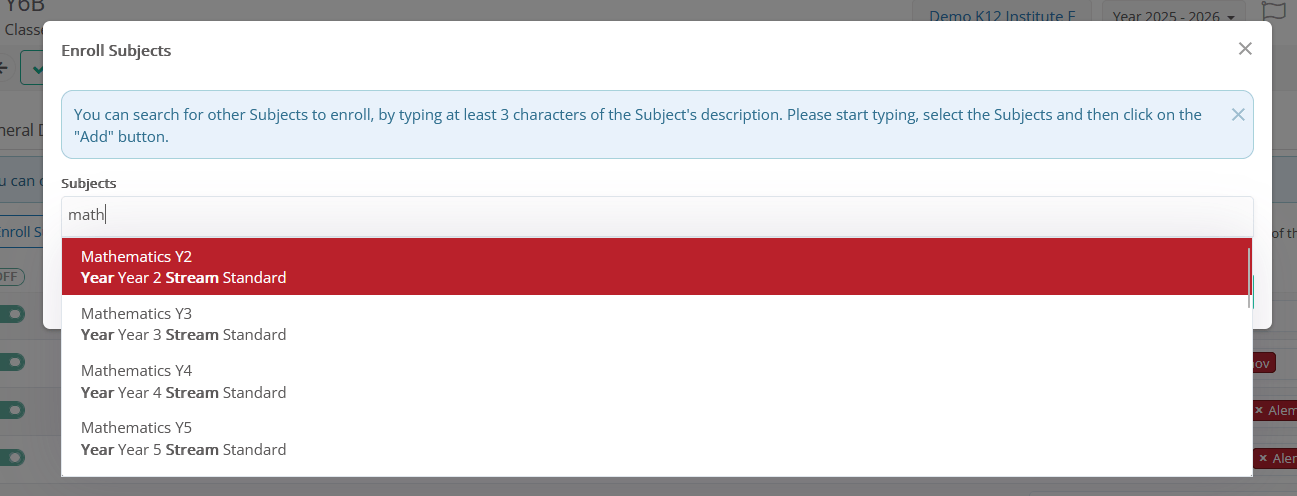
In College/HE, use the option ‘_Subjects_ not in curriculum’.
- Enroll all existing students of the _Group_ to the _Subjects_: Only in K-12 mode. While editing a group and adding subjects, you can select to enroll all existing students in all the subjects enabled in the group. Upon save, the system will find all enrolled students in the group (with or without subjects) and enroll them to all subjects currently enabled in the group.
- Show only active: As mentioned above, the system automatically shows all subjects connected to the same _Grade_ and _Stream_. After configuring the subjects, you can select to see only enabled subjects.
Options in the table:
- Enable/Disable Subjects: Toggle subjects on to connect them with the group. Only enabled subjects are available for enrollment in the group (Students, Teachers).
- Main Group Toggle: The allocation is considered as ‘main’/default. Used to core subjects of the group.
For example: We have a group which includes the core subjects, but also some optional. All students are enrolled to the core subjects, but not all of them to the optional ones.
- Allocate _Teachers_: Start typing the Teacher’s name, to allocate to the group – subject. You can add multiple teachers if needed.
- New session creation icon:
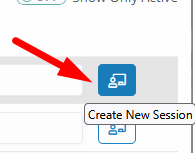
From this option, you can create sessions for the selected group – subject – teacher. These options will be pre-selected during creation, and the new session pop-up is the common session card, including all components.
Billing & Prices
The Billing & Prices Tab defines if the group is billable and the default prices, billing methods, taxes, installment plans, etc.
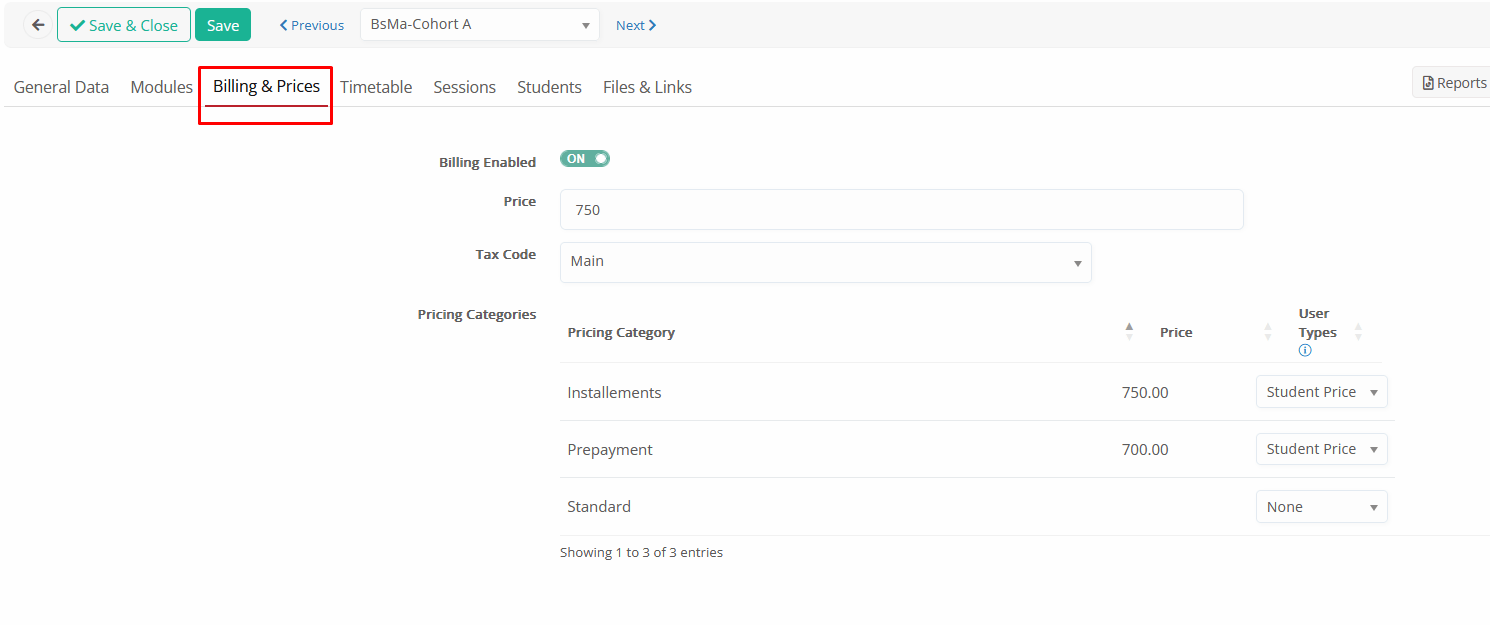
- Billing Enabled (On/Off): Toggle to activate billing for this group. If enabled, then the system, upon enrollment in the group, will search for default prices and billing properties in order to create an arrangement command for the student.
Relevant and general settings in Financial Settings may affect this functionality, such as the Student Status enabled for arrangement creation.
- Price: The default/starting price for the group.
- Tax Code (optional): Apply the relevant tax code for pricing and billing (e.g., VAT 20%). If taxation is not used in your configuration, this field may be ignored.
To enable, use the setting CONFIGURATION > Financial Settings > ‘Price Lists, Fees &Taxes’ Tab > ‘Fees & Taxes’ section > ‘Use tax’ setting – enable _Groups_.
Please note that if the above setting is enabled for groups and there is a Tax Code set as Default, the system will still calculate taxes. If you wish to exclude a group in this case, you can create a Tax code with 0% taxes.
Tax Codes must be pre-configured at CONFIGURATION > Financial Settings > Dropdown Lists > Tax Codes.
Pricing categories section (optional): Use this section when the same groups need different pricing per pricing category (e.g., prepayment, installments, EU, non-EU, or other special/custom categorizations which may change the starting price). Each row can be enabled/disabled depending on whether it applies.
To enable, use the settings at CONFIGURATION > Financial Settings > ‘Price Lists, Fees &Taxes’ Tab > ‘Price List Configuration’ section.
Pricing categories are configured from CONFIGURATION > Financial Settings > Dropdown lists > Pricing categories (categories connected to Type: _Group_).
The pricing categories may be set (even automatically) at the student educational program, and be inherited at the relevant enrollments/arrangements, or can be set directly at the student enrollments.
Timetable
The Timetable Tab shows the scheduled Timetable of the group (per timetable category), as well as offers searching filters, the ability to edit the schedule, layout changing, and printing possibilities.
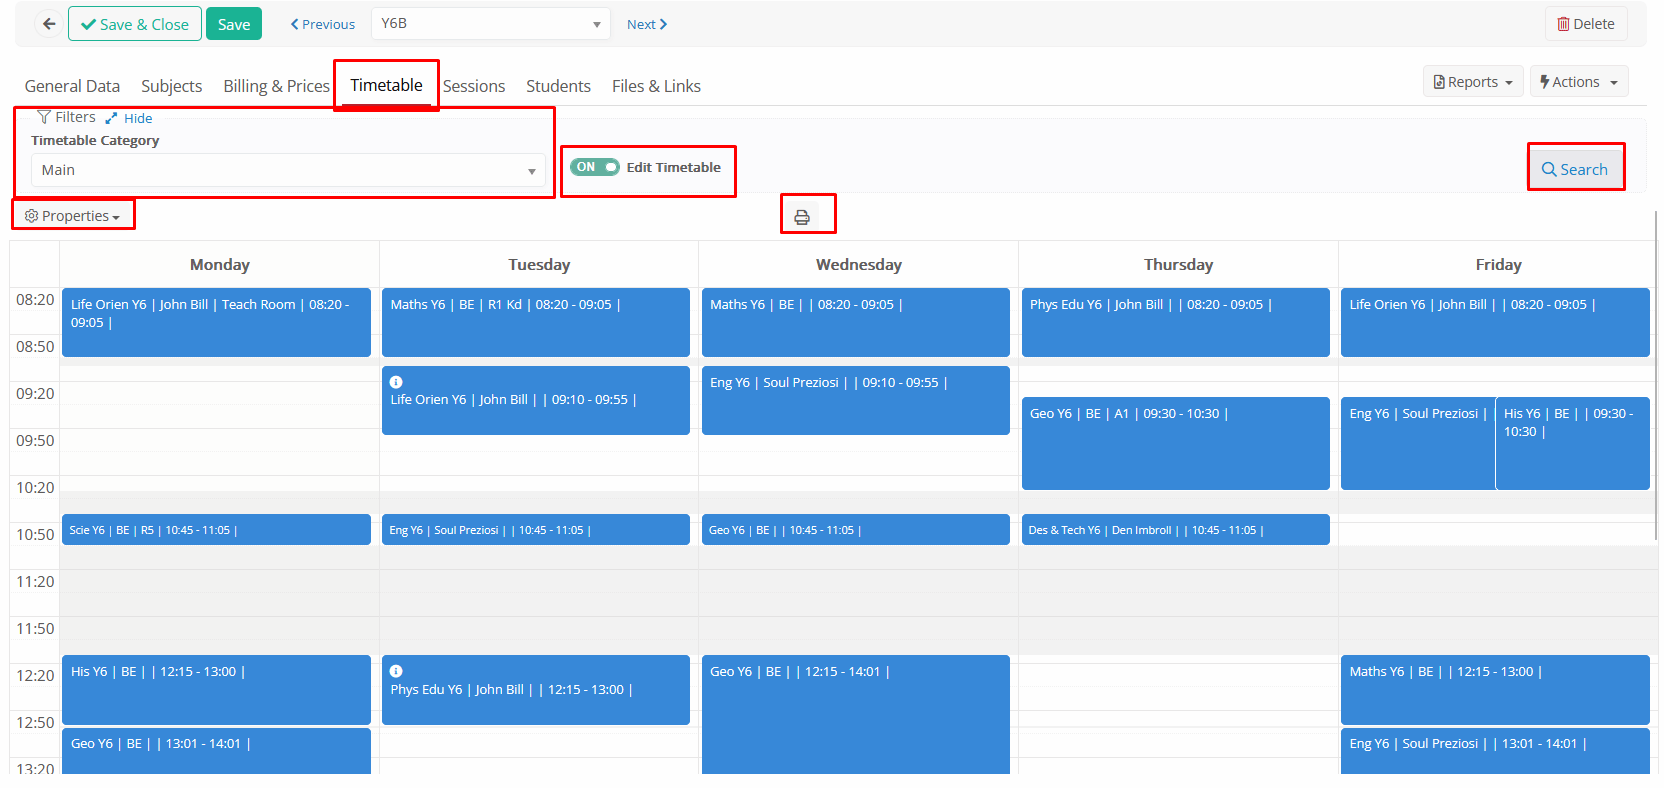
Filters
Timetable Category: Select the desired timetable category and click on search to see the scheduled timetable.
Timetable categories are configured from CONFIGURATION > Academic Settings > Timetable > Timetable Categories.
Edit Timetable (ON/OFF): Switch ON and click on search to edit the group’s timetable.
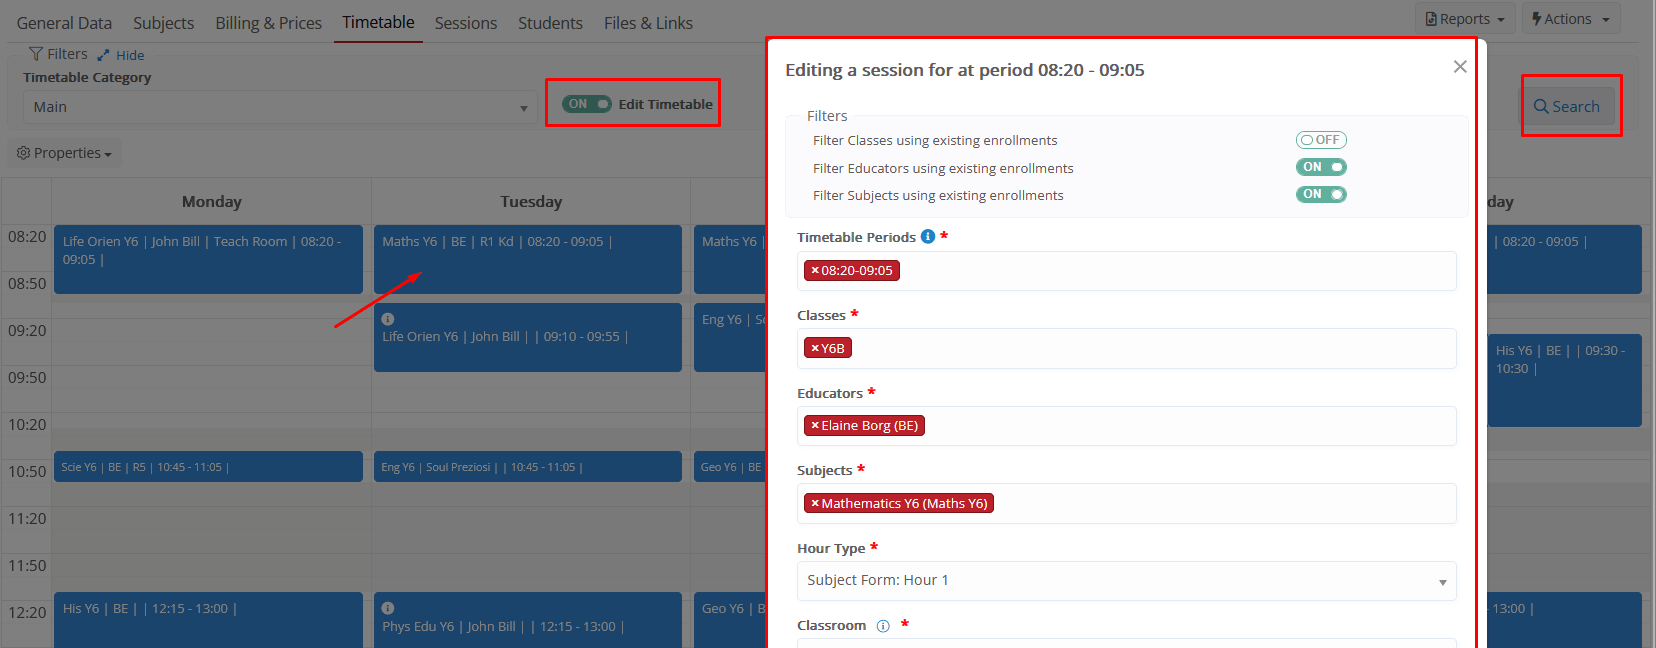
Security: Works based on the general Timetable – Edit privilege from the User Role.
The timetable editing follows the same methods and restrictions as the normal Timetable schedule from the general menu, but only allows editing for the specific group.
Properties
Same functionalities as the general Timetable – Calendar View menu. Change the layout of the timetable calendar or enable options.
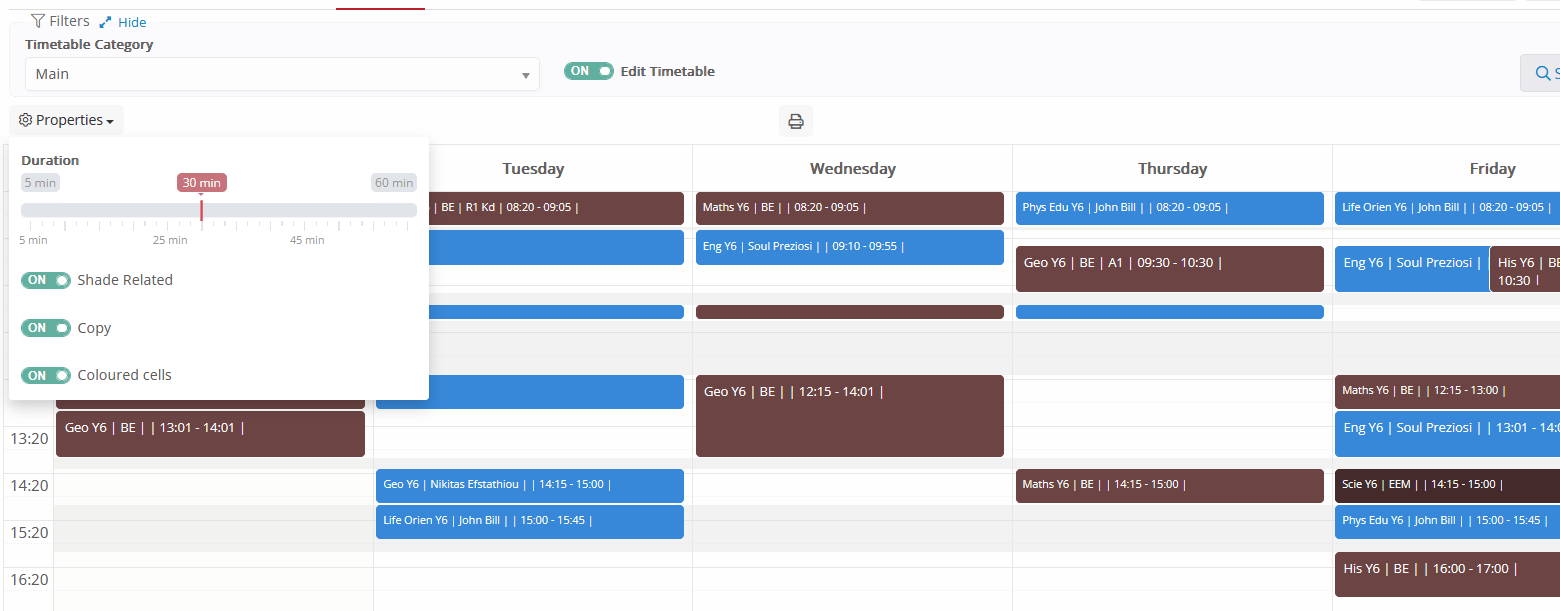
- Duration: Change the duration of slots shown in each row (maximizes/minimizes table).
- Shade-related: Will shade time slots, not available for scheduling due to any restrictions related.
- Copy: Enables the option to copy lessons to days. If copy is enabled, then you can click on the lesson to copy, and then click on the free slot to paste.
- Colored cells: Changes the color of the scheduled slots, based on subjects’ colors.
Sessions
The list of the group’s sessions, with searching filters and edit actions.
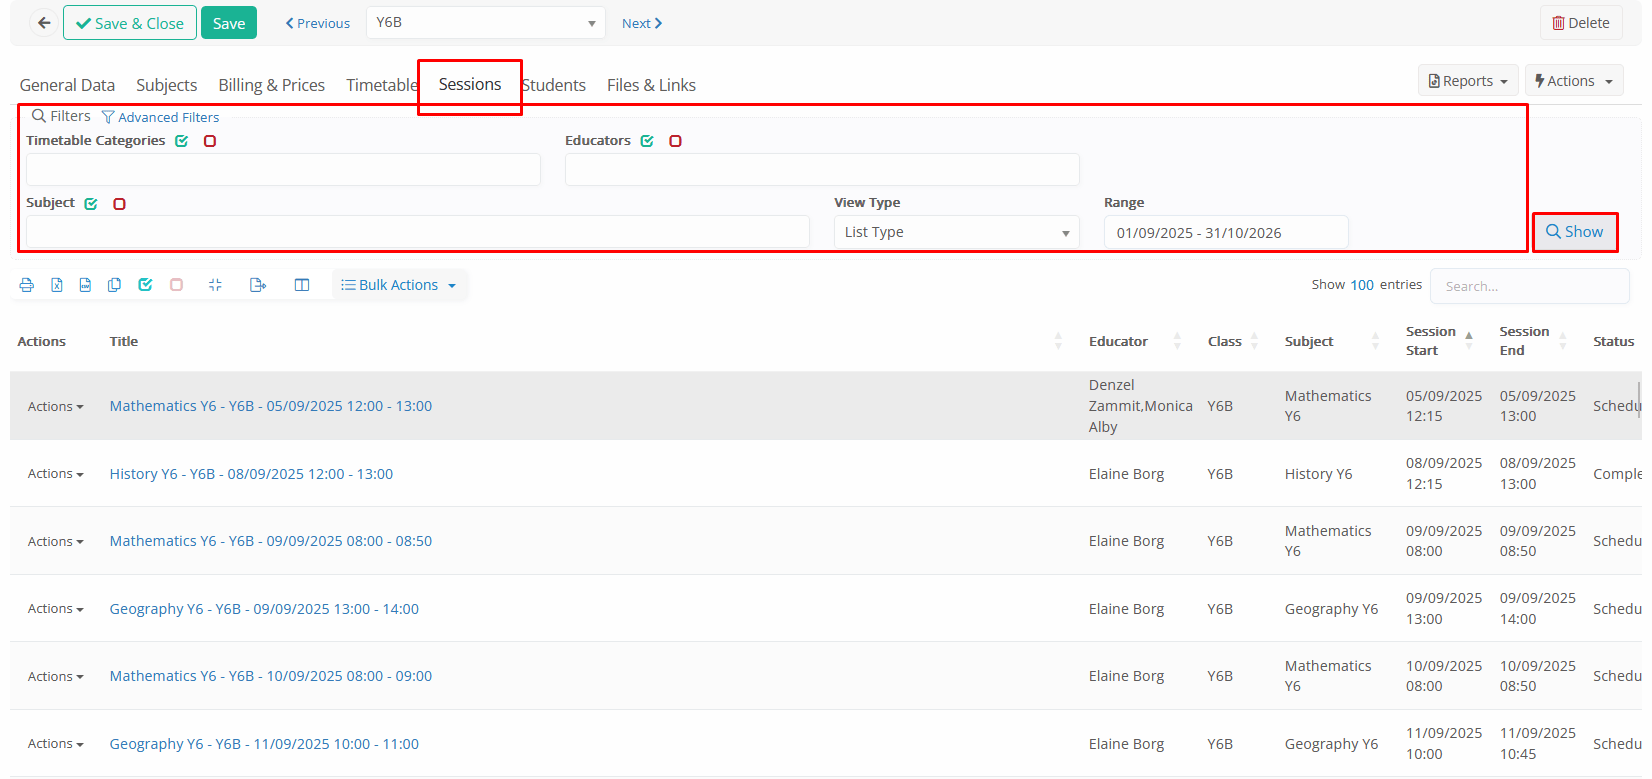
The screen is designed as per the standard list of Sessions menu, including all filters, bulk actions, row actions, but only for the current group.
Security: Works as per the standard Sessions show/edit privileges in the User Role.
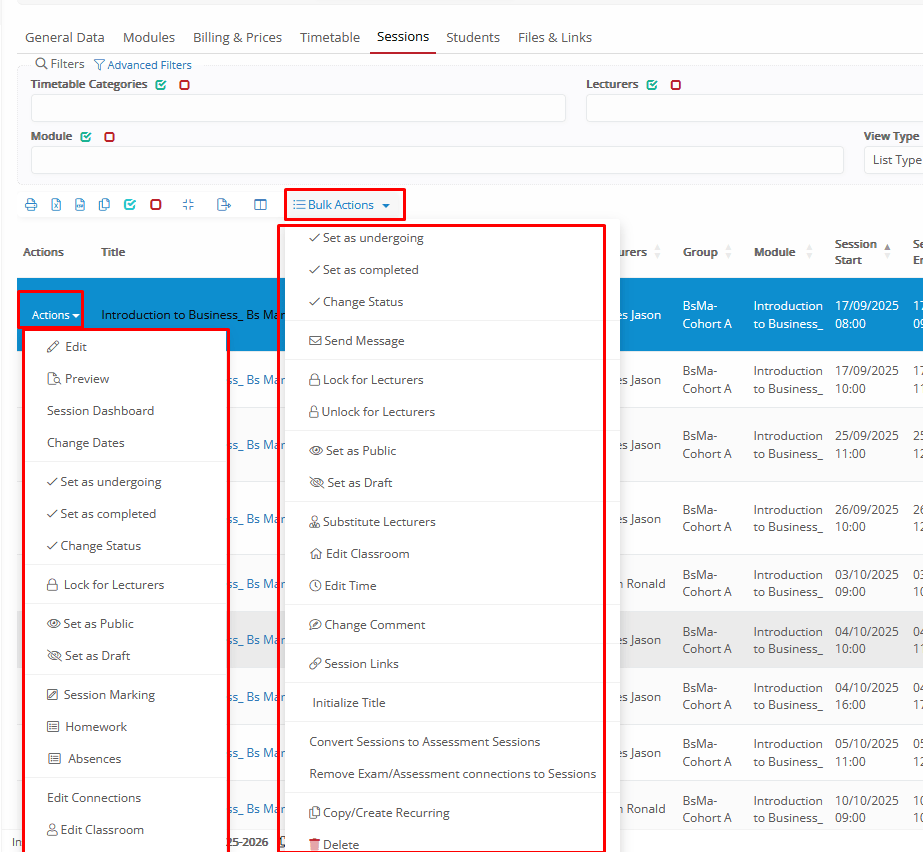
From this view, you can:
- See scheduled sessions
- Send messages
- Edit sessions
- Copy/Create recurring
- Update sessions (change status, edit visibility, lock/unlock, edit substitute Teachers, reschedule, etc.)
- Go to the session’s Attendance
- Go to the session’s Marking
And any other action as per the general sessions’ menu.
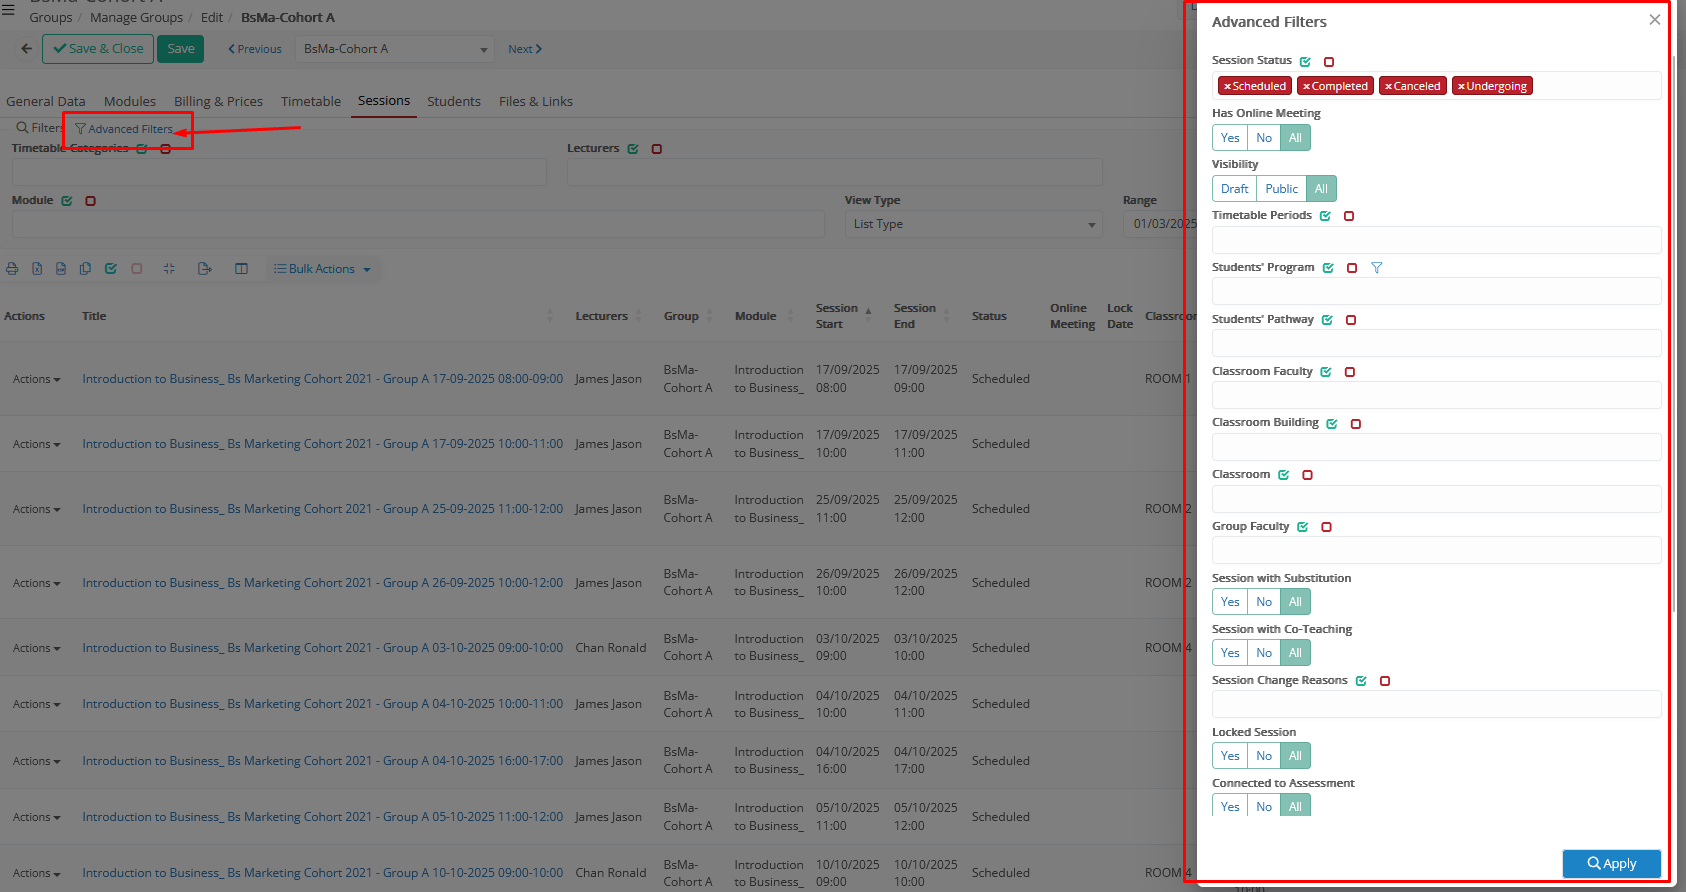
Filters & Advanced Filters
- Timetable categories: Select the desired timetable category.
Timetable categories are configured from CONFIGURATION > Academic Settings > Timetable > Timetable Categories.
- _Teachers_: Select the desired _Teachers_to filter (connected to subjects in the _Group_ -Teachers’ enrollments must exist already)
- _Subject_: Select the desired _Subjects to filter (connected to the group already)
- View Type: List or Calendar view (changes the user interface of the result). In Calendar view, the sessions will be grouped per date.
- Range: Date range for the sessions to show.
Advanced Filters: Filter by Session Status, Online Meeting link, Visibility, Timetable Periods, connected _Grades_, Classrooms, and other session properties. Same functionality as in the general Session menu.
Actions & Bulk Actions: You can copy, create recurring from existing sessions, as well as edit the sessions or update various properties. Options like change status, send a message, edit visibility, add substitute Teachers, edit classrooms, connect assessments, and all options from the general session list menu.
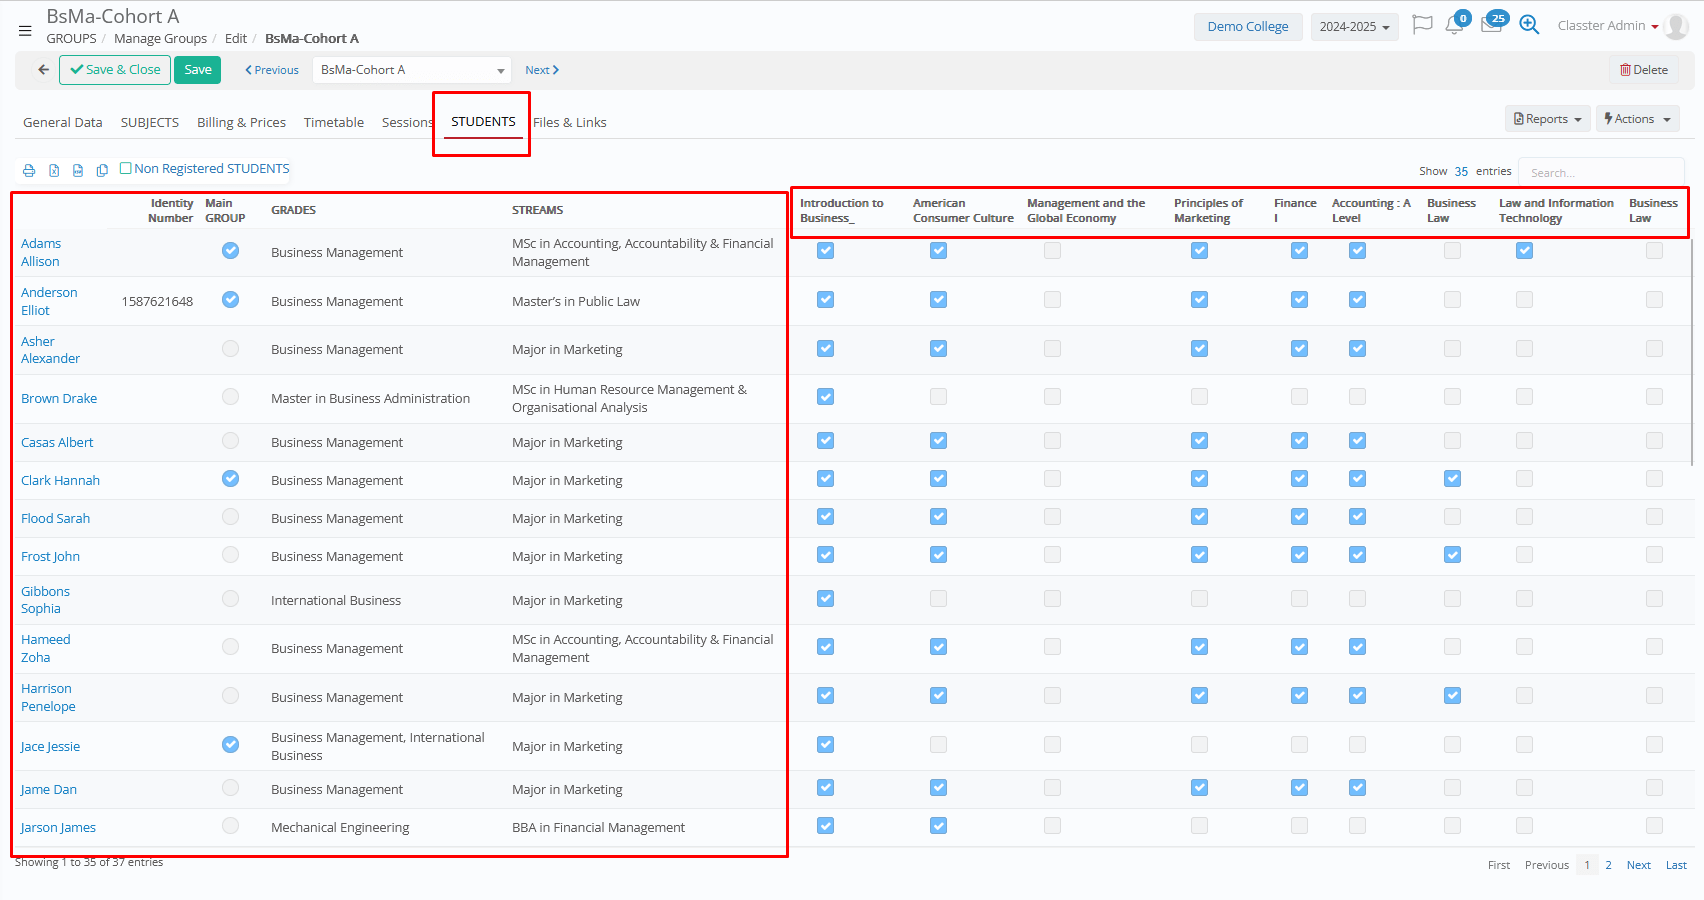
Students
In the Students Tab of a Group, you can:
- View all the registered students who are enrolled in the Group.
or non-registered (status) students when the corresponding toggle is enabled.
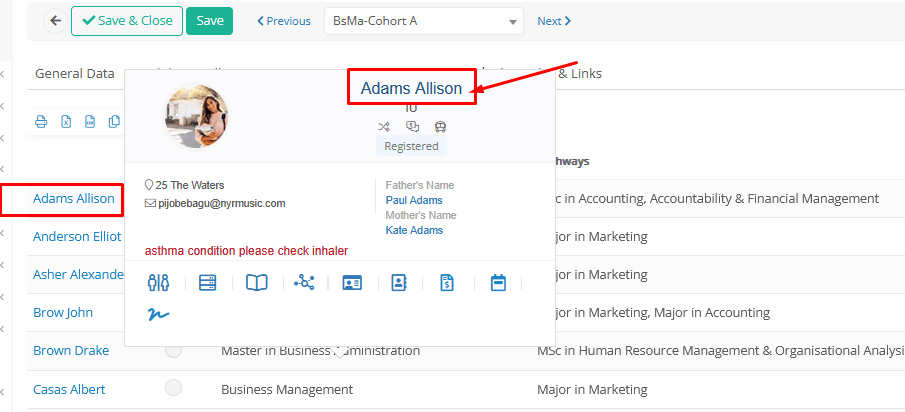
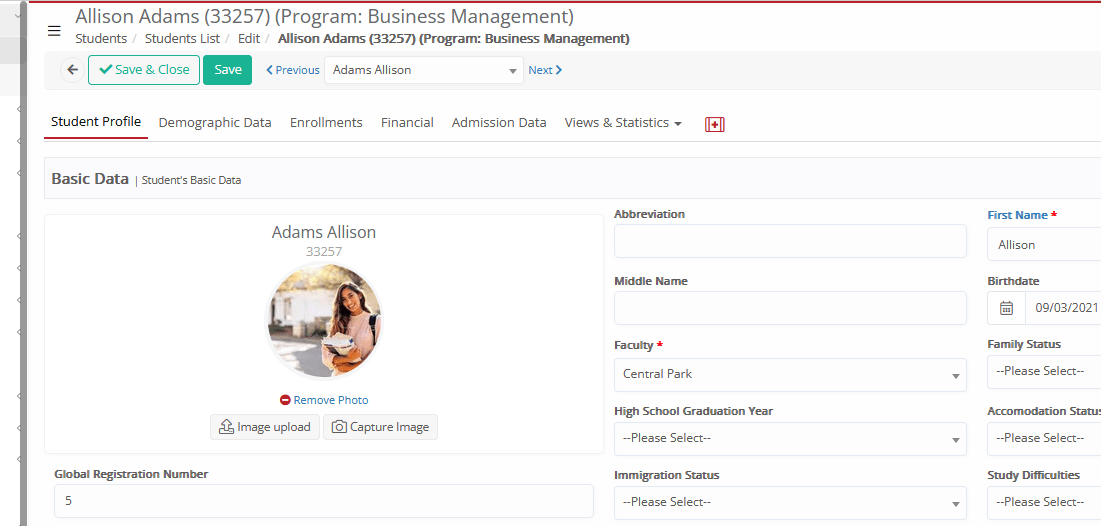
- See the quick view of the student, or redirect to the student card
- Enroll Students with a bulk action.
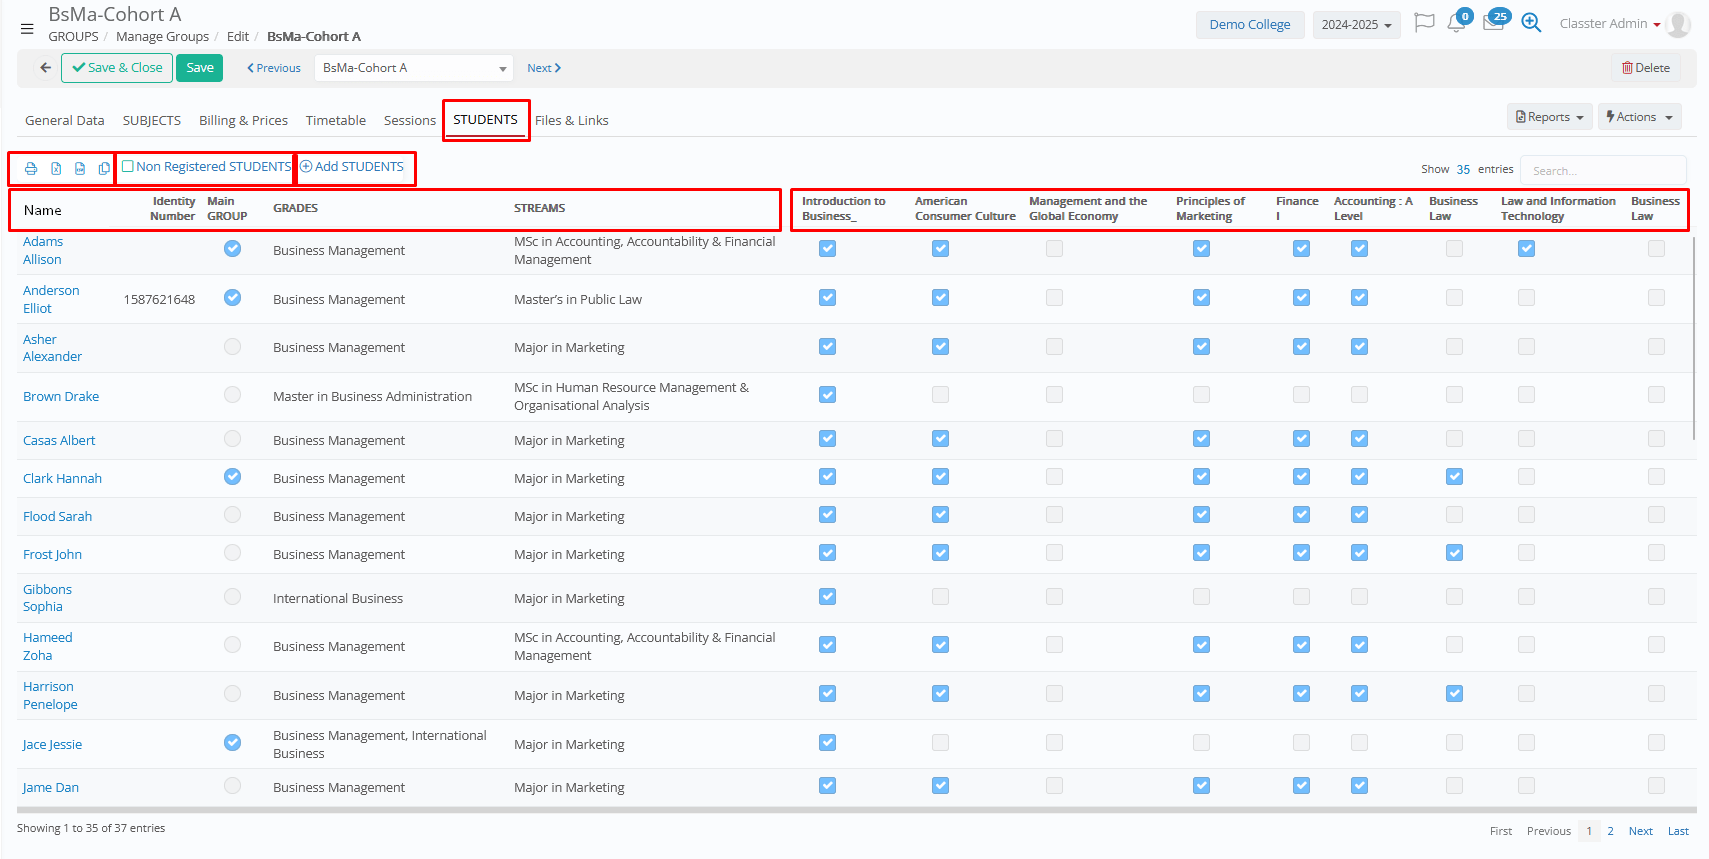
The options and actions
On the top left, you will find
- Print, Export, and Copy options for the table of data
- Toggle ‘Non Registered Students’, which will change the list to non-registered (Student Status) Students, who are enrolled in the group.
- Action ‘Add Students’, which will open a pop-up window, searching in the Student List, to select Students and bulk enroll to _Groups_ and _Subjects_.
Action Add Students:
Filter out the Students based on their _Location_, _Grade_/Program, _Stream_, enrolled _Groups_, Annual Results Model/Curriculum, or free text (Student name) and select the Students from the list to proceed to bulk enrollment.
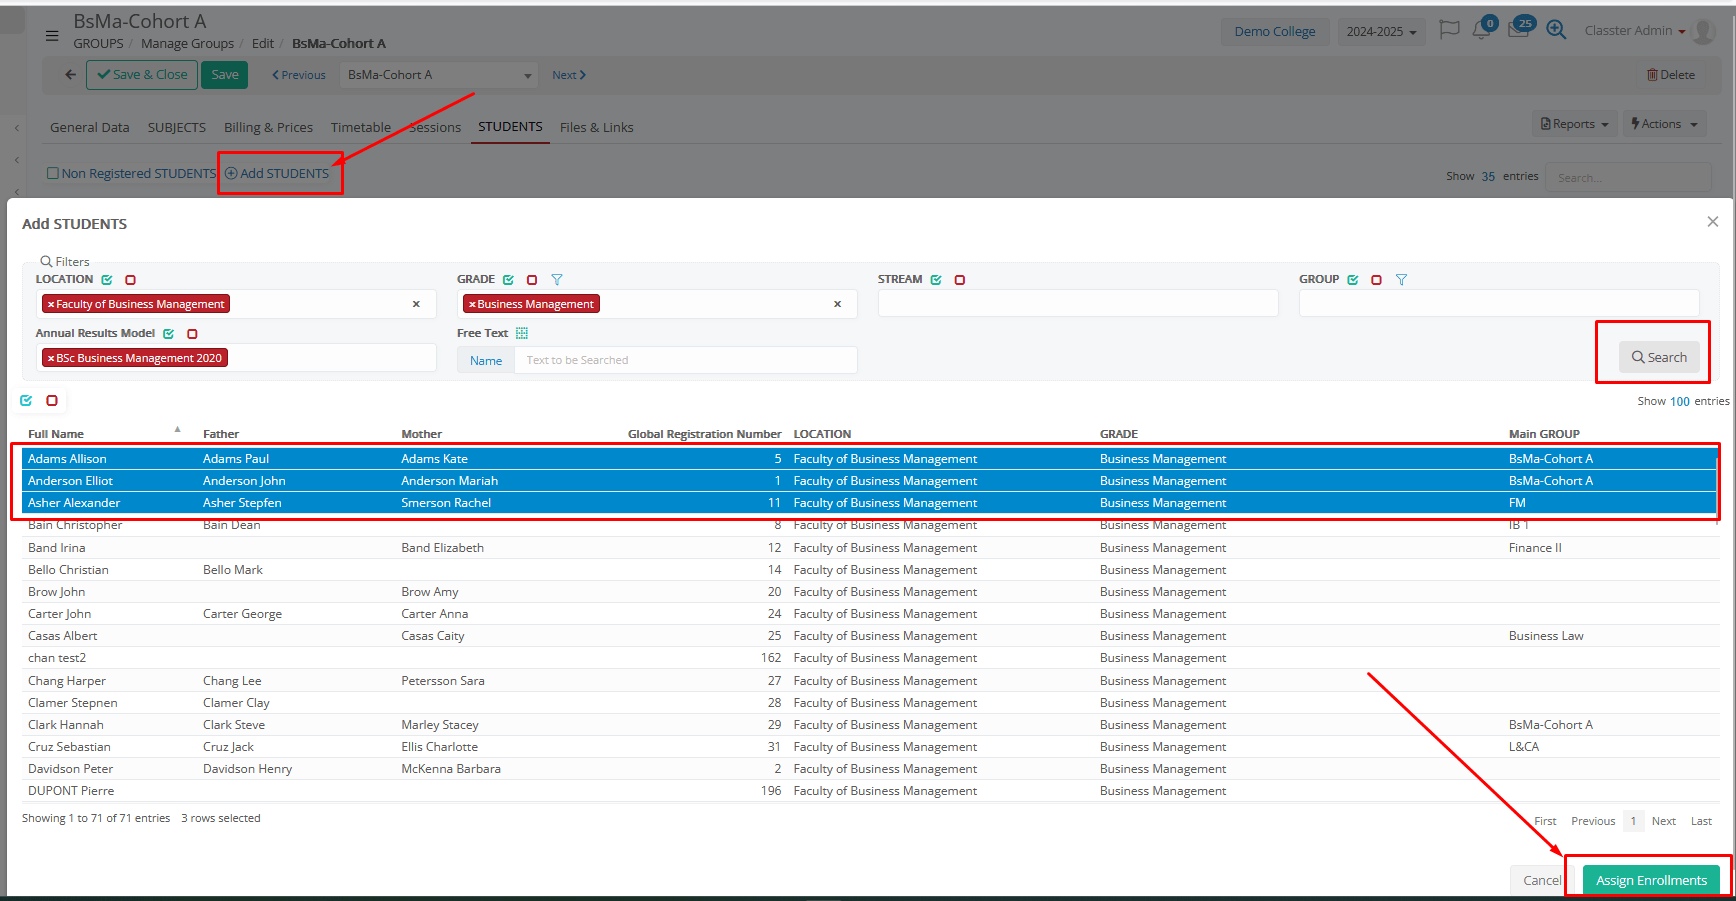
Please note that this process is based on the Classter Mode you are using (K-12 or College mode), and the next step is different based on that (based on the group subjects on K-12 or based on the curriculum structure on College/HE).
The process is the same as the Bulk Enrollment Action in the Student List (Enroll Students to _Groups_ and _Subjects_).
For further information, please refer to the relevant manuals.
The list
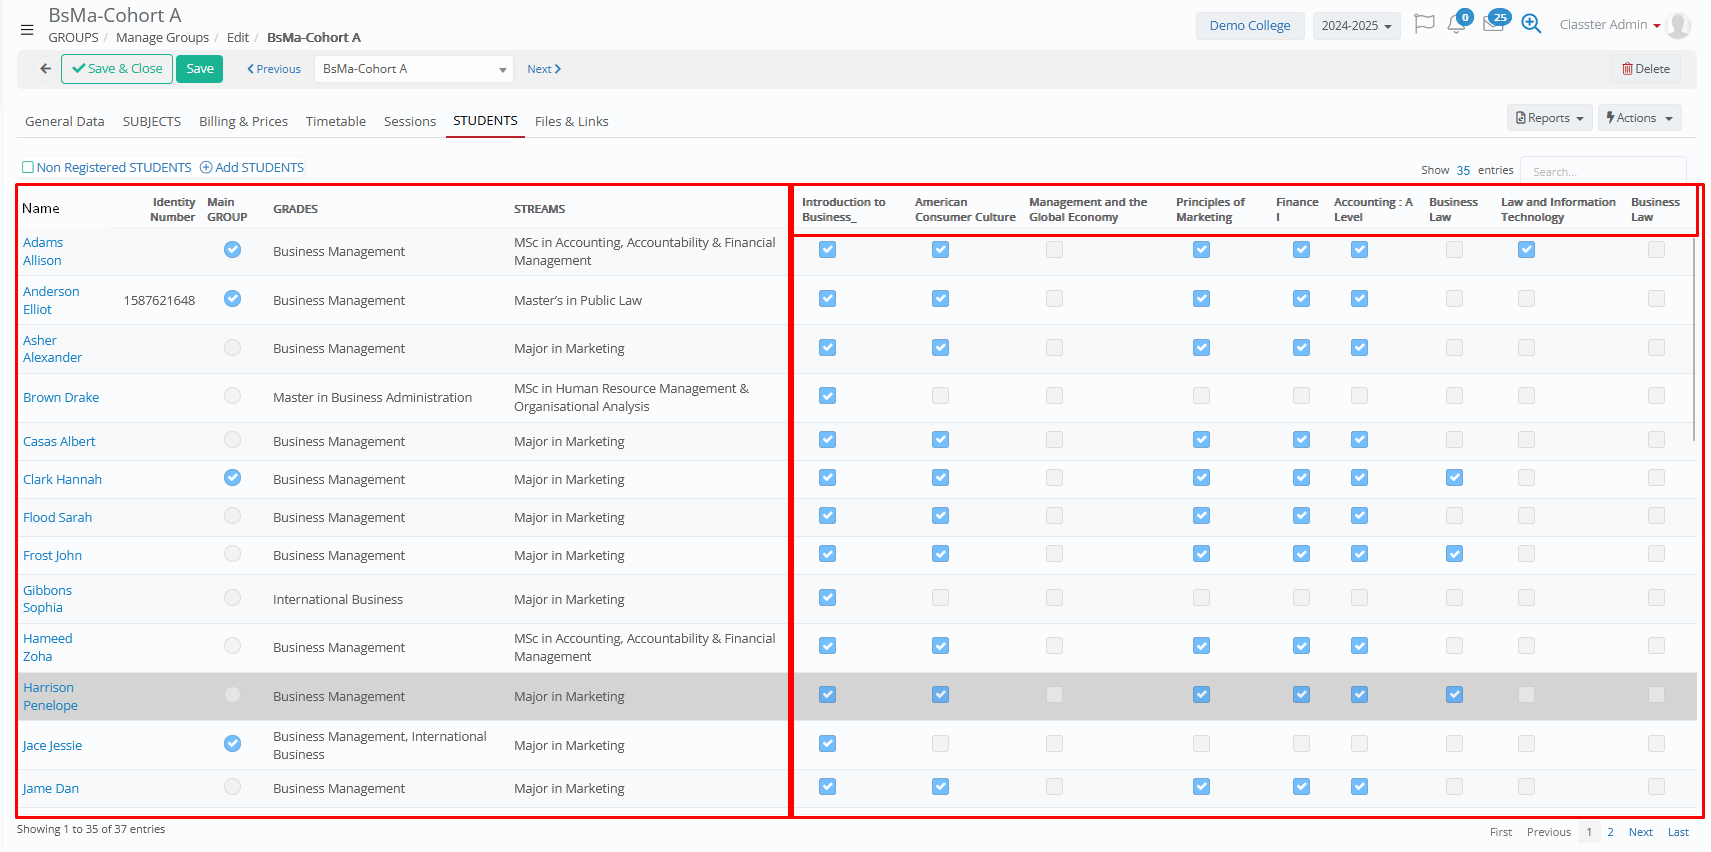
- Student’s Name & ID card: Represents the student’s name and ID card info.
- Main Group: Indicates whether this is the student’s main/primary Group.
- _ Grade_ and _Stream_: Shows the student’s academic _Grade_/program and _Stream_ (student’s educational program).
- Enrolled Subjects: Lists the subjects the student is enrolled in within the Group.
The tab also provides Grid Tools, including Column Management, allowing you to show, hide, or reorder the displayed columns as needed.
From this list, you can also see the student’s quick view and redirect to the student card by clicking on the student’s name:
Files & Links
Use this Tab to attach any content for the _Subject_, related to general info, official documents, academic info, pricing info, and any other category you may need.
The files can be made visible to different user types and categorized for easy access.
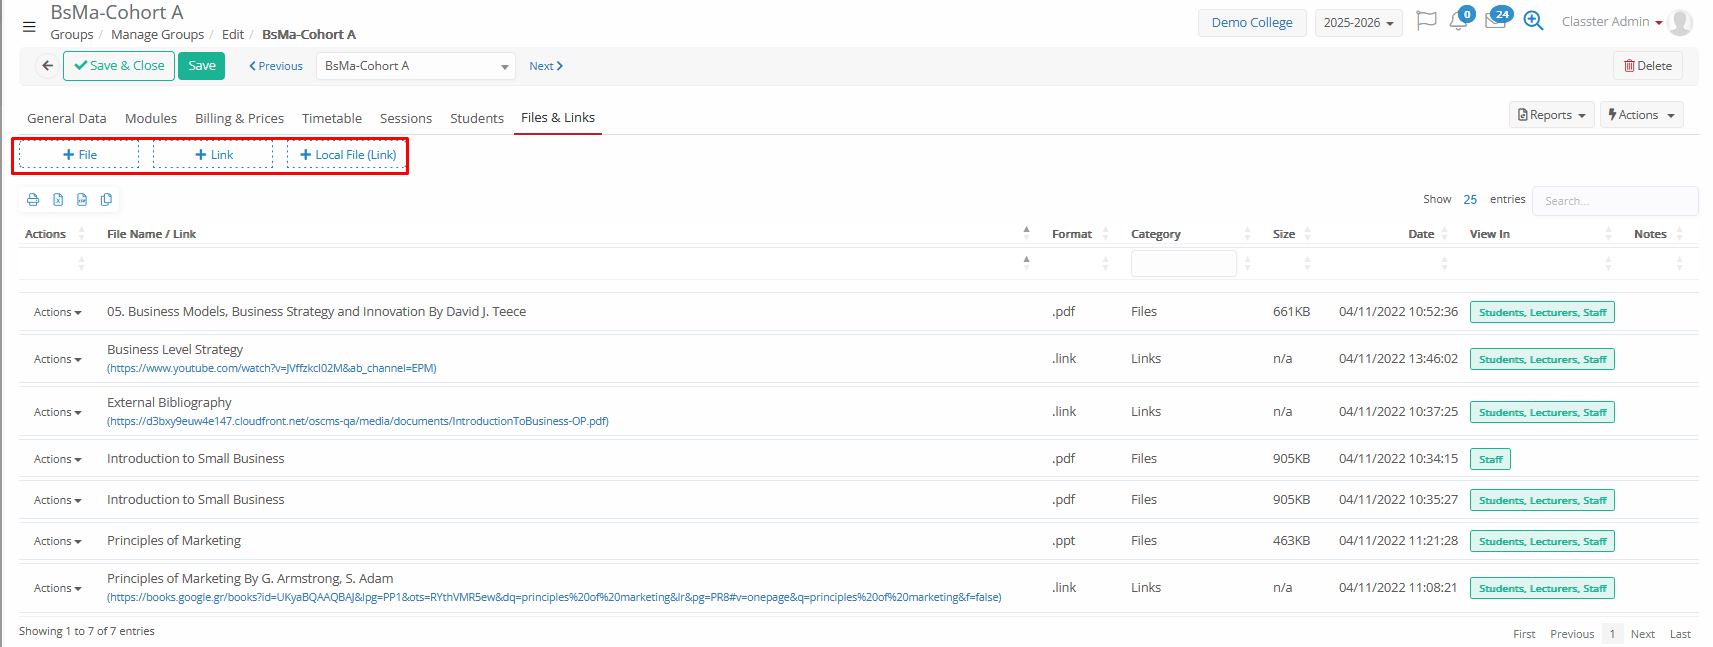
There are 3 options to attach data:
- Files: Upload/attach documents related to the service (e.g., consent forms, schedules, notices, instructions).
- Links: Add URLs/resources related to the service (e.g., external information pages, online material, forms).
- Local file (link): Add a local path that points to a file stored on your own machine.
Please note that no other users will be able to see these files even if you open the view at the privileges, since this option will not upload a file, but saves only the path, so you will open the file quickly from your machine.
Adding a new file:
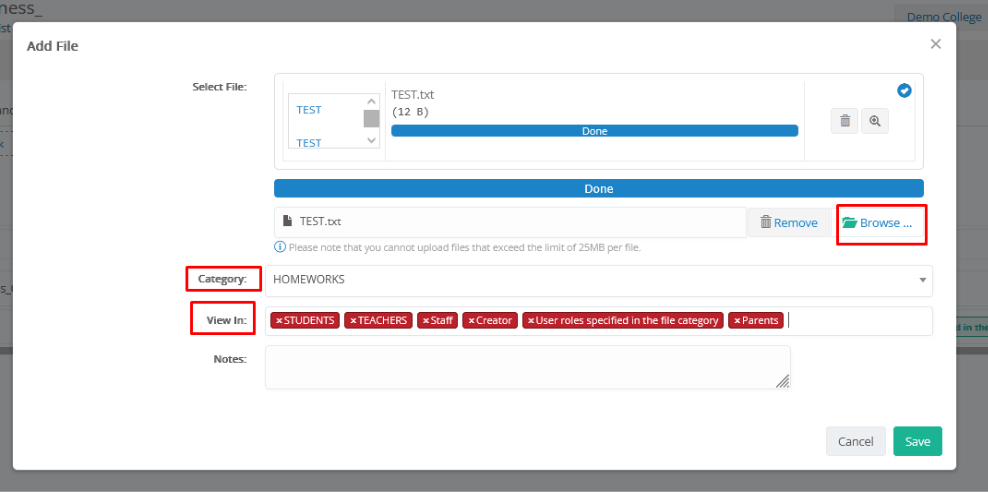
Based on the Type of file you will select (File, Link, or Local File), a pop-up window with the relevant fields will open.
- Select File: Click on Browse to select the file to attach, or add the link/URL or the path of your machine.
- Category: You can organize your documents per category, such as ‘Activities Documents’, ‘Images’, ‘Official Documents’, ‘Notices’, and any other option you may need. If you don’t need a special categorization, please just keep a generic category for all.
- Service Categories can be configured from CONFIGURATION > Main Settings > Dropdown Lists > Type: System, Dropdown list: Files Category.
- View in: Make the file visible to other users. You can select the file to be visible at _Students_, _Teachers_, Staff, Parents, the Creator, and/or specific user roles (as defined in the file category).
Notes: Any notes, comments, or clarifications related to the file.
Tip!
While working on a specific Tab-section, or updating various info at your _Subjects_, you can switch between the subjects using the following options:
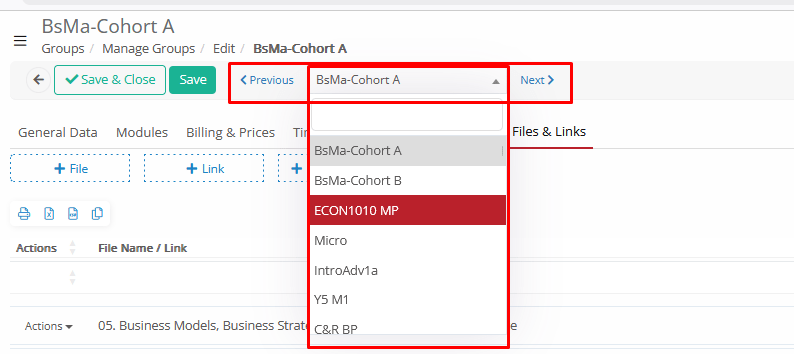
The system will automatically open the selected (or previous/next subject from the list) at the current working Tab.
Menu List of _Groups_
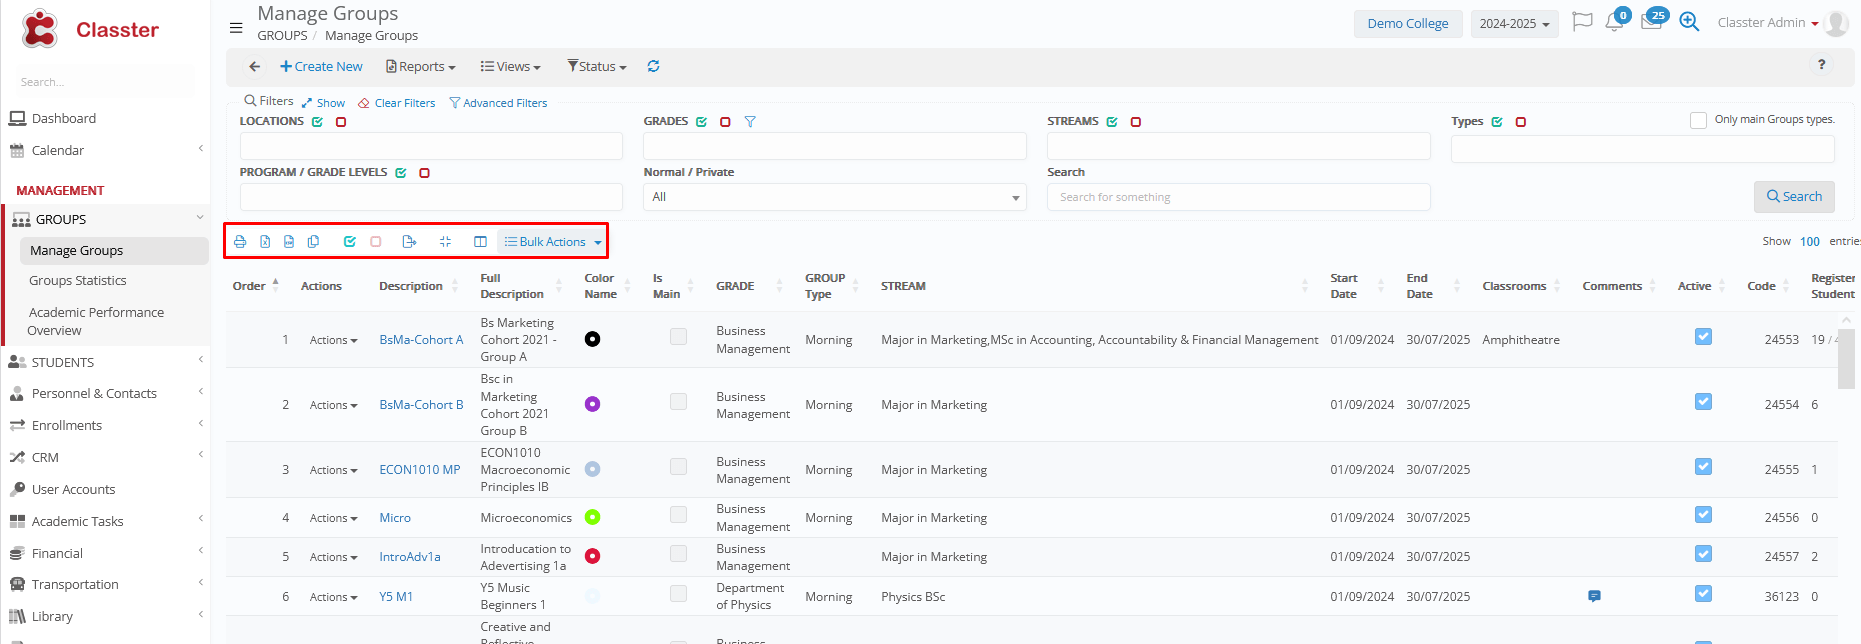
Navigate to MANAGEMENT > _Groups_ > Manage _Groups_.
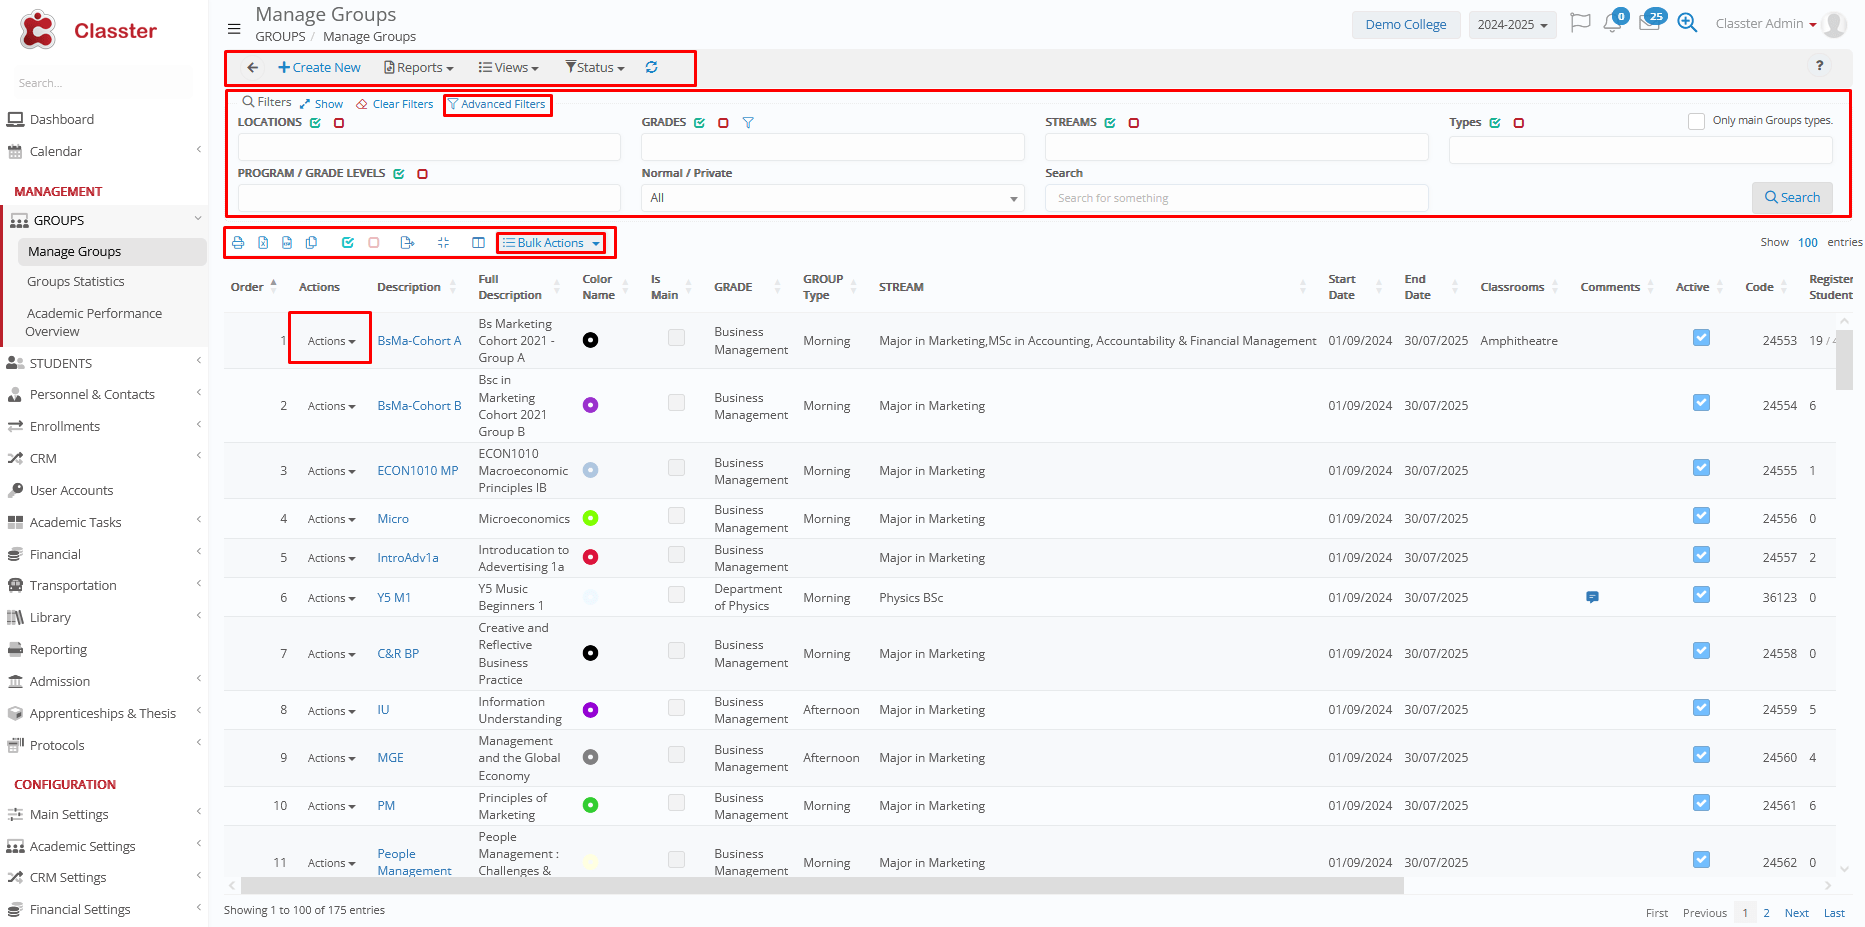
The List of Groups page provides a consolidated view of all academic Groups in the current academic period. From here, administrators can quickly navigate, filter, and manage their Groups.
When accessing this page, Classter displays all Groups according to the selected filters and view preferences. At the top right, you will also find the “Select Only Main Groups” option:
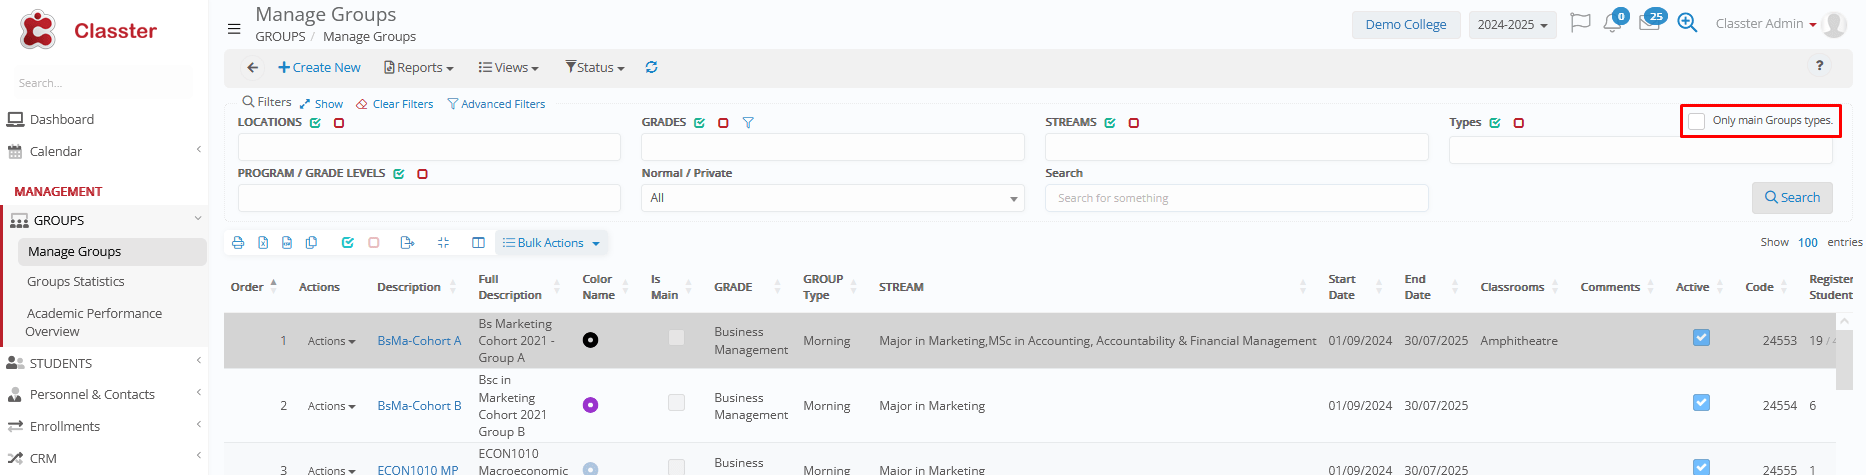
Main _Group_ setup: Setup the Types from CONFIGURATION > Main Settings > Dropdown Lists > Type: System & Dropdown list: _Group_ Type > Property “In Main” in the Types. Connect types to the groups (Group card > General Data > _Group_ Type).
Main Actions & Views
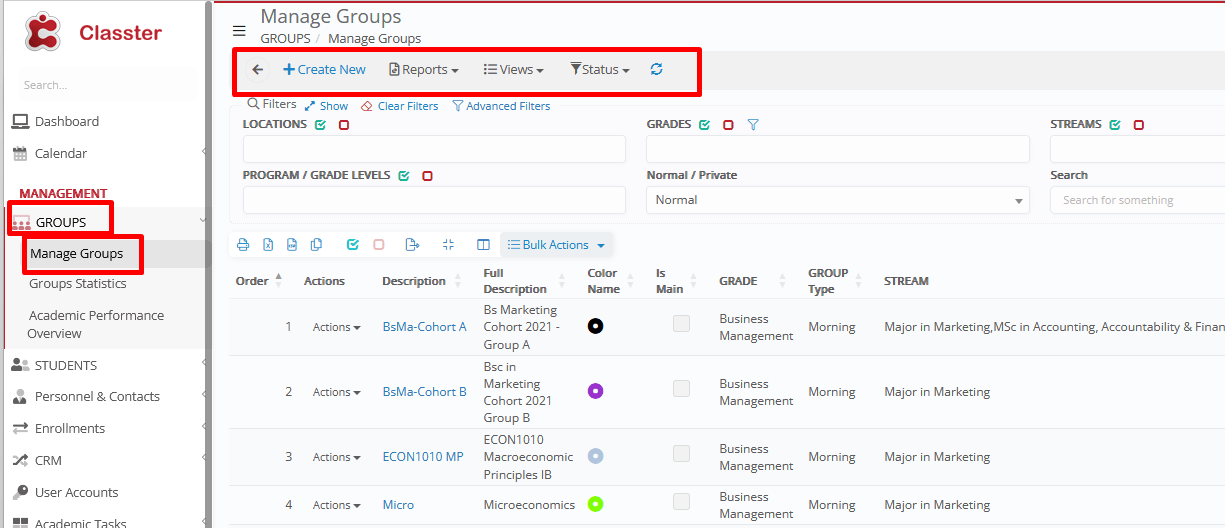
The Main Actions & Views section provides quick access to all essential tools for navigating and managing Groups.
- Create new: Creates a new Group directly from the Group list page.
- Reports: Default or custom reports, related to the list of groups. Relevant privileges exist in User Roles, editing access for each one of the available reports.
- Views: Card view, Grid view, Predefined views (Students – Group overview, Group per categories): Allows switching among multiple display formats for easier navigation, such as grouping the _Groups_ per category at the grid.
- Status: All, Active (Current Period), Inactive (Current Period), Inactive (All Periods): Filters Groups based on their activity state across academic periods.
Filters
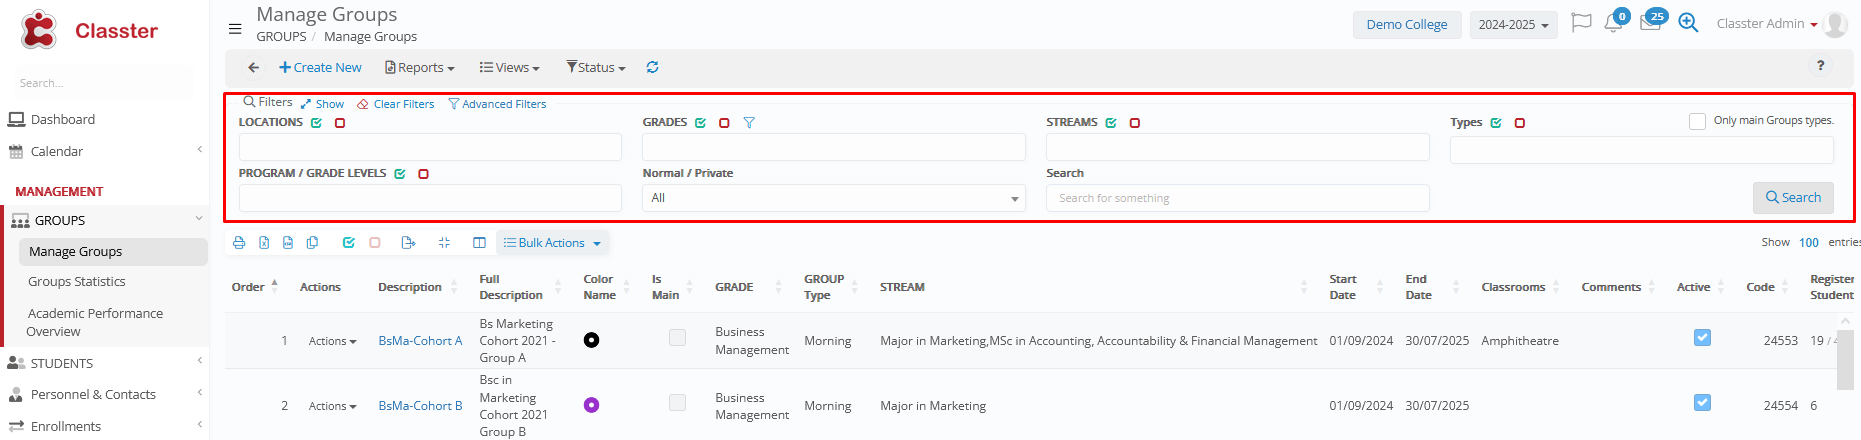
Use filters to narrow down the list of Groups:
- _Location_: Filters Groups based on their connected _Location_ (school, campus, level, etc., based on the institute’s configuration).
- _Grade_: Filters Groups based on their connected _Grades_ / programs (including additional _Grades_).
- _Stream_: Filters Groups based on their connected _Streams_ (specializations, years-semesters etc., based on the institute’s configuration).
- _Group Type_: Filters Groups based on their connected _Group_ types (main, foreign, morning, evening, etc.).
Group types are configured from CONFIGURATION > Main Settings > Dropdown Lists > Type: System & Dropdown list: _Group_ Type
‘Main’ Groups are based on the Property “Is Main” in the Types.
Connect types to the groups via (Group card > General Data > _Group_ Type
- _Grade Level_: Filters Groups based on their connected _Grade Levels_ (e.g., BSc, MSc, etc., based on the institute’s configuration).
Grade levels are configured from CONFIGURATION > Main Settings > Dropdown Lists > Type: System & Dropdown list: _Grade Level_
- Normal/Private: Filters Groups marked as private lesson Groups (based on the ‘_Group_ type’ property: ‘Private Session’)
CONFIGURATION > Main Settings > Dropdown Lists > Type: System & Dropdown list: _Group_ Type > Property “Is Main” in the Types. Connect types to the groups (Group card > General Data > _Group_ Type – property ‘Private Session’.
- Free Search text: Performs a keyword search across Group names and attributes.
Advanced Filters
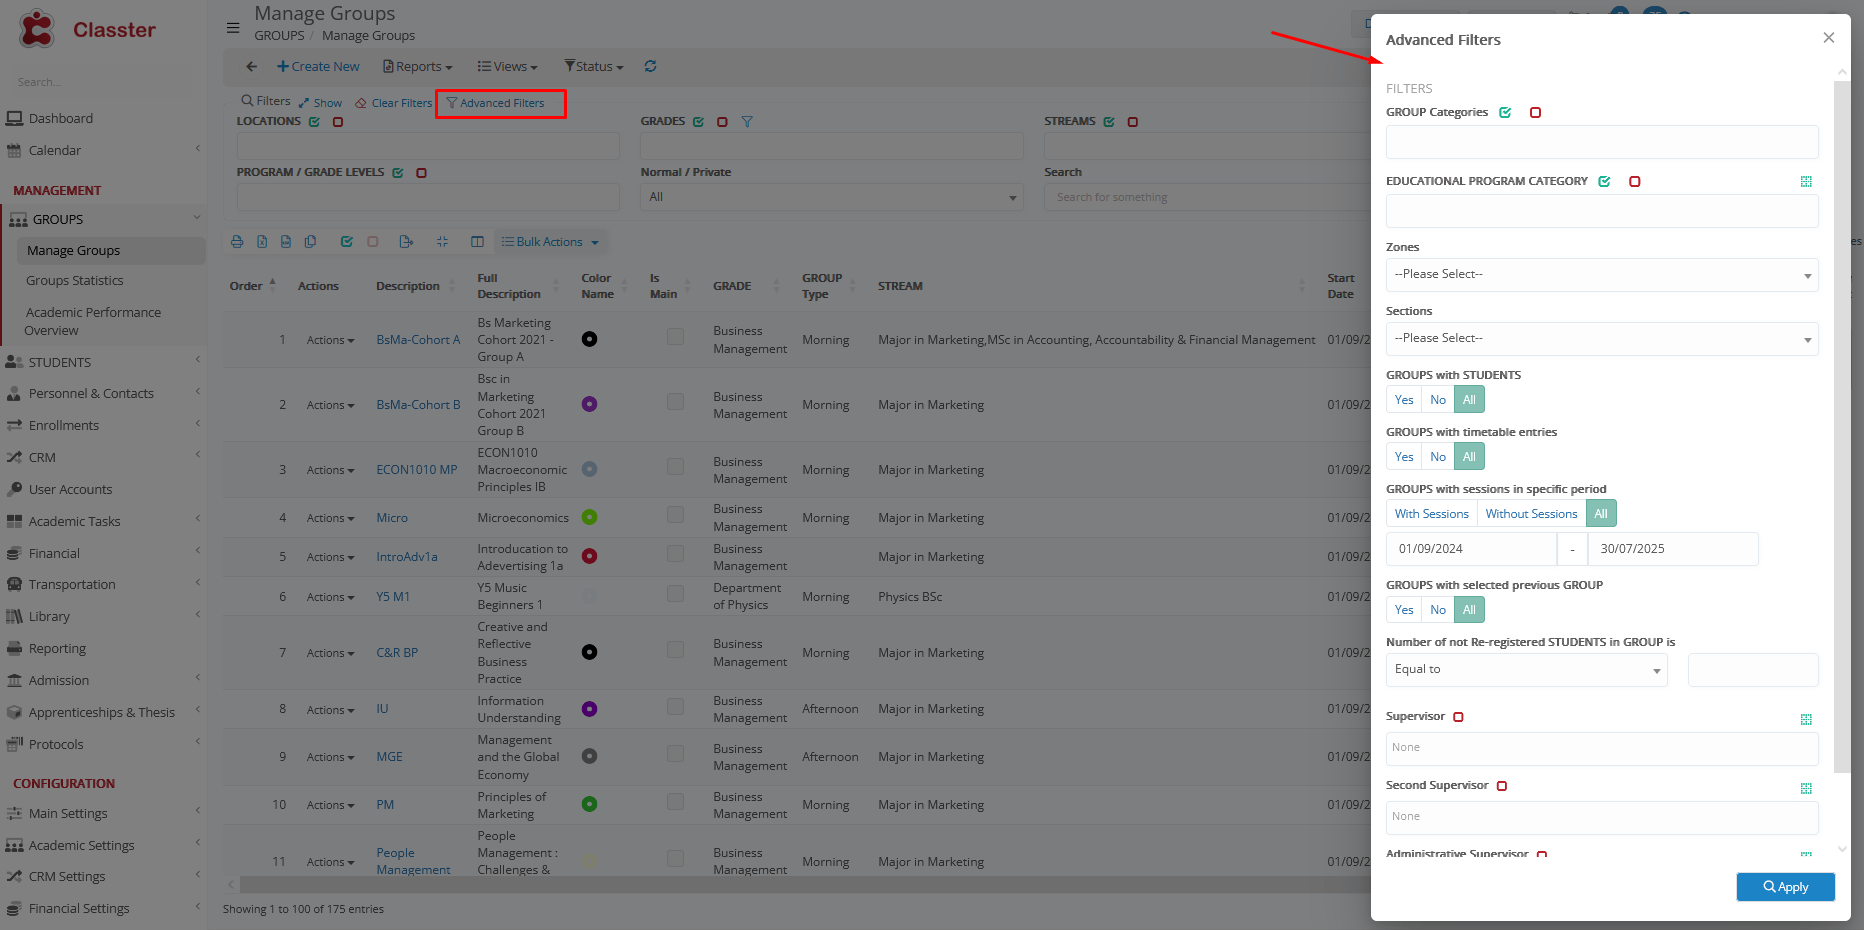
Advanced filtering options provide deeper control when working with large data sets:
- _Group_ categories: Filters groups based on their connected _group types_ (online, campus etc.).
Group categories are configured from CONFIGURATION > Main Settings > Dropdown Lists > Type: System & Dropdown list: _Group_ Type > Property “In Main” in the Types. Connect types to the groups (Group card > General Data > _Group_ Categories
- _Educational program category/Specialization_: Active, when the corresponding entity is enabled. Filters groups by their connected _educational program category/specialization_ (theoretical orientation, full-part time, year-semester etc., based on the institution’s configuration).
- Zones: Filters groups based on the Zone of their connected timetable Section (e.g., Zone: “Afternoon” and Section: “Afternoon 15:00-17:00”).
CONFIGURATION > Academic Settings > Timetable > Dropdown Lists > ‘Sections’ and ‘Zones’.
- Sections: Filters groups based on their connected timetable Section (e.g. Afternoon 15:00-17:00”).
CONFIGURATION > Academic Settings > Timetable > Dropdown Lists > ‘Sections’ and ‘Zones’.
- _Groups_ with students (Yes/No/All): Filters groups that currently have student enrollments or not.
- _Groups_ with timetable entries (Yes/No/All): Filters Groups with existing timetable schedule.
- _Group_ sessions in a specific period (With/Without Sessions/All with Date filters): Filters groups based on their scheduled sessions in specific date periods.
- _Groups_ with selected previous _Group_ (Yes/No/All): Filters groups which have a ‘previous’ _Group_ set or not.
- Number of non-registered _Students_ in _Group_ is (equal/greater/less than X): Filters groups counting their students’ enrollments (e.g., groups which have less than 10 students enrolled or groups which have more than 20 students enrolled)
- Supervisor: Filters groups by their assigned supervisor (you need to start typing the teacher’s name for options to appear).
- Second supervisor: Filters groups by their assigned second supervisor (you need to start typing the teacher’s name for options to appear).
- Administrative supervisor: Filters groups by their assigned administrative supervisor (you need to start typing the employee’s name for options to appear).
Grid Tools
The grid includes several tools to manage data efficiently:
- Print: Prints the list of Groups or exports it as a PDF.
- Export: Exports the Groups list to Excel (XLS) or CSV.
- Copy: Copies the current list to the clipboard.
- Select All / Unselect All: Selects or deselects all Groups in the grid (for bulk actions or exports)
- Export selection: Exports only the selected Groups with a chosen file name.
- Maximize grid: Expands the grid to full-screen mode.
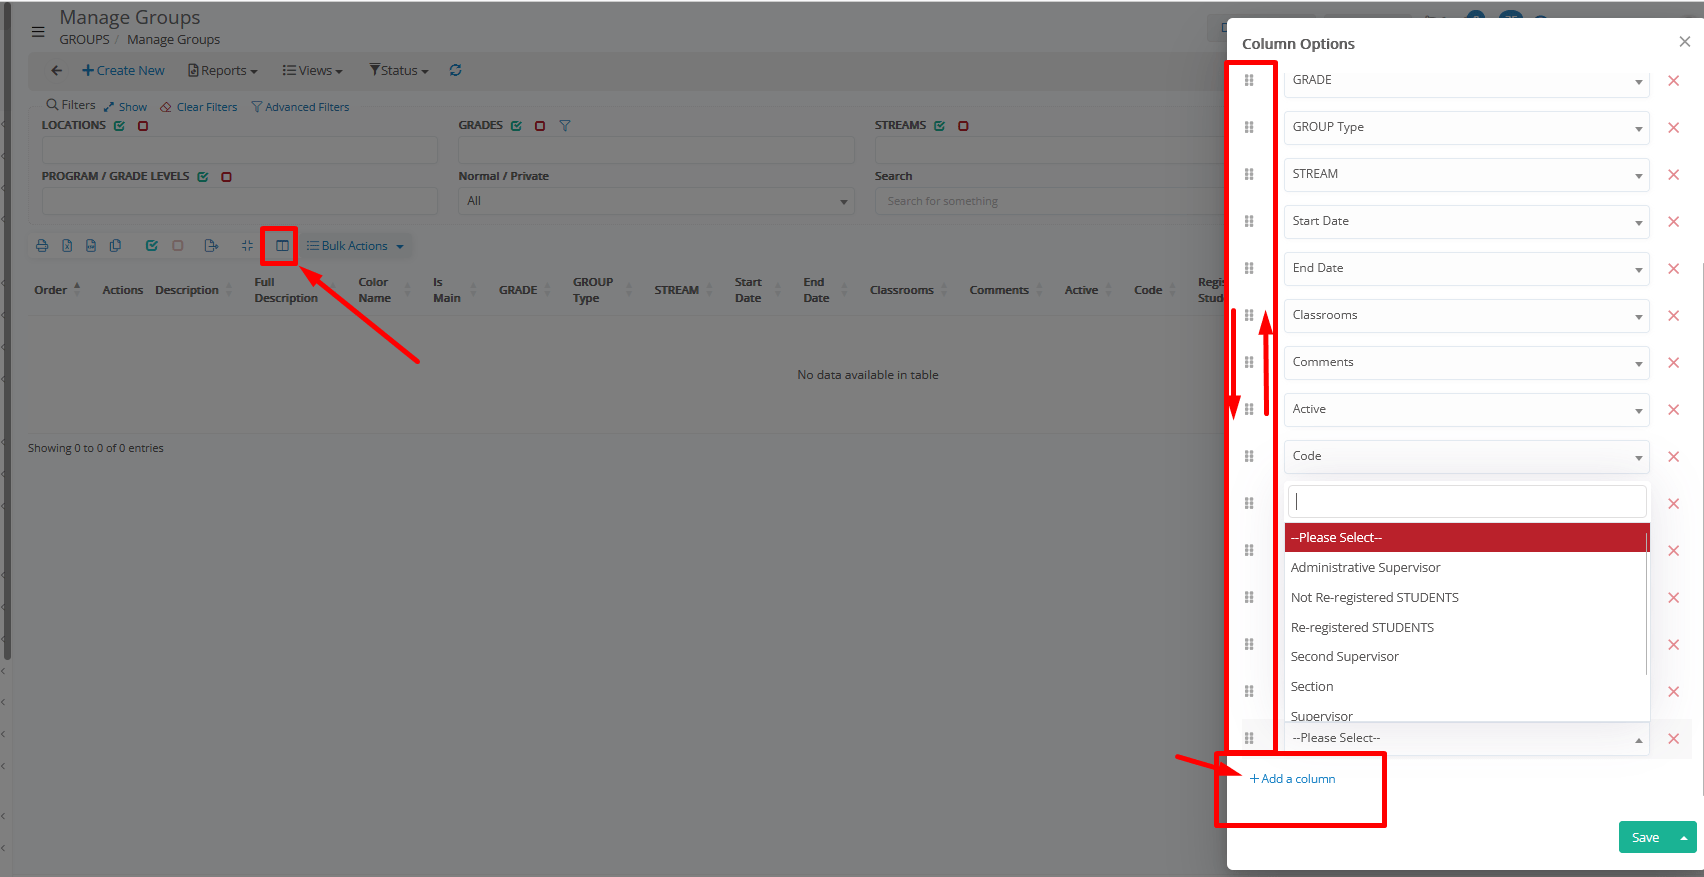
- Manage Columns: Allows showing, hiding, or reordering available columns in the list. User-based functionality, with a systemic memory.
- Bulk Actions: Performs actions on multiple Groups simultaneously.
Tip!
Use the ‘Manage Columns’ option to customize your view, based on your day-to-day work and institution structure.
Bulk Actions
Use these actions when managing multiple Groups simultaneously:
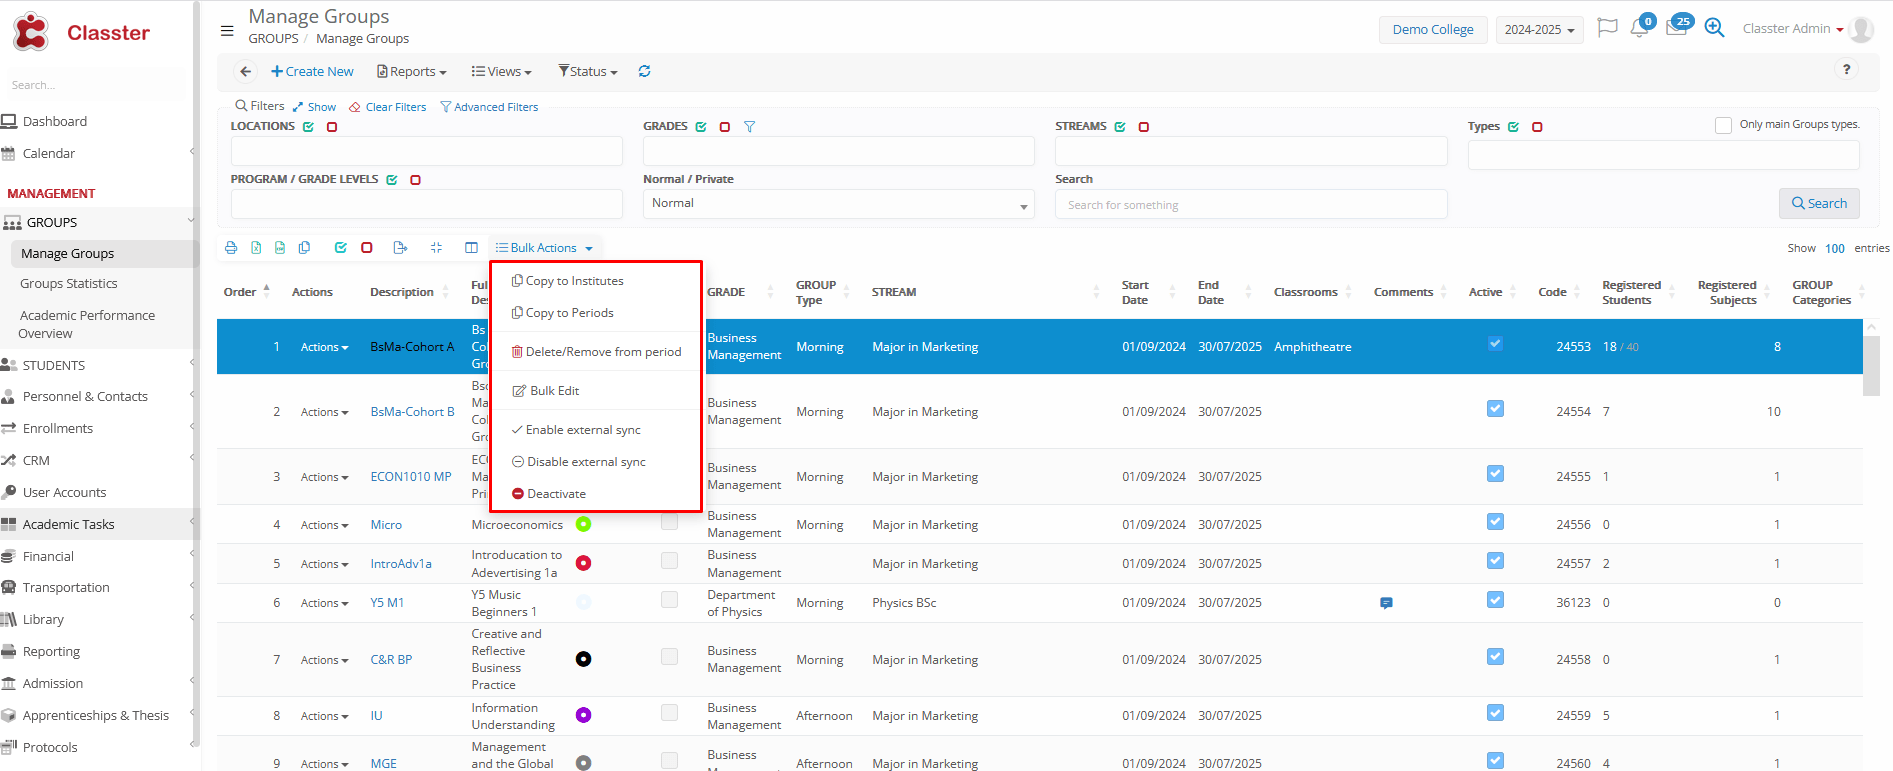
Select the groups’ rows you wish to update from the list.
- Copy to Institutes: For installations with multiple institutes. Copies the groups to other Institutes, ensuring a cross-institute setup and management. During copy, a cross-institute code will systemically ‘connect’ the groups. Case examples: Cross-institute group statistics or editing group details and copying again to update the data.
This copy requires a uniform academic period setup (similar academic periods across institutes).
- Copy to Periods: Copies the group to other academic periods (e.g., to the next academic period), ensuring a cross-period setup and management. Case example: Cross-period group statistics or editing group details and copying again to update the data.
- Bulk Delete / Remove from Period (current or all periods): With a later question, you can select to delete the groups a) from the current academic period or b) from all academic periods (permanent deletion, not deactivation).
If there are enrollments and connections to the group, they must be deleted.
Not recommended if a group actually took place, you could use the ‘Deactivation’ option to retain historical data.
- Bulk Edit: Specific fields’ mass update (supervisor, second supervisor, and administrative supervisor) to the selected groups.
- Enable External Sync: Activates synchronization with external LMS systems for the selected groups.
- Disable External Sync: Prevents synchronization with external LMS systems for the selected groups.
- Deactivate Groups: Deactivate selected groups from the current academic period. This is not a deletion. This option disables/hides groups from lists, enrollments, scheduling, etc., but keeps the group in the academic period, and enrollments are not affected, but considered as disabled as well.
You can view the disabled groups from the ‘View’ > ‘Inactive’ options, at the top of the list of groups.
Row Actions
Individual actions on the group:
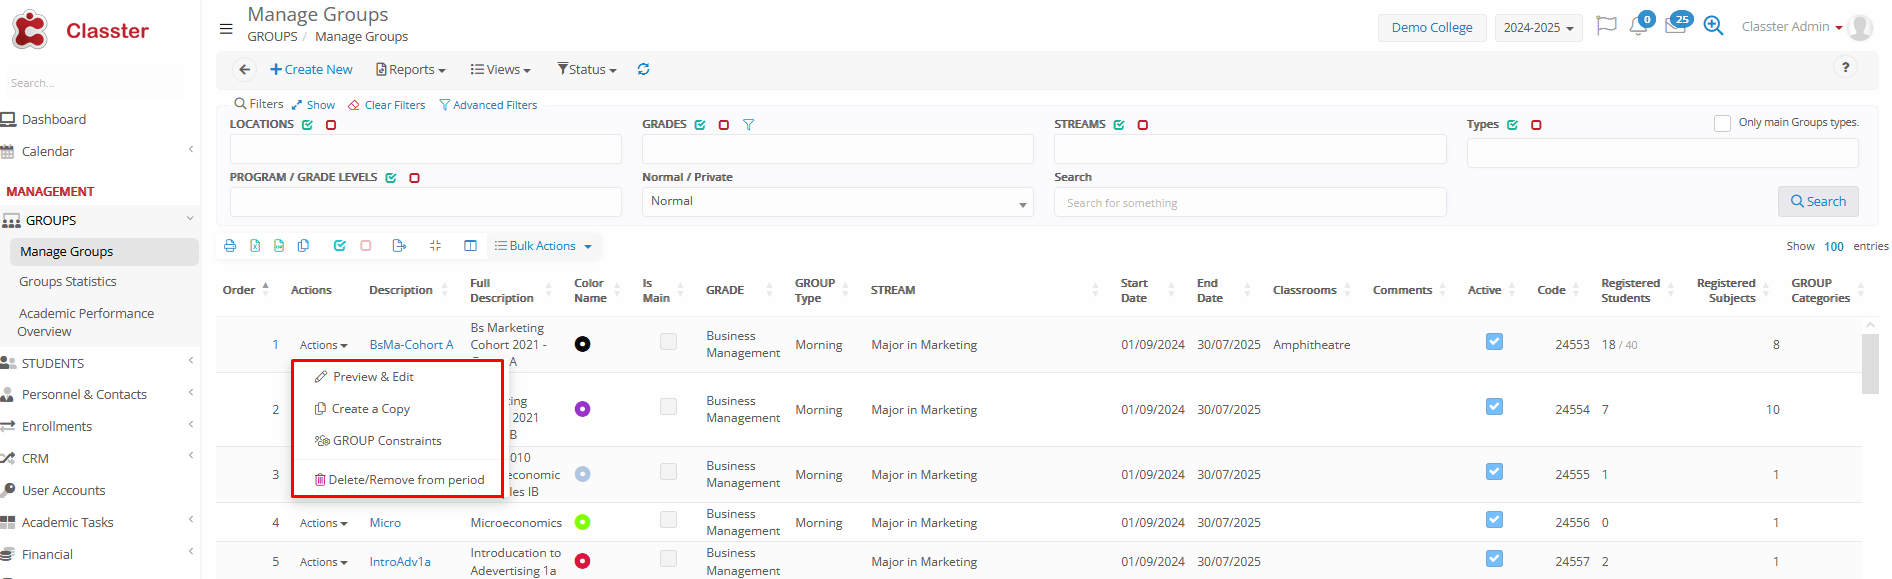
- Preview & Edit: Opens the Group Card for viewing or editing (same as if double-clicking on the Group Description).
- Create a Copy: Opens the ‘Create New’ card, with all fields at ‘General Data’, ‘_Subjects_’, and ‘Billing & Prices’ Tabs prefilled as per the group copied. You can make the required changes before Saving/Creating.
For similar groups, like ‘Main Group A1’ and ‘Main Group A2’ of ‘Grade/Year A’, or ‘MBA Cohort 2026’ and ‘MBA Cohort 2027’.
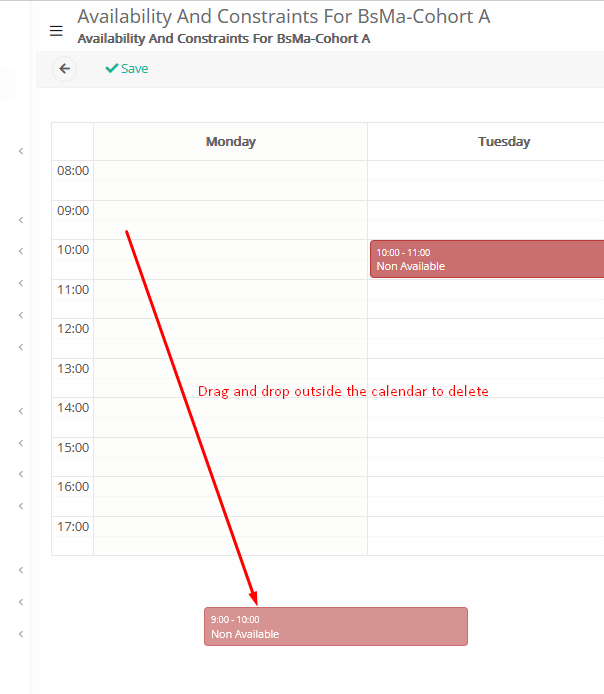
- Group Constraints: Opens a pop-up window with a calendar, where you can add availability or unavailability for the group on specific days/times used in the general Timetable.
Please note that to delete an entry, you need to drag and drop the slot outside the calendar/table:
- Delete / Remove from Period (current or all periods): With a later question, you can select to delete the group a) from the current academic period or b) from all academic periods (permanent deletion, not deactivation).
If there are enrollments and connections to the group, they must be deleted.
Not recommended if a group actually took place, you could use the ‘Deactivation’ option to retain historical data.
Tip: Use Remove from Period instead of deleting Groups to preserve historical data.
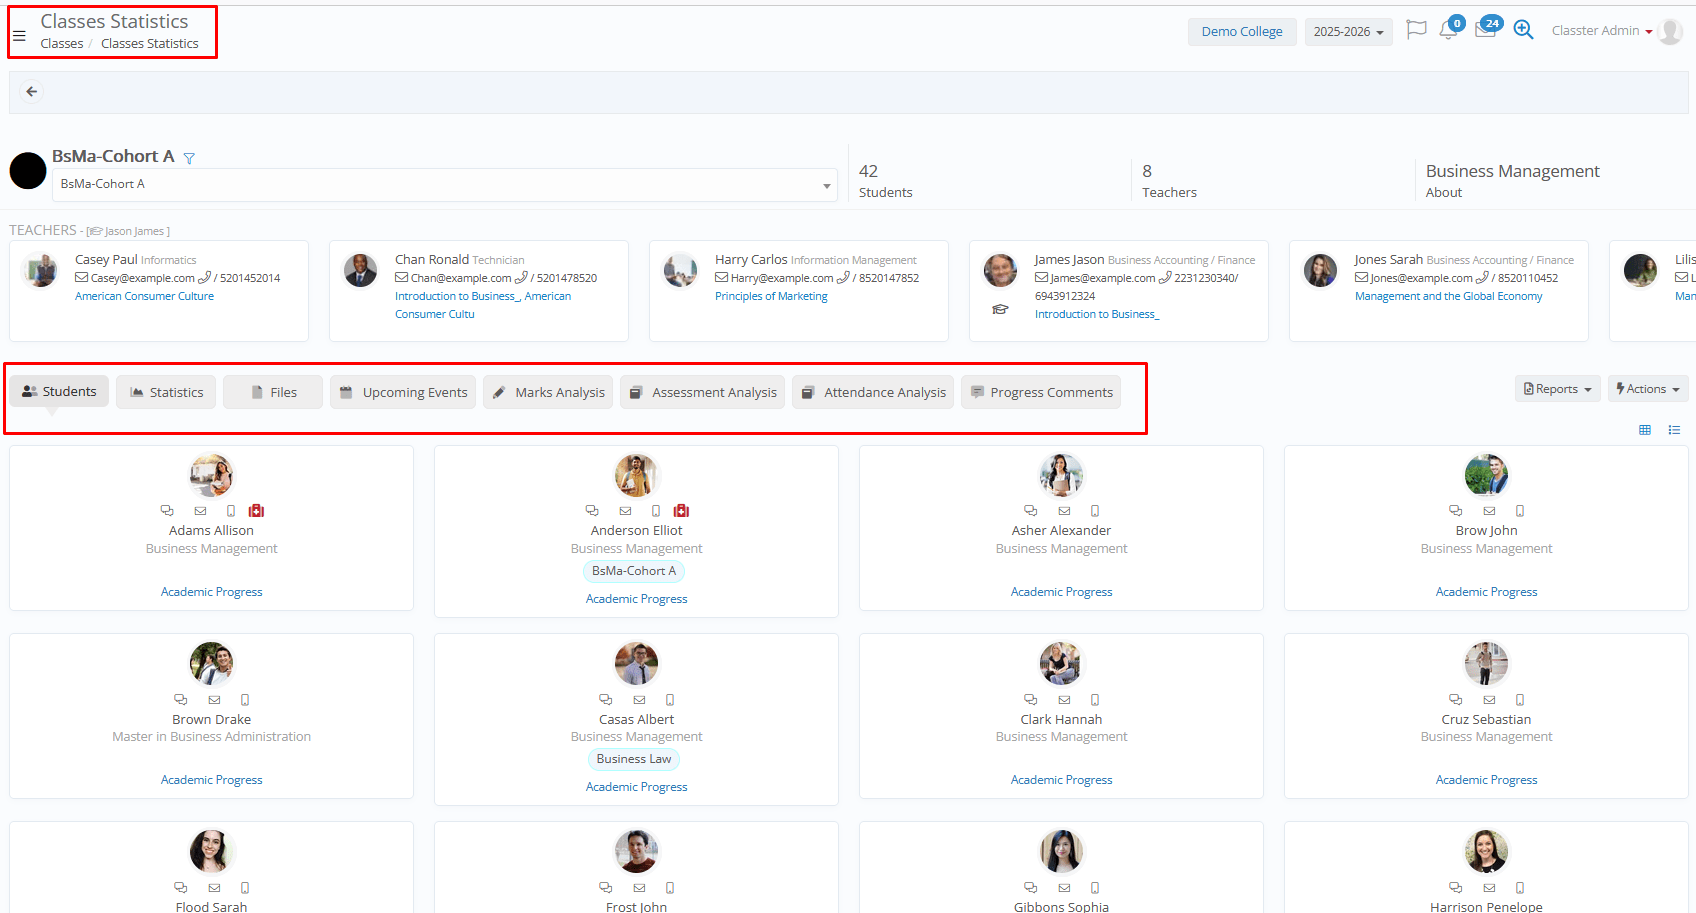
Menu _Group_ Statistics
The menu Group Statistics provides a comprehensive overview of each group’s key data, including teachers, students, and essential details. It also offers access to insights such as gradebook performance, attendance analysis, upcoming events, and overall group progress.
You can access it via: Management > Groups > Statistics.
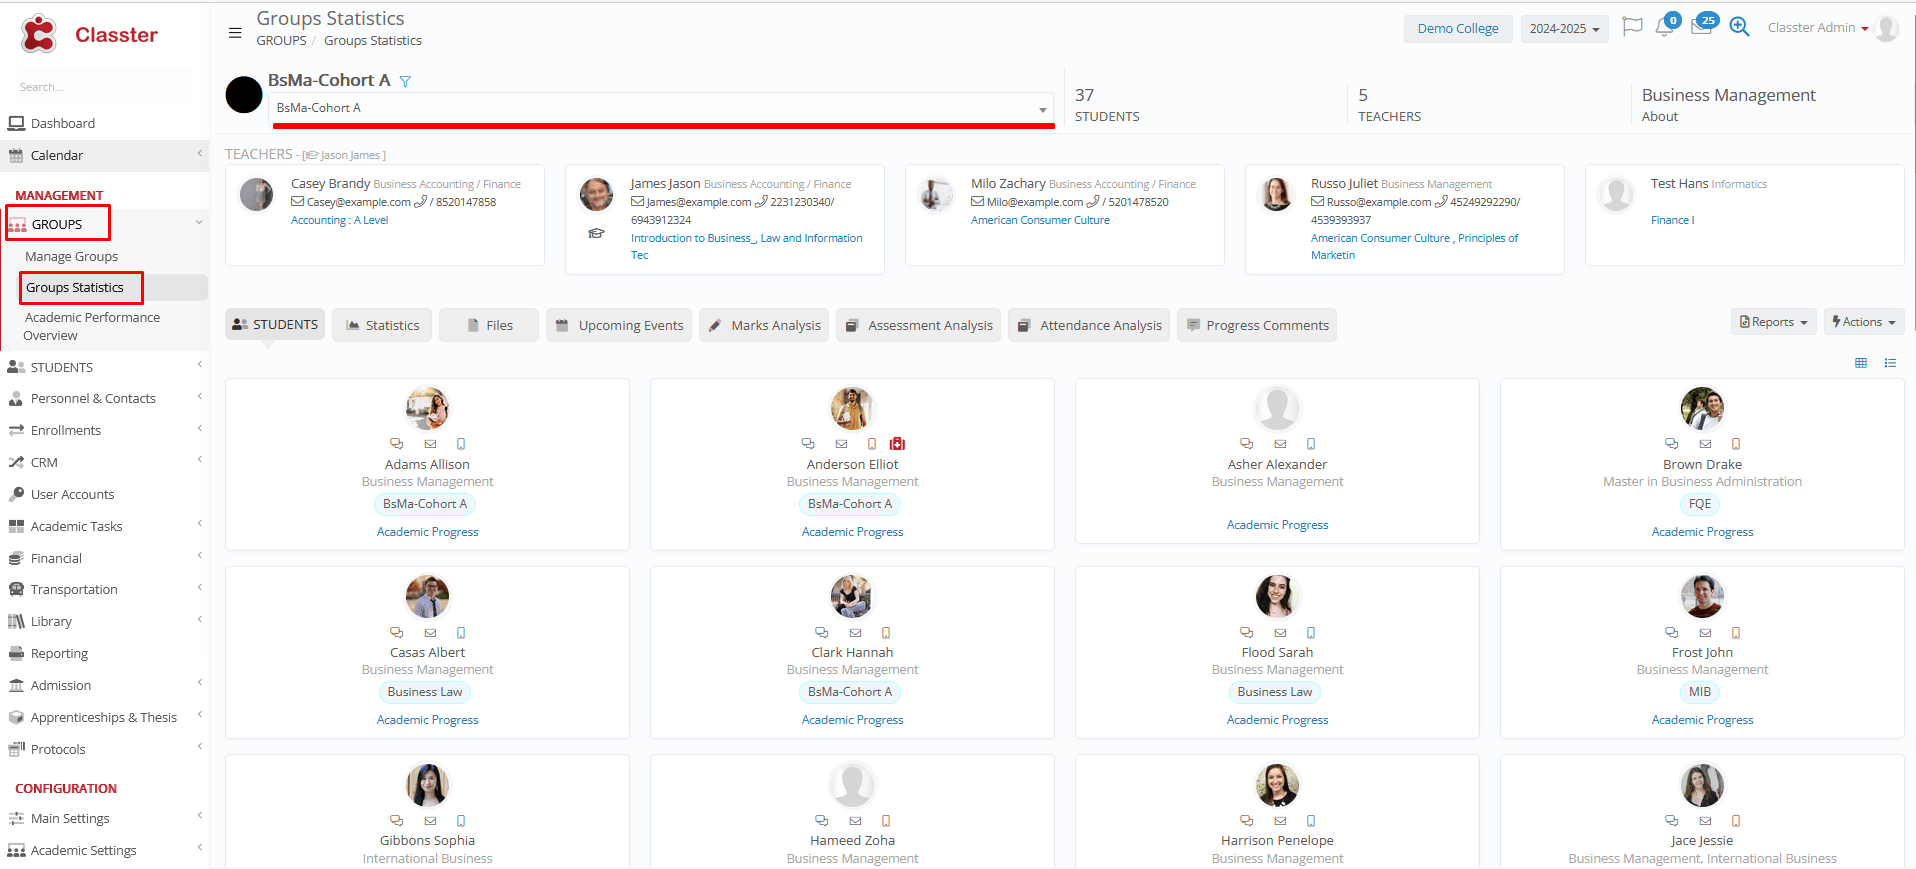
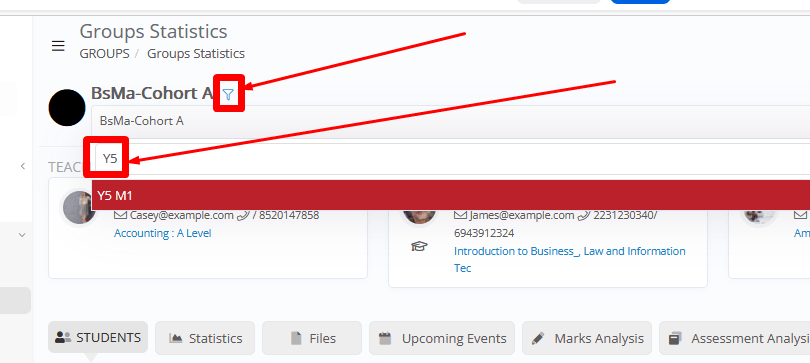
You can select a _Group_ from the dropdown list on the top left of the screen.
You can start typing the group Title, or you can use the Advanced filters to easily search for the group you are looking for.
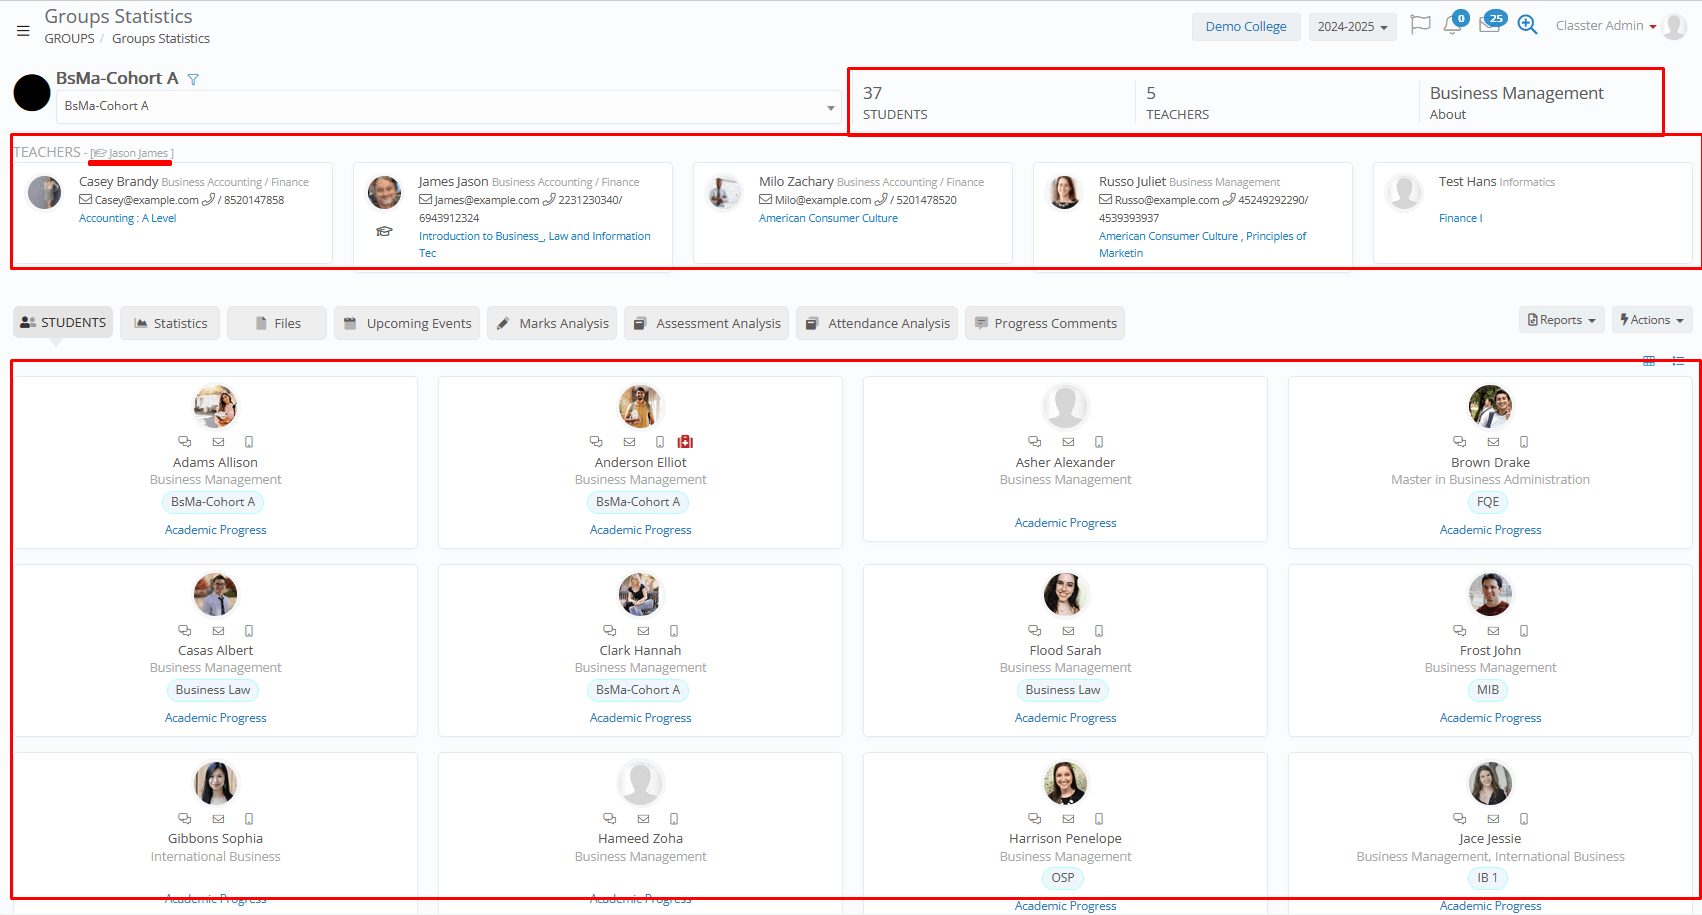
Once a Group is selected, the system automatically loads all related information.
-
- Allocated Teachers and Supervisor
- Enrolled Students
With important information such as Contact details, send Message, Medical info, ability to redirect to the Students’ Academic Progress view, etc.
- Additional Tabs with Gradebook / Assessment Marks Charts, Group Files, Upcoming Events (Assessments, Quizzes, etc.), Gradebook Marks / Assessment Marks and Attendance Analysis, and Group’s current Progress Status and Comments.
Available Tabs

- Students: Displays the list of students enrolled in the _Group_ (any _Subject_), in card view, with quick actions and views available, such as send message/email/SMS and medical info.
The student’s Educational _Grade_/Program and the ‘Main’ Group are also displayed on each card.
The Academic Progress option is a link redirecting to the student’s academic progress view.
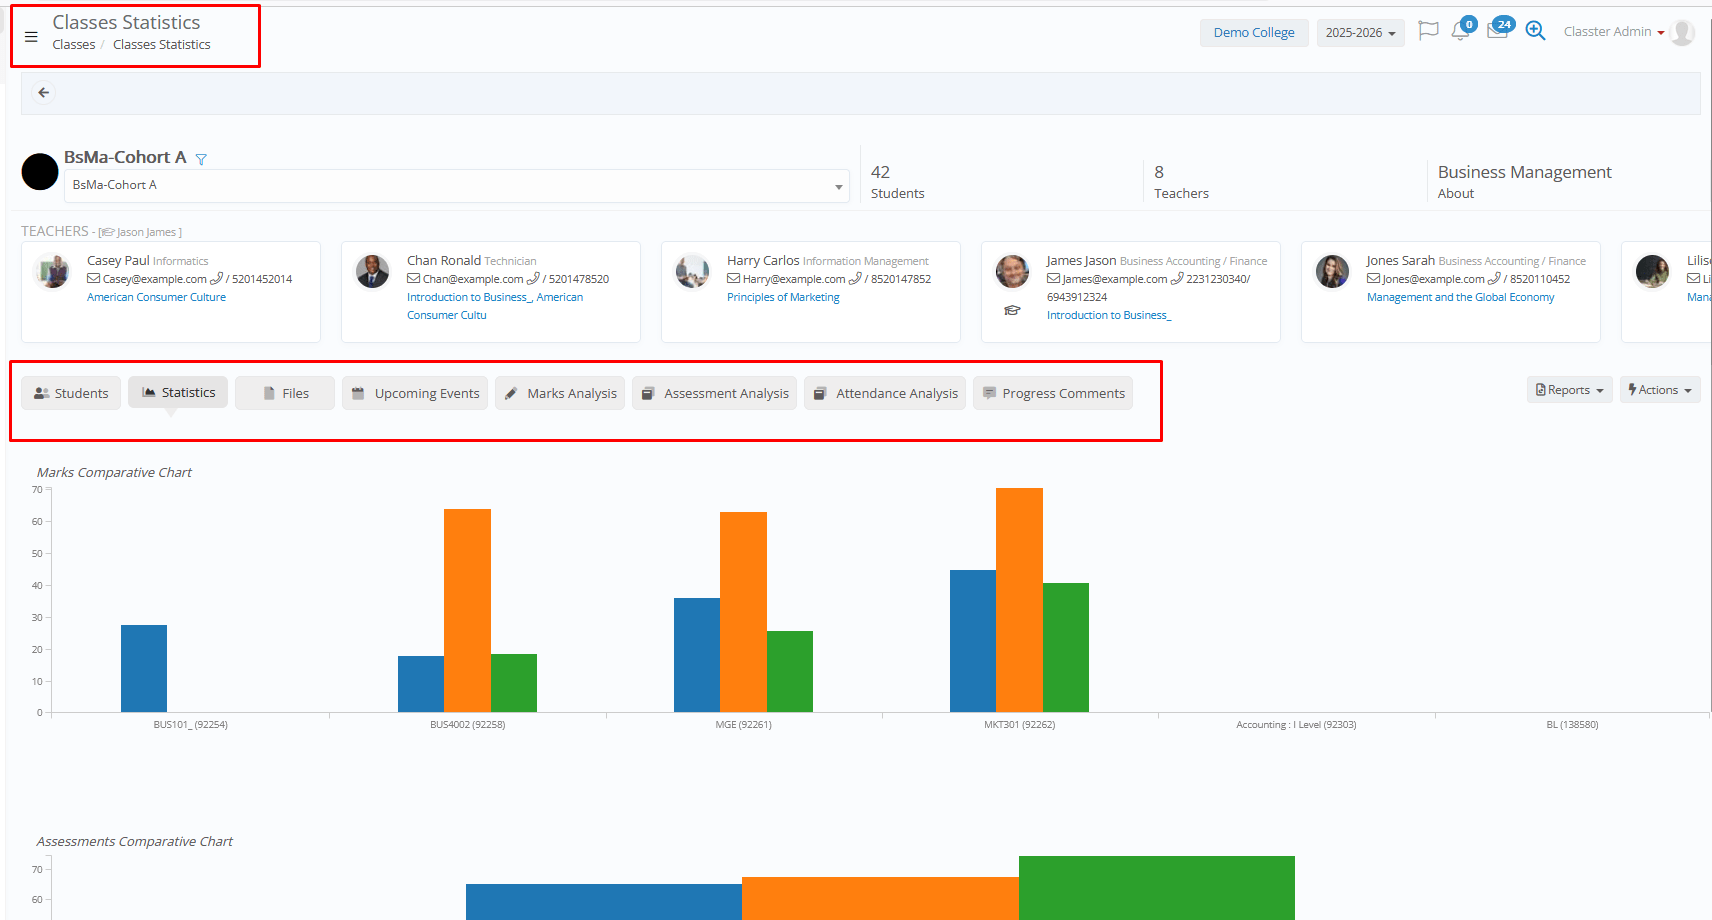
- Statistics: Charts with statistics from the gradebook and assessment marks per subject and marking period.
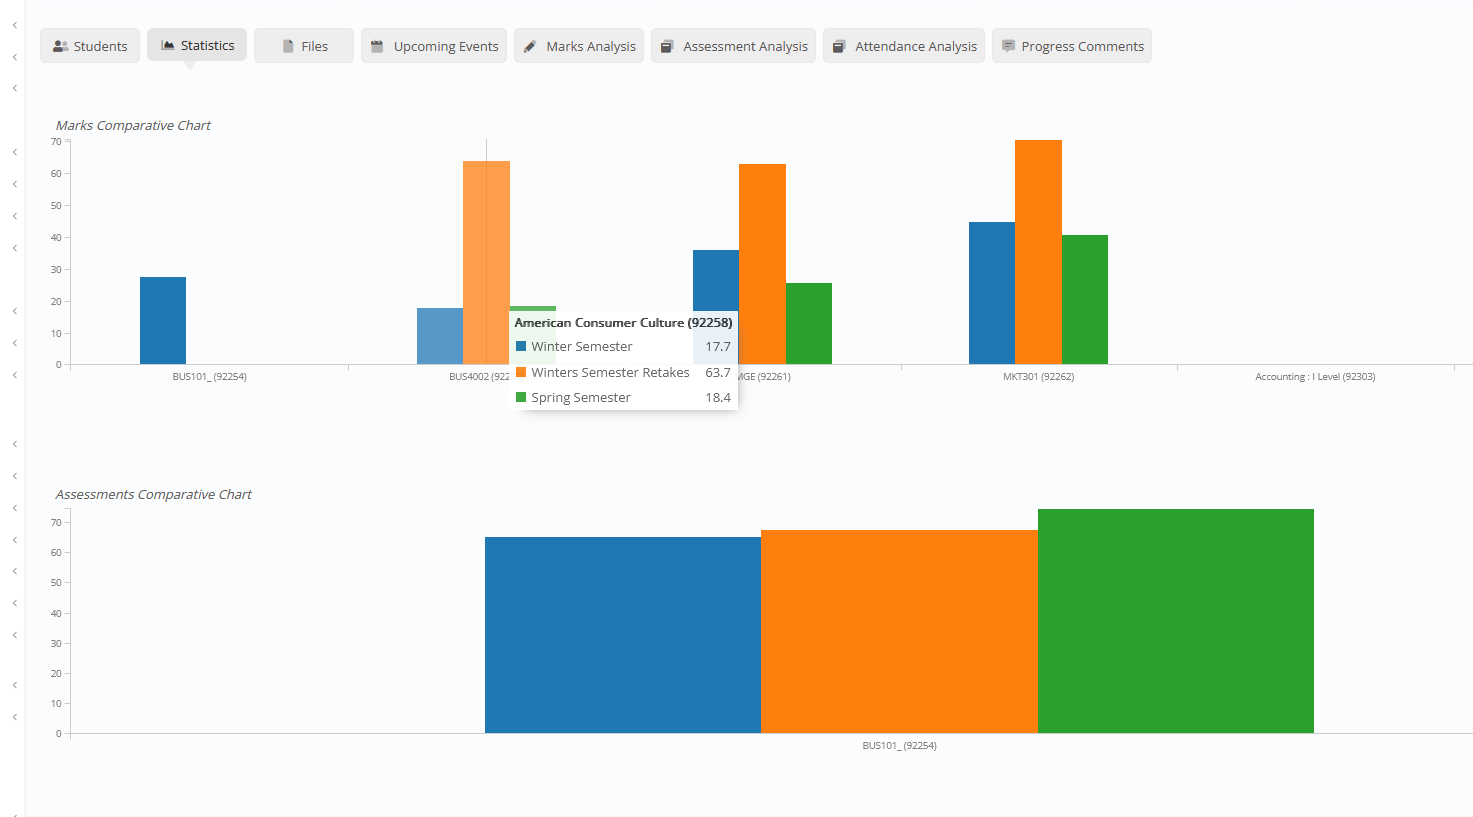
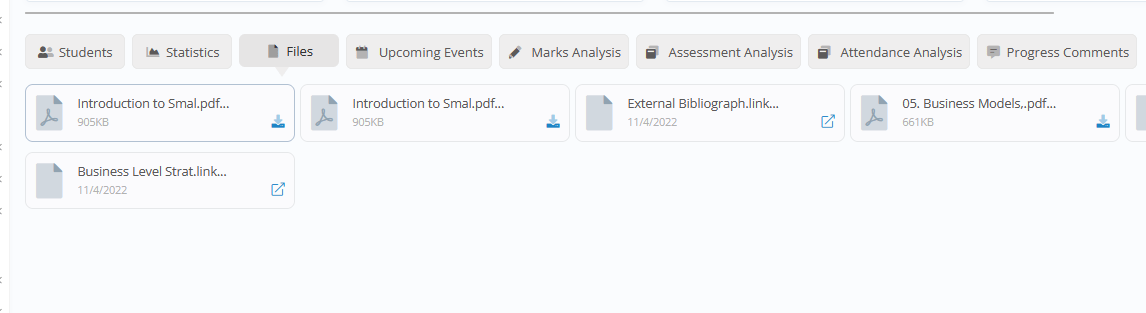
- Files: View of the group’s Files & Links (added from the Group card > Files & Links Tab).
- Upcoming Events: View of scheduled upcoming assessments, assignments, quizzes, homework, and deadlines.

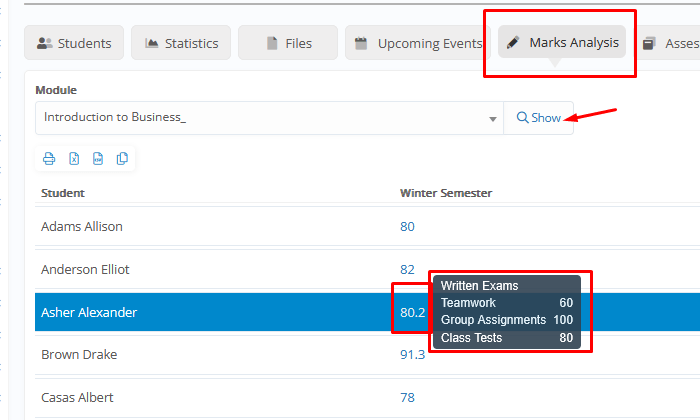
- Marks Analysis: View of marks per _Subject_ and marking period. A quick view of all marks from the marking scenario is also available when hovering over the mark.
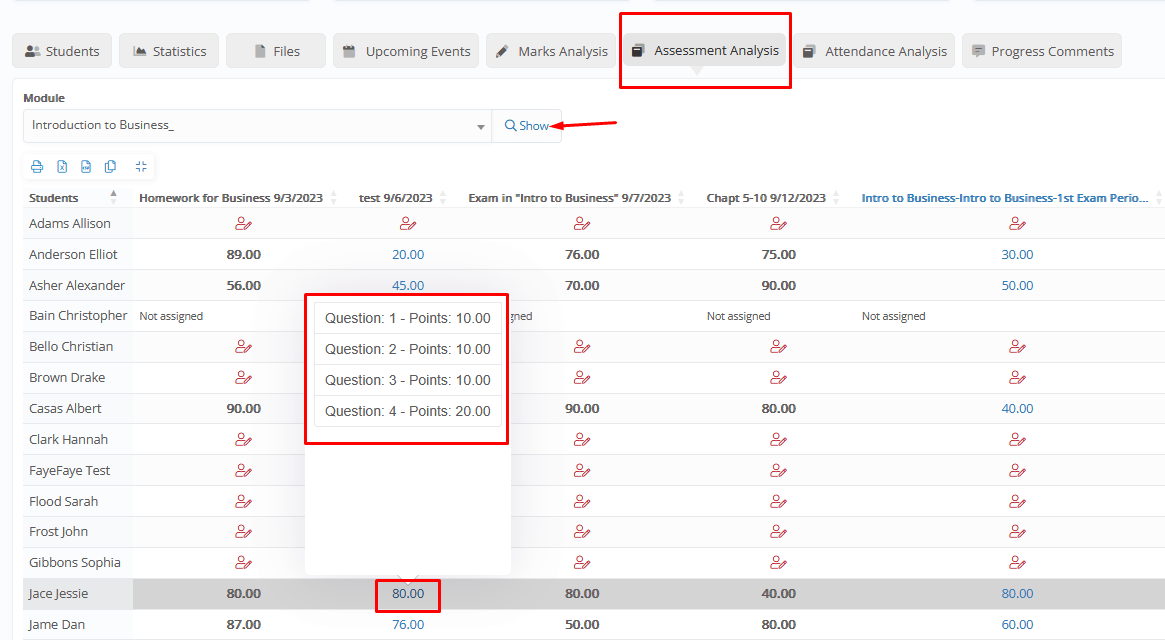
Assessment Analysis: A view of the results of all assessments, assignments, and quizzes of the group per subject. For quizzes, a quick view of the questions is also available when hovering over the mark.
- Attendance Analysis: View of all attendance records (absences/presences) with 2 view options, all student totals per week, or individual student records per day.
- Attendance Weekly Analysis: Weekly total absences & all weeks’ total absences, for each student.
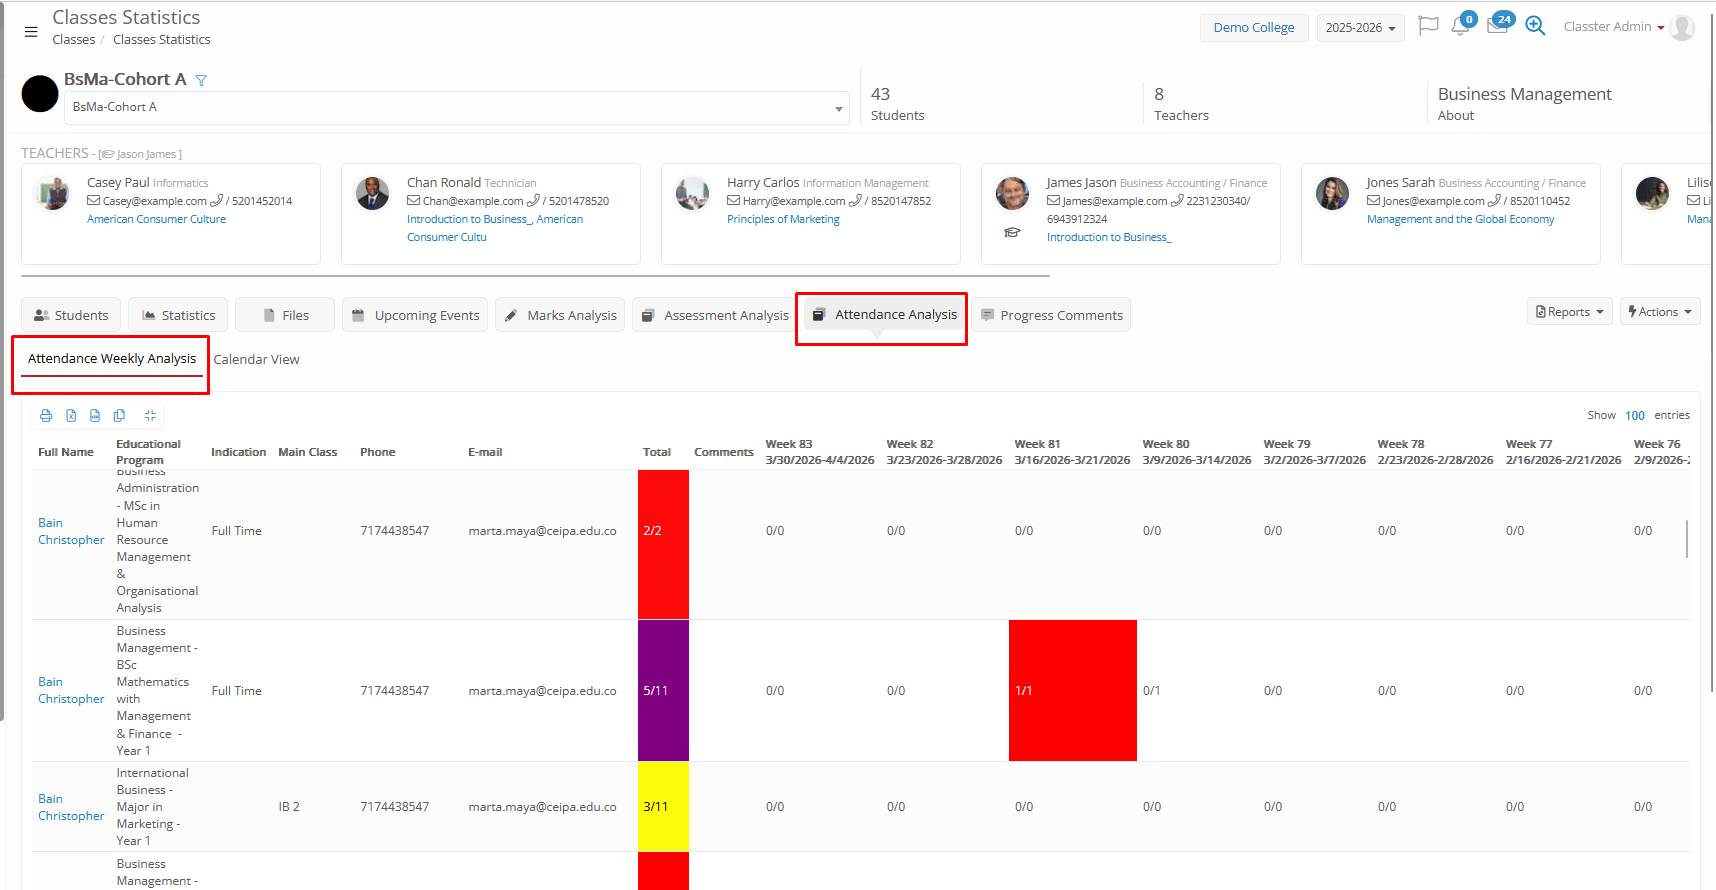
Color meaning: The grid uses colors to make it easier to quickly spot students with higher absence levels (both for total absences or weekly totals).
- 0% to 20% absence → no color
- 21% to 40% absence → Yellow
- 41% to 60% absence → Purple
- More than 60% absence → Red
e.g. 6 absences out of 10 → 60% → Purple
-
- Calendar View: A calendar view of absences/presences per student, showing the records of each day, with the ability to show in Weekly or Monthly view.
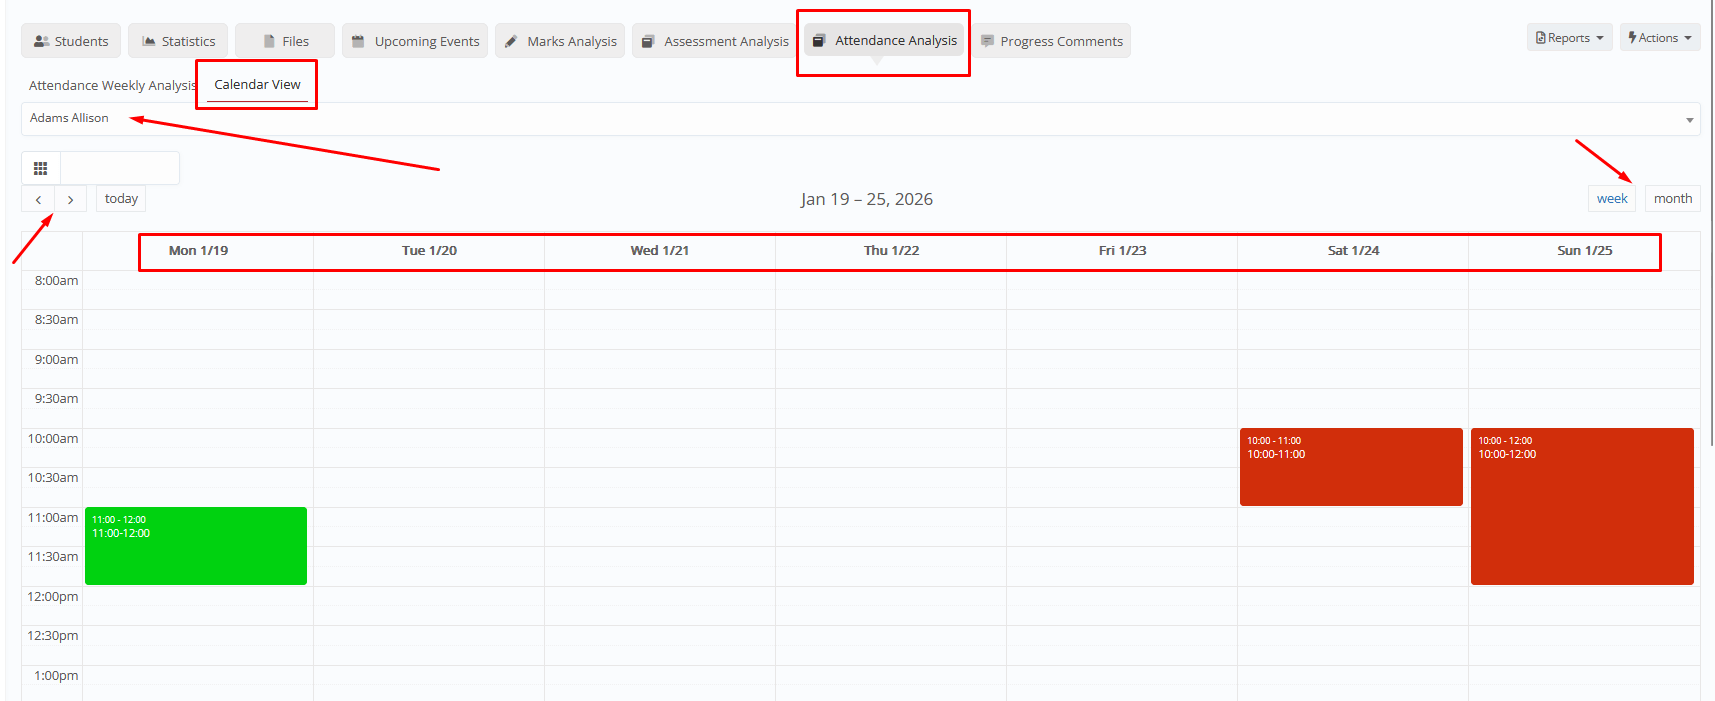
Color meaning: Presences in Green, Absences in Red.
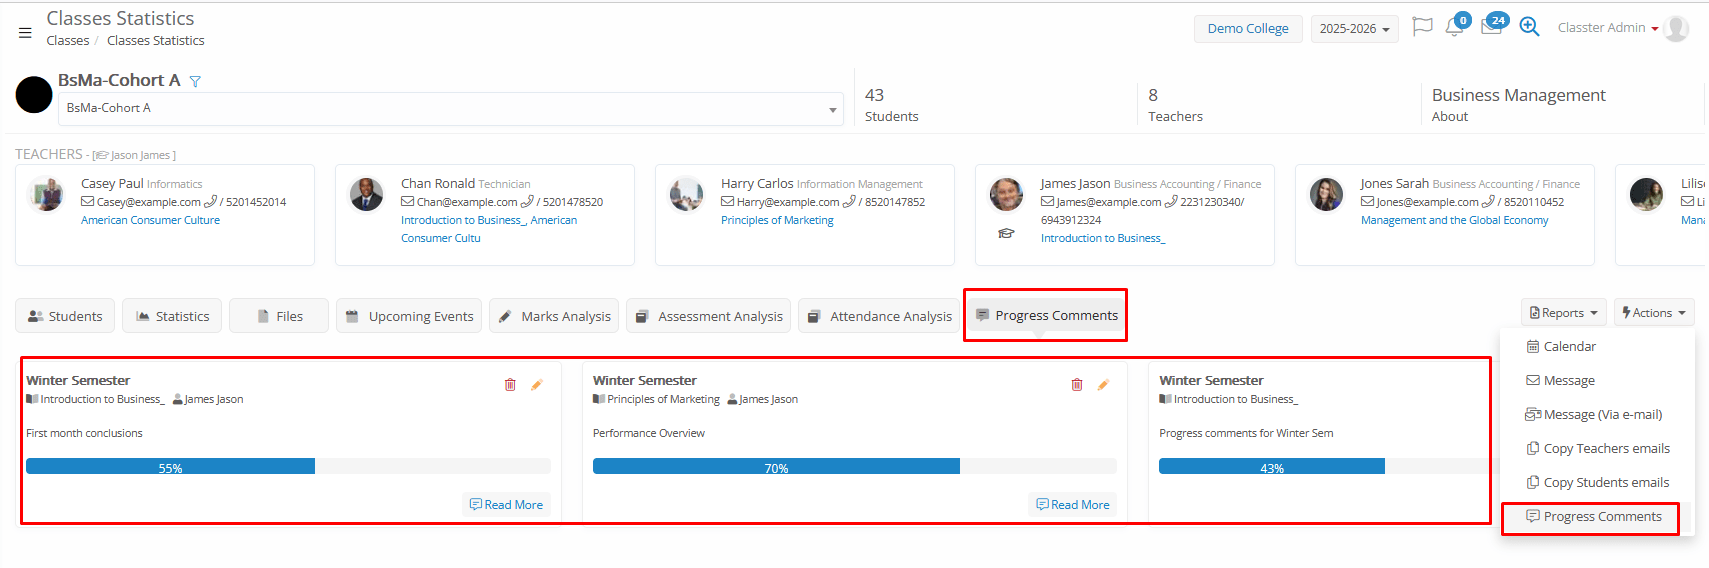
- Progress Comments: Displays academic progress notes and teacher feedback recorded for each group and subject combination, including the current progress ratio as well. You can view and edit from this Tab.
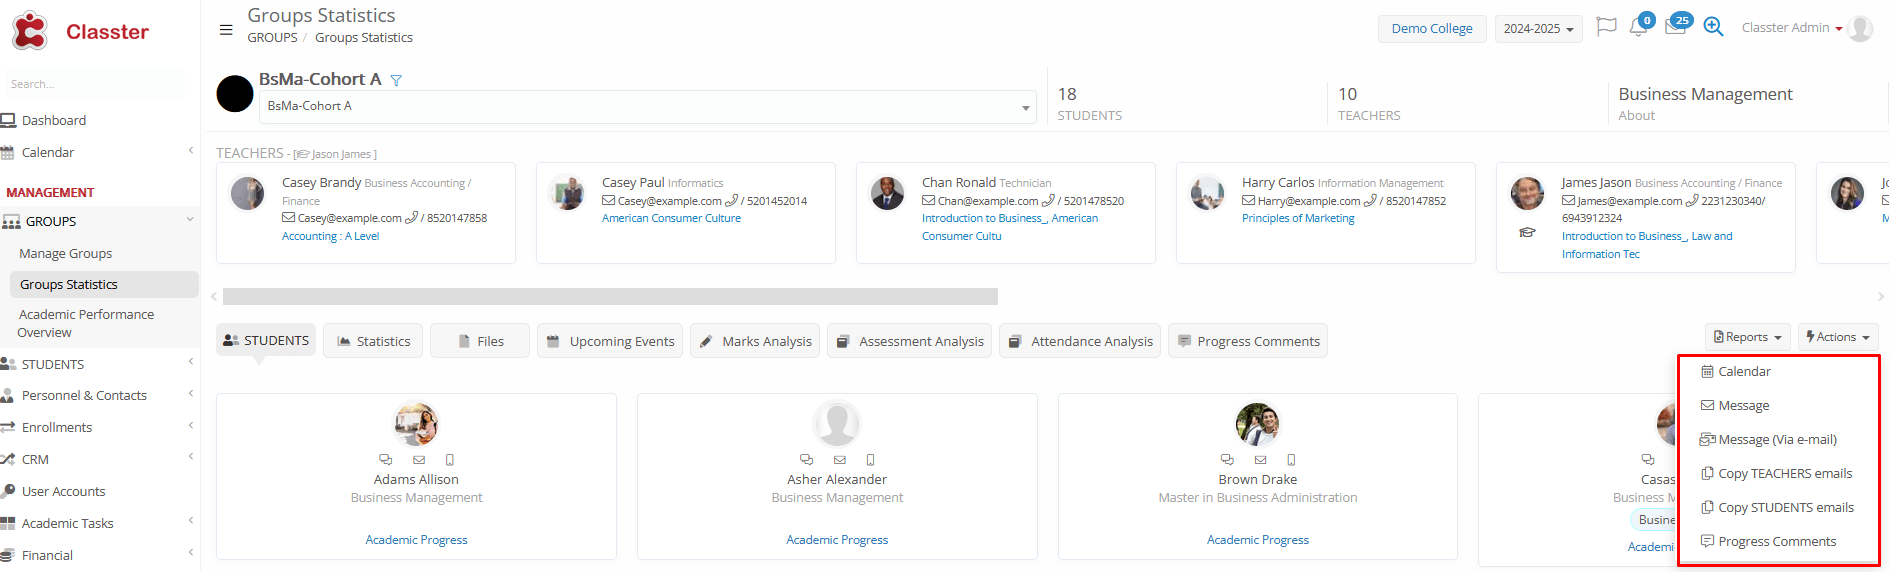
Actions in Groups Statistics
From the Group Statistics page, you can perform several actions:
- Reports: Default or custom reports, related to the groups’ statistics. Relevant privileges exist in User Roles, editing access for each one of the available reports.
- Calendar: View all Group-related events in a calendar format (Timetable, Assessments, Events)
- Message: Communicate directly with all students/teachers within the group (internal Classter message).
- Message (via e-mail): Communicate directly with all students/teachers within the group (e-mail and internal Classter message).
- Copy Teacher Emails: Instantly copy all allocated teachers’ email addresses to the clipboard.
- Copy Student Emails: Instantly copy all student email addresses to the clipboard.
- Progress Comments: General academic progress notes for each _Group_ and _Subject _ combination. Including completion rate 1-100%. Progression notes can also be submitted by Teachers and used in progress reviews.
You can view them as follows:
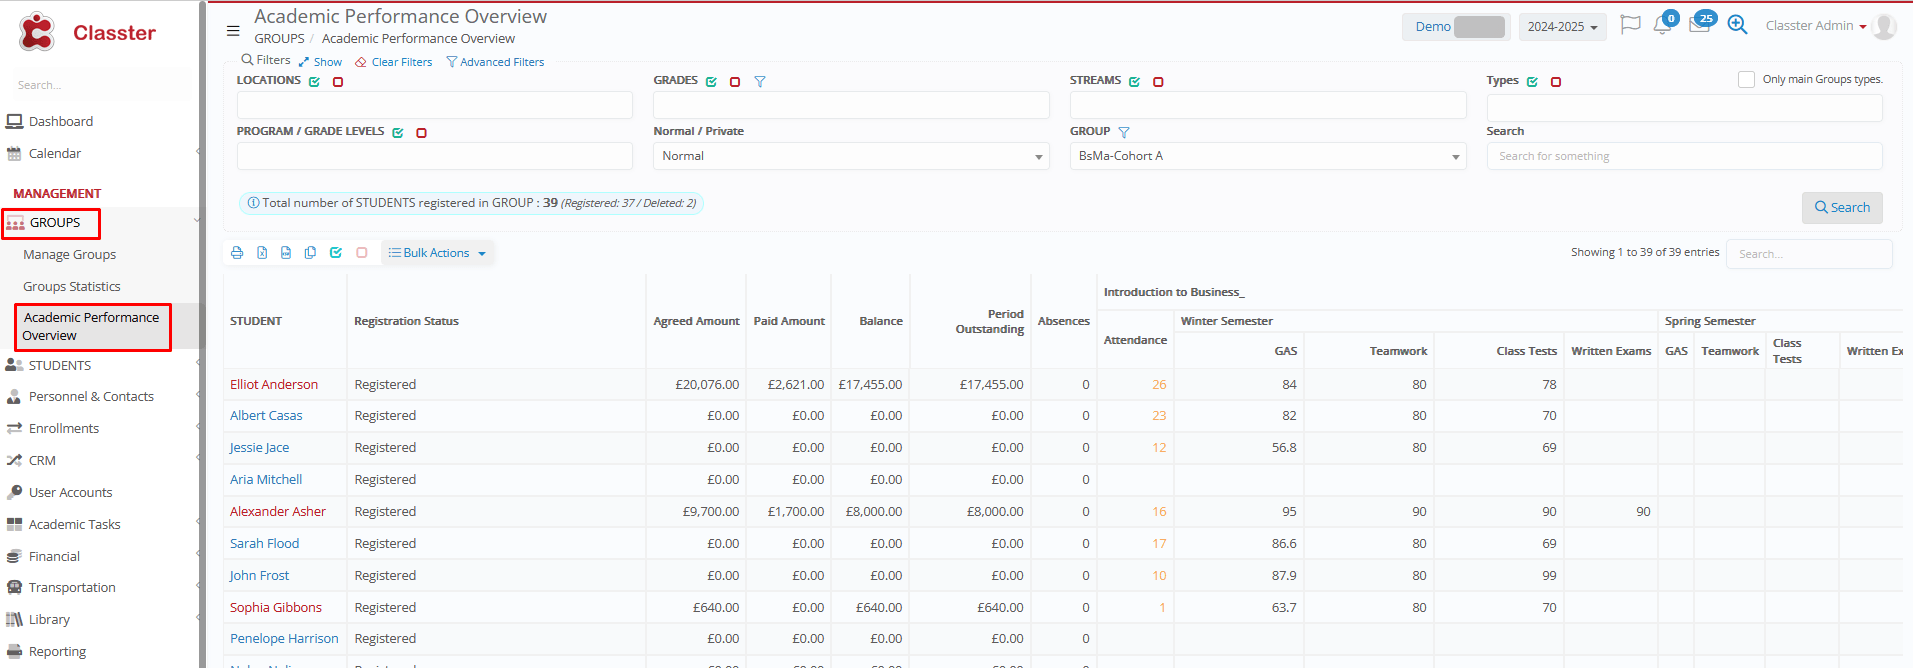
Menu Academic Performance Overview
The Academic Performance Overview provides a centralized dashboard for monitoring and analyzing student payments and performance (attendance, marks, across all subjects and marking periods) for the selected group.
You can access it via: MANAGEMENT > _Groups_ > Academic Performance Overview.
Filters
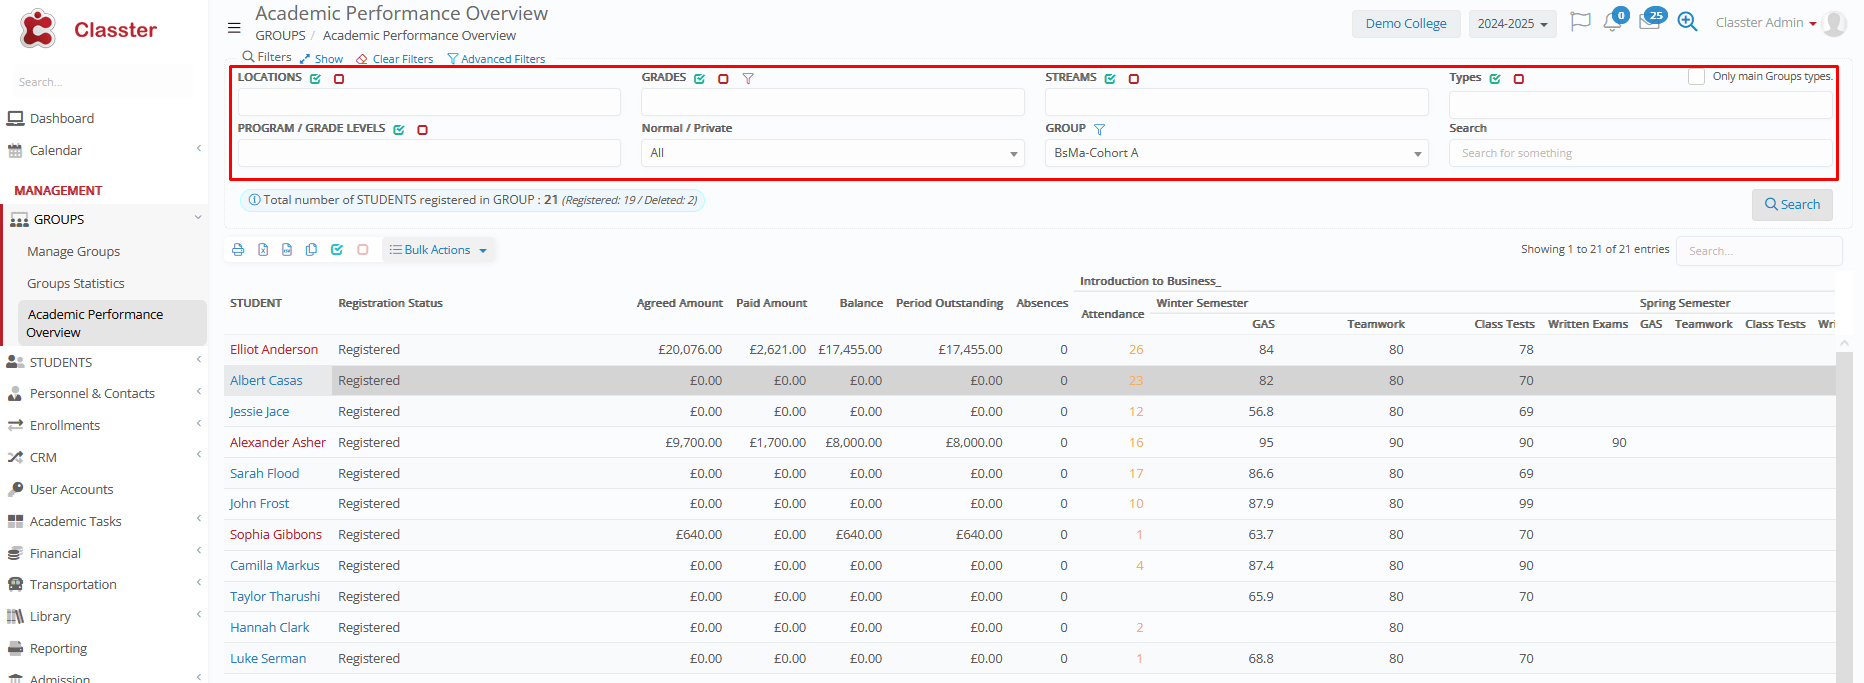
Select the desired _Group_, using the filters on the top. All filters are actually used to filter out the relevant _Groups_ in the group filter.
- _Location_: Filters the relevant _Grades_/Programs in the next filter and the relevant _Groups_ in the corresponding filter.
- _Grade_/Program: Filters the relevant _Streams_ in the next filter and the relevant _Groups_ in the corresponding filter.
Advanced filters also exist in this filter, to additionally filter out Grades/Programs based on their _Grade_ Level, _Building_/Sublocation, _Grade_ Type, and connected Curricula.
- _Stream_: Filters the relevant _Groups_ in the corresponding filter.
- _Group_ Types (& Select only Main _Group_ Types toggle): Filters the relevant _Groups_ in the corresponding filter.
Group types are configured from CONFIGURATION > Main Settings > Dropdown Lists > Type: System & Dropdown list: _Group_ Type
Property “Is Main” in the Types. Connect types to the groups (Group card > General Data > _Group_ Type
‘Main’ Group property is based on the
- _Grade Level_: (If used) Filters the relevant _Groups_ based on their connected _Grade_/Program’s _Grade_ Level.
(Please note that this filter may affect the results of the _Grade_/Program filter; if this criterion is not met, some groups may be excluded even though they were initially included in the _Grade_/Program filter).
- Normal/Private: Filters Groups based on their Type. This is set through the _Group_ Types: ‘Private session’ property.
CONFIGURATION > Main Settings > Dropdown Lists > Type: System & Dropdown list: _Group_ Type > Property “Private session” (if disabled, then it is considered as normal).
- _Group_: The final filter to show the results. The overview will be shown for the selected group and all students enrolled in this group.
Previous filters may affect the results you will see in this filter (as explained). If you don’t use any other previous filters, this filter will show all active groups.
Advanced filters also exist in this filter, to additionally filter out groups based on their Group Types, Group Categories, ‘Is Main’ property, Sections, and Supervisors.
After the above filters or without additional filtering, you can start typing the group title to find the one you are looking for.
Advanced Filters
Advanced filtering options provide deeper control when working with large data sets:
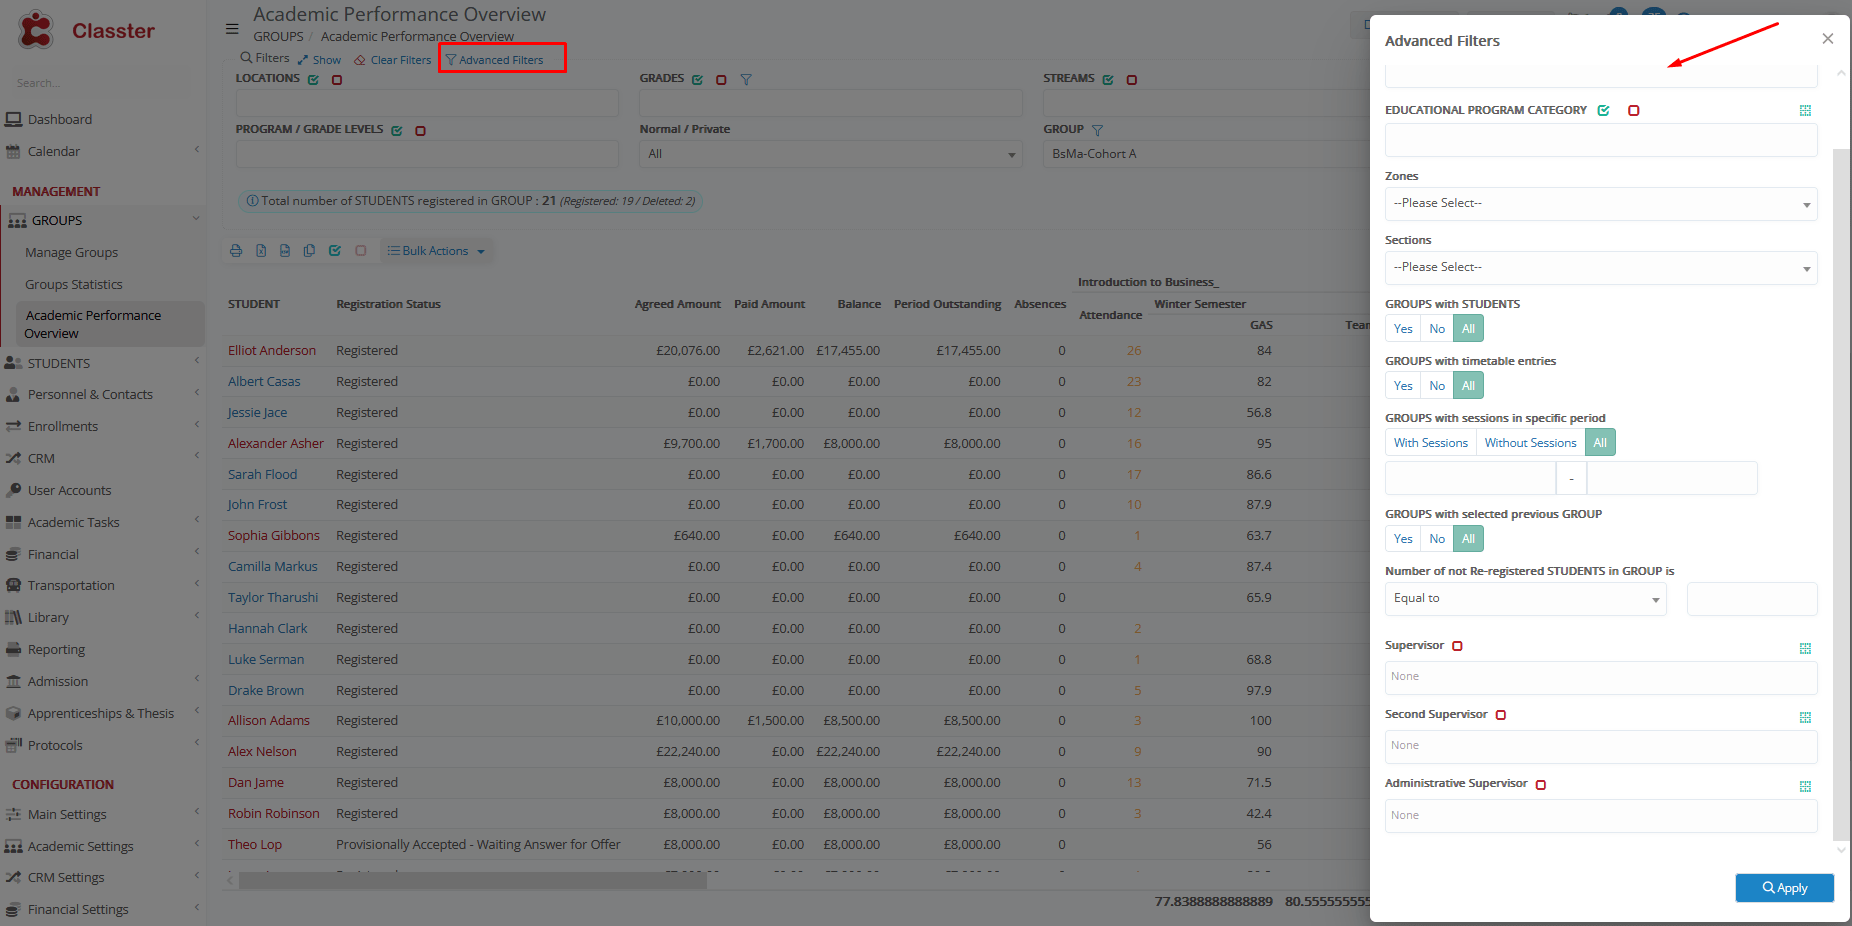
- _Group_ categories: Filters the filter of _Groups_ based on their connected _group types_ (online, campus etc.).
Group categories are configured from CONFIGURATION > Main Settings > Dropdown Lists > Type: System & Dropdown list: _Group_ Type > Property “In Main” in the Types. Connect types to the groups (Group card > General Data > _Group_ Categories.
- _Educational program category/Specialization_: Active, when the corresponding entity is enabled. Filters the filter of _Groups_ by their connected _educational program category/specialization_ (theoretical orientation, full-part time, year-semester, etc., based on the institution’s configuration).
- Zones: Filters the filter of _Groups_ based on the Zone of their connected timetable Section (e.g., Zone: “Afternoon” and Section: “Afternoon 15:00-17:00”).
CONFIGURATION > Academic Settings > Timetable > Dropdown Lists > ‘Sections’ and ‘Zones’.
- Sections: Filters the filter of _Groups_ based on their connected timetable Section (e.g., Afternoon 15:00-17:00).
CONFIGURATION > Academic Settings > Timetable > Dropdown Lists > ‘Sections’ and ‘Zones’.
- _Groups_ with students (Yes/No/All): Filters the filter of _Groups_, based on whether they currently have student enrollments or not.
- _Groups_ with timetable entries (Yes/No/All): Filters the filter of _Groups_, based on whether they currently have a timetable schedule or not.
- _Group_ sessions in specific period (With/Without Sessions/All with Date filters): Filters the filter of _Groups_, based on their scheduled sessions in specific date periods.
- _Groups_ with selected previous _Group_ (Yes/No/All): Filters the filter of _Groups_, based on whether they have a ‘previous’ _Group_ set or not.
- Number of non-registered _Students_ in _Group_ is (equal/greater/less than X): Filters the filter of _Groups_, counting their students’ enrollments (e.g. groups which have less than 10 students enrolled or groups which have more than 20 students enrolled)
- Supervisor: Filters the filter of _Groups_, by their assigned supervisor (you need to start typing the teacher’s name for options to appear).
- Second supervisor: Filters the filter of _Groups_, by their assigned second supervisor (you need to start typing the teacher’s name for options to appear).
- Administrative supervisor: Filters the filter of _Groups_, by their assigned administrative supervisor (you need to start typing the employee’s name for options to appear).
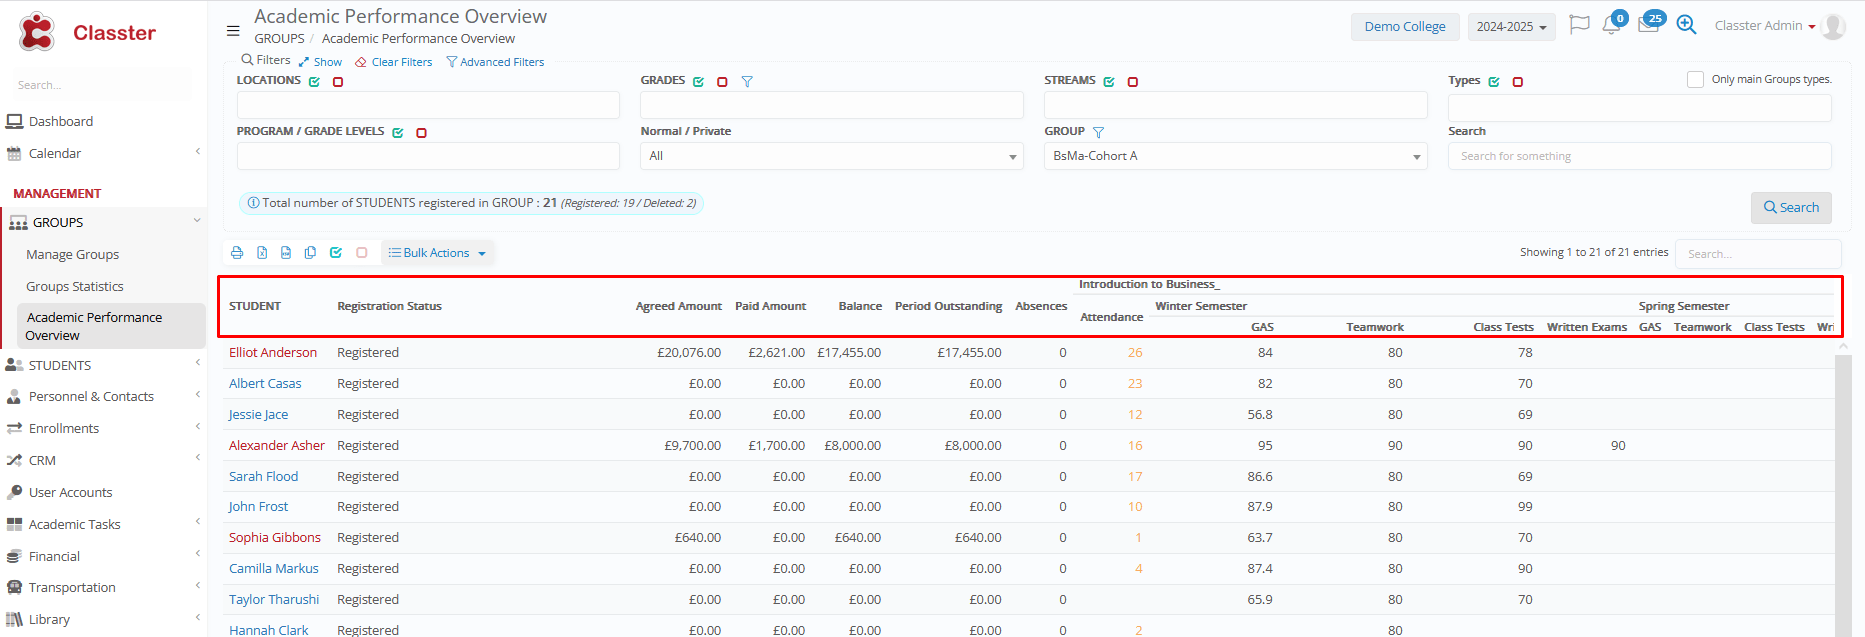
Metrics and columns
The dashboard provides key academic, financial, and attendance insights per Group:
- Student: Shows the student’s name and profile.
- Registration Status: Indicates whether the student’s registration is complete or pending.
- Agreed Amount: Shows the total agreed tuition or fees.
- Paid Amount: Displays the amount already paid.
- Balance: Shows the remaining outstanding amount.
- Period Outstanding: Displays pending payments per academic period.
- Attendance: Shows attendance rate and absence counts.
- Assignments: Displays average assignment performance.
- Teamwork: Shows evaluation of collaborative tasks or projects.
- Class test: Displays performance in in-class tests.
- Written Exams: Shows performance in written assessments or exams.
Group connections
Importance of Linking Groups – Subjects – Teachers – Students
In Classter, accurate academic and other functions depend on correctly linking _Groups_, _Subjects_, _Teachers_, and _Students_.
Two connection levels are critical:
- Group → Subjects → Teachers: Defines which subjects belong to each Group and who is teaching each subject in the group.
- Group → Subjects → Students: Defines the exact enrollments of each student. (Note that Students can be enrolled in specific subjects of each group).
For enrollment processes, please refer to the relevant manuals.