Agent Management
Overview
Personnel & Contacts / Employees & Contacts / Select an Agent account / Allow agent to access financial data and online payments of connected students/applicants even if he is not set as payer AND Agent can only register installment payments
Classter now enables Agents to access Student Financial data and online payment options, even if they are set as payers. Depending on configurations, Agents can register installment payments but cannot proceed to check out. These privileges are visible in the Agent Portal and are fully managed by administrators through Role Management and individual Agent Profiles.
Note: The following sections explain how to configure Agent settings as an Admin.
Set/Unset Agent as a Payer
To set/unset Agent as a payer, navigate to: Main Settings > Role Management > Edit > Agent > Privileges > Billing > The agent will be set automatically as a Payer.
Then, select one of the following options (as per your requirements):
- Yes (editable): The Agent is automatically set as a payer but can be removed or changed manually.
- Yes (not editable): The Agent is automatically set as a payer and cannot be removed or changed manually.
- No (not available): The Agent will not be set as a payer, regardless of circumstances.

Agent Profile Privileges
To manage Agent Profile privileges, go to: Personnel & Contacts > Employees & Contacts > Select an Agent account. Then, enable or disable the following toggles:
- Allow agent to access financial data and online payments of connected students/applicants even if he is not set as payer.
- Agent can only register installment payments.
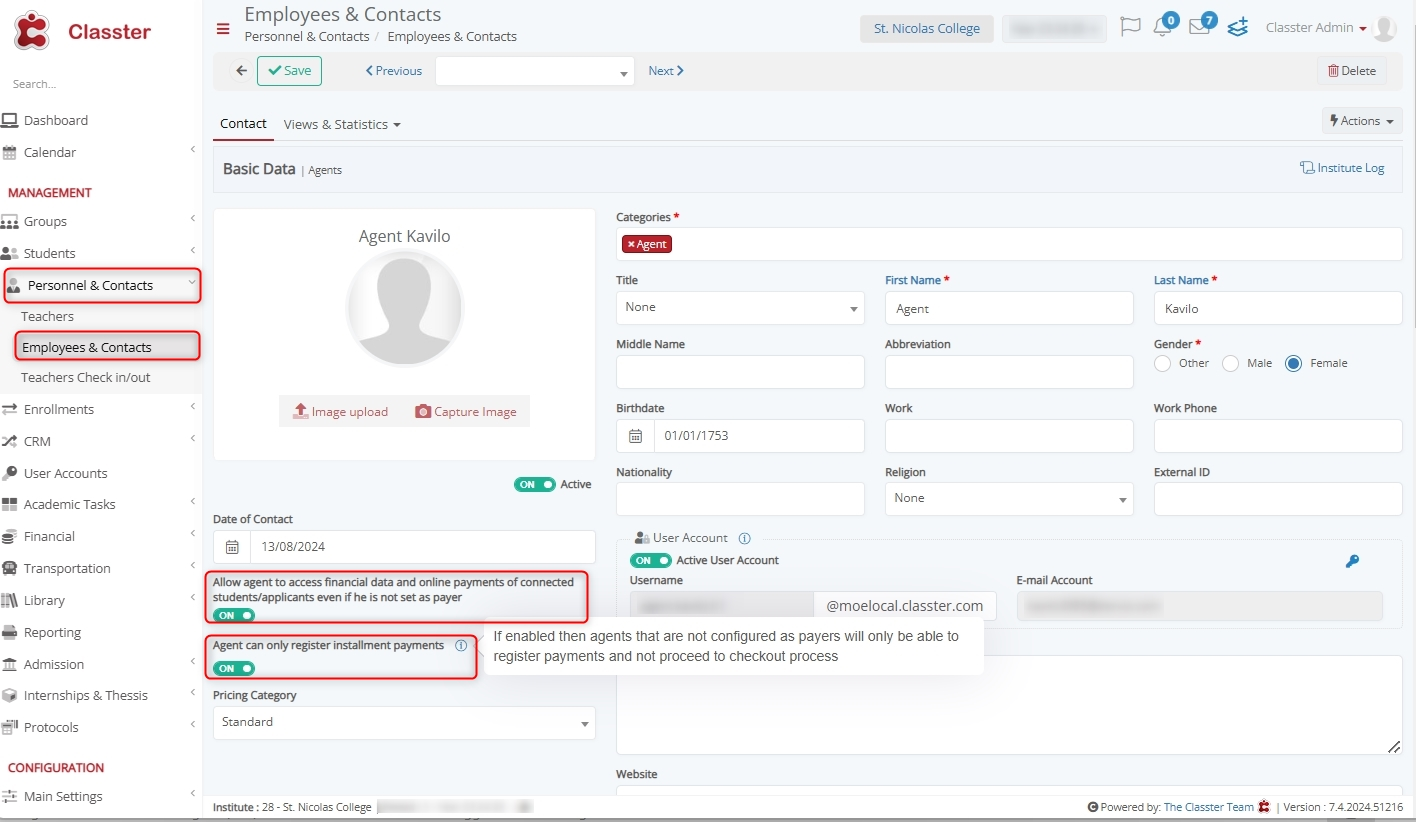
Note: Before Registering an installment, make sure you’ve added Agent as a Relative to the desired Student Profile.
Register Installments in Agent Portal
To register an installment: Log in as an Agent > Financial > Overview > Online Payment > Specific Installment/Free Payment (Open Amount) > Specify required information > Proceed to Payment.

However, as per configured settings, an Agent can only register installment payments and not pay them.
Commissions
Financial Settings / Dropdown lists / Pricing Categories / Edit a Pricing Category
Overview
The Commissions feature allows admins to configure commission settings for Pricing Categories. This includes enabling commissions, setting commission percentages, and choosing a calculation method (initial value, final value after discounts, or initial value minus discounts). Commissions are calculated per arrangement, saved in headers, and distributed across installments.
Enable Commissions
To enable commissions for Pricing Categories, navigate to: Financial Settings > General Settings > Price Lists, Fees & Taxes > Enable Commissions.

Setting Commission Percentage
To set Commission Percentage for a specific Pricing Category, go to: Financial Settings > Dropdown lists > Pricing Categories > Edit a Pricing Category > Mark Enable Commission checkbox > Enter Commission %.

Calculate Commission Method
In the Calculate Commission Method dropdown menu, select one of the following options:
- One the Initial Value: Commissions are calculated based on the original Pricing Category value before any discounts or reductions.
- On the Final Value – after Discounts and Reduction: Commissions are calculated using the final value after applying the discounts or reductions.
- One the Initial Value minus Discounts: Commissions are calculated based on the original value, subtracting only the discounts applied.

Pricing Categories and Lists
Main Settings > Educational Programs/Subjects/Services > Programs/List of Subjects/Manage services > Edit program/subject/services > Billing & Prices > Advanced Discount Configuration
Overview
Pricing categories linked to Agents are preselected when adding Educational Programs, Subjects, or Services. For enabled commissions, pricing lists include commission amounts and percentages, with auto-calculation and user-editable fields.
For Educational Programs
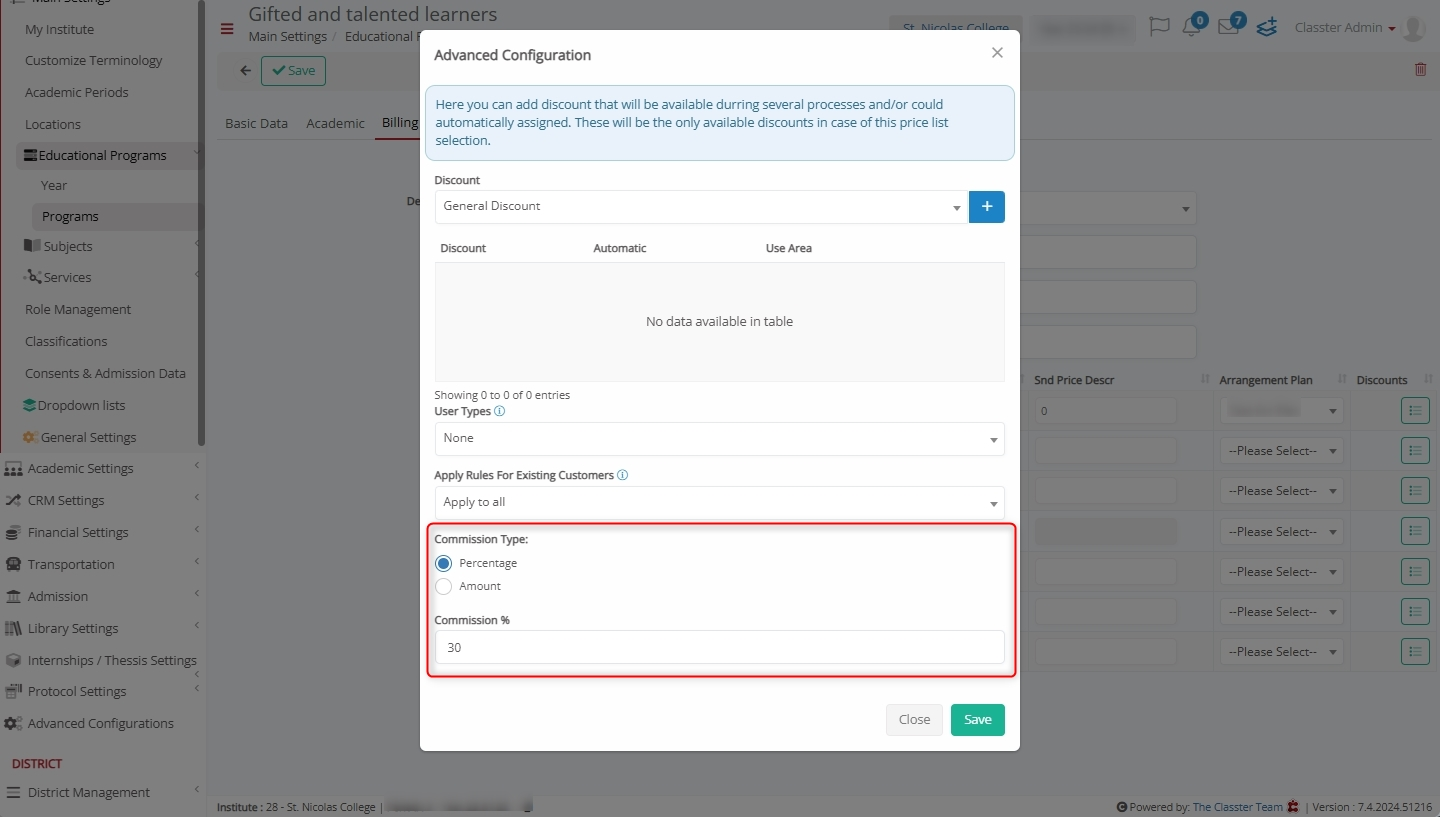
To set Commission for the Pricing Category of a specific Program:
- Navigate to: Main Settings > Educational Programs > Programs > Edit program > Billing & Prices > Advanced Discount Configuration.
- Set Commission Type: Percentage or Amount.
- Specify Commission % OR Commission Value.
For Subjects
To set Commission for the Pricing Category of a specific Subject:
- Go to: Main Settings > Subjects > List of Subjects > Edit Subject > Billing & Prices > Advanced Discount Configurations.
- Set Commission Type: Percentage or Amount.
- Specify Commission % OR Commission Value.

For Services
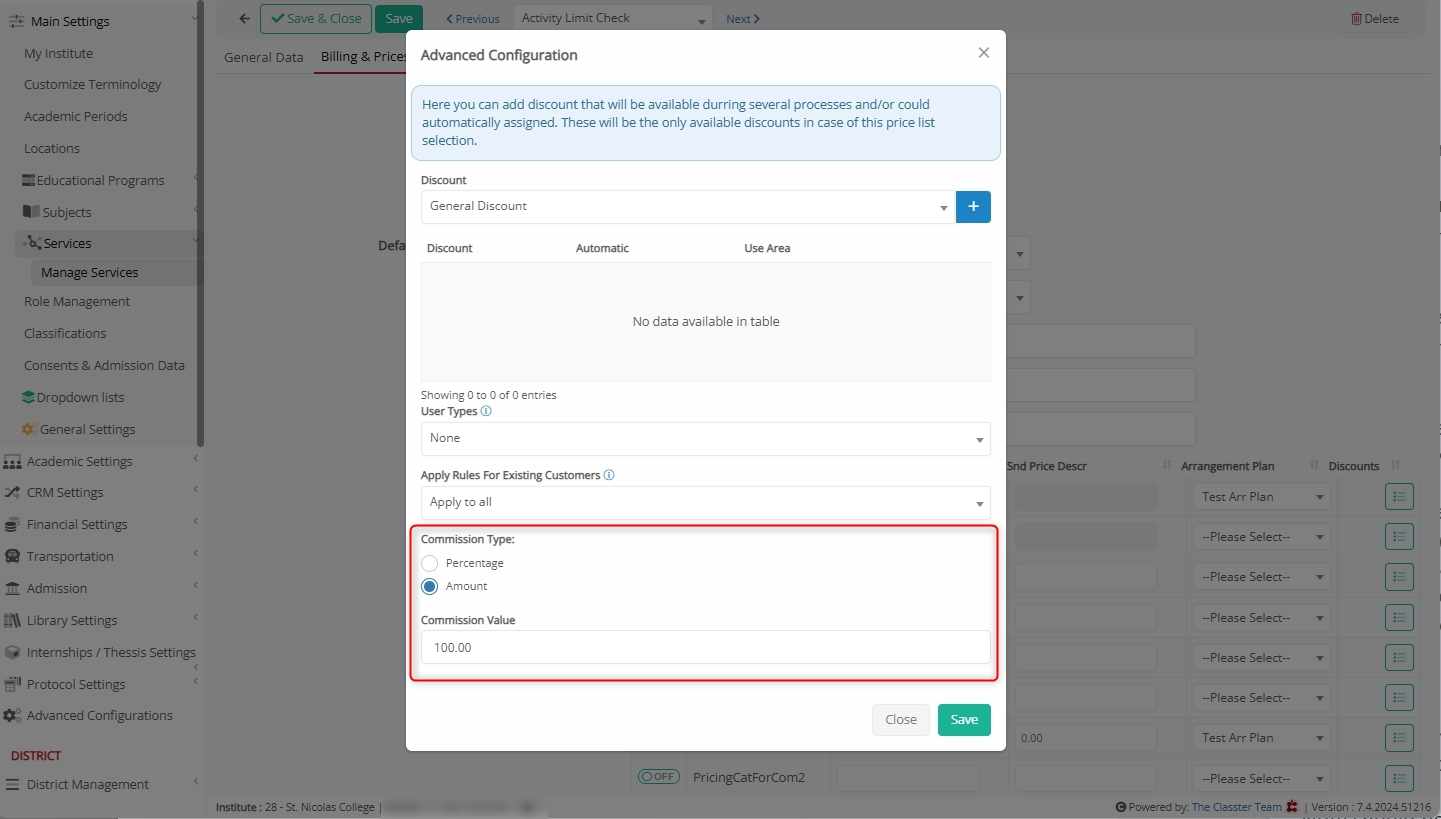
To set Commission for the Pricing Category of a specific Subject:
- Navigate to: Main Settings > Services >Manage Services > Edit service > Billing & Prices > Advanced Discount Configuration.
- Set Commission Type: Percentage or Amount.
- Specify Commission % OR Commission Value.
Arrangement Creation
Financial Settings / Dropdown lists / Dropdown lists / Arrangement Plan / Add New
Overview
Arrangement Plans help you to break down the total costs of Student payments into installments and integrate pricing categories with commission settings.
Specifically, if you select a pricing category with commissions, the system calculates the commission and net value (final price minus commission) and saves them in the arrangement header and installments.
Create a New Arrangement Plan
To create a New Arrangement Plan:
- Go to: Financial Settings > Dropdown lists > Dropdown lists > Arrangement Plan > Add New.
- Add Arrangement Plan Description and click Save.

Add Installments
To add a new Installment to an Arrangement plan:
- Select an Arrangement and click on the Details icon.
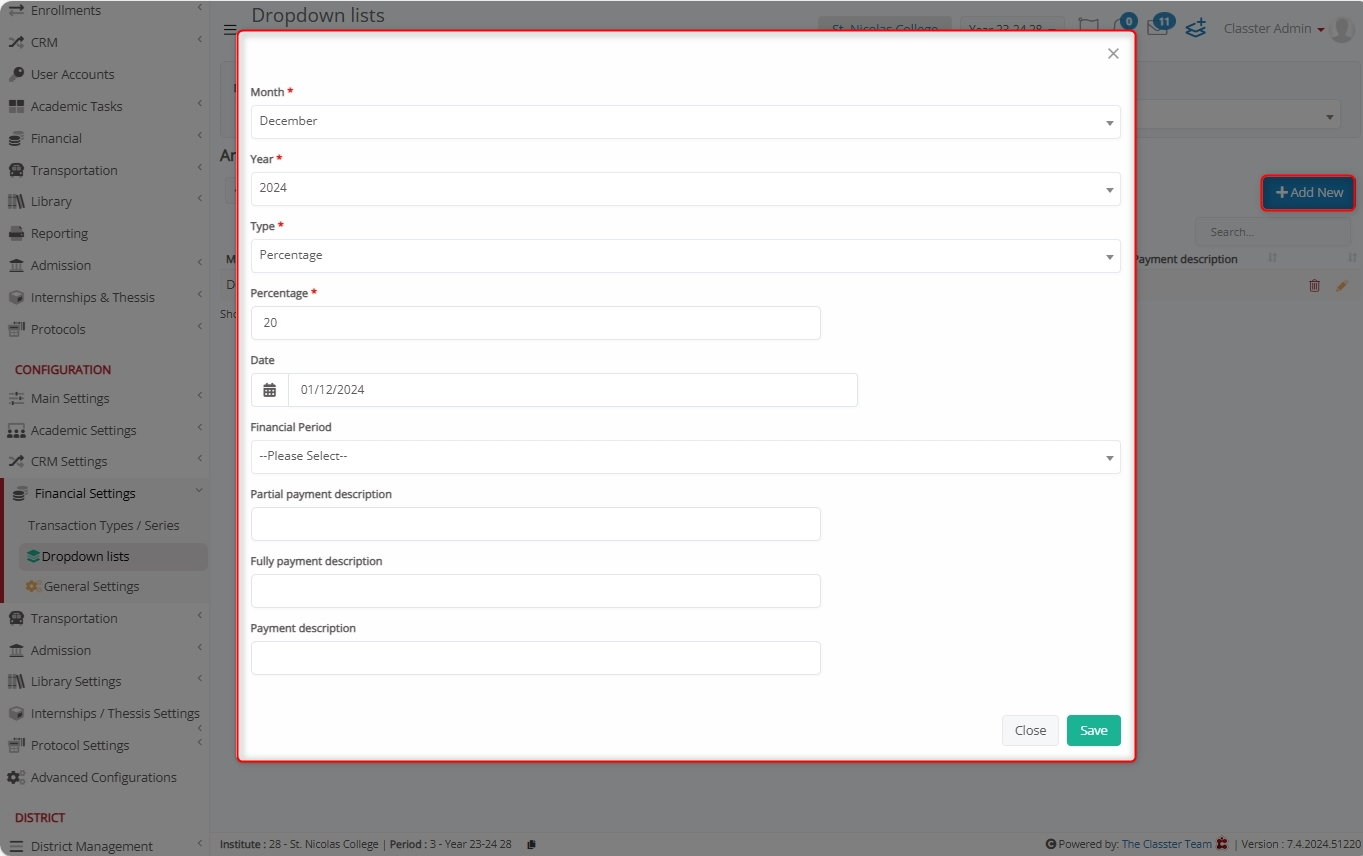
- Click on the + Add New button.
- Enter values for Month, Year, Type, Percentage, and other optional fields, and click Save.
View Arrangements Installments Details
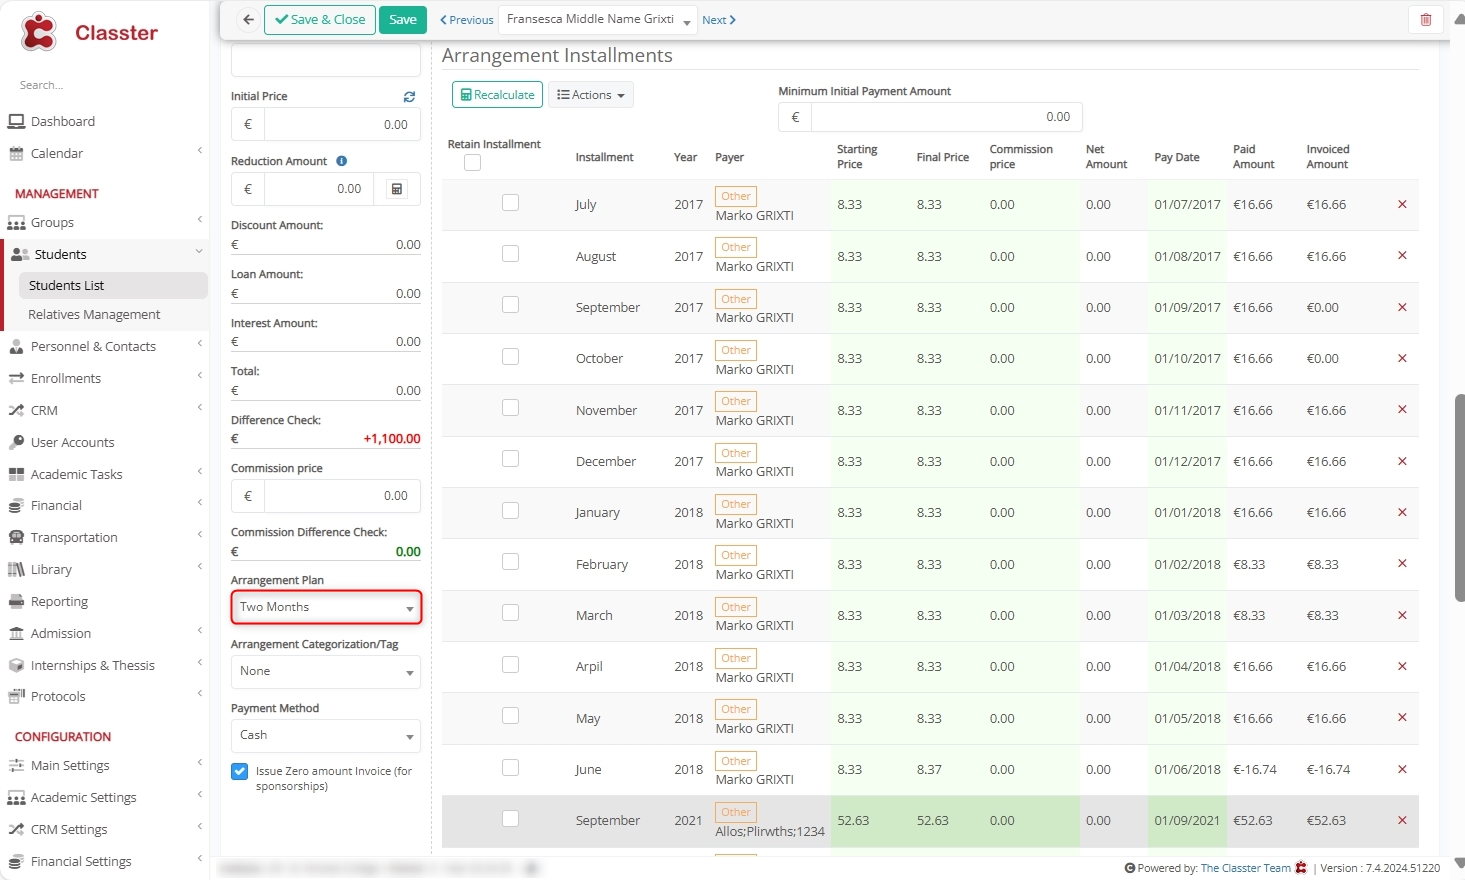
Navigate to: Students > Students List > Select a Student > Financial > Arrangements.

Select the desired Arrangement Plan and Pricing Category, and view the Arrangement Installments details including Starting Price, Final Price, Commission Price, Net Amount, etc.
Transaction Series
Financial Settings / Transaction Types / Series / Edit Transaction Type / Used for Agent
Overview
The Transaction Series features a property to mark transaction series for Agent Payments. This makes sure that all agent-related financial transactions are accurately tracked and reconciled in the system.
Configure Transaction Series for Agent’s Payments
To mark a Transaction Series for Agents Payments, navigate to: Financial Settings / Transaction Types / Series.

Select a Transaction Category > Actions > Edit > mark Used for Agents Payments checkbox.

Agent Portal
Financial / My Application / Application View / Arrangements / Installment Analysis
Overview
The Agent Portal provides agents access to financial details, including total and installment-level commissions (if enabled). While agents can register and save verified payments, they cannot proceed to checkout. This ensures controlled financial transactions through the portal.
Installment Analysis
To analyze installments of a linked Student, navigate to: Financial > My Application > Application View > Arrangements > Select an Arrangement > Installment Analysis.
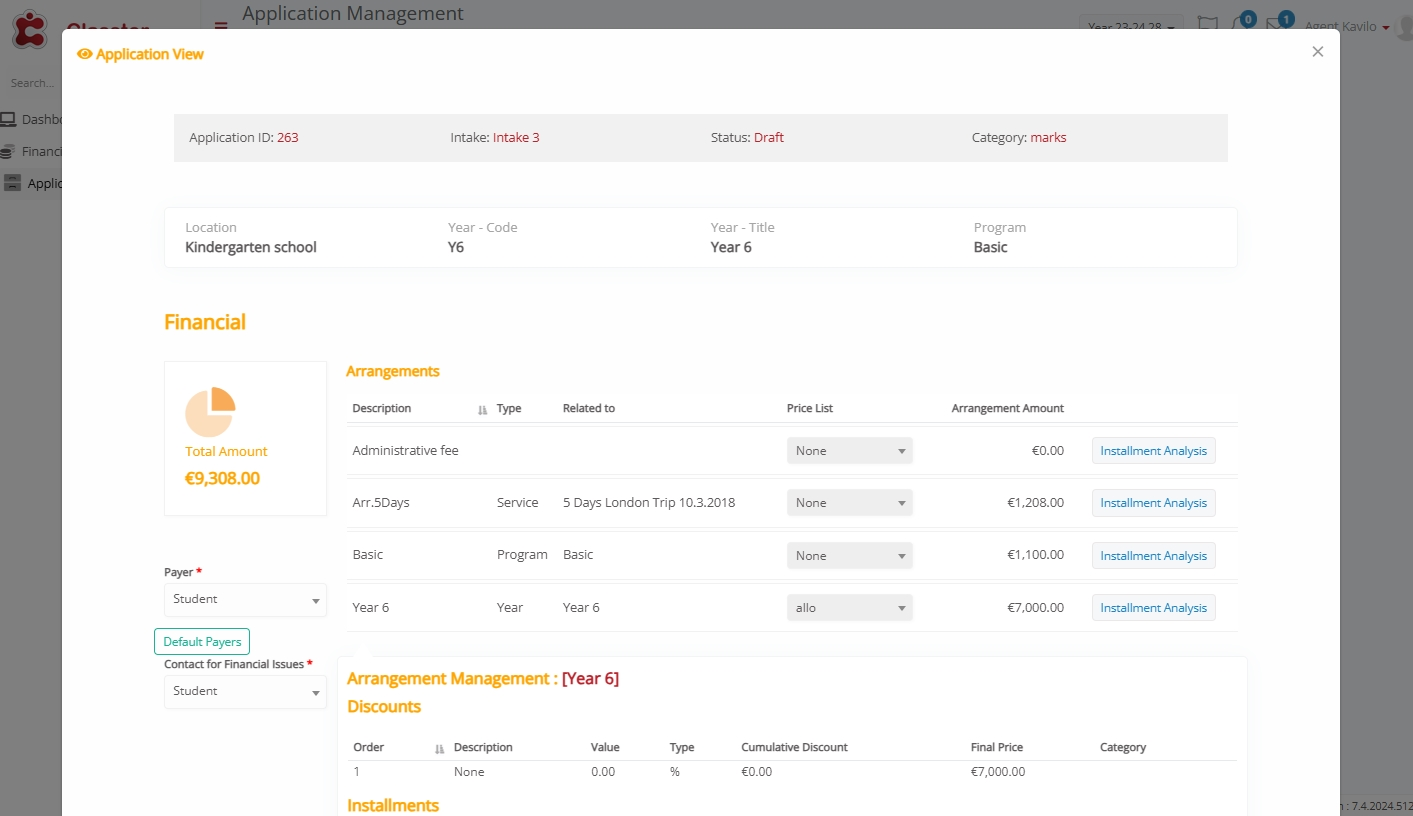
As a result, you see information regarding applied Discounts and total Installments with Commissions, if enabled.

Register Installments
To register an installment: Financial > Overview > Online Payment > Specific Installment/Free Payment (Open Amount) > Specify required information > Proceed to Payment.
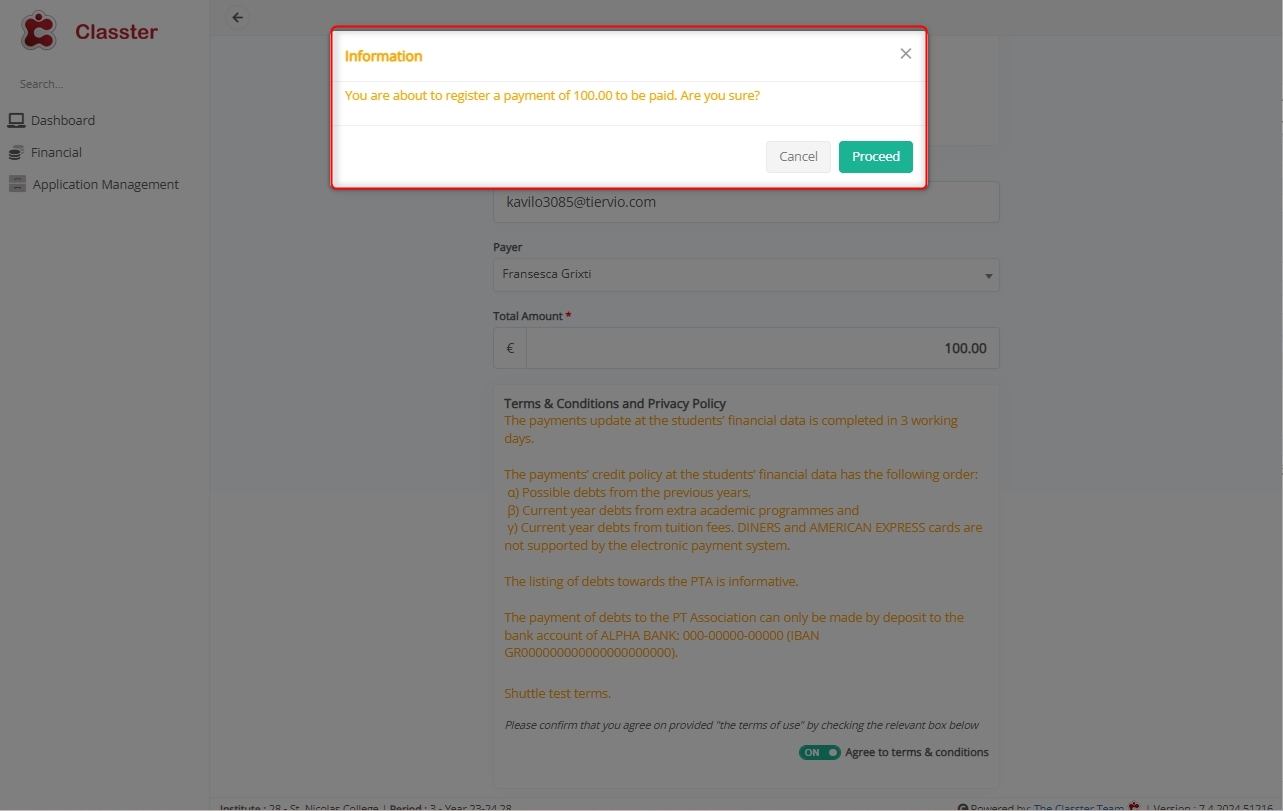
However, as per configured settings, an Agent can only register installment payments and not pay them.
Reconciliation Form
Financial / Transactions / Actions / Reconciliation Form
Overview
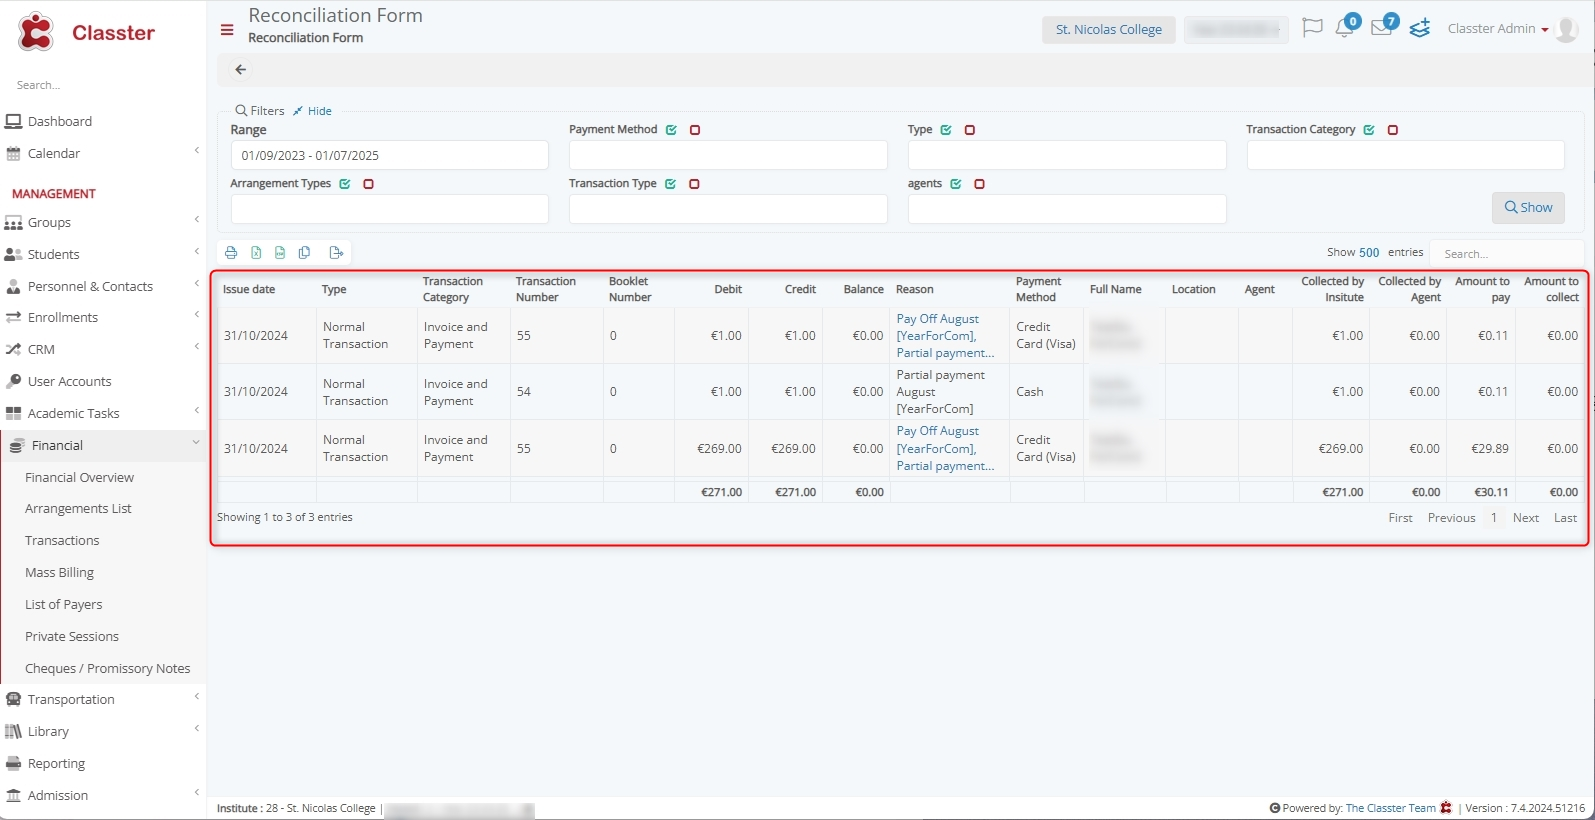
The Reconciliation Form provides a detailed overview of financial transactions, including amounts collected by agents, commissions, and outstanding balances. With advanced filters and export options, it helps to analyze transactions easily.
View Reconciliation Form
To view the Reconciliation Form, navigate to: Financial > Transactions > Actions > Reconciliation Form.

The Reconciliation Form offers filters including Range, Payment Method, Type, Transaction Category, Arrangement Types, Transaction Type, and Agents.

Moreover, it also displays a grid with details related to Transaction Categories, Transaction Number, Debit, Credit, Amounts Collected by institute and agents, etc.
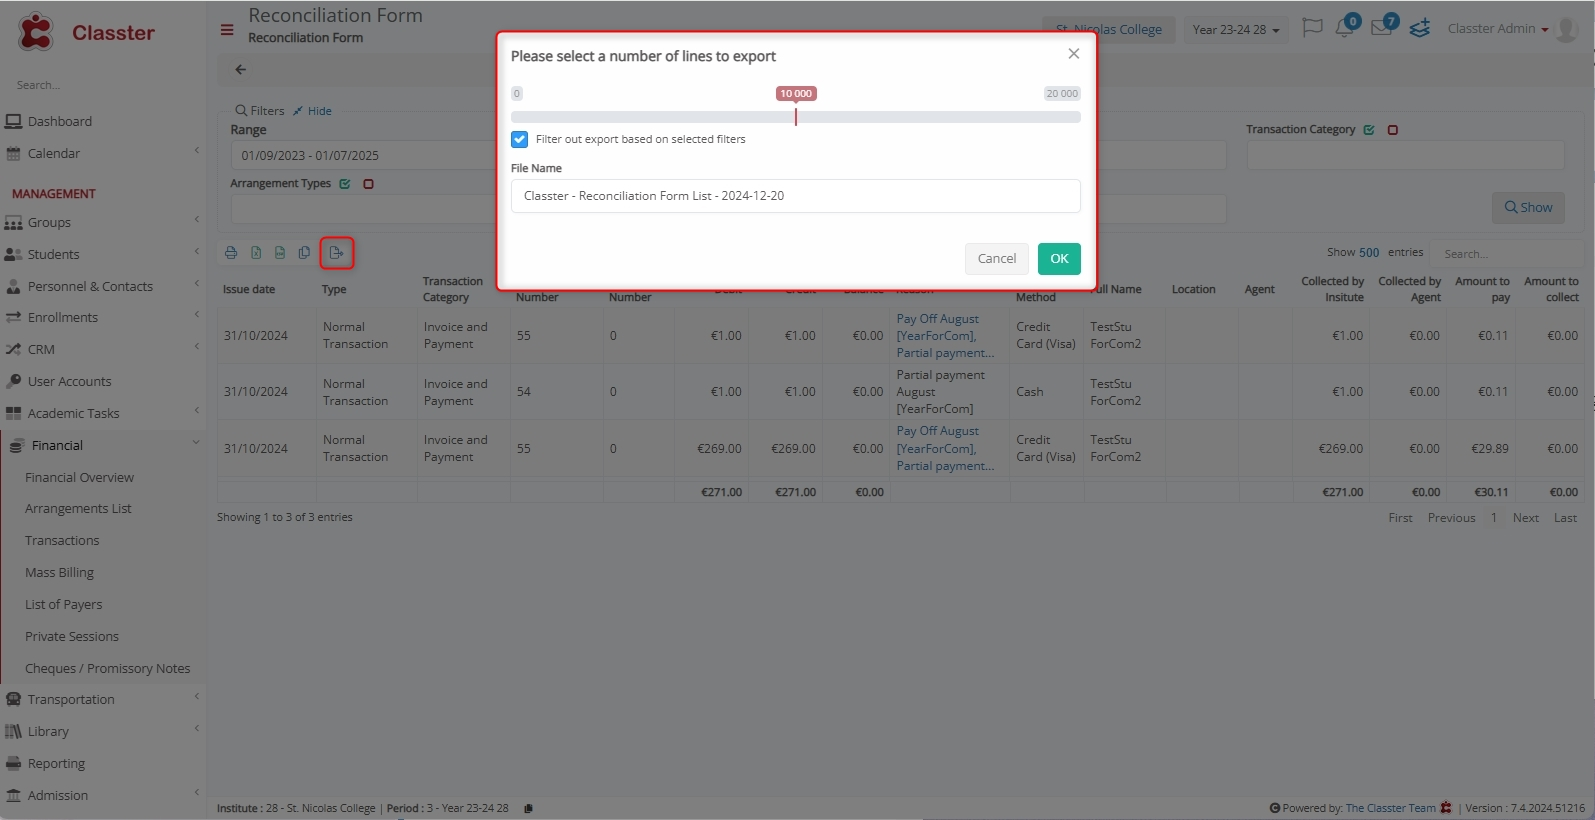
Export Reconciliation Form
To Export the filtered Reconciliation Form data:
- Click on the Export icon from the Table actions.
- Select a number of lines to export.
- Enable Filter out export based on selected filers
- Specify the File Name and click OK.