

To create a new entity, you need to click on the +Create New button located on the top left side of Figure 2.
Once you have done this, you will be transferred to the creation page. Follow the path: Dashboard > CRM > Manage Entries > Create (Figure 5).
New Remarks
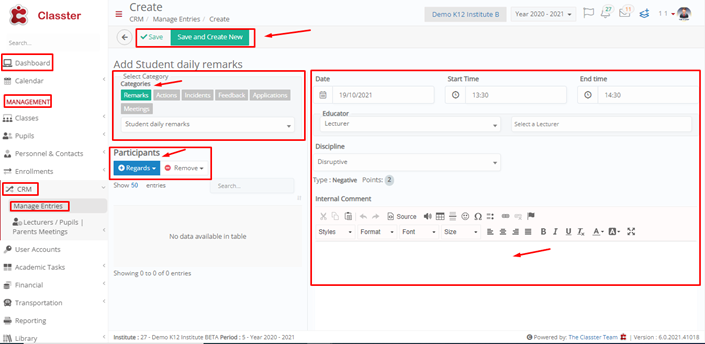 Figure 5
- Select comment category e.g Remarks.
- Select comment subcategory e.g Student Daily Remarks.
- Add Participants who this comment regards Student, Parent, Teacher, Employee (notifies).
- The date and times are auto-filled.
- Enter/select an educator type e.g Teacher and then a specific educator.
- This comment regards a disciplinary issue e.g Uniform Issue.
- Choose the Subject if any this regards.
- Enter if applicable the Hours of the incident.
- Fill in your comment in the main comment text field.
- Disciplinary remarks can involve positive or negative points to a student’s record.
- Click on the save button to save the comment or click on save and create a new button to save comments and create a new one.
New Actions

Figure 6
- Select comment category e.g Actions.
- Select comment subcategory e.g Medical Office Visit.
- Add Participants who this comment regards Student, Parent, Teacher, Employee (notifies).
- The date and times are auto-filled.
- Enter/select an Employee/Doctor type and then a specific doctor.
- Choose the Urgency of the medical matter e.g High.
- Fill in your comment in the main comment text field.
- Click on the save button to save the comment or click on save and create a new button to save comments and create a new one.
New Incidents

Figure 7
- Select comment category e.g Incidents.
- Select comment subcategory e.g Bullying Incident (Internal).
- Add Participants who this comment regards Student, Parent, Teacher, Employee (notifies).
- The date and times are auto-filled.
- Enter/select an educator type and then an educator.
- Fill in your comment in the main comment text field.
- Click on the save button to save the comment or click on save and create a new button to save comments and create a new one.
New Feedback

Figure 8
- Select comment category e.g Feedback.
- Select comment subcategory e.g Parent Complaint.
- Add Participants who this comment regards Student, Parent, Teacher, Employee (notifies).
- The date and times are auto-filled.
- Enter/select an educator type e.g Teacher and then a specific educator.
- In the has reported again option you can choose e.g Yes to indicate that there have been other complaints before this one.
- Fill in your comment in the main comment text field.
- Click on the save button to save the comment or click on save and create a new button to save comments and create a new one.
New Applications
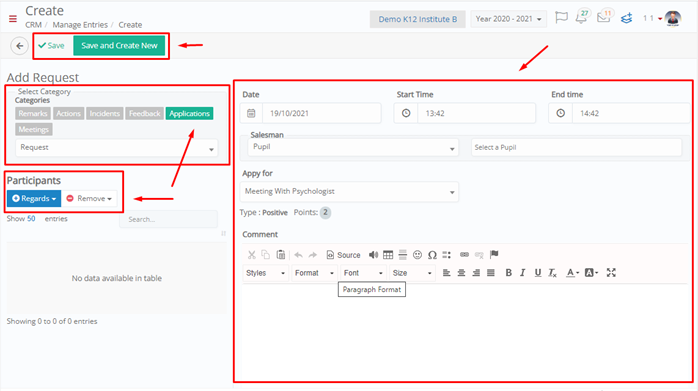
Figure 9
- Select comment category e.g Application.
- Select comment subcategory e.g Financial action.
- Add Participants who this comment regards Student, Parent, Teacher, Employee (notifies).
- The date and times are auto-filled.
- Enter/select a creator type e.g Teacher and then a specific educator.
- Choose an entity this comment regards.
- Choose a parent this regards e.g Mother.
- Fill in your comment in the main comment text field.
- Click on the save button to save the comment or click on save and create a new button to save comments and create a new one.
New Meeting

Figure 10
- Select comment category e.g Meeting.
- Select comment subcategory e.g Student/Parent Meeting.
- Add Participants who this comment regards Student, Parent, Teacher, Employee (notifies).
- Date and times are auto filled.
- Enter/select an educator type and then an educator.
- This comment regards a disciplinary issue e.g Uniform Issue.
- Choose the Subject if any this regards.
- Enter if applicable the Hours of the incident.
- Fill in your comment in the main comment text field.
- Click on save button to save the comment or click on save and create new button to save comment and create a new one.
Adding Participants to Notify
To add participants to be notified about the comment, click on the regards dropdown button and choose an entity type e.g Pupil (Figure 11).

Figure 11
Once you have clicked on the Pupil entity type, you will view the following popup window (Figure 12).
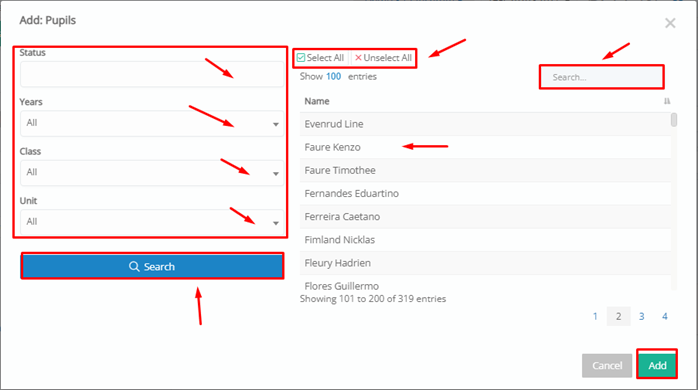
Figure 12
- In this figure you need to fill in the filter fields to locate one or all available students.
- Filters: Status e.g Waiting Registration, Year e.g year 4, Class e.g Y4B, Subject e.g All.
- Click on the search button to view students who fit your criteria.
- Use the select all button if you wish to select all students in the list. You can click on unselect all to undo previous action.
- Use the search field to locate a specific student.
- Select a student by clicking on the name in the list
- Click on the add button to add your choices.