Getting Started
Creating Office 365 user account
In order to set up your message center for emails and to enable the single sign-on function you need to integrate Classter with Office 365. Keep in mind that Office 365 is free for all educational institutions and their Students, Teachers, and Staff.
Please follow the instructions below, to establish the integration.
First step is to go to this URL : https://www.microsoft.com/en-us/education (Figure 1)
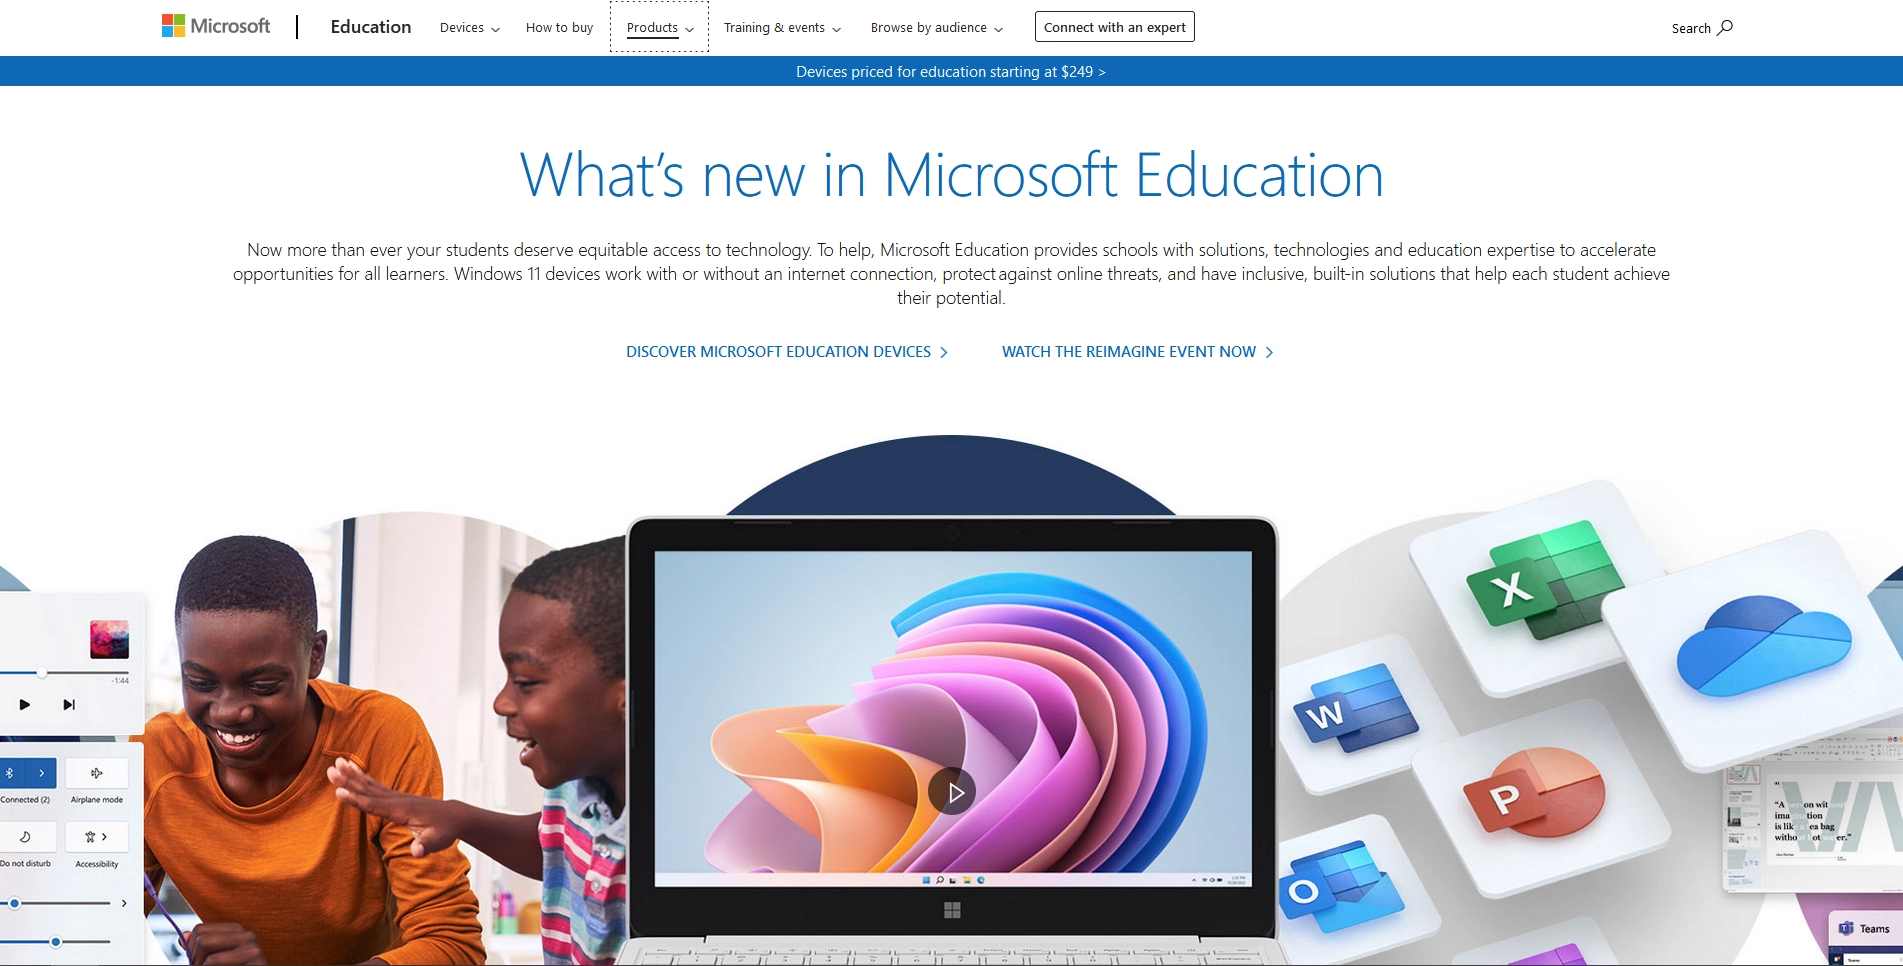
Figure 1
Click once on Products and find Office 365 (Figure 2)
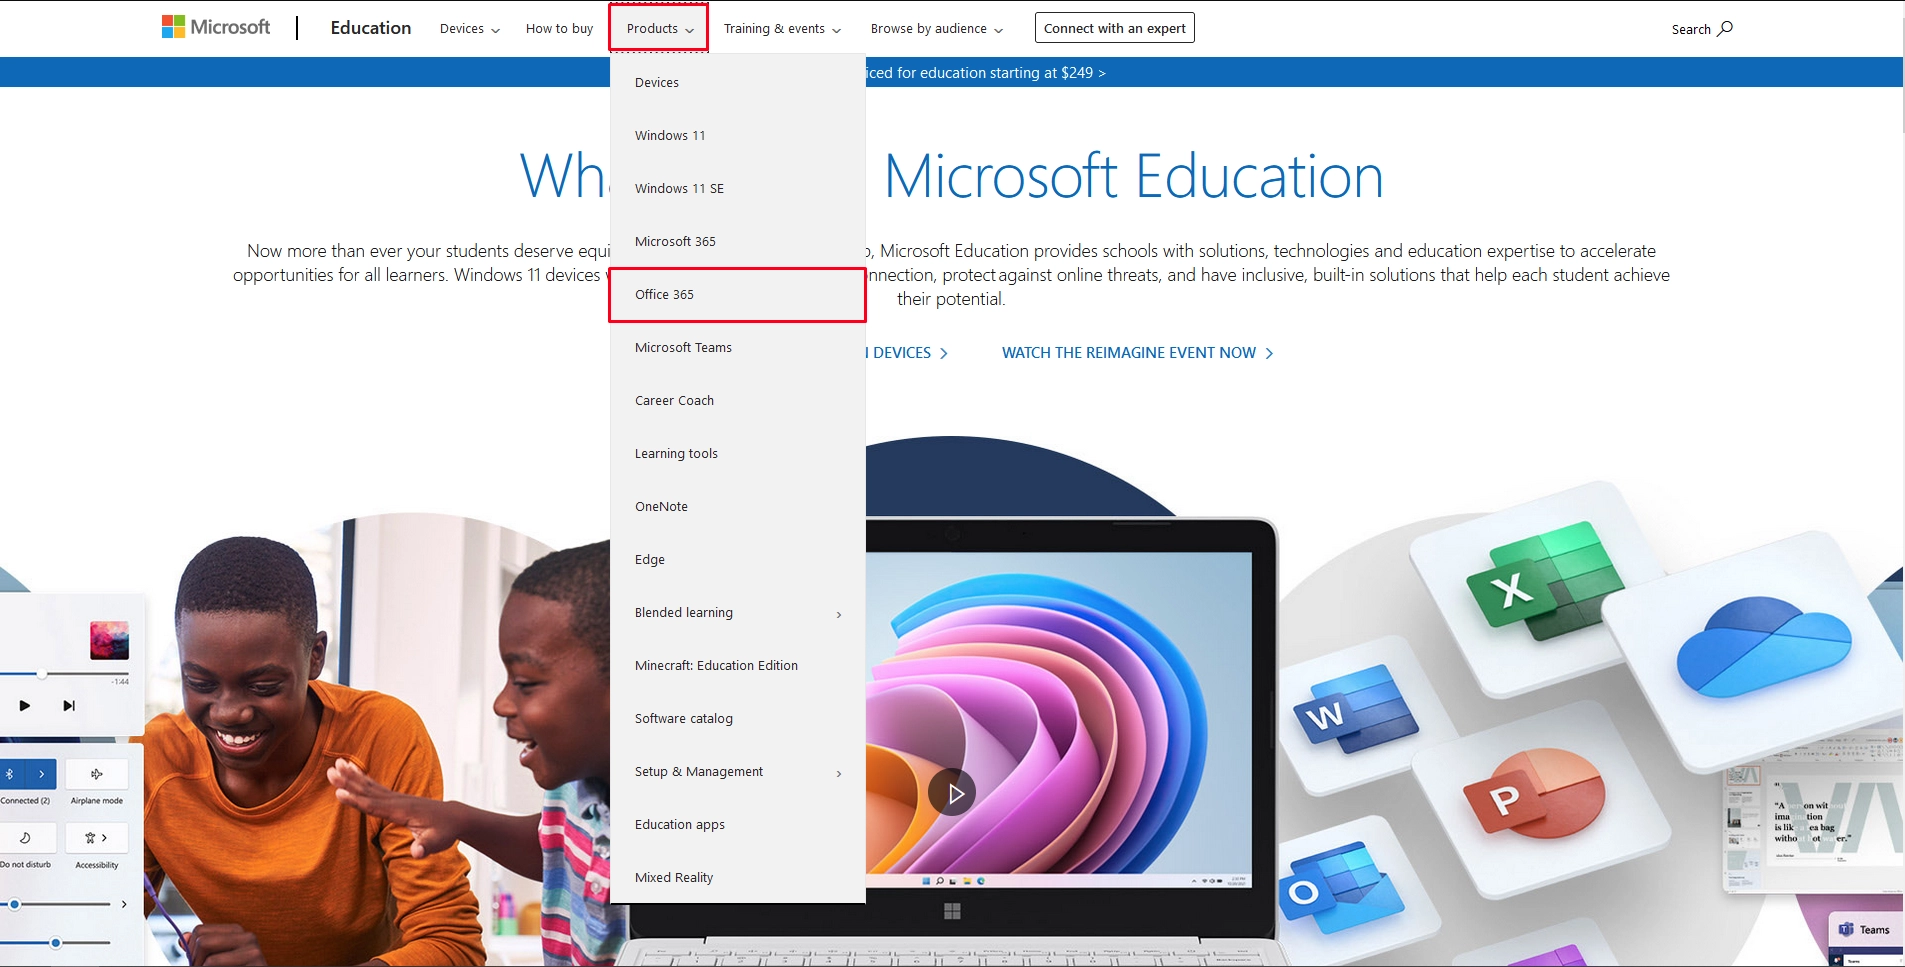
Figure 2
After clicking “Office 365″ you will be redirected to a new window like this (Figure 3)
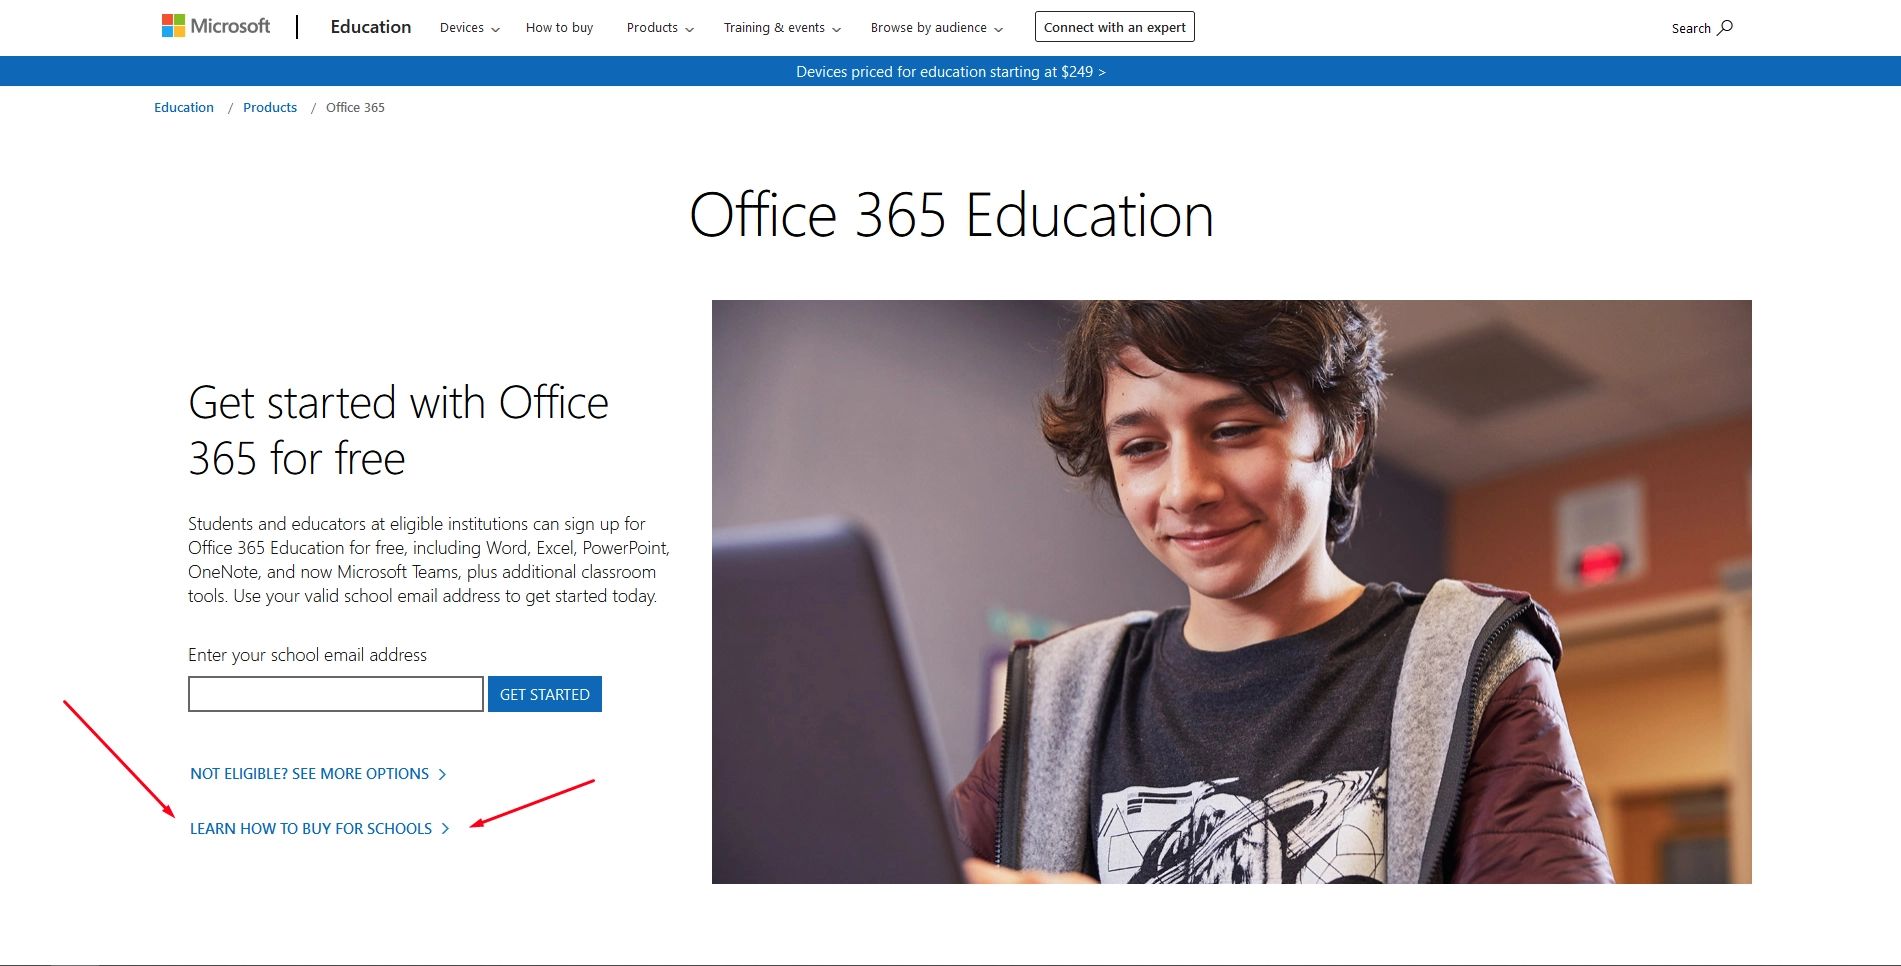
Figure 3
Find and click the link with name “LEARN HOW TO BUY FOR SCHOOLS”
You will be redirected to a window similar to this (Figure 3.5)
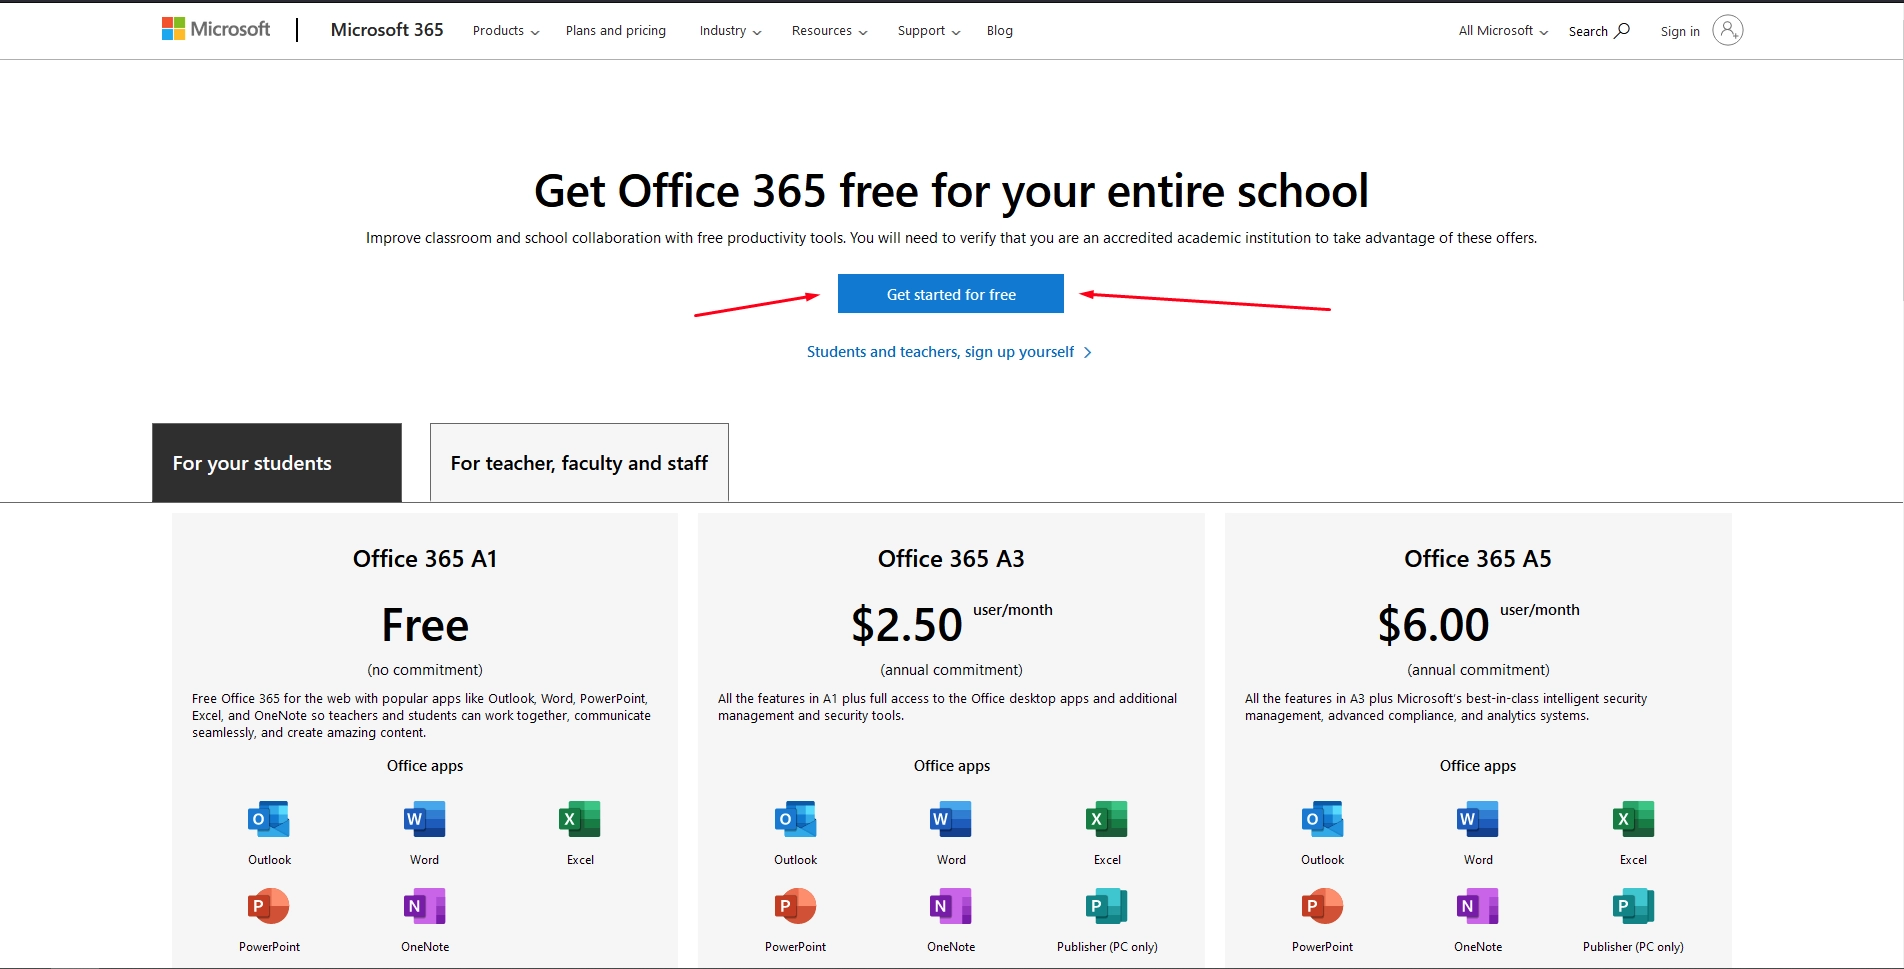
Figure 3.5
At this window you click the “Get Started for free” button and a new window will come up looking like this (Figure 4)
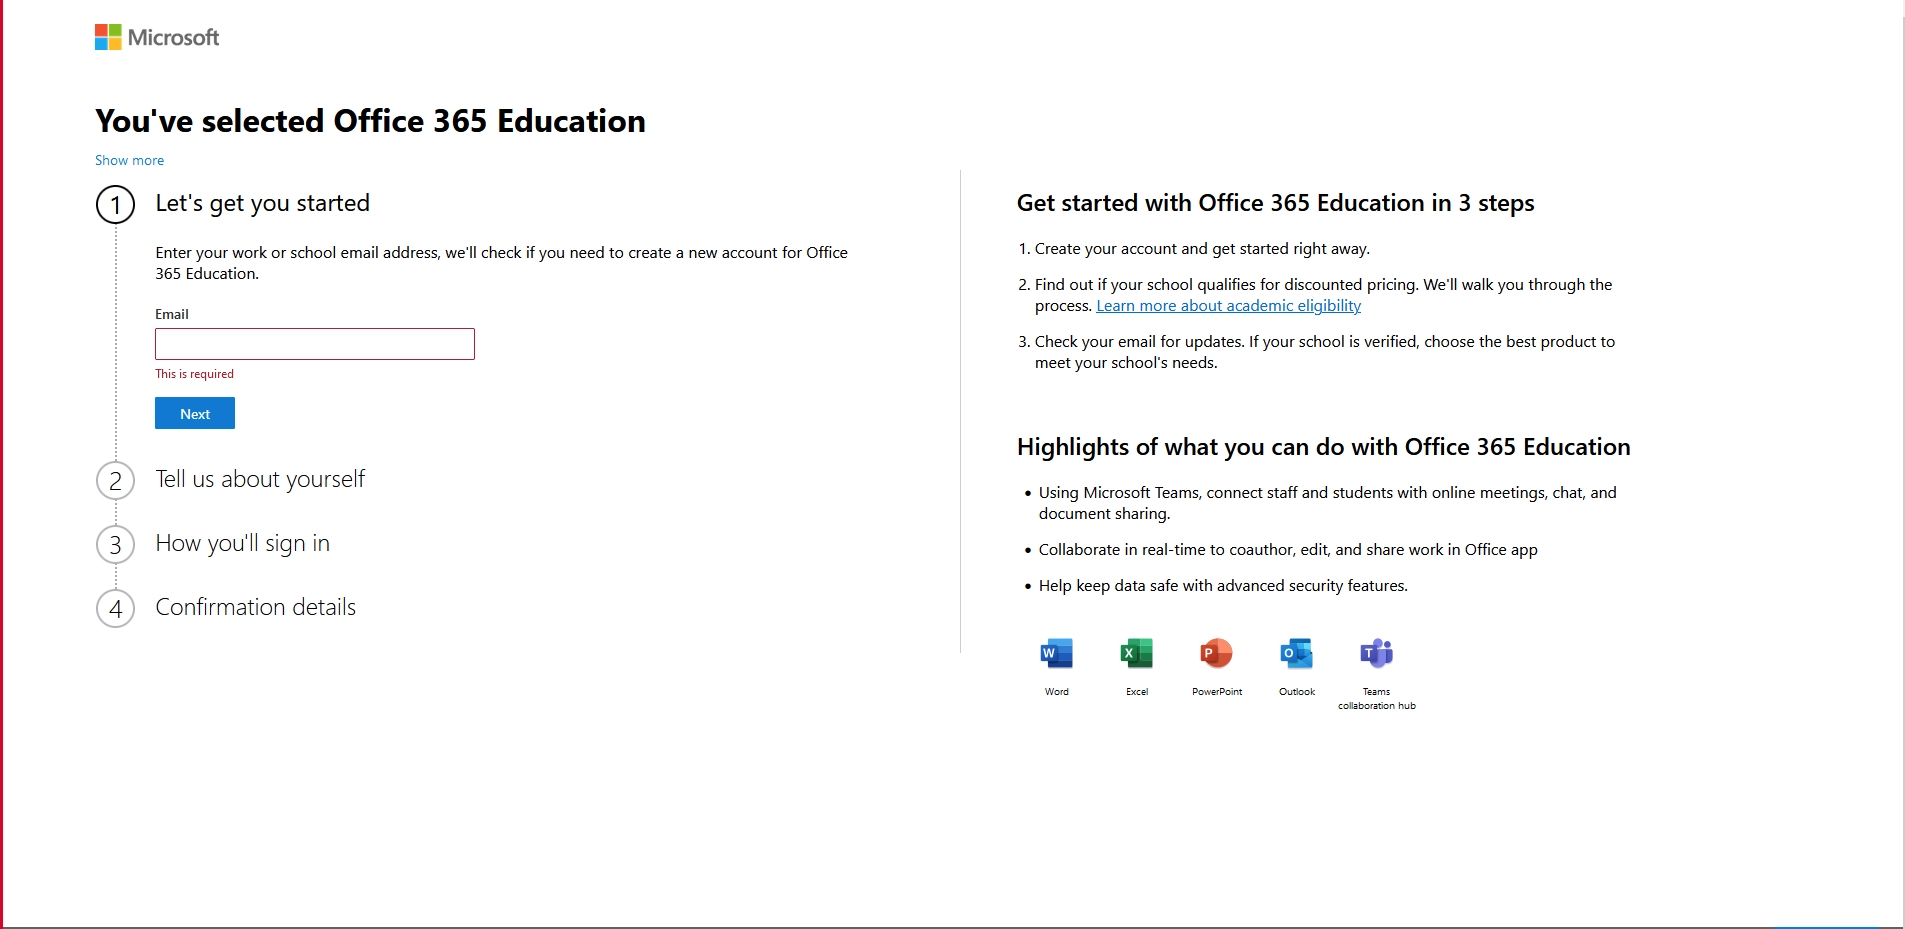
Figure 4
- Fill in your email and click “Next” and then “Set up Account” for the other fields to appear. (Figure 5)
- Fill in the required information in each field, e.g. First Name, Last Name.
- Fill in your institution’s email and phone number.
- Enter your institution’s Name and size.
- Once you are done filling in information, click on the ‘Next’ button.
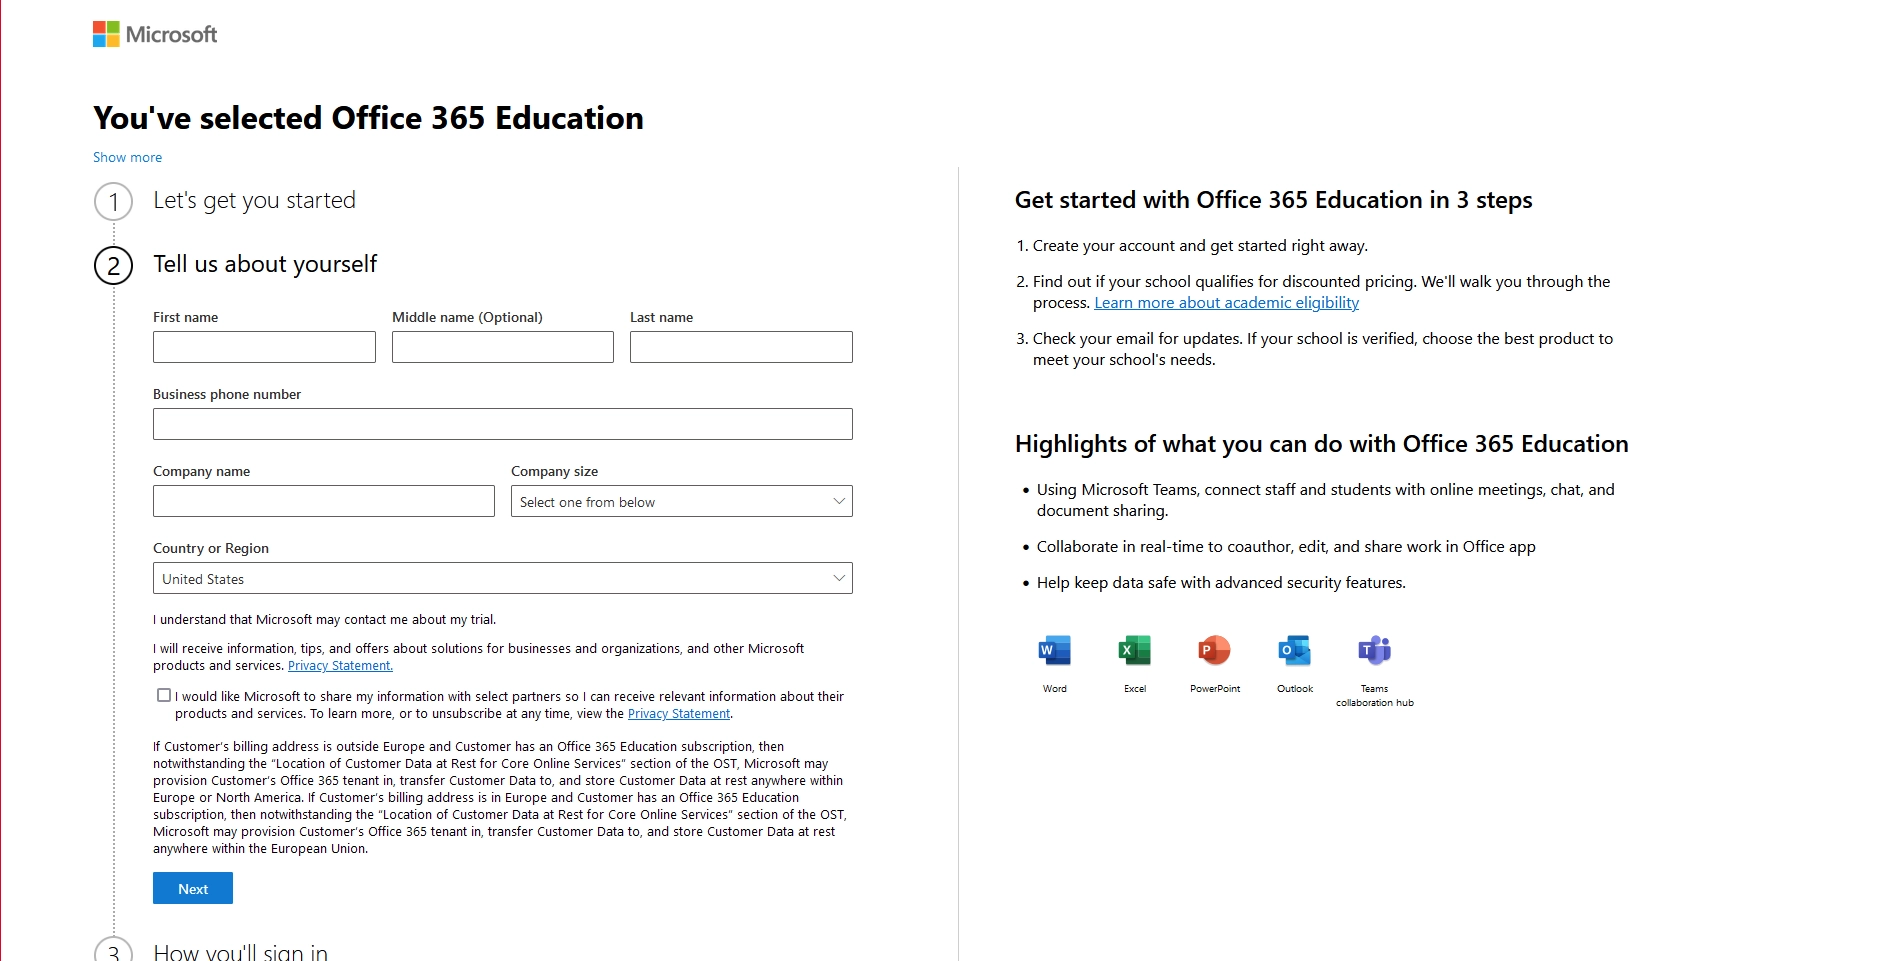
Figure 4.5
After clicking the “Next” button, you need to verify your phone.
After successfully verifying your phone, you need to create your user ID for Office 365, you need to enter a username, and you will then create a temporary domain e.g. admin@officeclassterdomain.onmicrosoft.com
- Enter your preferred Username and Domain name, then type in a password for your account.
- Click “Next” to complete the creation of the Office 365 account.
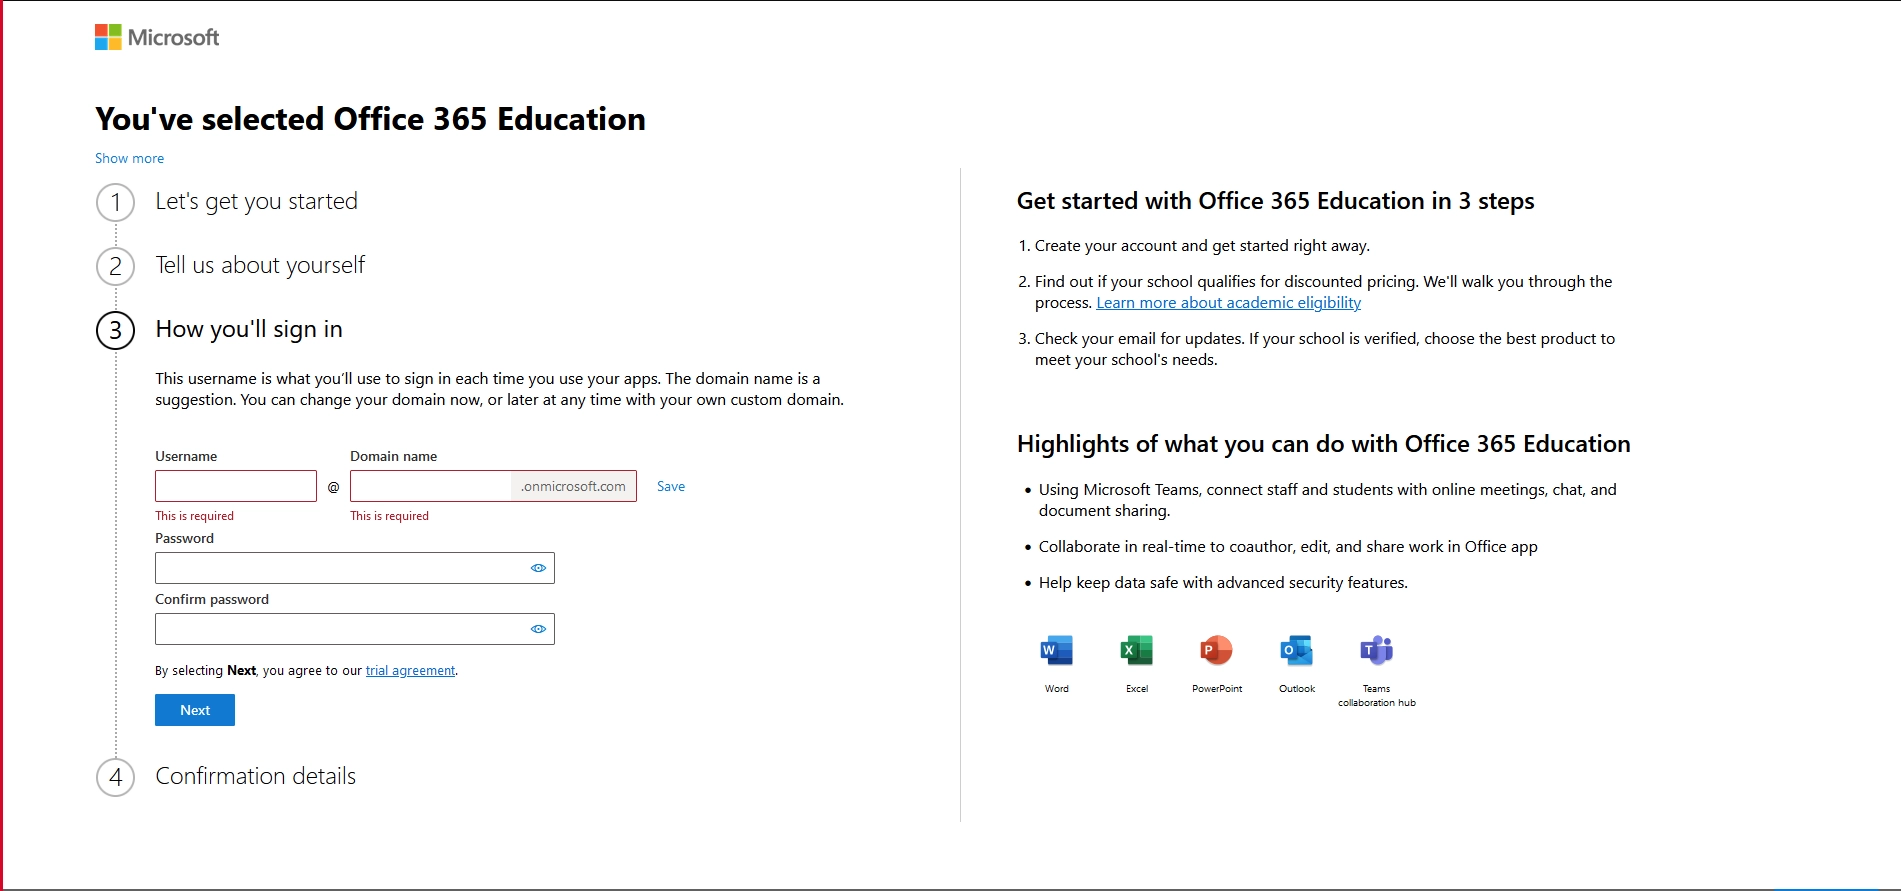
Figure 5
After clicking “Next” you will be presented with a window similar to this (Figure 6)
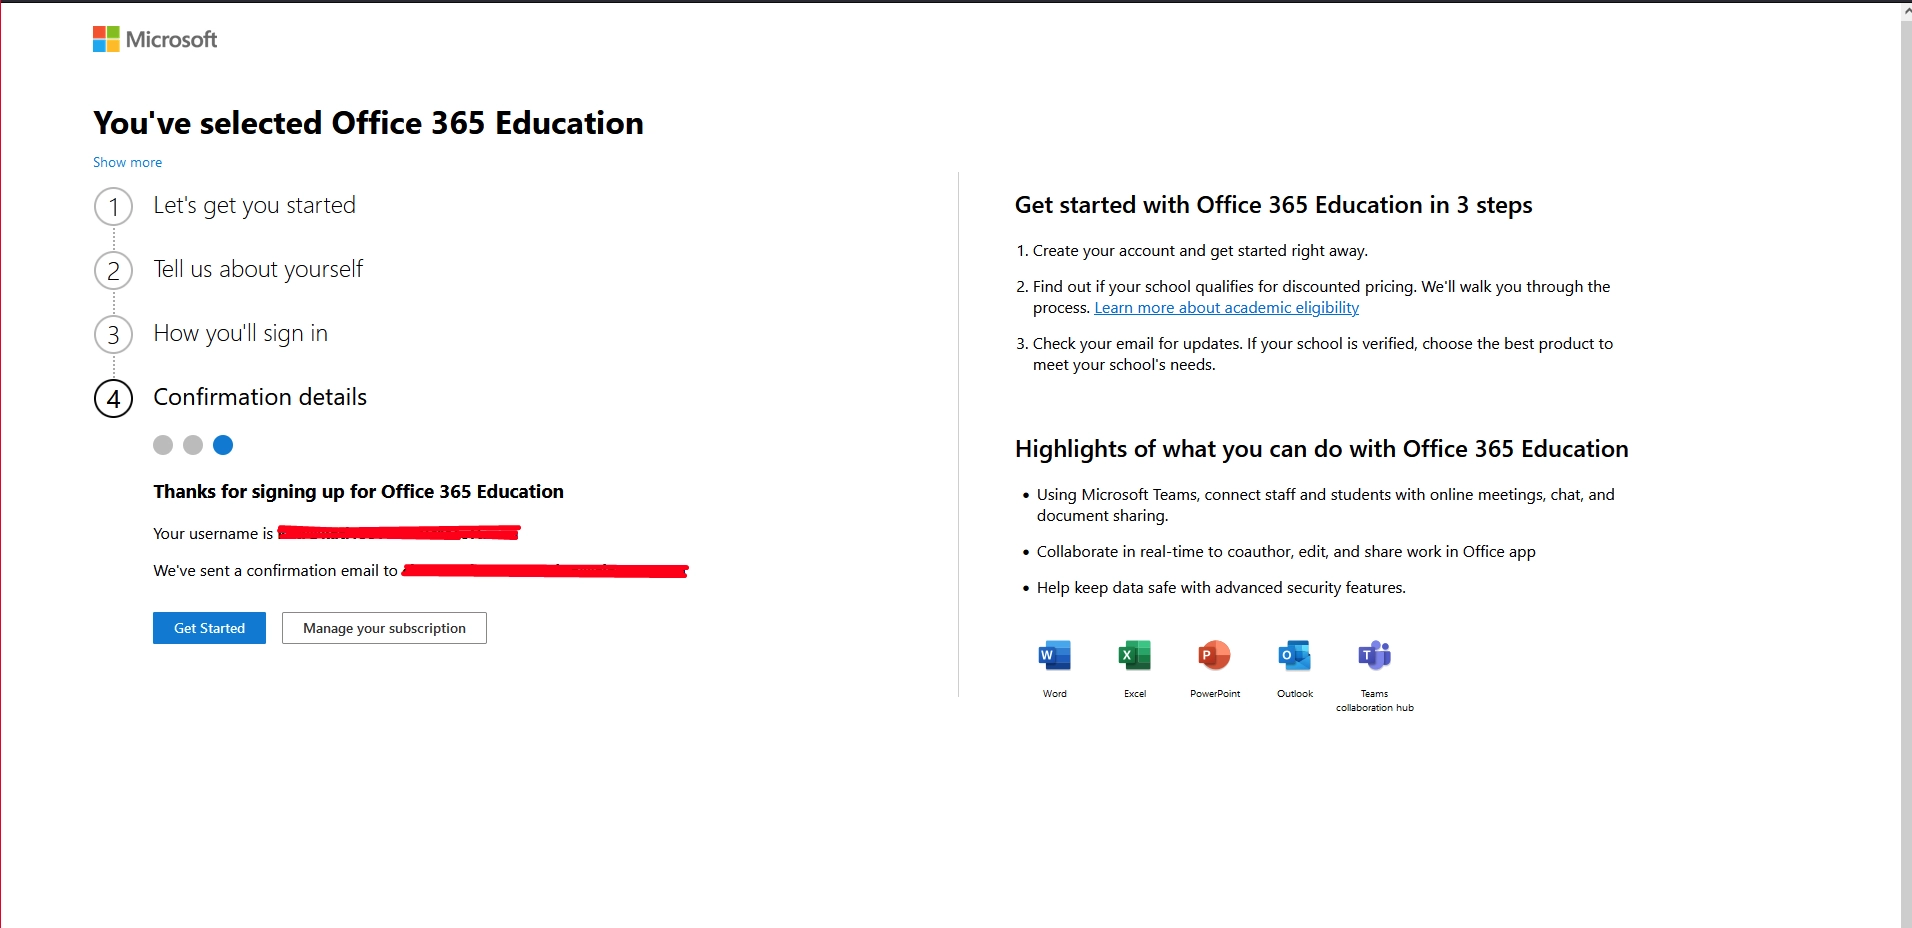
Figure 6
After clicking the “Get Started” you will be redirected to the Microsoft 365 Admin Center. (Figure 7)
- In order to get Office 365 for free, you need to verify you own an educational institution domain.
- Choose one of the two options according to your needs.
- Then click on “Use this domain” so you can continue the setup.
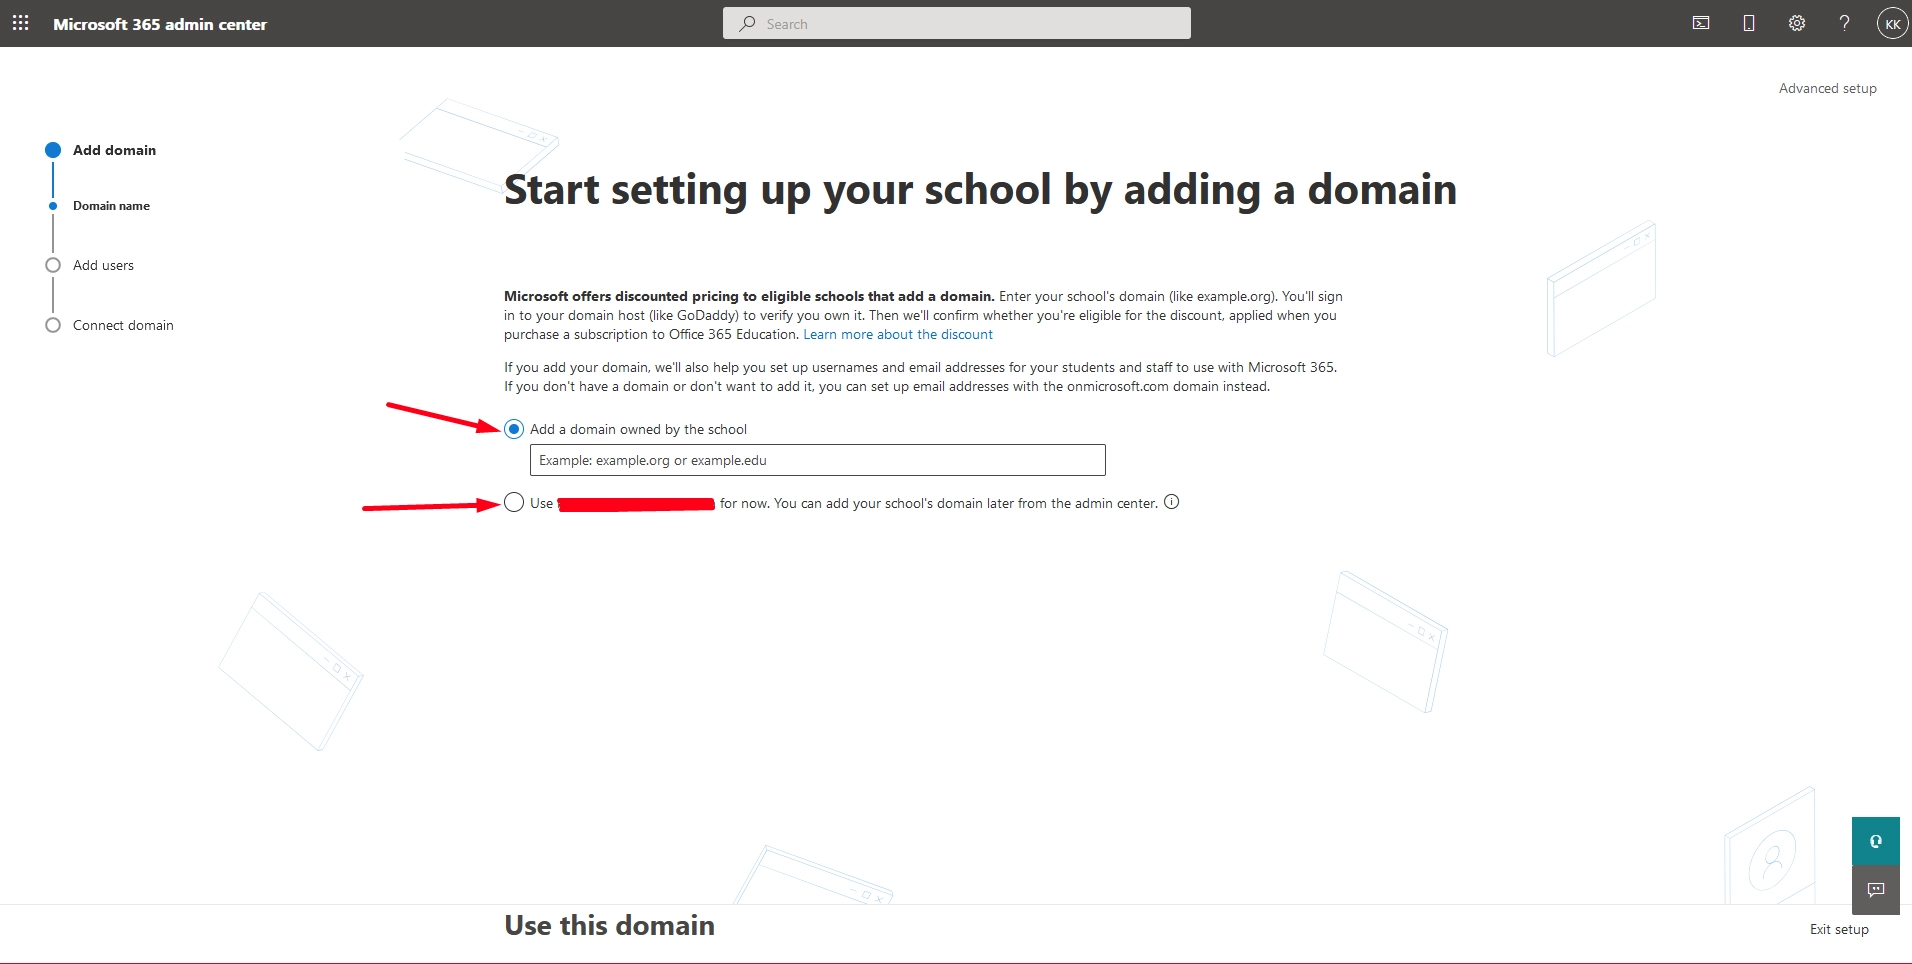
Figure 7
After clicking the “Use this domain” button, you will be redirected to a window looking like this (Figure 8)
- Add users and licenses if required.
- Enter Advanced setup mode for more settings if required.
or click “Do this later”
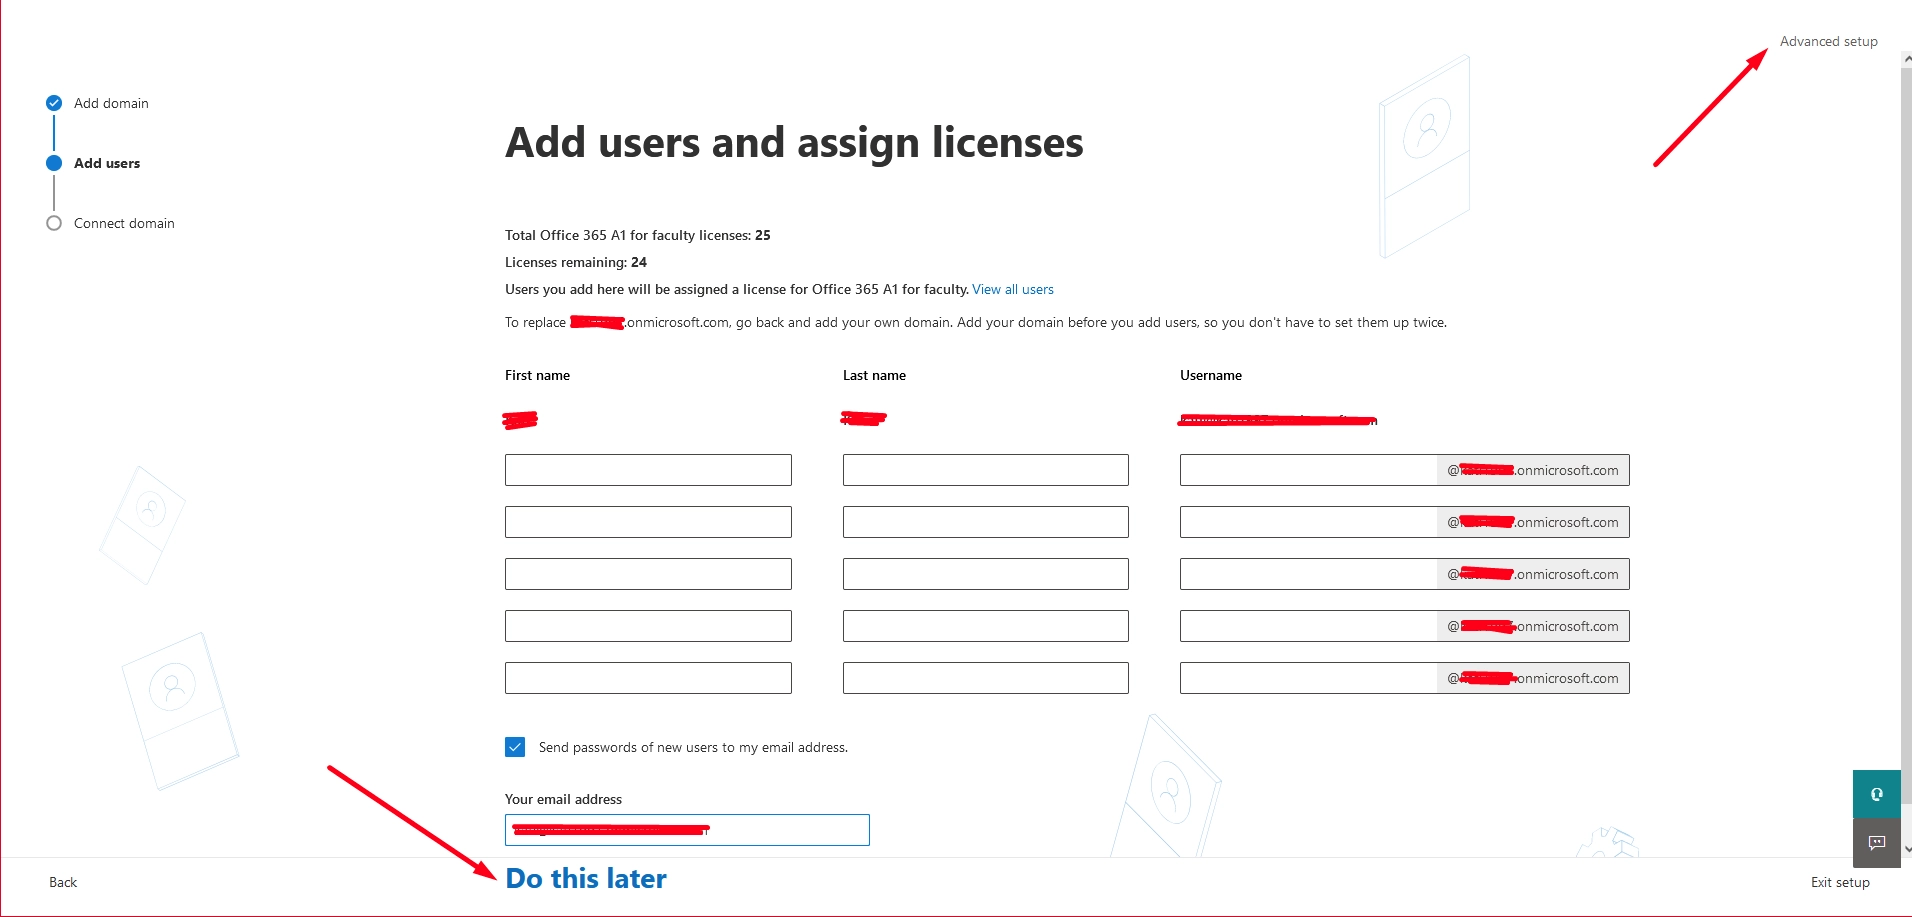
Figure 8
In our example, we added a user (Figure 9)
After adding a user, click “Add users and assign licenses” to continue.
If you didn’t add a user, click “Do this later”
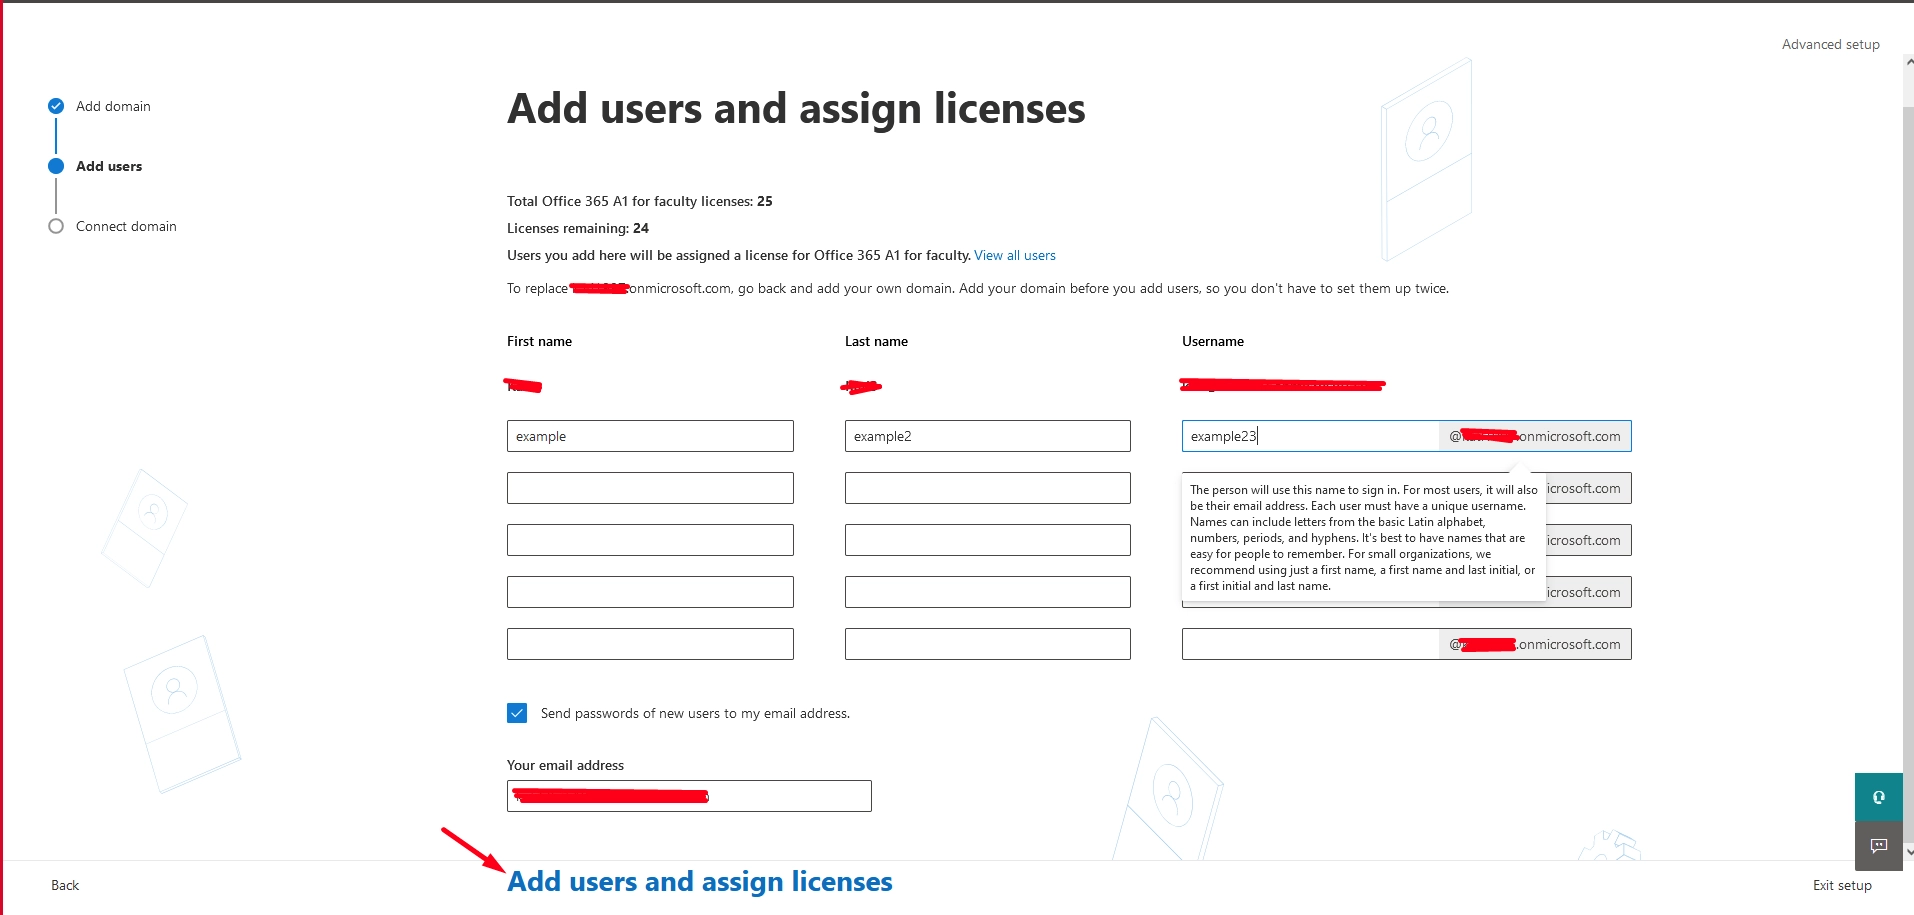
Figure 9
By clicking “Add user and assign licenses” or “Do this later” you will be redirected to a page similar to this (Figure 10)
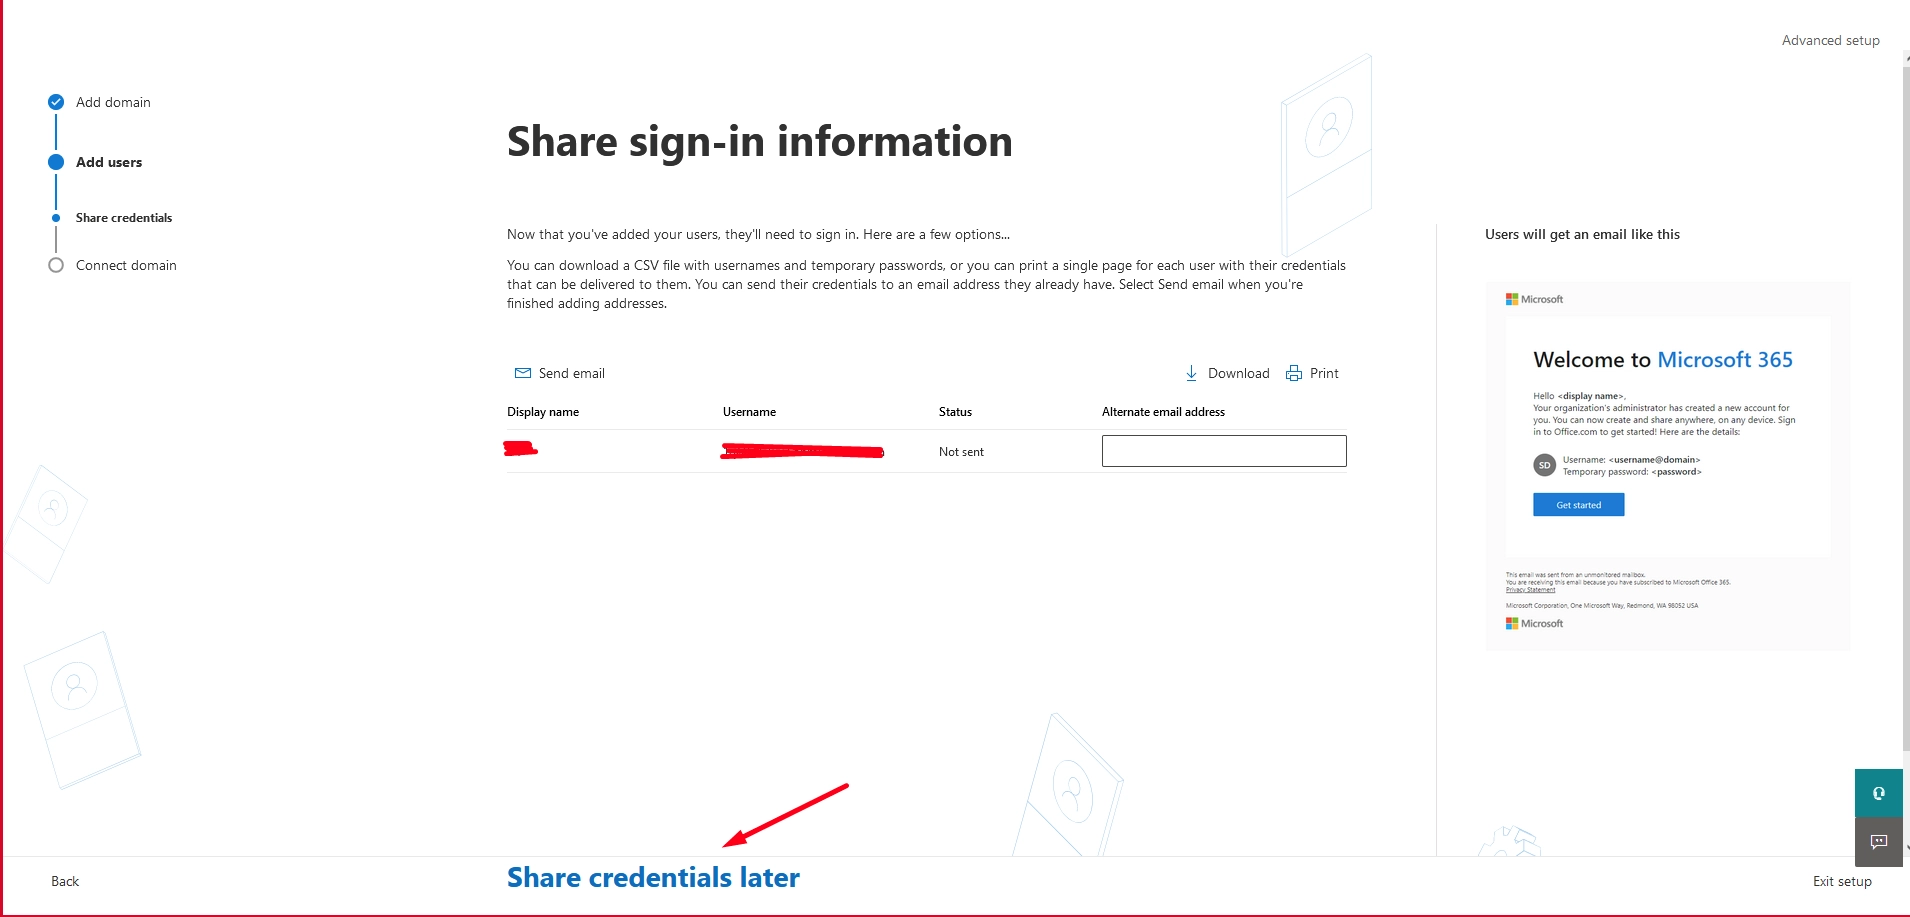
Figure 10
You have the option to share credentials with the users you just created.
We, in our example, clicked “Share credentials later”
The final step is to connect your domain, Microsoft achieves it with just one click!
After clicking “Share credentials later” a new window will appear, just click “Continue” to finish up!
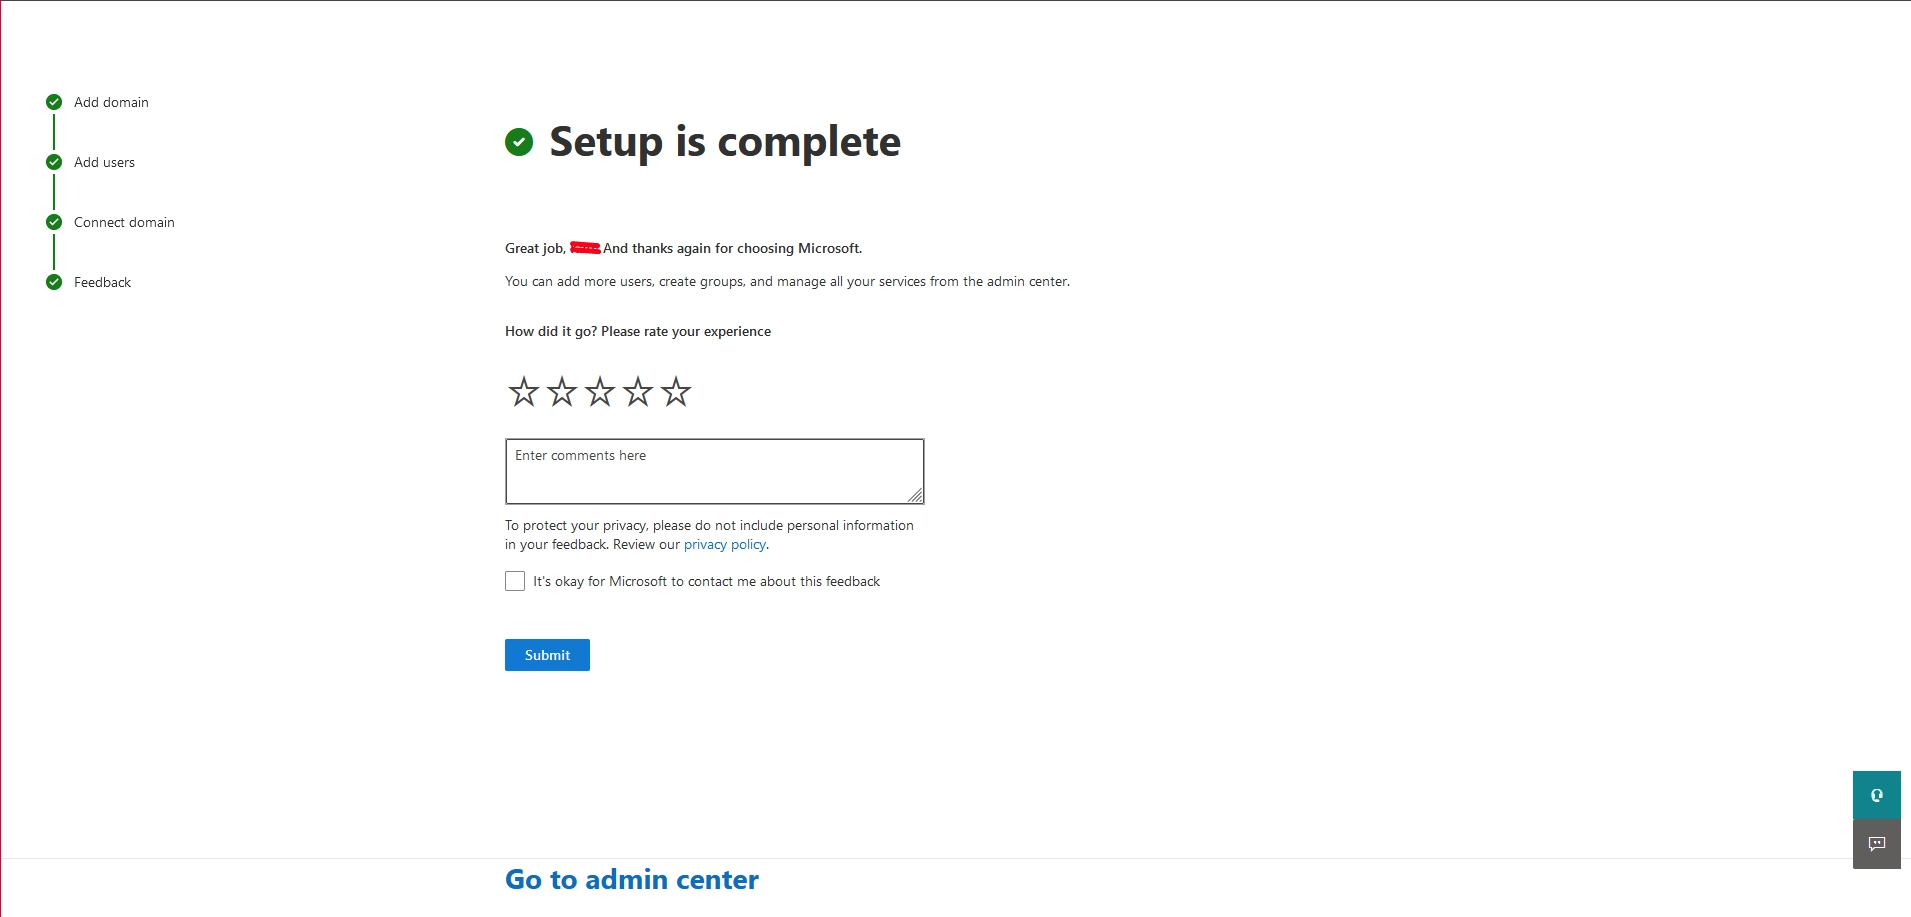
Figure 11
That’s it! Click “Go to admin center” for more settings.(Figure 11)
Classter Integration
Connecting Classter with Office 365
Follow the path: Configuration > Advanced Configuration > Third-Party Integrations (Figure 12).

Figure 12
After clicking ‘Advanced Configurations‘ you will be redirected to a window looking like this (Figure 13)
- Here you can see all third-party integration options.
- Click on ‘Office 365 Settings’ button to begin integration.
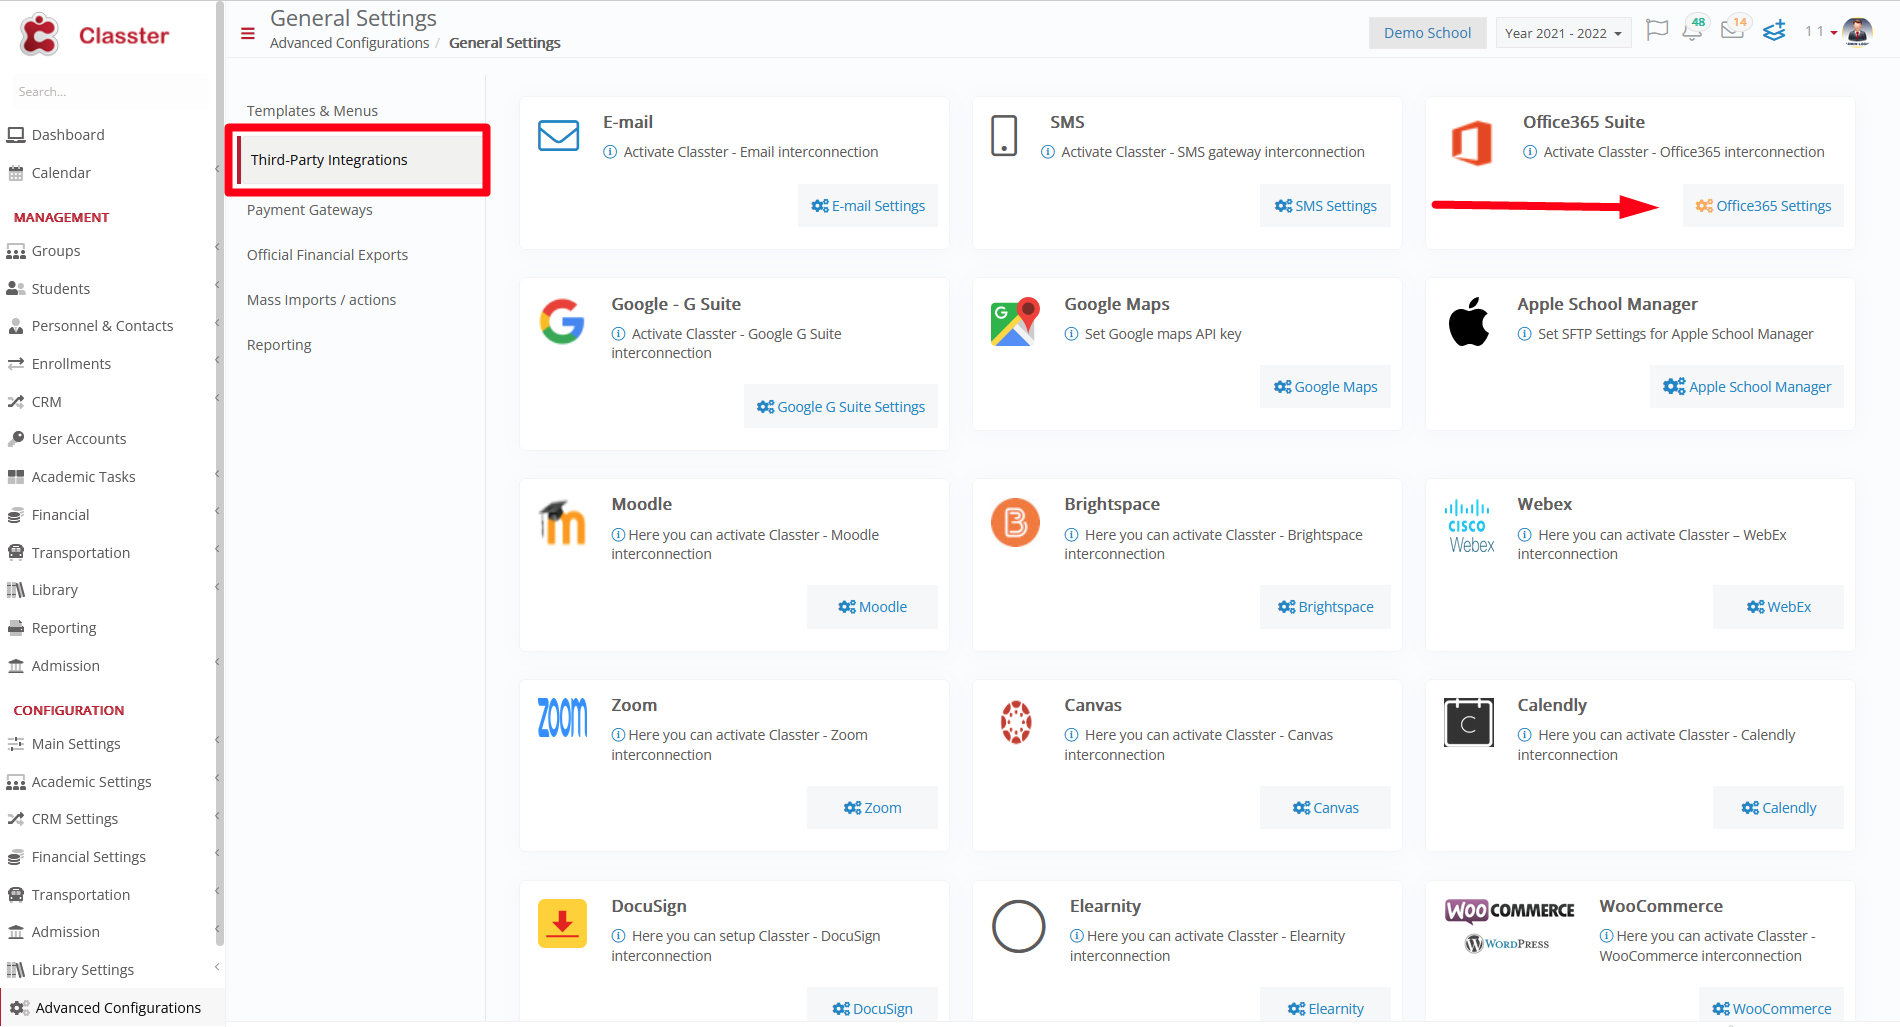
Figure 13
After clicking “Office 365 settings” you will be redirected to a window looking like this (Figure 14)
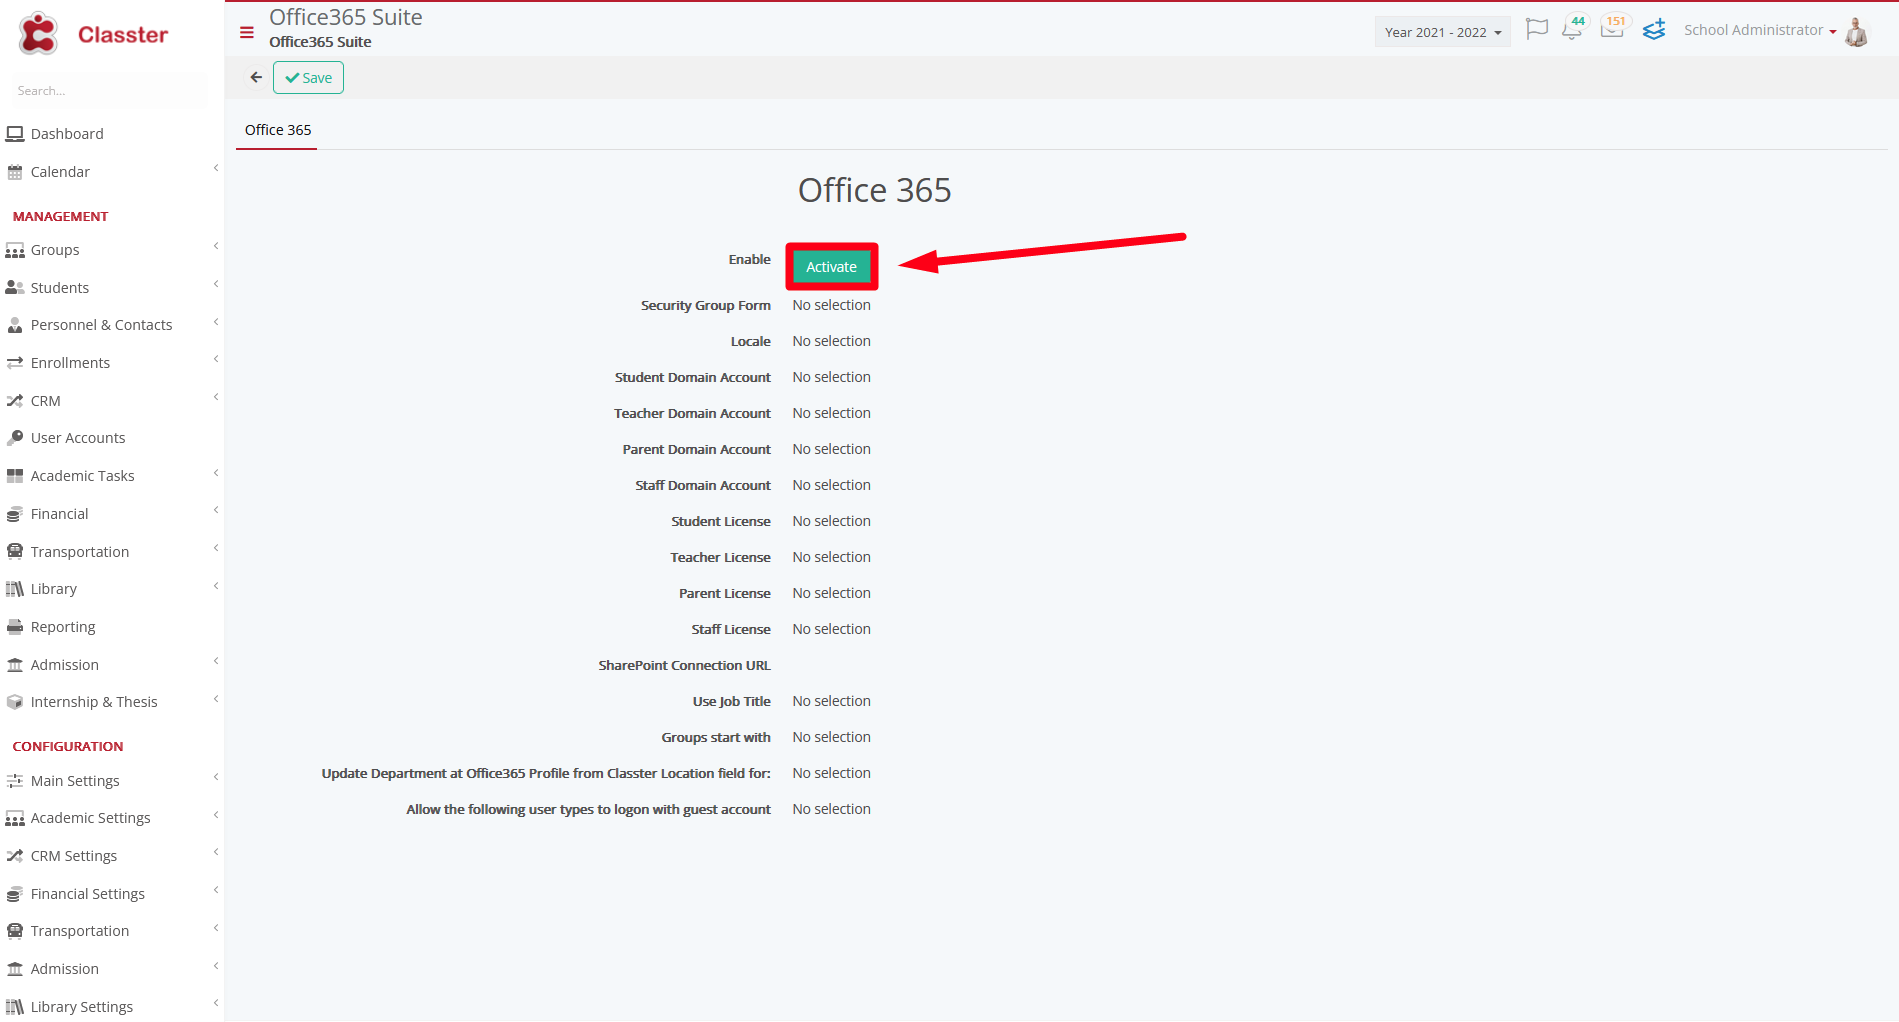
Figure 14
After clicking the “Activate” button you will be redirected to a new window looking like this (Figure 15)
- Select your account, or use another account with the appropriate rights.

Figure 15
After clicking the “Next” button you will be redirected to a window looking like this (Figure 16)
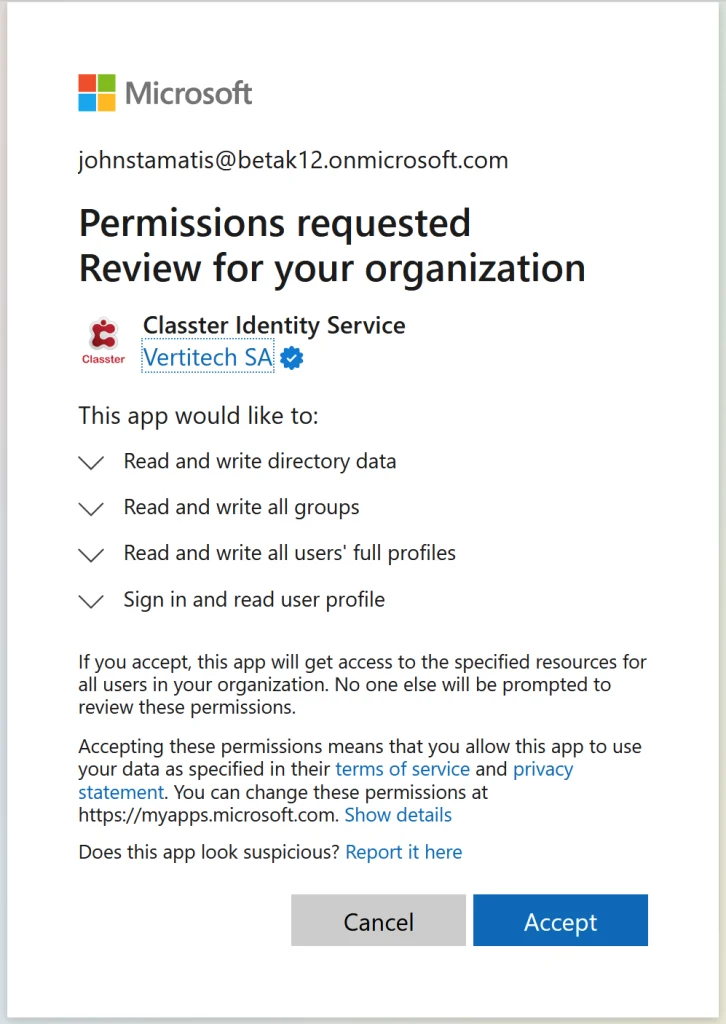
Figure 16
Click on ‘Accept’ button to activate connection with Classter.
- Once you have logged in to your School Office 365 account, you will see that the Office 365 Settings page in the Classter portal has changed to something similar to this (Figure 17).
In the following page, you will see (Figure 17):
- Enable option: Turn this switch on to Enable Office 365 for use with Classter.
- Security Group Form option: Here you can add security parameters for what files and capabilities different user types may have according to their enrollments on Classter. You create security groups from your School’s Office 365 Account. If you choose a security group e.g. Year, then users such as Students or Teachers will be able to access Office 365 material that is designated to them based on what Year they belong to. A Student in Year 4 would be able to see only Year 4 material.
You can create and add security groups in your School’s Office 365 account (Admin account full rights) and set security parameters on each file created, e.g. You can create a file and indicate it can be opened by Students of Year 4, from Class Y4B, attending Math Year 5 and History Year 5. Security groups can include Year, Stream, Class, Subject the system creates security groups for all of these entities a Student or Teacher is enrolled to. The suggested security groups for K12 are just the Year, for higher education Year and Subject. - Locale option: Choose a Location that will be assigned to a user upon creation to indicate where they are from, e.g. English (United Kingdom).
- Student, Teacher, Parent, Staff Domains: In each field you can enter the domain name you want each type of user to use for their O365 email account e.g Students can be “studentmyschool.com” and for Teachers can be “teachermyschool.com” or all types of users may have the same domain name, it’s your choice.
Domains are free for Students, Teachers, and Staff. If you wish to create accounts for Parents, it will come as an extra cost (Parents can create their own accounts directly from Office 365 for free). - Student, Teacher, Parent, and Staff Licenses options: In each option, you must choose the corresponding licenses you have for each user type. Licenses are given from Office 365.
For both the domains and the licenses, contact the administrator of your organization’s Office 365 account. - SharePoint URL field: Here you must add your institution’s SharePoint URL. This allows Students to connect to SharePoint through a link from their portal.
- Use Job Title option: if this is switched on, Teachers’ job titles will be set in their Office 365 account profile.
- Groups Start with option: here you can choose the form in which groups are presented, either institute code first or institute description first.
- Update Department at Office 365 Profile from Classter “Location” field for: The options currently are Students and Teachers. The Users selected here will get the Location they have on Classter in their Office 365 account profiles.
- Allow the following user types to log on with guest account: The available option here is the Relatives user type. When relatives are selected, instead of them having an Office365 account, they can log in both in Office365 as guests with their personal emails. When enabled, the parent’s license and domain fields are disabled on the integration page.
- Click on the ‘Save’ button to complete the process.
Once you are done filling in the fields and options in the Advanced Configuration/Third Party Integrations page, every user created from this point on will automatically create an Office 365 account.
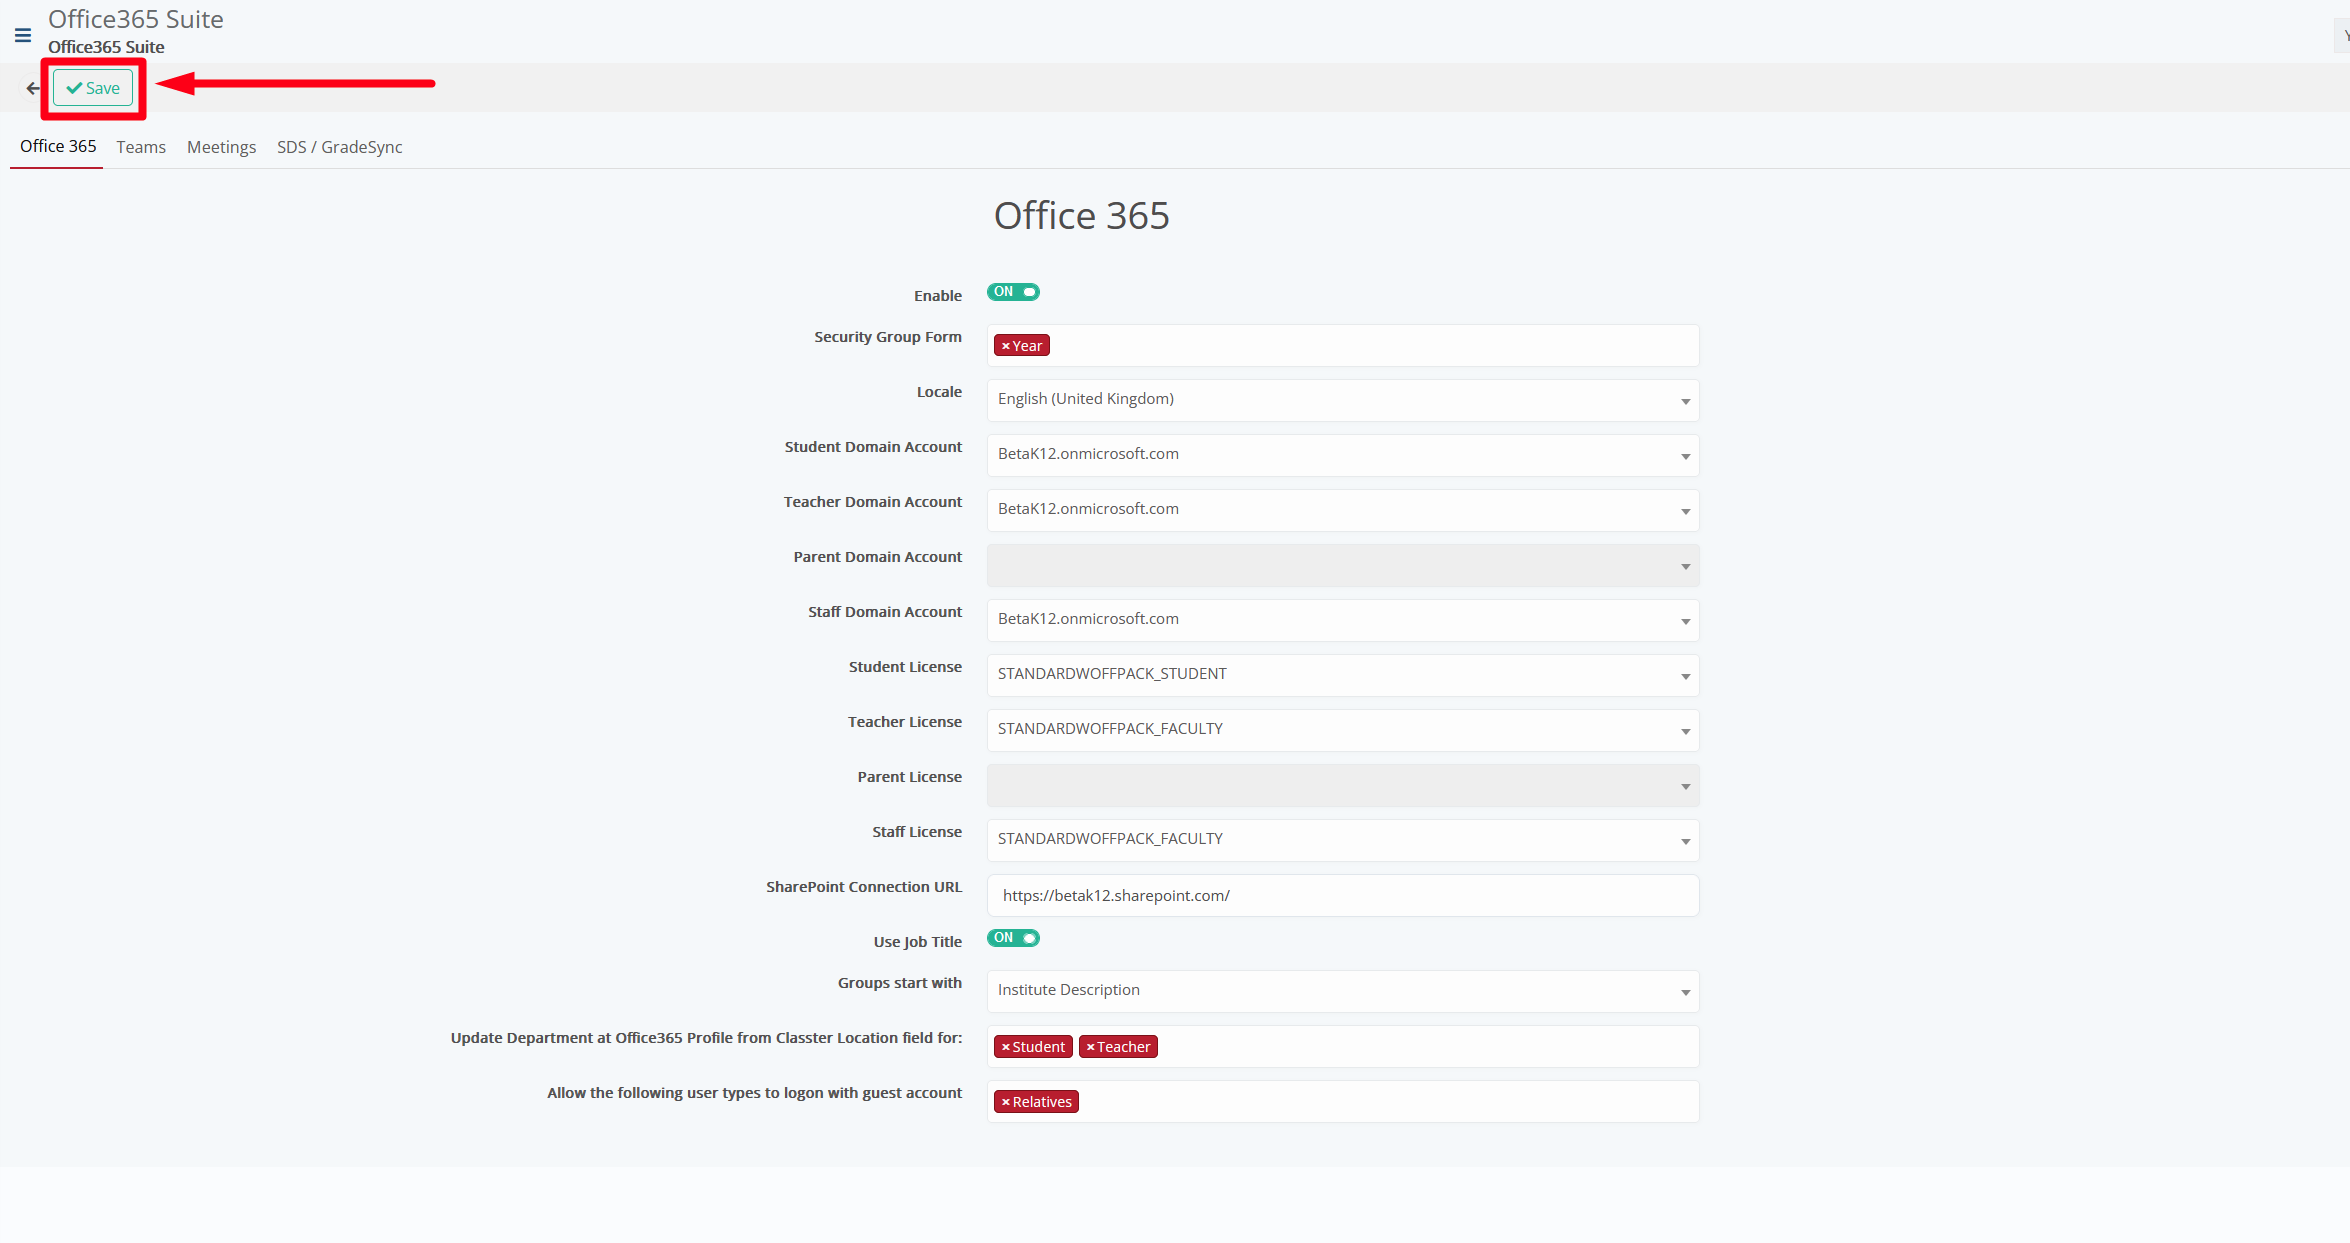
Figure 17
Create Office 365 accounts for pre-existing Classter users
After successfully connecting with Classter it is now time to use all of Office 365 features to their full potential.
From the User Accounts window, you can locate all pre-existing user types, Students, Teachers, Staff, and Administrators.
All users, created prior to the Office 365 integration activation, must be converted.
To start giving these users Office 365 accounts, follow the path: Dashboard > Management > User Accounts (Figure 18).
- The User Types filter will show only the user accounts that you have selected
- Click the “Search” button to show the list of your selected User Types

Figure 18
Accounts for Students
After selecting Students and clicking the “Search” button, you will see a list like the following (Figure 19):
- From the Actions dropdown menu, click on the ‘Convert to External Provider Account’. This will create a single sign on O365 account for this Student.
- When you click the “Convert to External Provider Account” button, the Pending Changes Column will turn to Yes and when it turns from Yes back to No the account will have been created and linked to Classter (Figure 20).

Figure 19

Figure 20
There is also the ‘bulk’ way of doing this (Figure 21)
- By clicking the “Select all” button and then by clicking the “Bulk Actions” dropdown button the “Convert to External Provider email Accounts” field will come up, click it to start the creation of the accounts (Keep in mind this can take up to 24 hours)

Figure 21
Accounts for Teachers
Pretty much you follow the same steps as shown above for the Students (Figure 22)
From the User Types search filter, select Teachers.
- Click on ‘Search’.
- From the “Actions” dropdown menu, click on the ‘Convert to External Provider Account’. This will create a single sign on O365 account for this Teacher.
- When you click the “Convert to External Provider Account” button, the Pending Changes Column will turn to Yes and when it turns from Yes back to No, the account will have been created and linked to Classter.
- The ‘bulk’ way works exactly the same for the Teachers as well. The only difference is that you select Teachers instead of Students (Figure 21)

Figure 22
Tip: This process can be repeated for Staff / Employees / Administrators as shown above.
Final connections check on Office 365 Admin Center
In the Office 365 Admin Center, go to Users / Active Users and click on the refresh button to refresh the list of users connected from Classter (Figure 23).

Figure 23
To learn about which data are being synced with Azure, check this article here: Which Data Will Be Synced With Azure
Find more or post your questions on our Facebook Community Page.
Also, watch our how-to videos on our YouTube channel.


