

Introduction
In Classter’s Higher Education mode, a Curriculum defines how an Educational Program is structured and how _Students_ progress through it. It connects _Grades_, _Streams_, _Subjects_, classifications, and academic rules into a single configuration.
More specifically, A Curriculum is used to manage subject grouping, enrollment rules, progression, graduation eligibility, reporting, transcript generation, and self-enrollment.
This manual explains the main concepts, prerequisites, and steps for creating and using a Curriculum effectively.
Each Curriculum:
- Can be associated with one or more _Grades_
- Can coexist with other Curricula linked to the same _Grade_
- Defines how subjects are organized and how academic rules are applied
- Supports enrollment, progression, evaluation, and graduation processes
Curricula are also used for:
- Bulk auto-enrollment in Mandatory subjects
- Online self-enrollment in subjects
- Promotion control, such as progression to the next academic year or semester
- Academic reporting, including transcript generation
Prerequisites and Important Information
Before creating a Curriculum, make sure the institution’s core academic structure is already configured. Curricula rely on these entities to apply rules correctly, organize subjects, and support student enrollment and progression.
Main Entities
The following entities should already exist before you begin configuring Curricula:
- _Location_: Represents the institutional structure, such as Campus, Faculty, or Department
- _Grade_: Represents the academic level or Program, such as Foundation Year, BA, MBA, MSc, Certificate, or Non-Degree Program
- _Stream_: Represents the student’s academic path or variation within the Educational Program, such as BA in International Economy
- _Educational Program Category_ / Specialization: Represents tracks, options, pathways, or shifts such as Online, Hybrid, or a subject-area specialization.

These entities are required because they determine where the Curriculum applies and how students and subjects are organized within the institution’s academic model.
List of Subjects
Before building a Curriculum, all _Subjects_ must be created in the central List of Subjects available in the Main Settings. This master list acts as the base repository from which subjects are later connected to one or more Curricula.

Each subject includes default information such as:
- Abbreviation
- Description
- Subject Category
- Grade
- Stream
- Prerequisite Subjects
- ECTS or Credit Value
- Weekly Hours

These values are used as the starting point only. In practice, each Curriculum can define its own subject-specific settings, allowing institutions to reuse the same master subject across different Curricula while applying different academic requirements where needed.
Common Subjects Across Curricula
If the same _Subject_ is used in more than one Curriculum (e.g., co-teaching across Programs), it should only be added once to the central List of Subjects and then get connected to relevant Curricula.

When a subject is added to a Curriculum Classification, it can be customized for that specific Curriculum without changing its master record. This allows institutions to maintain consistency at the central Subject level while still adapting academic requirements per Curriculum.

Basic Data
- Subject Custom Abbreviation for This Curriculum: Allows a localized abbreviation different from the main subjects list, suitable for internal codes or specific cohort identifiers.
- Subject Custom Title for This Curriculum: Enables renaming the _Subject_ as it appears in this curriculum, without altering its master record title.
- Subject Default Abbreviation, Title, Code: Displays the original information from the central subject list for reference (e.g., ABY 151, Introduction to Christian and Byzantine Archaeology).
- Allow Enrollment of This as an Additional Subject (Interested Only): If enabled, students can enroll in this subject optionally, beyond their core requirements.
- Subject Category: Defines whether the subject is Mandatory, Optional, Elective, etc., which affects enrollment rules.
- It Replaces the Following Subjects: Lists any subjects this one supersedes, used for equivalency handling during curriculum transitions. If the original subject is marked as reserved, the new subject will also be considered as reserved/passed.
- Alternative Subject: Used in specific cases for parallel programs offered by different providers.
- Exclude from Transcript Calculations: If checked, the subject will not be factored into transcript summaries (e.g., GPA, total credits).
- Exclude from Marks Calculation (Degree Marks & GPA): Omits the subject’s marks from degree classification and GPA calculations.
Hours & Credits
- Labs / Lab2: Defines the number of lab hours associated with the subject.
- Total Hours: The cumulative instructional hours for the subject within this curriculum.
- Credits 1 / Credits 2: Specifies the subject’s credit values, used for academic credit tracking and graduation requirements. (Credits 2 is used only in reporting)
Prerequisites
- Prerequisite Hours: Minimum hours required before enrolling in this subject.
- Credits: Minimum earned credits required as a prerequisite.
- Prerequisite Subjects Number: Indicates how many prerequisite subjects must be completed.
- Prerequisite Subject: Lists specific subjects that must be completed/passed prior to enrolling in this one.
- Prerequisite GPA Mark: The minimum cumulative GPA a student must have to enroll in this subject.
Properties when used in the Qualification Curriculum in Admission
- Multiplier: A weight applied during qualification calculations (e.g., admission scoring).
- Enable Maximum / Minimum Mark Limit: Activates mark thresholds for this subject.
- Minimum Mark: The lowest acceptable mark.
- Maximum Mark: The highest possible mark allowed.

This configuration enables institutions to:
- Maintain a unified list of academic _Subjects_
- Reuse shared content across different Curricula and _Grades_
- Connect _Subjects_ to LMSs and integrations using consistent subject codes
- Customize each Curriculum’s academic requirements while using common teaching components
Other Notes
-
_Groups_ are configured separately from Curricula. A Subject may have one or more Groups, such as lab sessions, class sections, or teaching groups, assigned independently.

- Enrollment begins from the Curriculum, while Group assignment follows based on system configuration or manual selection. For this reason, Curricula should be understood as the academic structure and rule layer, while Groups represent the delivery layer of the teaching process.

Typical Curriculum Structures
Curricula can be structured in different ways depending on the institution’s academic model. Some institutions use a simple structure with direct subject groupings, while others use a multi-level hierarchy based on academic _Year_, _Semester_, _Specialization_, or _Subject Category_.
Example A: Standard structure with academic _Years_ and _Semesters_
Type: Hierarchical
Bachelor’s in Business Administration (BBA)
- Year 1
- Semester 1: Introduction to Business, Business Communication
- Semester 2: Financial Accounting, Microeconomics
- Year 2
- Semester 1: Marketing Principles, Organizational Behavior
- Semester 2: Business Analytics, International Business Strategy

(This is a hierarchical structure where classifications contain other nested classifications.)
Example B: Term-based structure
Type: Simple
MBA Full-Time Program
- Year 1 – Semester / Quarter / Term 1: Strategic Management, Quantitative Methods
- Year 1 – Semester / Quarter / Term 2: Managerial Finance, Operations Management

(This is a simple structure consisting of a single classification that directly groups subjects.)
Example C: Mixed Mandatory and Optional
Type: Hierarchical
MSc in Digital Marketing
- Semester 1
- Mandatory: Digital Marketing Foundations, Consumer Behavior
- Optional: E-Commerce Technologies, Web Analytics
- Semester 2
- Mandatory: Campaign Strategy, Social Media Marketing

(This is a hierarchical structure where classifications contain other nested classifications.)
Example D: Categorized modular layout
Type: Simple
- Semester 1 – Mandatory: Business Ethics, Data Analysis for Managers
- Semester 1 – Optional: Leadership Lab, Business Simulation

(This is a simple structure consisting of a single classification that directly groups subjects.)
Or
- Year 2 – Semester 1 – Mandatory: Innovation Strategy, Strategic HR Management
- Year 2 – Semester 1 – Optional: Sustainable Finance, Emerging Markets Analysis

(This is a simple structure consisting of a single classification that directly groups subjects.)
Example E: Simple Flexible Structure
Type: Simple
Certificate in Entrepreneurship (flexible, non-sequenced program)
- Mandatory: Business Plan Development, Startup Financing
- Optional: Entrepreneurial Law, Innovation Management

(This is a simple structure consisting of a single classification that directly groups subjects.)
Note: Such structures allow flexibility without enforcing a predefined academic path. Rules such as prerequisites or minimum ECTS per Subject still apply.
Configuration Steps
In the following steps, you will create the Curriculum record, define its academic structure, create the necessary classifications, connect subjects, and finally connect the Curriculum to the appropriate Programs and students.
This process ensures that the Curriculum is not only structurally correct but also ready to be used in enrollment, progression, and academic evaluation processes.
Here’s what to do:
- Define the Classifications in your Curriculum (e.g., Year → Semester → Category)
- Add _Subjects_ or other Classifications under the proper Classification
- Set properties for each _Subject_ within the Curriculum:
- Title
- ECTS / Credits
- Weekly Hours
- Prerequisites
- Code / Abbreviation
- Subject Category
These values will be used during _Student_ enrollment, academic tracking, and reporting.
Step 1: Create your Curriculum
Navigate to Main Settings > Educational Programs > Curriculum > Create New to create a new Curriculum record.

Set the required properties carefully before continuing to the Curriculum structure, as these settings determine how the Curriculum will be used across academic operations.

General Data & Rules
- Active: Enables or disables the Curriculum. Only active Curricula are available for use in enrollments and academic operations.
- Title: The name of the Curriculum, typically aligned with the academic program it supports.
- Description: A brief summary providing additional context or details about the Curriculum.
- Duration: Standard duration of the Curriculum, expressed in academic _Years_ or _Semesters_.
- Max allowed duration: The maximum time a student can remain enrolled in the Curriculum.
- Total absences limit: The allowable total number of absences across the entire Curriculum.
- Unauthorized absences limit: The maximum number of absences, including those not formally justified.
- Annual Result: Select a predefined annual results model to apply for academic evaluation. The annual result model also defines the given Curriculum.
- Auto assign Subjects in Classifications with no filtering values (checkbox): During the automated enrollment of subjects, this will override the enrollment constraints at the curriculum level.
Graduation Eligibility
These fields determine whether a student qualifies for graduation:
- Graduation Eligibility Based on: Choose the primary criteria used to calculate eligibility (Subjects, Hours, or Credits).
- Required Number Of Subjects: Total subjects a student must pass to graduate.
- Required hours: Total instructional hours required for graduation.
- Required Credits: Total credit units (e.g., ECTS) needed for graduation.
- Max num of Credits: Maximum number of credits allowed within the Curriculum.
- Limit for failed Subjects: The maximum number of failed subjects allowed for graduation eligibility.
- Required GPA mark: The minimum cumulative GPA a student must achieve.
- Special Subject mark: Select a specific subject whose passing mark is critical for graduation, even if it is not included in the official transcript.
- Distinction mark: Minimum mark for achieving graduation with distinction.
- Distinction GPA mark: GPA required for graduation with distinction.
- Distinction mark of required Subject: A higher threshold grade for a key subject used in honors evaluation.
Enrollment Rules for Students’ Self-Enrollment
Define the constraints for students who self-enroll online:
- Enrollments period: Choose whether self-enrollment rules and constraints are managed per Curriculum or per academic period.
- Min Subjects: Minimum number of subjects a student must enroll in during the enrollment period.
- Max Subjects: Maximum number of subjects a student can enroll in during the enrollment period.
- Min new Subjects: Minimum number of new subjects (not previously enrolled) required per period.
- Allowed credits per enrollment Period: The maximum credits a student can take during a single enrollment period.
Certifications Setup
- Marking Range: Select a predefined scale (e.g., 0–100, A–F) used for subject assessment and transcript generation.
Custom Fields
Use this section to apply any additional custom fields that are specific to your institution’s reporting or compliance needs.
- My Custom Curriculum Field: A configurable dropdown to categorize Curricula using internal custom parameters (e.g., funding stream, academic division).
- Option 1, Option 2: Sample selectable values defined by the institution.
Step 2: Define a Structure
The first step in building a Curriculum is to define the Classifications that represent the structural hierarchy of your _Subjects_. These Classifications help group subjects into meaningful categories based on how your institution organizes its academic offerings.
There are two common approaches to structuring a Curriculum using Classifications:
- Simple Structure: A direct grouping of subjects under a small number of Classifications, such as Mandatory and Optional.
- Structure with Classifications: A hierarchical arrangement where parent Classifications contain other Classifications, such as Year > Semester > Subject Category.
Note: At least one classification must exist to add Subjects.
Simple Structure
For example, in the image below, we see a list of _Subjects_ grouped under the “Mandatory” or “Optional”.
To begin, you can Add or Create a new classification by pressing the blue button on the upper – left corner of the Curriculum screen.

(This is a simple structure consisting of a single classification that directly groups subjects.)
A pop-up window will appear, allowing you to configure the new Classification. Each Classification reflects a type of academic requirement, such as Mandatory and Optional, and defines how its included subjects behave in terms of enrollment rules.
Add a new Classification by pressing the blue button in the upper left corner, or Edit an existing one by pressing the pencil icon.

Let us see it as a diagram to better understand the structure. Classification properties are fully explained in the next step below.

(This is a simple structure consisting of a single classification that directly groups subjects.)
Structure With Classifications
A Curriculum is structured using a hierarchy of Classifications, organized groupings of _Subjects_ that typically follow the academic progression of the Program, such as: Year → Semester → Subjects.
In the example below, the Classification titled Year 1 (Mandatory Core) is divided into two sub-Classifications:
- Semester 1
- Semester 2

(This is a hierarchical structure where classifications contain other nested classifications.)
Each Semester contains a group of 6 subjects, totaling 12 subjects for Year 1. This total is defined in the configuration settings of the Year 1 (Mandatory Core) Classification.
This hierarchical structure allows for a clear and scalable organization of subjects across years and semesters, supporting flexible rules for enrollment and progression.

Step 3: Create your Classifications
Classifications are used to organize the Curriculum into logical academic groupings. They allow institutions to reflect their academic model clearly, whether that model is based on Year, Semester, Term, Specialization, or Subject Category.
Examples of common classification types include:
- Academic Year (e.g., Year 1, Year 2)
- _Semester_ or _Term_ (e.g., Semester 1, Term 2)
- _Subject Category_ (e.g., Mandatory, Optional, Elective)
You can nest Classifications to reflect your institution’s progression and categorization. For example: Year 1 > Semester 1 > Mandatory or Optional.
Additional examples of Classification uses include:
- Specialization paths (e.g., Marketing Track, Finance Track)
- Course types (e.g., Labs, Workshops, Thesis)
Below, we will begin by creating classifications of subjects and any additional groupings needed for your Curriculum.
Add your first Classifications
To add a new Classification, click the blue Add Classification button located in the upper-left corner of the Curriculum screen.

A configuration pop-up will appear, allowing you to:
- Add a new Classification using the blue Add New button.
- Edit an existing Classification by clicking the pencil icon next to it.

In the pop-up window, fill in the appropriate fields to define the Classification:
This is an example of a parent Classification that serves as a top-level category and will contain additional nested sub-Classifications beneath it, such as Semester 3 and Semester 4 under Year 2.
- Enter a Description to label the Classification clearly
- Select the appropriate _Educational Program Category _/Specialization (this links the Classification to a specific academic track or department).
- It is very important to define the type of Classification: whether this is a parent Classification (containing other Classifications) or a Classification of Subjects. This determines how the Curriculum hierarchy is structured.
- Check the Mandatory box if this group includes subjects that _Students_ are required to enroll in. This setting works in conjunction with the enrollment rules defined below.
- Select the Count Type (subjects, credits, or hours) to define how enrollment rules will be applied.
- Number of Subjects – used in simpler structures
- Credit-based – for ECTS-aligned Programs
- Hours – useful for attendance-based tracking
- Once a Count Type is selected, fill in the corresponding field(s) below to define minimum and/or maximum values.
- Optionally, configure additional parameters such as _Grade_ or _Stream_ to further specify where this Classification applies within the broader Curriculum.

Once you have defined the structure of parent Classifications (e.g., Year 1, Year 2), you can continue by configuring the individual Classifications that will contain subjects.
These subject-level Classifications (such as Semester 3, Semester 4) define the actual academic content that _Students_ can be enrolled in. Within each of these, you can:
- Add a clear Description and select the appropriate _Educational Program Category_/Specialization to associate the group with a specific academic track.
- Apply enrollment rules based on credits, number of subjects, or hours.
- Specify whether the Classification is Mandatory or Optional for _Student_ enrollment.
- Define how many Subjects (or Credits/Hours) _Students_ must select or complete from this group.
- Optionally, configure additional parameters such as _Grade_ or _Stream_ to further refine how and where this Classification applies.
This structure enables full control over the student’s academic path while supporting flexible enrollment and graduation policies.

Note: Never forget to set the ‘Classification of’ property to either ‘Subjects’ or ‘Other Classifications’ when adding a new Classification—this is essential for the hierarchy to function correctly.
Create a structure for your classifications
To add a new Classification to your Curriculum Structure, first determine its appropriate place within the hierarchy, for example, under a specific _Year_ or _Semester_.
Once the target level is identified, click the Add button.

A window will appear displaying all existing Classifications. From there, you can select one or more Classifications to nest under the selected parent Classification. Do not forget to press the Add Selected button.

This step ensures that your Curriculum hierarchy remains organized and accurately reflects the academic structure of your Programs.
At this point, you should have your academic structure defined (e.g., Year 2 > Semester 3), ready to be populated with subjects.
Note: Never forget to set the ‘Classification of’ property to either ‘Subjects’ or ‘Other Classifications’ when adding a new Classification—this is essential for the hierarchy to function correctly.
Step 4: Add Subjects to Classifications
Semesters 3 and 4 are Classifications of Subjects, so the next step is to add the appropriate subjects under each one by following the same process used previously. Click the Add button within the desired Classification.

A pop-up window will appear, displaying all available subjects. You can use the built-in filters, such as _Grade_, _Stream_, or _Subject_ Category_—to narrow down the list and select the relevant subjects to include in this Classification.
Once you have found the subjects, select one or more from the list and click the Add Selected button to include them in the Classification.

The selected subjects will automatically appear under the corresponding Semester Classification where they were added, reflecting their placement within the Curriculum structure.


(This is a hierarchical structure where classifications contain other nested classifications.)
Step 5: Connect to Educational Programs/_Students_
Once the Curriculum structure is complete, the next step is to connect it properly so it can be used in daily academic operations.
Connect the Curriculum as Default to the _Grade_/Program
For the Curriculum to be used automatically, it must be connected as the default Curriculum to the relevant _Grade_ /Program and Stream.
Navigate to: Main Settings > Educational Programs > Grades > Academic > Annual Results Model & Curriculum.
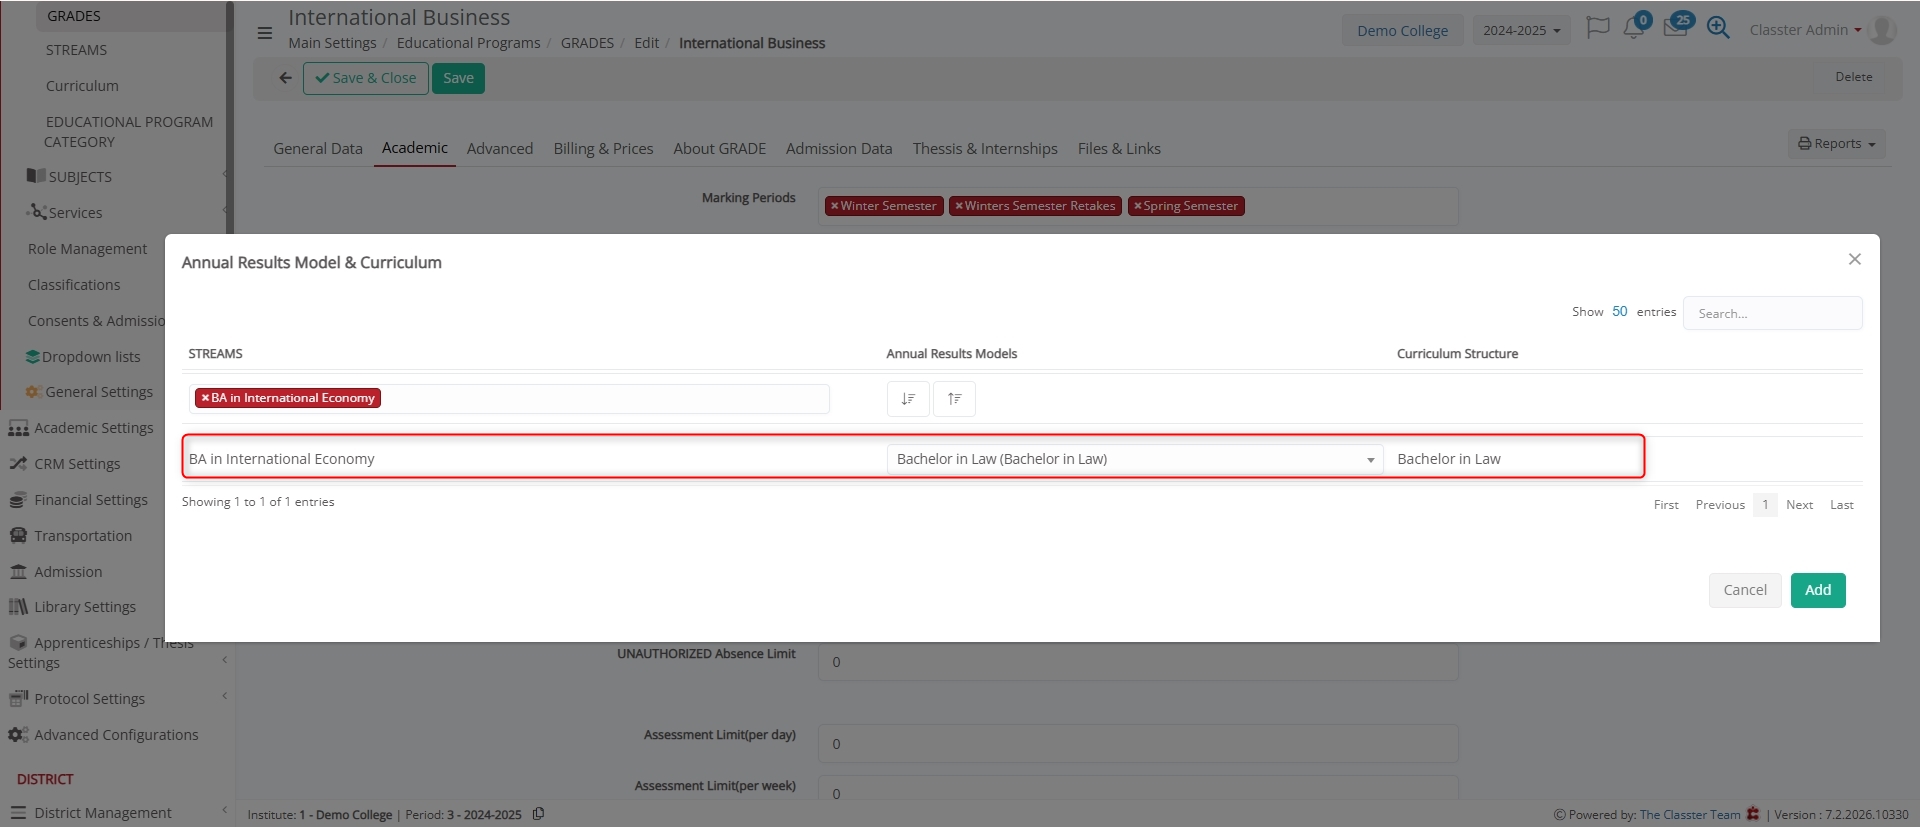
Here, define the Annual Result Model and Curriculum as the default one for the relevant Grade/Program and Stream.
The default Curriculum is the one applied automatically by the system to every new student Educational Program entry, regardless of how that entry is created, including:
- Admission
- Manual registration
- Import, etc.
This means that if a new cohort should follow a revised Curriculum, you can create a new Curriculum, such as MBA 2026, and then set it as the default in the relevant _Grades_, _ Educational Programs_, and _Streams_. From that point onward, all newly created educational program entries will automatically receive that new default Curriculum.
Note: Changing the default Curriculum does not affect existing Curriculum connections already assigned to students. It applies only to new educational program entries created after the change.
Change Curriculum/Annual Results Model for Existing Students
In most cases, no additional action is required for existing students if the default configuration has been set correctly from the beginning. However, in custom or exceptional cases, institutions may need to update the Curriculum or the Annual Results Model for existing students.
This can be done through the following bulk action: Filter Students per Educational Program > Bulk Actions > Change Annual Results Model.
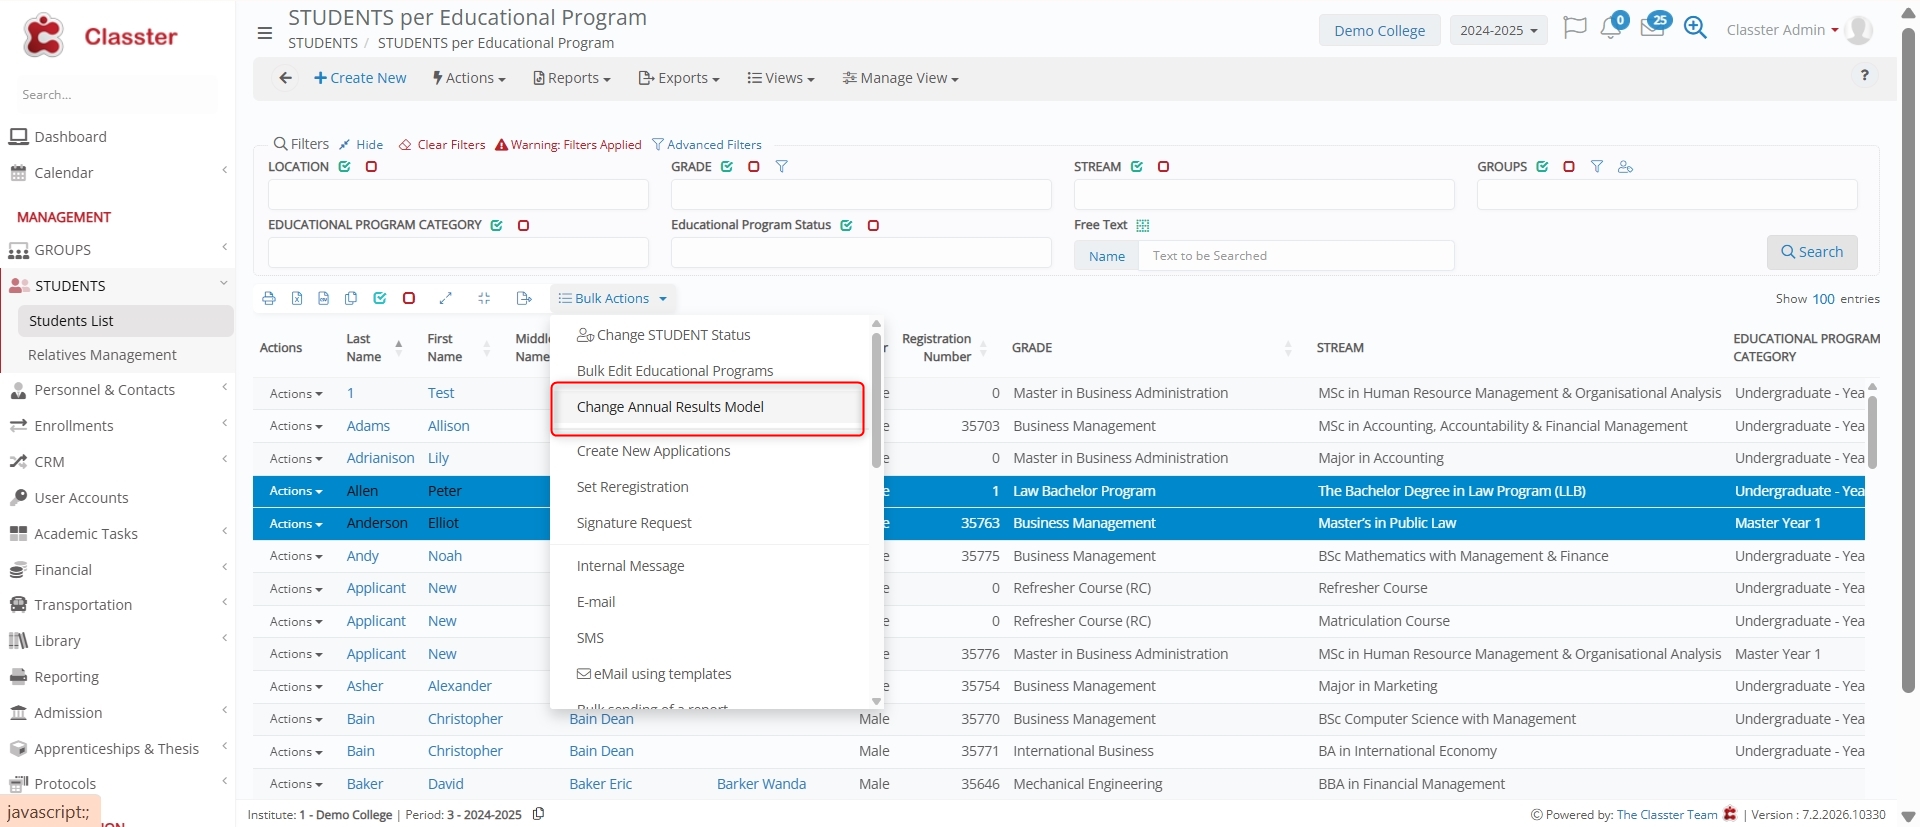
This bulk action allows you to update the Curriculum/Annual Results Model connection for selected students when required.
Manual Update from the Student Card
A Curriculum connection can also be reviewed or changed manually from the student record. To do so, navigate to: Student Card > Educational Programs.
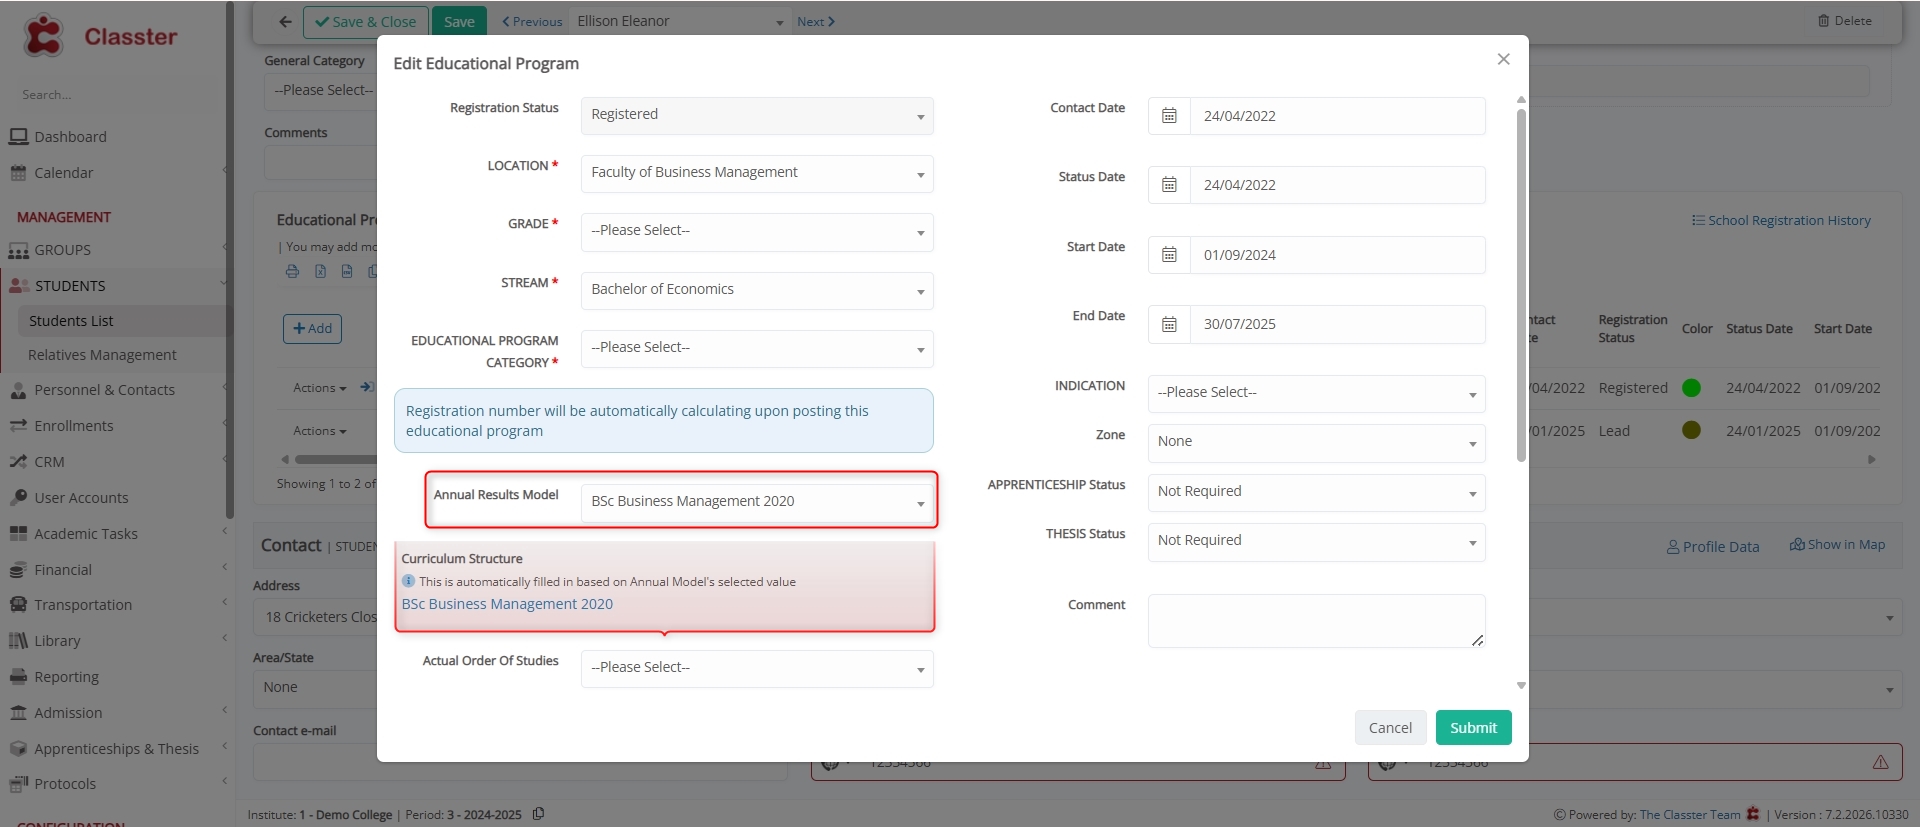
This option is useful when the change is needed only for specific students rather than for a larger group.
Note: If there are already existing subject connections within the current Curriculum, the system will not allow the Curriculum change. This restriction protects the academic consistency of the student record and prevents conflicts between existing subject enrollments and the newly selected Curriculum.
Conclusion
A well-configured Curriculum is the foundation of academic operations in Classter. It defines how subjects are structured, how enrollment and progression rules are applied, and how graduation eligibility is evaluated.
By following the steps in this guide, institutions can create Curricula that accurately reflect their academic model, support operational consistency, and connect properly to the relevant Programs and student records. This ensures that both new and existing academic processes are managed in a structured, scalable, and reliable way