A Custom Query is a powerful tool that allows users to execute custom SQL queries directly on the Classter database. These queries provide flexibility for extracting, updating, or manipulating data based on specific needs, beyond the built-in reports and processes. Also used for official exports of financial data.
Key behaviors:
- Executes only verified queries
- Sends Excel files if results are found
- Logs execution time and SQL messages
- Skips queries that return no data or have been unverified
- It can be executed through the Notification Service, which is an automated background process that runs scheduled tasks, including verified Custom Queries.
Once a Custom Query is created and verified, it can be executed either manually (on demand) or automatically using the Notification Service:
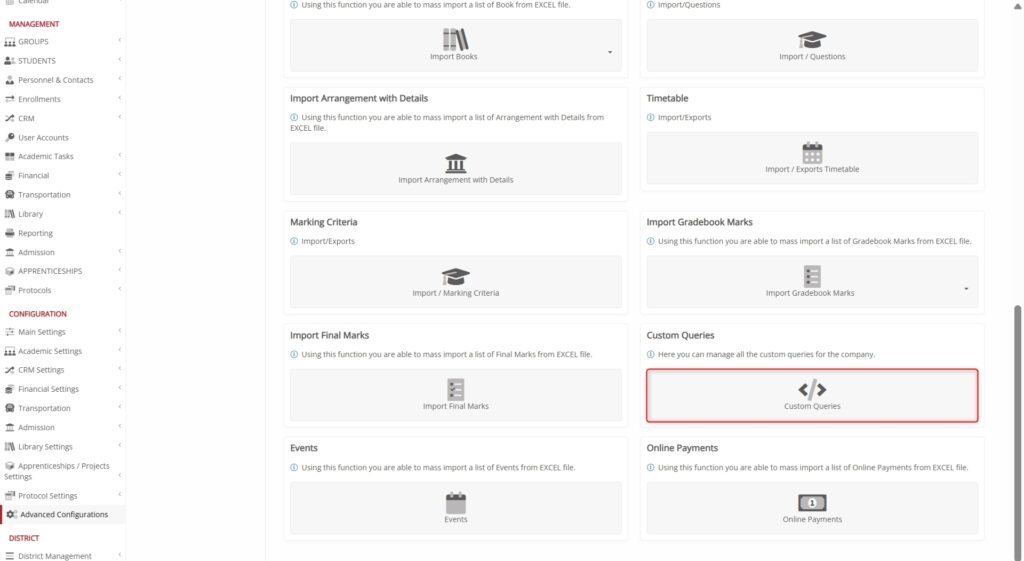
- Manually (from the Mass Imports menu)
Path: Advanced Configurations > Mass Imports / actions > Custom Queries.
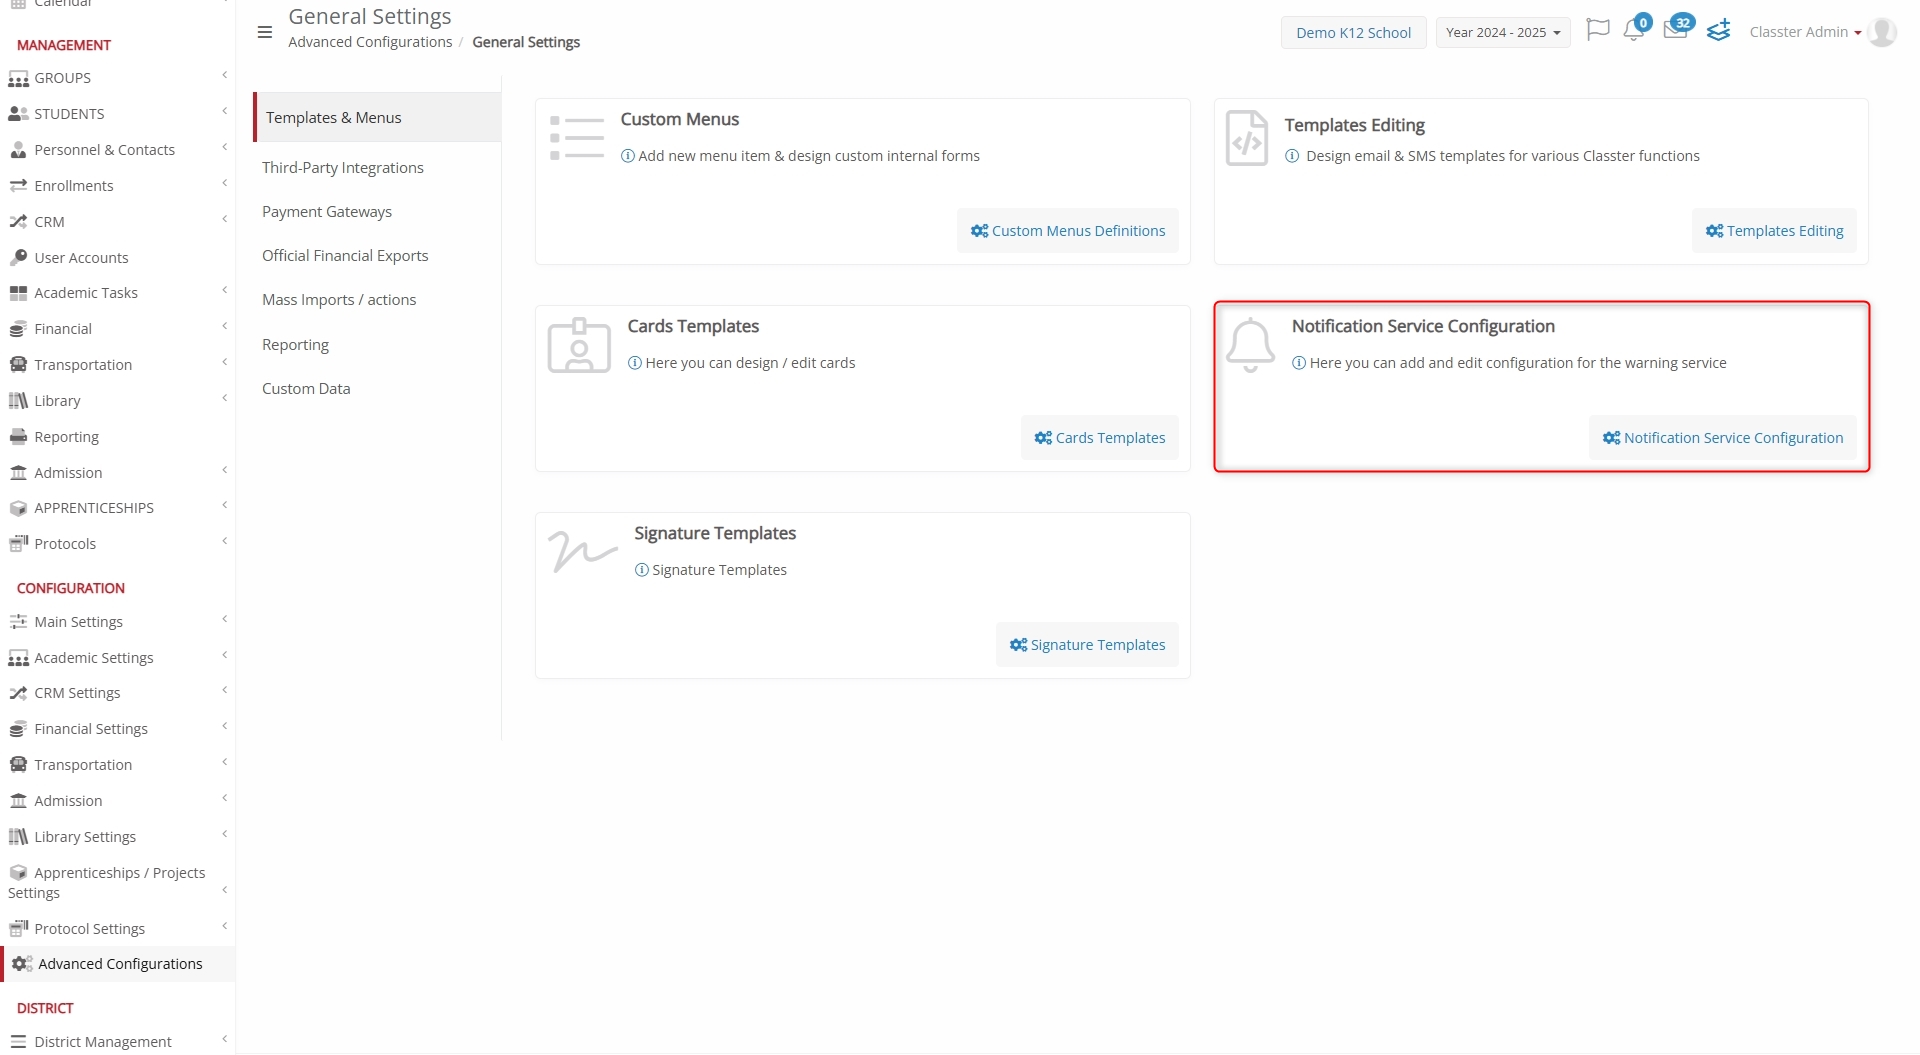
- Automatically (scheduling the automation from the Notifications Service)
Path: Advanced Configurations >Templates & Menus > Notification Service Configuration.
Prerequisites
To create and manage Custom Queries, the following conditions must be met:
You must have the right user role
- Only users with the role of Admin or Owner are allowed to create or execute Custom Queries.
- Other roles (e.g., Secretary) do not have access to this feature.
Your user role must include specific privileges
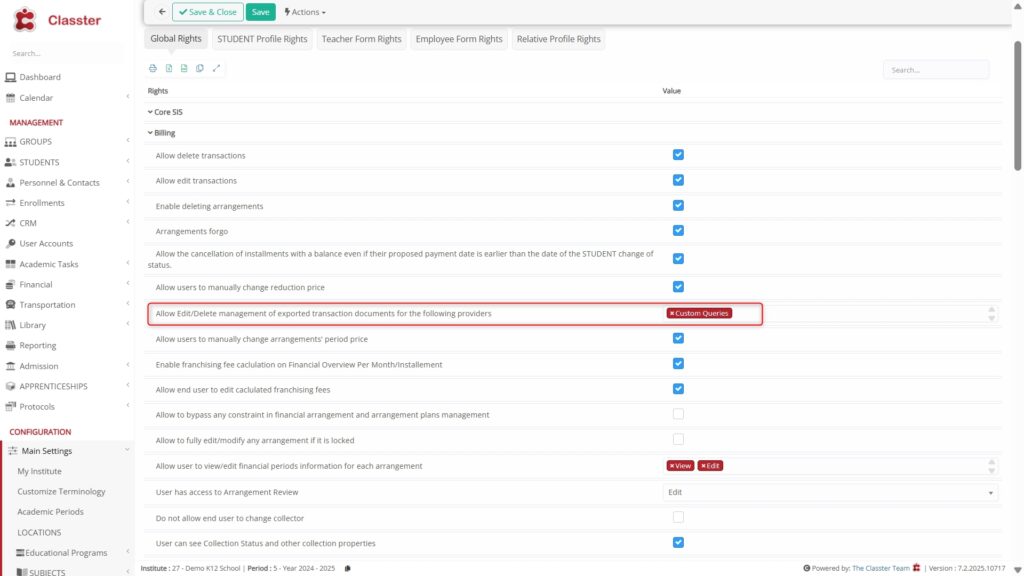
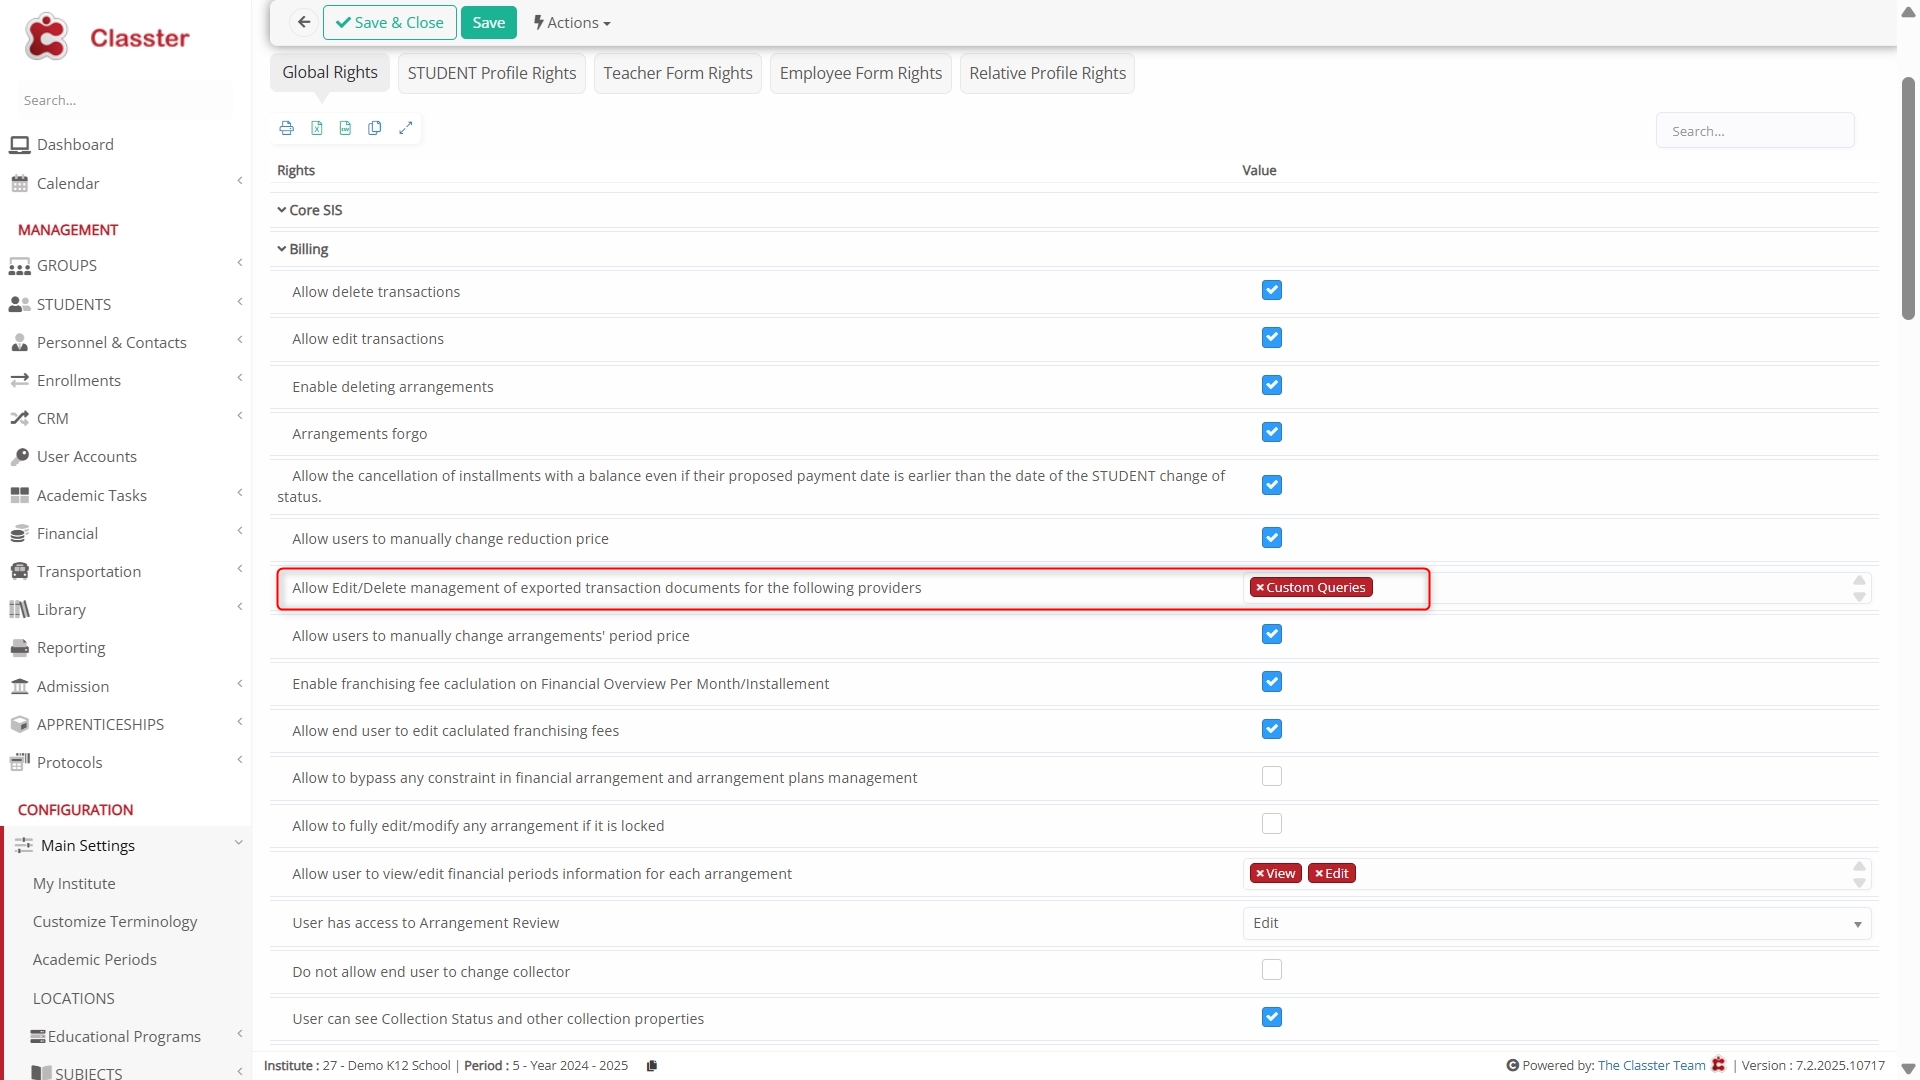
- You need the “Can Execute Custom Queries” and the related values on “Custom queries management” privilege.
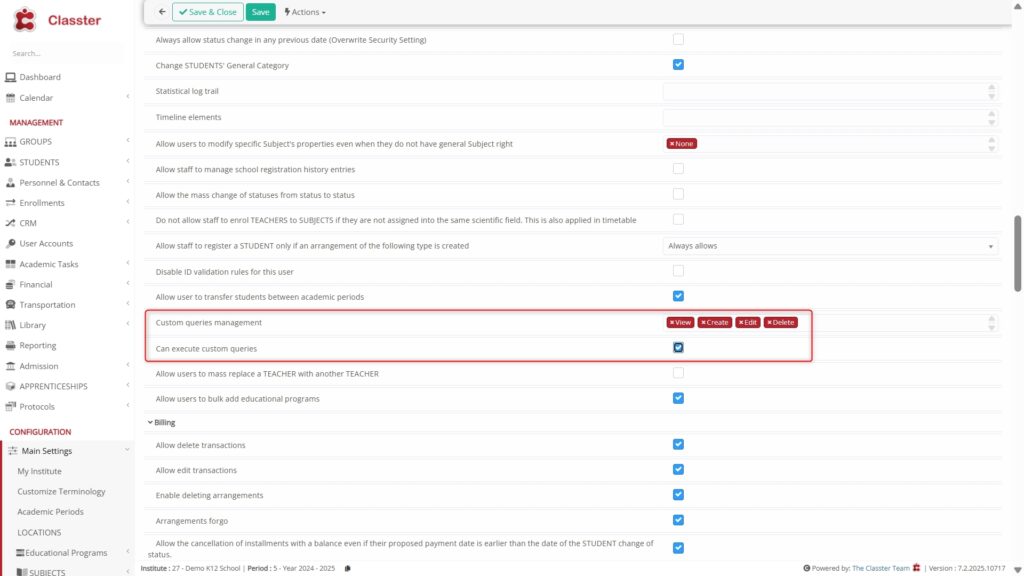
- To edit or delete existing queries, you must also have: “Allow Edit/Delete management of exported transaction documents for the following providers → Custom Queries”.
(Found under: Role Management → Global Rights → Billing)
Single Database is required
- Custom Queries only work in Single Database environments.
- If your agreement is for a shared database, the feature will be disabled.
The Advanced Module must be active
Your Classter setup must include the Advanced Configurations Module, which unlocks:
- Mass Imports > Custom Queries
- Notification Service Configuration
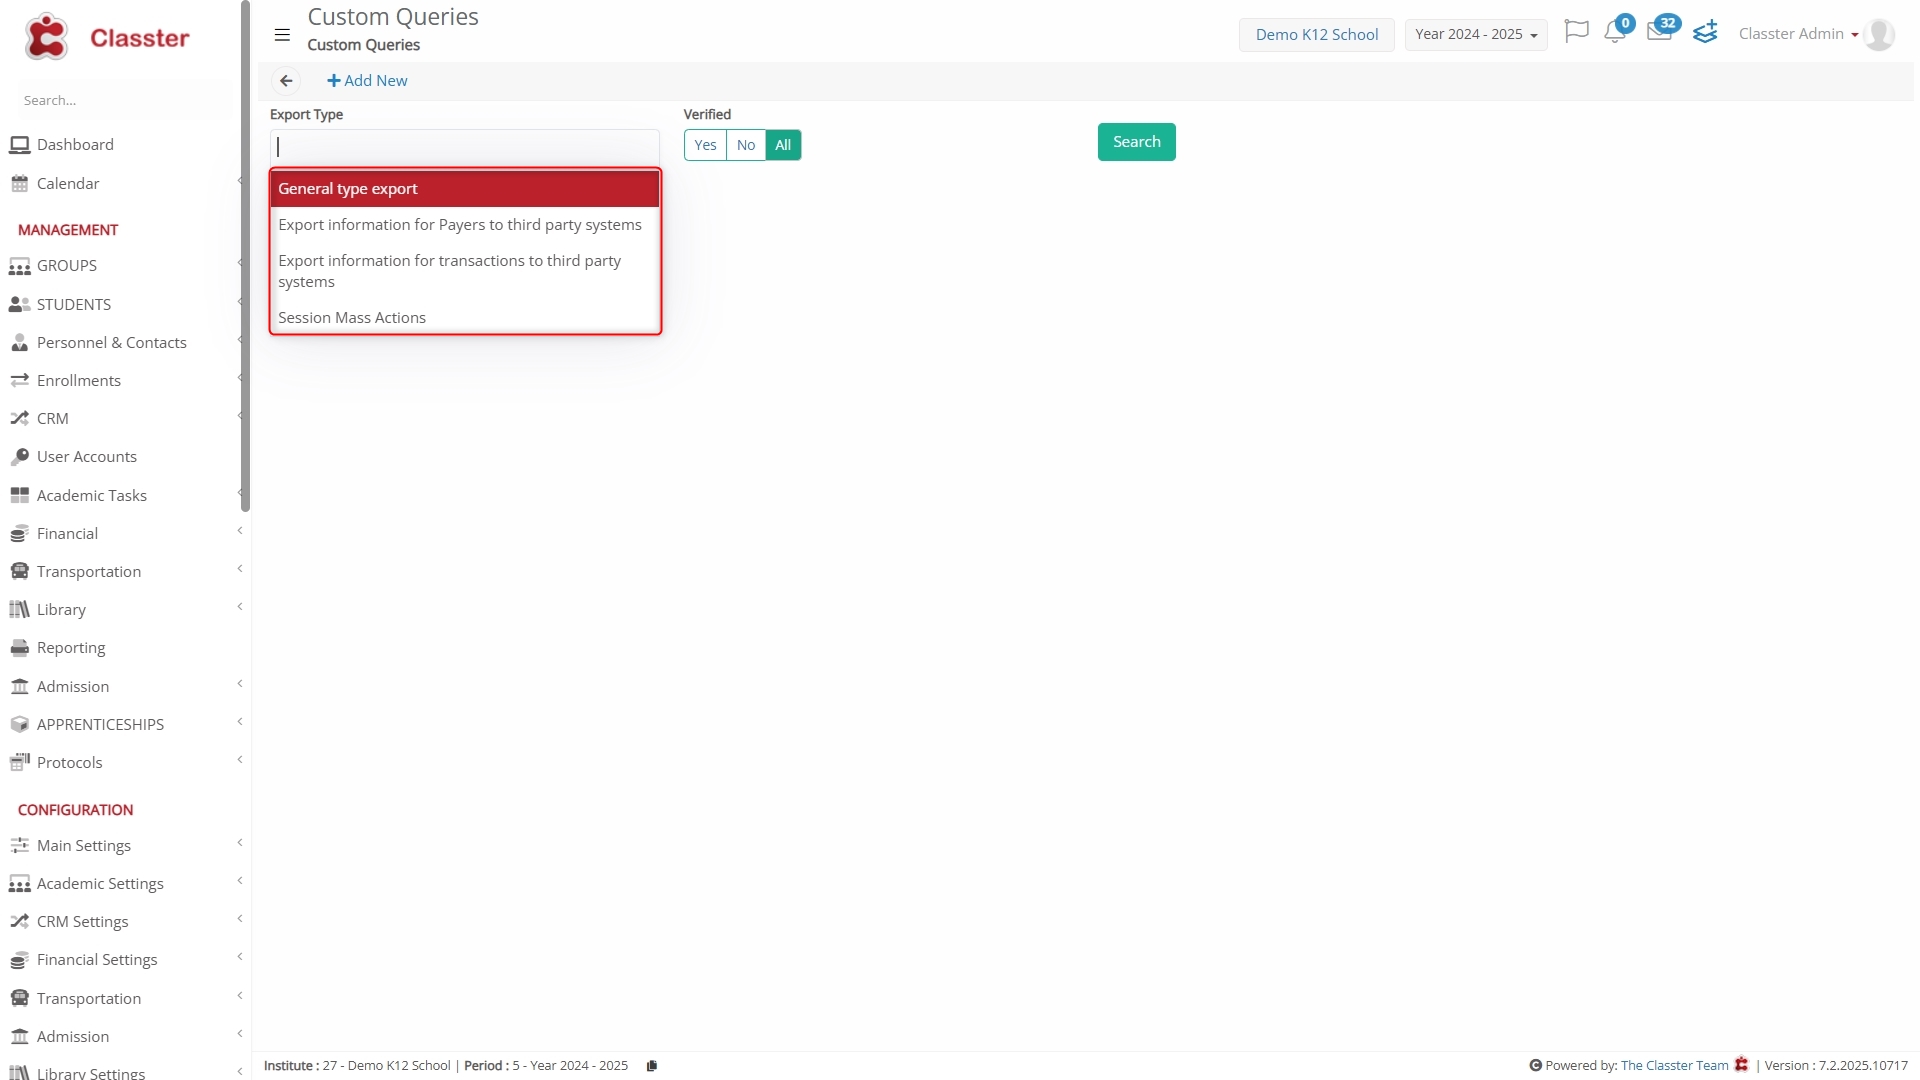
You must select the correct query type
When creating a Custom Query, you’ll choose from:
- General Type – For flexible, direct database operations (e.g., SELECT, INSERT, UPDATE)
- Export Payers – For exporting payer information to third-party systems
- Export Transactions – For exporting financial transaction data
- Mass Session Actions – For creating custom mass session copies.
Note: Export Payers and Export Transactions are primarily used for official financial exports.
Queries must be verified before use
All Custom Queries must be reviewed and marked as Verified by Classter before execution.
- Queries that are unverified:
- Cannot be executed manually.
- Will be skipped by the Notification Service if scheduled.
- If you edit a verified query, it becomes unverified and must go through review again.
Create a Custom Query
Navigate to Advanced Configurations > Mass Imports / actions > Custom Queries > press the Add New button. A pop-up window will appear to fill in the appropriate information.
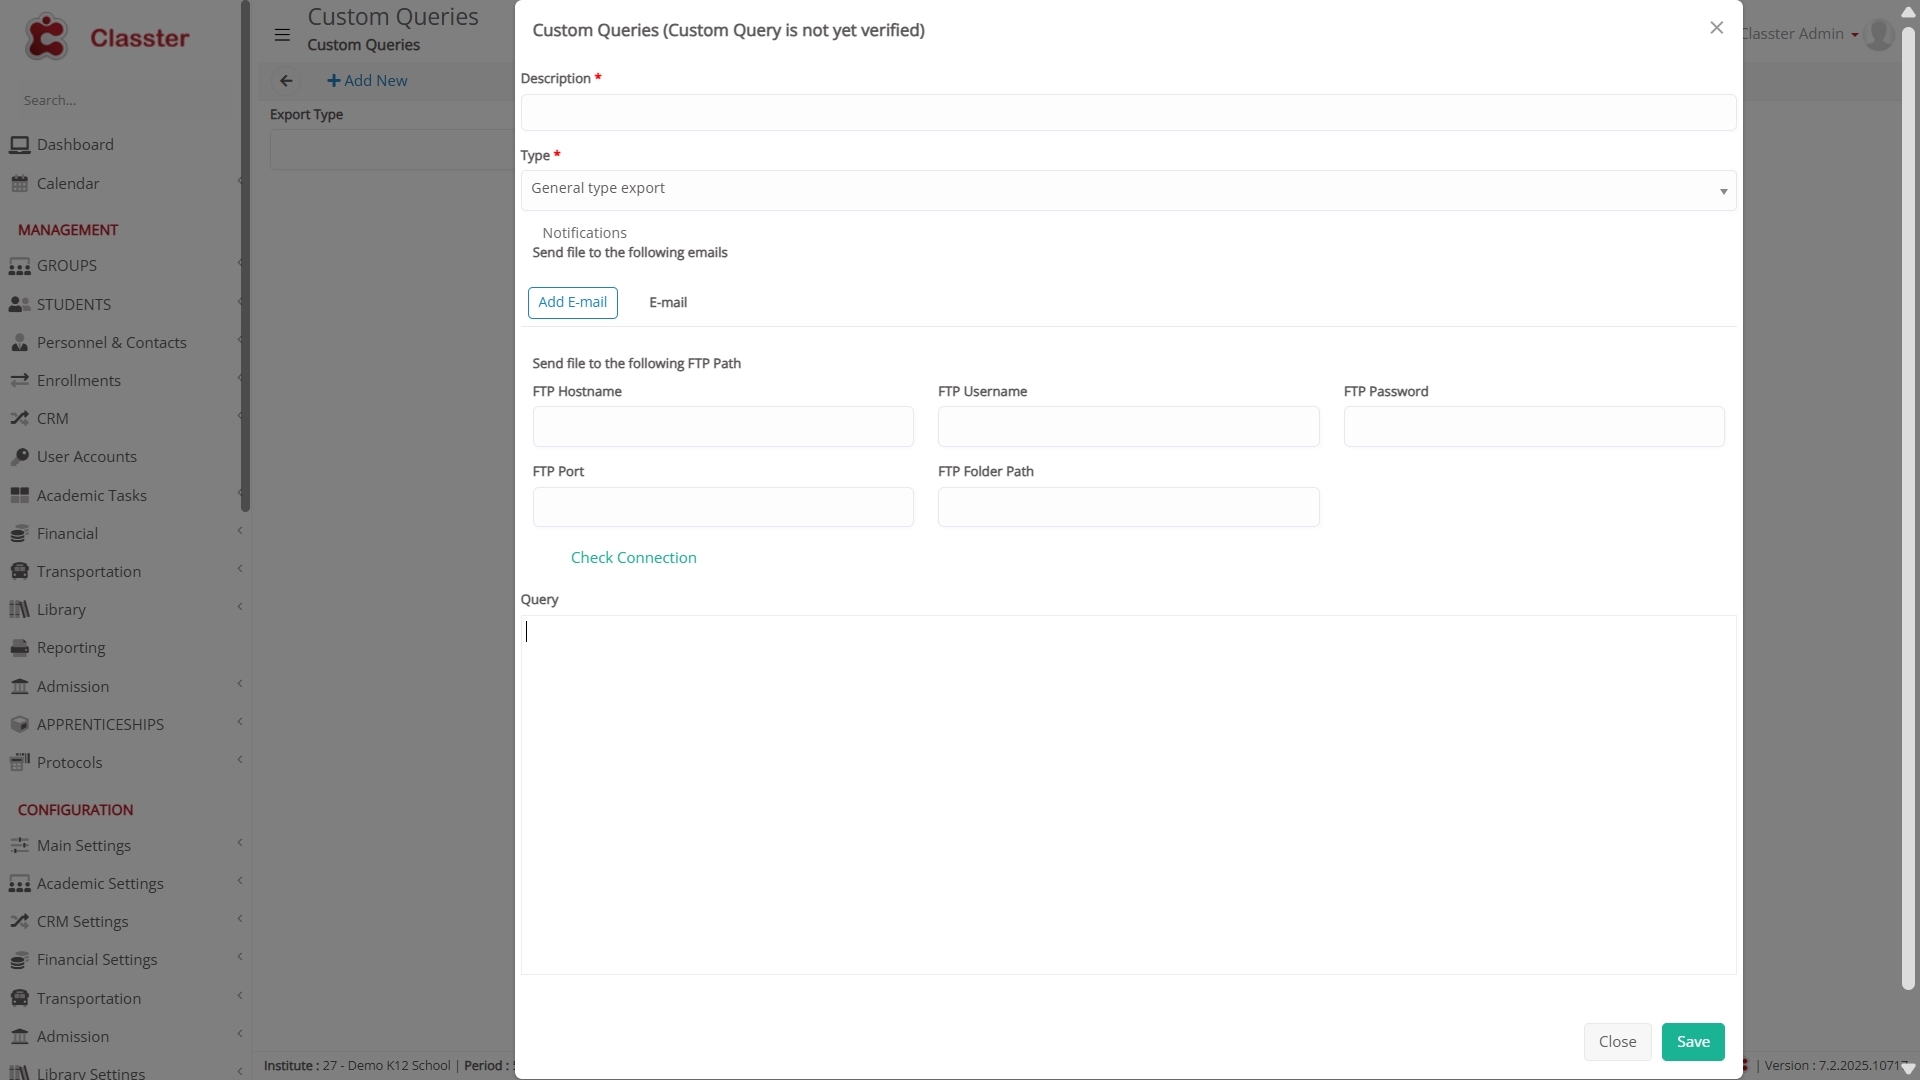
- Define the Description
Write a clear, meaningful description of the Custom Query. This helps identify its purpose and context during execution or later reference.
- Select the Query Type
Choose one of the supported query types:
- General Type – Executes directly on the database. Suitable for a wide range of use cases, including data updates.
- Export Payers Information – Extracts payer details for integration with third-party systems.
- Export Transactions Information – Extracts transaction data for financial services or external use.
- Session Mass Actions – For internal use only. For example, in Classter, this was implemented for a college that required a custom absence calculation—specifically, converting three instances of lateness into one absence.
- Set Email Recipients
Clients can enter as many email addresses as needed. These recipients will automatically receive the resulting Excel files when the Custom Query runs.
- Configure FTP Settings (Optional)
If file delivery to external systems is required, the client can define FTP credentials. When the query runs, the output will be uploaded to the specified destination.
- Write the SQL Query
Enter the SQL query that defines the logic of the report. This may be:
- A SELECT for data extraction
- An INSERT or UPDATE (for General Type) — in which case, a SELECT must also be included to preview the affected data
- Query Verification Required
Before a Custom Query can be executed — manually or via the Notification Service — it must first be reviewed and verified by Classter.
⚠️ Important:
If a verified query is modified after verification, it is automatically marked as unverified. It must go through the verification process again before it can be executed.
- Privileges for Edit/Delete Actions
To edit or delete an existing Custom Query, the user must have the appropriate security privilege enabled.
📌 To enable this right:
Go to Role Management → Select a User Type → Privileges → Global Rights → Billing →
Enable: “Allow Edit/Delete management of exported transaction documents for the following providers → Custom Queries”
Run Manually
Once your Custom Query is created and verified, you can proceed to run it manually.
Steps to Run the Query Manually:
- Navigate to Custom Queries:
Go to Advanced Configurations > Mass Imports / Actions > Custom Queries.
- Find the Desired Query:
Locate the Custom Query you want to run in the list of existing queries.
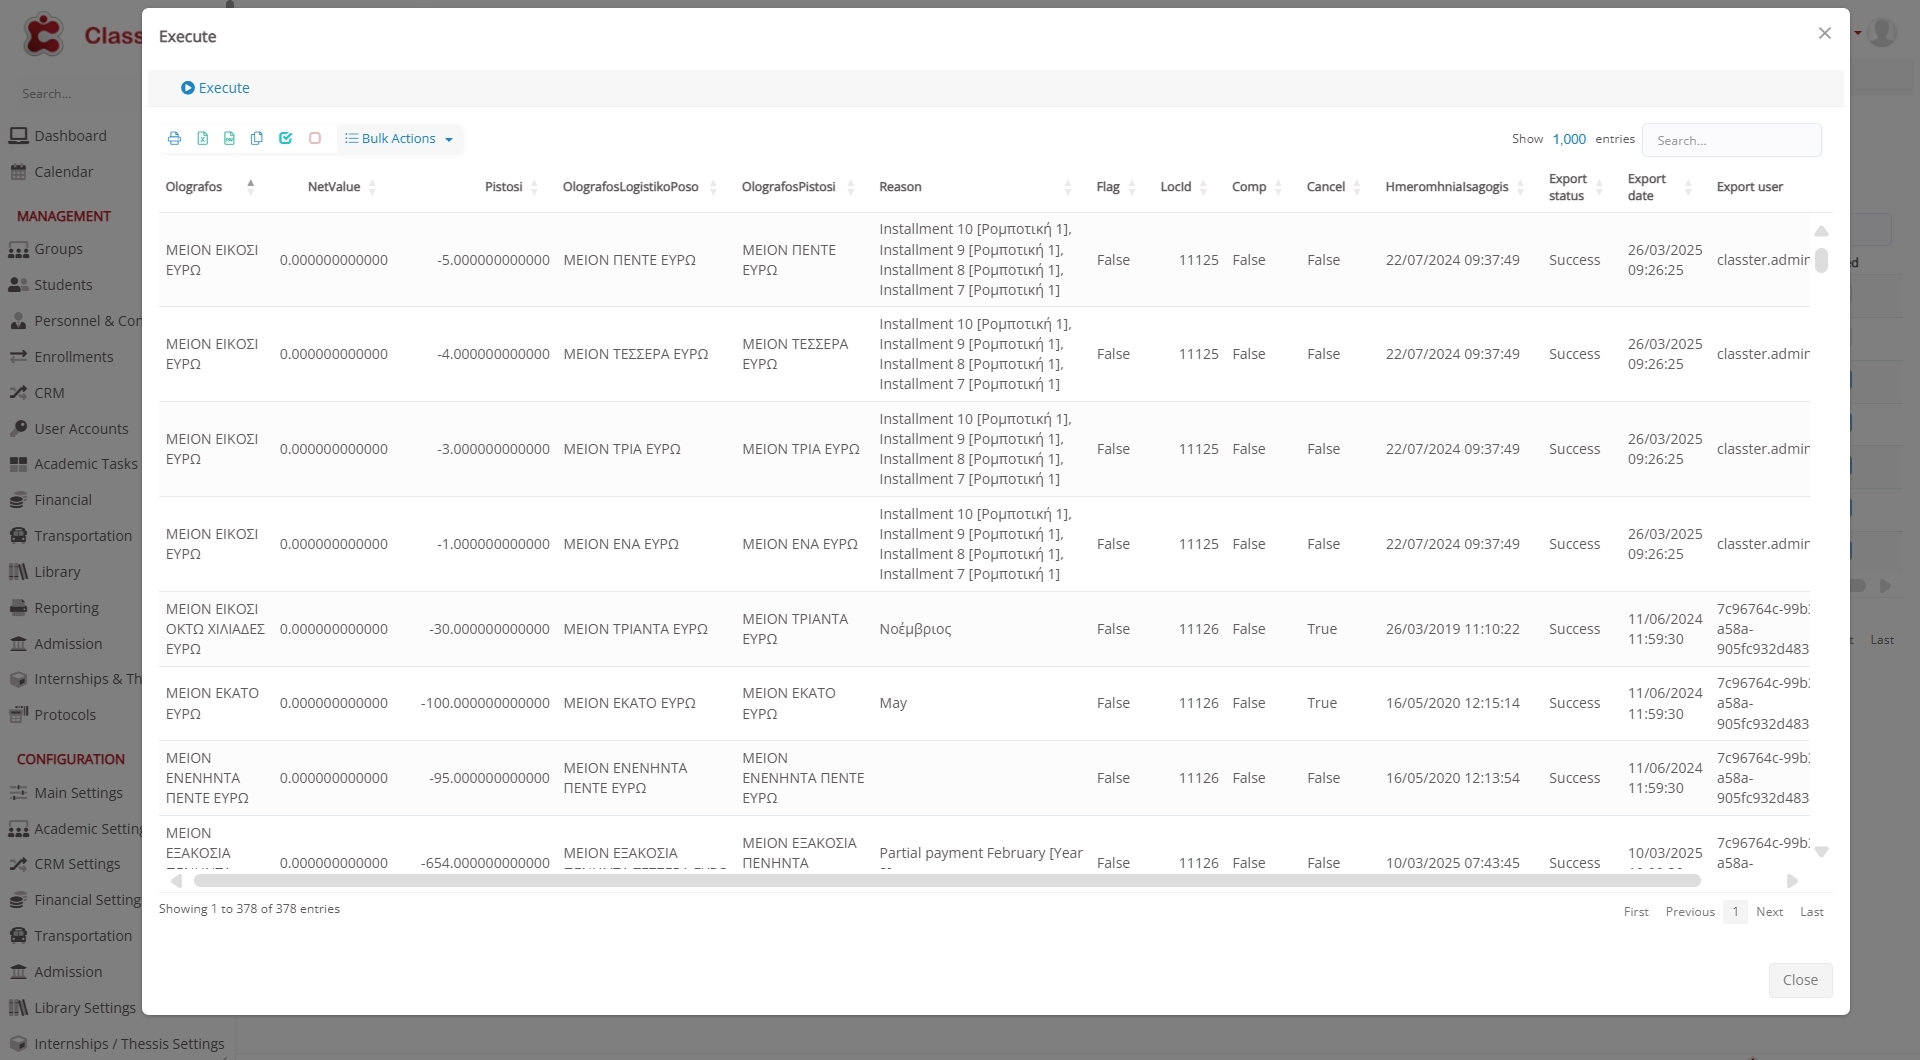
- Execute the Query (Preview Action):
Once you’ve found the query, click on Preview (if applicable) to check the live results.
Press Execute to run the query. This will generate the Excel result, send emails, upload to FTP, and log the action.
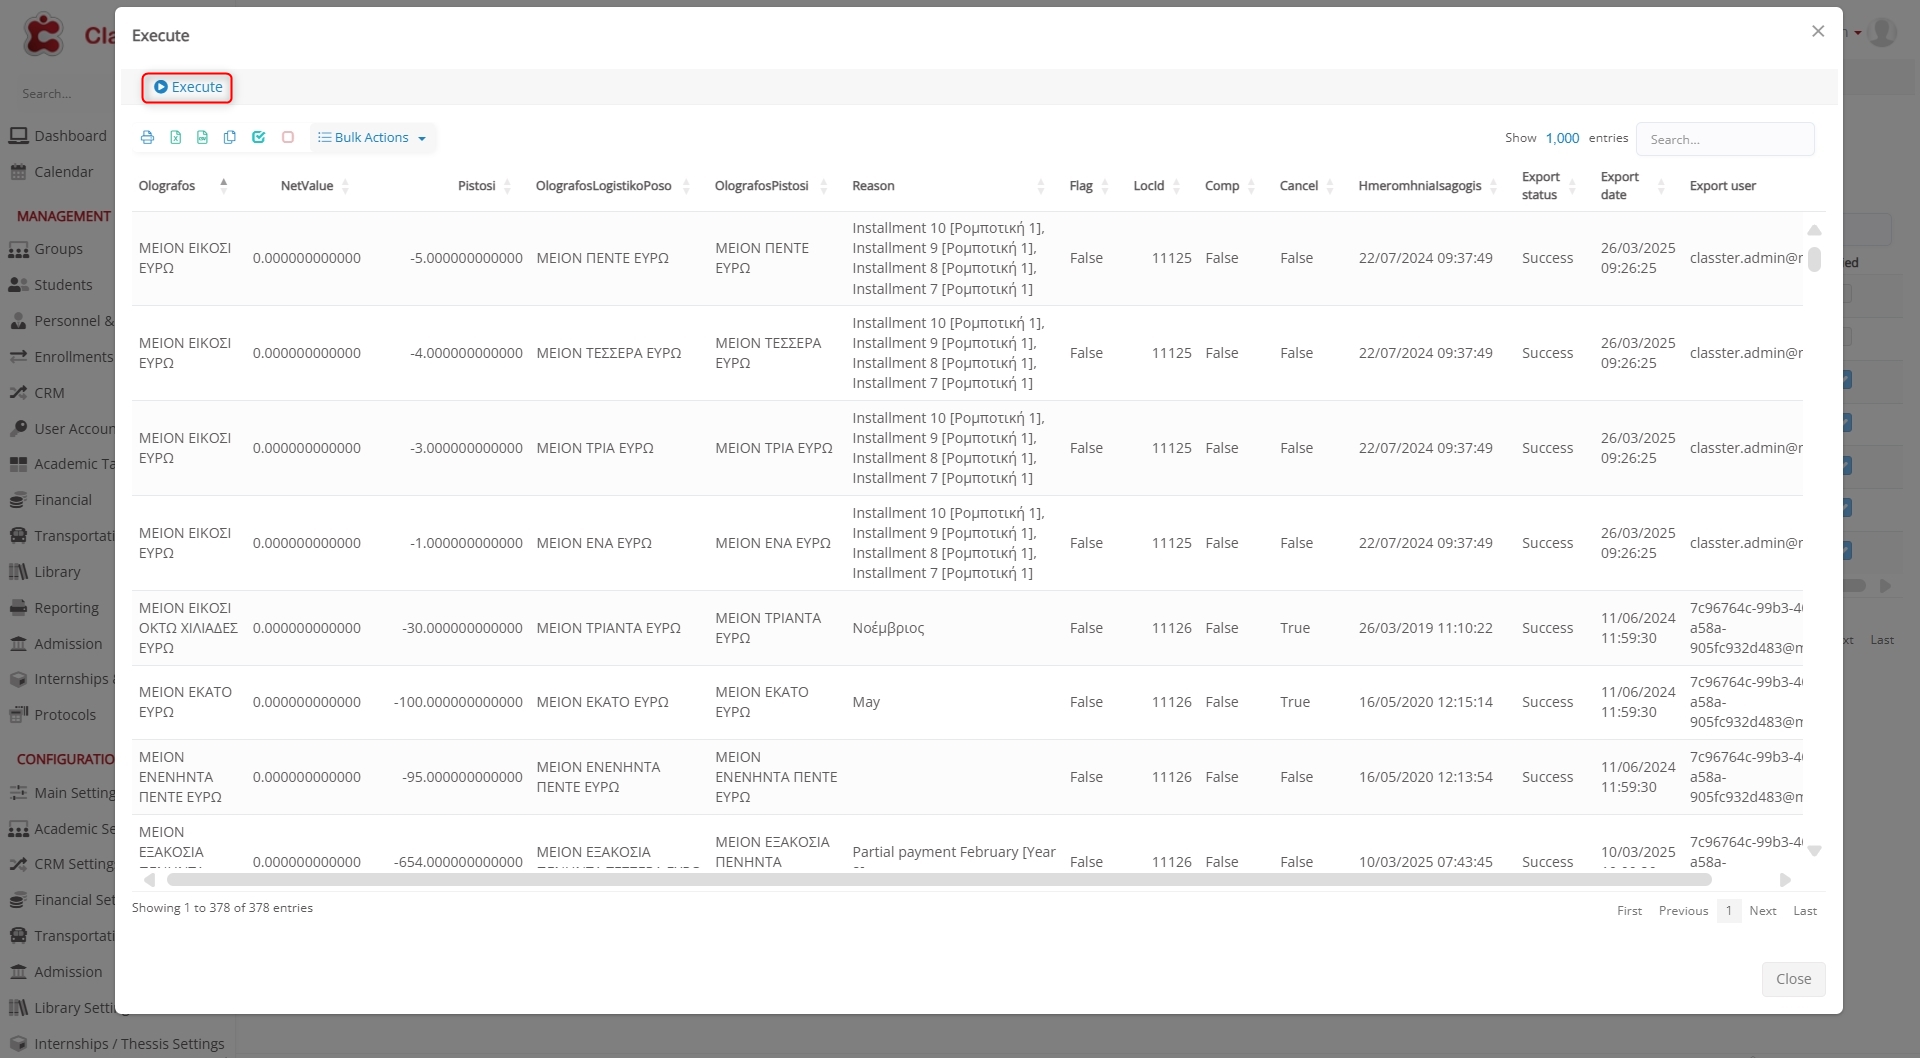
⚠️ Preview is not available for General Type queries.
- Delete – Remove the query from the system.
Audit Trail
Classter logs all actions performed on Custom Queries — including edits, deletions, previews, and executions — to ensure traceability and security.
Tracked Columns:
- Export Status – Current state of the most recent execution.
Possible values include:
- Success – Executed and returned data.
- No Need to Export – Manually excluded from export.
- Pending Re-export – Flagged for re-execution/export.
- Export Date – Timestamp of the last execution.
- Export User – The user who ran the query.

Bulk Actions
Admins can apply the following actions to multiple queries:
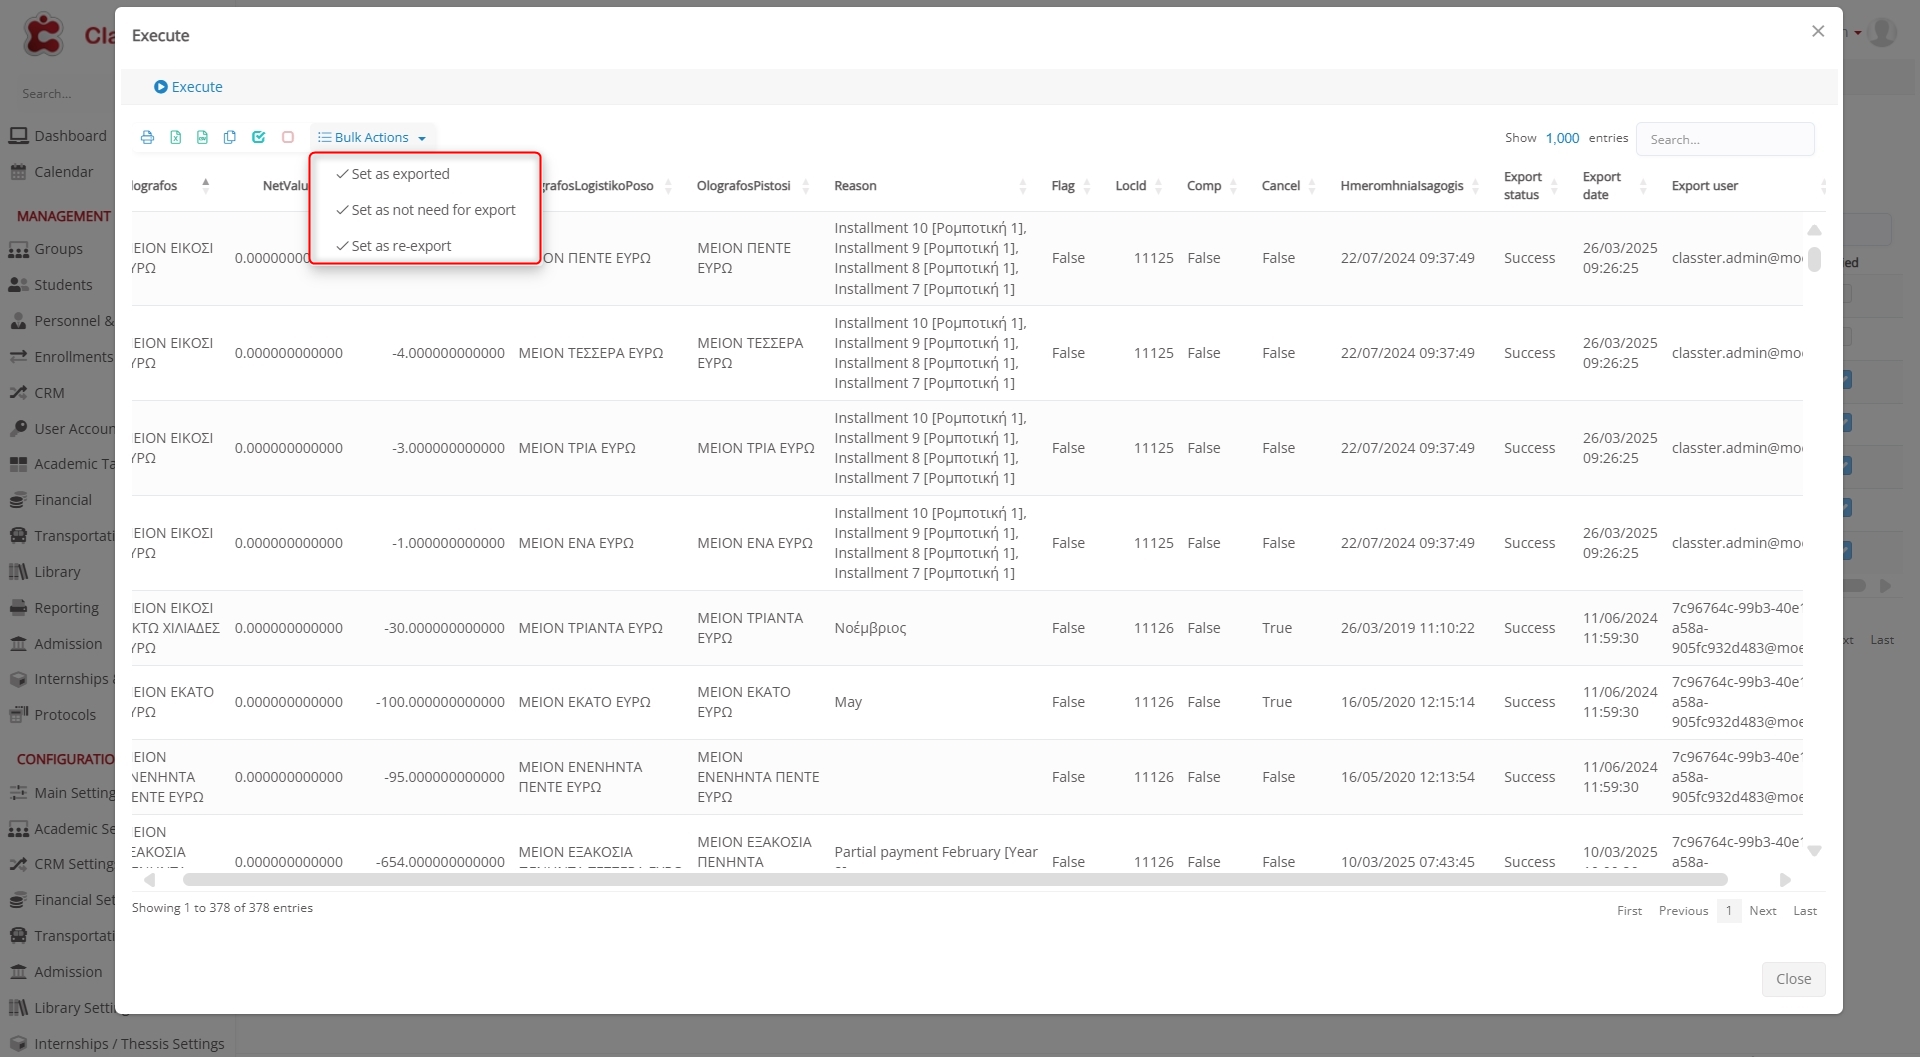
- Set as Exported – Flags the query as completed/exported.
⚠️ Note: This does not perform an export — it’s only for tracking.
- Set as Not Need for Export – Excludes the query from the export workflow. Useful for queries that should remain in the system but not be processed.
- Set as Re-export – Marks queries for re-execution and delivery. Ideal for regenerating output or correcting earlier runs.
Run Automatically
After creating and verifying your Custom Query, you can set up automatic execution using the Notification Service.
The Notification Service in Classter is responsible for automatically executing scheduled system actions — including Custom Queries, notifications, and alerts — based on predefined rules and intervals.
Steps to Set Up Automation:
Go to:
Advanced Configurations → Templates & Menus → Notification Service Configuration
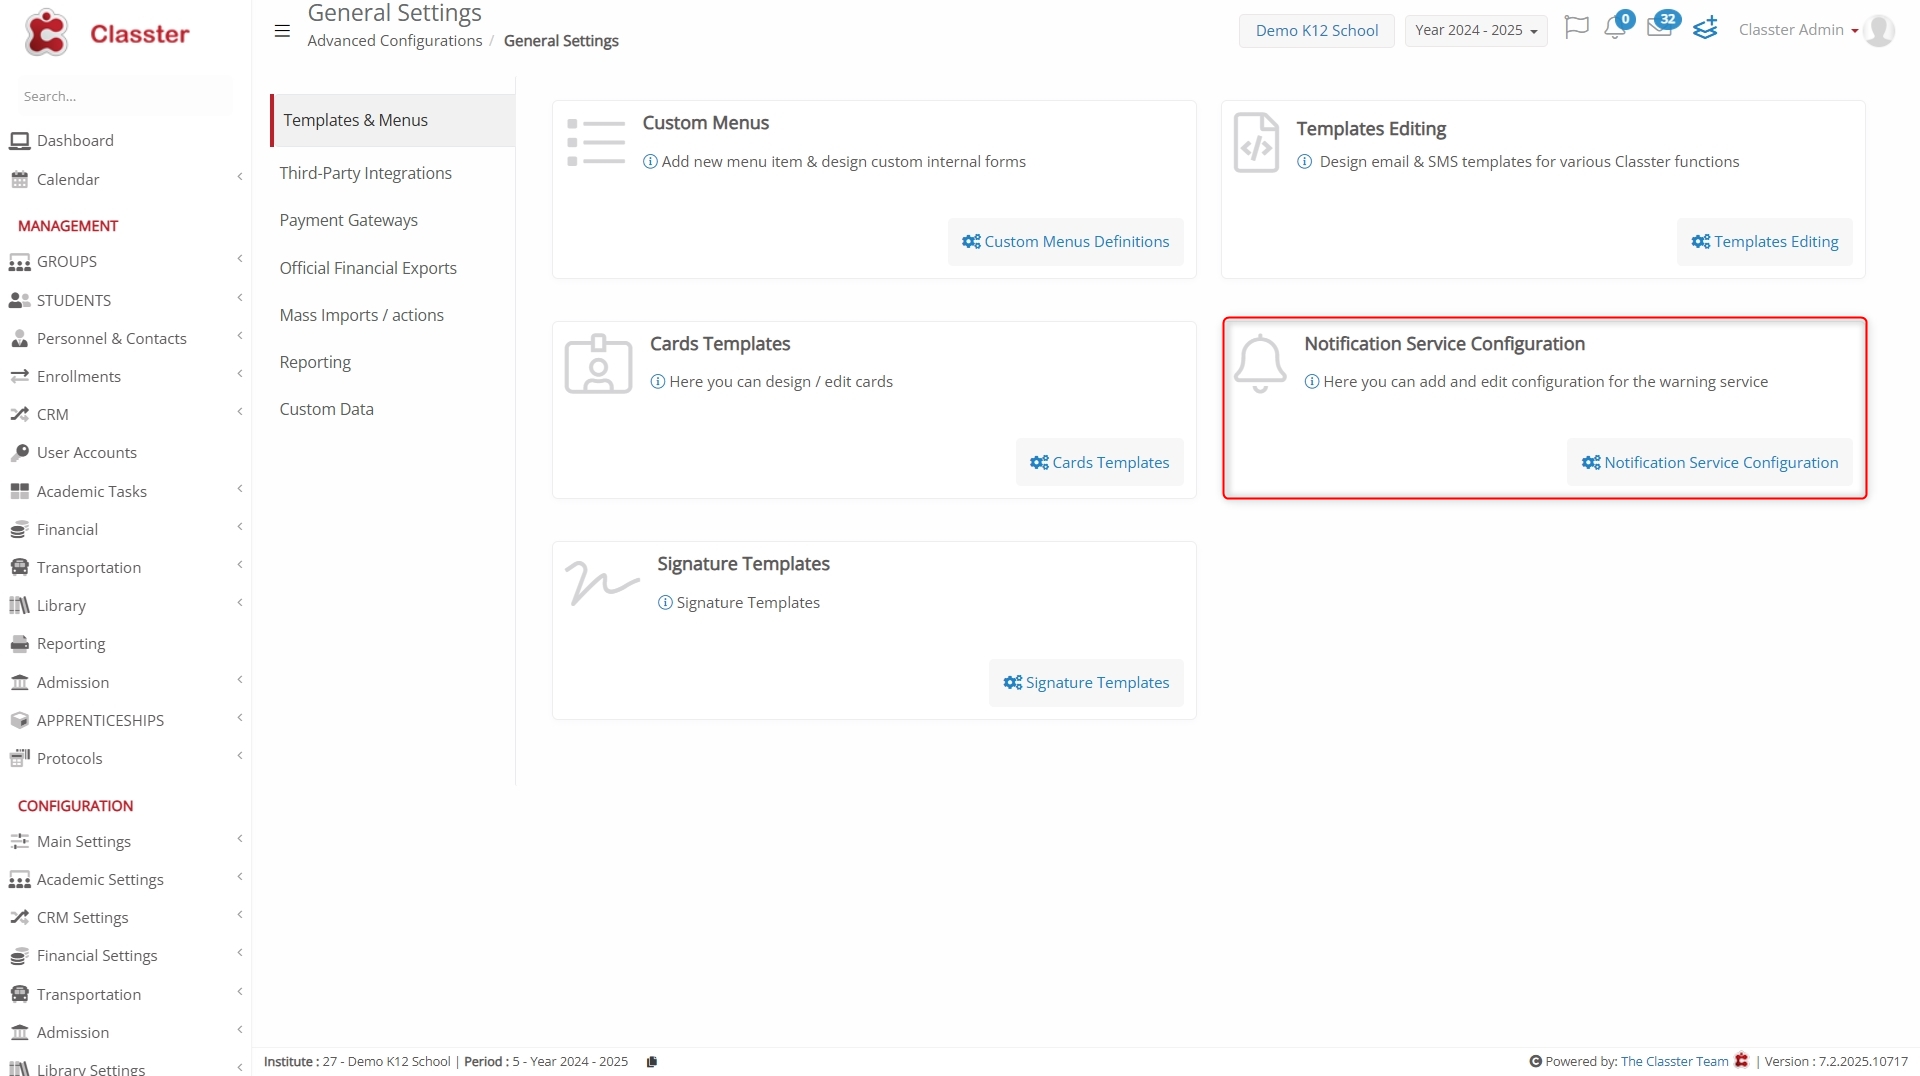
Scheduled Custom Query Execution
- Click “Add New” to create a new scheduled action.
- Select Notification Type:
Choose “Custom Query Execution” as the notification type.
- Assign an Internal (Classter) Employee:
Select a Classter employee to be informed when the automated process is complete.
This is important: If any issues arise during execution, this employee will be able to review the logs and investigate what went wrong.
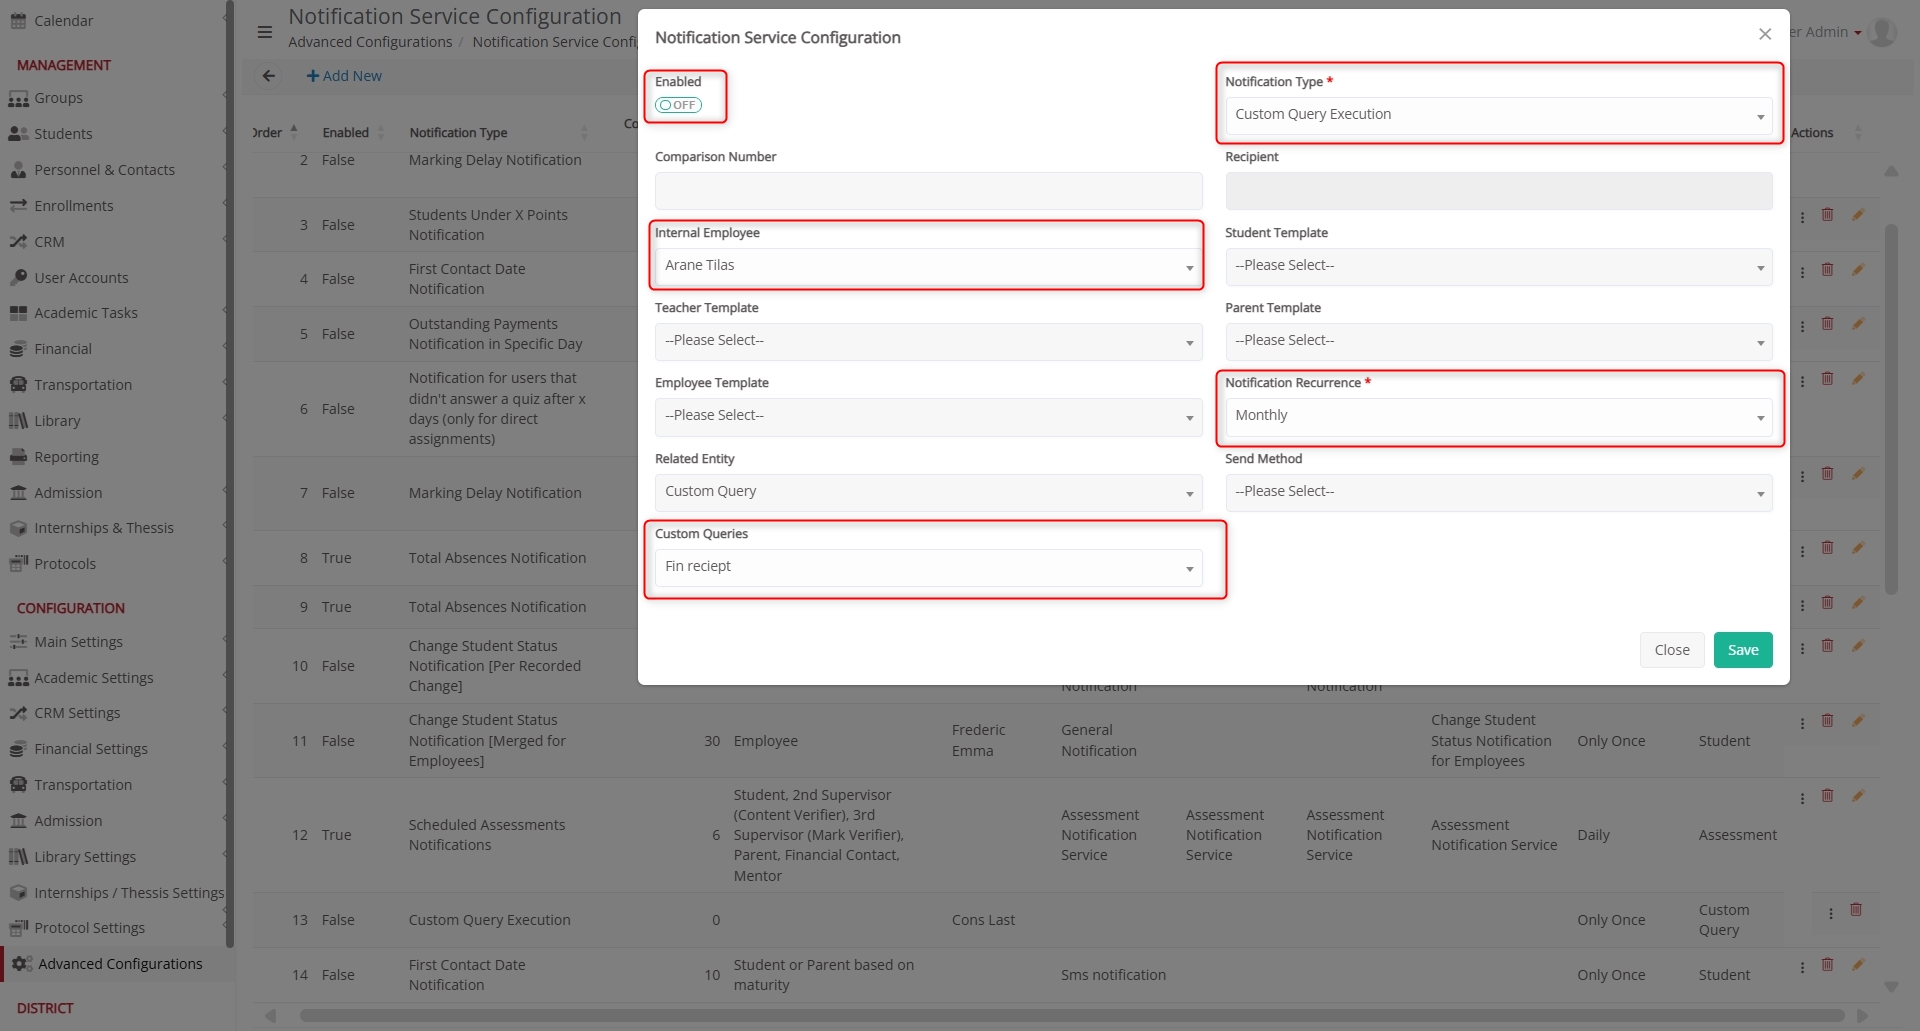
- Set Notification Recurrence:
Define how often the Custom Query should run. Available options include:- Only Once
- Daily
- Biweekly
- Weekly
- Monthly
- Select the Specific Custom Query
Choose the verified Custom Query you want to schedule for execution.
- Enable the Configuration
Ensure the toggle is enabled, allowing the task to run based on the defined schedule.
- Save the Setup
Once saved, the Notification Service will take over and execute the selected query according to the recurrence settings. All executions are logged, and any issues are automatically reported to the assigned internal user.
Tip: Make sure the selected Custom Query is already verified; otherwise, it will be skipped by the Notification Service.
Users (with permission) can:
- Edit – Update query details or logic.
- Preview – Run the SQL and display live results. It displays live query results on-screen.