

Introduction
Integrating Moodle with Classter enhances the management and synchronization of educational data across platforms. This guide provides step-by-step instructions to configure and synchronize key entities such as users, courses, enrollments, and hierarchies between your LMS (Learning Management Systems) and Classter. Following these instructions you ensure seamless integration, enabling efficient data management and consistency across your educational systems. Whether you are setting up the integration for the first time or updating existing configurations, this guide will assist you in optimizing the synchronization process to meet your institution’s specific needs.
Moodle Configuration
Token Generation
1. Download the Classter Integration Plugin
- In Classter, navigate to the Integration Plugin section. Click the Download button to obtain the plugin file.
2. Install the Plugin in Moodle
- Log in to your Moodle environment as an Administrator. Proceed with the standard plugin installation process by uploading the downloaded file. (same as SSO Plugin installation below)
3. Generate and Copy the Token
- After successful installation, Moodle will generate a unique token. This token will be displayed on-screen.
→ Copy the token carefully; you’ll need it in Classter.
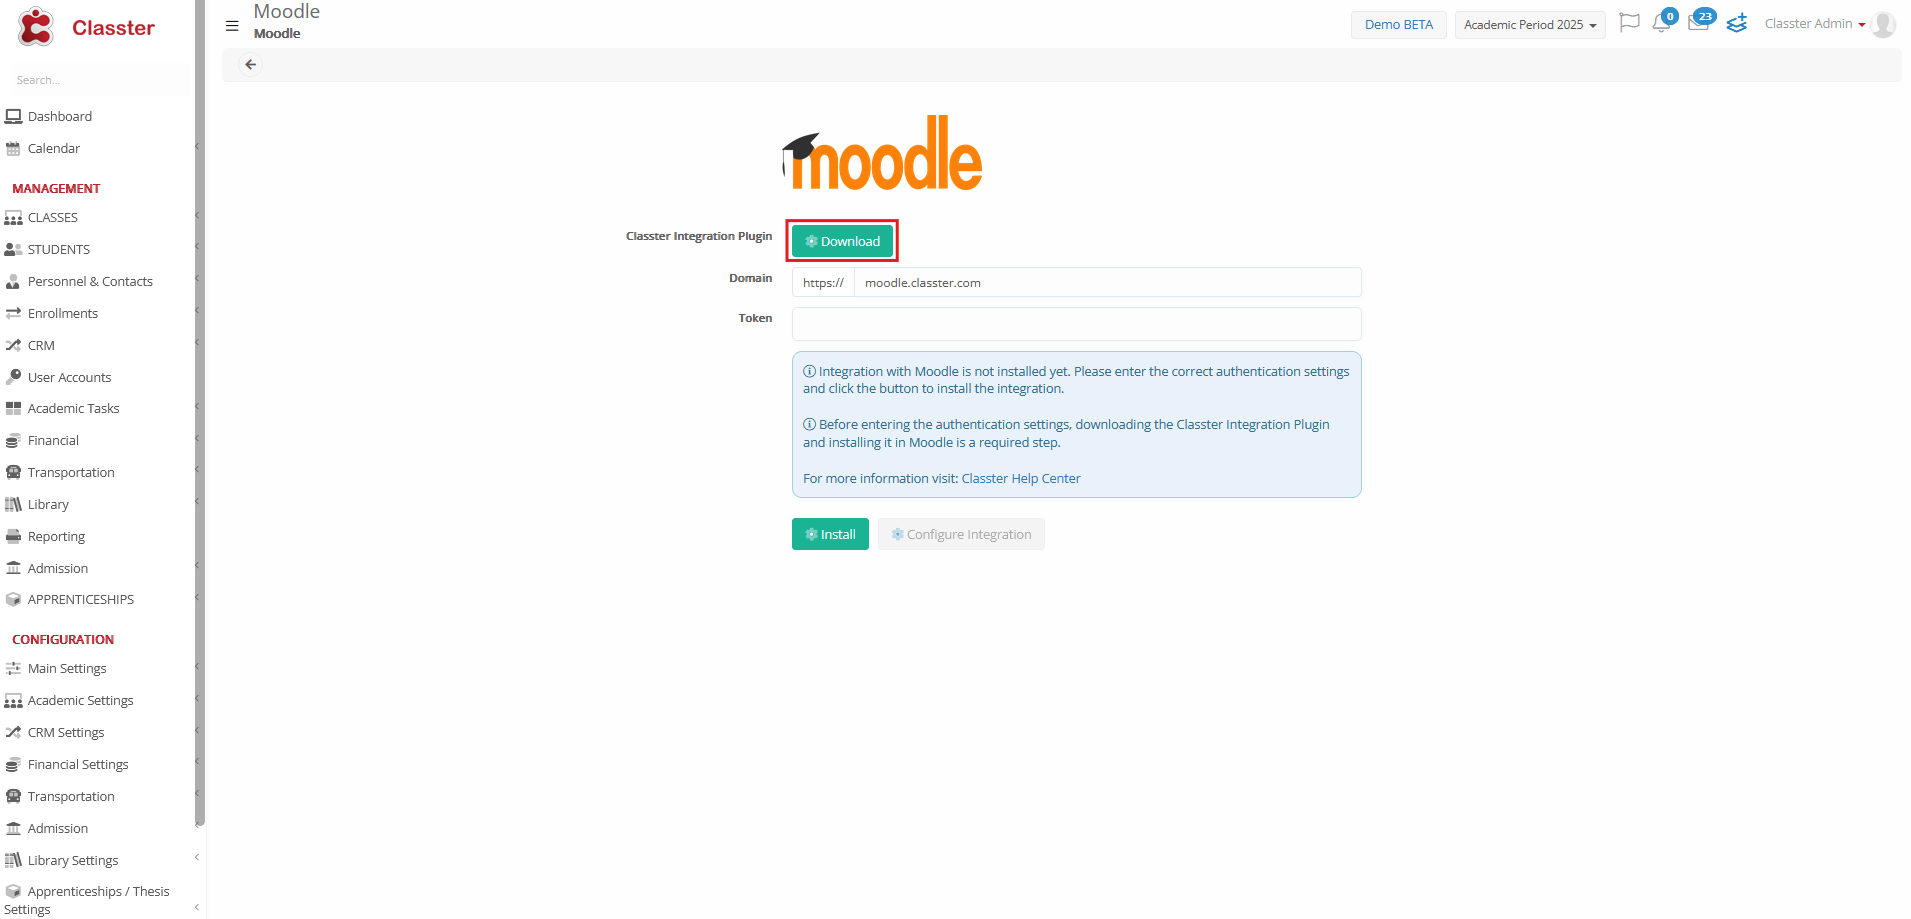
Figure 1
Back at Classter, fill in the Token field with the copied Token (Figure 2) after following the steps according to the Integrating with Moodle (Configuration Settings) section of this article.
Figure 2
Tip: Your Moodle Token is uniquely generated and is very sensitive information.
We at Classter suggest, for your own safety, that you do not share the Token with third-party services or people who are not relevant to your Institute.
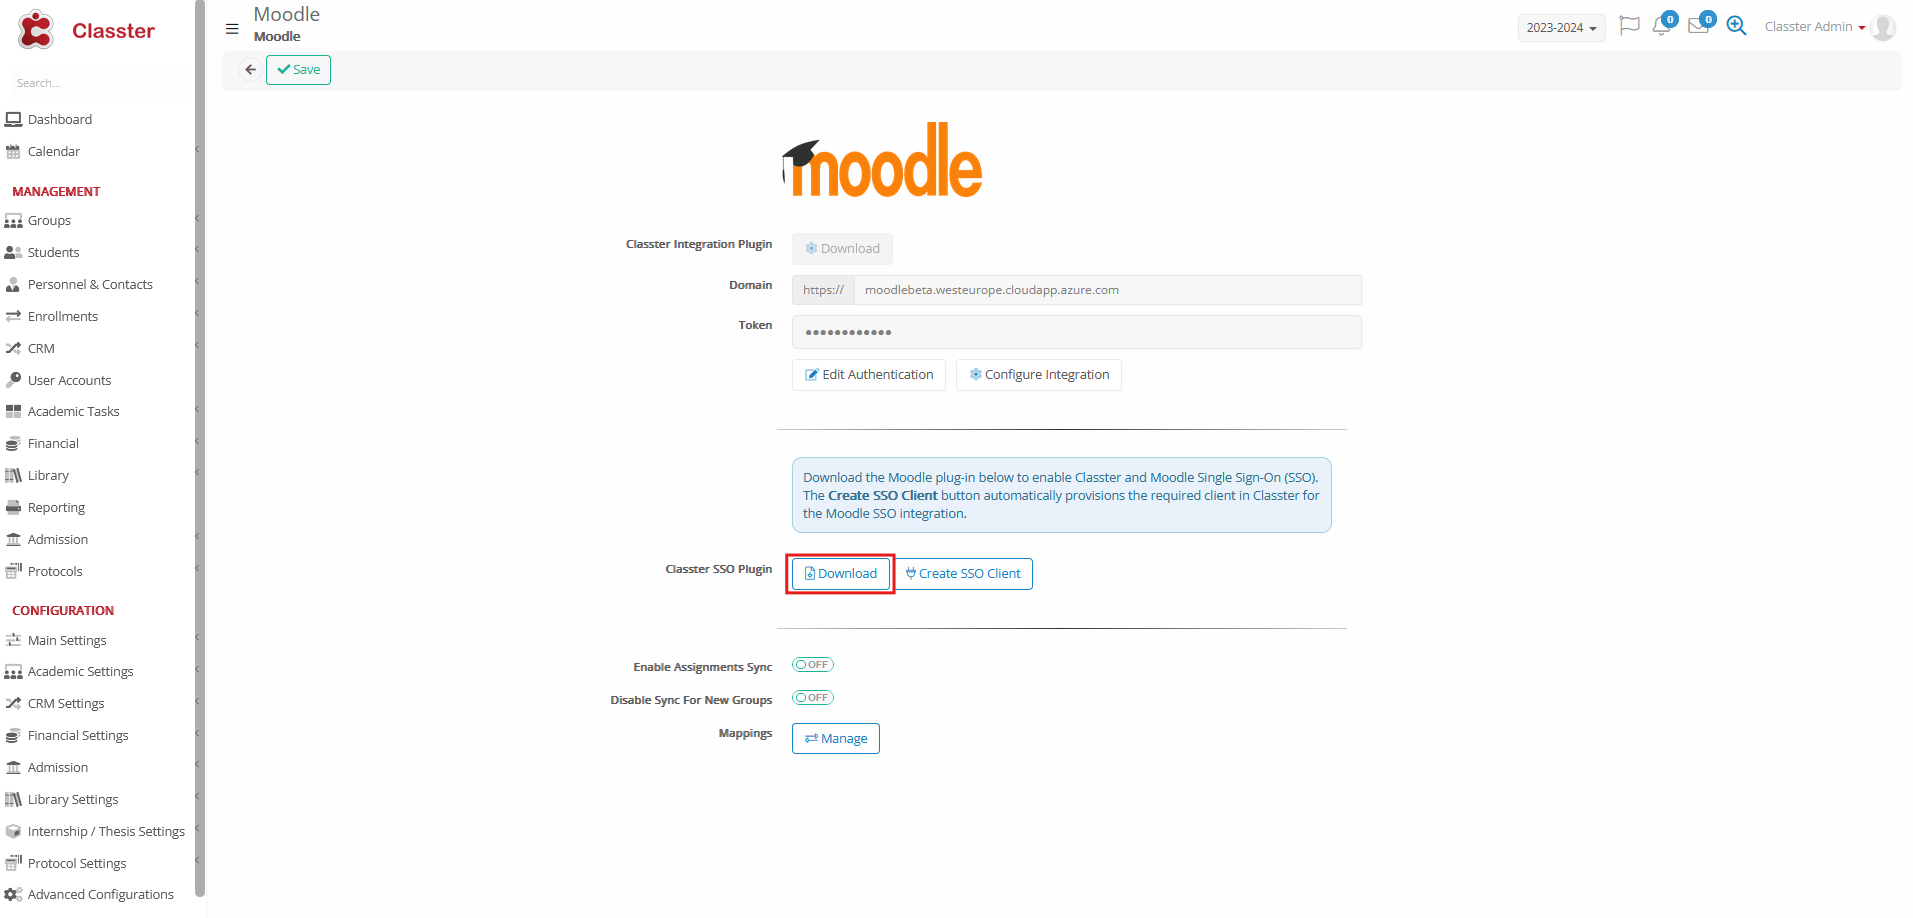
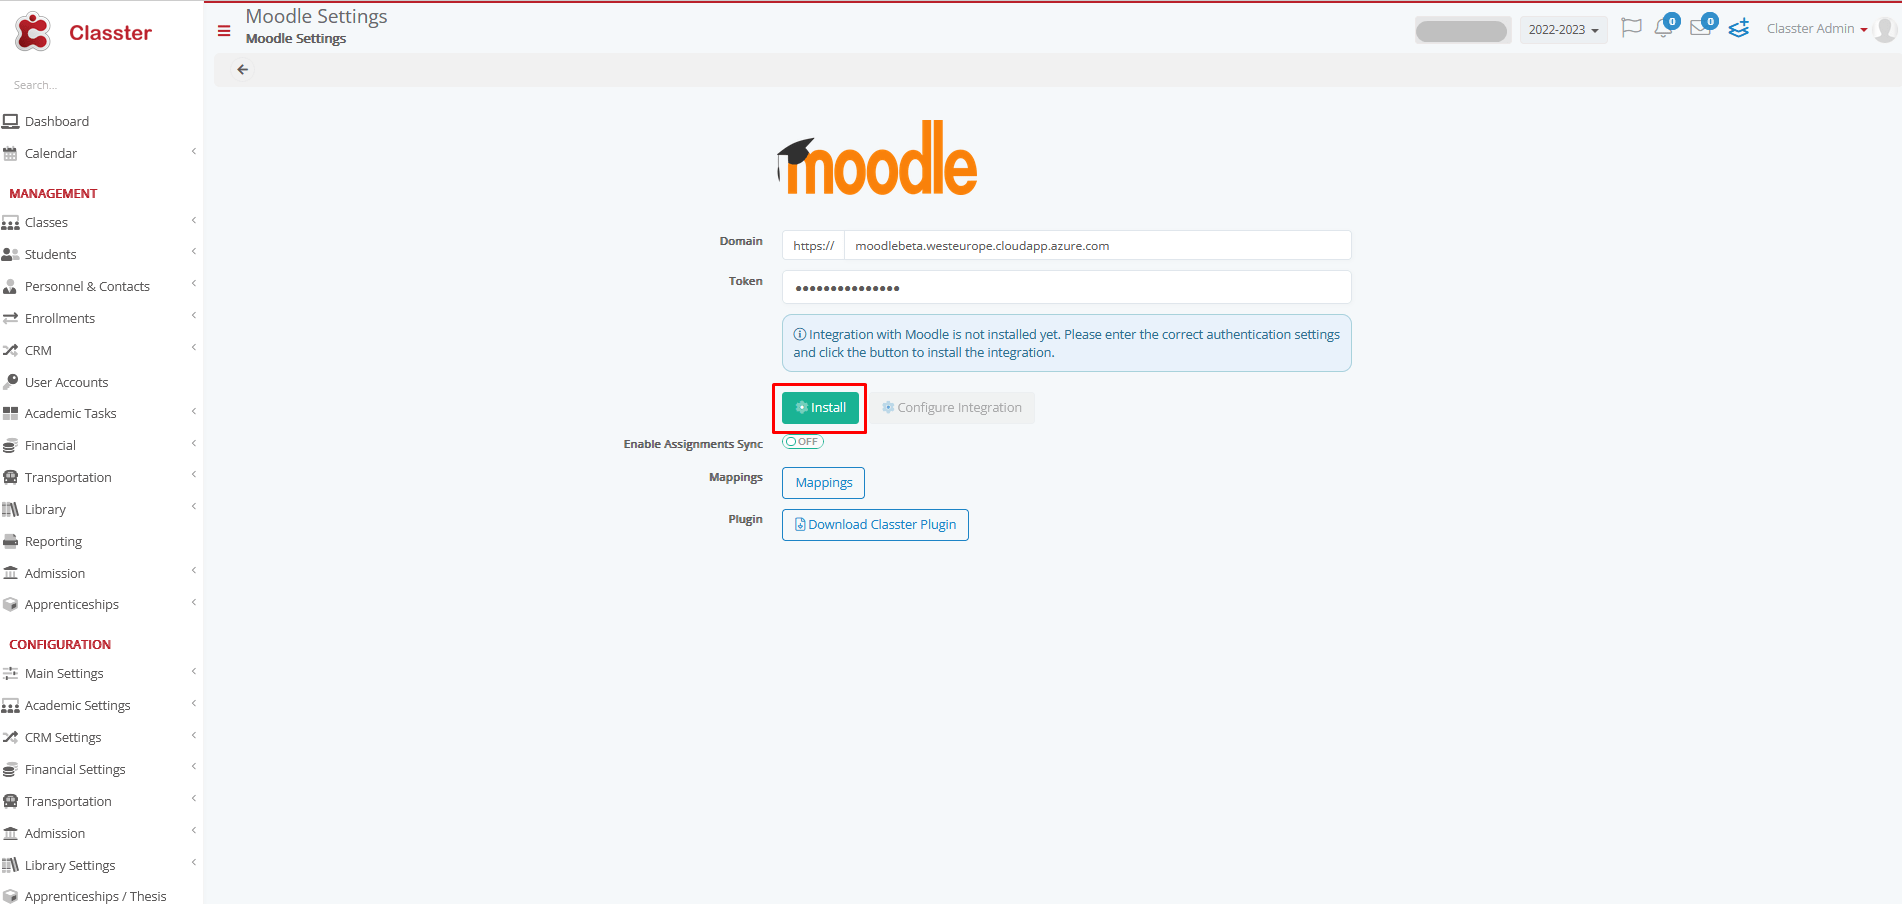
The final look of your Moodle Settings Page must look something like this in Figure 3.
Tip: Some of the settings you see in the picture may vary slightly from the ones that you have on your platform.
Click on the Save button when you feel that everything is set correctly (Figure 3).
SSO Plugin
Download the SSO Plugin
This step is necessary only if you want to enable the single sign-on functionality between Classter and Moodle.
To begin with, start by downloading the necessary plugin, which is required to successfully integrate Classter with Moodle and enable single sign-on functionality.
Upon pressing the ‘Download Classter Plugin button,’ a file named ‘classterauth.zip’ will be automatically downloaded to your Downloads folder.
Install the Plugin in Moodle
After downloading it, go to your Moodle account page and log in as an Administrator, and follow the instructions below. (Figure 4)
Note: You need to have the administrator account for your institution’s Moodle account.
Tip: If you encounter any problems with the Integration, feel free to contact our support team at any time!

Figure 4
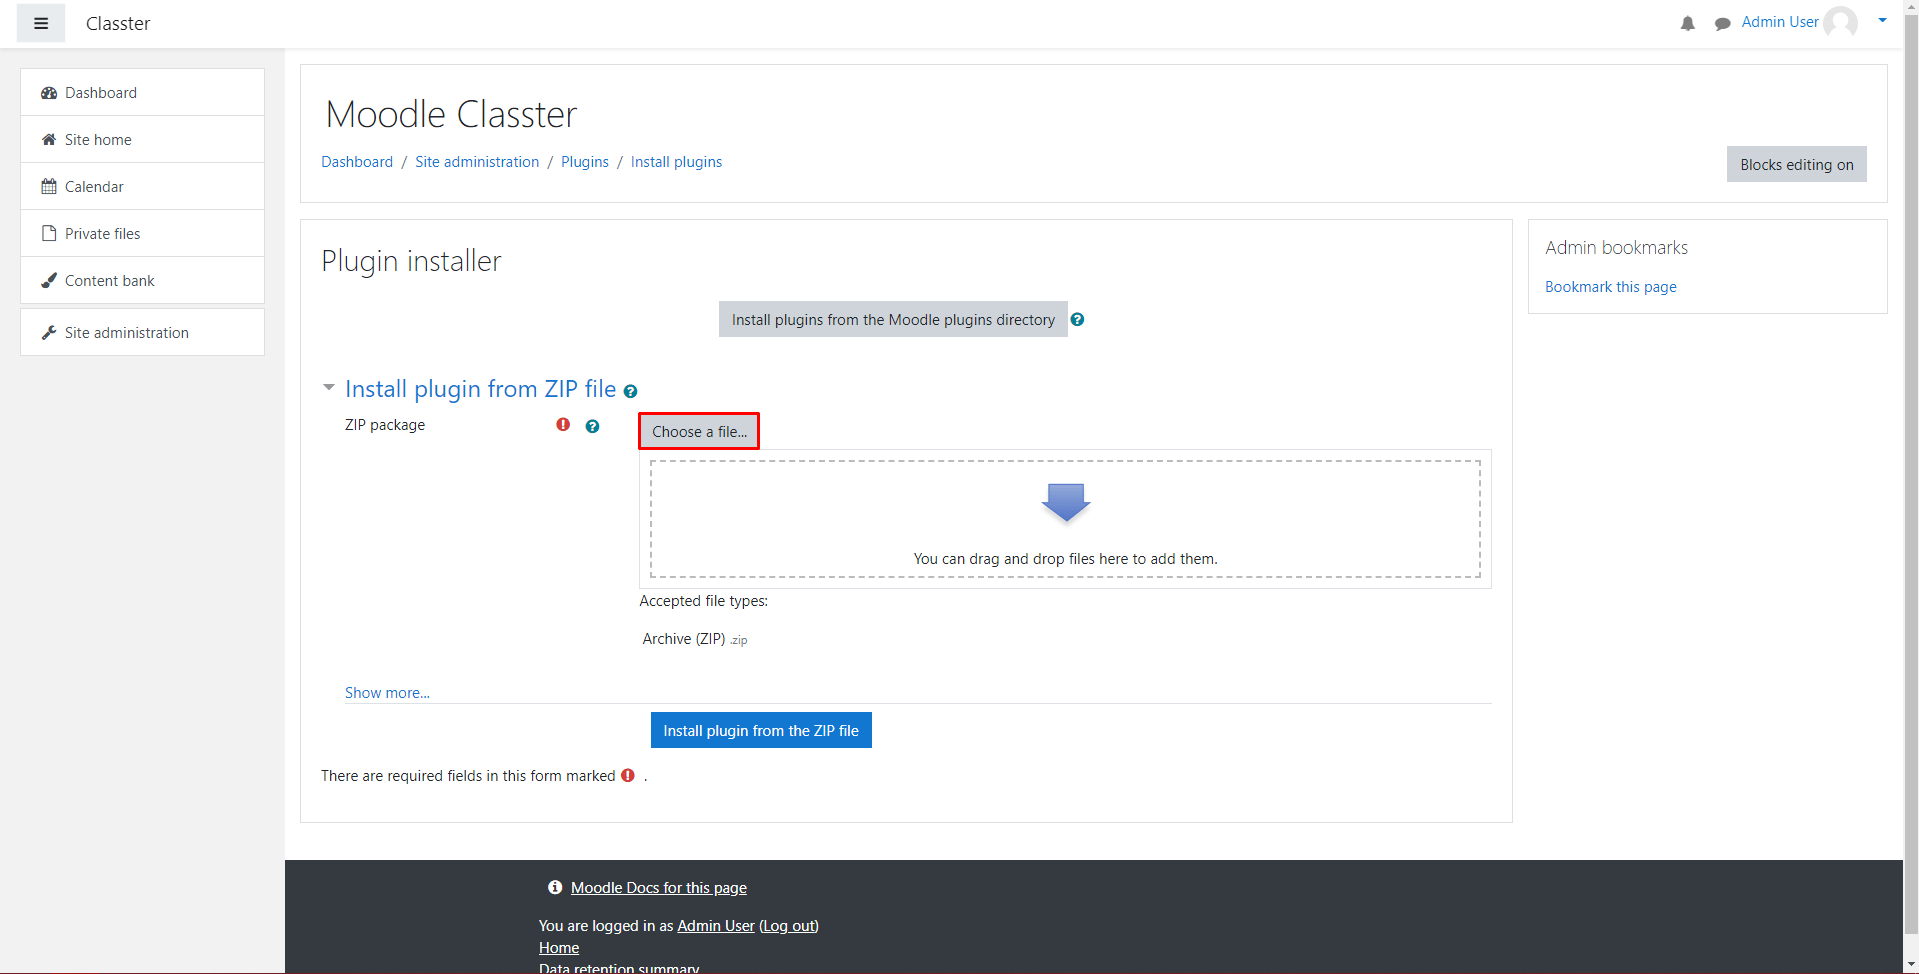
After clicking on the Install Plugins button, a new window will come up with some steps to follow to correctly install the Classter Plugin (Figure 4).
At the new window, click to Choose a File, and a small new window will pop up with some options to choose from.
Here, you can find and click on the Upload a File option, then the Choose File button, and a small new window will pop up, so you can find and select the ‘.zip file’ that you downloaded before with the name ‘classterauth.zip.’
Having followed the steps up to here, and if everything went correctly, you should be able to find, select, and upload the file to Moodle, so the integration can continue. Select the zip file (classterauth.zip) as seen in Figure 5.
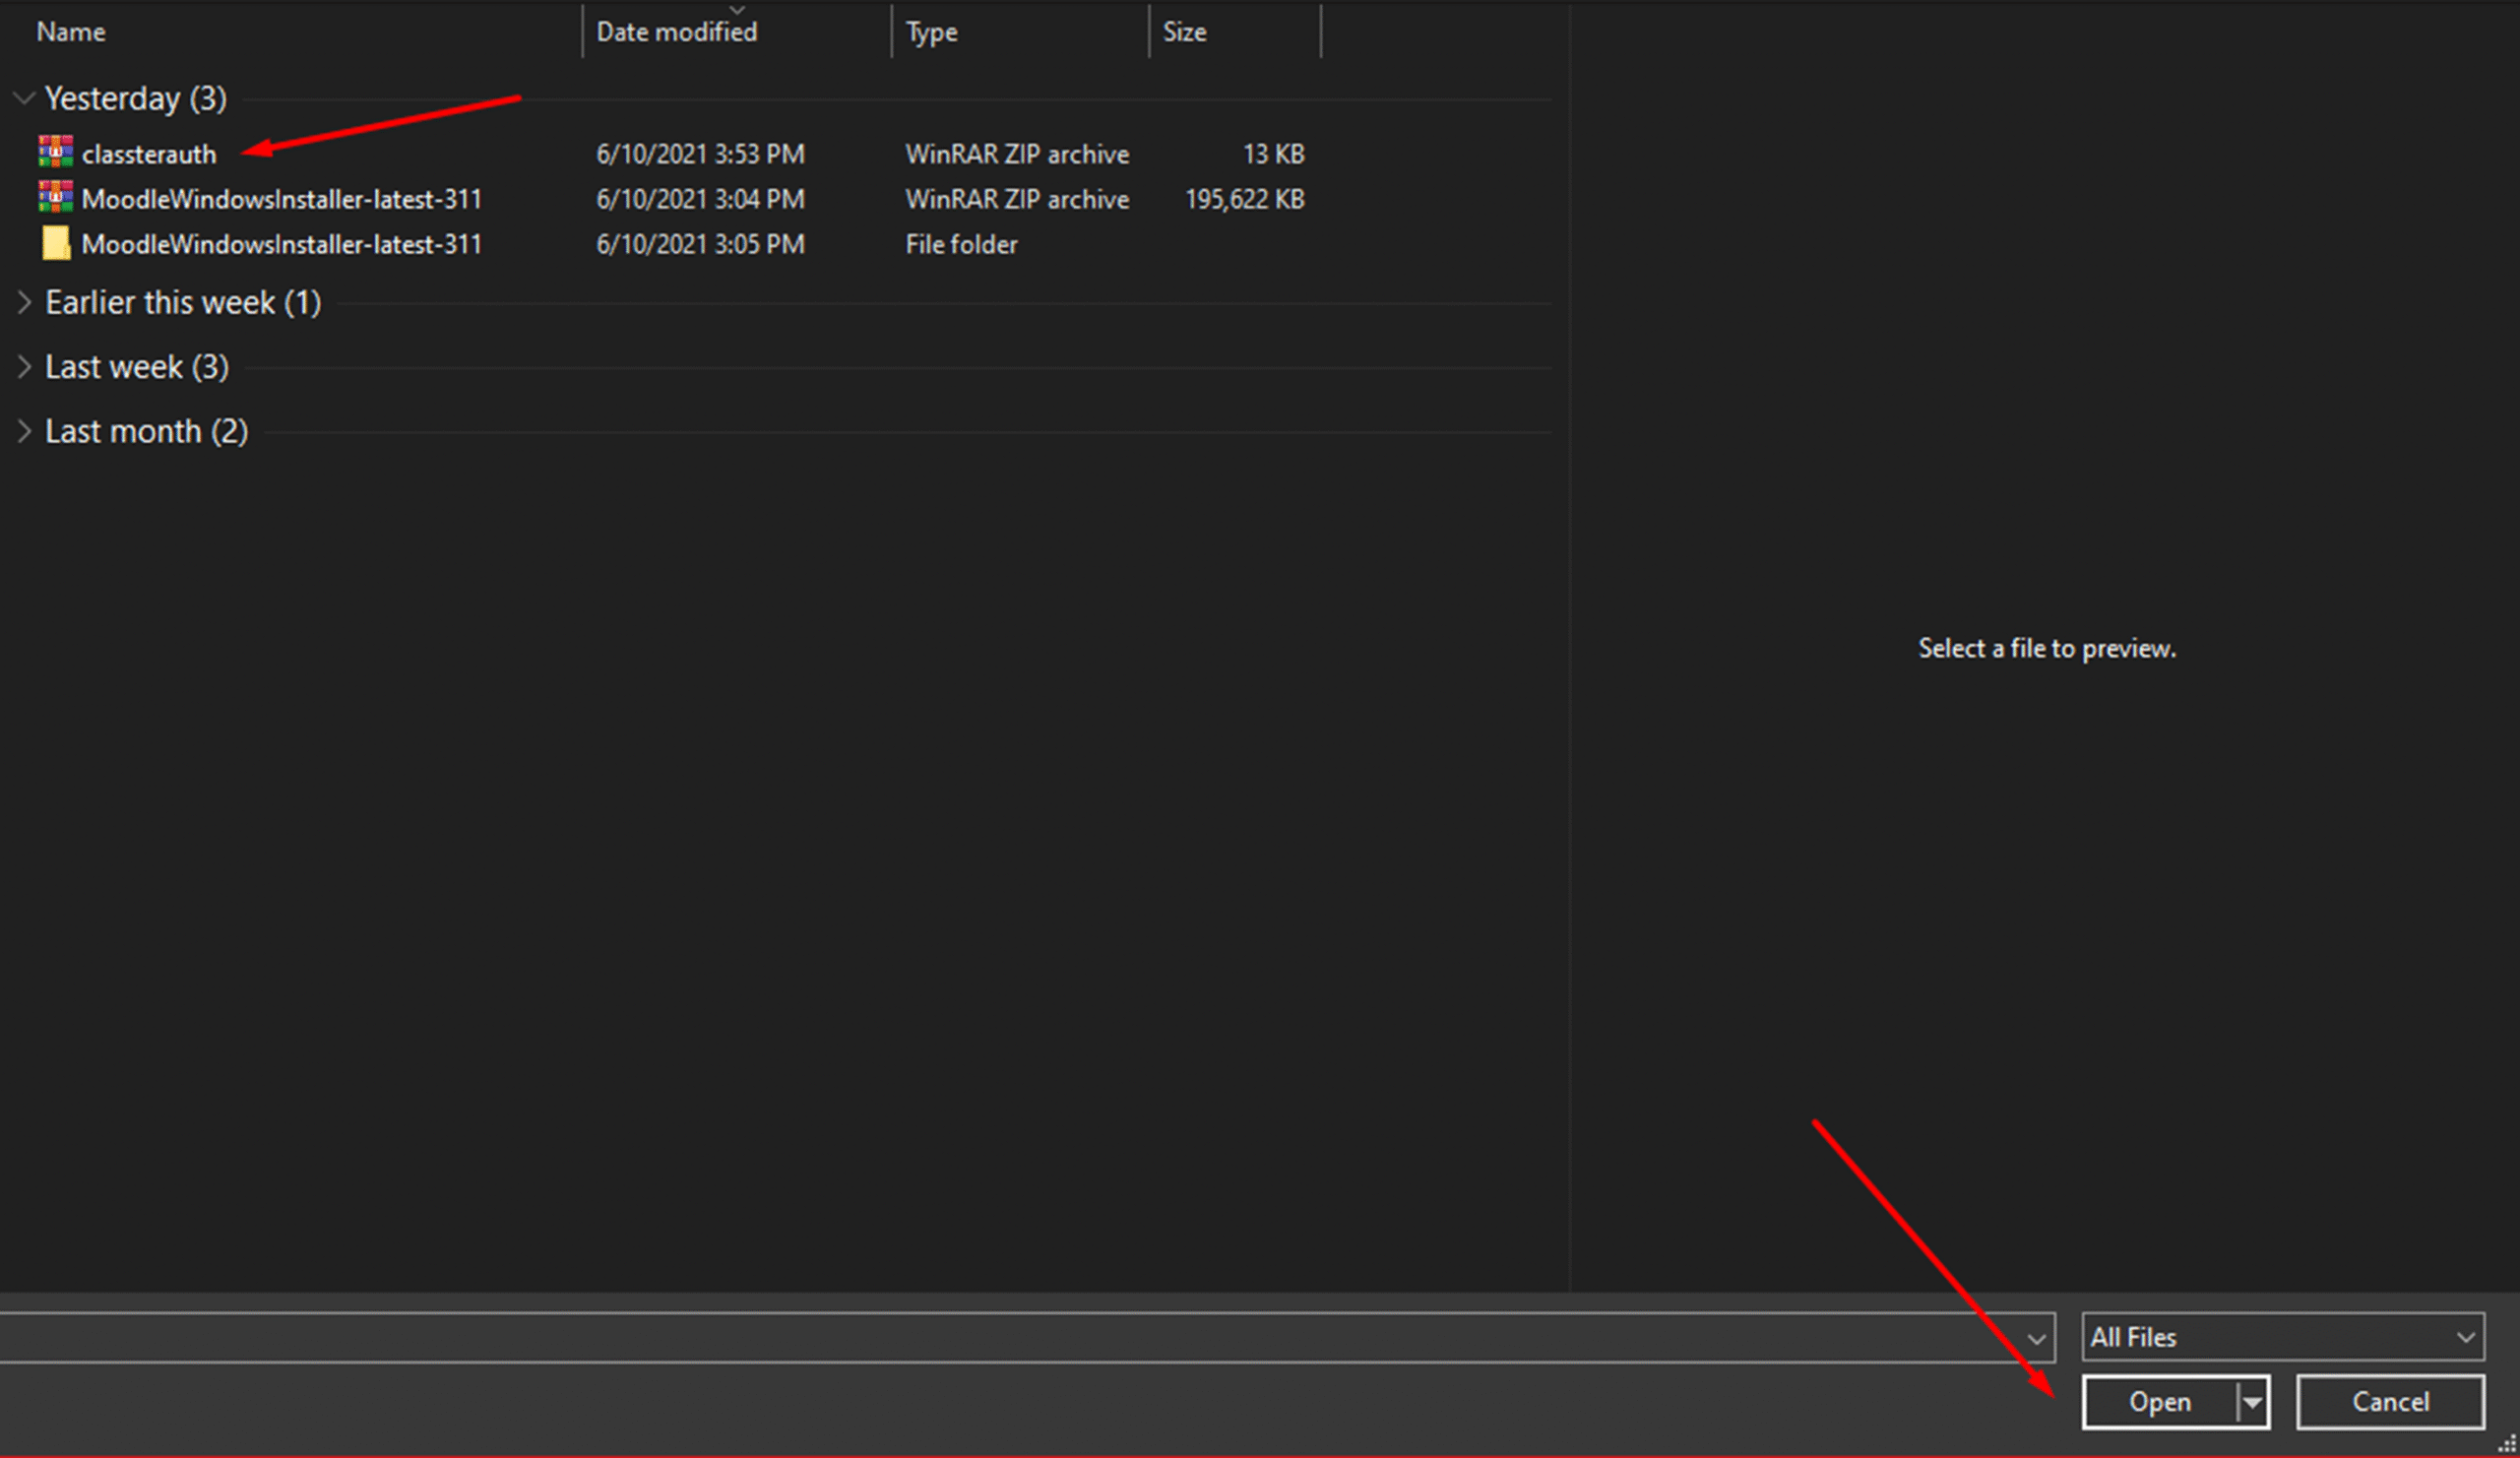
Figure 5
Make sure you select the correct file and press Upload File.
The upload should be almost instantaneous, but it always depends on your internet speed. (Figure 6).
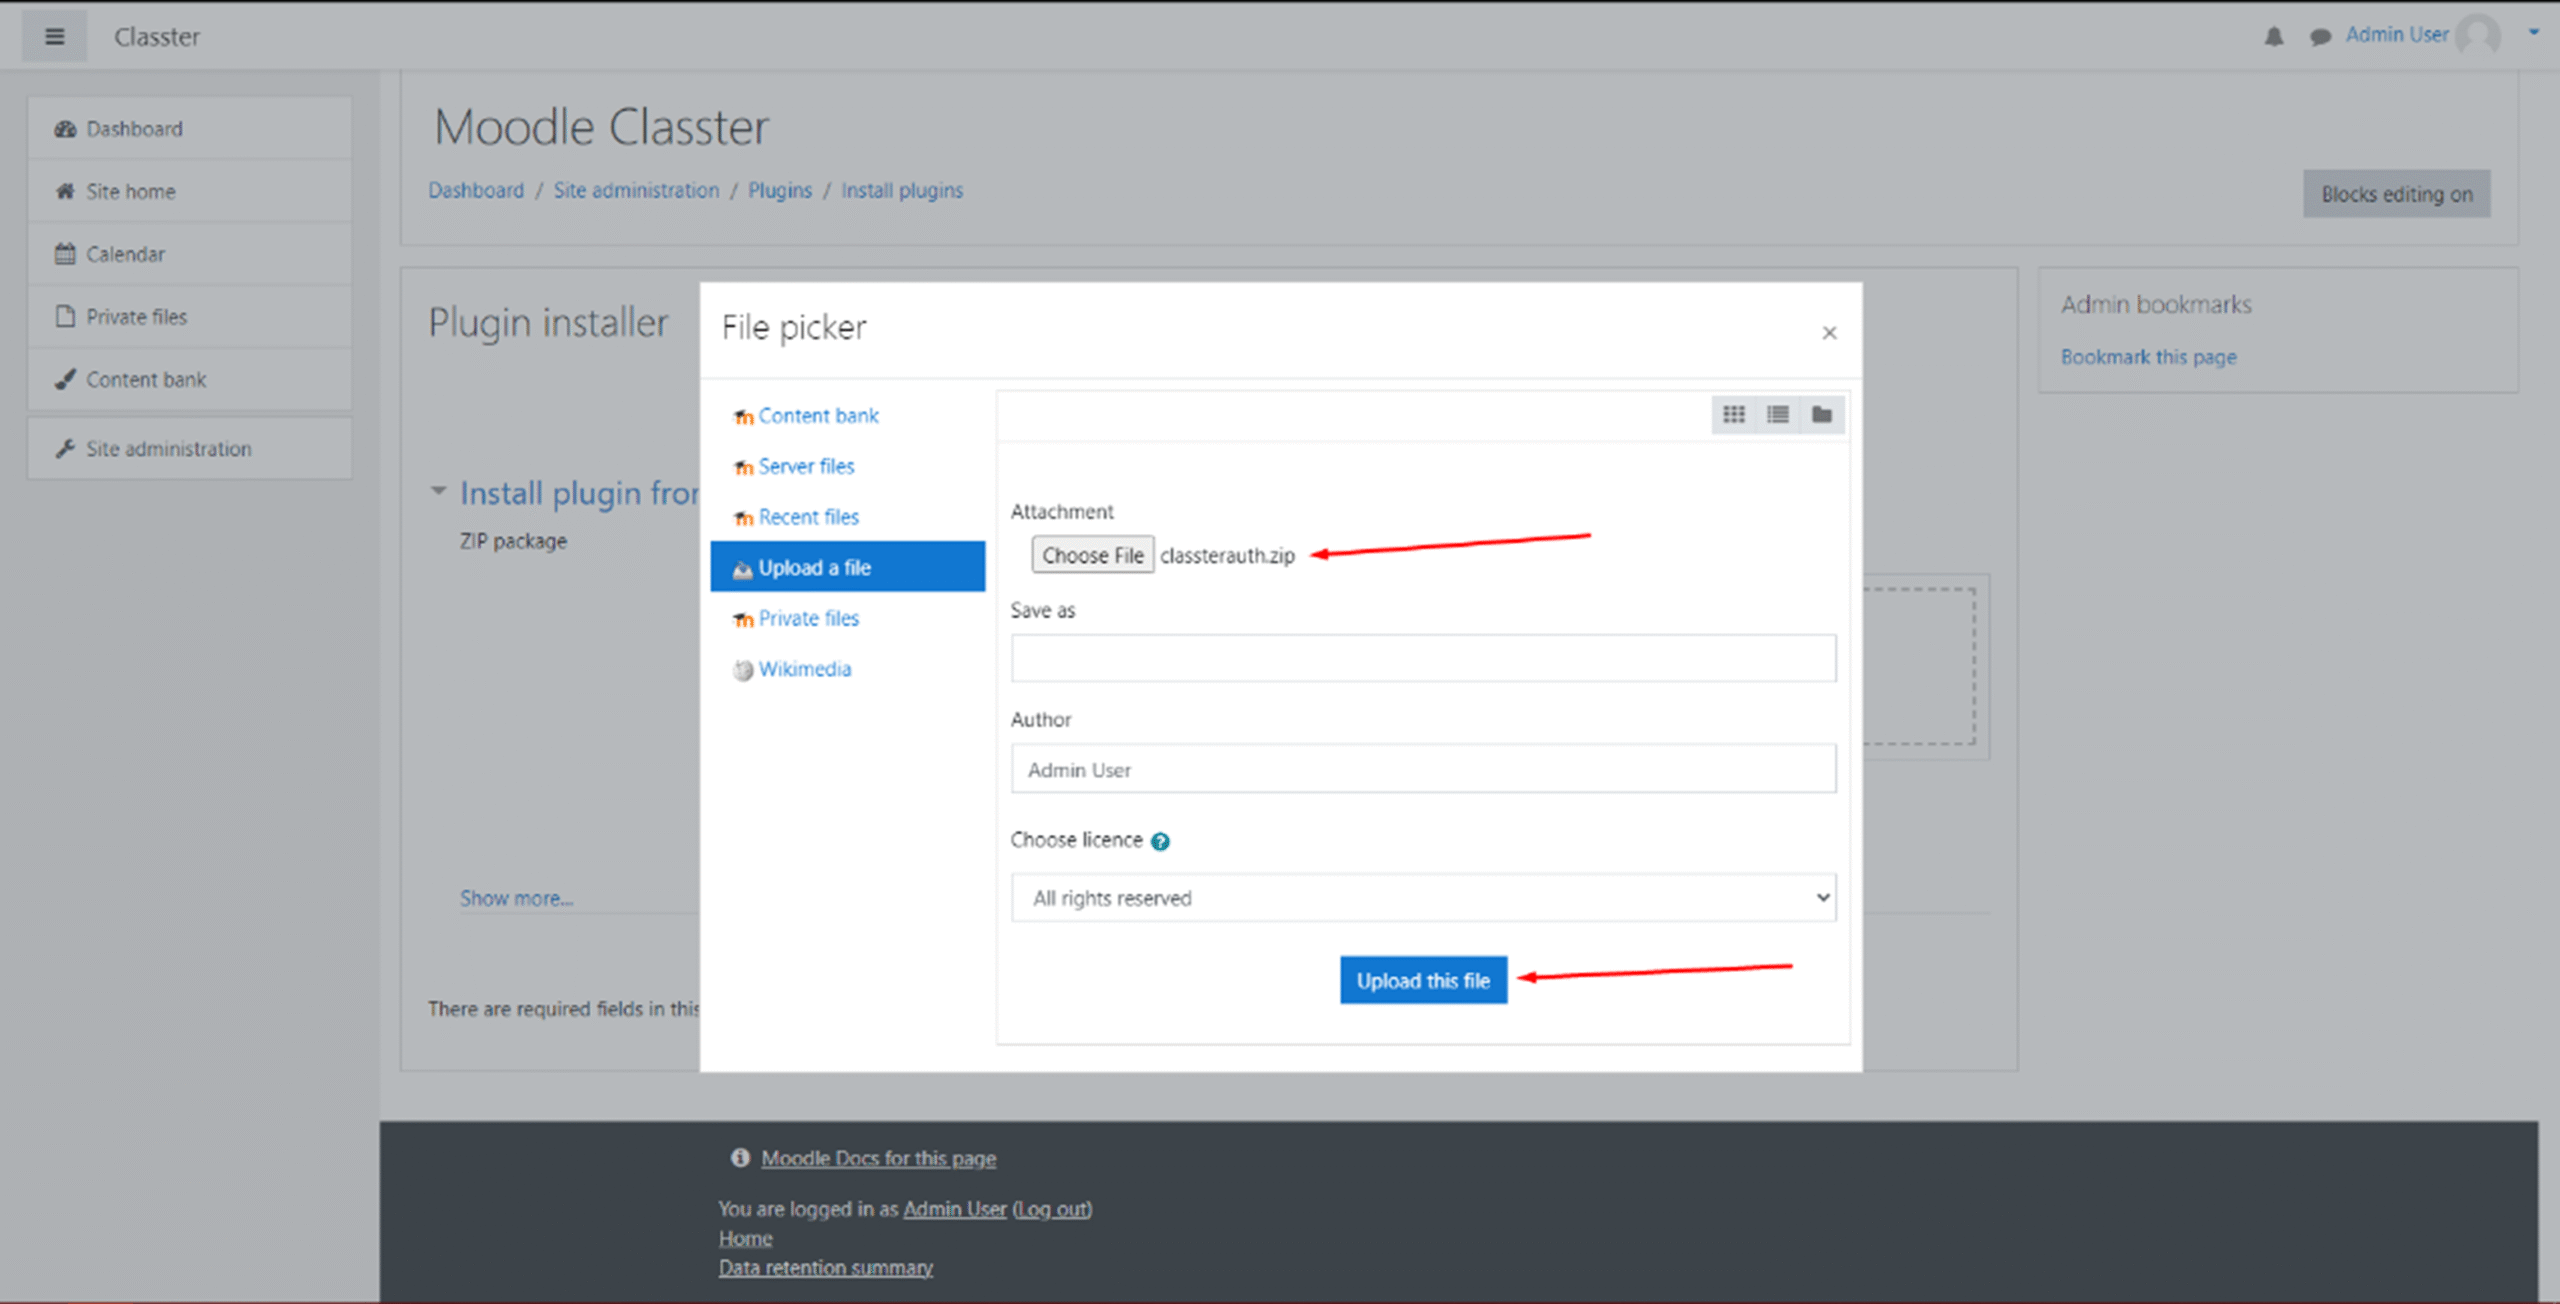
Figure 6
After clicking on the Install plugin from the ZIP file, a new window with many details will come up. Do not worry, none of that is what we will discuss here. (Figure 7 & 8)
Tip: To learn more about the fields that came up while installing this new plugin, contact our support team!
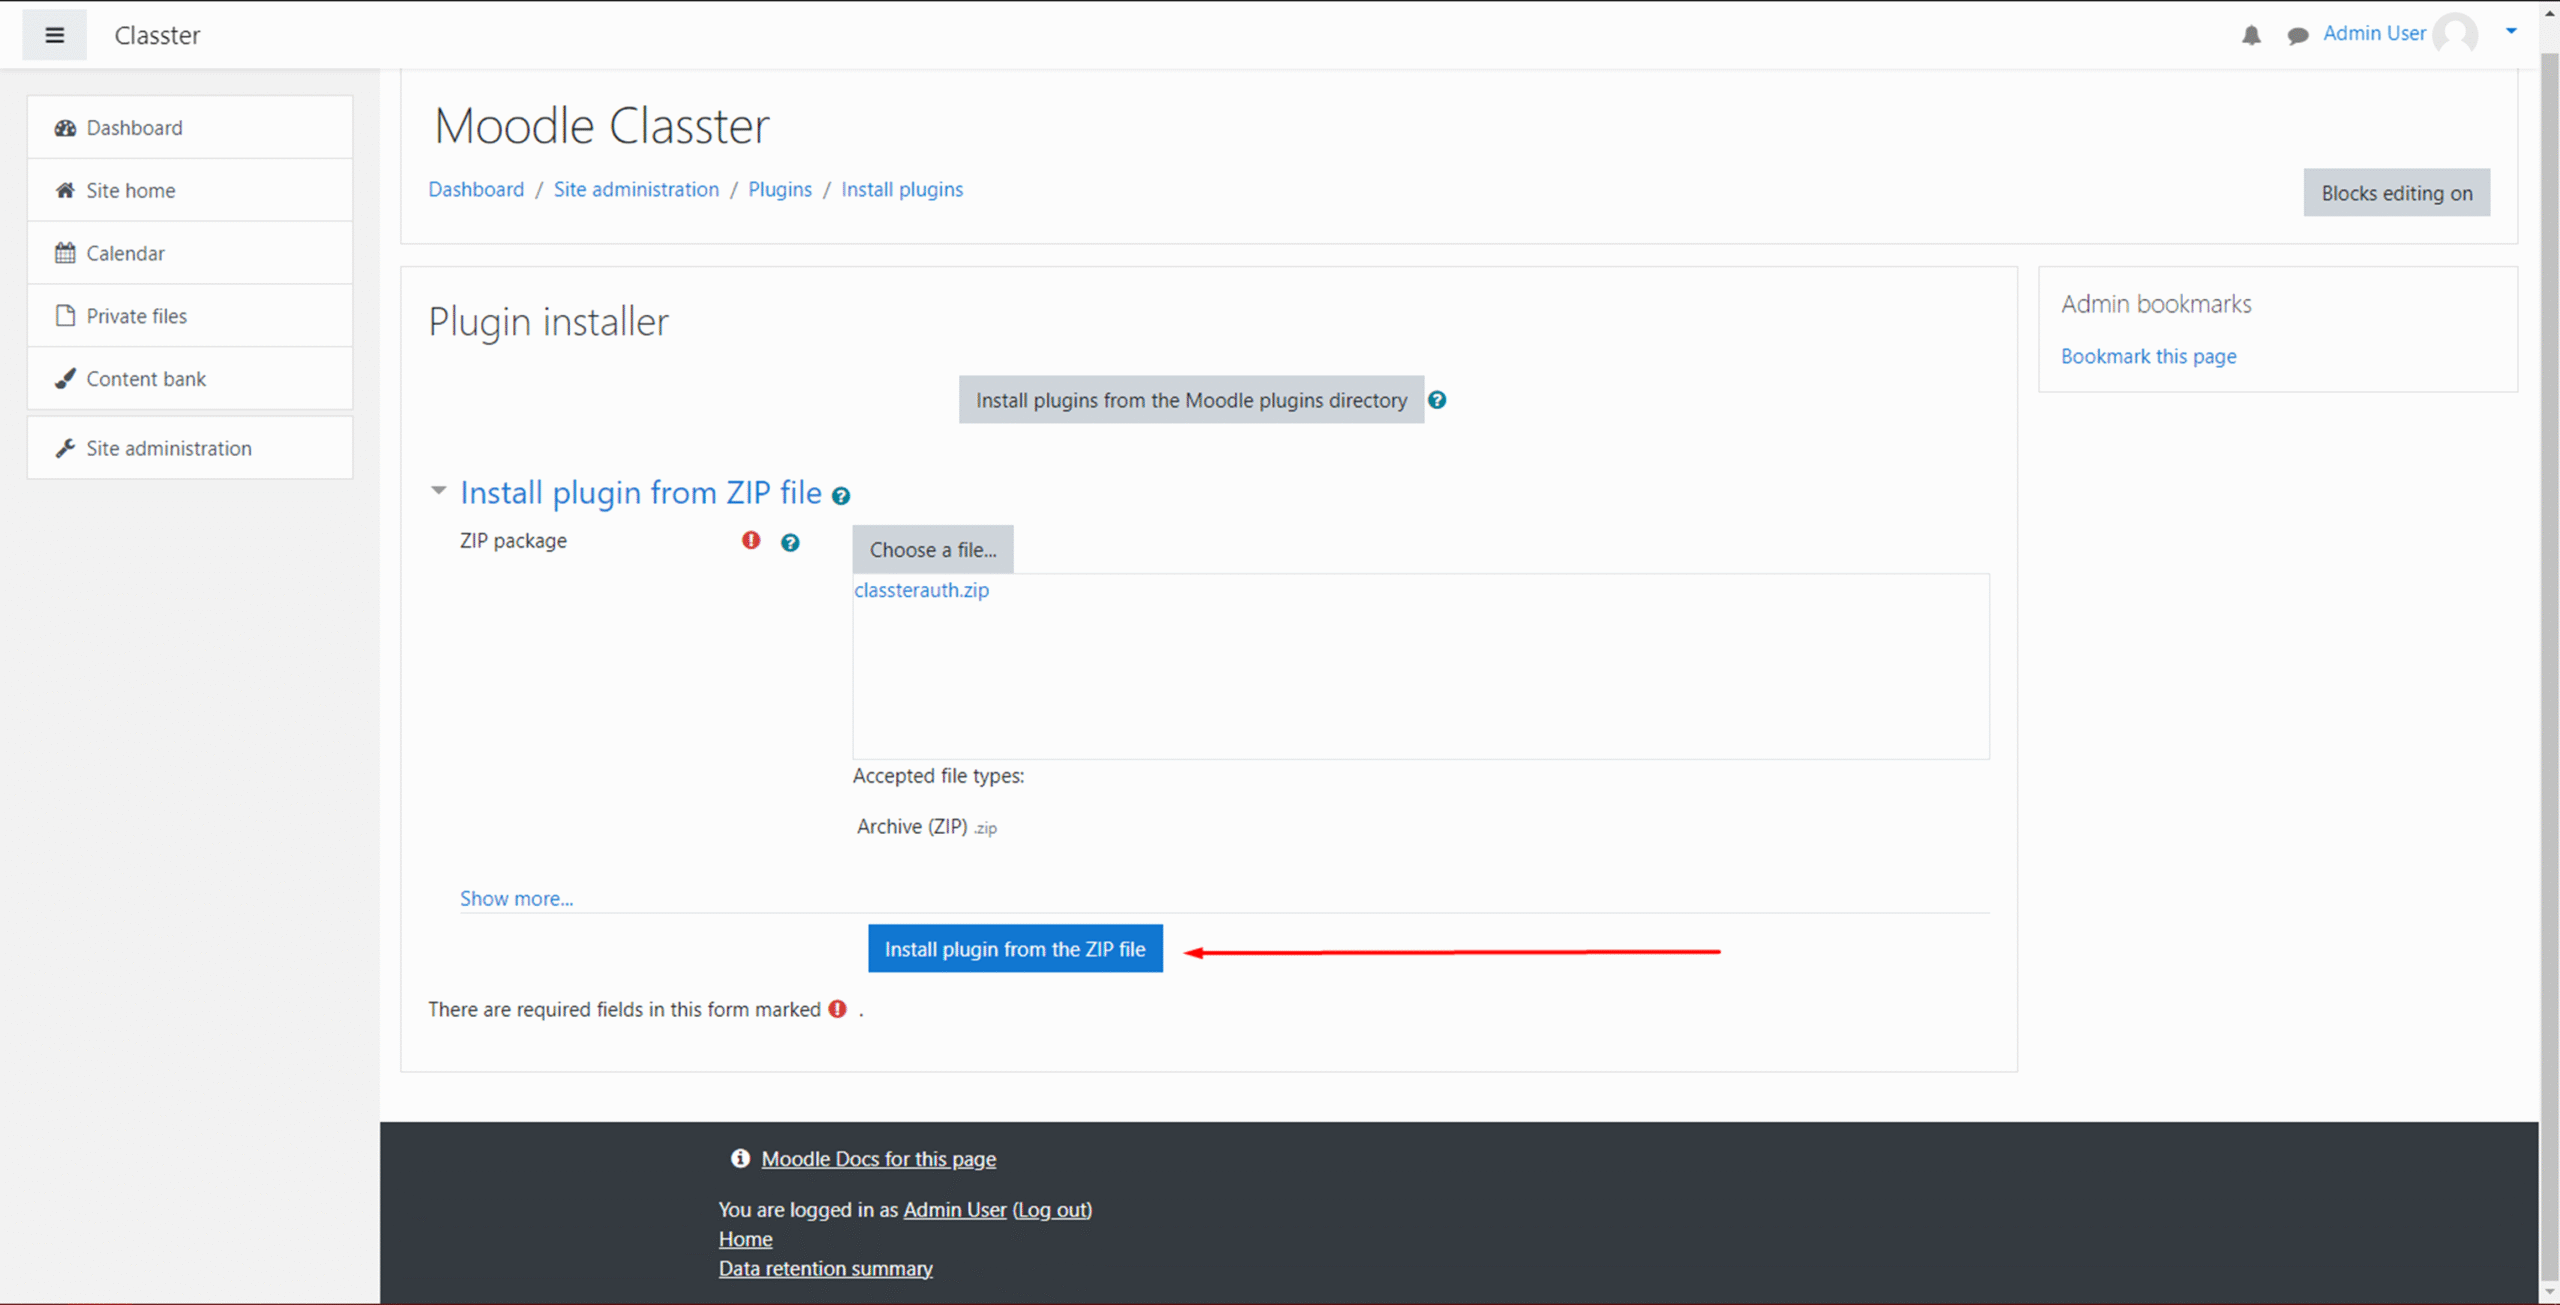
Figure 7
Complete Installation
After scrolling to the bottom of the page, you must find and click on the Continue button (Figure 8).
Figure 8
When the new window comes up, press Upgrade Moodle database now (Figure 9).
Tip: To learn more about plugin updates, contact our support team!
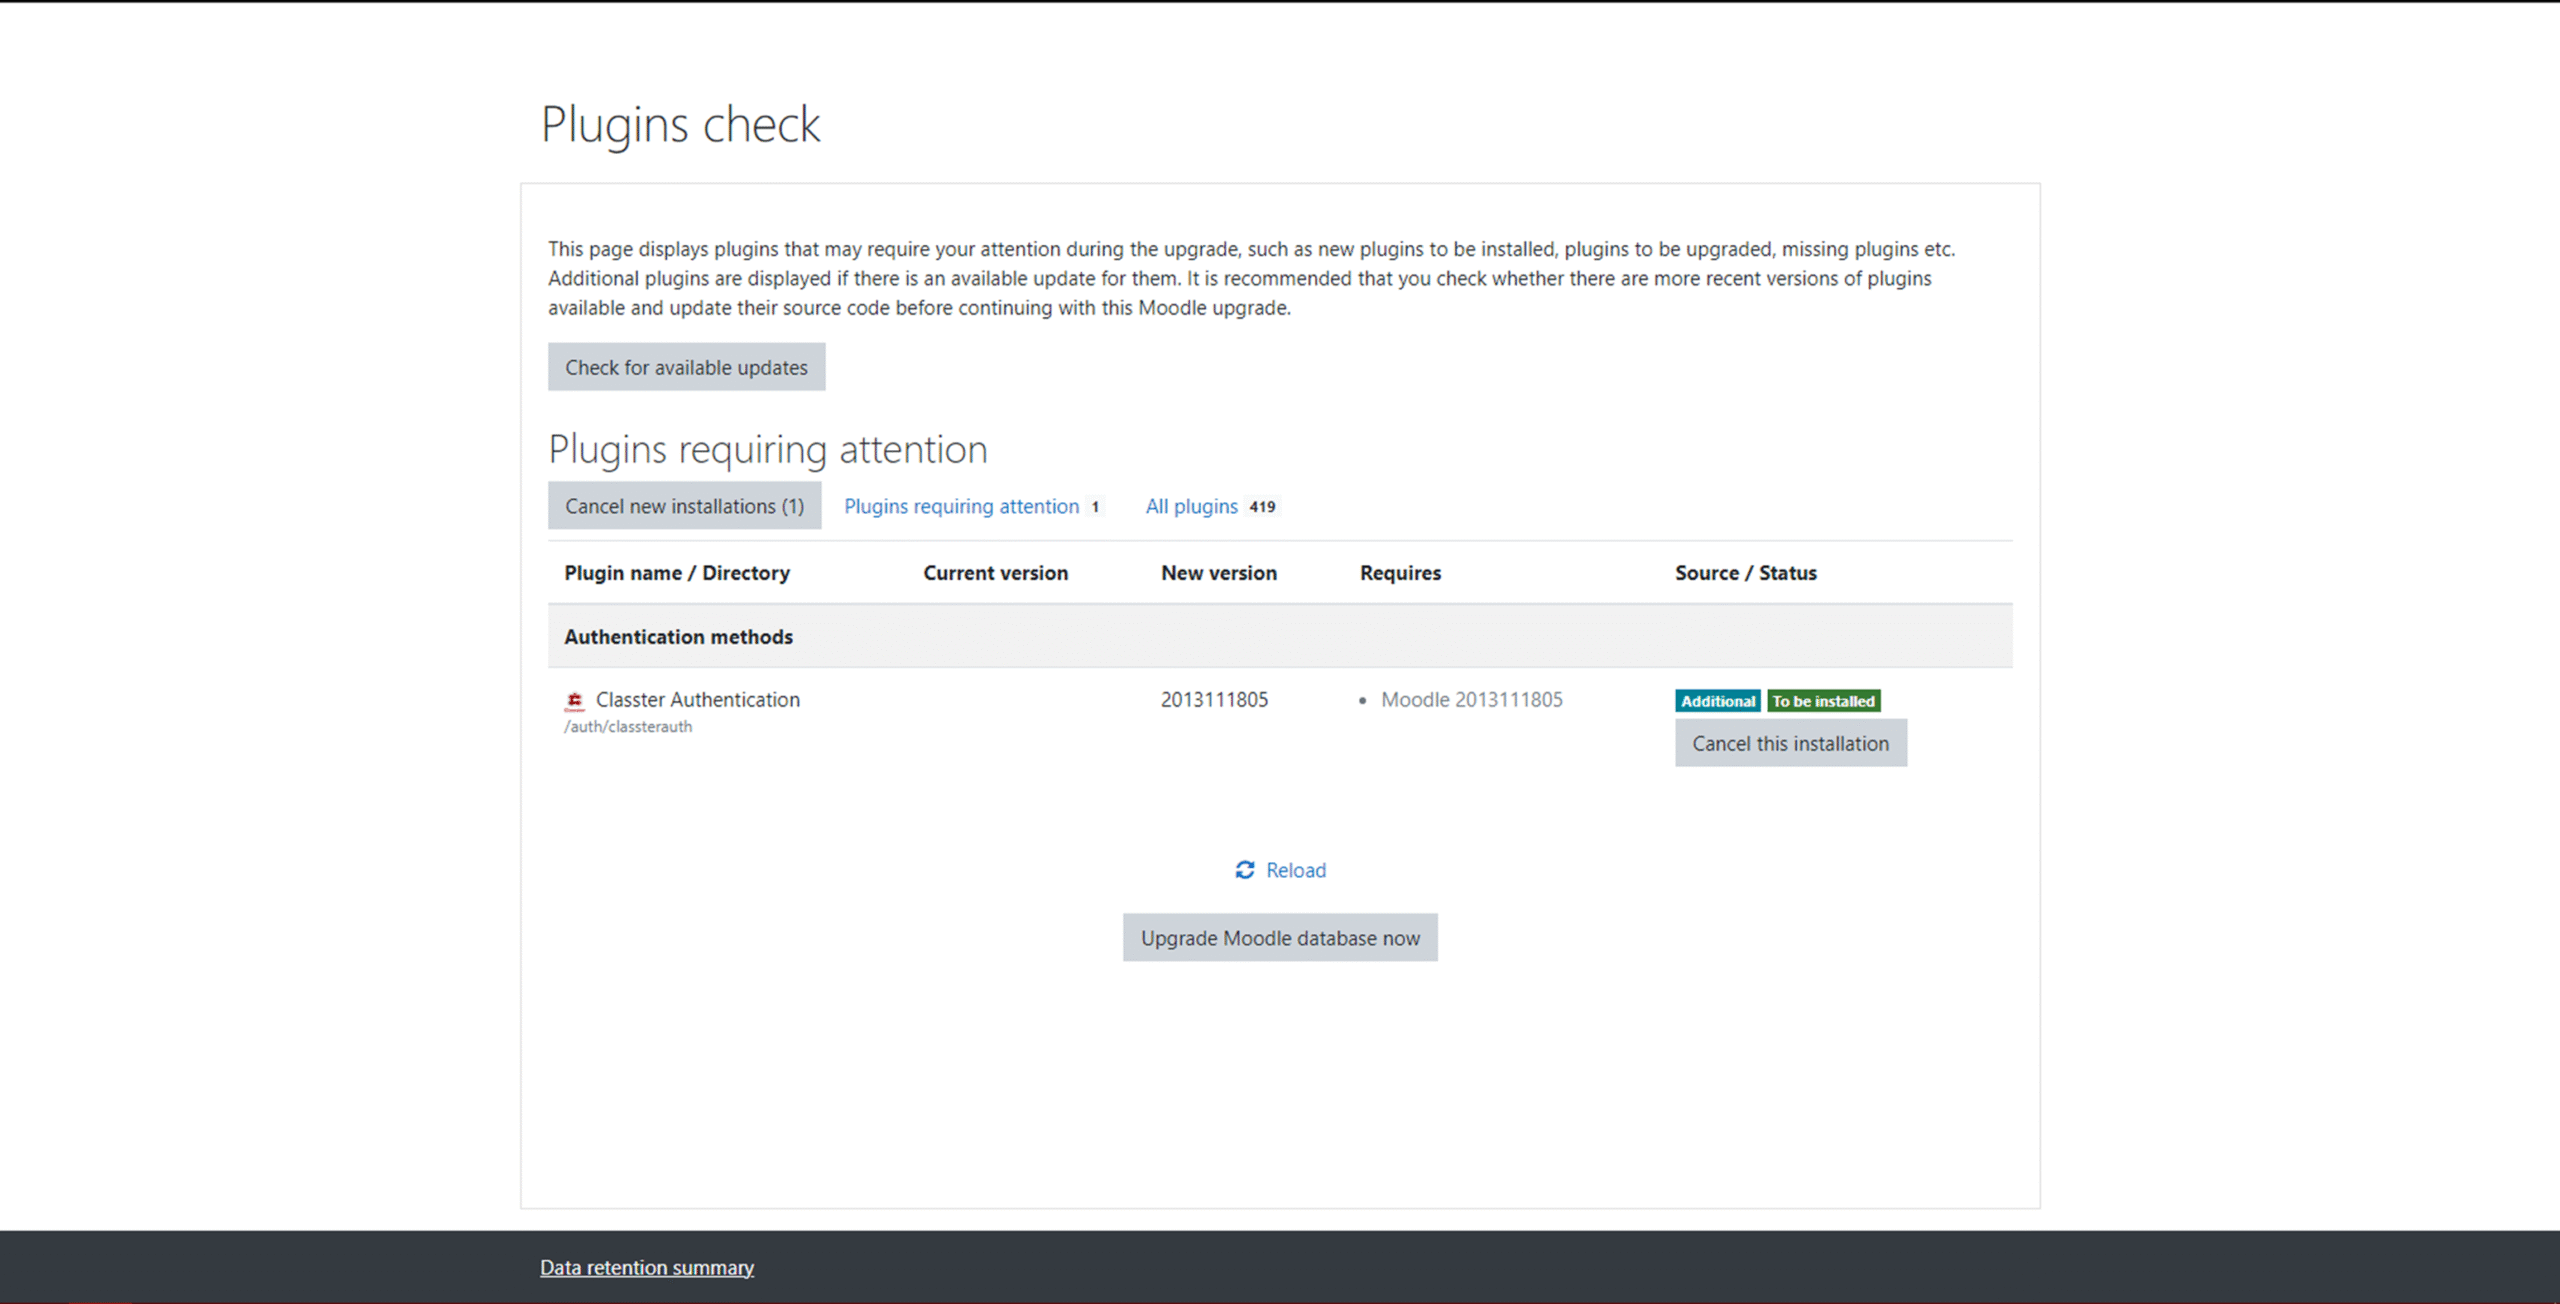
Figure 9
Many more settings will come up; all these settings are very important to you if you want to have a customized plugin experience.
Tip: To learn more about the settings that came up when installing this new plugin, contact our support team!
If you like the default settings, just press Save Settings (Figure 10).
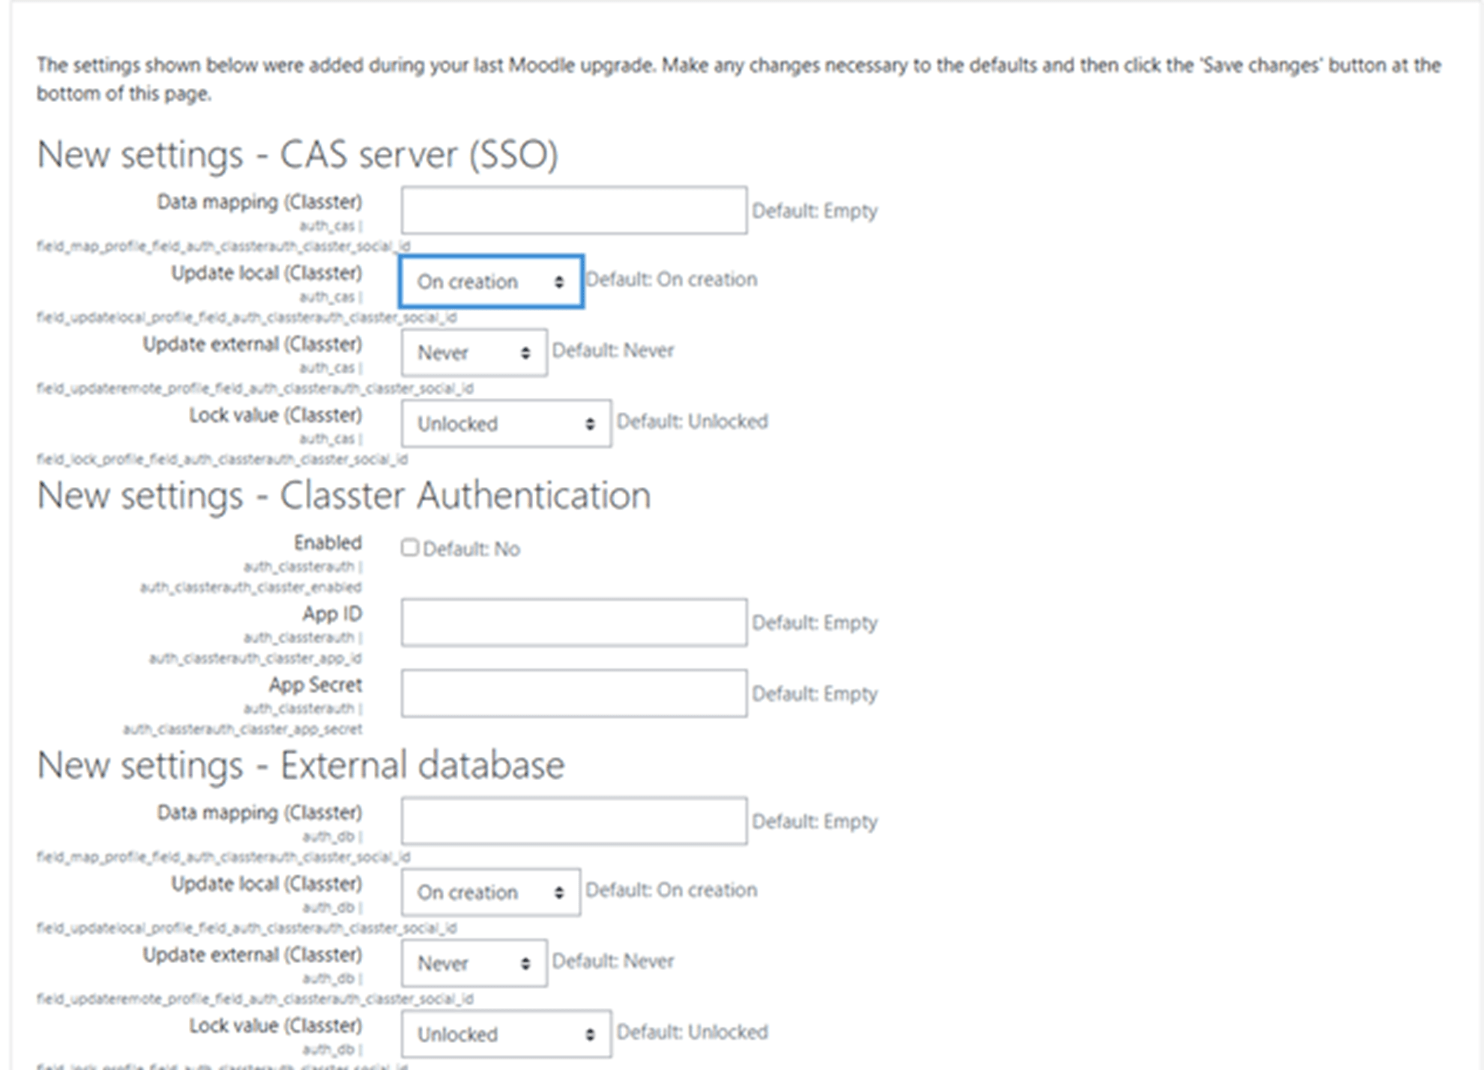
Figure 10
If everything went well so far, you should be redirected to the Dashboard of your Moodle Page. (Figure 11)
Setting up the plugin correctly
After that, go to Site Administration, Plugins, and then Plugins overview. (Figure 11)
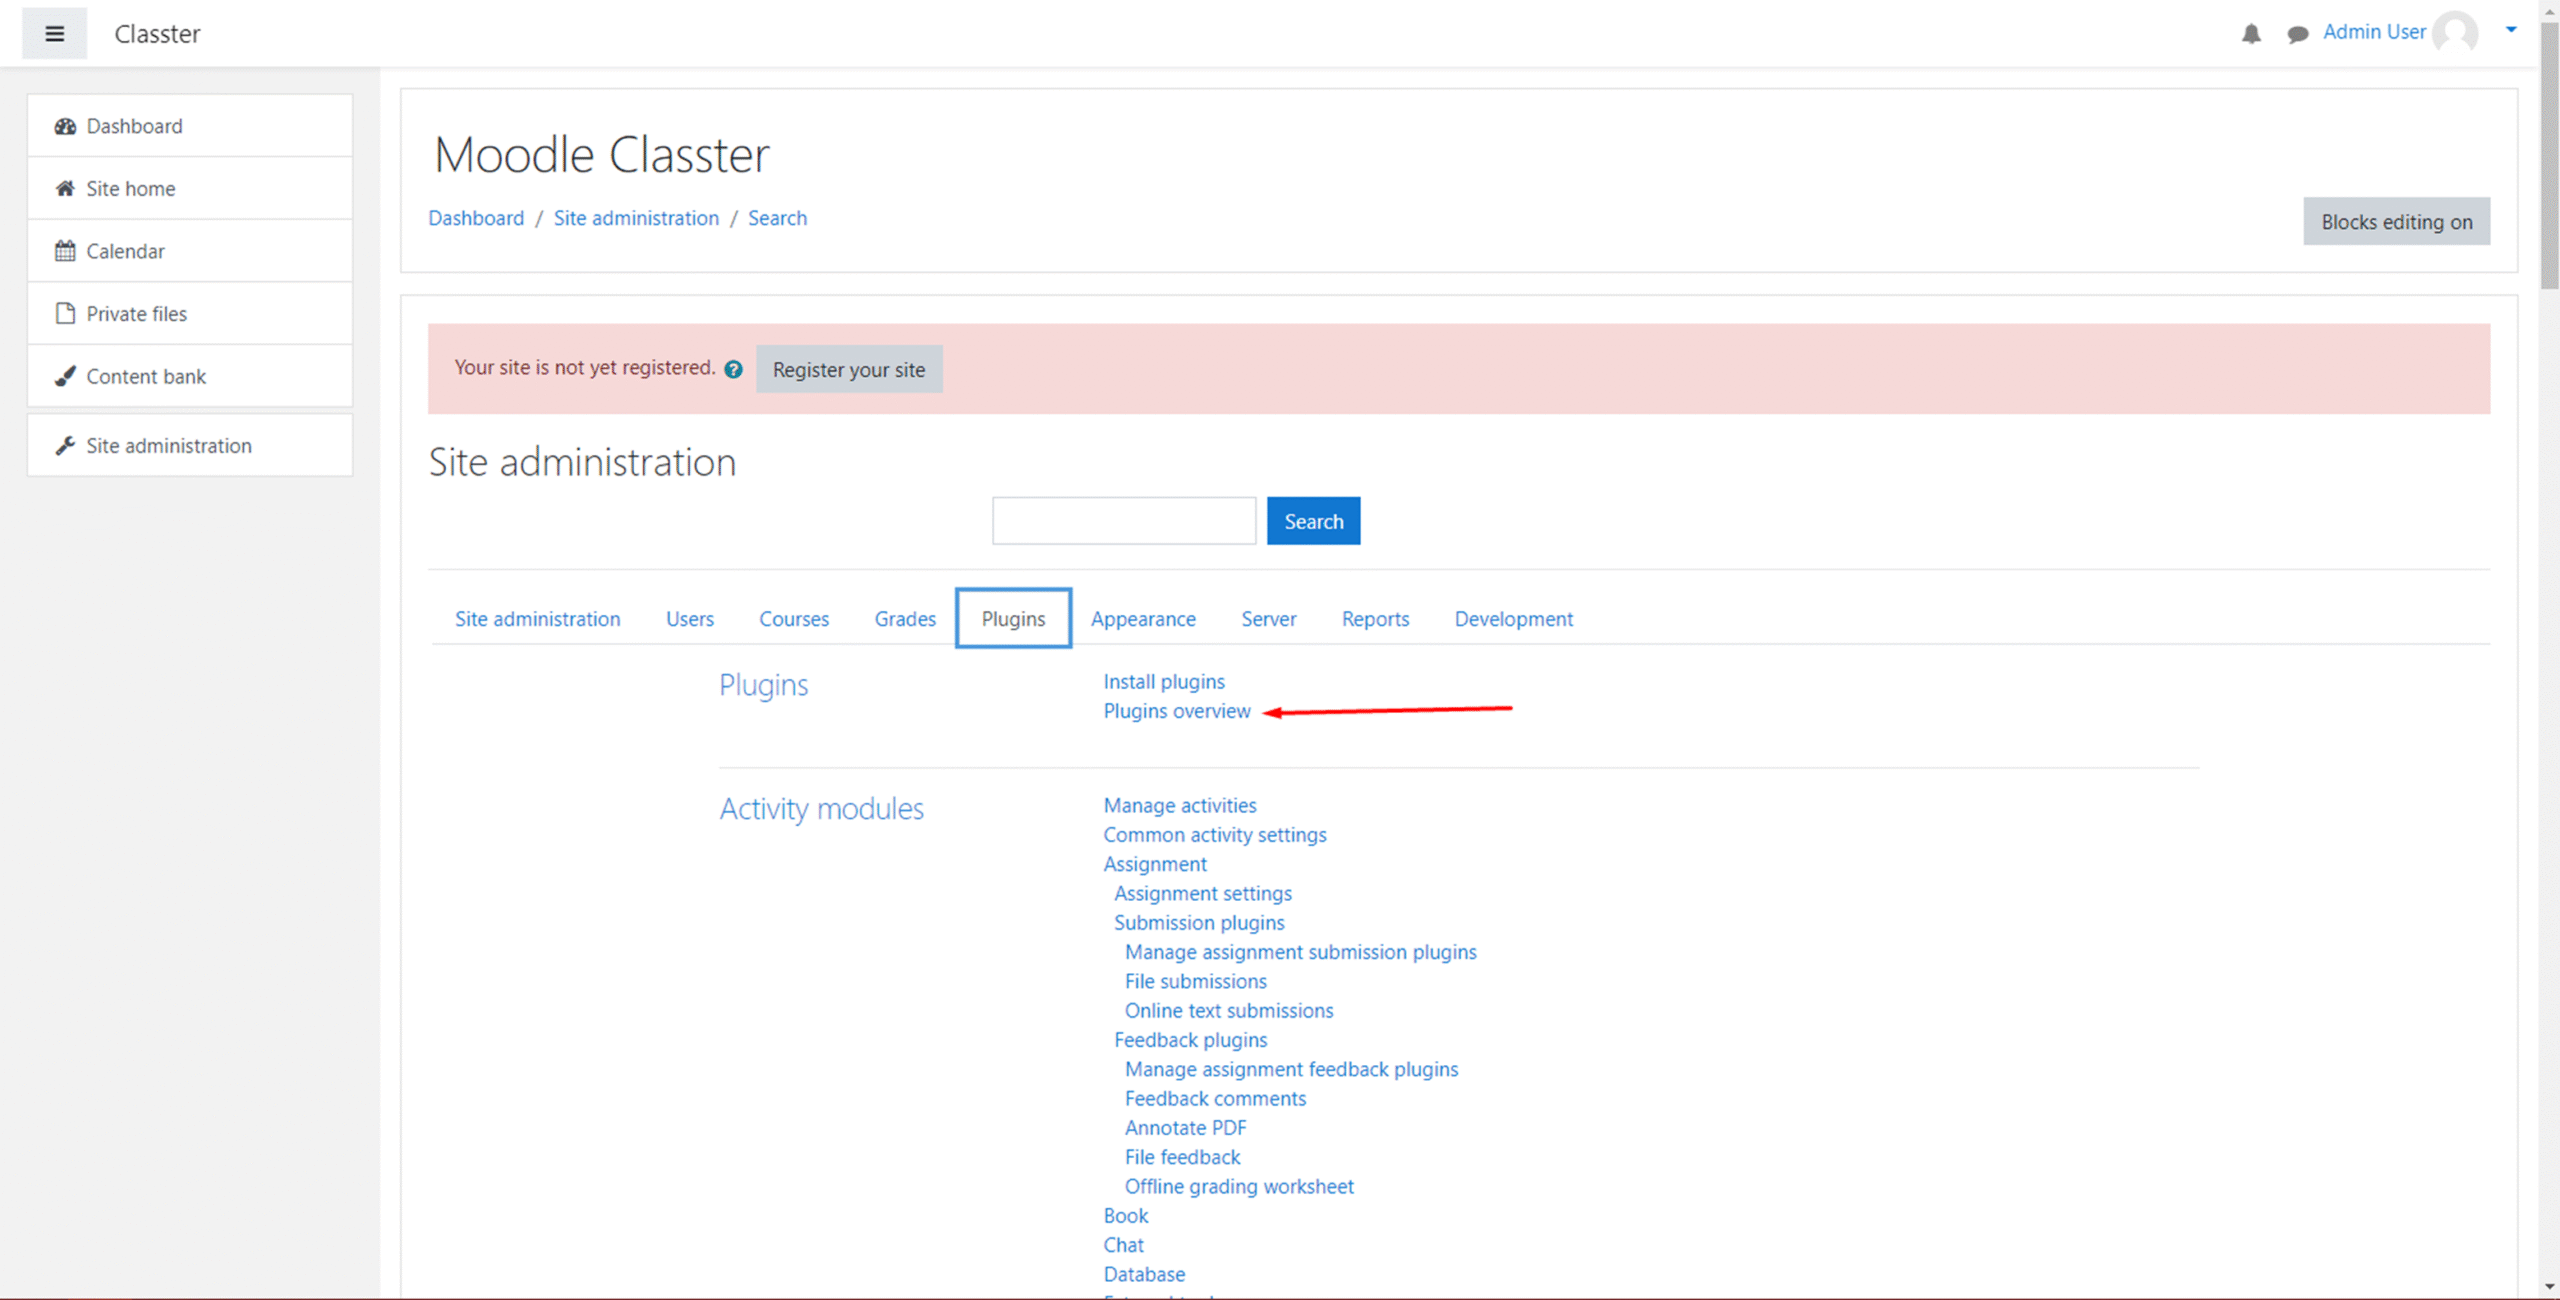
Figure 11
Here, search for Classter Authentication at the Authentication methods section and click Settings (Figure 12).
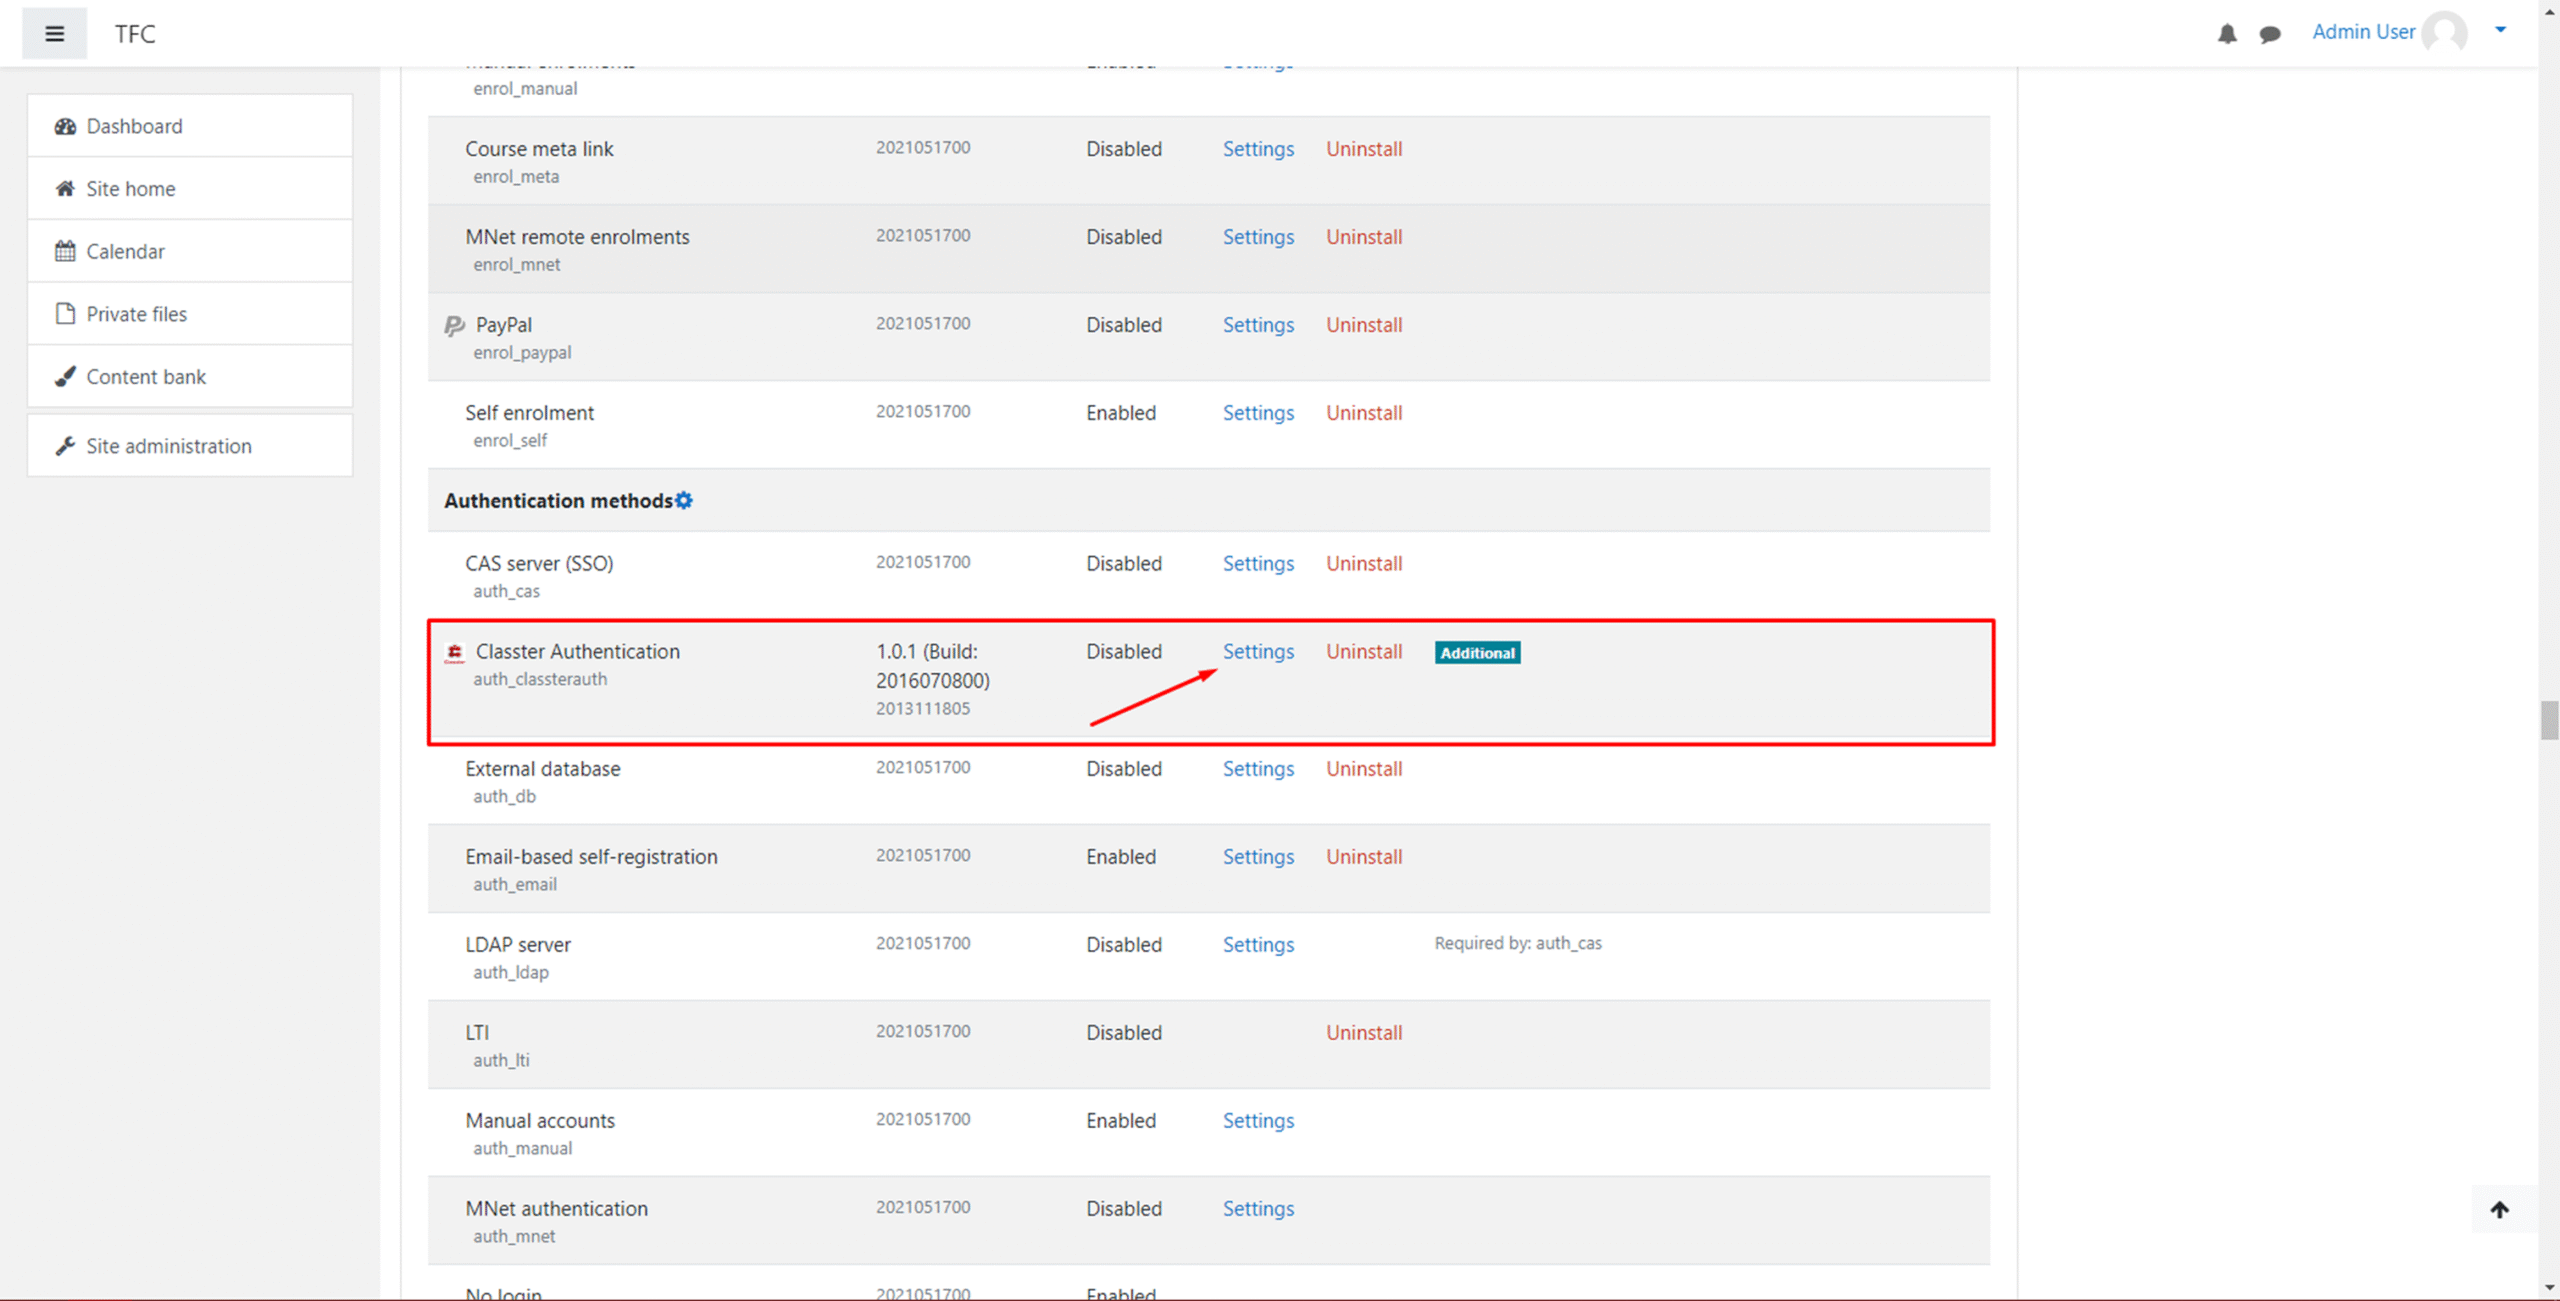
Figure 12
This step is crucial, and if you skip it, you will not be able to connect Moodle and Classter together for the SSO process!
First, change the Enabled checkbox to active.
Moodle SSO Client Setup (Automated)
Once Moodle Integration is enabled in Classter and the SSO plugin is installed:
- A “Create SSO Client” button becomes available.
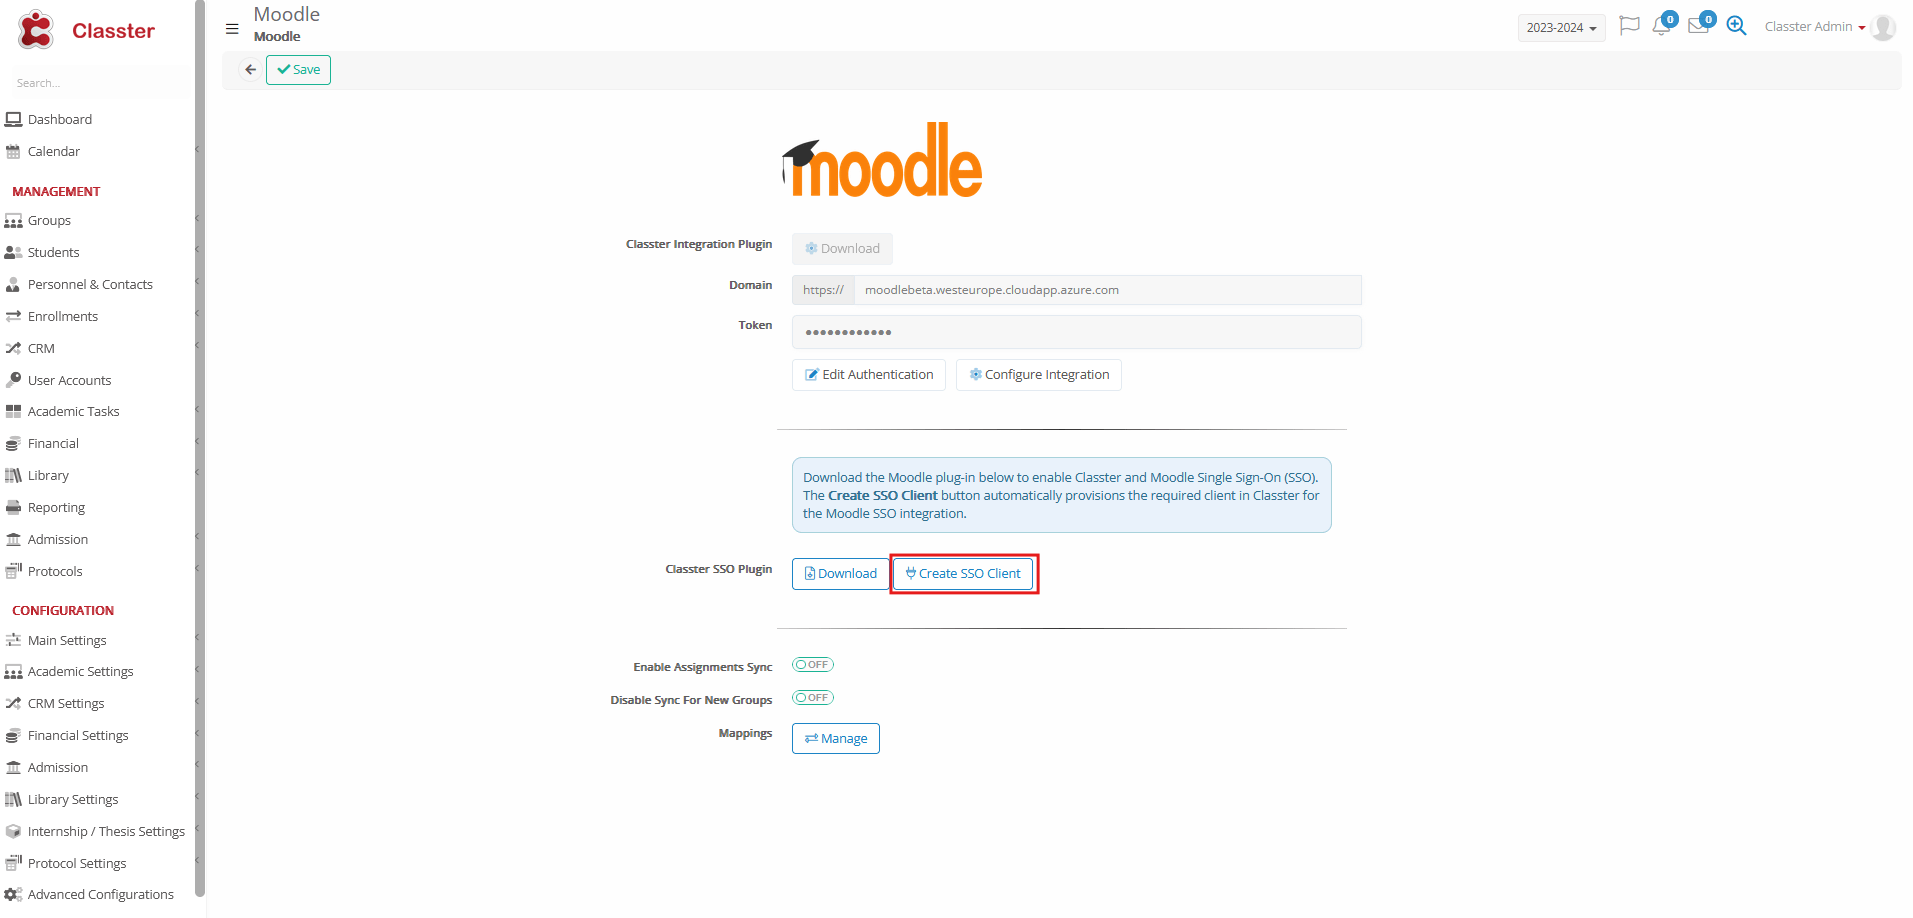
- Clicking it generates a ClientId and ClientSecret based on your domain URL.
- After creation:
-
-
- ClientId remain visible to all relevant users.
- ClientSecret is hidden by default but can be revealed by Integration Admins using a “Show Secret” button.
-
Paste the ClientId and ClientSecret into the Classter plugin settings in Moodle, then click Save Changes to complete the integration. (Figure 13)
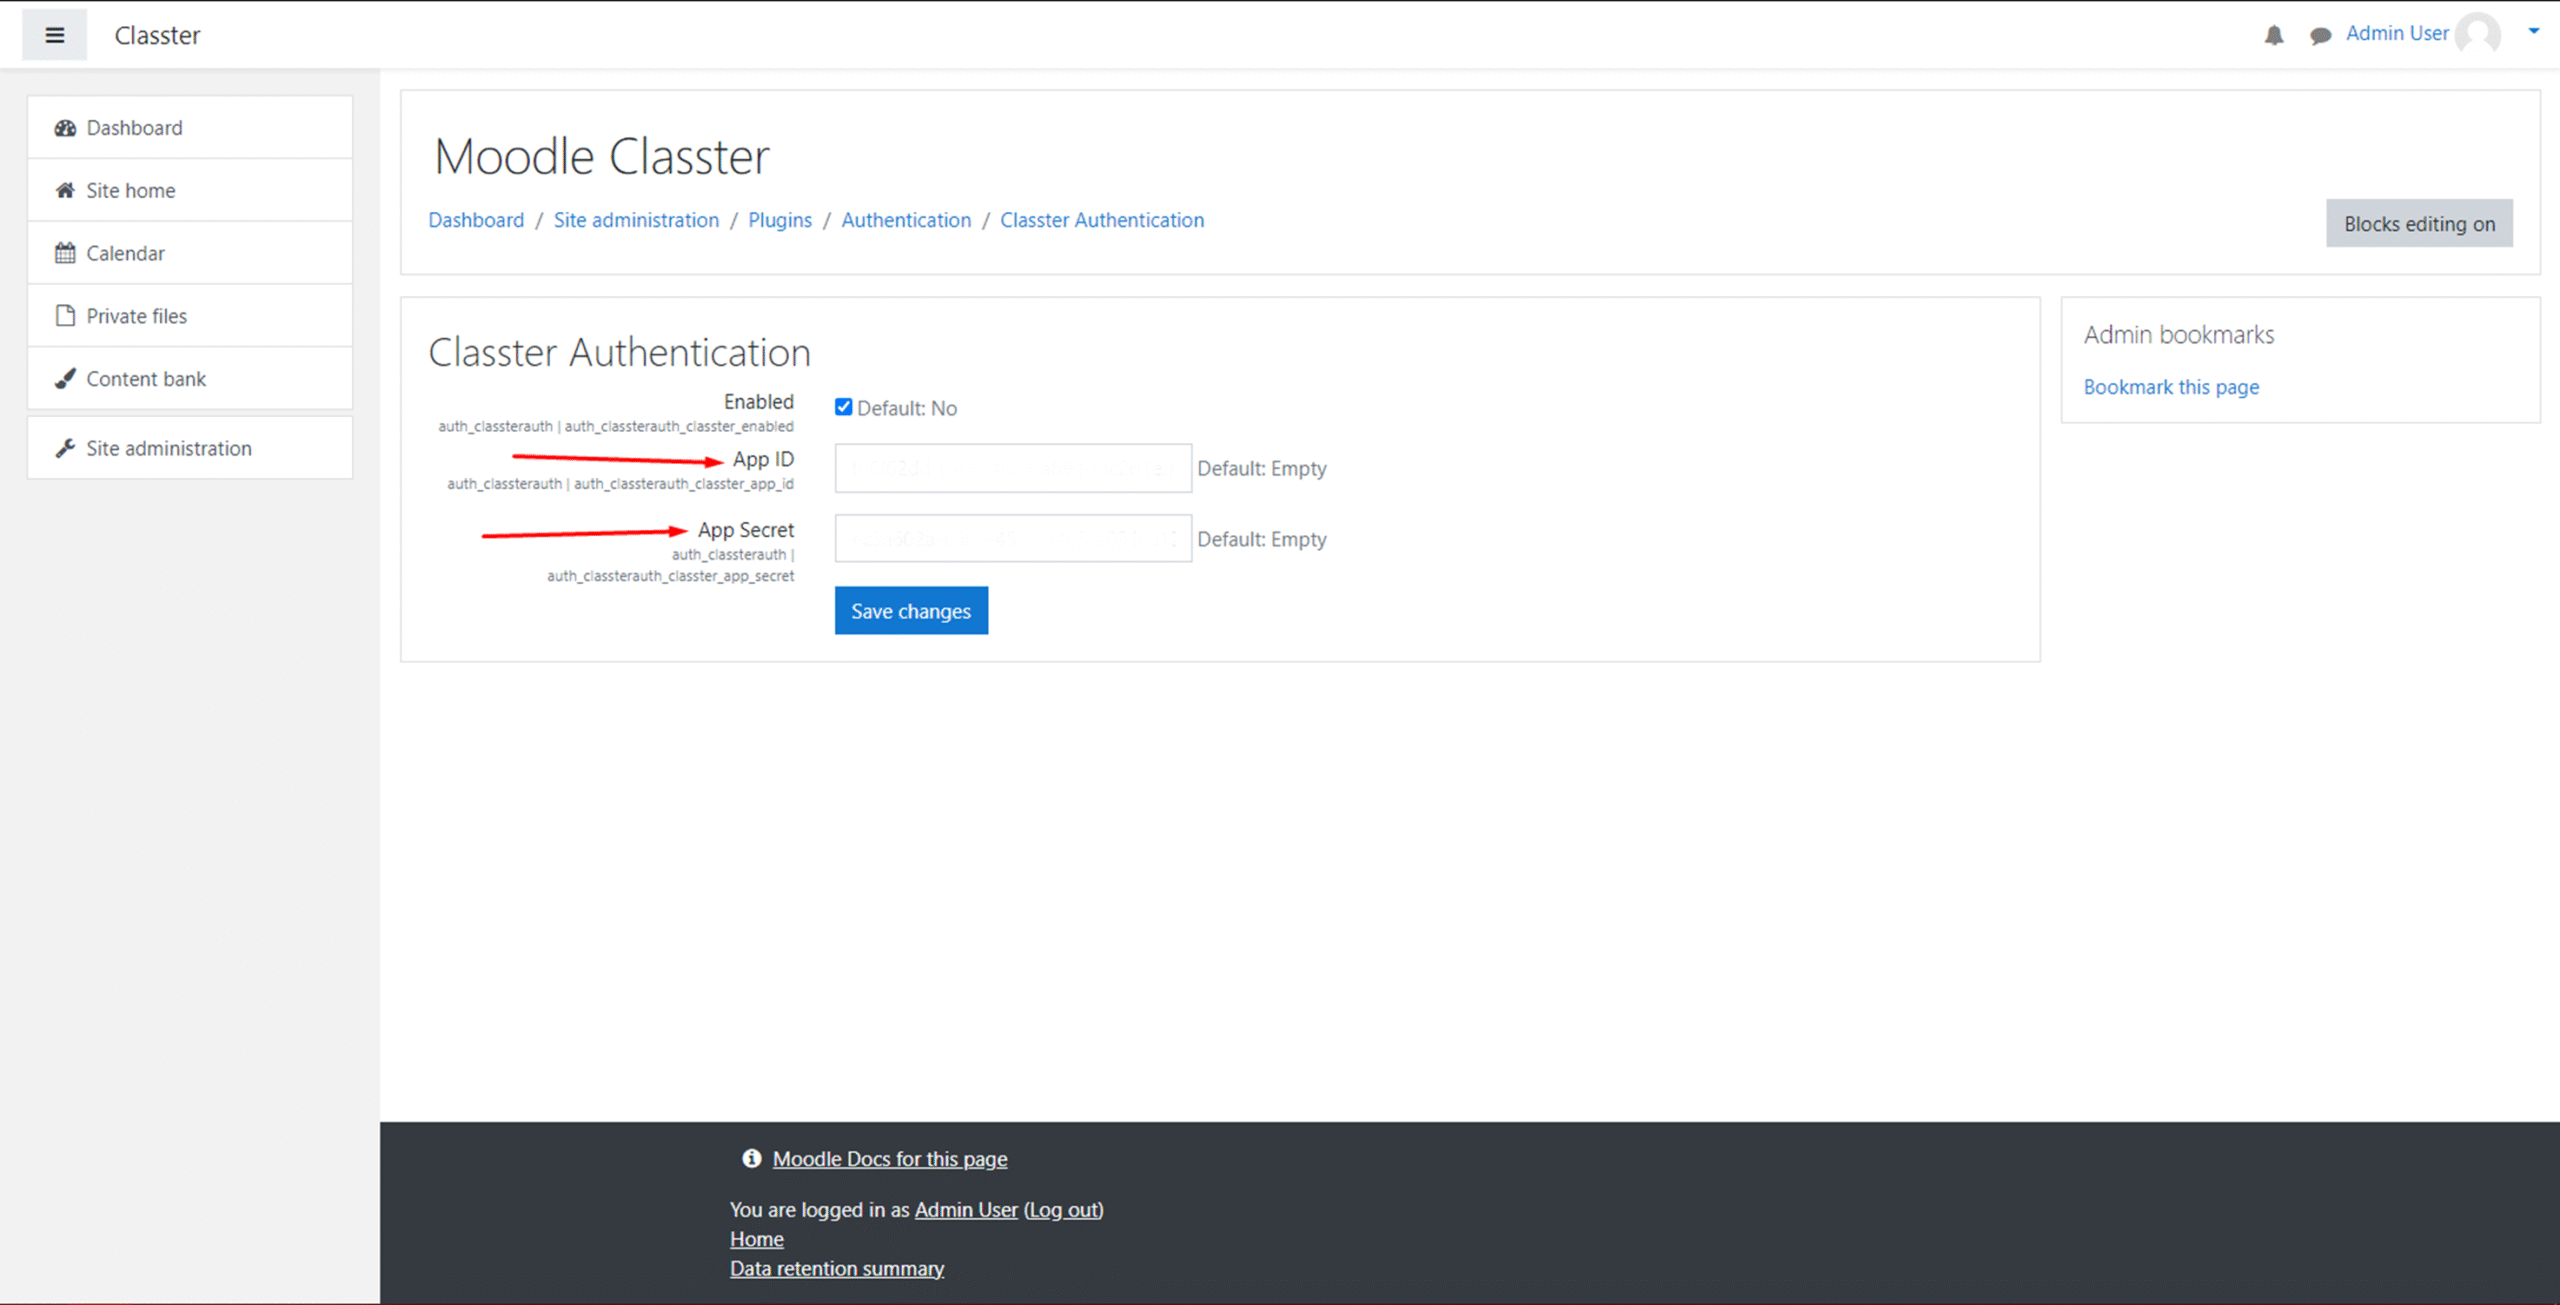
Figure 13
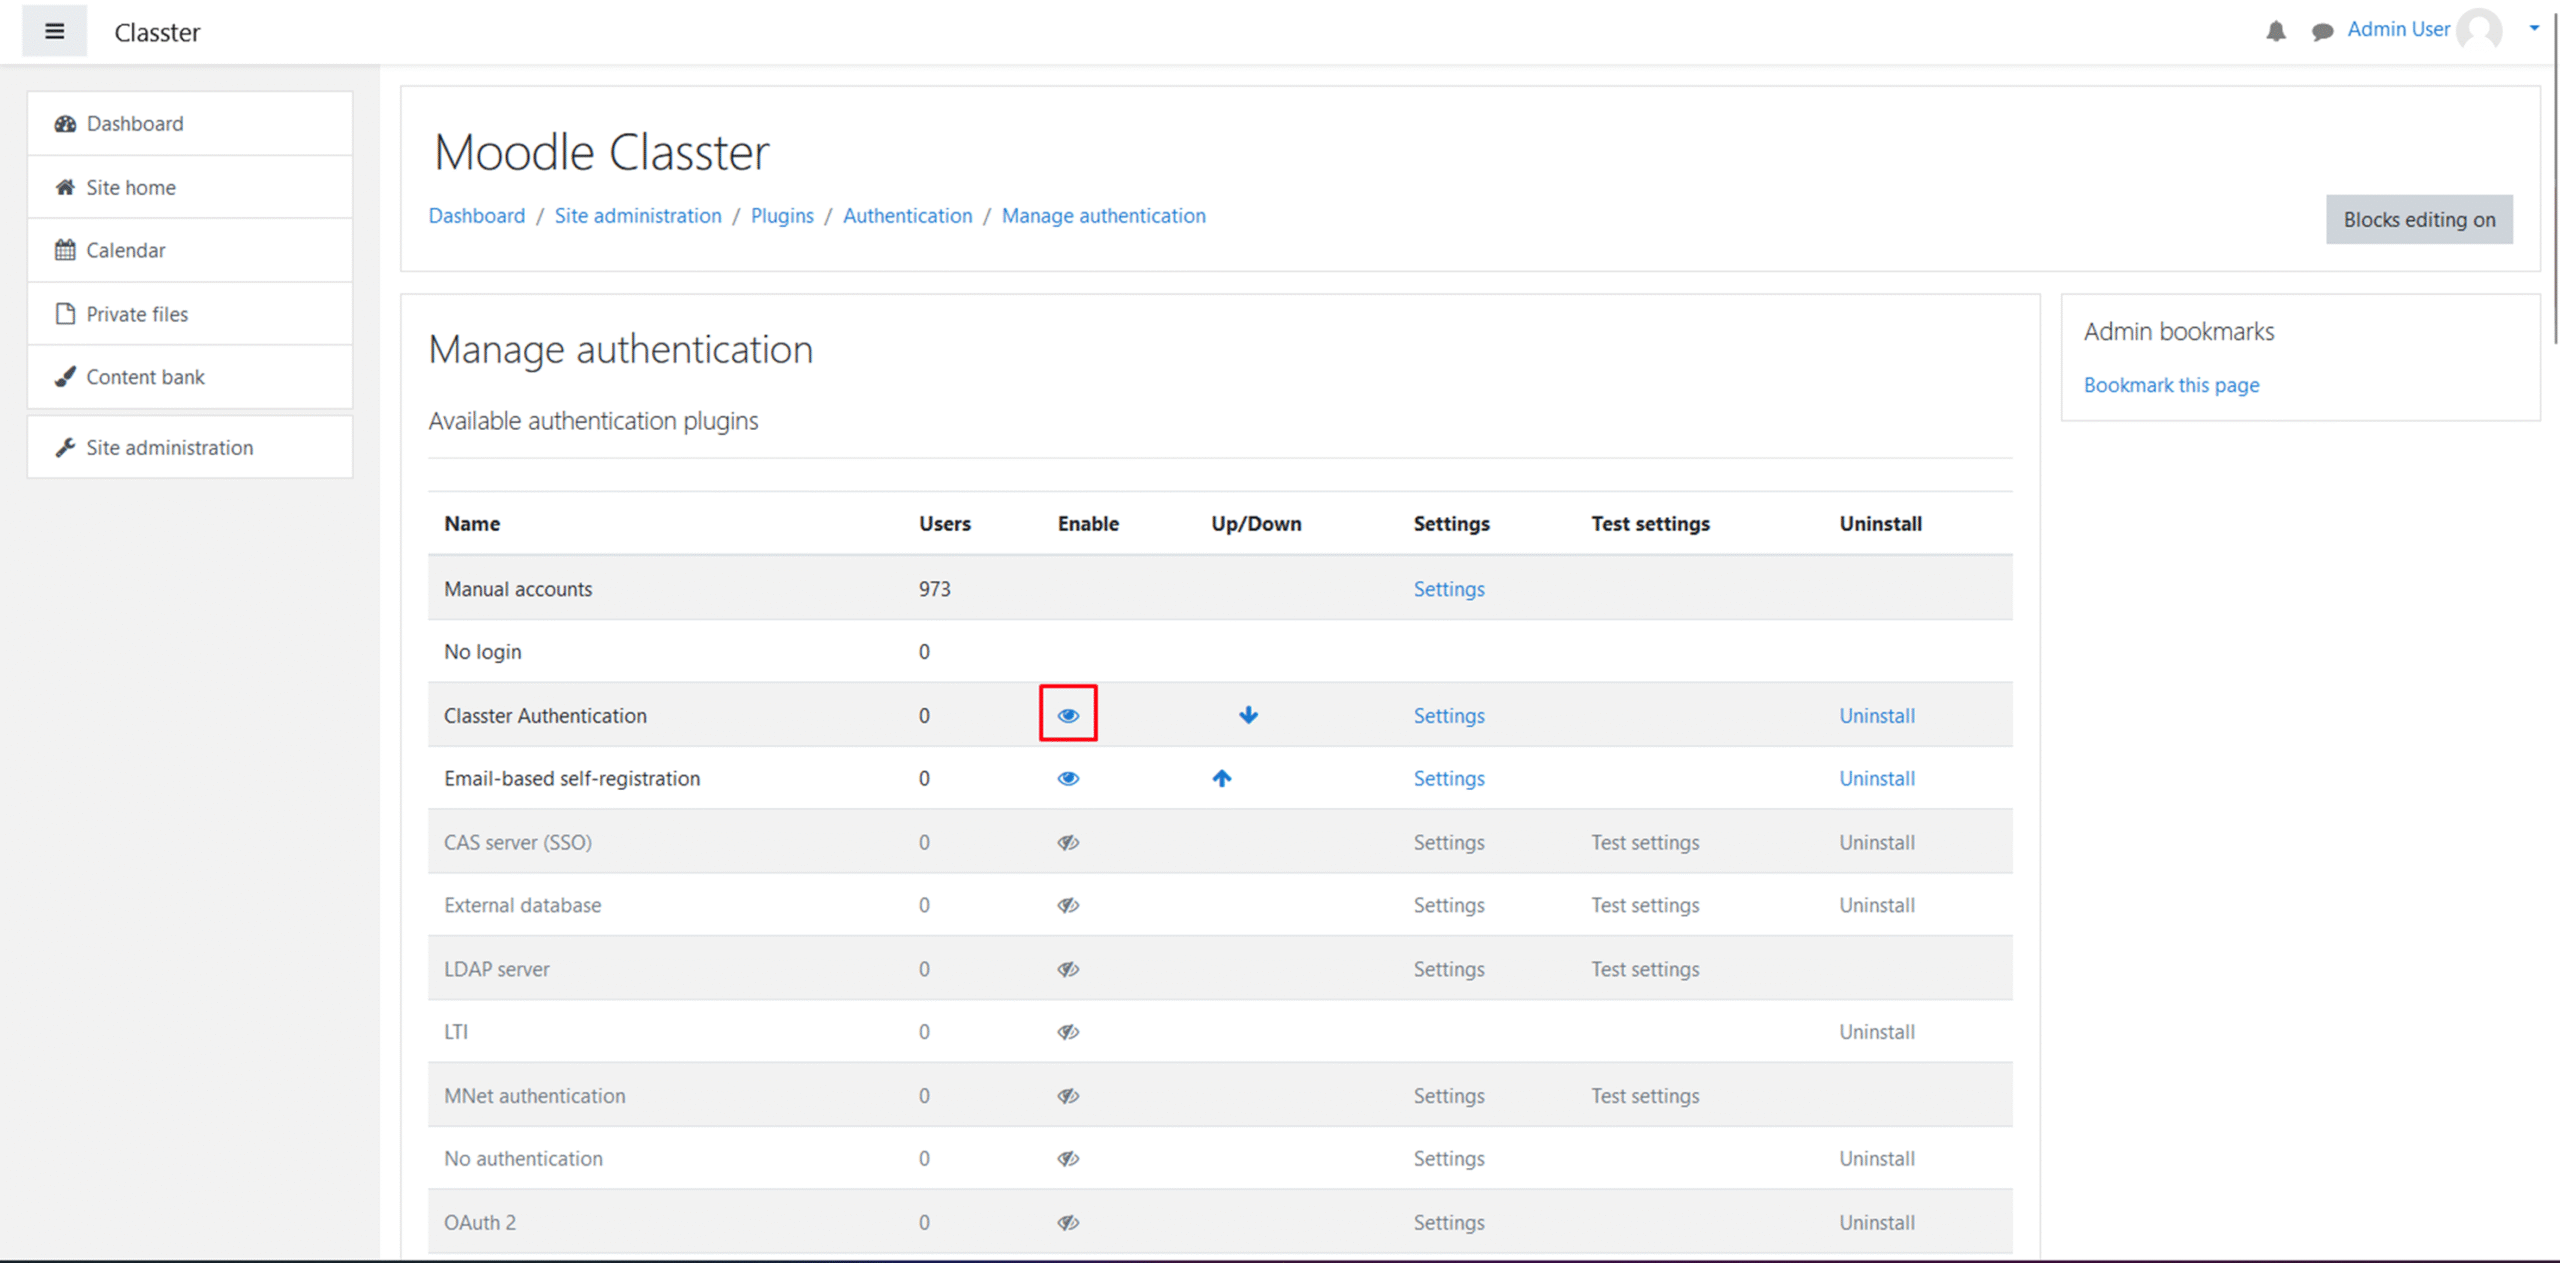
Moving on with the authentication, follow the path: Plugins / Authentication / Manage Authentication
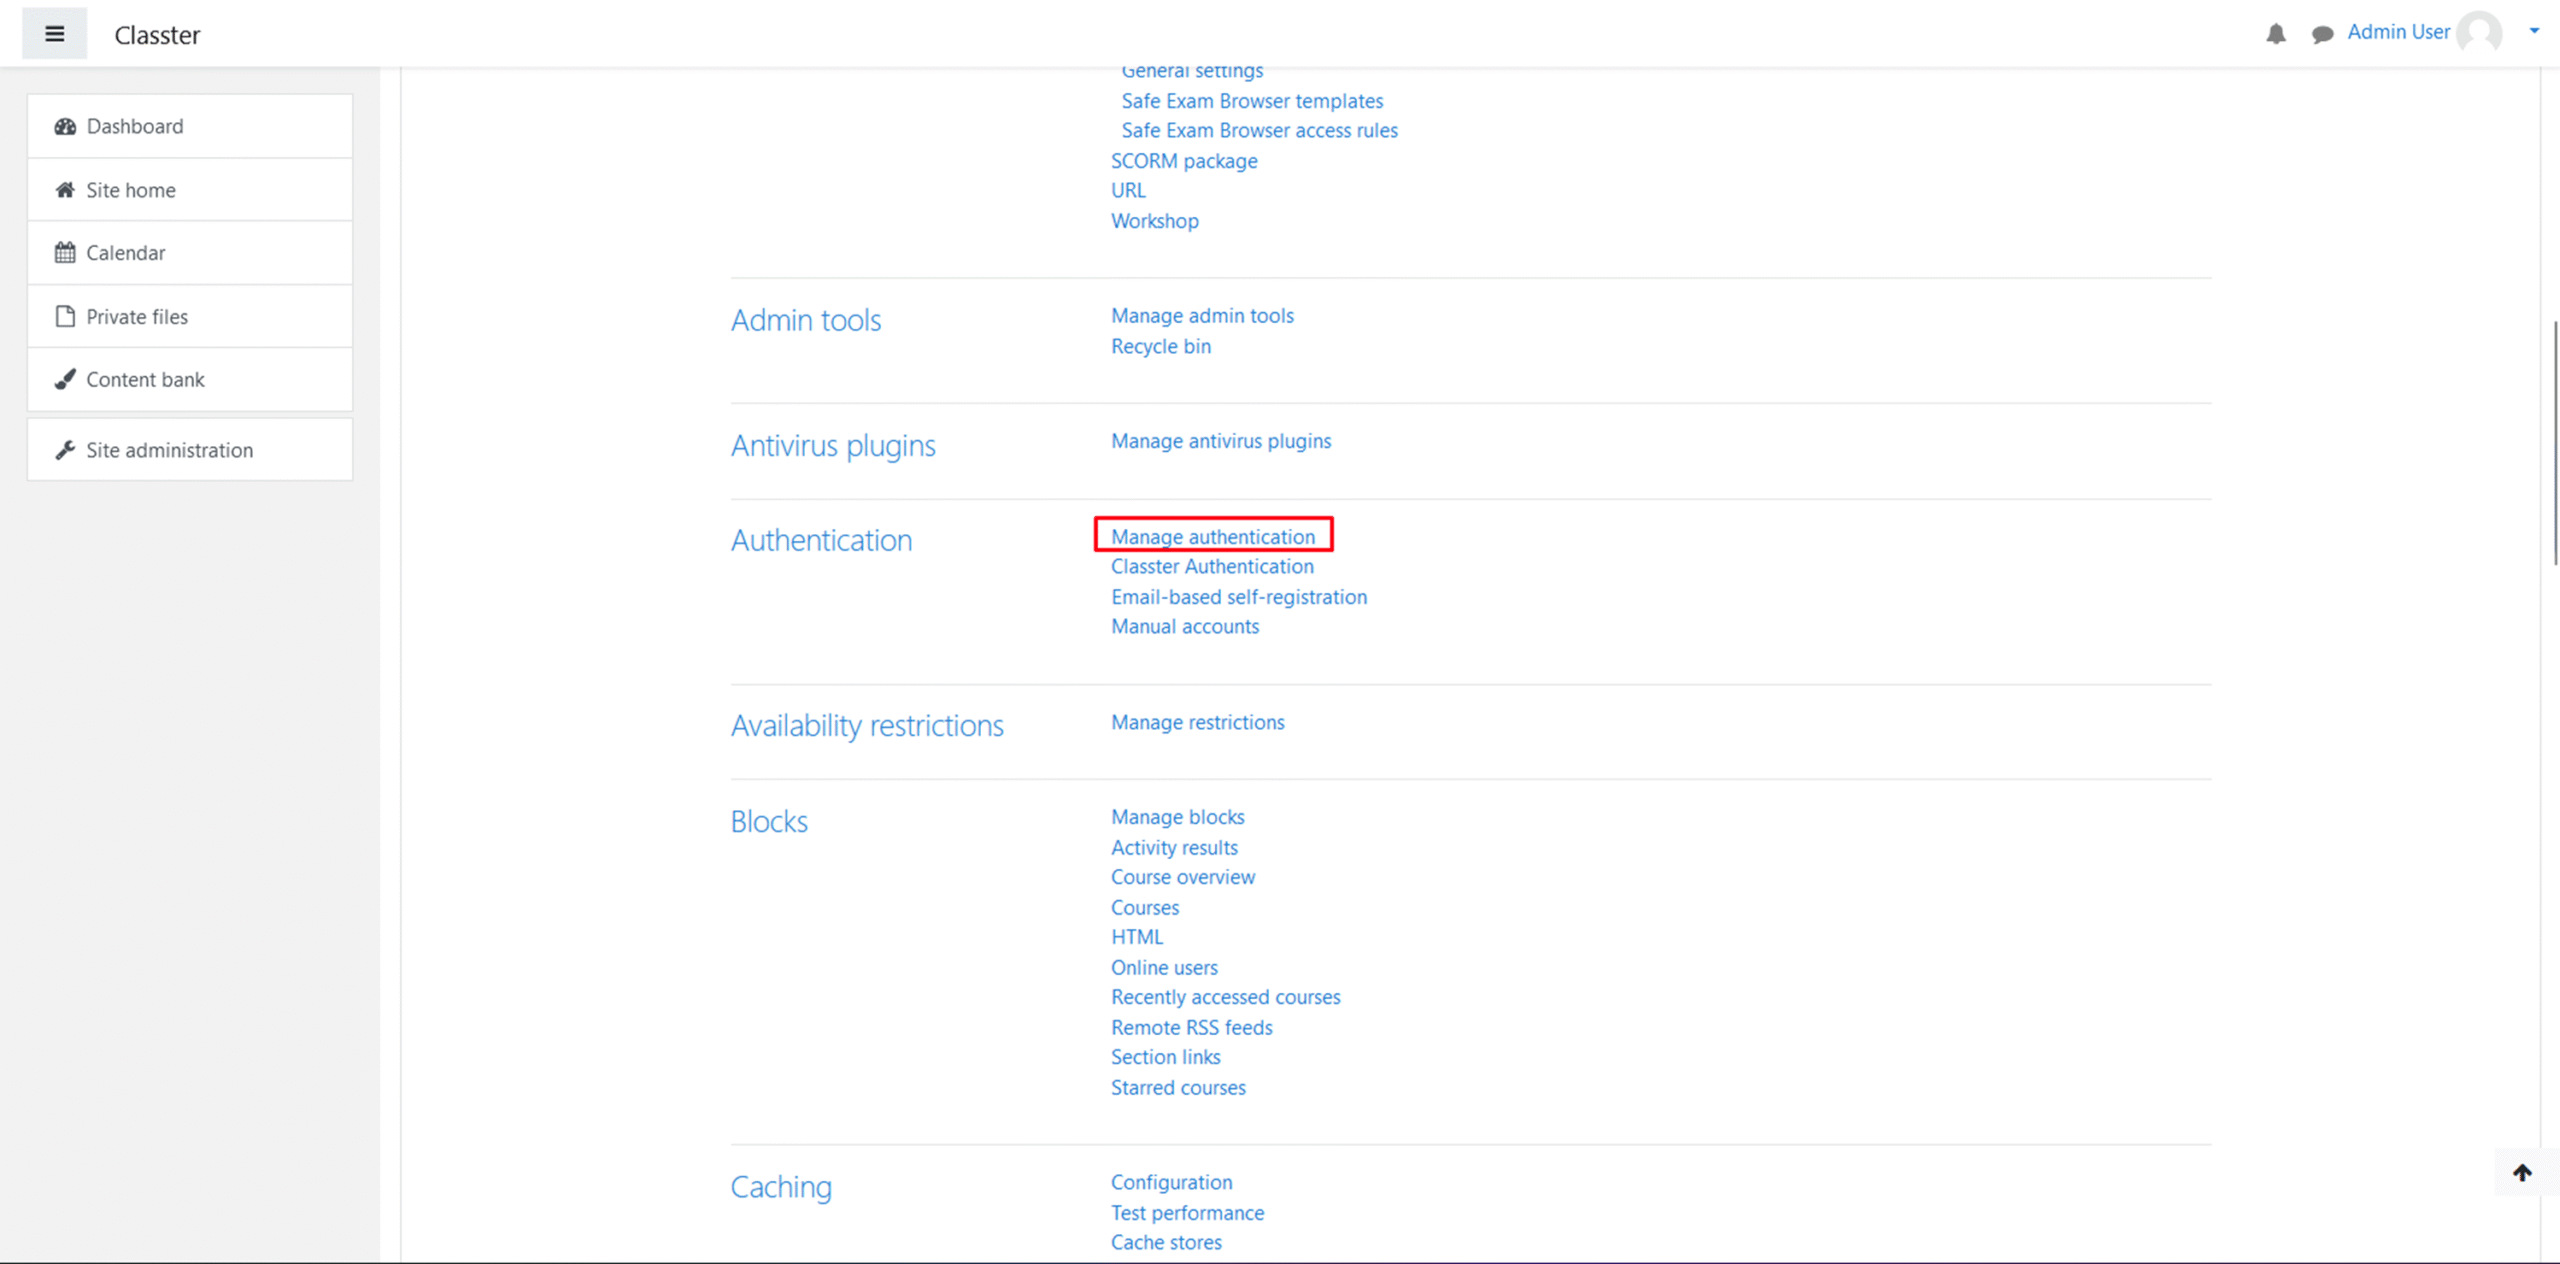
Make sure that Classter authentication is enabled, as shown below.
Integrating with Moodle (Configuration settings)
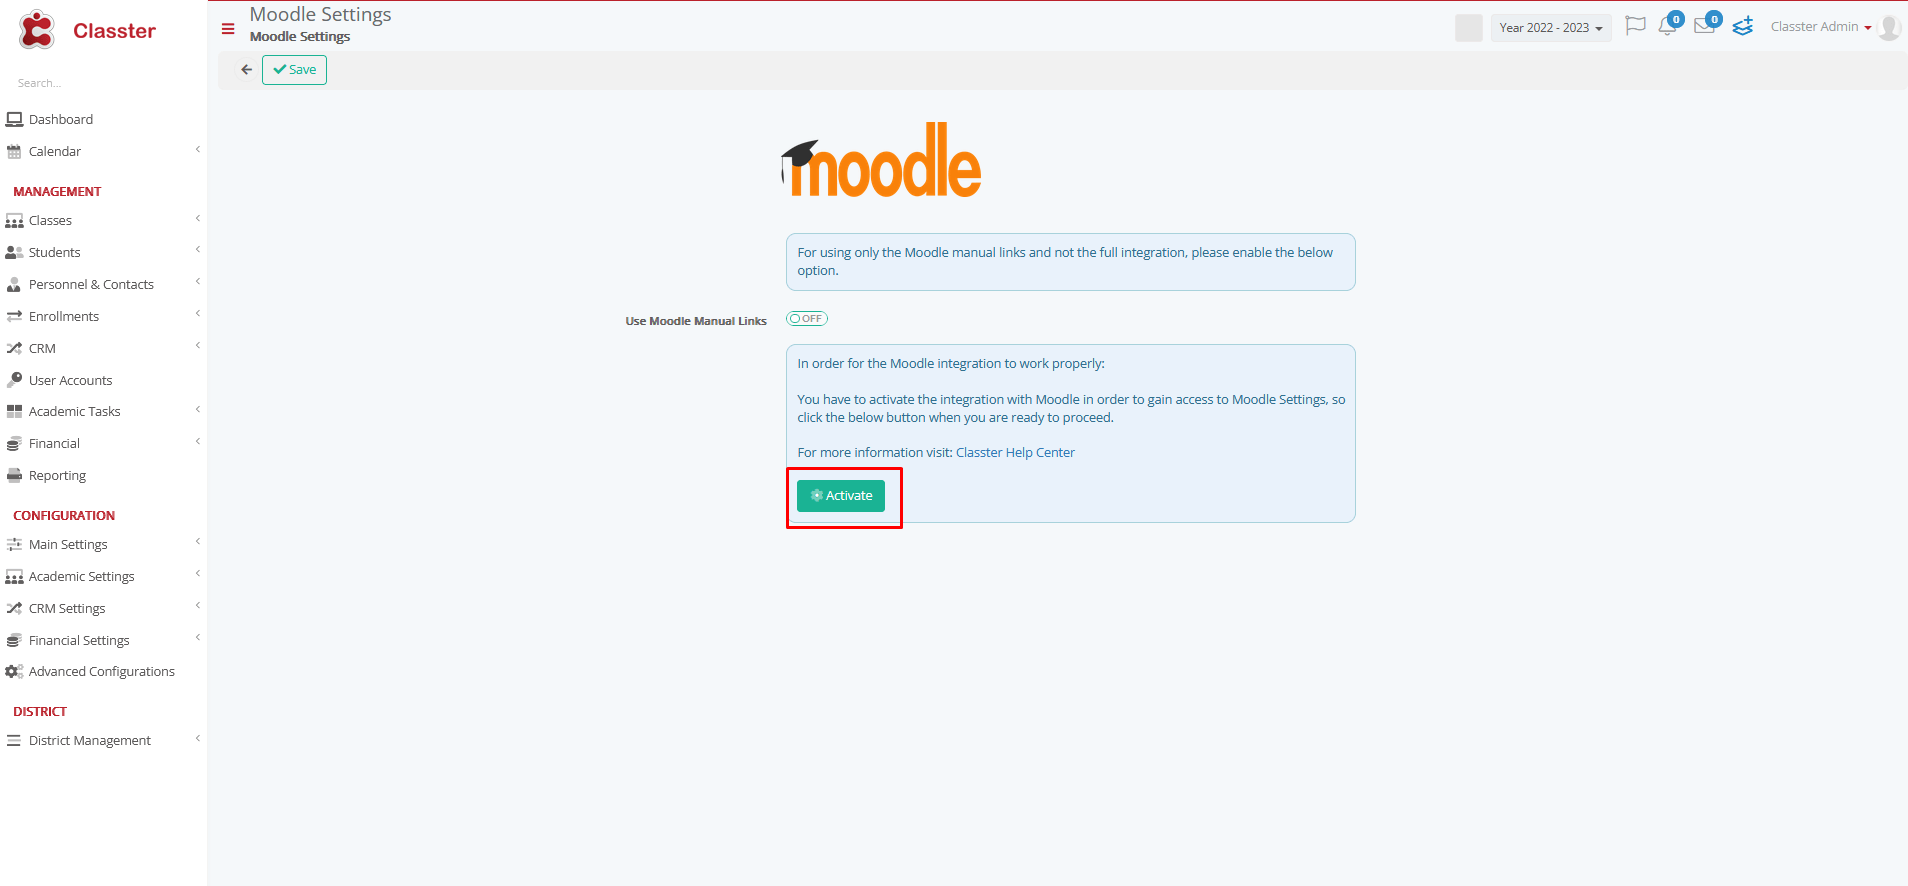
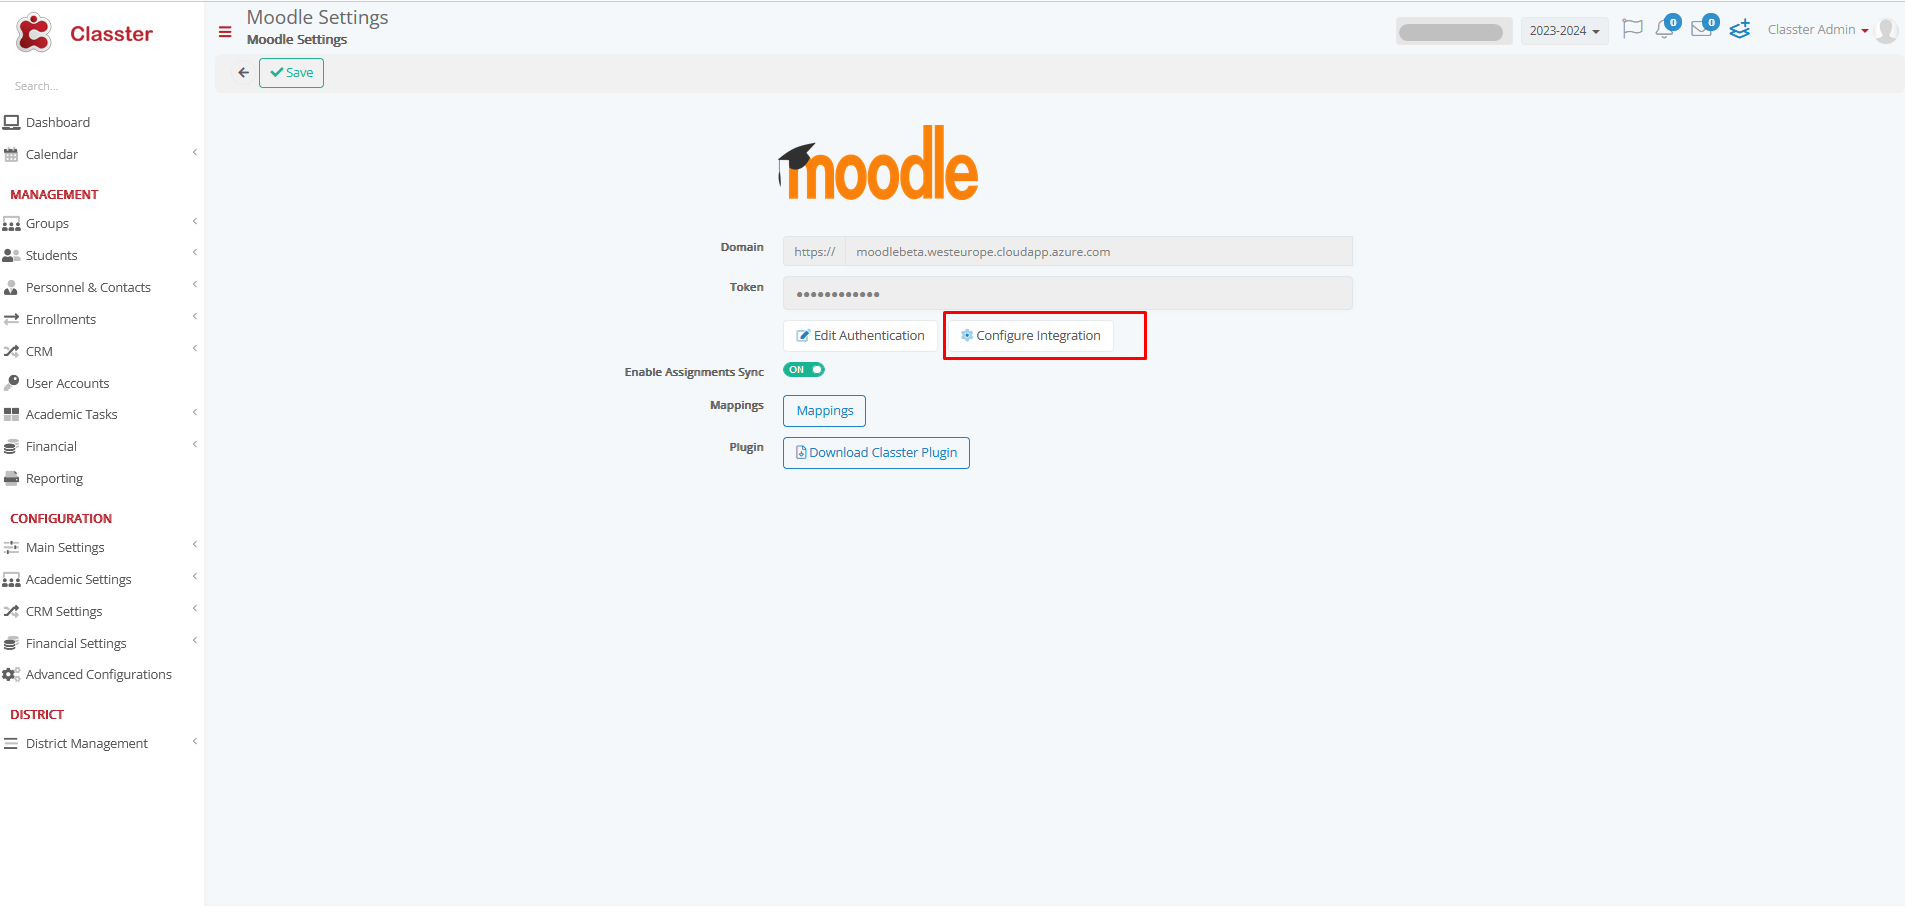
To get started, you will need to activate Moodle through Classter. Access Advanced Configurations > Third Party Integrations > and Moodle.
Press the Activate button.
Going forward with the Validation Process, enter the domain and token, then proceed with the installation.
During the installation process, the system will verify that the provided credentials possess the necessary permissions to ensure the proper operation of the integration.
As per procedure, enter Advanced Configurations > Third-Party Integrations > Moodle to configure it.
Academic Period and Sync Duration
Set a new Synchronization Period by pressing the add (+) icon, as seen in the Figure below, to create a new Execution Profile for your LMS.
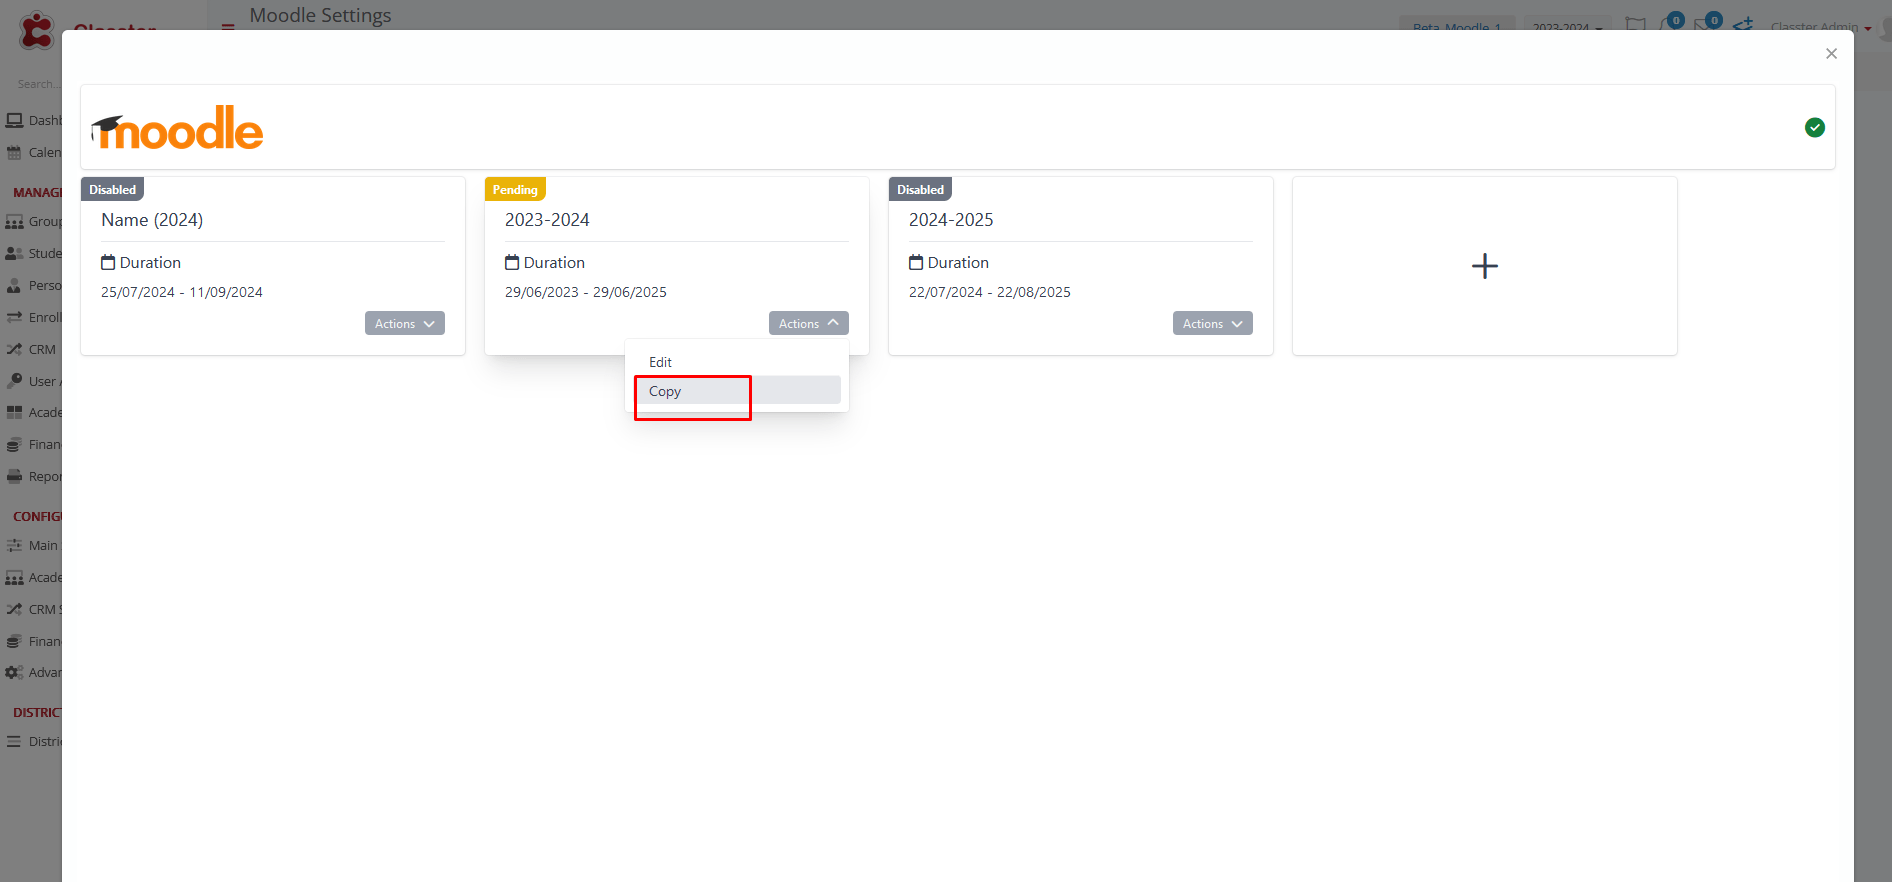
Here, as you observe, there are two already create,d one Active (Pending) and one Disabled.
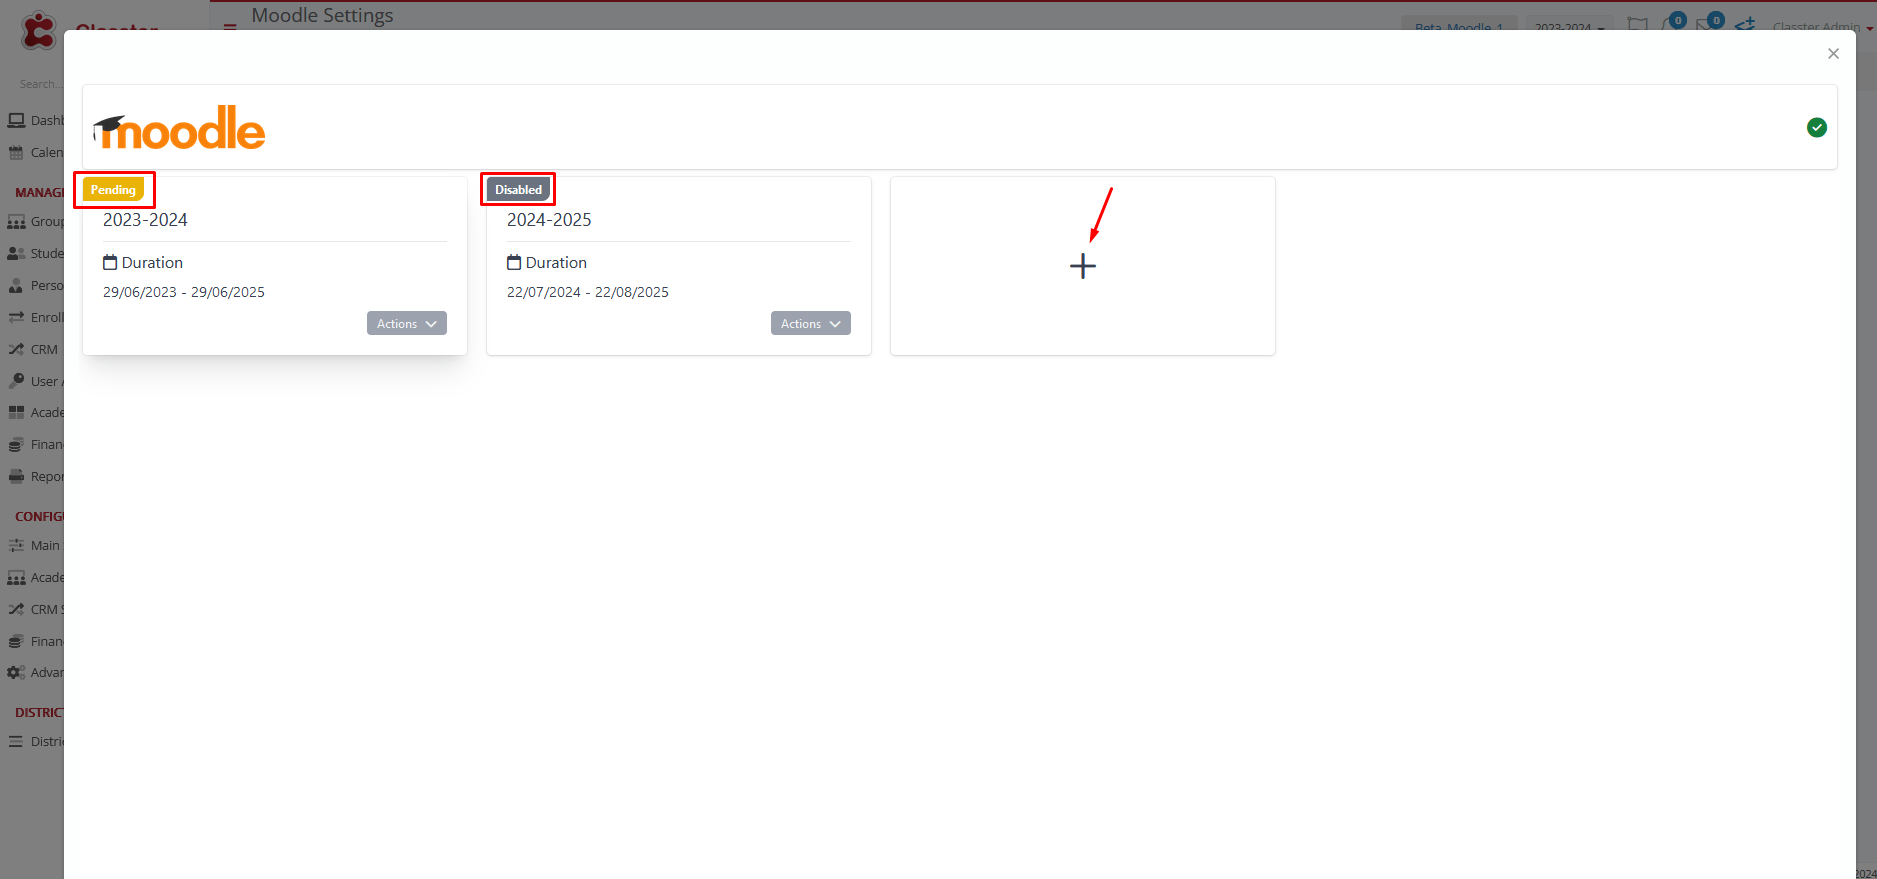
Note that if there are two profiles with concurrent dates, only one of them will run and synchronize data. Therefore, ensure you set up dates that do not overlap.
Define: Name, Sync Start and End Dates, Academic Period (Classter), Configuration Template (we recommend you choose one: based on _Group_, _Subject_, _Group Subject_)
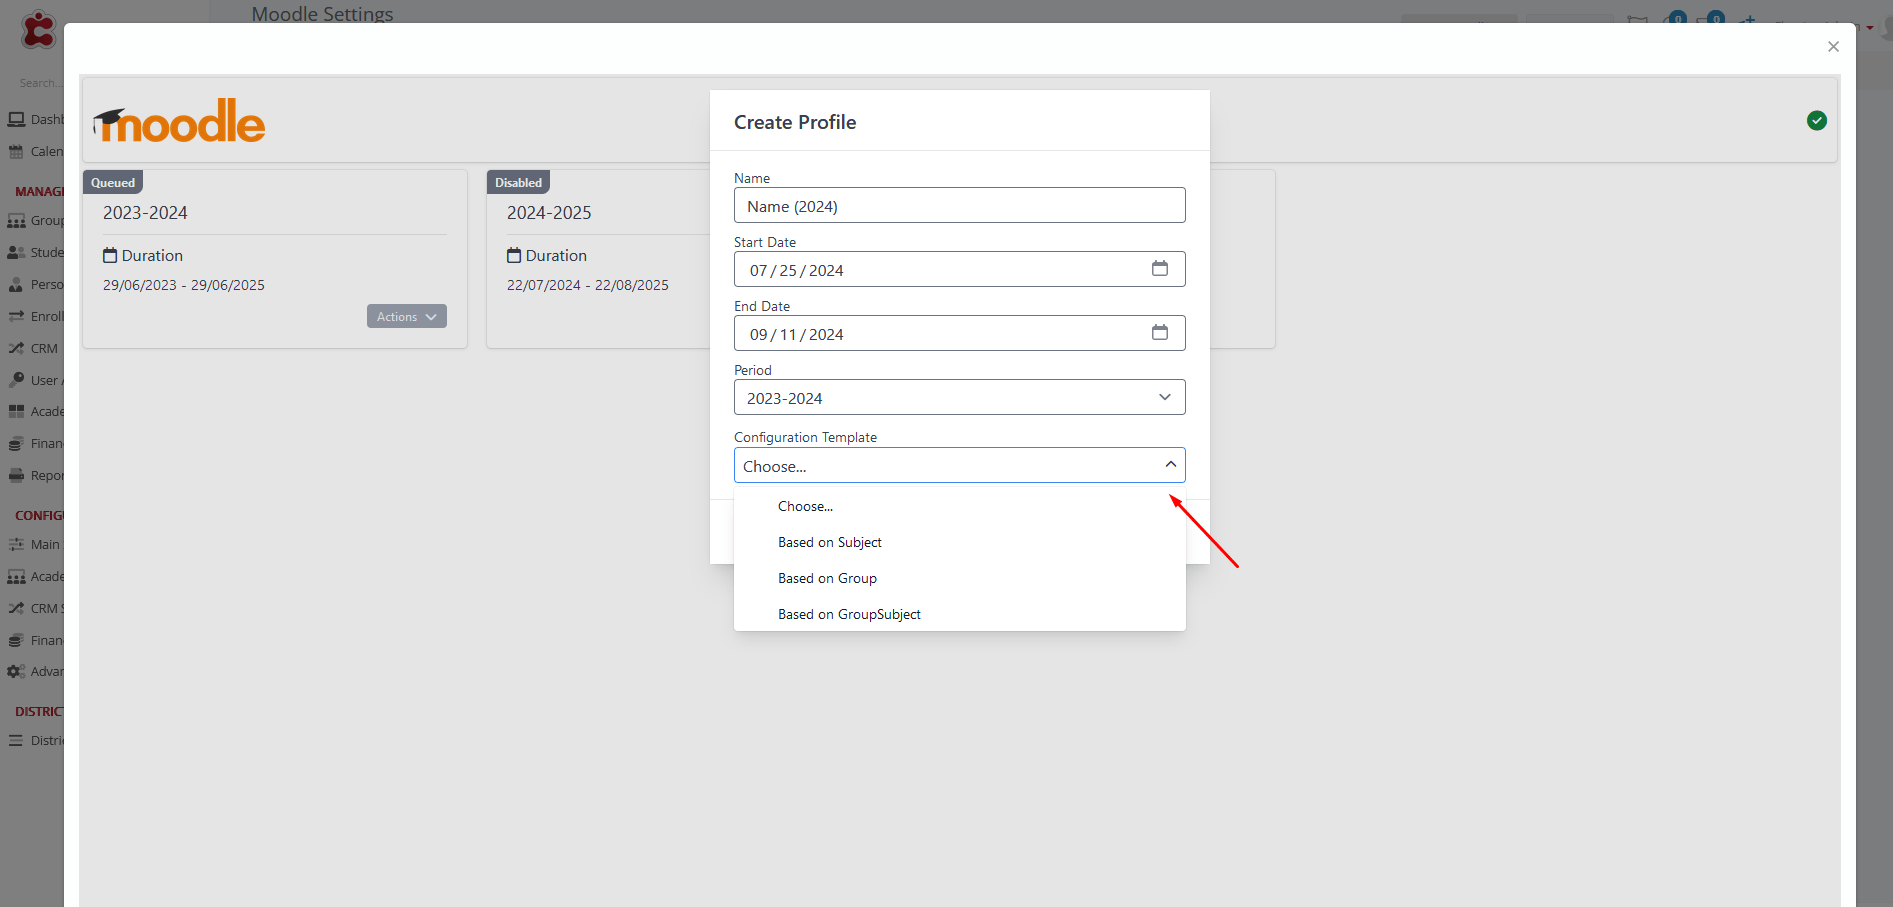
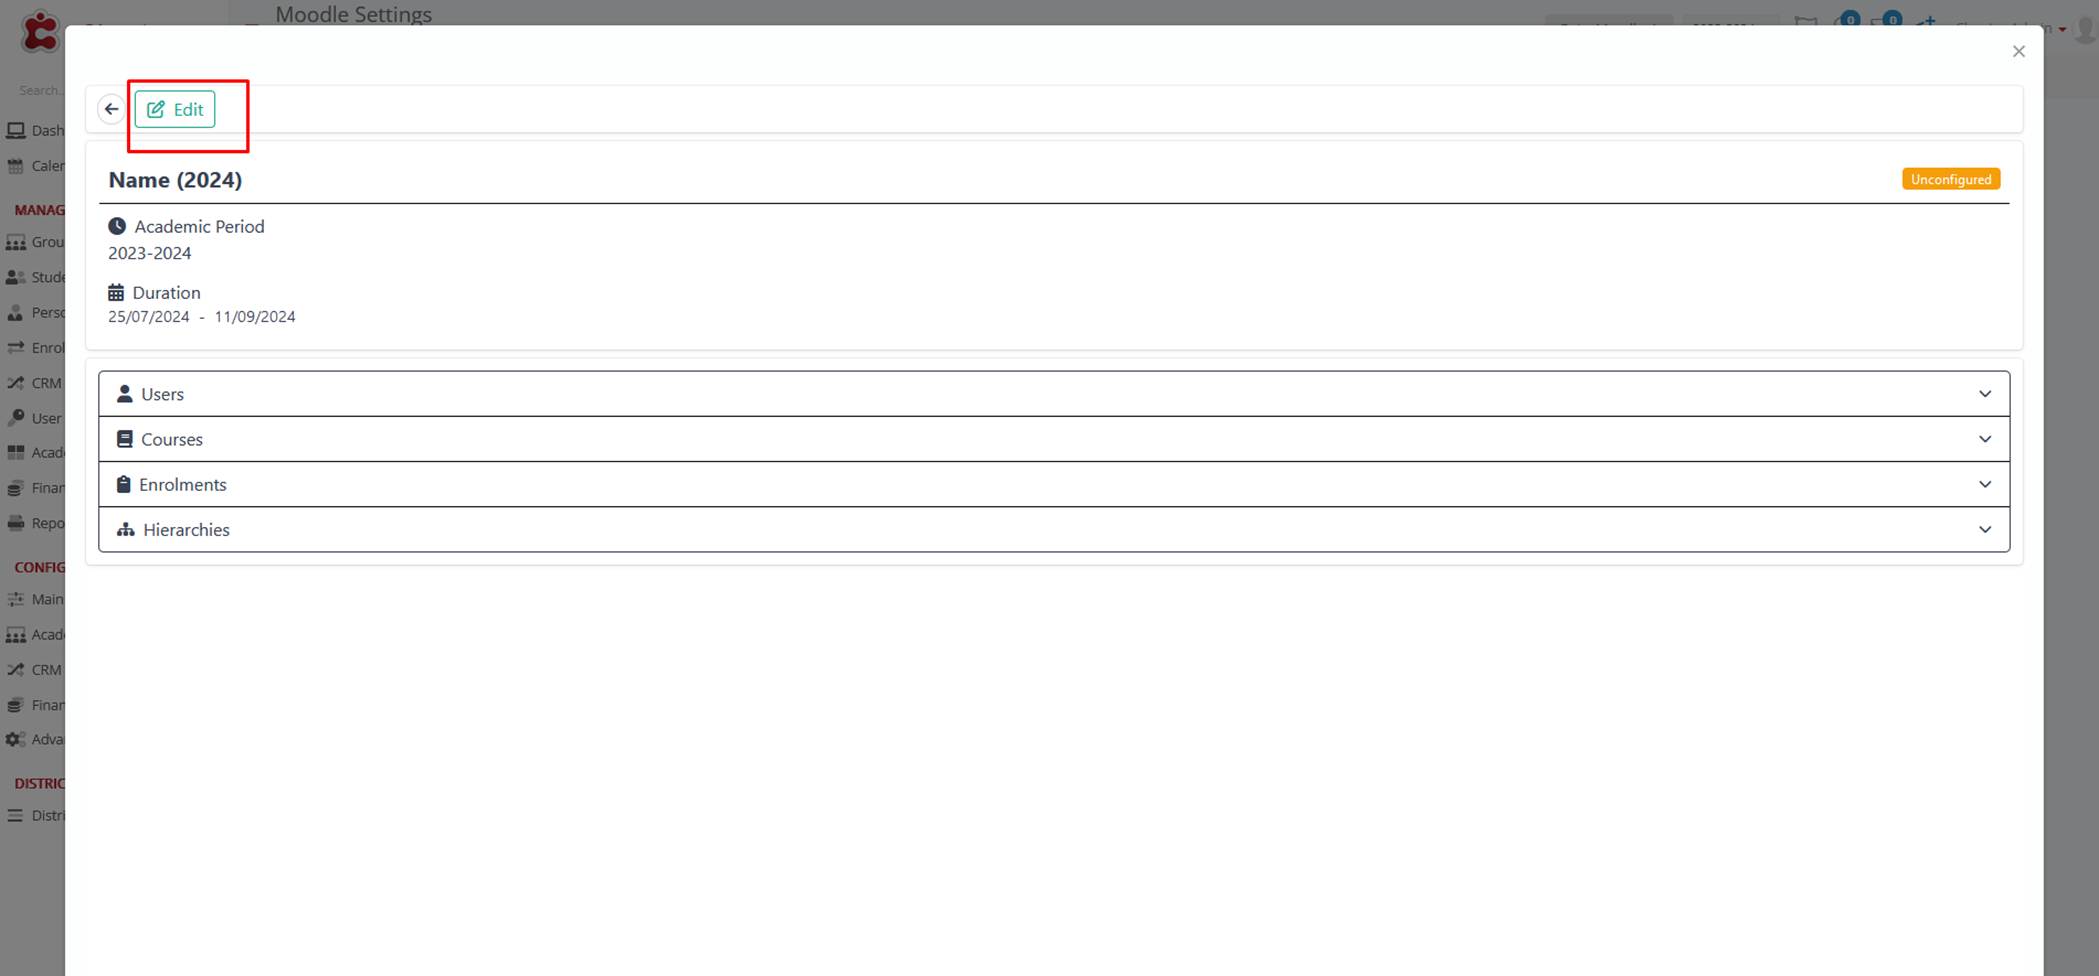
- To edit an Execution Profile, press the Actions icon > Select Edit.
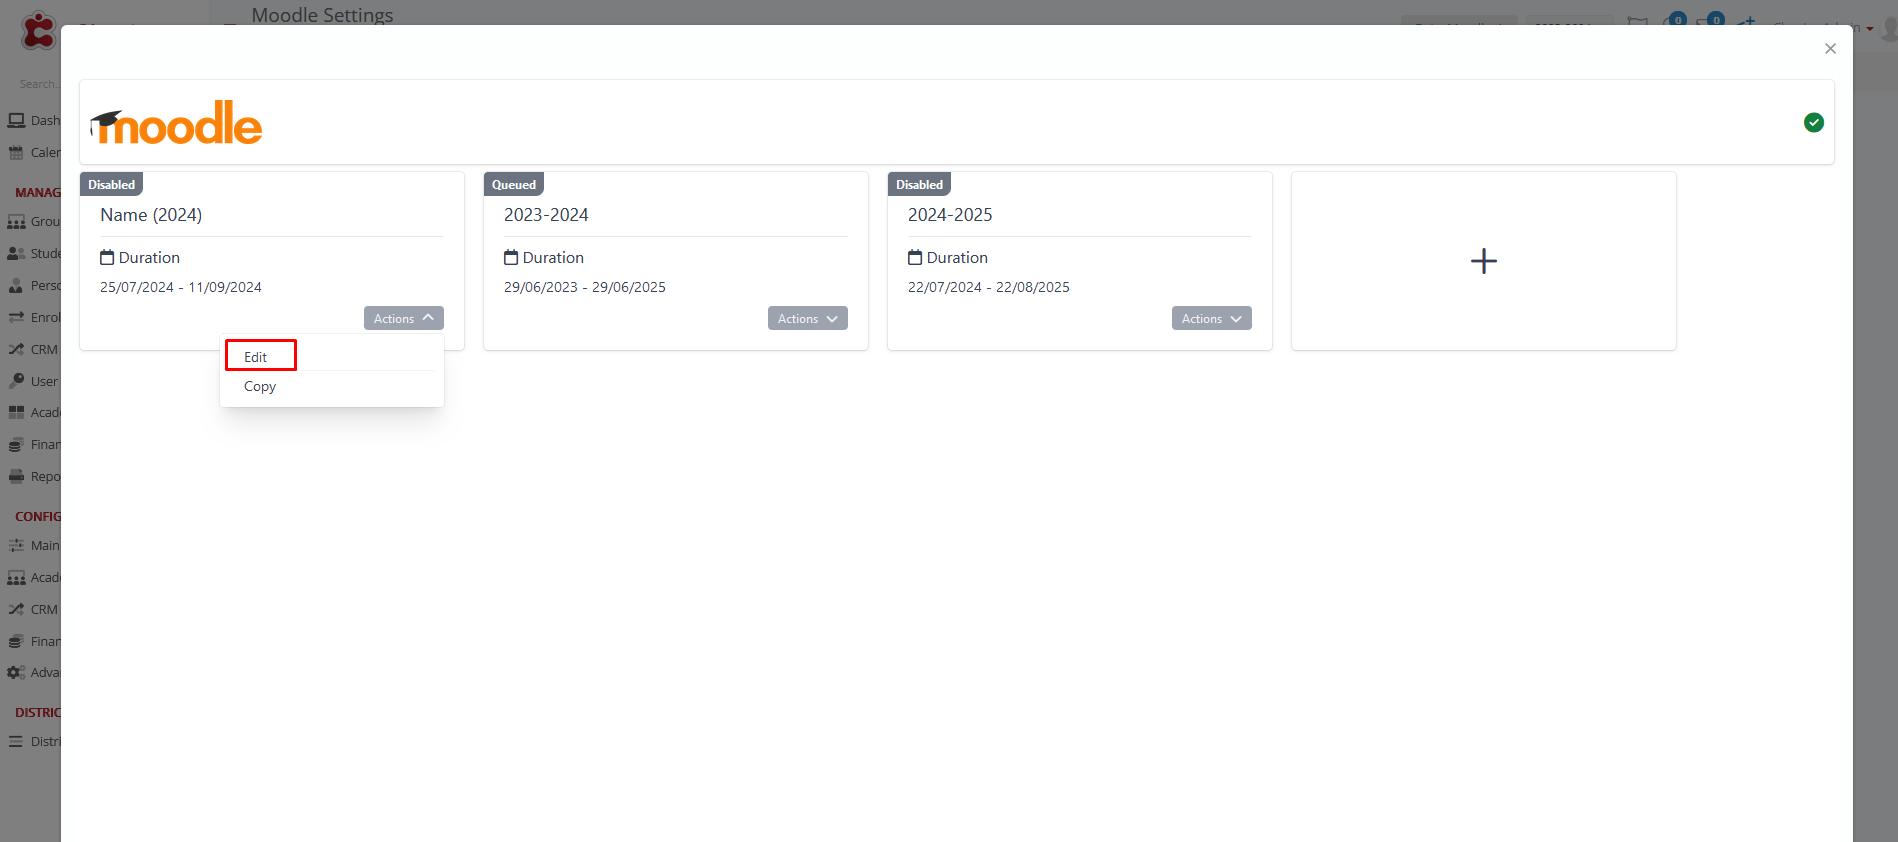
Otherwise, you can enter the Profile and then select the Edit button.
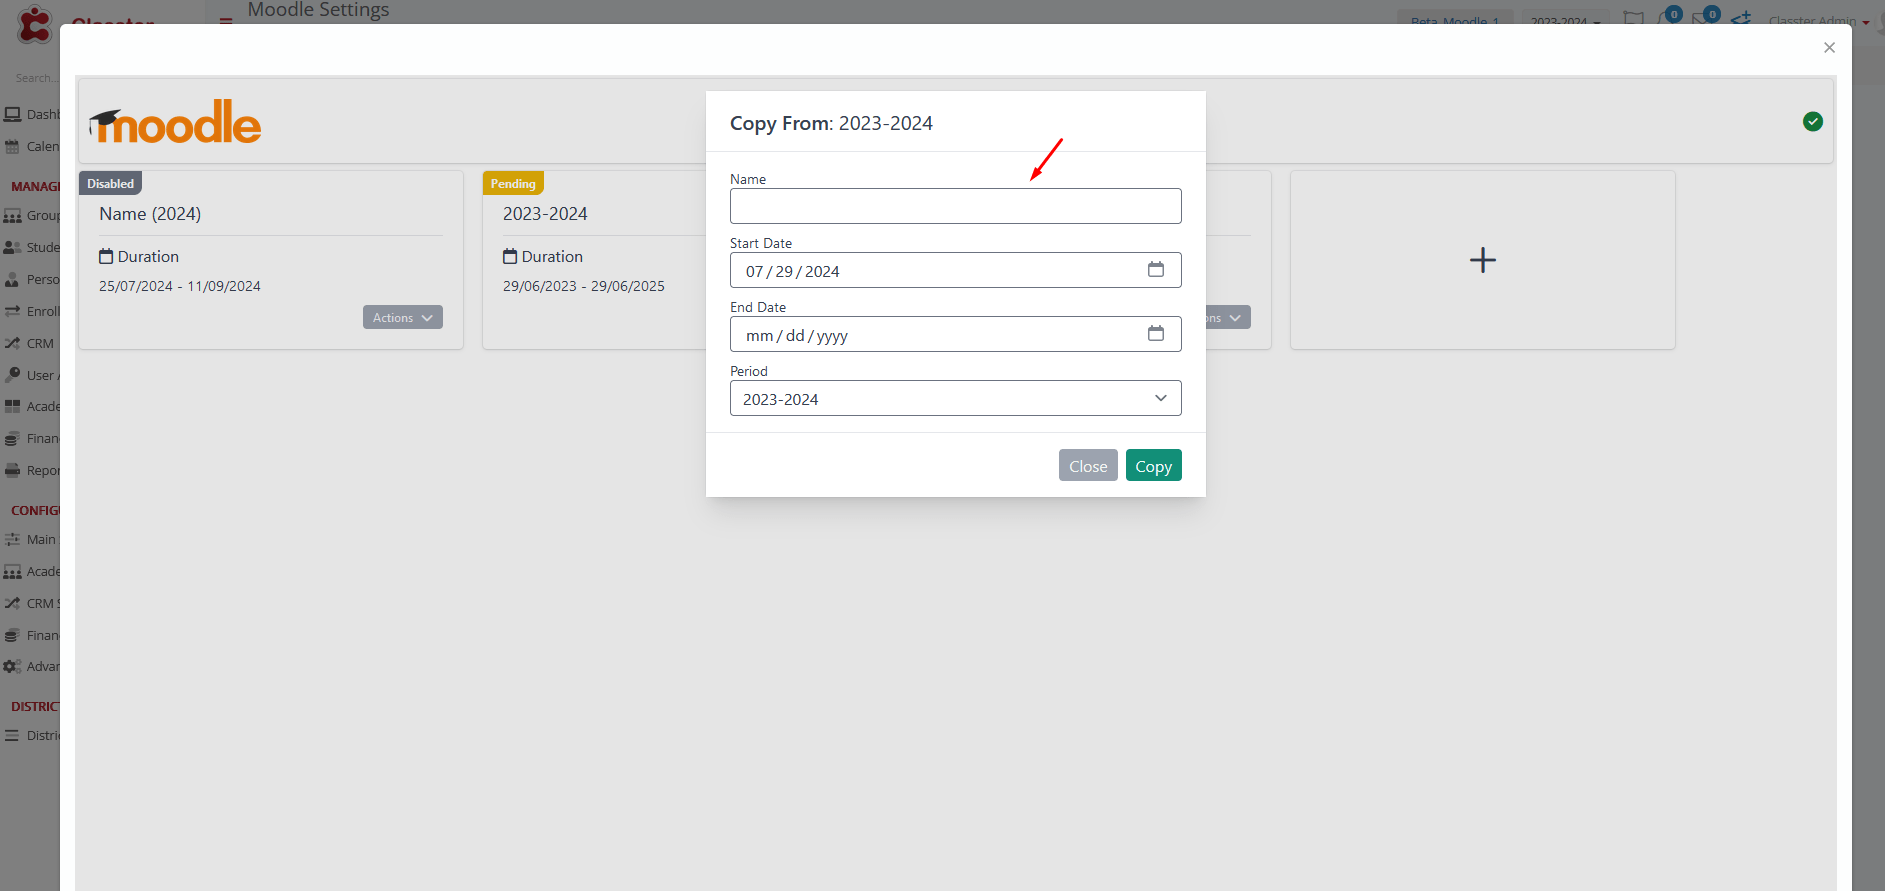
- You can also copy a profile, with all existing settings, to use again on the same or another Academic period, with a different Sync Period and a New Name.
The configuration should be divided into 4 parts (depending on your LMS), as many as the main entities we need to match our system. These, for Moodle, are the Users, the Courses, the Enrollments, and the Hierarchies.
Mappings
Mappings define how Classter data translates to your system. You will encounter them in each section of your configuration. They are based on various properties such as:
- For Users: Properties like Contact email, First and Last Name, Id, etc.
- For Courses: Properties like Group Title, Subject Title, Subject Id, etc.
- For Enrolments: Properties like Roles for Enrolments, Subject Start and End date, etc.
- For Hierarchies: Properties like Year title, Stream title, etc.
NOTE! that if any of them is Grey (locked), it is either already chosen to be configured or it is Required.
For all mappings, rules include:
Type: Property or Static
Value: e.g., email, Entity ID, First Name, End date, External ID, Grade, Group ID, Institute Name, etc.
Casing: None, Lower Case, Upper Case.
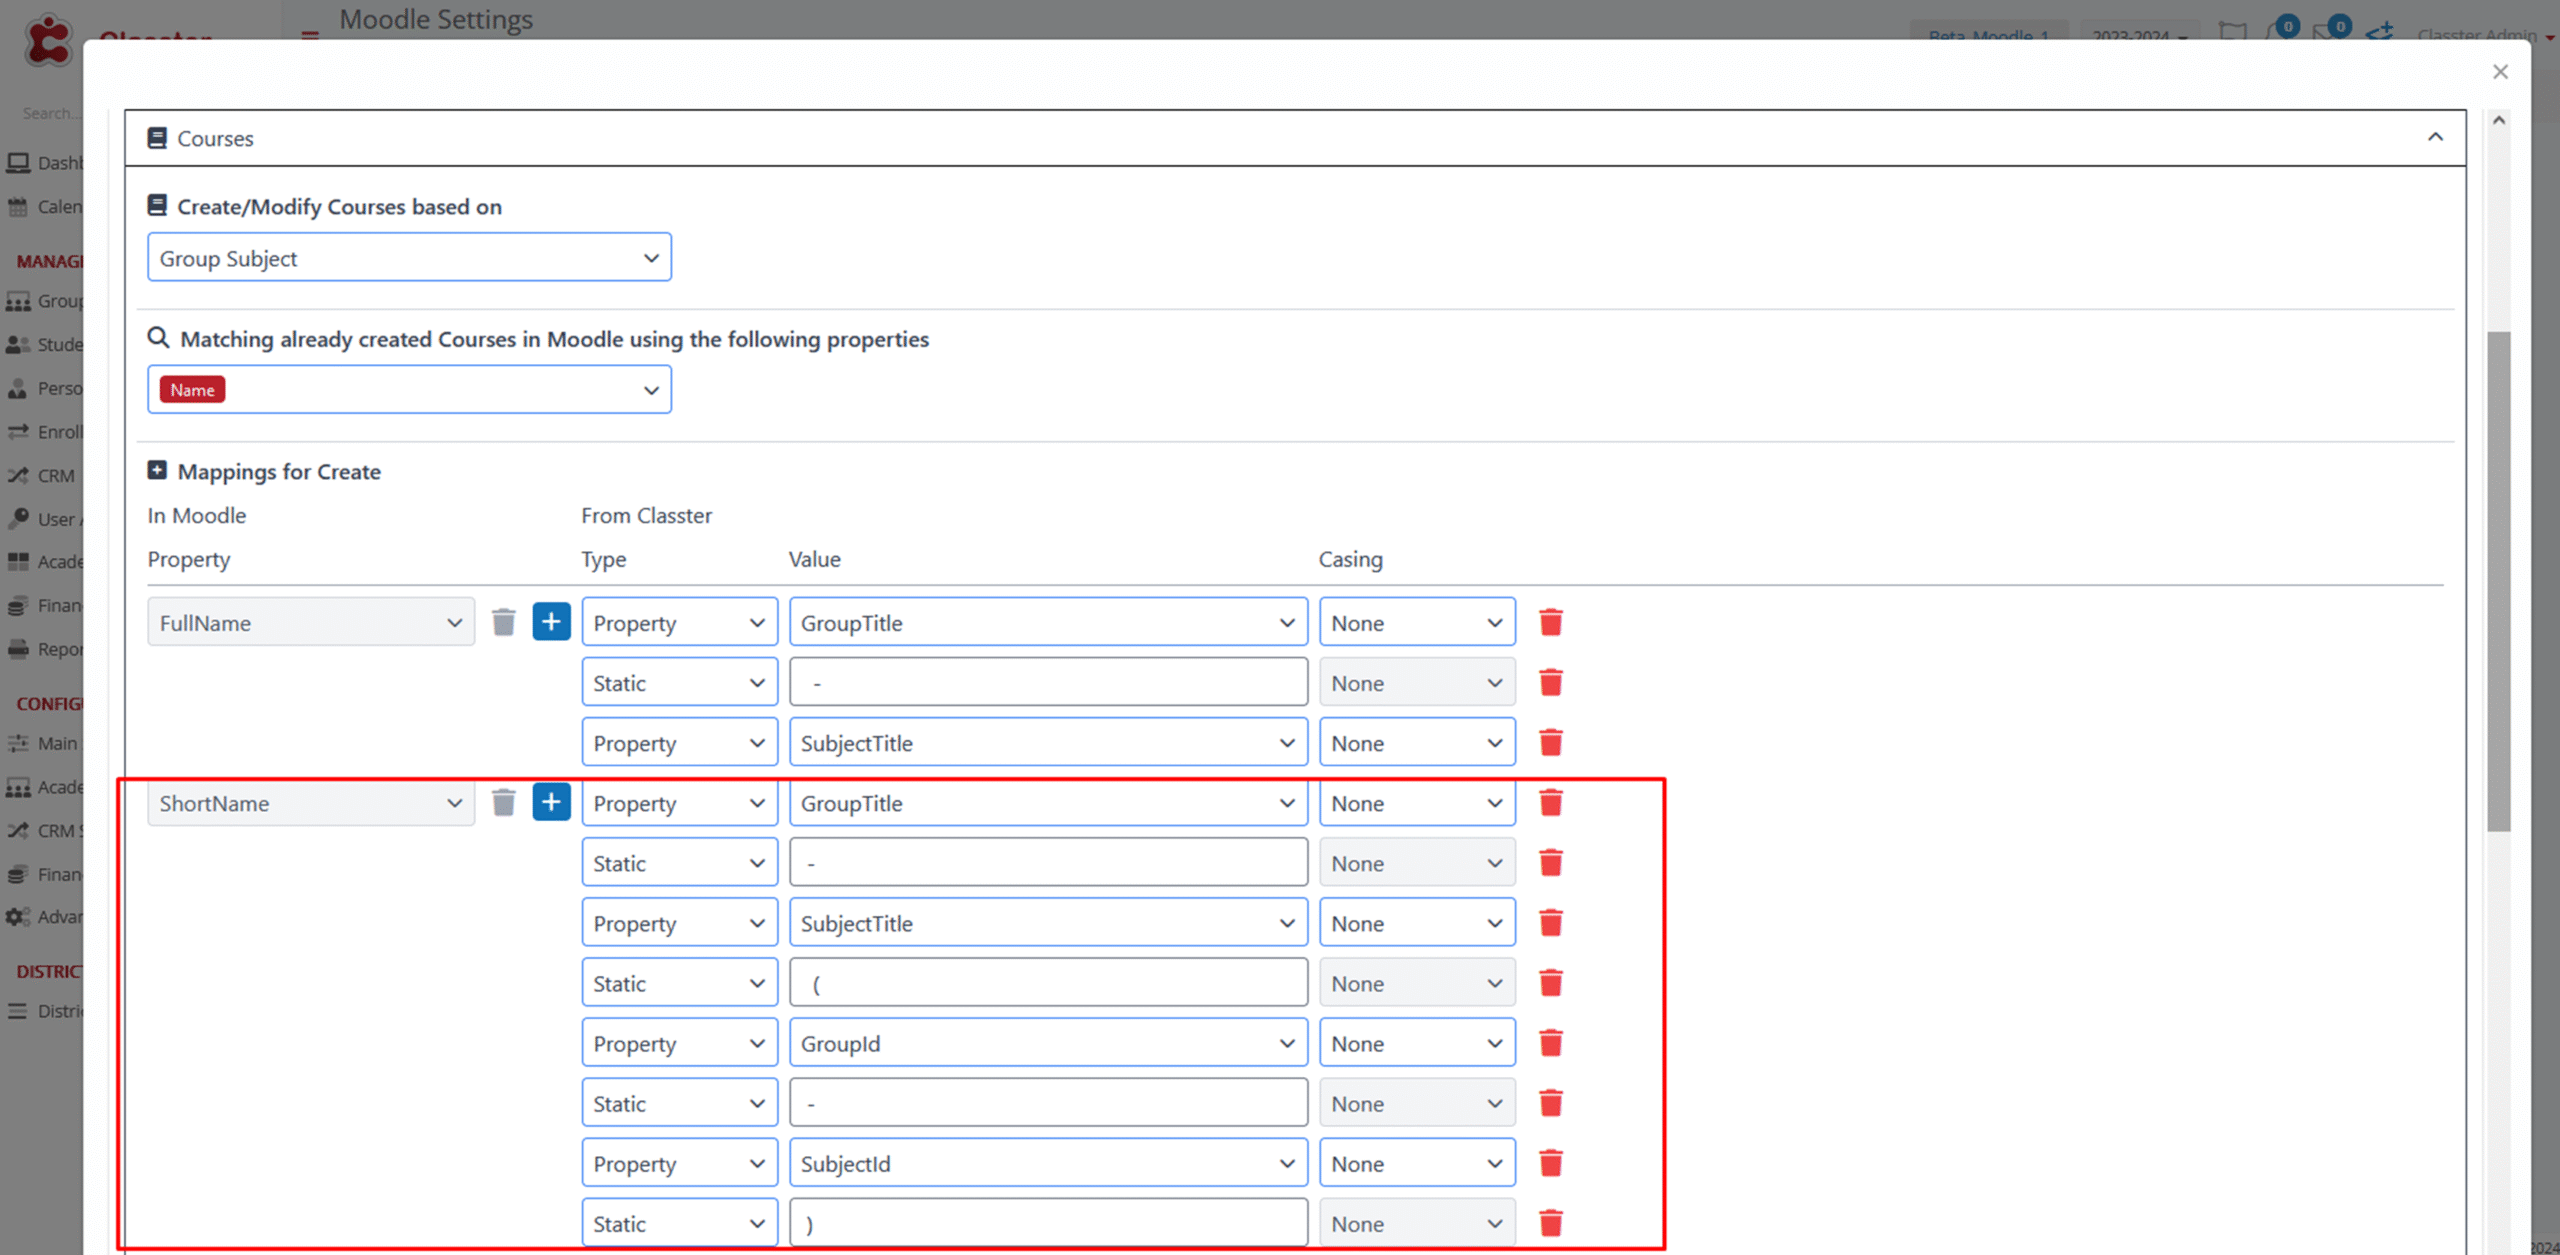
In the Figure below, you can see an example of an Advanced Property Mapping for Courses.
ShortName (in Moodle): takes the following form: GroupTitle-SubjectTitle(GroupId-SubjectId) (from Classter)
Actions
For the User entity type, the following actions can be performed during synchronization: Create, Update, and Deactivate.
In the following Figure, we can see that:
- All Suggested Actions for the Student user type are selected for synchronization.
- For the Teacher, only the Update and Deactivate Actions are selected for synchronization.
- No Actions for the Parent type.
- And just update for the Employee type.
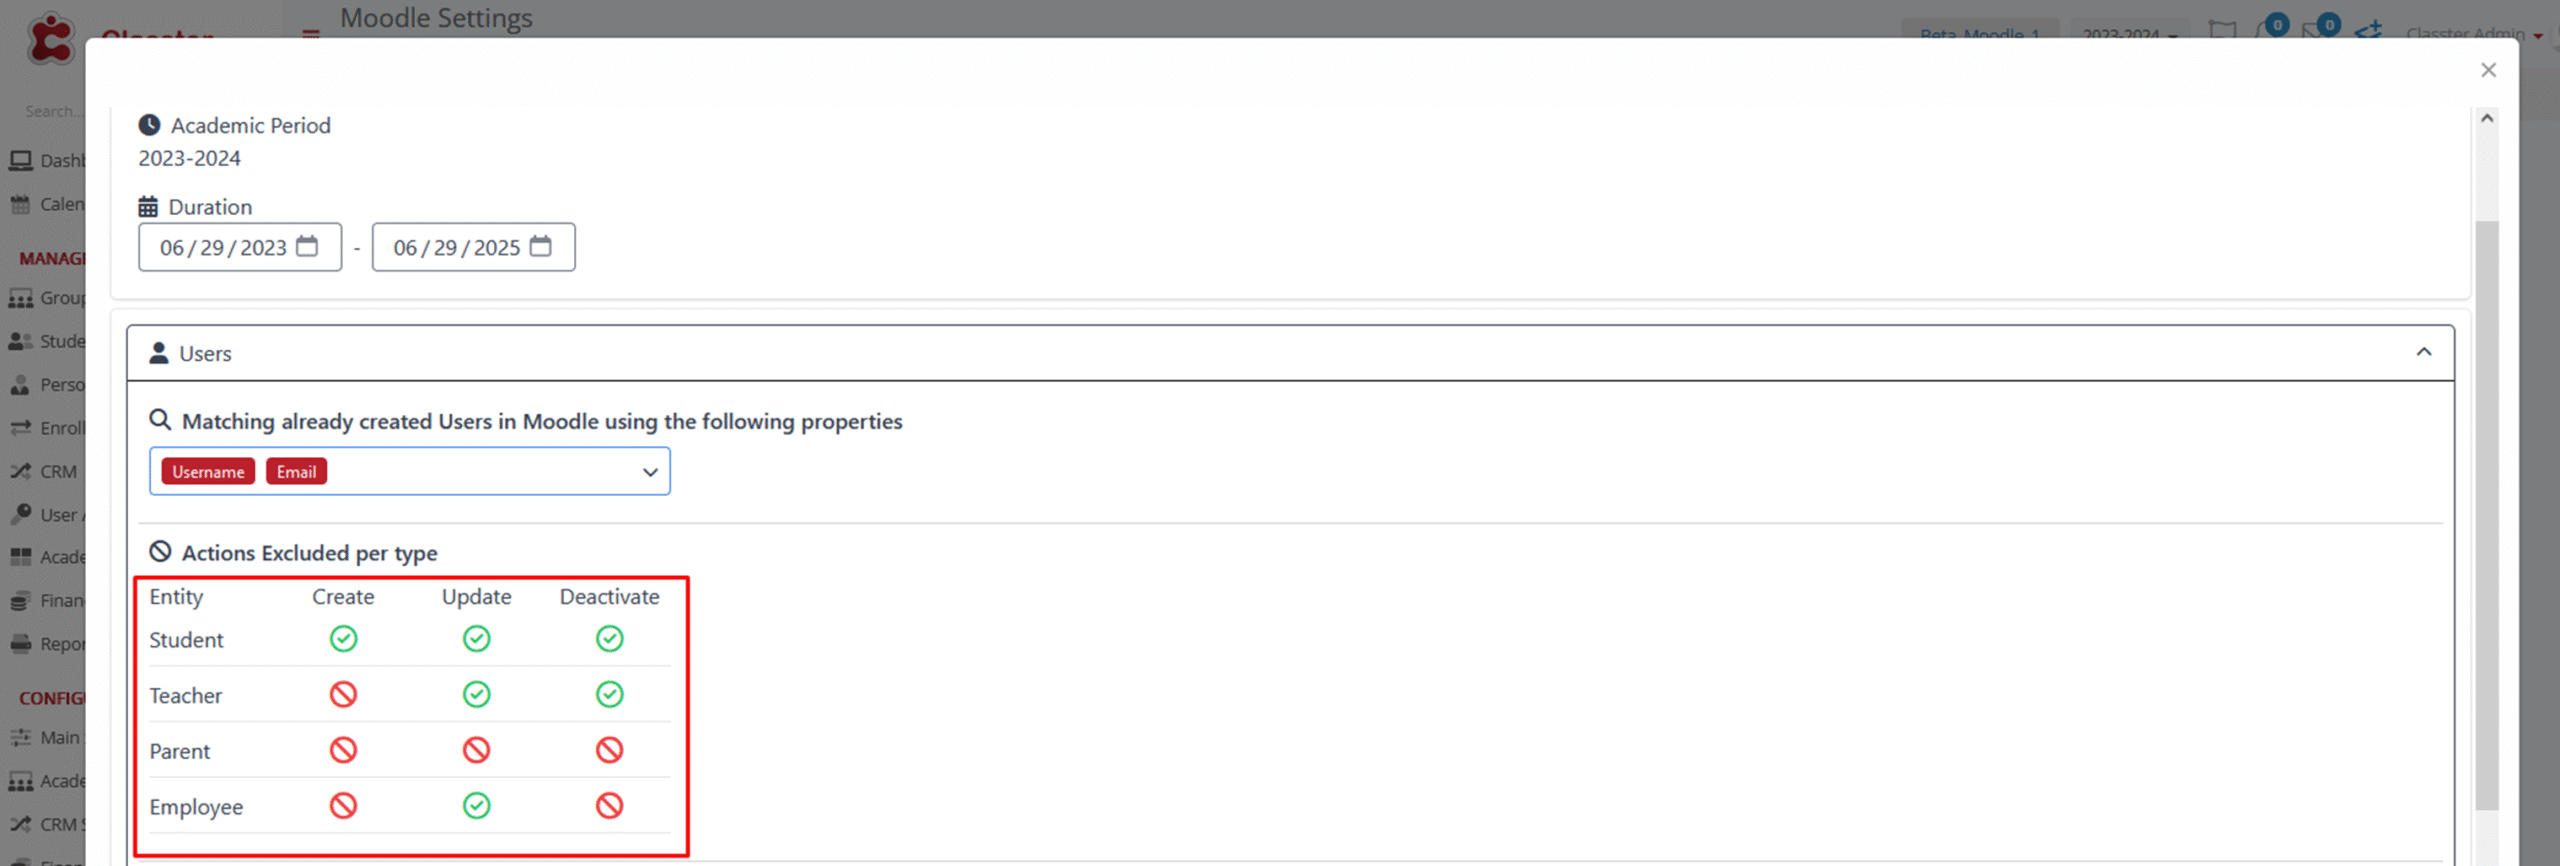
The selected actions ensure a precise configuration.
Configuration per Entity
Users
- When setting up the configuration for the first time between the two systems, we must match our entities to a property based on the initial configuration on the LMS (e.g., email, username, etc.).
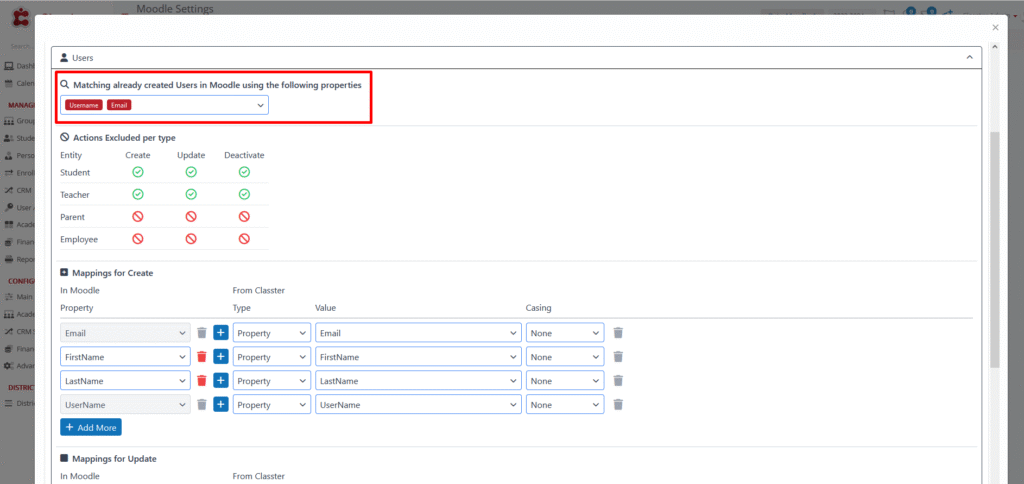
After this initial matching per execution profile, synchronization will proceed based on the LMS entity ID.
Courses
Accordingly, we continue setting up the Courses’ Mappings as in Figure 14 (_Subject_, _Group_, or Combination of the two)
When setting up the configuration for the first time between the two systems, we must match our entities to a property based on the initial configuration on the LMS. (e.g., Name, External Id)
After this initial matching per execution profile, synchronization will proceed based on the LMS entity ID.
Enrollments
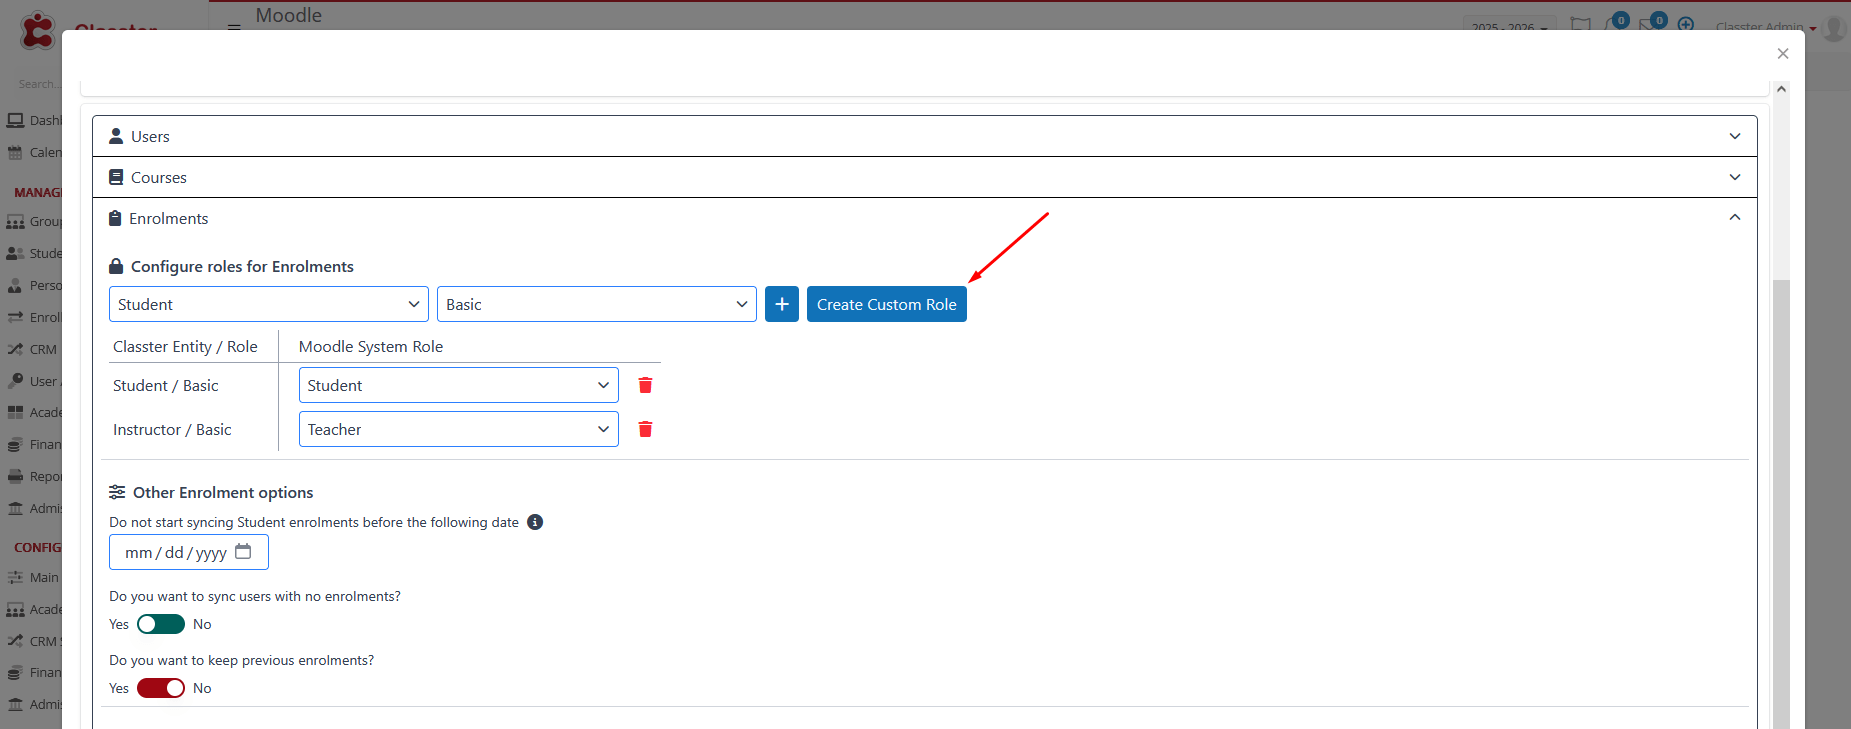
Configure Roles for Enrolments
Setting up the enrollments, we could also configure the roles of _Students_ or _Teachers_, and supporting other Teacher Types, such as a supervisor, second supervisor, assistant, special associate, or a mentor.
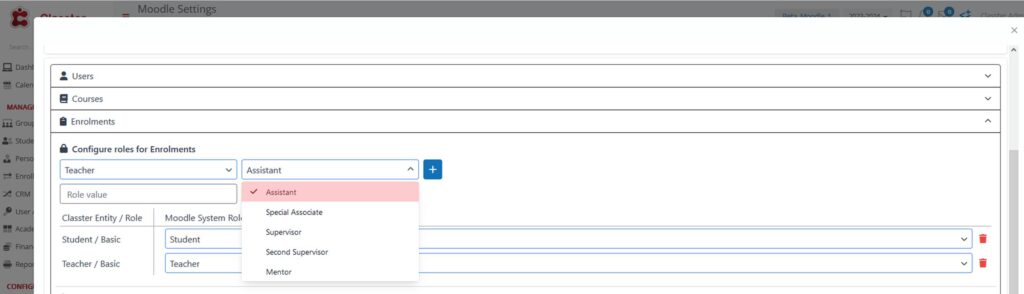
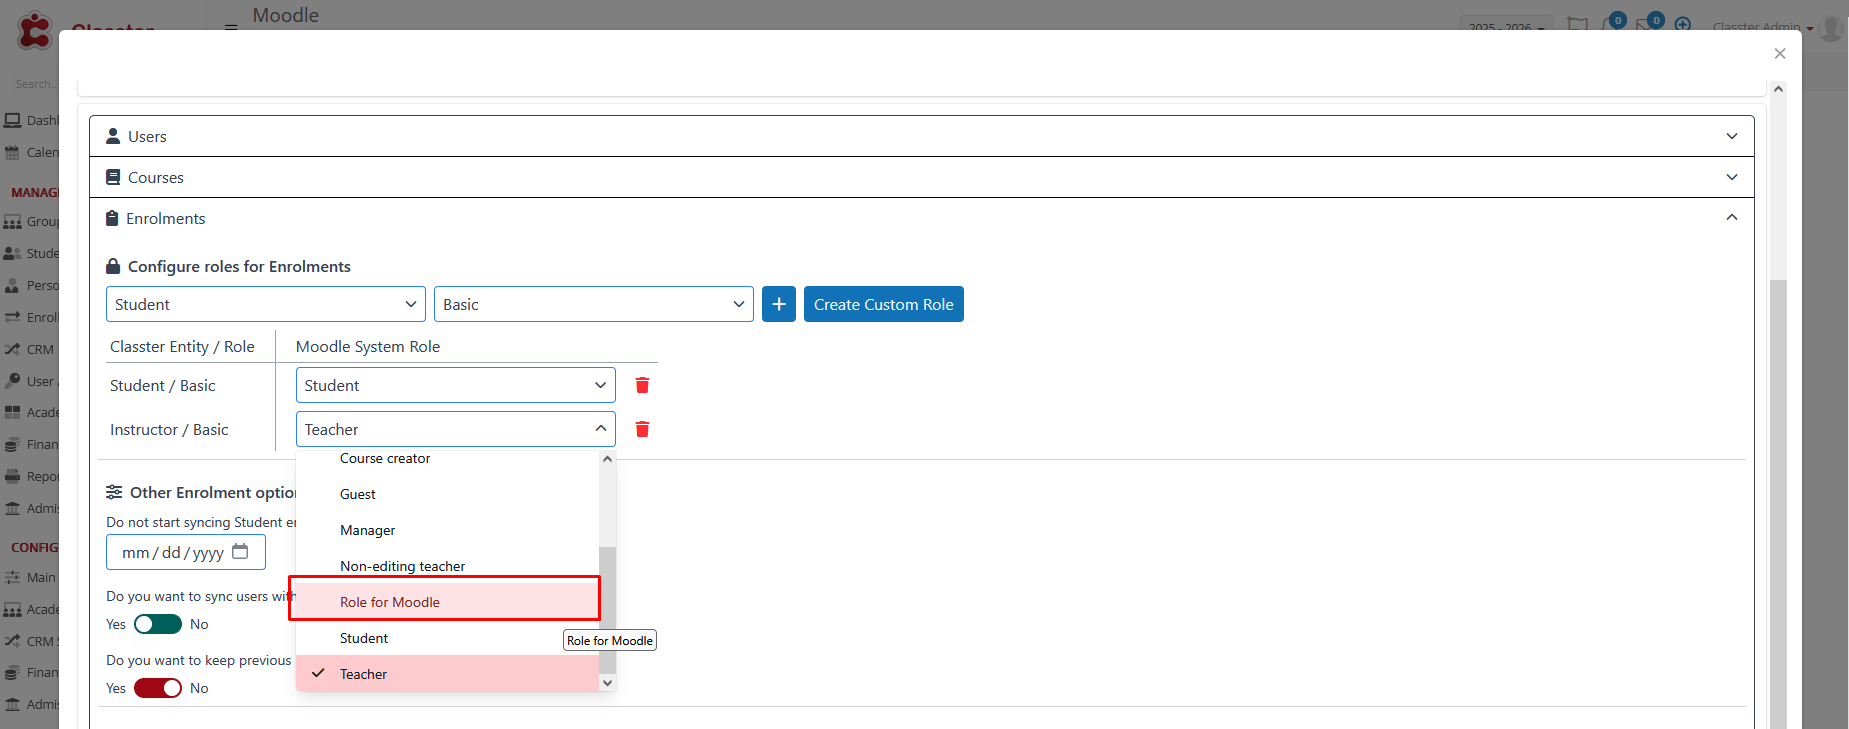
The default Moodle System Roles can be selected from the Drop-down list.
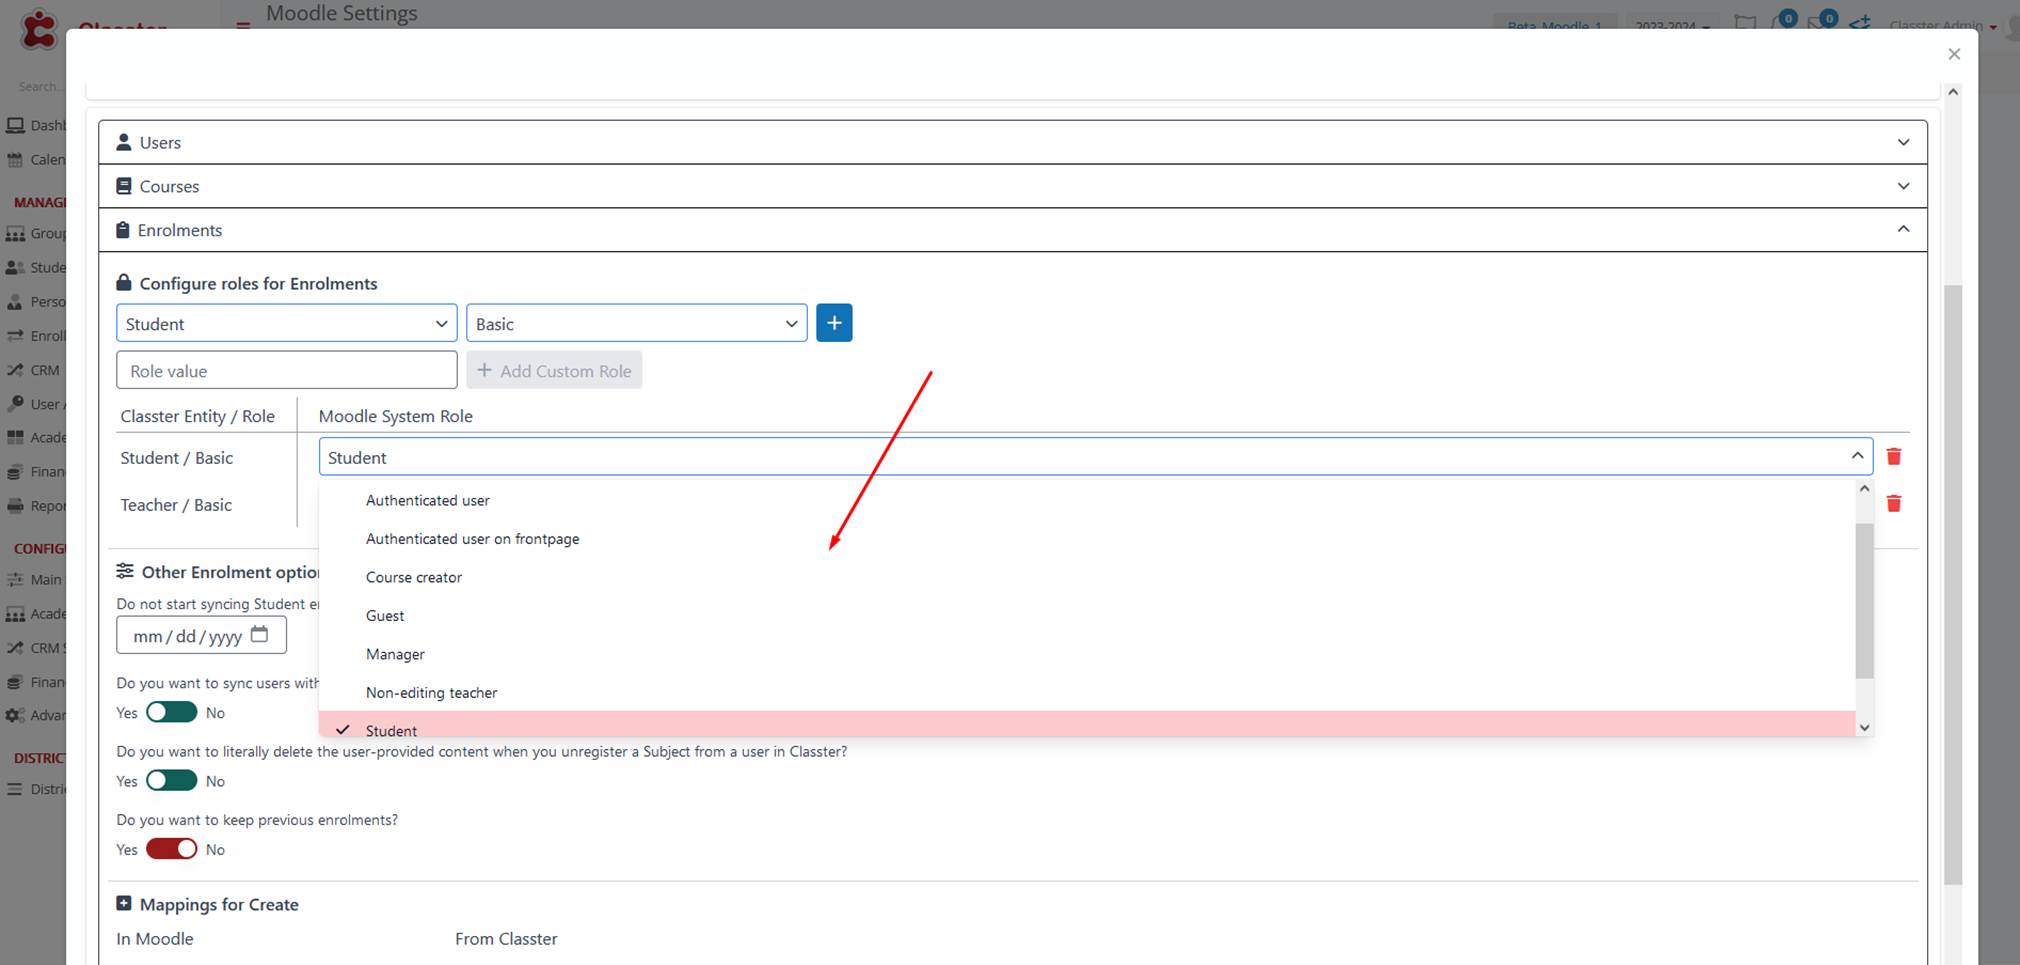
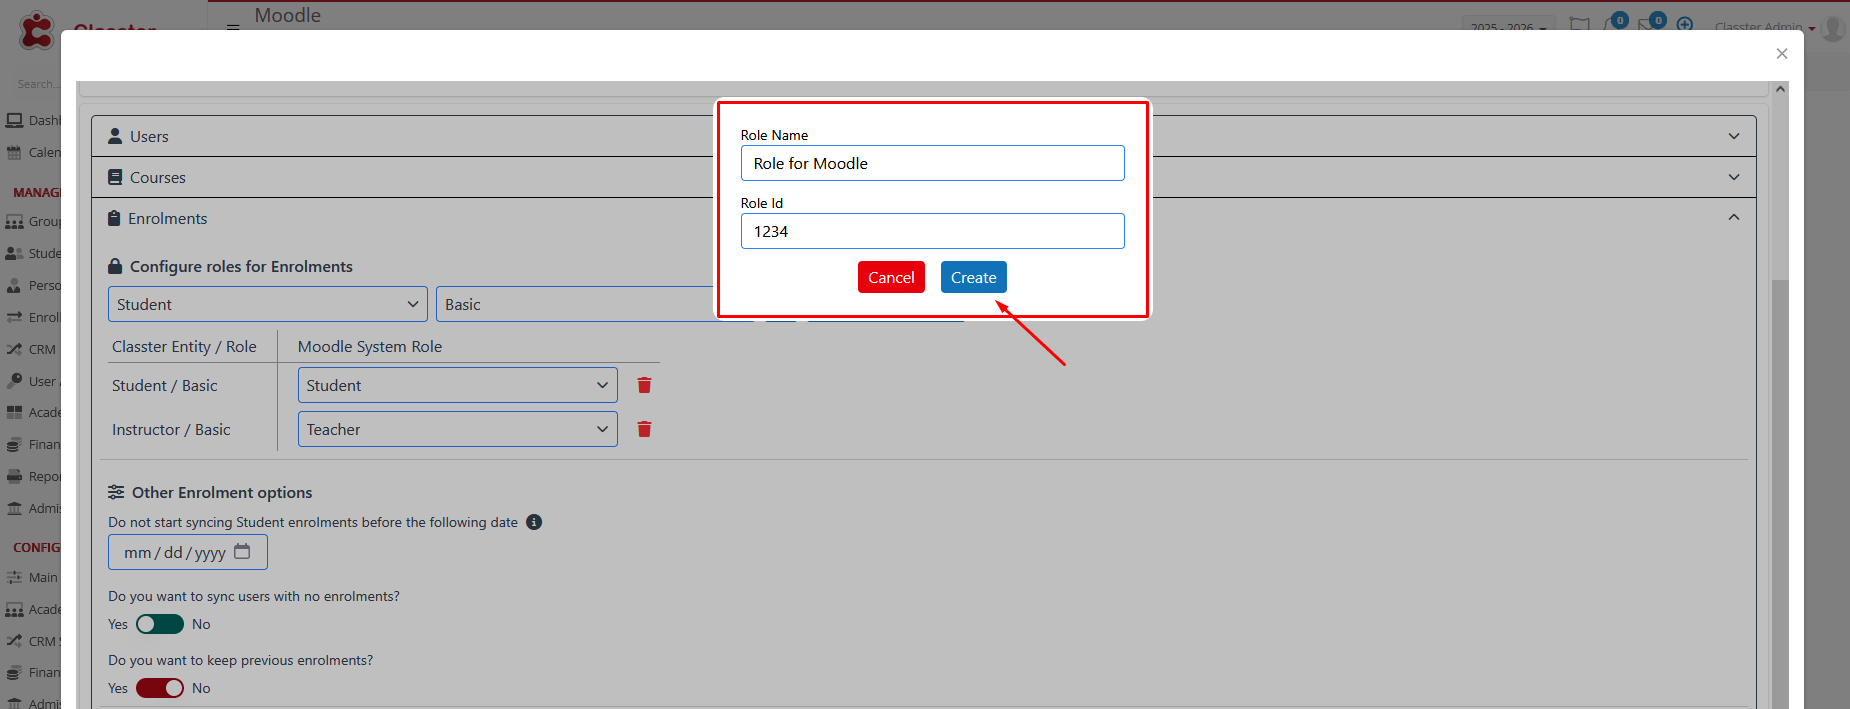
If there is a custom Role added to your Moodle account and you wish to add it here as well, press +Create Custom Role and the system will prompt you to enter two fields:
-
Role Name (description)
-
Role ID
Other Enrolment Options
- Sync Start Date: Specify a date before which student enrollments are not synchronized automatically. Manual synchronization is required for enrollments before this date via User Accounts > Choose Students > Sync External Provider/Users.
- Sync Users with No Enrollments: Choose whether to synchronize users who have no current enrollments (Yes/No).
- Keep Previous Enrollments: Choose whether to keep previous enrollments in the system (Yes/No). IF YOU WANT CLASSTER TO ENROL SUBJECTS FOR USERS AND NOT UNENROL.
Mapping
In Moodle, Mappings for the Creation of Enrolments are always enabled and include DateTimeEnd and DateTimeStart, with the addition of Exclude Actions for _Students_ or _Teachers_. Here are some examples of how this Mapping works:
If the DateTimeEnd property is excluded for Teachers, it means they will continue to have access indefinitely, even after any date that might have been set to end their access.
If the DateTimeStart property is excluded for Students, it means they will have access before the DateTimeStart date, provided their enrolment already exists.
Categories
The category’s configuration maps out an educational institution’s structure across eight levels: Institute, Academic Period, _Grade_, _Stream_, _Location_, _Group_, _Subject_, and _Semester_. If one of these levels has already been configured elsewhere (on any of the entities above), it will not be displayed here.
You can configure your mappings only for the selected entities in your categories.
If you have selected Year, for example, when setting up the configuration for the first time between the two systems, we must match the entity to a property based on the initial matching per execution profile, on the LMS (e.g., Name, External Id).
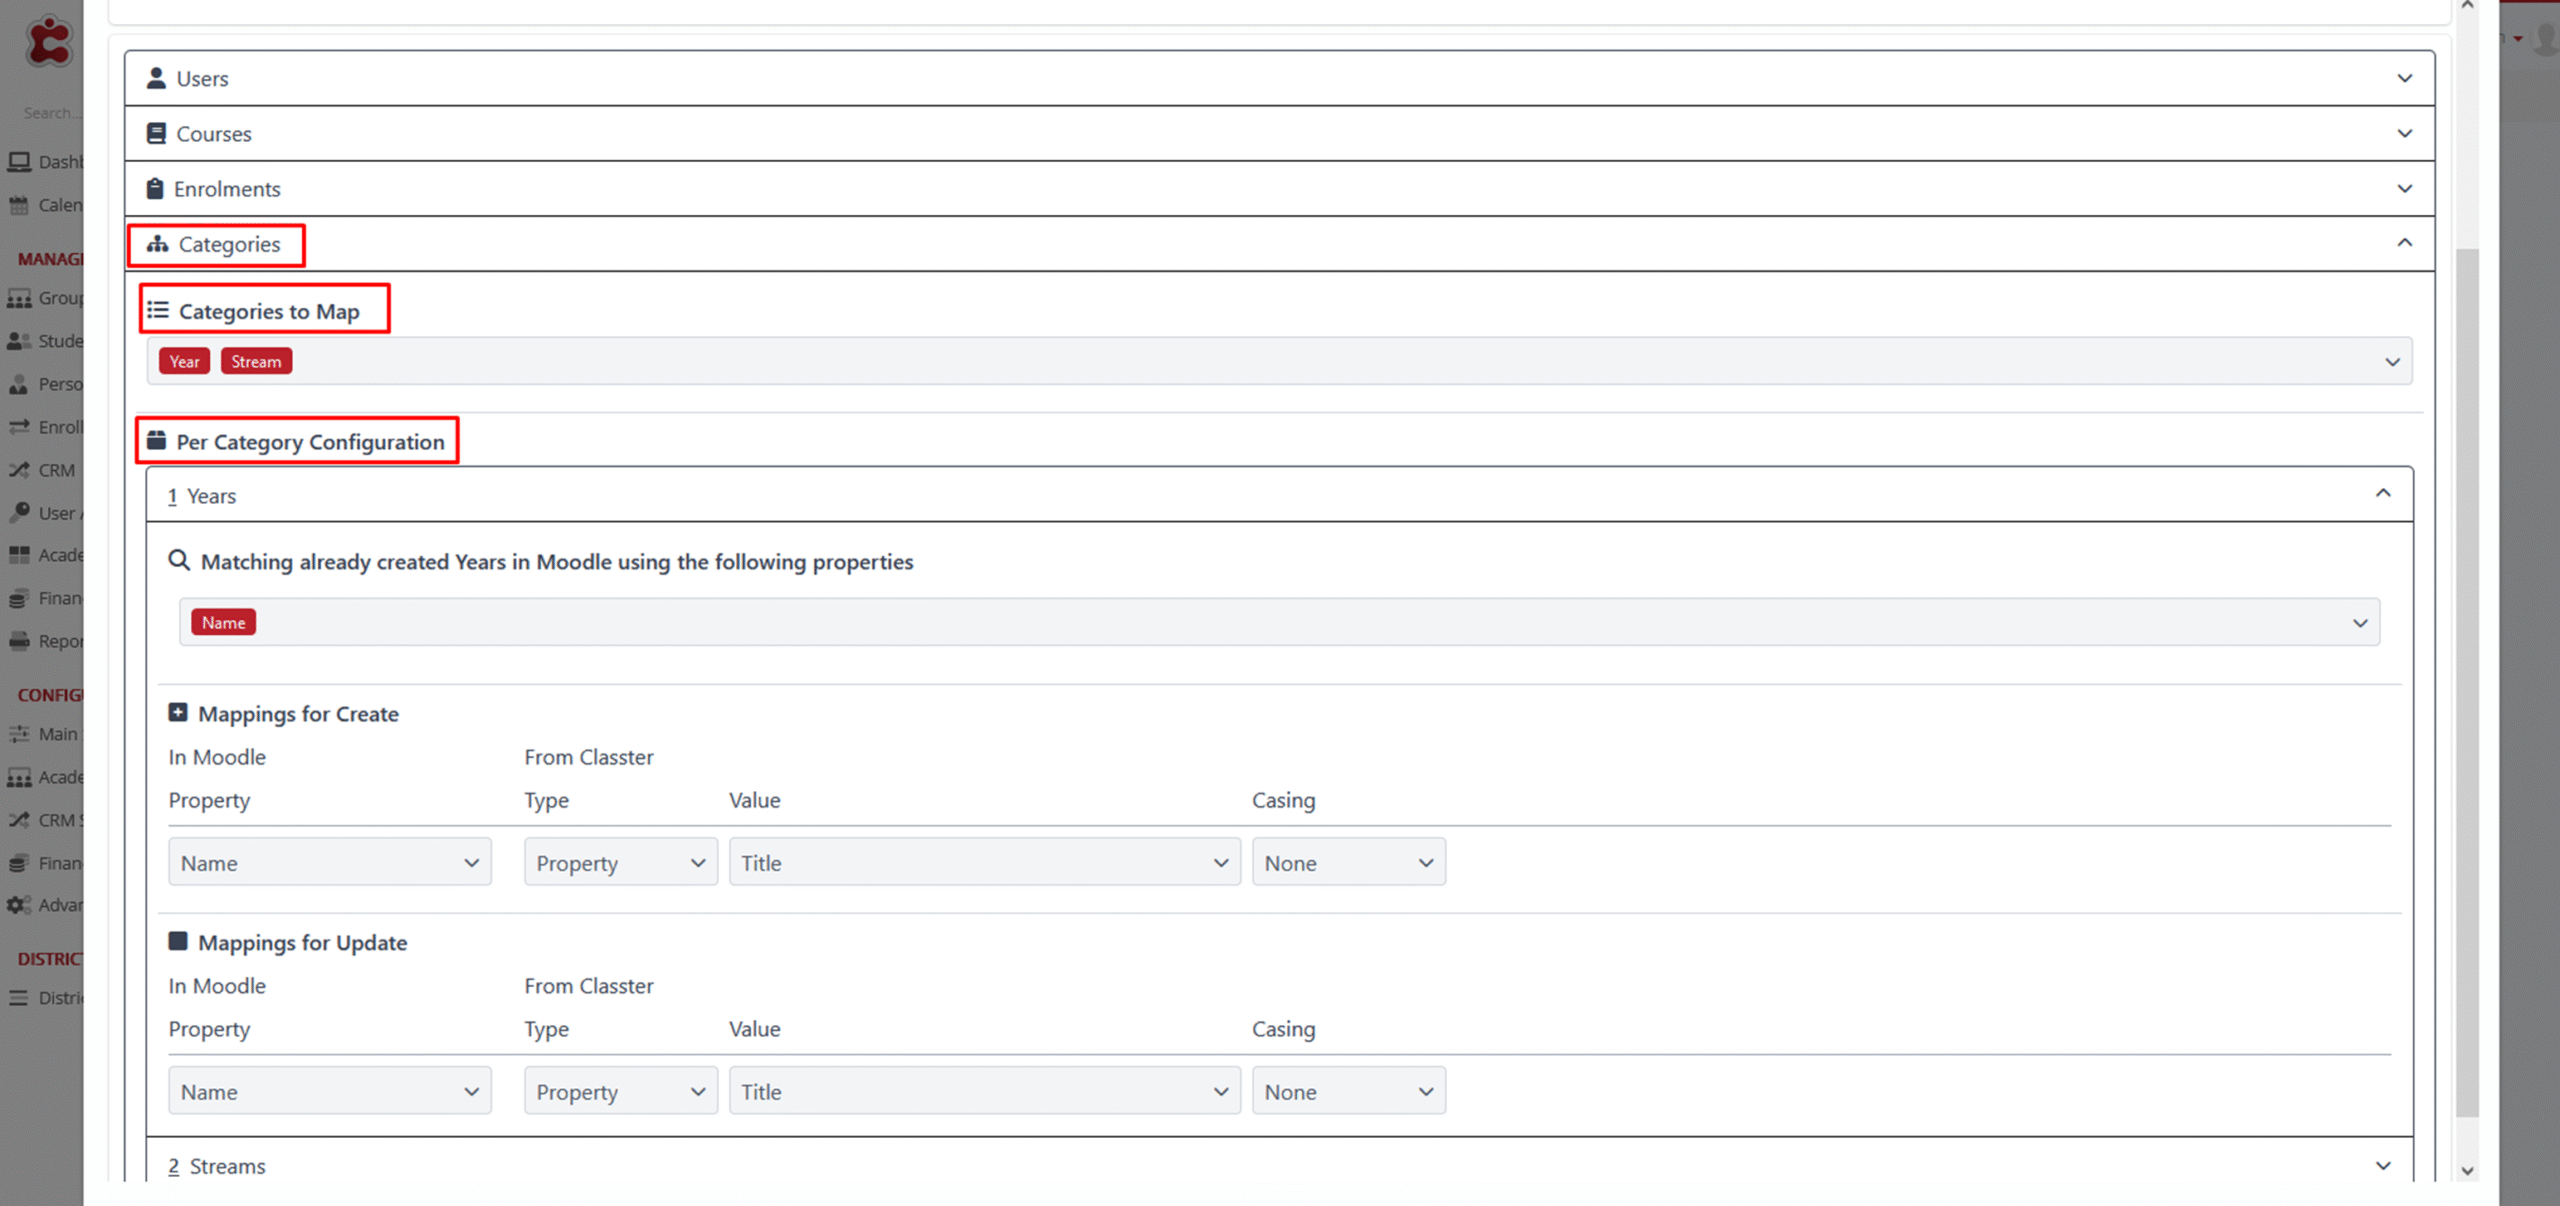
After this, synchronization will proceed based on the LMS entity ID.