More results...

Generic selectors
Exact matches only
Search in title
Search in content
Post Type Selectors
docs
betterdocs_faq
Updated on August 7, 2023

By creating an assessment type, you essentially add the rules with which an assessment operates.

Assessment types are added in Assessment Scheduling when creating a New Assignment/Exam, Assignment or Quiz.

Assessment Types page follow the path:
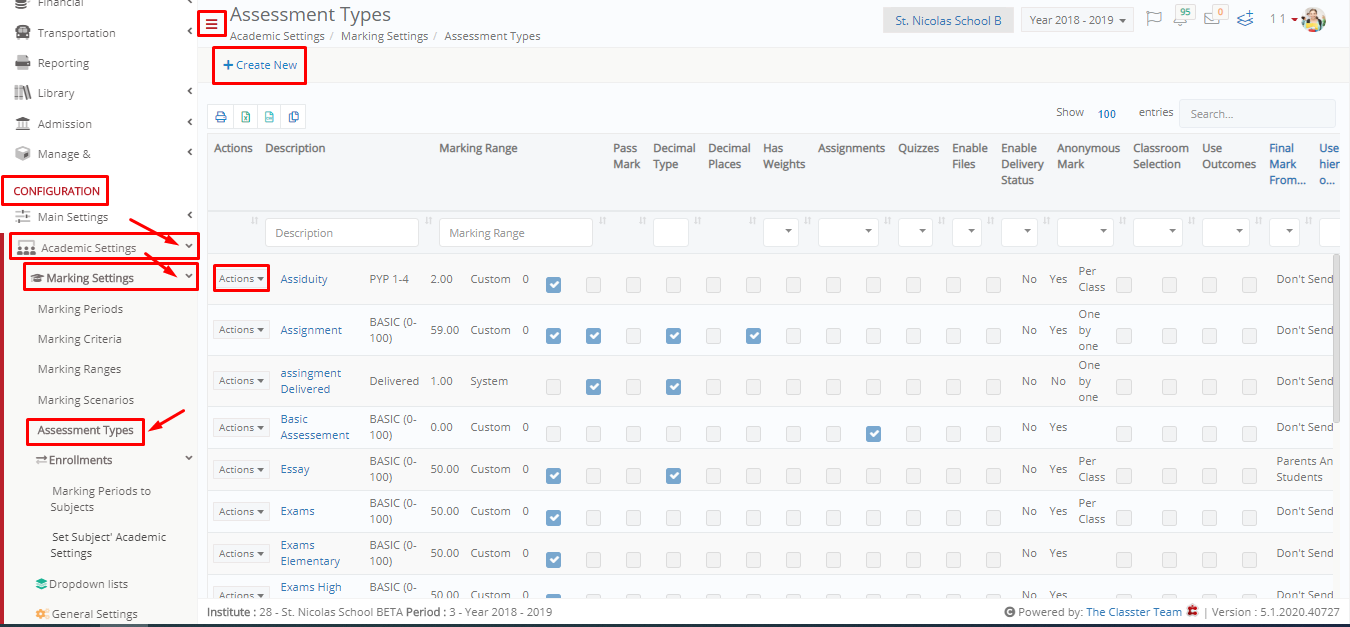
Dashboard > Configuration > Academic Settings > Marking Settings > Assessment Types (Figure 1).


Figure 1


Assessment Type page (Figure 1):

  • On this page, you can view all the existing Assessment Types.
  • By clicking on the action’s dropdown button, you can choose to edit an assessment type or delete it.
  • Click on +Create New button to create a new Assessment Type.
  • See an example of a new assessment type below.


We take for example a Popup Quiz Assessment Type:

We begin Creating an Assessment Type.


Follow the Path: Dashboard > Configuration> Academic Settings > Marking Settings > Assessment Types > Create New Button (Figure 1).


Figure 1


  1. Add the description of the assessment type you wish to create, e.g., Popup Quiz.
  2. Marking Range: Choose a marking range for the marking of this assessment type, e.g., Basic (1-20). The marking ranges are created in the marking ranges page
    (Dashboard > Configuration > Academic Settings > Marking Settings > Marking Ranges).
  3. Pass Mark: enter the mark which will be considered as a minimum passing mark. Based on the marking range you have selected, enter the minimum required grade for passing, e.g., 10 out of 20.
  4. Decimal Type: Here you can choose how many decimals are used in marks. You can select the system or subject default decimals, or you can select the custom option.
  5. Decimal Places: Enter the number of decimals you wish to include when entering marks for this assessment type. You must previously have selected custom decimal type.
  6. Type: Here you define what sort of Assessment type this will be. You have the option to create an assessment or quiz.
    Depending on your choice, some options further down may become locked. In this case we are creating a Popup Quiz which is a Type: Quiz.


Continuing in Figure 2.


Figure 2


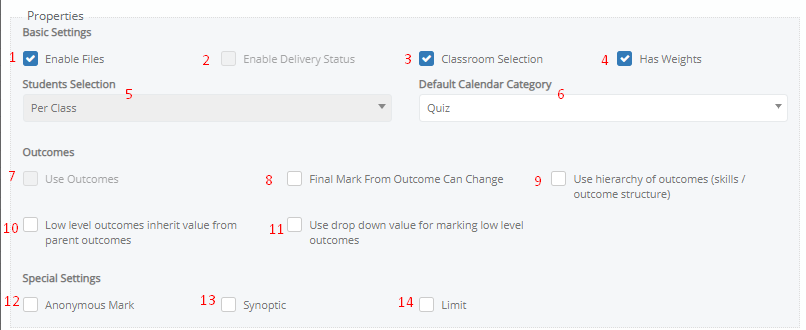
Properties – Basic Settings for the Assessment type Quiz:

  1. Enable Files: by clicking on this option, you allow the addition of files to this assessment type.
  2. Enable Delivery Status: This does not apply to a Quiz – Assessment Type.
  3. Classroom Selection: enable the selection of a classroom for this assessment type. You will be able to choose a class in which this popup quiz will take place.
  4. Has Weights: This option when selected will add the marking weights associated with Quizzes for a specific subject. It depends on the marking structure the subject follows.
  5. Student Selection: In the case of a Quiz Assessment Type the only available choice is Per Class. If this is an assessment-assessment type, then you must select to select students “one by one”.
  6. Default Calendar Category: Choose a calendar category to which this assessment type will belong. Calendar Categories are created in the dropdowns page of Main Settings. Their purpose is to categorize events, activities, exams etc. that appear on all the user’s calendars (Dashboard Calendars). In this case, we select the Quiz Calendar Category.
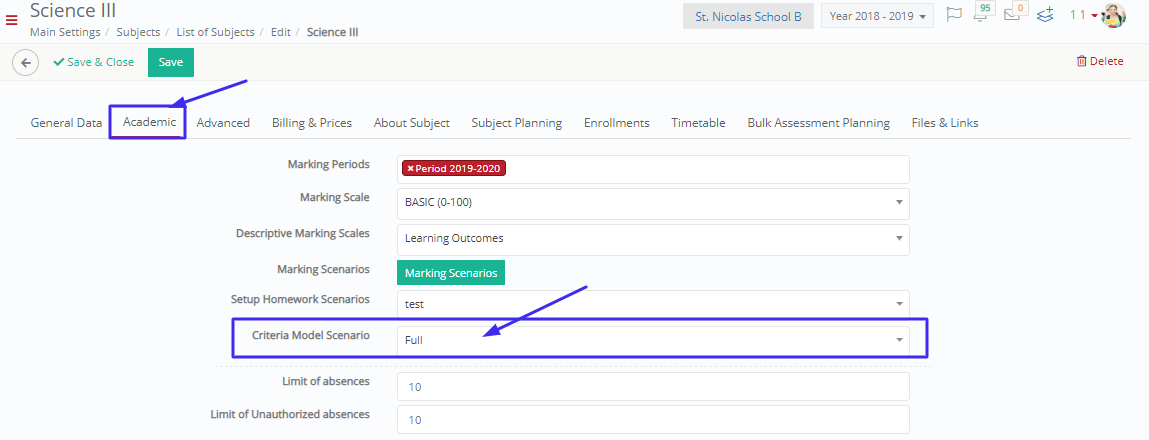
  7. Use Outcomes: This option is unavailable if you have selected the Quiz – Assessment Type. If you select the Assessment – Assessment Type, then you can select this option. If you select this option, then you will be able to use outcomes for marking based on the marking scenario selected in a specific subject. Specifically, the field that feeds outcomes is located in the subject connected to this assessment, e.g Science III.Follow the path Configuration > Main Settings > Subjects > Subjects List > Edit Subject > Academics Tab > Criteria Model Scenario option (Figure 2a).
    You can create marking scenarios (Numeric/Descriptive) in the marking scenario page in marking settings and add them to outcomes.


Figure 2a


  1. Final Mark from Outcome can Change: if this option is selected, then the final mark for this quiz – assessment type will be editable/changeable.
    Because in some cases, marks are auto-calculated.
  2. Anonymous Mark: if this is selected then all students included in this quiz upon completion will appear as numbers in the Teachers marking page so as the teacher will not know whose quiz he is marking. This serves to keep things unbiased.
  3. Synoptic: if this option is selected, then this quiz – assessment type will regard students who have failed in a subject or on their previous quiz and are given a second chance to take the quiz and pass the class/subject.
    Synoptics/Re-sits are given in the end of the normal academic period unless otherwise required by the academic institution.


Continuing in Figure 3


Figure 3


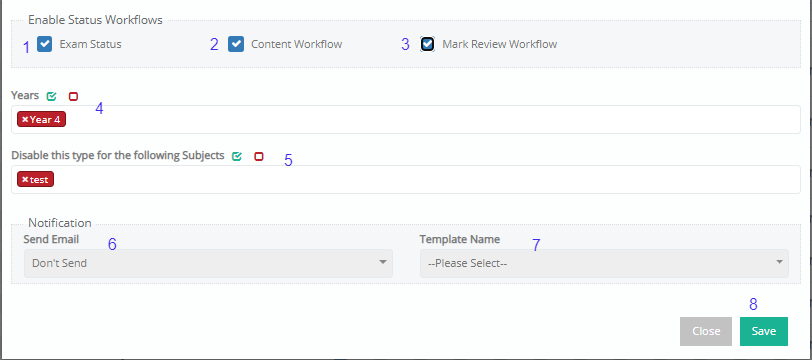
Enable Status Workflows:

  1. Exam Status
  2. Content Workflow: If this is selected, then you will be adding a process or workflow to this specific quiz – assessment type.
    Teachers with the role of Content Verifier will be required to go through the quiz and verify/approve the content of the specific quiz used in this quiz-assessment type.
  3. Mark Reviewer Workflow: If this option is selected then upon completion of this quiz by students and the subsequent marking of the quiz by the teacher who assigned the quiz, an additional teacher with the user role Mark Verifier, Second Marker etc. will need to go over all the marks given by the original teacher and approve/verify that they are accurate and fair before releasing the results to the students.
  4. Years: in this multi-select dropdown option, you can choose the years that this assessment type will concern/affect/be available too, e.g., Year 4.
  5. Disable this Type for the following Subjects: This dropdown option is filtered by the year/s you selected in the previous option. Here you can select which subjects taught in a specific year or years will not be able to use this specific assessment type.


Notification

  1. Send Email: if you wish, you may select to send or not send notification emails to the participants of the quiz in this case.
    You can select Don’t send email, send to students, parents or both.
  2. Template: from this dropdown list, you can select the email template that will be used to send notification emails.
    Templates are created in the advanced configurations page, templates editing option.


Was this article helpful?