

Subjects are connected to _Grades_ and _Streams_. The subjects are created here and assigned to the relevant _Teachers_ of any institution. Here you can create or delete _Subject_ as well as plan them timewise and content wise.
Configuration > Main Settings > Subjects
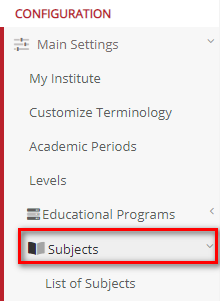
Figure 57
List of Subjects
Here you can see and configure all existing _Subjects_ as well as create and edit them.
Configuration > Main Settings > Subjects > List of Subjects

Figure 58
On this page you will see the following (Figure 58):
- View _Subjects_ in a Card or Grid view by clicking on the View button and choosing either option. You can also choose to use a predefined view – Subject per _Group_ (Figure 59).
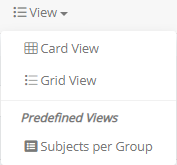
Figure 59
- You can filter subjects from the Status dropdown button e.g., active, or inactive.
- From the search field you may locate the subject you wish to change.
- You can also use the _Grade_, _Stream_ or Category dropdown lists to filter subjects.
- Click on the +Create New button to create a new subject.
- By clicking on the subject card, you can edit it.
- You can also click on the action buttons on each subject card and then click on view button to view them.
- Click on the refresh button to refresh page.
Grid View

Figure 60
On this page you will see the following (Figure 60):
- You can use the _Grade_, _Stream_ or Category dropdown lists to filter subjects.
- Click on the +Create New button to create a new subject.
- You can also click on the action buttons on each subject and then click on the edit or delete button.
- In this view you can also print, copy, or export the list of subjects you want.
- From the manage columns button you can add or remove columns from the list.
- Use the Bulk Actions to manage multiple _Subjects_ (Figure 61).
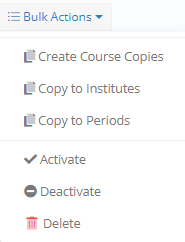
Figure 61
Subject Per Group View
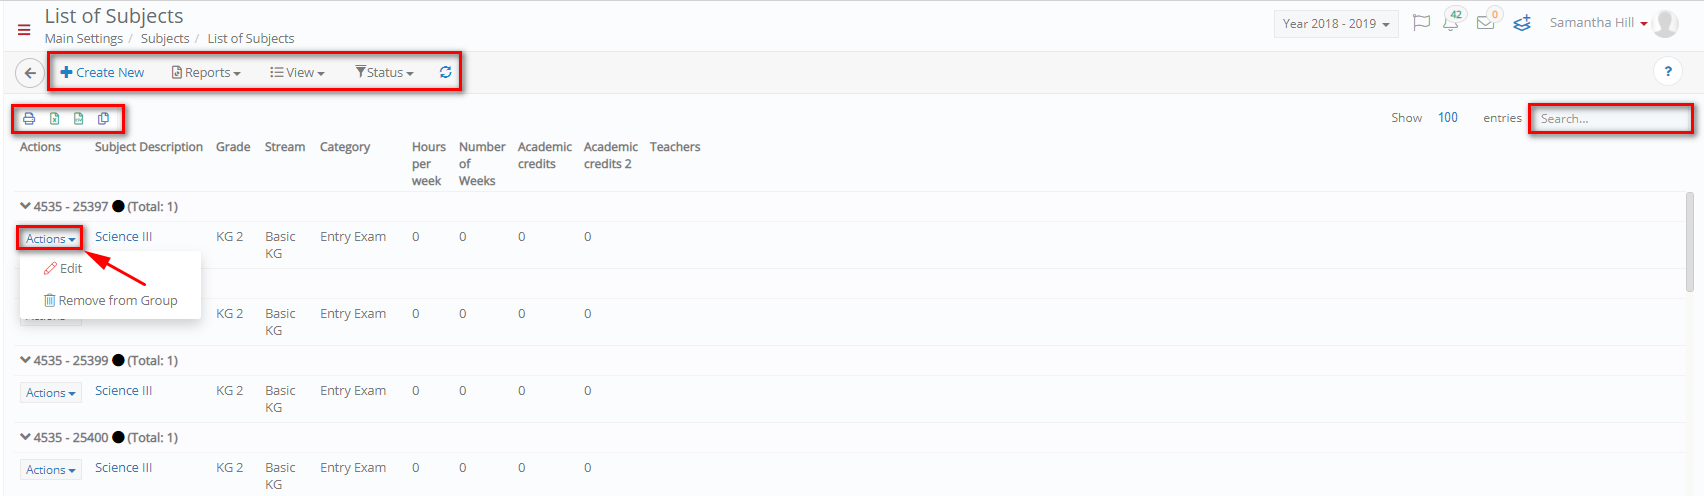
Figure 62
On this page you will see the following (Figure 62):
- In this view you can click on the action buttons on each subject and then click on the remove from group button to remove a subject from a specific _Group_.
- Click on the refresh button to refresh page.
- In this view you can also print, copy, or export the list of subjects you want.
Create Subjects
Once you click on the create new button (Figure 58), you will be transferred to the creation page (Figure 63).
On this page you will see the following (Figure 63):
- Abbreviation: Here you can add the short code for the new _Subject_ e.g., EN1.
- Description: Here you can add the description of the subject e.g., Intro to English.
- Color: Here you can choose a color to signify this subject in subject lists.
- Category: Here you can add the subject to a specific category of subjects e.g., Mandatory.
- Active: If this is turned on then this subject will be available for use.
- _Grade_: Connect this subject to a specific grade e.g., KG1.
- _Stream_: Here you can connect this subject to a stream e.g., Basic.
- Additional Grades: Here you can add connections to other grades as well.
- Type: You must choose a type to classify this subject. Since this is a subject you can choose e.g., Subject type.
- Pre-requisite Subjects: Here you can decide if the subject you are creating will have pre-requisite subjects for a _Student_ to enrol in them e.g., I need to have taken Introduction to Accounting in order to enroll in Managerial Accounting.
- Supervisor: Here you can assign a _Teacher_ as the supervisor of this subject e.g., Elaine Borg.
- 2nd Supervisor (Content Verifier): Here you can choose a second supervisor responsible for verifying content which is uploaded to the system e.g., verify absences.
- 3rd Supervisor (Mark Verifier): Here you may choose a 3rd supervisor responsible for verifying the assessment marks, given by the teacher of the subject.
- Start/End Date: Here you can set the time parameters for this subject. Enter the date the subject will begin and the end date to set the day the subject is supposed to end.
- Hours per week: Enter the hours of teaching for this subject per week.
- Number of Weeks: Enter the total academic hours for this subject every week.
- Academic credits: Specify how many credits this subject is worth to the student’s academic program or towards achieving graduation.
- Academic credits 2: Second field for subject credits in case this subject offers different types of credits (If Applicable).
- Comments: This text box is here for you to enter any data about the subject that could be helpful to the _Student_.
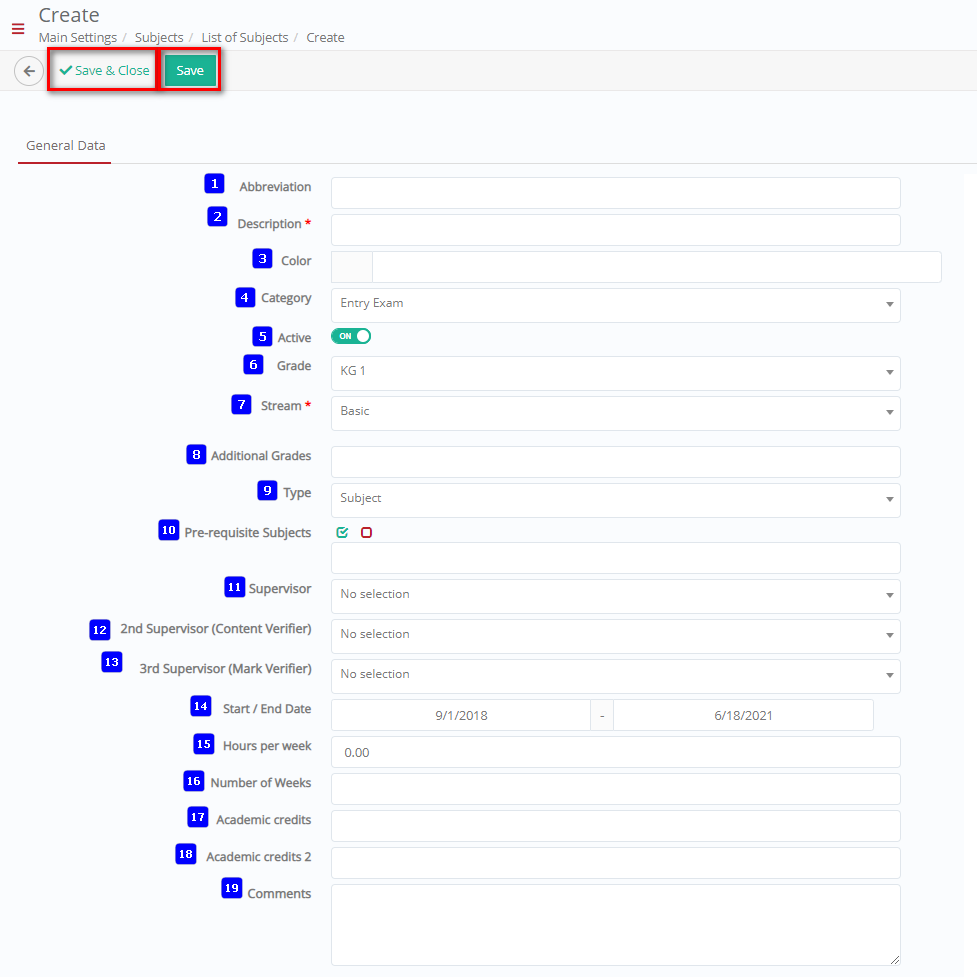
Figure 63
Once you have filled in the fields, options, and anything else that was required click on the ‘Save & Close’ button to save this new subject and return to the list of subject’s page.
Edit Subjects
Once you click on the _Subject_ card that you created, you will be transferred to the edit page (Figure 64).
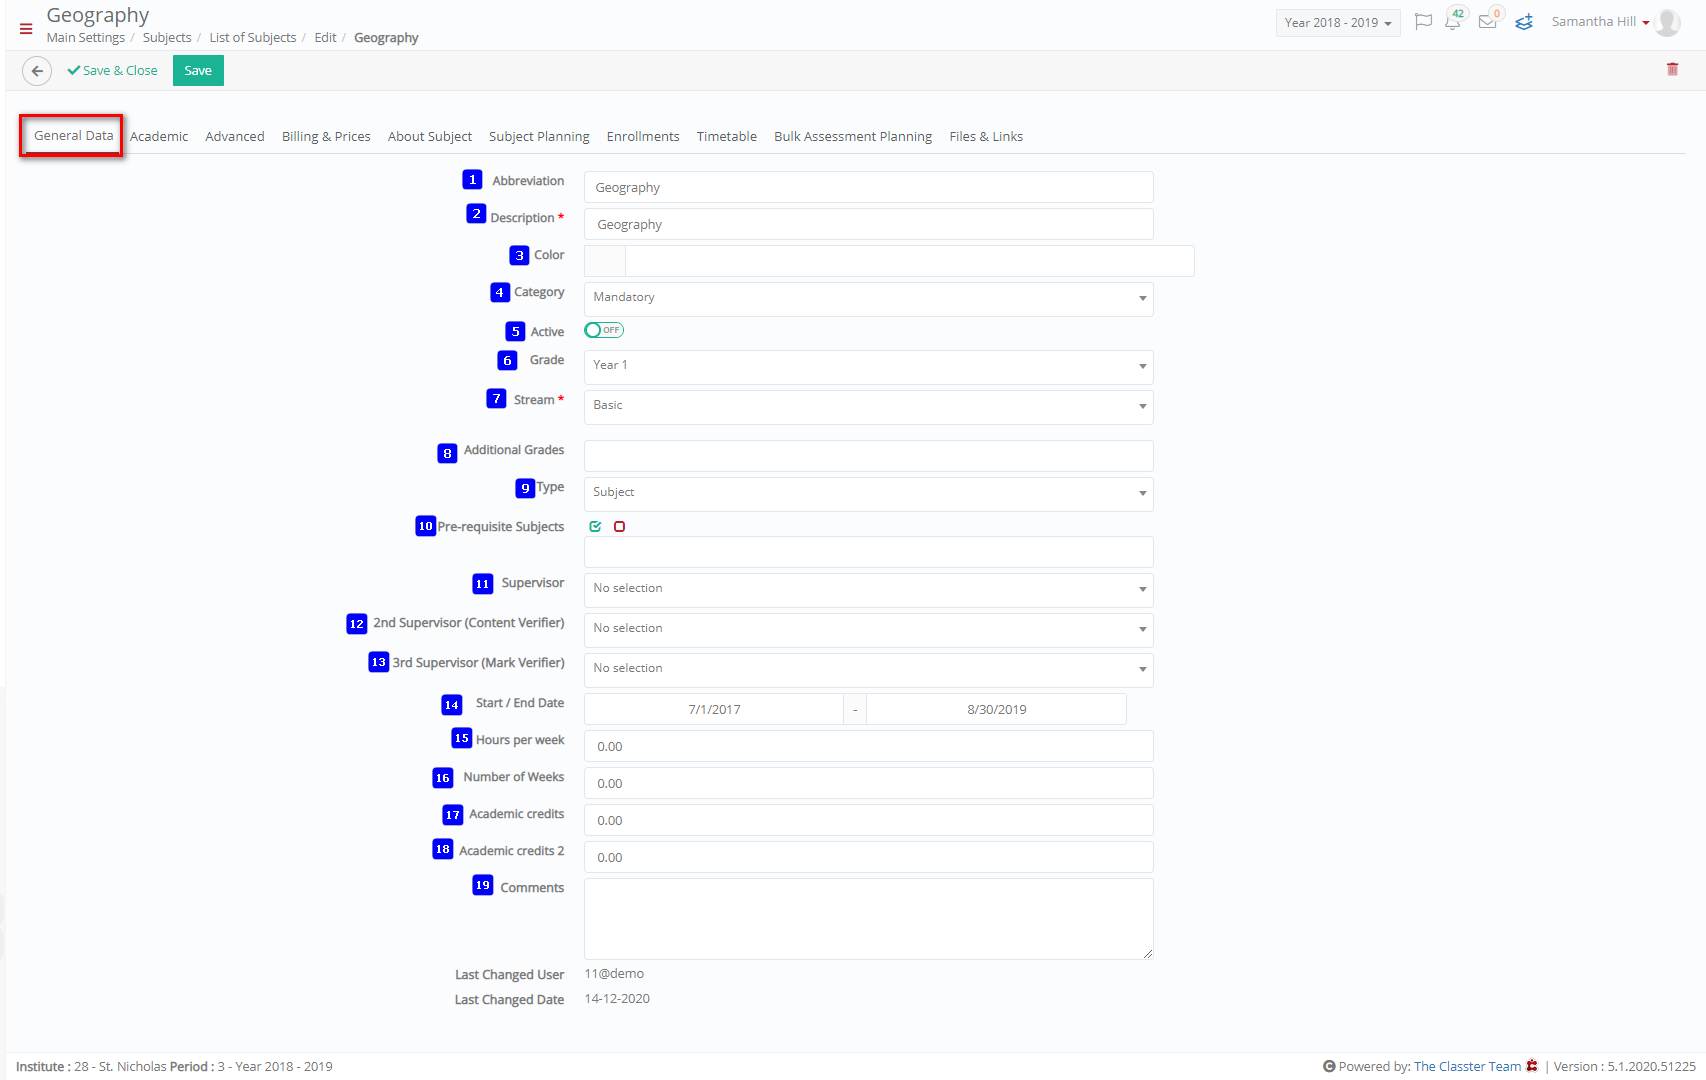 Figure 64
On this page you will see the following (Figure 64):
General Data
- Abbreviation: Here you can change the short code for the subject.
- Description: Here you change the description of the subject.
- Color: Here you can choose a different color to signify this subject in subject lists.
- Category: Here you can change the _Subject_ to a specific category of subjects.
- Active: If this is turned on then this subject will be available for use.
- _Grade_: Connect this subject to a different grade.
- _Stream_: Here you can connect this subject to a different stream.
- Additional Grades: Here you can add connections to other grades as well.
- Type: You can change the type to classify this subject.
- Pre-requisite Subjects: Here you can decide if the subject you are creating will have pre-requisite subjects for a _Student_ to enroll in them e.g., I need to have taken Introduction to Accounting to enroll in Managerial Accounting.
- Supervisor: Here you can assign a _Teacher_ as the supervisor of this subject.
- 2nd Supervisor (Content Verifier): Here you can change the second supervisor responsible for verifying content which is uploaded to the system.
- 3rd Supervisor (Mark Verifier): Here you may change the 3rd supervisor responsible for verifying the assessment marks, given by the teacher of the subject.
- Start/End Date: Here you can change the time parameters for this subject. Enter the date the subject will begin and the end date to set the day the subject is supposed to end.
- Hours per week: Change the hours of teaching for this subject per week.
- Number of Weeks: Change the total academic hours for this subject every week.
- Academic credits: Change how many credits this subject is worth to the student’s academic program or towards achieving graduation.
- Academic credits 2: Second field for subject credits in case this subject offers different types of credits (If Applicable).
- Comments: This text box is here for you to enter/change any data about the subject that could be helpful to the _Student_.
Once you have filled in the fields, options, and anything else that was required click on the ‘Save & Close’ button to save this new subject and return to the list of subject’s page. You can click on the ‘Save’ button to save and continue or on the ‘Delete’ button to delete this subject.
Academic
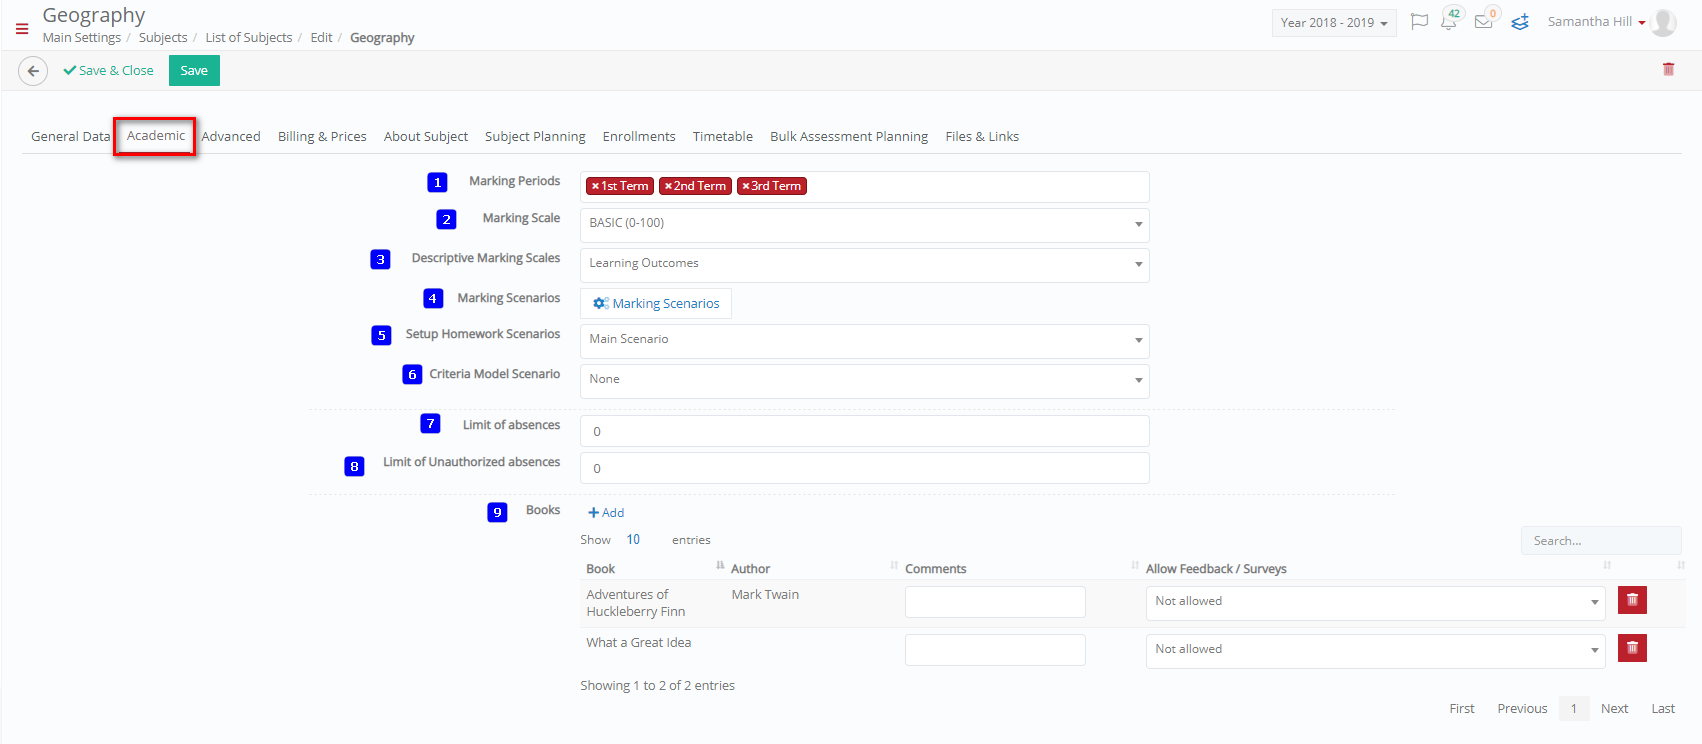 Figure 65
On this page you will see the following (Figure 65):
- Marking Periods: Here you can add or change marking periods e.g., Term 1, Term 2.
- Marking Scale: Here you can add or change the marking scale you use to measure student performance e.g., Basic (1-100).
- Descriptive Marking Scales: Here you can add or change the descriptive marking scale used to measure _Student_ performance e.g., Learning Outcomes.
- Marking Scenarios: By clicking on this option, you will see a popup window where you can add or change marking scenarios, descriptive scenarios and daily scenarios used for each marking period e.g., Teamwork, Main, Teamwork (Figure 66).
 Figure 66
- Setup Homework Scenarios: Here you can add or change the marking scenario for use in homework e.g., Main Scenario.
- Criteria Model Scenario: Here you can add or change marking scenarios concerning criteria e.g., teamwork.
- Limit of Absences: Here you can enter or change the number limit of absences for this _Subject_ e.g., 0.
- Limit of Unauthorized Absences: Here you can enter or change the limit of unauthorized absences for this subject e.g., 0.
- Books: Here you can add books from the library that are required for the completion of this subject/ Once you click on the +Add button you will see a popup window (Figure 67).
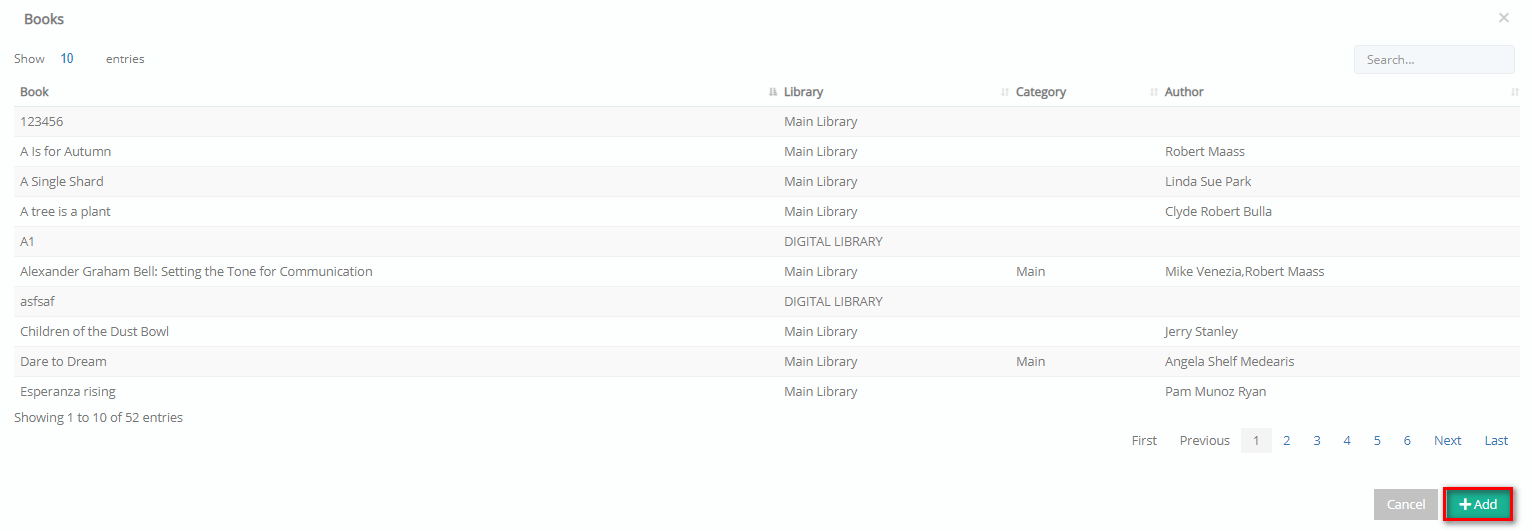 Figure 67
- Click on the books you want to add (Figure 67).
- Click on the +Add button to add the books you selected (Figure 67).
Once you have filled in the fields, options, and anything else that was required click on the ‘Save & Close’ button to save this new _Subject_ and return to the list of subject’s page. You can click on the ‘Save’ button to save and continue or on the ‘Delete’ button to delete this subject.
Advanced
These are advanced options that are optional for you to enter.
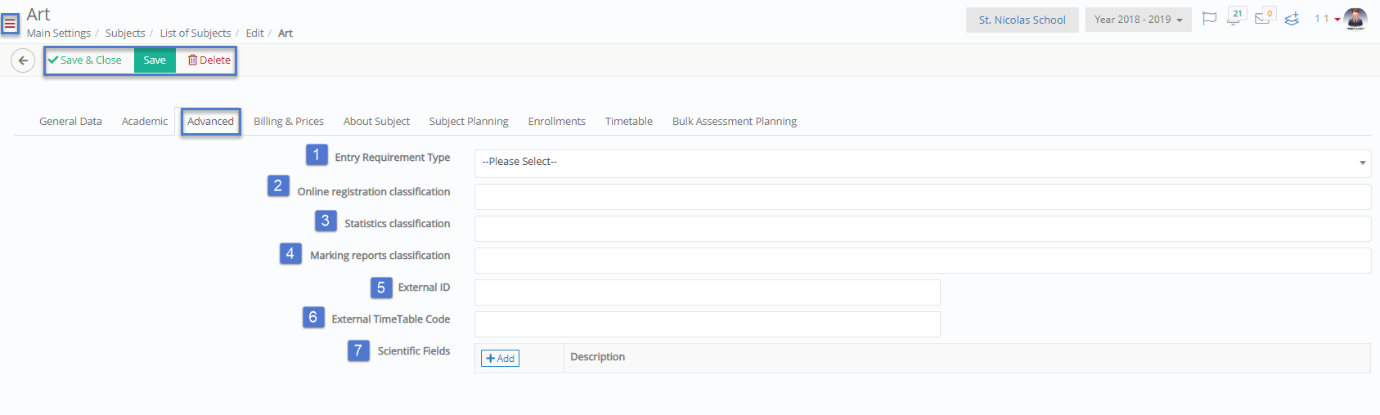 Figure 68
On this page you will see the following (Figure 68):
- Entry Requirement: Here you can enter entry requirements for the _Subject_ (if applicable).
- Online Registration Classification: Here you can choose a classification type for _Students_ enrolled to subject.
- Statistics Classification: Here you can choose what statistic classification will be used for students enrolled to this subject.
- Marking reports classification: Here you can choose what marking report classification will be used for students enrolled to this subject.
- External ID: Enter an external id if applicable to your institution’s subjects.
- External Timetable Code: Enter the code for an external timetable if applicable to your institution’s subjects.
- Scientific Fields: You can add scientific fields related to this subject by clicking on the +Add button. You will see the following popup window (Figure 69).
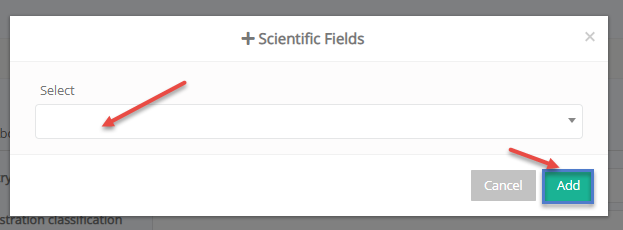
Figure 69
Once you have filled in the fields, options, and anything else that was required click on the ‘Save & Close’ button to save this new subject and return to the list of subject’s page. You can click on the ‘Save’ button to save and continue or on the ‘Delete’ button to delete this subject.
Billing & Prices
These are advanced options that are optional (this may vary depending on the configuration settings).
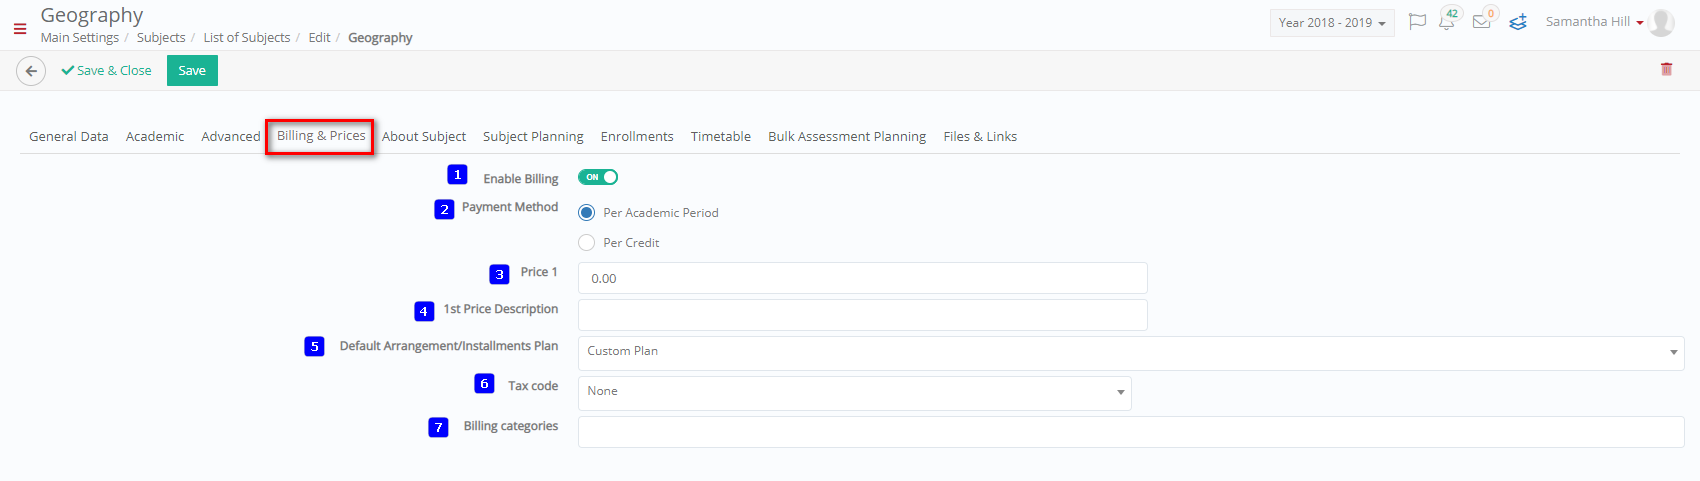 Figure 70
On this page you will see the following (Figure 70):
- Enable Billing: If this is turned on then billing will be enabled for this subject.
- Payment Method: Here you can choose the payment method for this subject e.g., Per Academic Year or Per Credit.
- Price: Here you can enter the price of the subject to be charged to _Student_ or payer.
- 1st Price Description: Here you can enter a description for this payment e.g., Initial Price.
- Default Arrangement/Instalment Plan: Here you can choose an instalment plan e.g., 4-month instalment plan.
- Tax code: Select the tax method e.g., Main, or Tax Free.
- Billing Categories: Here you can choose a billing category for this payment e.g., Standard.
Once you have filled in the fields, options, and anything else that was required click on the ‘Save & Close’ button to save this new subject and return to the list of subject’s page. You can click on the ‘Save’ button to save and continue or on the ‘Delete’ button to delete this subject.
About Subject
On this tab you will enter some references and info about the subject.
 Figure 71
On this page you will see the following sections (Figure 71):
Basic Data
- Image Upload: Add an image related to the _Subject_ here.
- Title: Enter the title/name of the subject e.g., Geography.
- Short Description: To further enrich content add some additional information describing this subject.
- Subject URL: Enter the subject website address if applicable.
- WordPress URL: Enter the Word Press URL for this subject if applicable.
- Language: Here you can choose the language that the subject will be taught in e.g., English, or whatever language the Institution uses primarily.
About
- About: Enter information about the subject in the text box.
Syllabus
- Syllabus: Enter the syllabus for the subject here.
Subject Format
- Subject Format: Enter details on the format the subject will take here.
FAQ
- FAQ: Enter frequently asked questions about the subject here.
Once you have filled in the fields, options, and anything else that was required click on the ‘Save & Close’ button to save this new subject and return to the list of subject’s page. You can click on the ‘Save’ button to save and continue or on the ‘Delete’ button to delete this subject.
Subject Planning
Under this tab, you can plan out the material and topics that will be covered in this _Subject_.
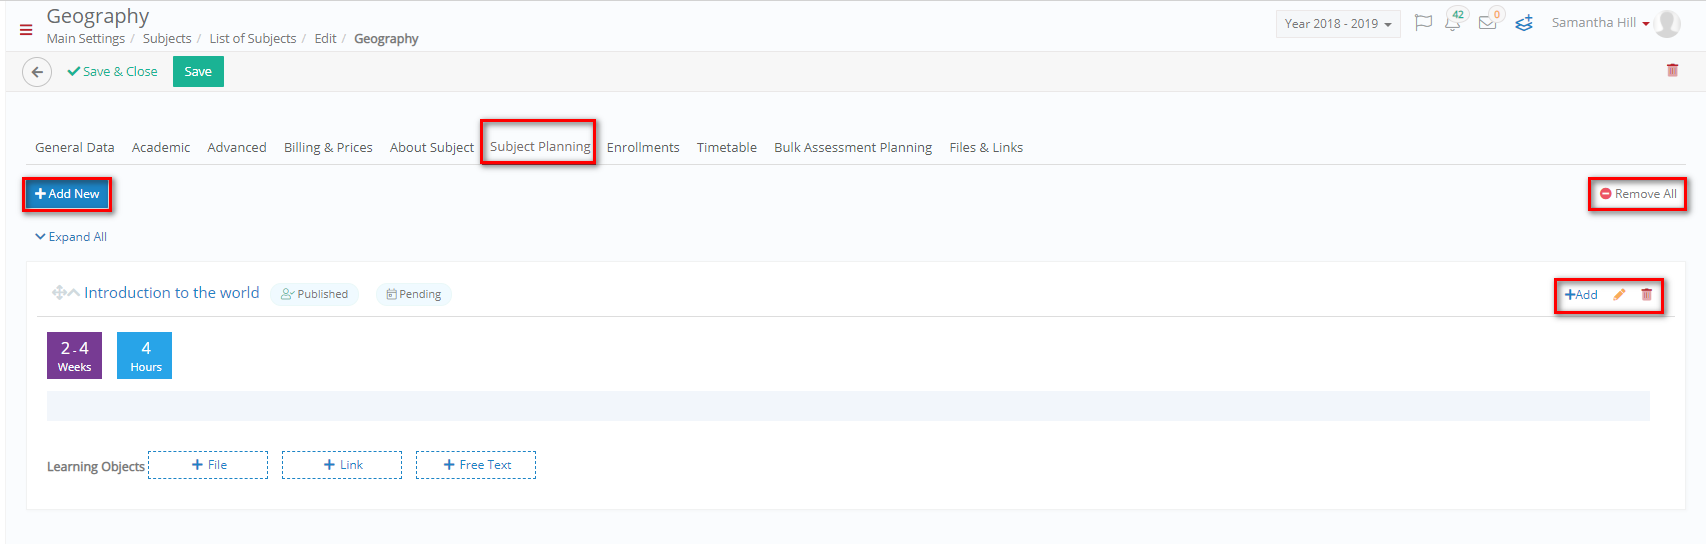
Figure 72
On this page you will see the following (Figure 72):
- On this tab you can add or edit topics.
- To add a topic for this subject, click on the +Add button at the top left of the page.
- If you already have created a topic, you can add a subtopic by clicking on the +Add button on the right side of the page.
- You can edit or delete an existing Topic by clicking on the respective buttons.
Creating a Topic
Once you click on the +Add button on the top left of the screen (Figure 72), you will see the following popup window (Figure 73).
On this page you will see the following (Figure 73):
- Title: Here you must enter a title for the topic e.g., Introduction to Art.
- Hours: Here you can enter the number of hours it will take to cover this topic e.g., 12.
- Date: The date this topic will begin.
- Start Week: Enter in what week the topic will start e.g., Week 13.
- End Week: Enter the last week this topic will be covered e.g., Week 14
- Link: Add a link relevant to this topic if you believe it would be helpful material for _Students_.
- Moodle: You can add a link for this topic/subject to Moodle if the topic/subject exists on Moodle.
- Status: Select the status of the topic e.g., Pending, In Progress or Completed.
- Draft: Enable the draft switch if this topic is still a draft.
- Description: Here you can describe in detail the way this topic is to be taught as well as any additional structure or requirements.
Once you click on the edit button you can follow the same instructions as were presented in creation. When you are done creating and editing topics you can click on the ‘Save & Close’ button to save this new topic and return to the list of subject’s page. You can click on the ‘Save’ button to save and continue or on the ‘Delete’ button to delete this subject.
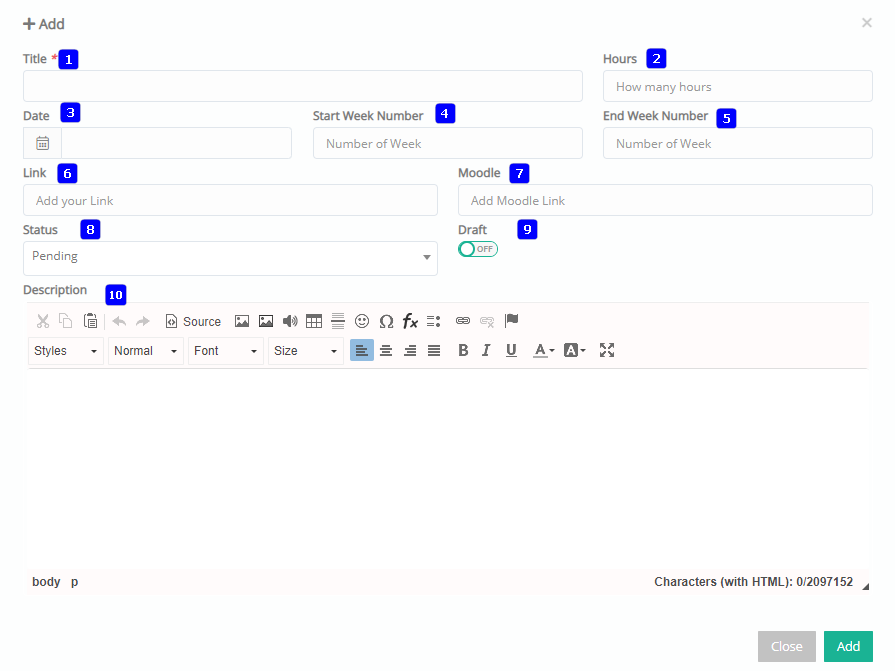
Figure 73
Enrollments
Here you can see the _Groups_ and _Students_ who will be taking this subject. You van view them either Groups/Students (Figure 74), Groups/_Teachers_ (Figure 75) or Groups/Additional Teachers.
- Here you can see the Groups and Students who take this subject.
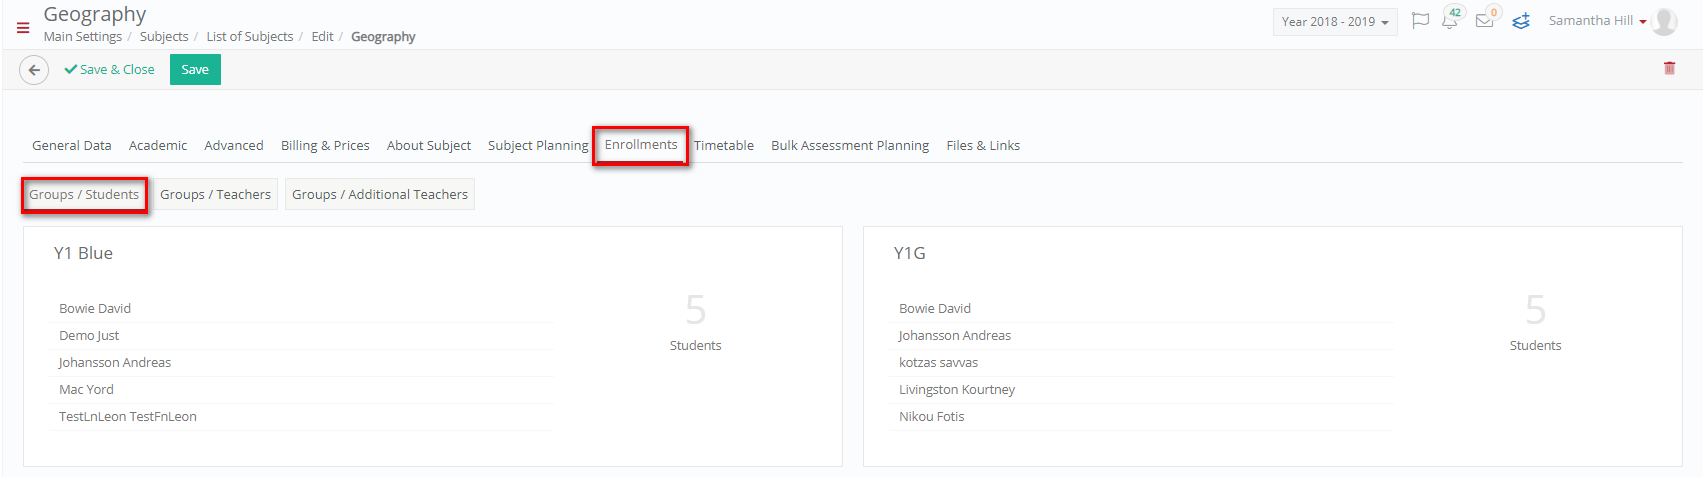
Figure 74
- Here you see the Teachers who teach specific groups.
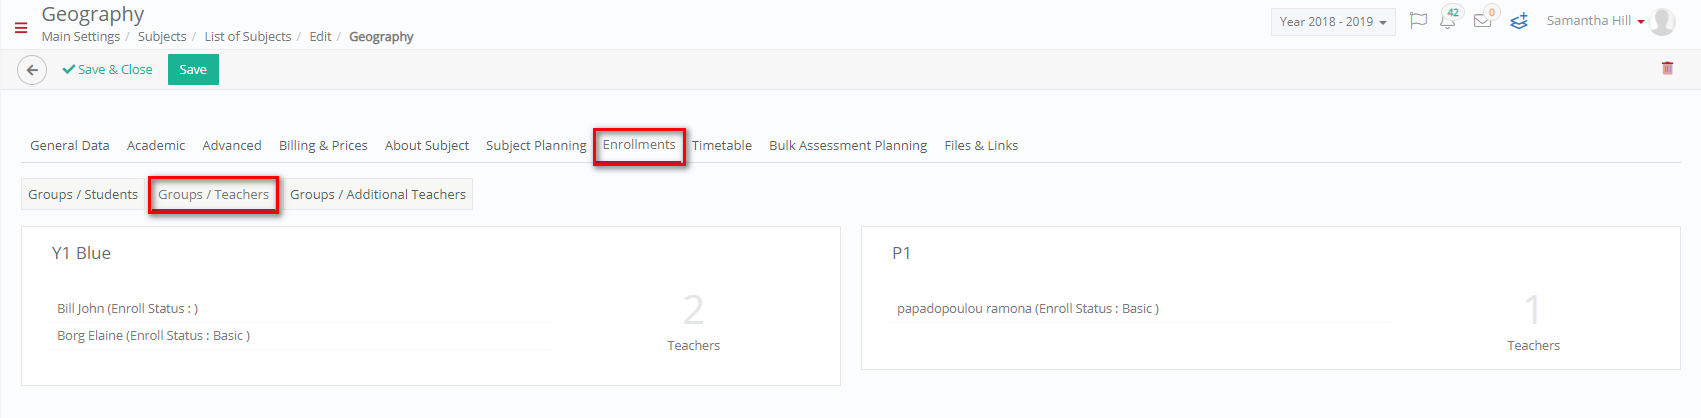
Figure 75
When you are done viewing enrolments you can click on the ‘Save & Close’ button to save and return to the list of subject’s page. You can click on the ‘Save’ button to save and continue or on the ‘Delete’ button to delete this subject.
Timetable
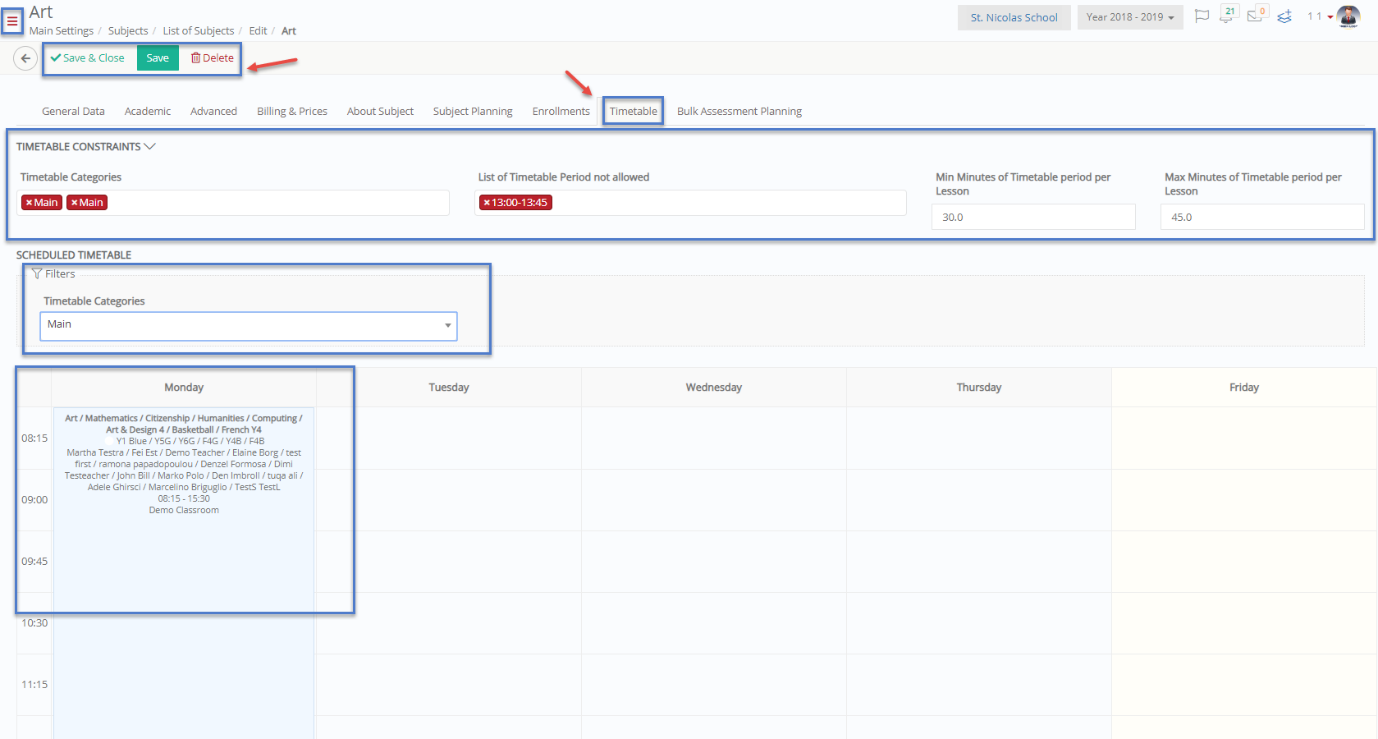
Figure 76
On this page you will see the following (Figure 76):
- Choose the relevant timetable category from the dropdown to view the subject’s schedule e.g., Main.
- Define the timetable period where no subjects can be scheduled e.g., 13.00-13.45. This depends on each institution.
- Enter the minimum number of minutes a subject is taught e.g., 30 minutes.
- Enter the maximum number of minutes a subject is taught e.g., 45 minutes.
- Choose a timetable to view the subject in the schedule
When you are done viewing the timetable you can click on the ‘Save & Close’ button to save and return to the list of subject’s page. You can click on the ‘Save’ button to save and continue or on the ‘Delete’ button to delete this _Subject_.
Bulk Assessment Planning
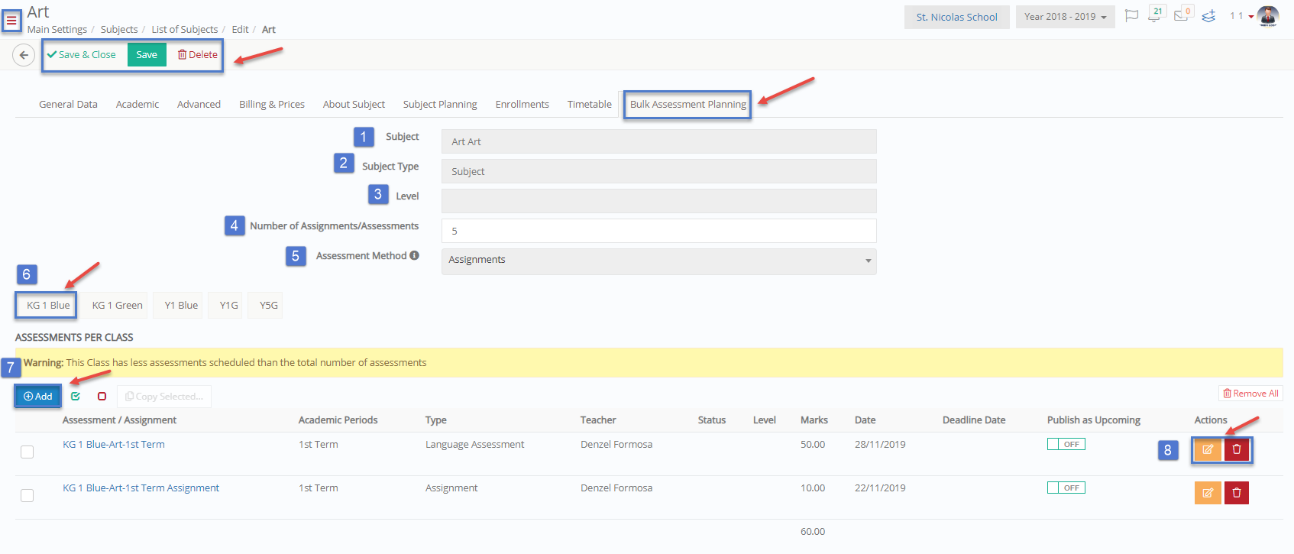
Figure 77
On this page you will see the following (Figure 77):
- Subject: Choose the subject you have created e.g., Art.
- Subject Type: Here you can define the subject type e.g., Subject.
- _Grade Level_: Here you can add the _Grade Level_ or levels this subject belongs to e.g., Elementary School.
- Number of Assignments/Assessments: Here you can set the number of assignments/assessments that will be given out to _Students_ for this subject e.g., 5.
- Assessment Method: What sort of assessment method will be used for this subject e.g., assignments.
- Class/_Group_/_Grade_ tabs: here you can set assignments for each class/group/grade that will has been assigned this subject e.g., KG 1 Blue. Navigate the tabs to add assignments to each one.
- Add button: Click on the add button to add assignment for this _Subject_.
- Edit & Delete button: By clicking on the edit button, you can edit the assessment and by clicking on the delete button you can delete the assessment from the list.
When you are done with bulk assignments you can click on the ‘Save & Close’ button to save and return to the list of subject’s page. You can click on the ‘Save’ button to save and continue or on the ‘Delete’ button to delete this subject.
Files & Links
Here you can add any files or links that are related to this academic year (Figure 78).
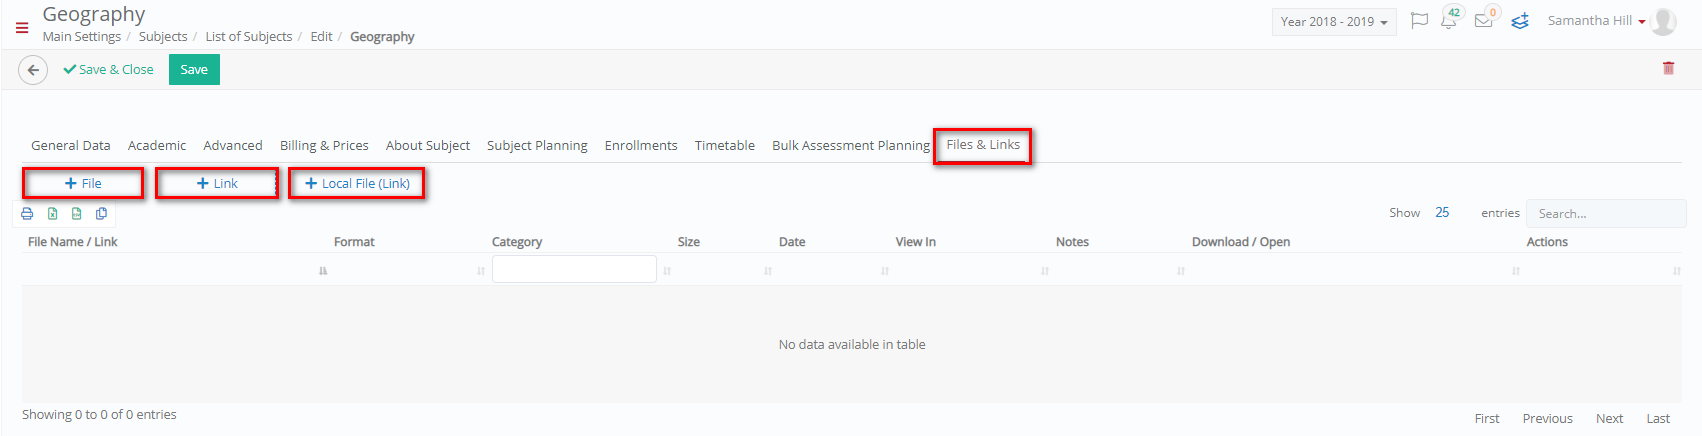
Figure 78
On this page you will see the following options (Figure 78):
- Use the File link to upload files e.g., books
- Choose a file
- Select a category
- Select in which views these can be accessed, i.e., View in Staff, _Students_, _Teachers_, Creator, etc.
- Add Notes related to the file
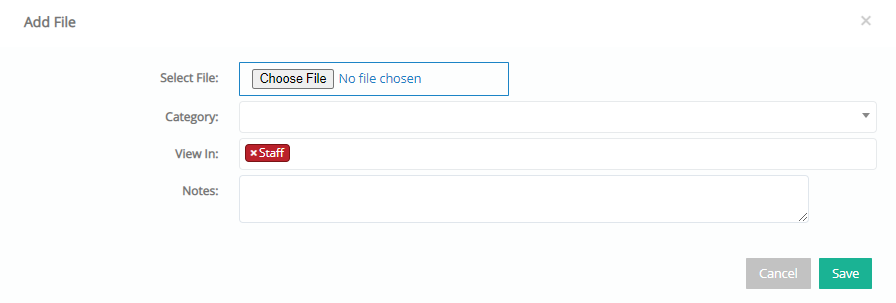
Figure 79
- Use the Link button to add links related to group

Figure 80
- Use the Local File (Link) to upload files from the local file directory.
Once you are done click on the ‘Save’ button to save the grade. If you want to delete this _Grade_ you can click on the ‘Delete’ button.
Note: All fields or options with a red asterisk next to them are mandatory fields or options. If you do not fill them in, you will be unable to save your creations or edits