

The Import Students function in Mass Imports allows institutions to bulk upload Student records into Classter using an Excel file. This feature helps to enhance Student enrollment, saving time by automating the data entry process.
Specifically, the Import Students process involves selecting a file, mapping fields, verifying data, and finalizing the upload.
Supported Use Cases
The Import Students function supports the following scenarios:
- Import new Students: Upload new Student records including personal data, admission data, consents, Educational Program, and details of father, mother, and associated relatives.
- Import new Students with multiple Educational Programs: Use multiple rows in the Excel file (specifically, one row per educational program). Ensure fields used for mapping are correctly mapped to associate multiple entries with the same student.
- Add new Educational Program(s) to existing Students: If the Student already exists in the system, you can add additional educational programs by importing a new Excel file. Matching fields must be used to correctly identify existing records.
Key Considerations
- The first row of the Excel file should ideally contain column names to ensure proper mapping.
- The values in the excel file, must match with the relevant field format in the system (e.g. date format, drop down list of values etc…).
- Proper field mapping is essential for accurate Student record creation.
How to Import Students
To use the Import Students function, follow the below-provided instructions.
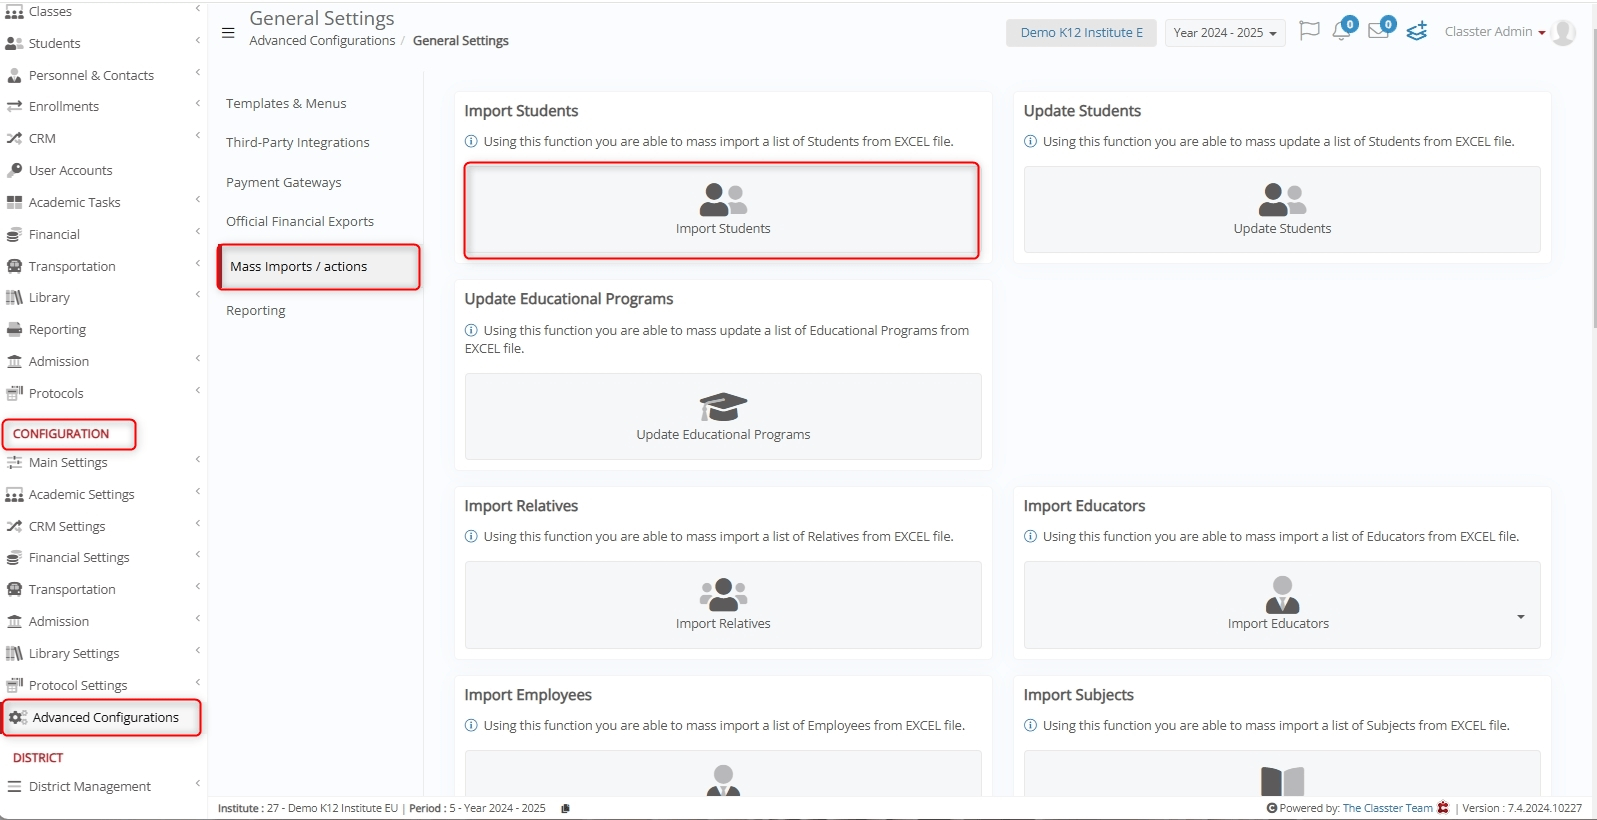
Navigate to Import Students
Log in to your Institute and navigate to: CONFIGURATION > Advanced Configuration > Mass Imports / actions > Import Students.
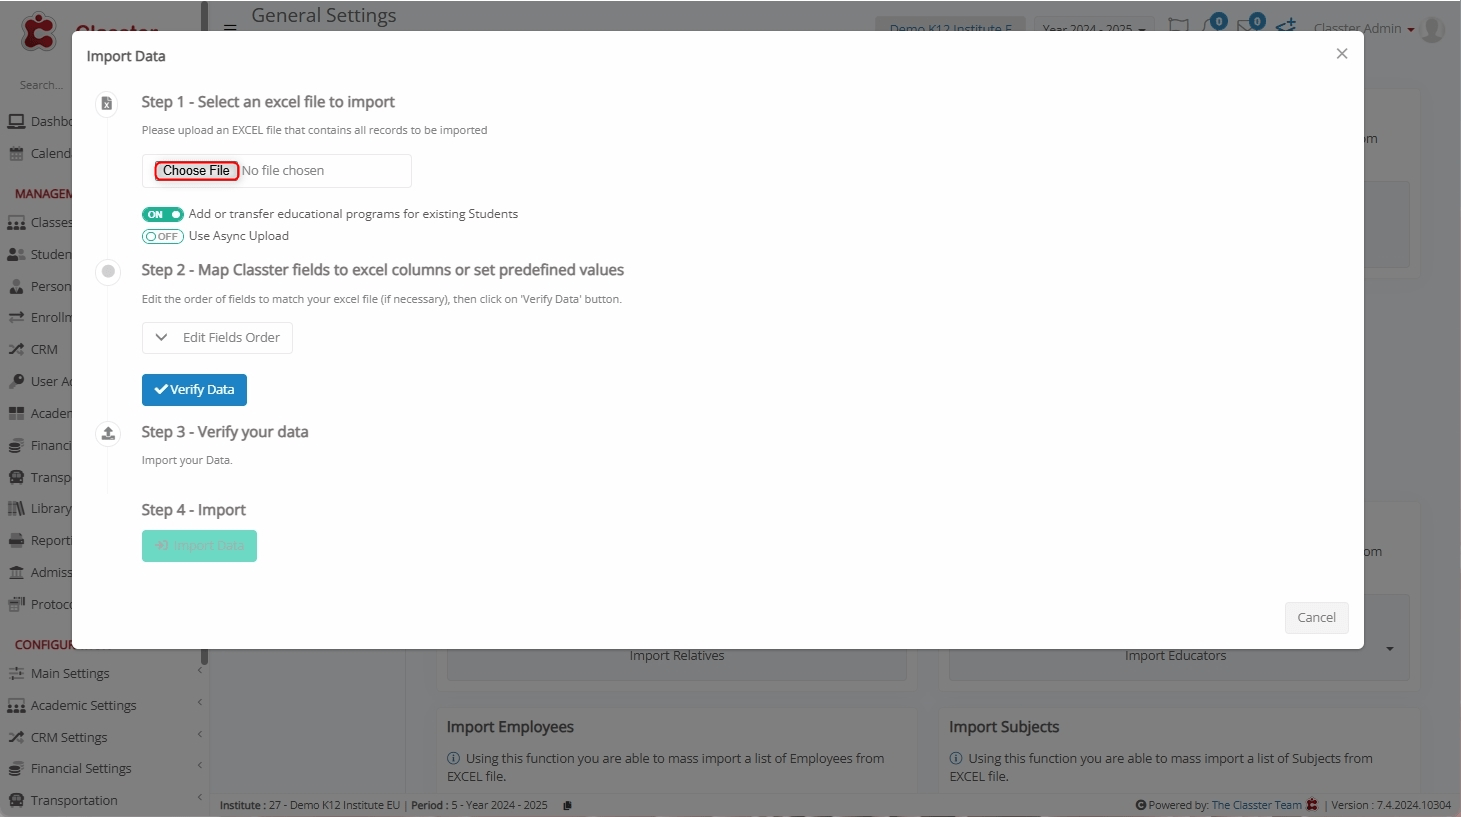
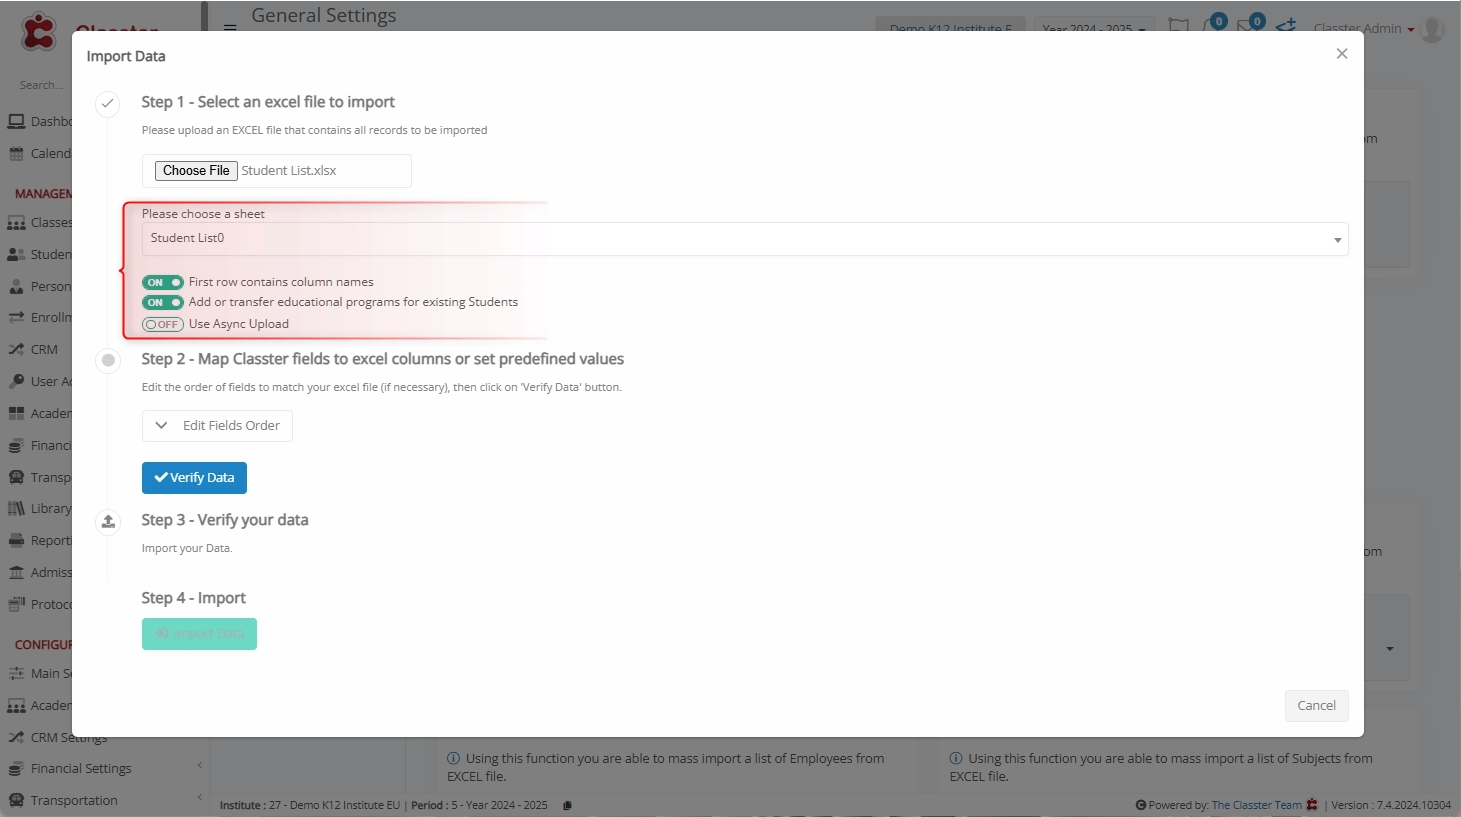
Select an Excel File to Import
Click Choose File to upload an Excel file containing all the required student records.
Choose the desired file and click Open.
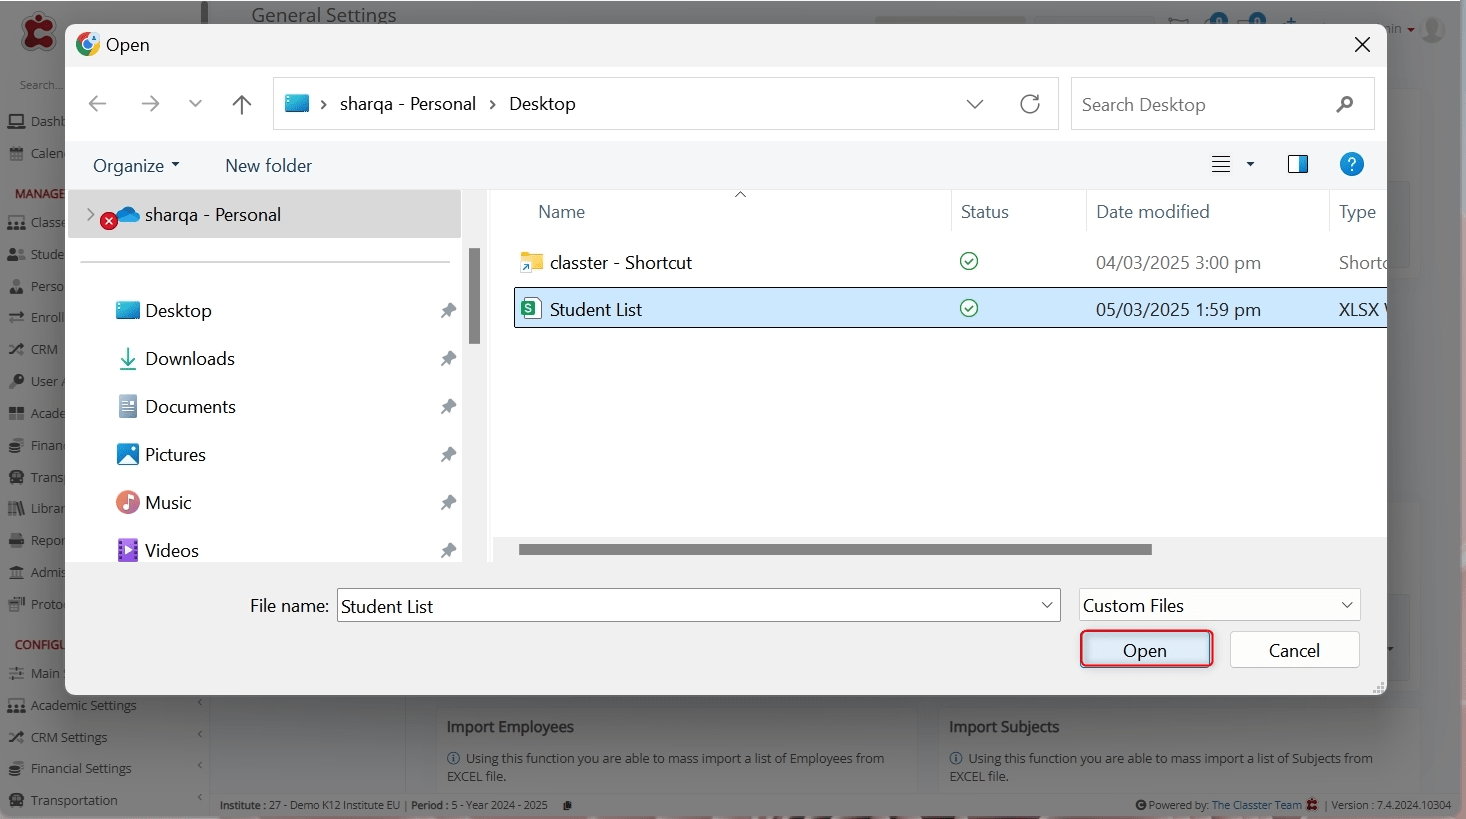
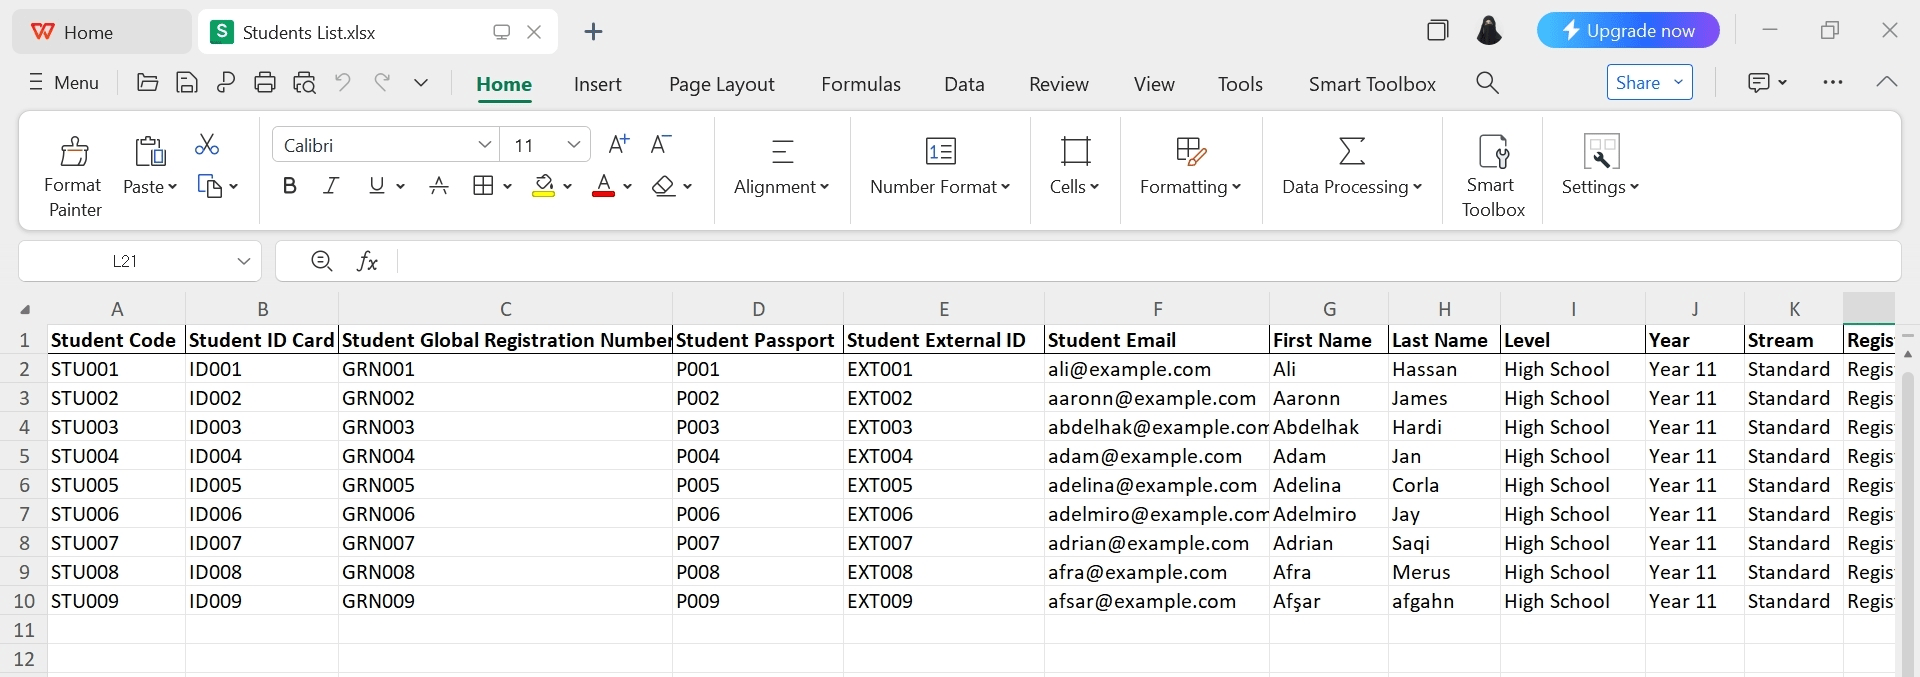
For the demonstration, the selected Excel file contains 9 Student records and the first row as column names.
File Selection Options:
- Choose a Sheet: Select the correct sheet from the uploaded Excel file.
- First Row Contains Column Names: Ensure the first row is used for headers to simplify mapping.
- Add or Transfer Educational Programs for Existing Students: Enable this option if Students should be assigned or transferred to educational programs.
- Use Async Upload: Recommended for large files to prevent timeouts.
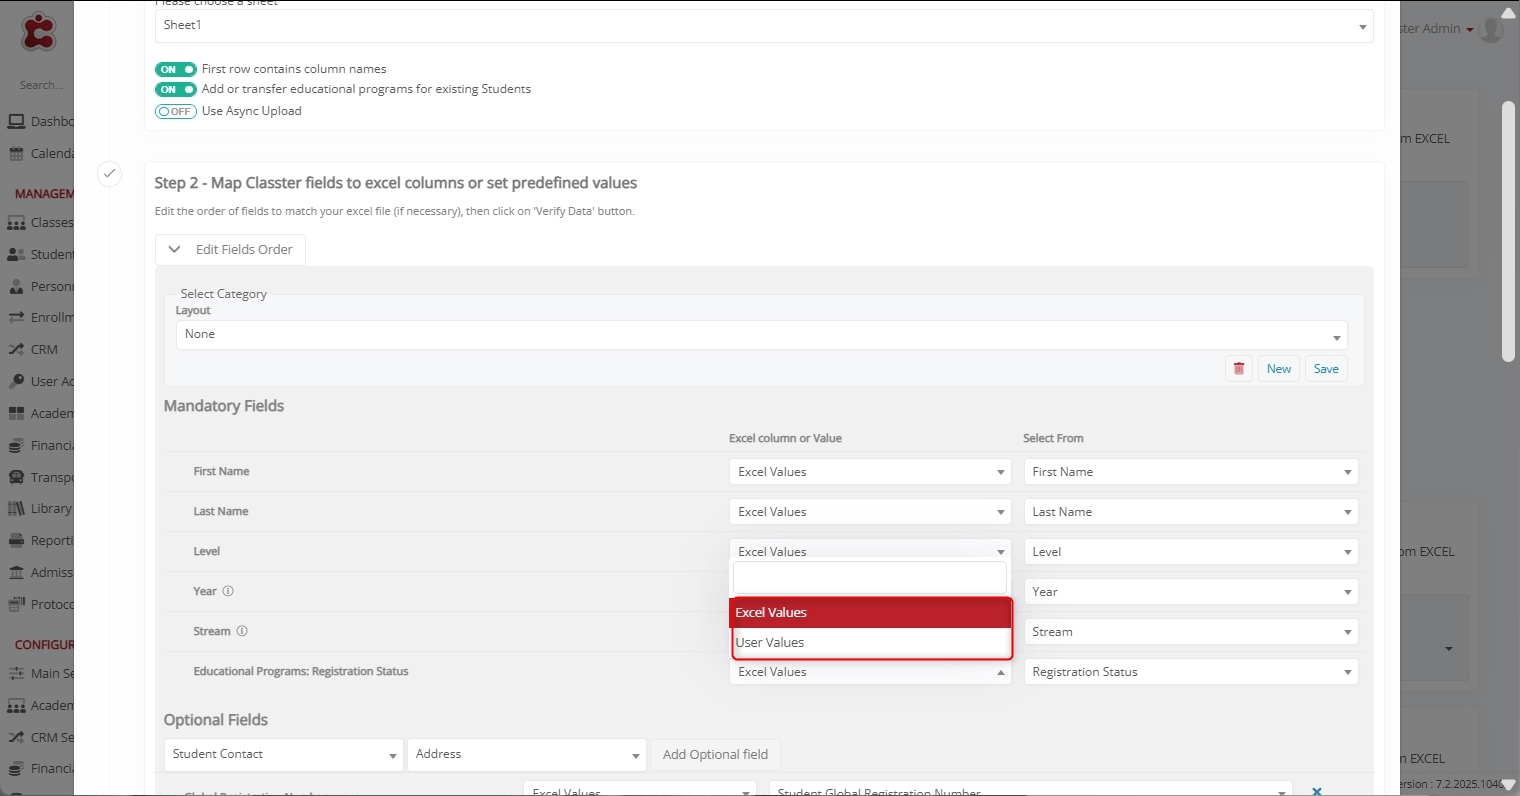
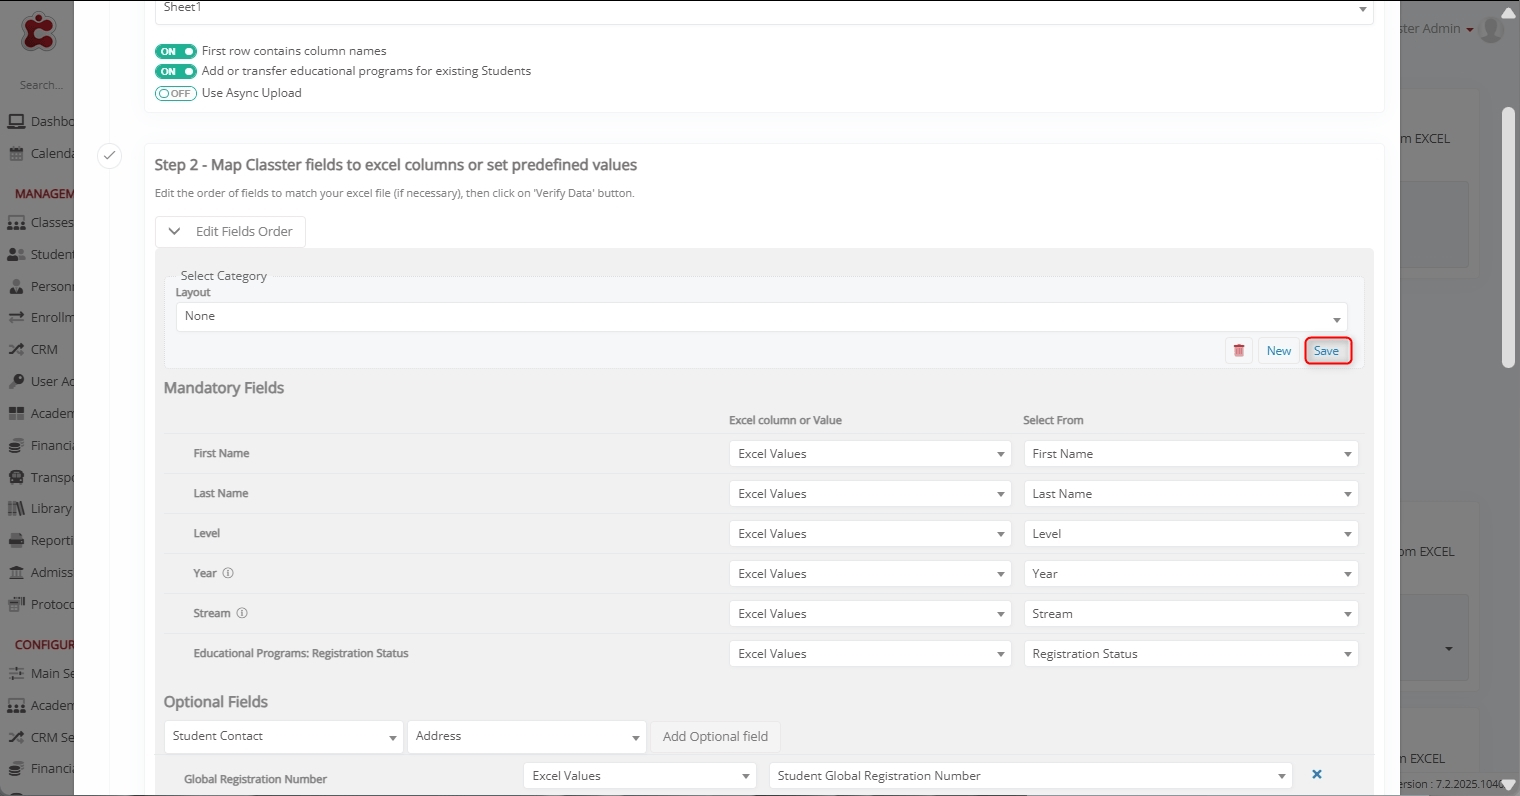
Map Classter Fields to Excel Columns or Set Predefined Values
Before proceeding, click Edit Fields Order and first configure the layout.
Mandatory Fields:
All fields must be mapped correctly to proceed. Note that mandatory fields (and their terminology) may vary based on the institution’s configuration.
The following fields are based on a K-12 demo school setup.
Notes:
- _Grade_ must be connected to _Location_
- _Stream_ must be connected to Grade.
- _Educational Program Category_ must be connected to Grade and Stream.
- The relevant connections between Locations, Grades, Streams, etc., must already be configured in the system.
- Each field can be mapped either with
- an “Excel Value” (select column from excel)
- or “User Value” (add value directly during the mapping – used in common values for all entries)
Mapping Method: Excel Value VS User Value
When mapping fields, you can choose between two methods:
- Excel Value: Values are taken directly from each row of the uploaded Excel file. In this case, during mapping, use the “Select from” dropdown to choose the corresponding Excel column.
- User Value: A predefined value is applied to all Students in the Excel file. This value is manually set during the import process. In this case, from the “Select from” dropdown, select a specific value instead of an Excel column.
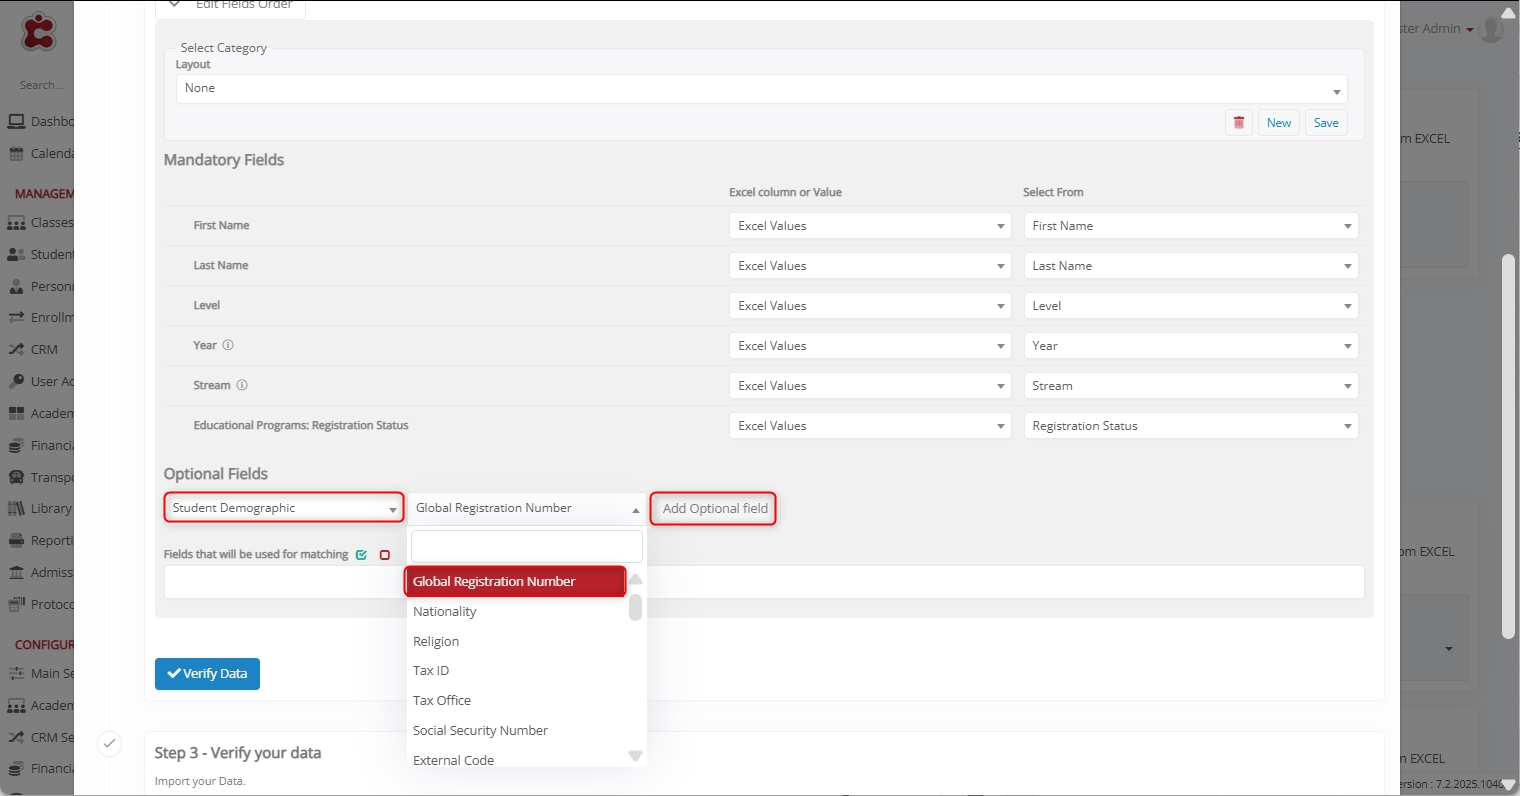
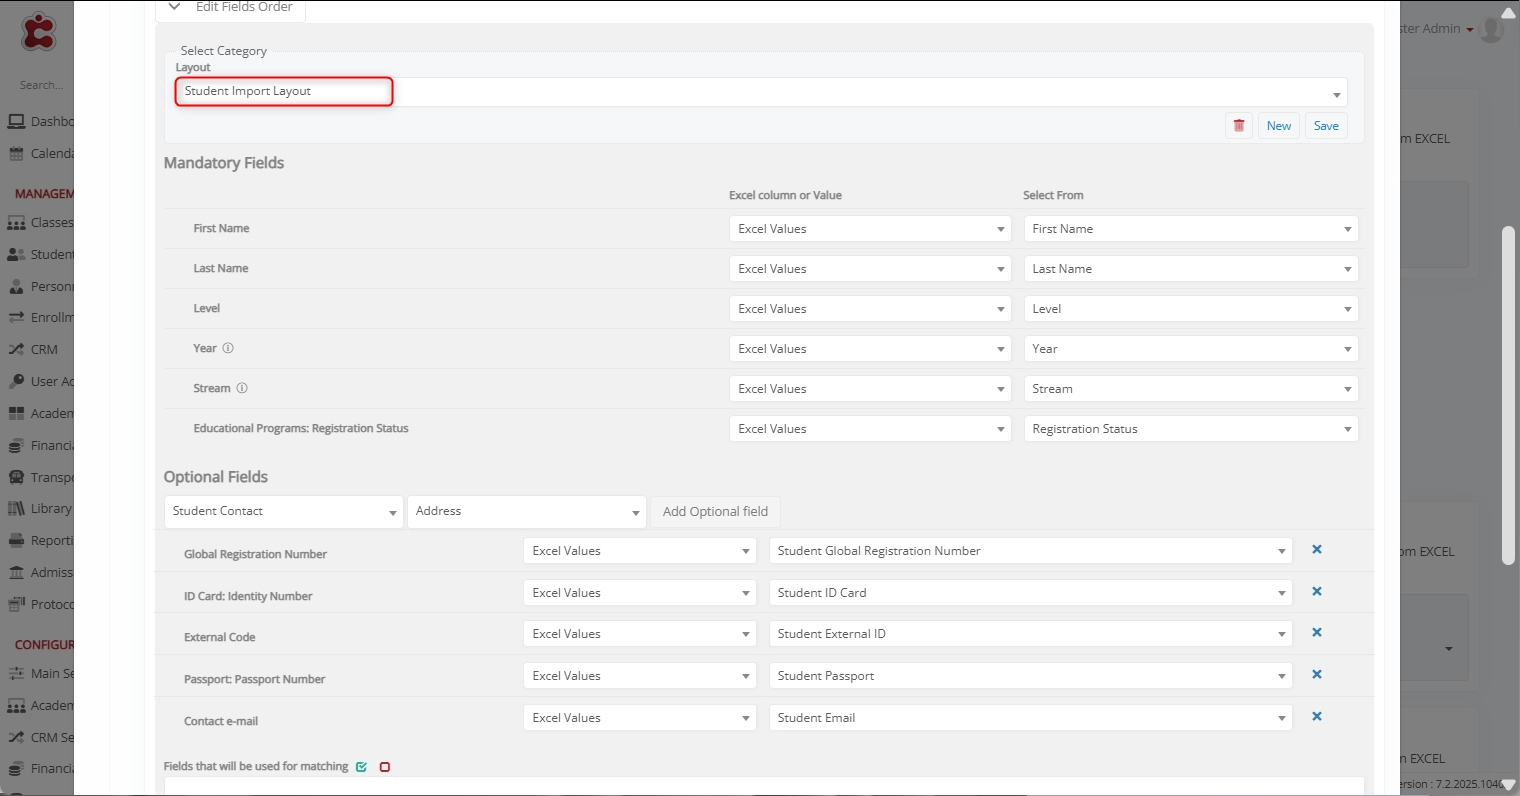
Optional Fields:
To enhance the Student Profile import process, you can include optional fields in your Excel file and map them during this step.
1. Student Basic Data
(Core personal and administrative information)
Fields:
- Student Code, First Name, Last Name, Abbreviation, Middle Name, Birthdate, Gender, _Location_ (overall student location, not per-program), Family Status, Mentor, First Contact Date, _Student_ Use Transportation, General Category, Comments, Email Account, Residence Permit Expiry Date, Year of Registration, Study Permit, Special Learning Status, Home Languages, Nationality Status, Relation to Our School
2. Student Educational Program
(Program-specific registration and status details)
Fields:
- Registration Number, Start Date, End Date, Status Date, Comment, Pricing Category
3. Student Contact Data
(Student contact information)
Fields:
- Address, Address Line 2, City, Post Code, Area/State, Country, Contact Email, Mobile Phone, Home Phone, Work Phone
4. Student Demographic Data
(Detailed personal, legal, and identification information)
Fields:
- Global Registration Number, Nationality, Citizenship, Religion, Tax ID, Tax Office, Social Security Number, External Code
- Birth Data: City of Birth, Birthplace, Country of Birth
- ID Card: Identity Number, Identity Issue Date, ID Expiration Date, Issuing Authority, Country, City, Type
- Passport: Passport Number, Issue Date, Expiration Date, Issuing Authority
- Army Details: Army Number, Registration Date, Issuing Authority
- Municipality / Population Register: Male Register, Municipality, Country, Family Register, Municipality Prefecture (Municipal Register), Protocol Number, Peripheral Section, City Section, Number of Population Registration
5. Student Financial Data
(Financial and billing information)
Fields:
- Contact for Financial Issues, Payer, Bank Account, SEPA ID, Financial Comment, General Ledger Account, Publish Financial Data To
6. Father’s and Mother’s Basic Data
(Personal, contact, and professional information)
Fields:
- First Name, Last Name, Active, Maiden Name, Title, Gender, Father’s Name, Mother’s Name, Categories, Birthdate, Status, Email Account, Degree Title, Educational Level, Specialty, Work, Comments
- Contact Information: Address, Address Line 2, City, Postcode, Area/State, Country, Email, Mobile Phone, Home Phone, Work Phone
- Roles & Permissions: Guardian, Academic Contact, Allow to Pick-Up _Student_, General Contact
7. Father’s and Mother’s Other Data
(Additional legal, tax, and identification information)
Fields:
- Tax ID, Tax Office, Identity Number, Issue Date, ID Expiration Date, Issuing Authority, Birthplace, Municipality
- Passport: Passport Number, Nationality, Issuing Date, Expiration Date, Issuing Authority, Birthplace, City of Birth, Country of Birth, Citizenship
8. Student Consents
(_Consents_ that the _Student_ or parent must provide)
Fields:
- All consent-related items (e.g., photo release, data processing, activity permissions)
Here’s how to add Optional Fields:
- Navigate to Optional Fields section.
- Use the first dropdown to select a category (Student Basic, Student Educational Program, Student Contact, Student Demographic, etc.).
- Choose supported fields of the selected category from the second dropdown (e.g., Address, Phone, Gender, Email, Nationality, etc.).
- Each field can be mapped either with
- an “Excel Value” (select column from excel)
- or “User Value” (add value directly during the mapping – used in common values for all entries).
Note: For User Values, you may either select the value from dropdown or enter as free text (depends on the type of the field).
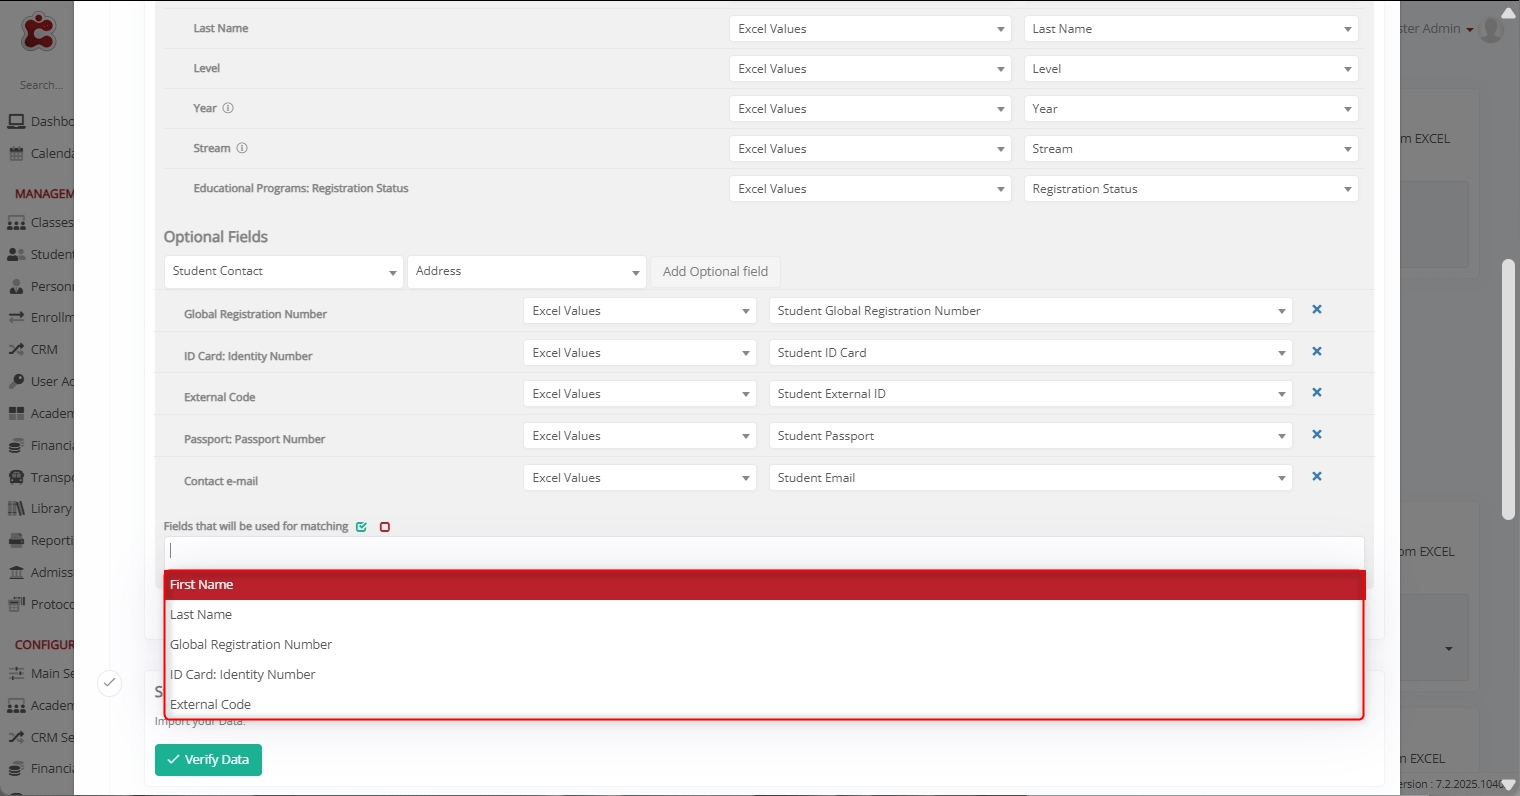
Here are the added optional fields.

Fields Used for Matching:
This feature is relevant only when:
- You are importing multiple educational programs per Student.
- You are adding new educational programs to existing Students.
However, if you’re simply importing new students, the listed matching fields are not required.
Save Layout
You can save the layout-mapping for later usage. This is used when we plan to do multiple imports, using exactly the same excel format.
After adding and mapping all fields needed, navigate to the Layout section and click Save.
Specify the Layout name and click Save.

Benefits of Saving the Layout
- Quickly reuse the same field mapping in future imports.
- Saves time and ensures consistency when working with Excel files that follow the same structure.
- Reduces the chances of human error by applying a pre-approved layout.
So, next time you use Excel with the same format, simply choose your saved layout from the dropdown and proceed directly to verification.
Verify Data
After completing fields mapping, click Verify Data.
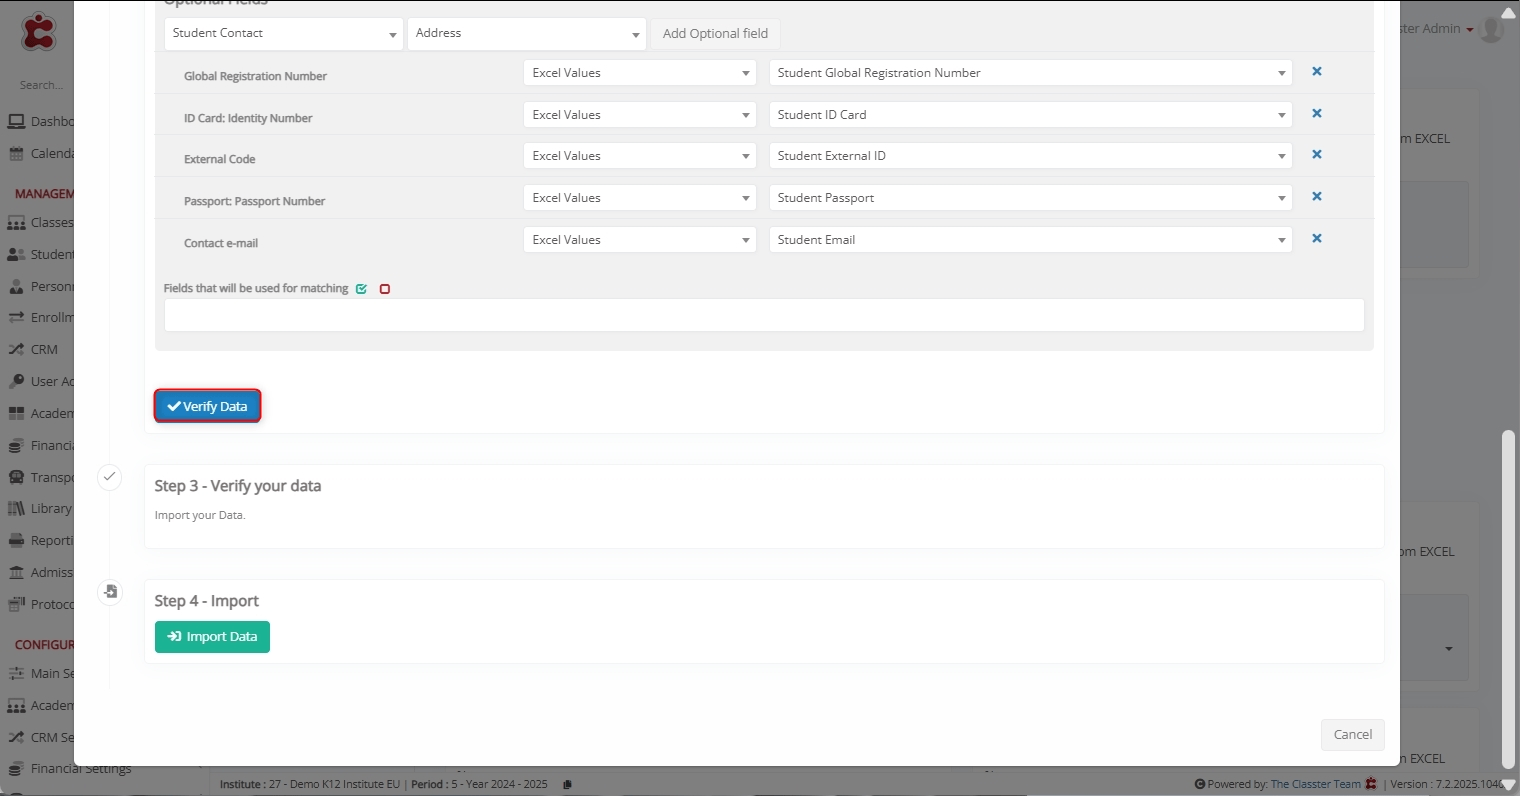
However, if there are errors (e.g., missing mandatory fields or incorrect columns formatting), Classter highlights the corresponding fields in red for correction.
Ensure that:
- All required fields contain valid values, and the data should be connected, like _Grade_ must be connected to _Location_, _Stream_ must be connected to Grade, etc,.
- There are no duplicate entries causing conflicts.
- The Uploaded Excel file column contains the exact same order as listed in Mandatory fields section.

Import Data
Once mapping is complete:
- Classter validates the data.
- If the data is correctly aligned, you see a preview of the records.
- In such case, click the Import Data button to complete the process.
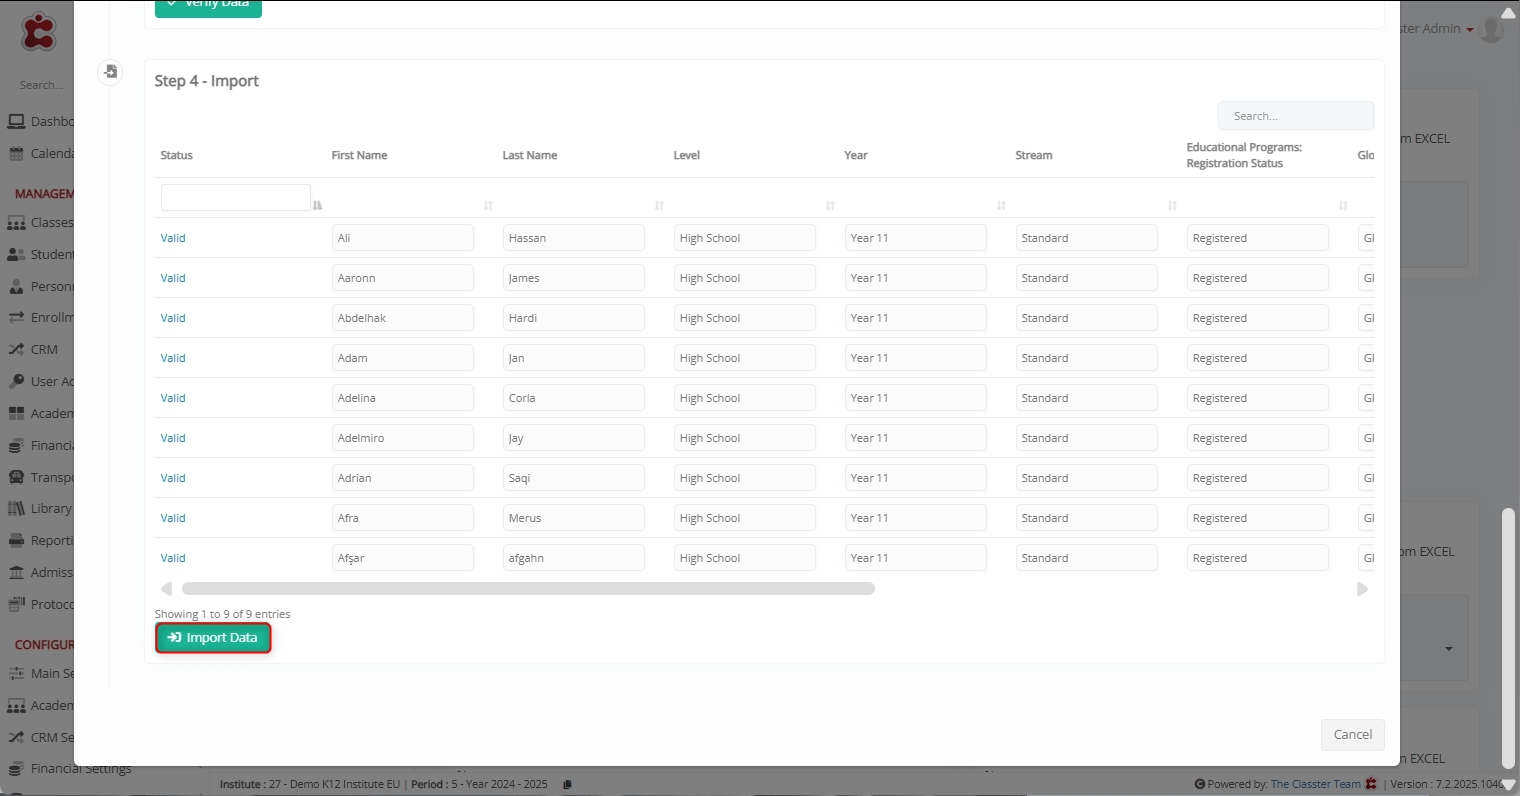
A confirmation message appears once the import is successful.
Note: Make sure that you have enough balance of Students in your License before the import.

Handling Errors
Invalid Value in Dropdown Field
If the Excel file includes a value not configured in Classter (e.g., Registration Status = Applicant), the system returns:
Error: Registration Status “Applicant” not found.
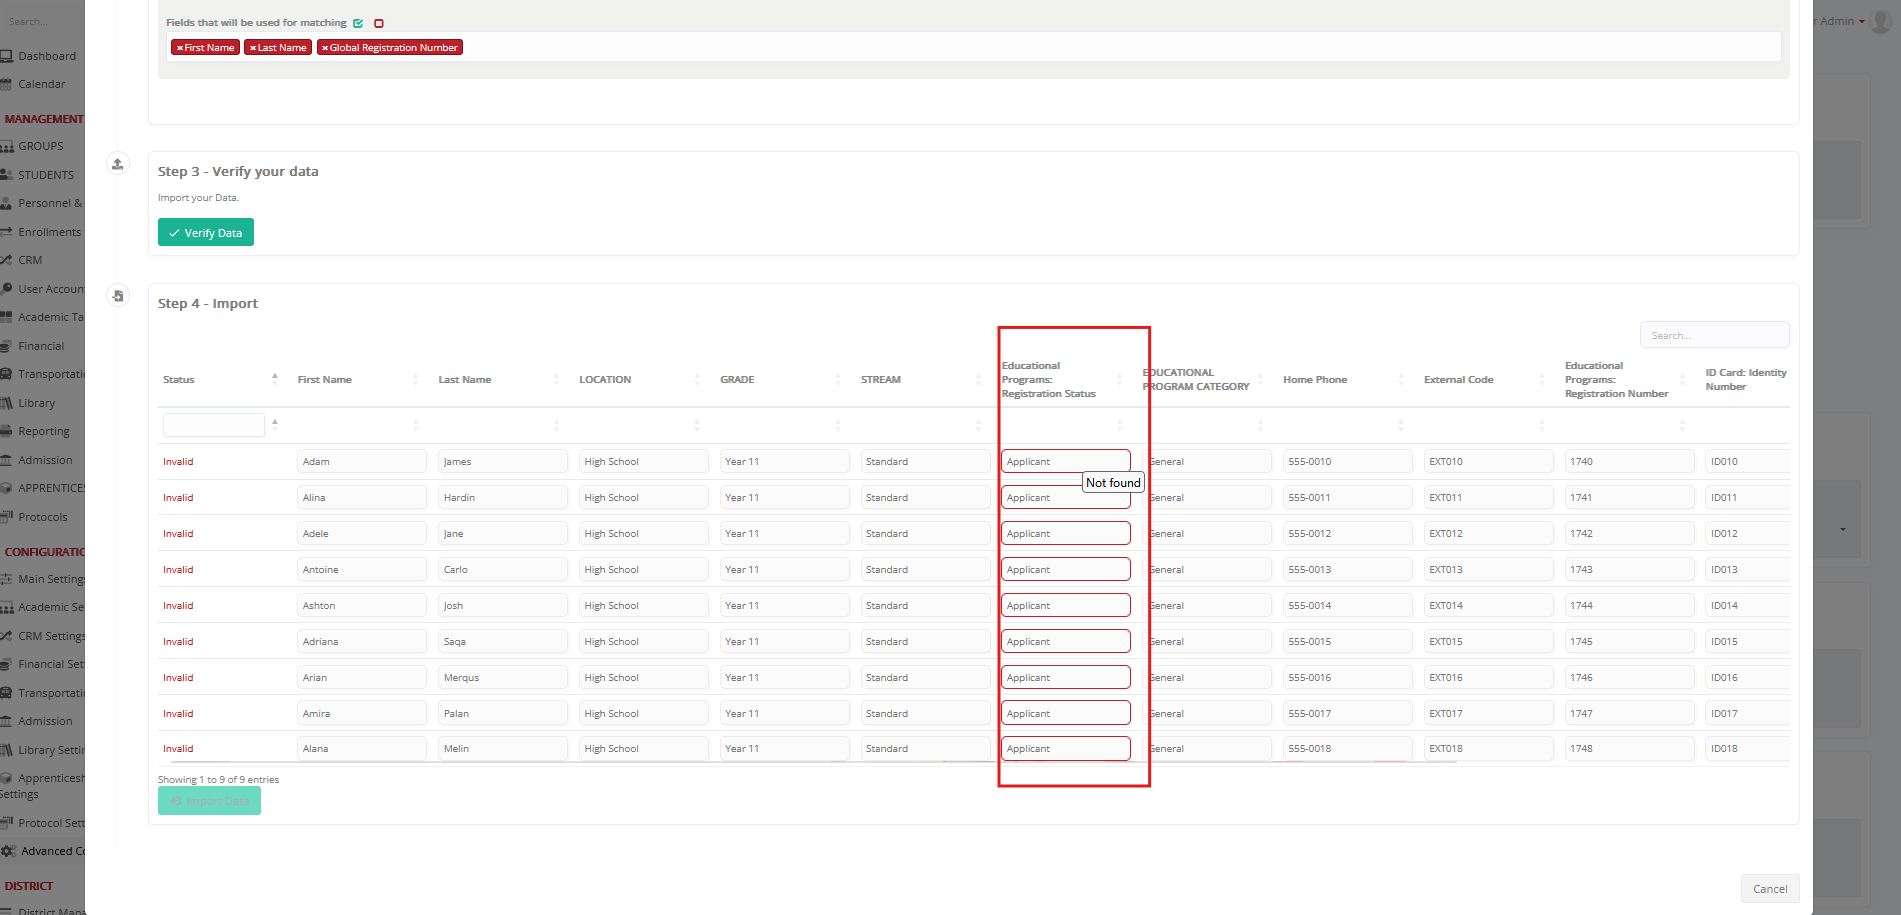
This occurs because dropdown fields only accept predefined system values.
Fix:
Update the Excel file to use an existing value or create the missing one in Classter, then re-run Verify Data.
Stream / Educational Program Category not connected to Grade
When importing students, the system may fail to validate Stream and Educational Program Category fields if the underlying configuration does not properly link these entities.
Example:
During the import process, the uploaded Excel file includes valid Stream and Educational Program Category values, but during verification the system cannot match them because:
- The Stream is not connected to the selected Grade.
- The Educational Program Category is not connected to the selected Grade and Stream.

Error Behavior:
The system highlights the affected rows in red, preventing a successful import.
Explanation:
Classter requires that hierarchical relationships between Location → Grade → Stream → Educational Program Category are properly defined in the system. If these links are missing, validation cannot occur.
Missing or Incorrect Matching Fields
When importing Students—especially when working with multiple Educational Programs or when the “Add or Transfer Educational Programs for Existing Students” switch is enabled—Classter relies on matching fields to determine whether each row refers to:
- an existing student (so the system should add programs), or
- a new student (so the system should create a new record).
If the matching fields are missing, duplicated, or incorrectly configured in the Excel file, several types of errors can occur.
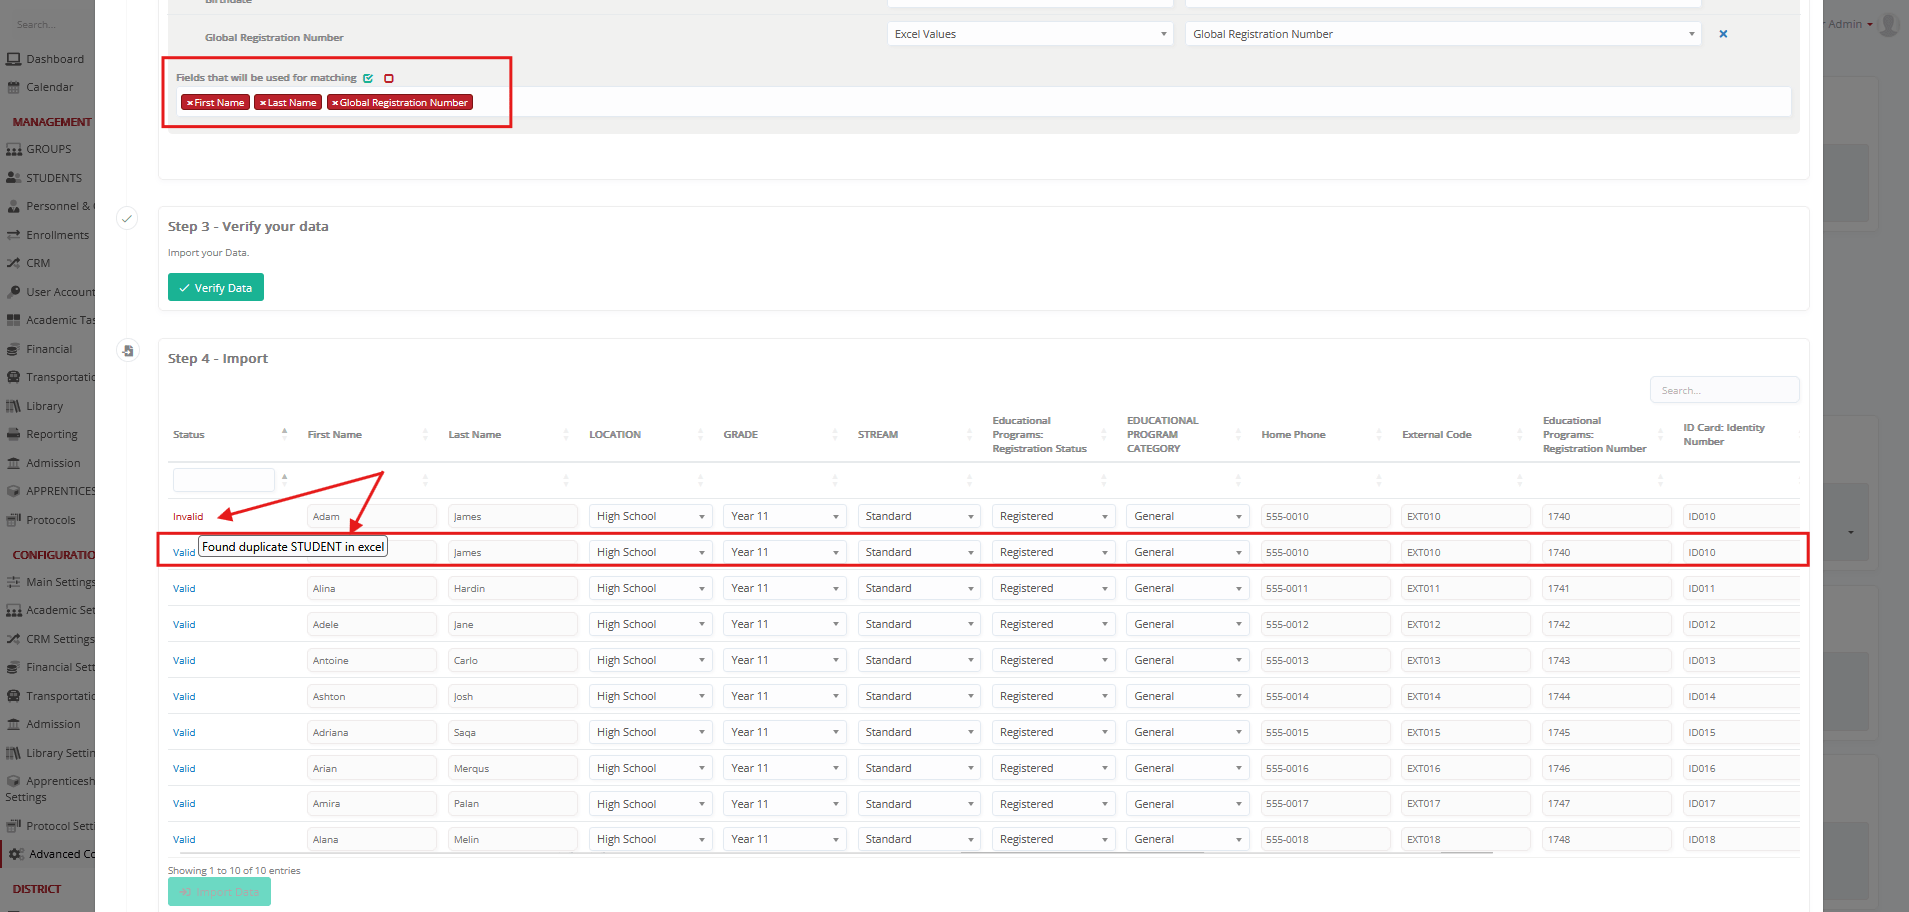
Scenario A – Duplicate Matching Values Found in Excel
Error Message:
“With matching fields found two duplicate rows in the excel with the same student and educational program.”
Explanation:
If the selected matching fields (e.g., First Name, Last Name, GRN) contain duplicate values in the Excel file, Classter cannot uniquely identify each student. This ambiguity prevents validation and causes the import to fail.
Fix:
- Ensure all matching fields contain unique and consistent values for each student.
- Remove accidental duplicates or correct the identification fields in the Excel file.
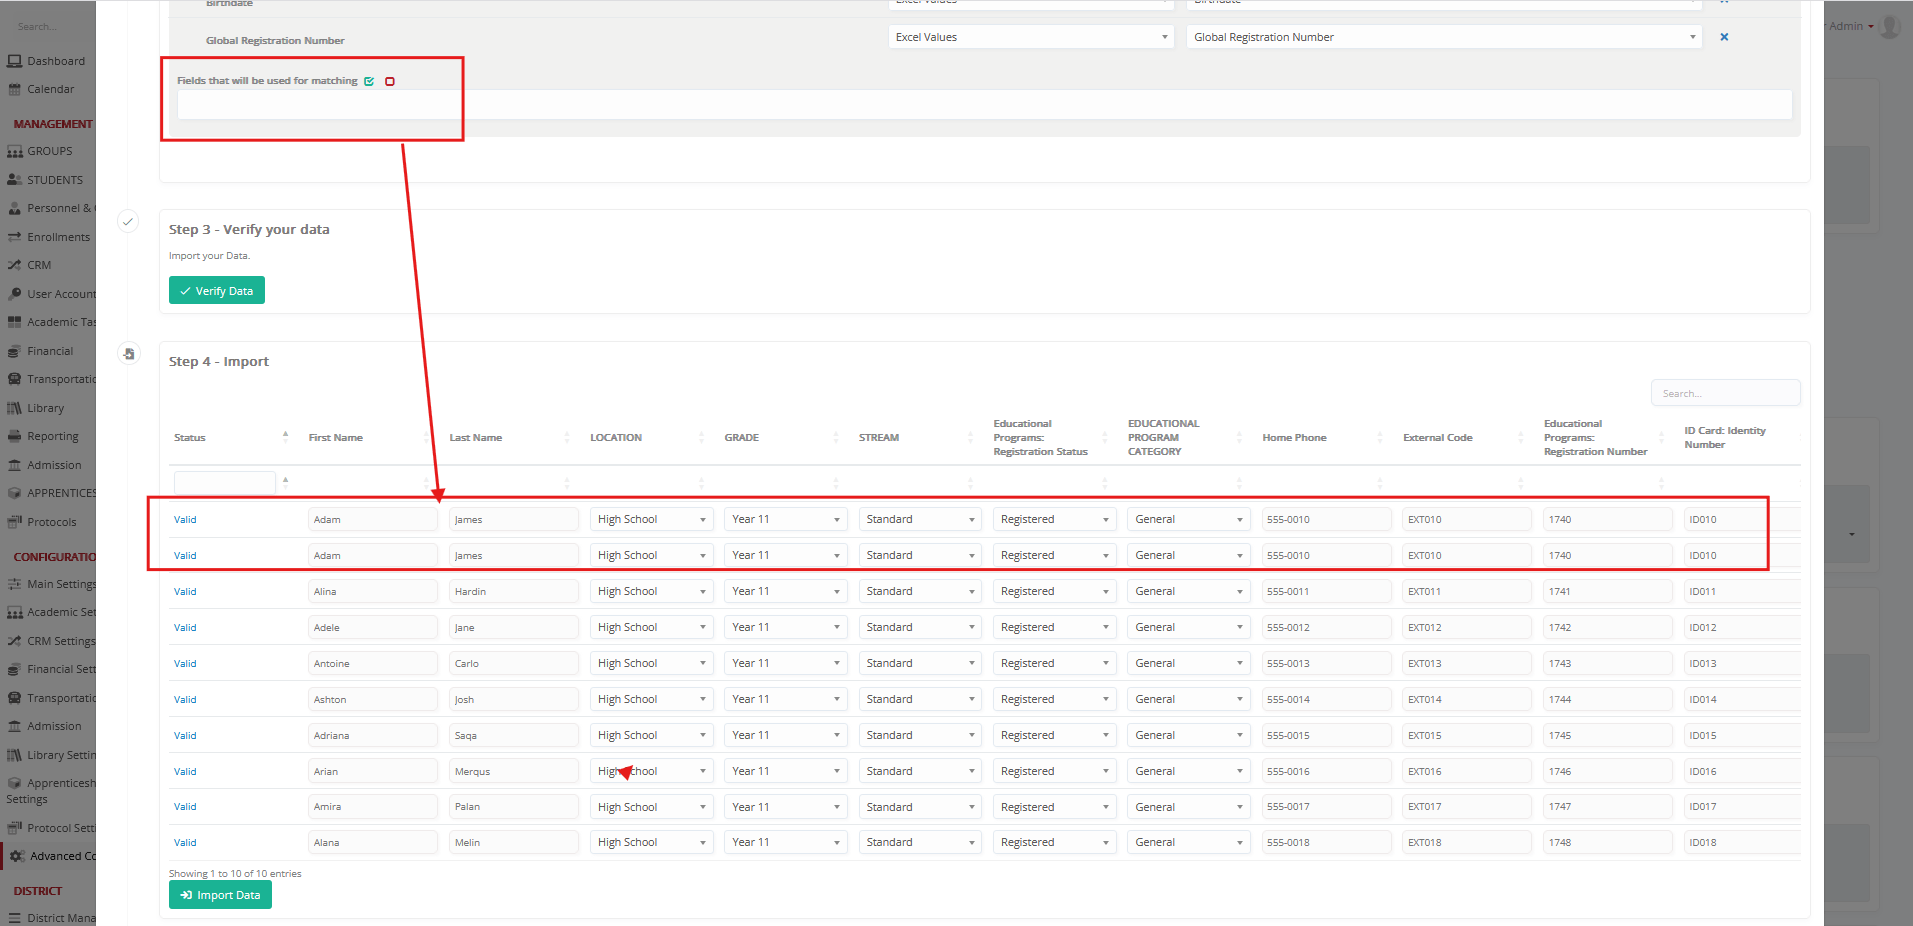
Scenario B – No Matching Fields Provided → System Treats Rows as New Students
If no matching fields are selected during mapping, Classter cannot determine whether the student already exists.
Result:
- Each row is treated as a new student, even when the data is identical.
- This may lead to the creation of duplicate student records, which require manual cleanup.
Fix:
- Always map at least one reliable unique identifier (e.g., GRN, External Code, ID Number).
- Ensure these identifiers already exist both in the system and in the Excel file.
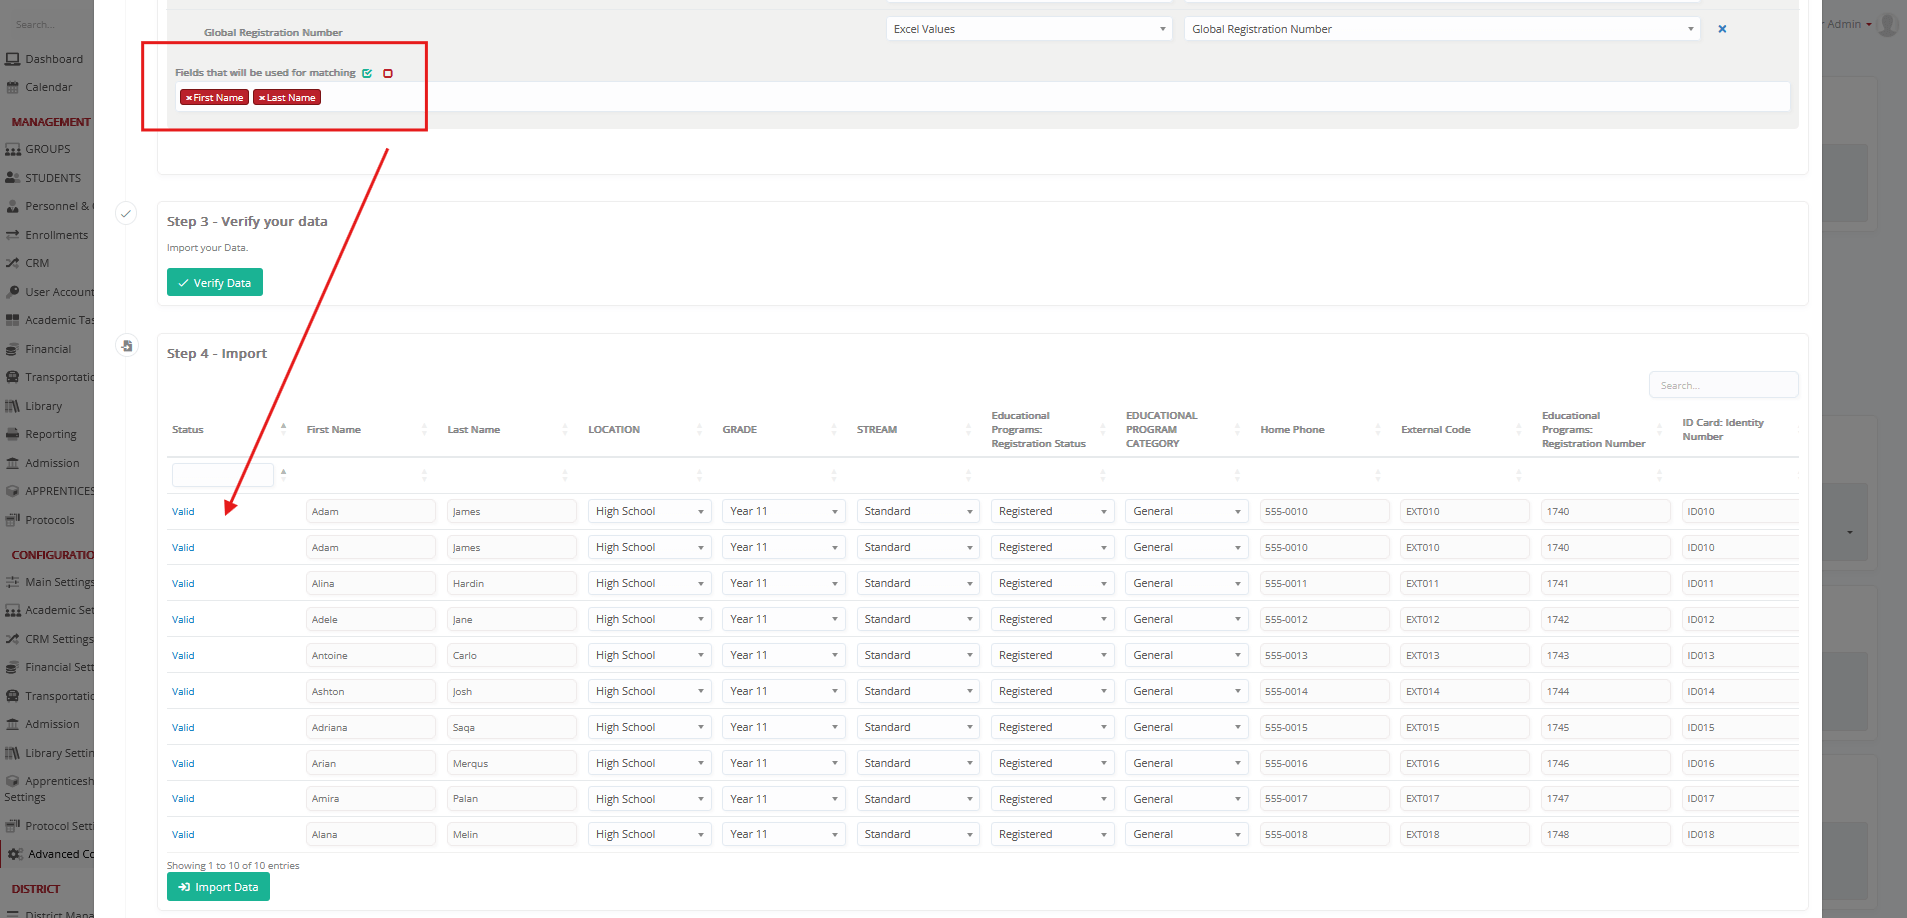
Scenario C – Matching Validation Skipped When the Update Switch Is ON
When the “Add or Transfer Educational Programs for Existing Students” switch is ON, Classter works in update mode.

Important:
➡️ In this mode, matching-field validation is not enforced. The system assumes you already know which students you are updating.
Result:
- Rows with missing or incorrect matching data may still import.
- This can create duplicate students or assign programs to the wrong record.
Fix:
- Turn the switch OFF to enforce matching validation.
- Ensure matching fields are correctly filled before verifying or importing.
Smart Tip!
A simple and effective way to verify what values a specific field expects (except free-text fields) is to temporarily switch its mapping type to User Value. When doing so, the dropdown will display all valid values that already exist in the system.
This method helps you:
- Confirm the exact spelling and formatting of allowed values
- Avoid errors caused by typos, extra spaces, or mismatched terms
- Understand whether the field is connected to other configuration elements
(e.g., Grade → Stream, Grade → Location, Educational Program Category → Grade/Stream)
Important:
For some fields, you may discover that additional configuration is required before the import can successfully validate (e.g., if a Stream is not linked to the selected Grade). Always ensure that all hierarchical relations and dependencies are correctly configured.
Output
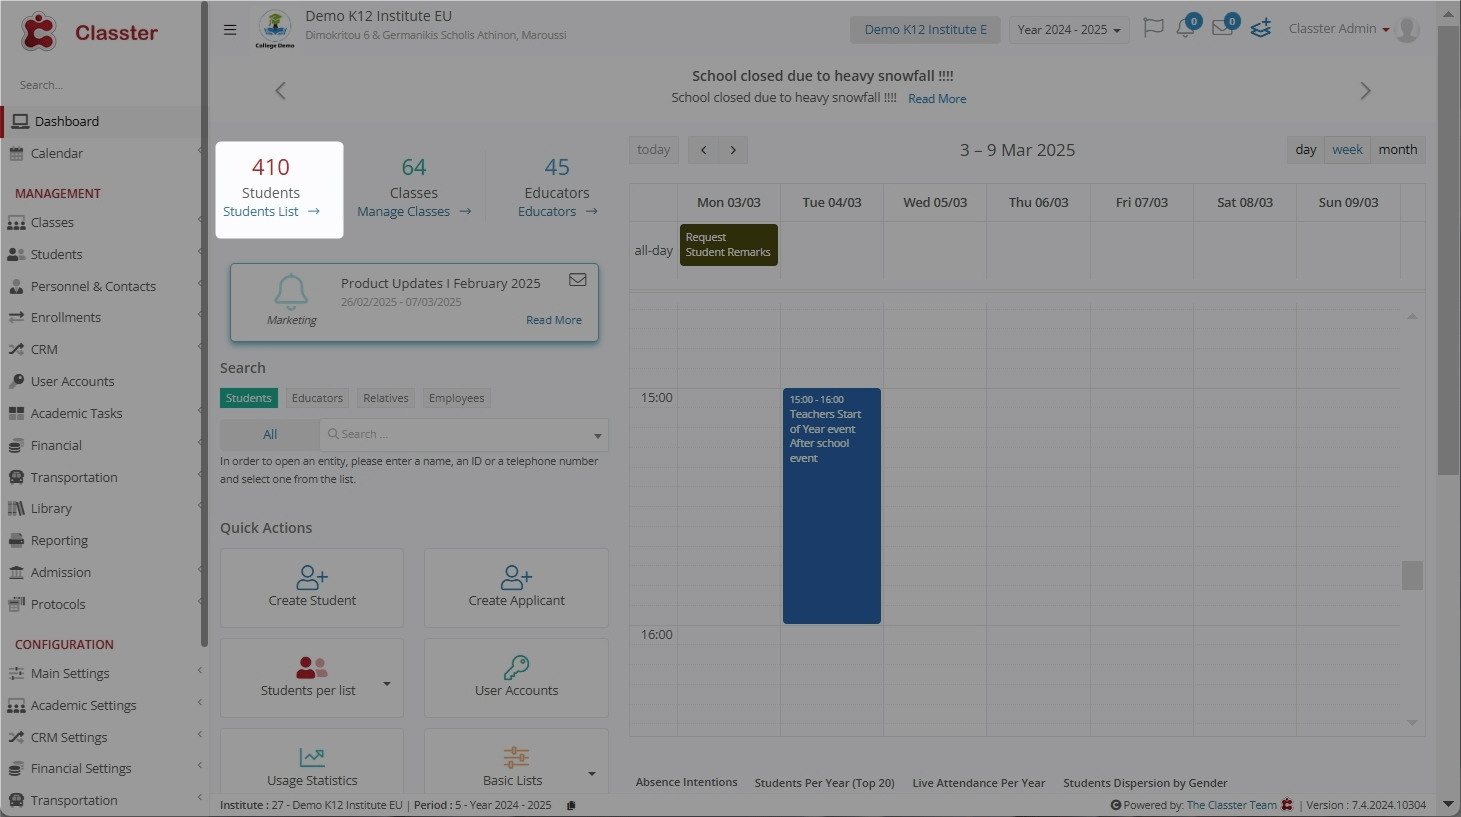
Once you successfully import the data, the result shows up immediately. For instance, before importing, we had 410 Students in the current institute.
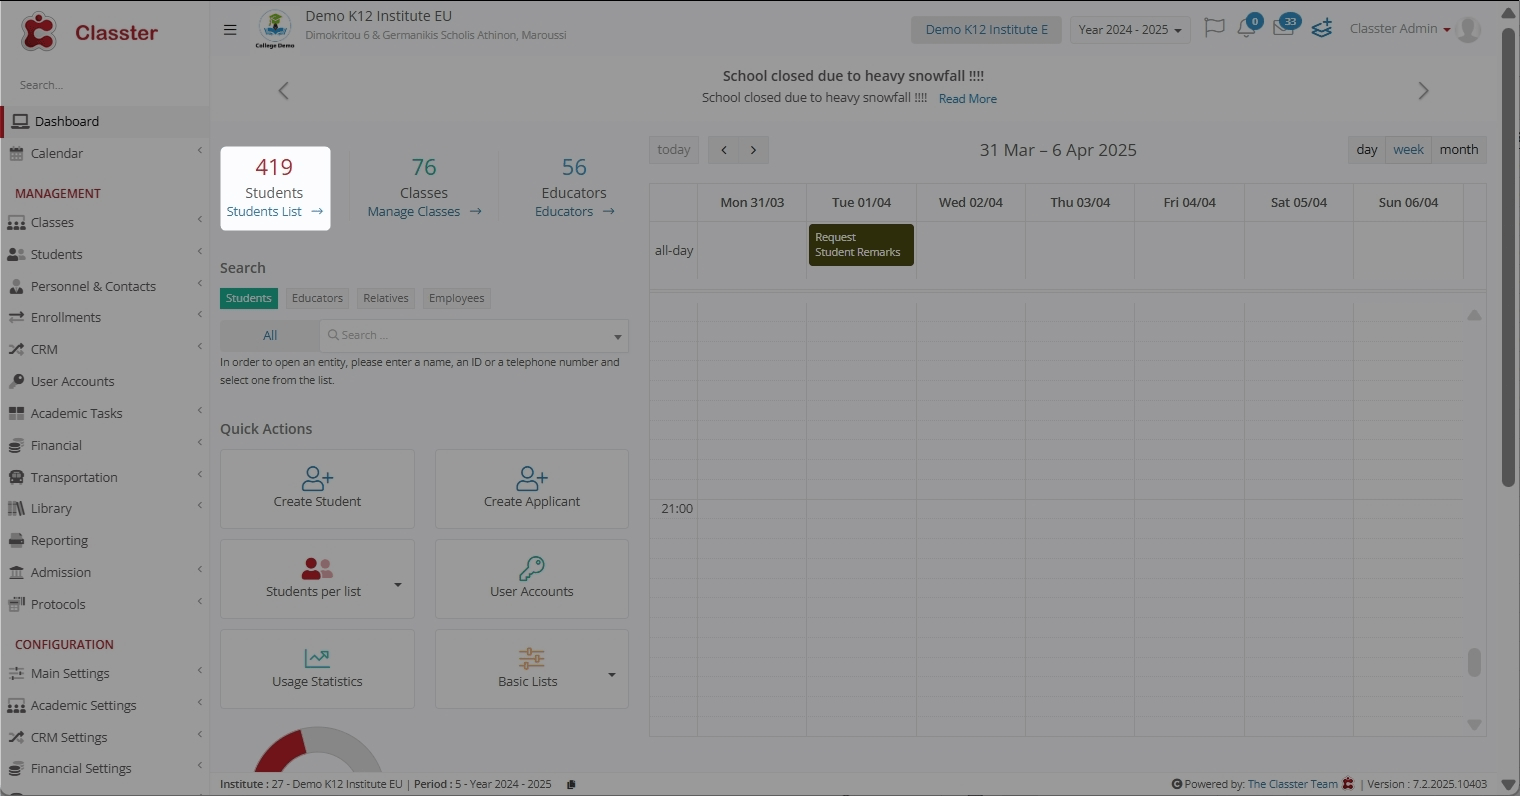
After importing, we have 419 Student records.
Filter Imported Students
Additionally, you can navigate to Students > Students List and search for the newly imported Students using different filters.
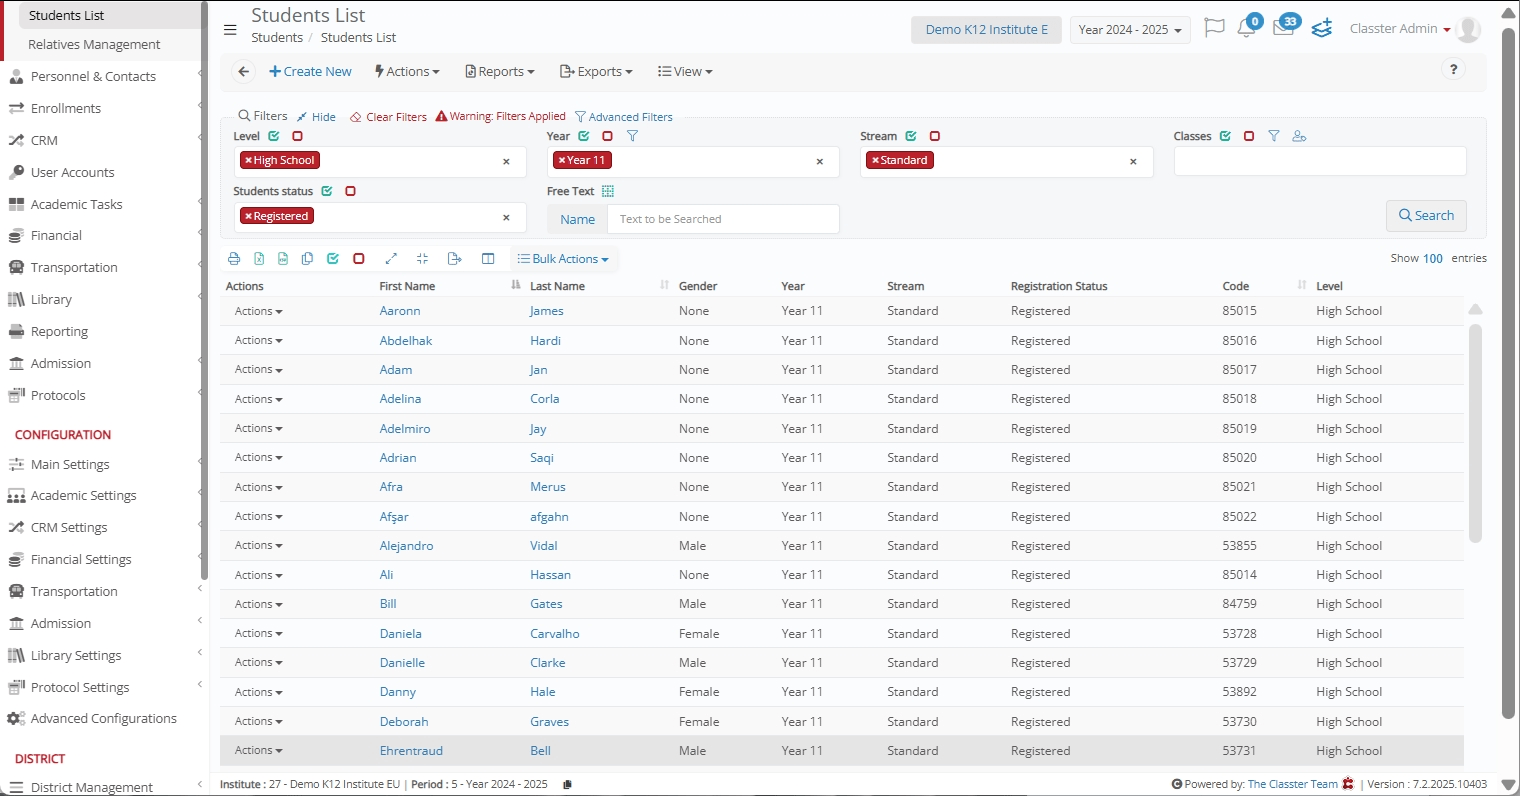
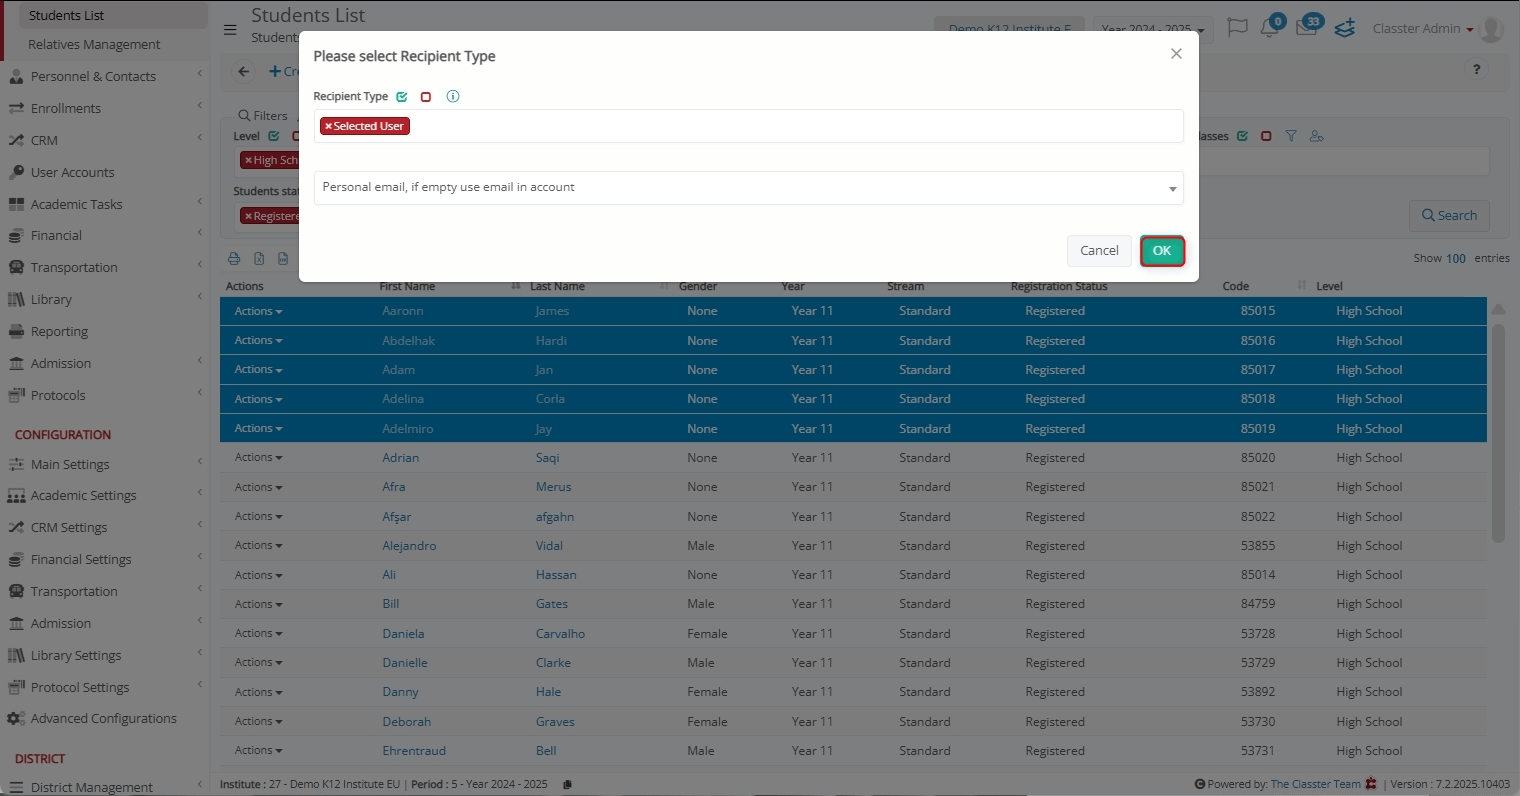
Perform Bulk Action
After fetching the required Student records, select them and perform any Bulk Action with ease.
For instance, you can send them an Initial Invitation.
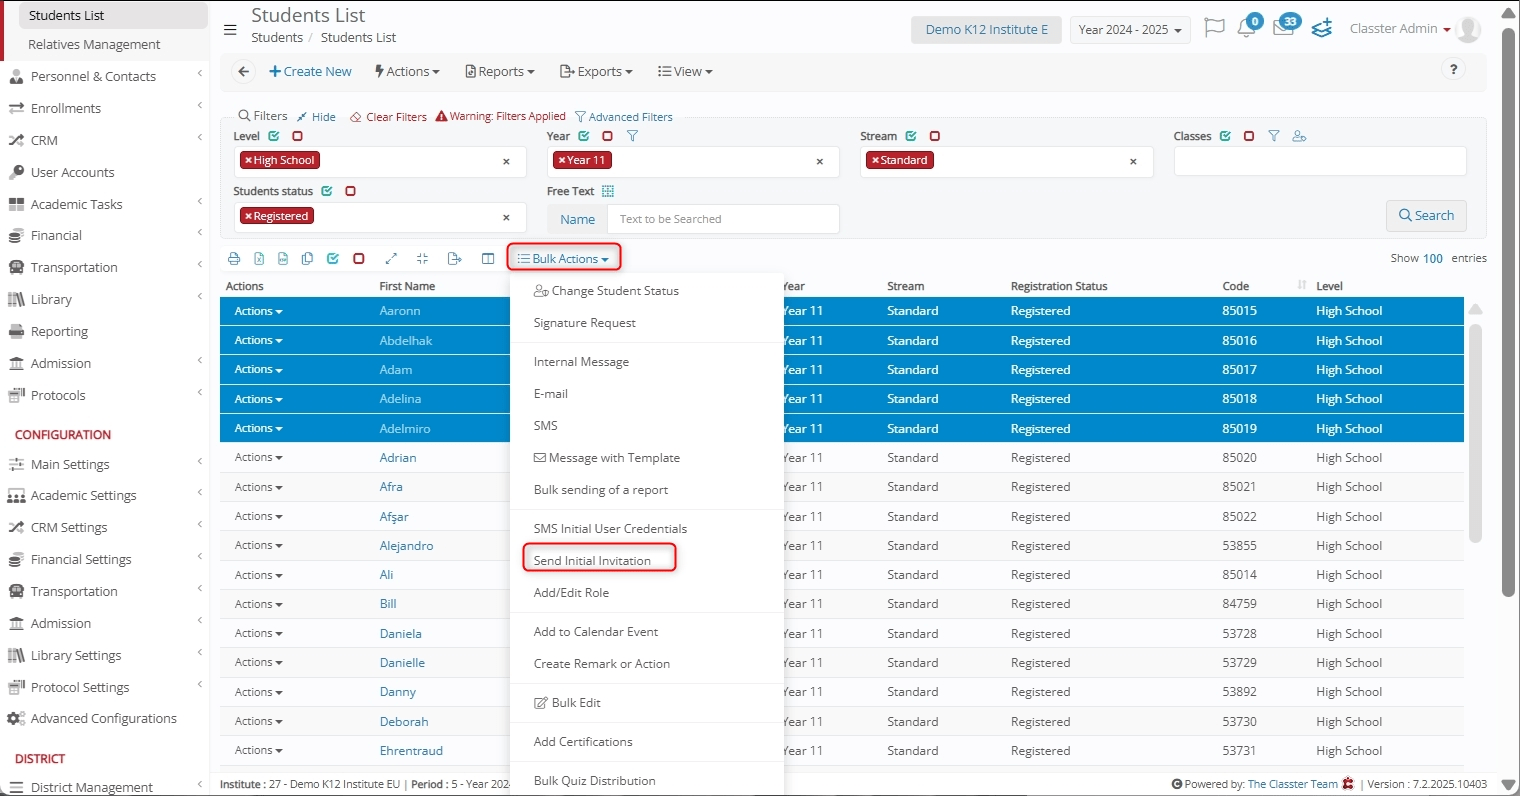
To do so, specify the Recipient type and click OK.
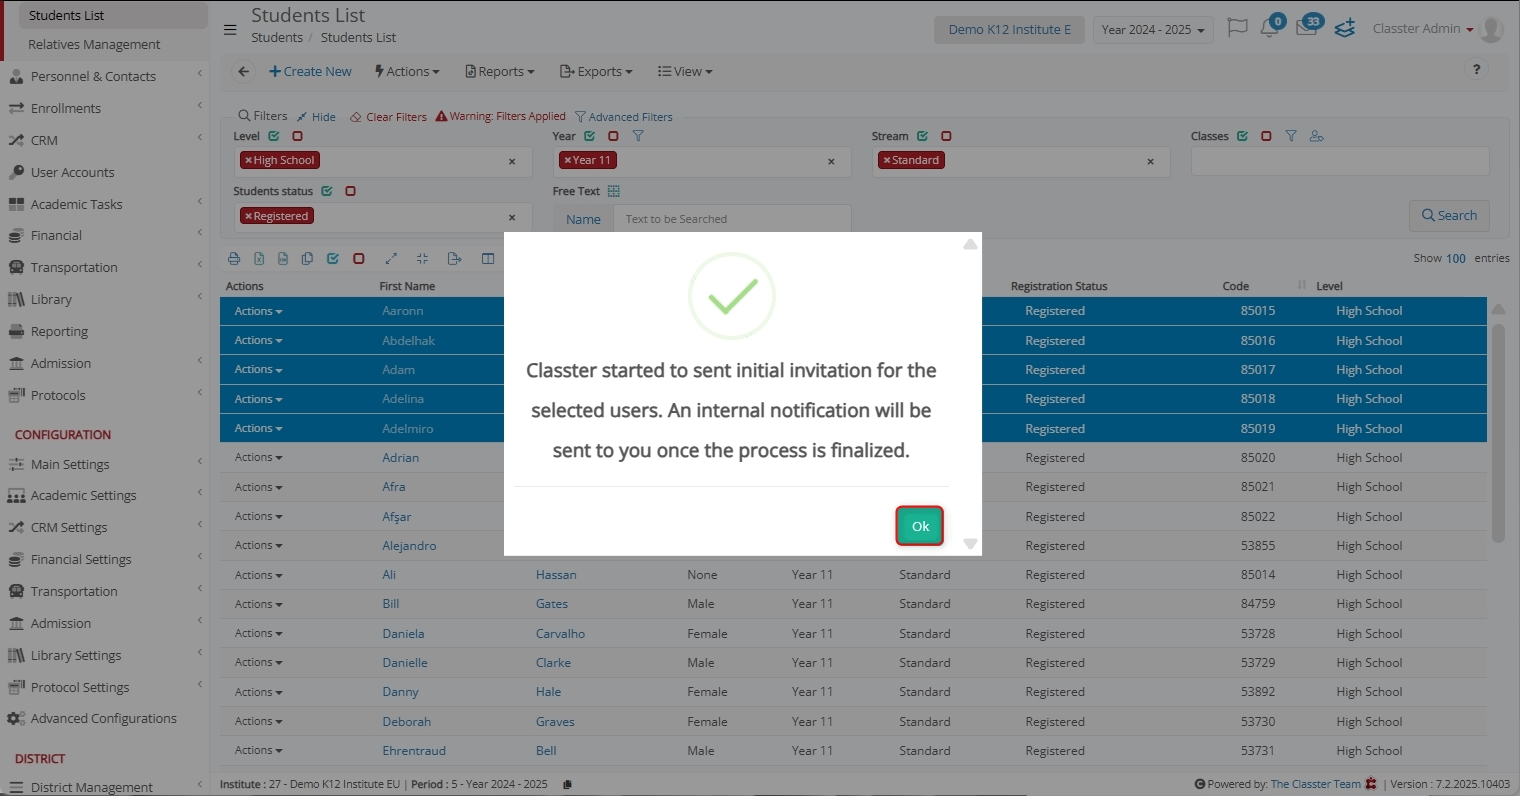
View the confirmation message and click OK.
Summary
By following the listed steps, institutions can efficiently import Student records into Classter. Properly formatted data, correct field mapping, and validation checks ensure easy and error-free imports.