

This section is very important in core configuration. Here you can configure settings governing all the core functions, these include Basic Customization, Registration, Enrollments, Service Parameters, Personnel and Contacts, Accounts & Roles, Security, Transfers & Re-Registration, Higher Education Customization and mobile apps.
Configuration > Main Settings > General Settings
Figure 229
Basic Customization
Basic Settings
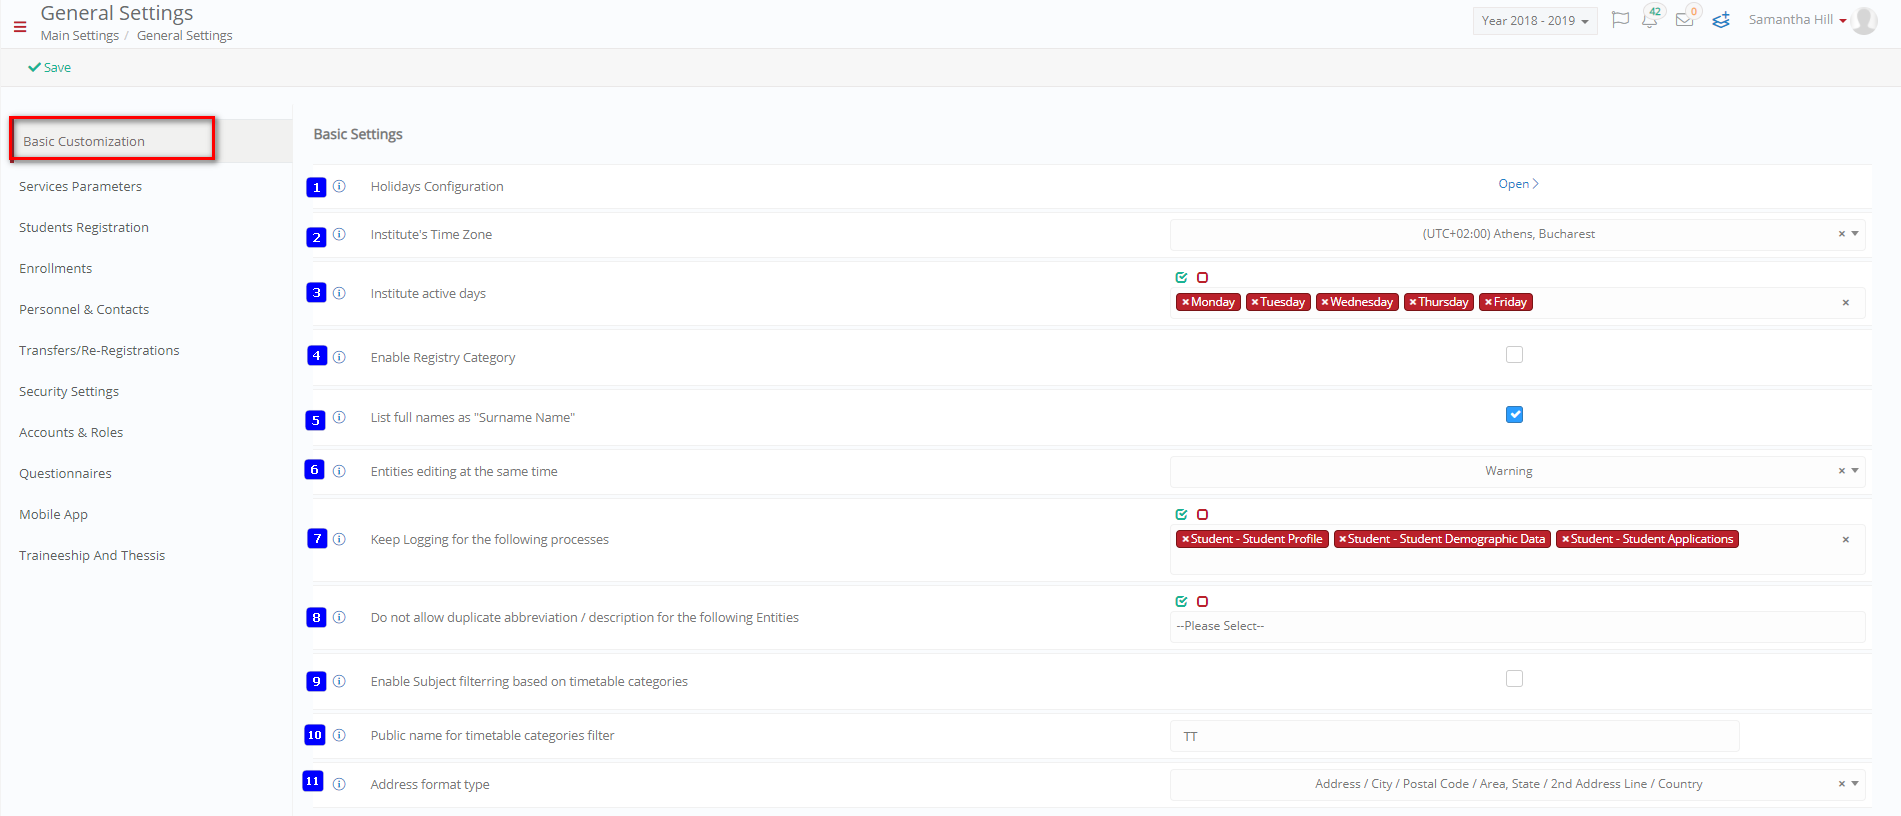 Figure 230
- Holidays Configuration: By clicking on the open button, you will be taken to the holidays configuration page where you can create holidays in your academic timetable that will indicate that these days are not teaching days e.g., Christmas Break (Figure 231).
 Figure 231
- On the holiday page you can create, edit, or delete a holiday
- You can print, copy, or export the list of holidays
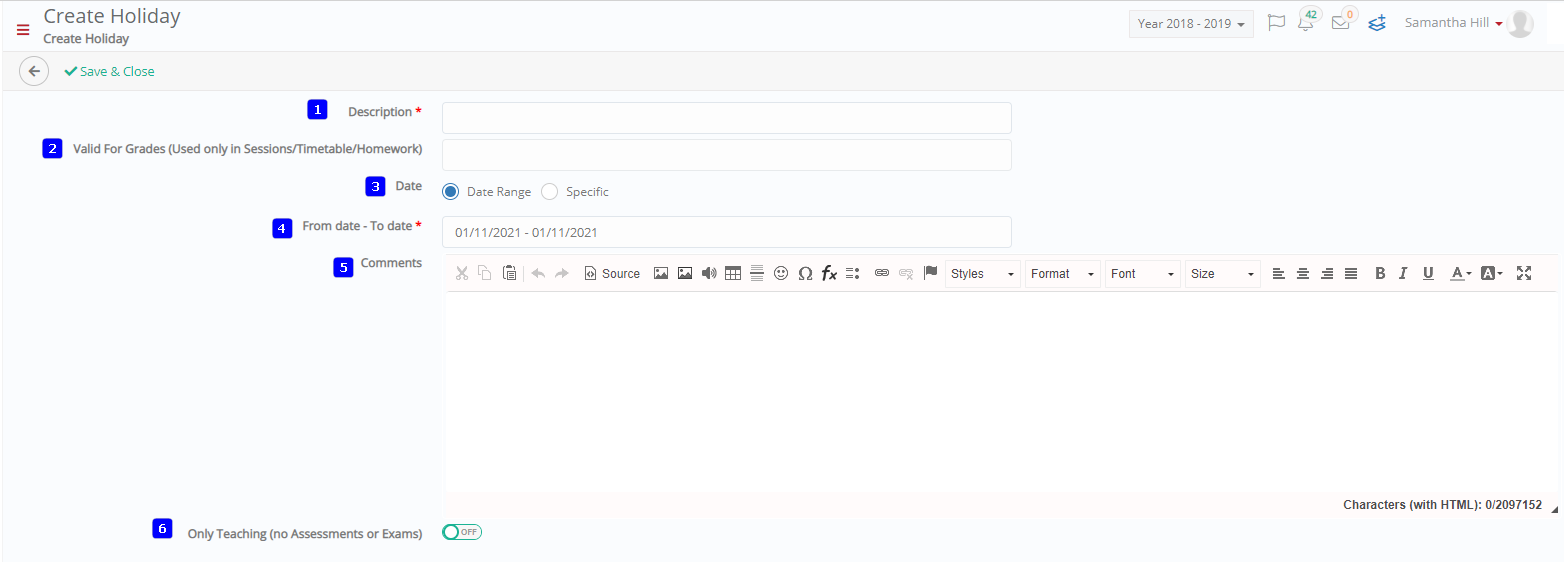 Figure 232
- Add a description in the description field e.g., Christmas Holidays.
- Add the _Grades_ which this holiday will be applied to.
- Choose either Range or Specific option to identify if this holiday is on a specific day or in a range of days e.g., 12.01.2020 or 12.01.2020-16.01.2020.
- Add the range of dates or the specific date here (this is filtered by the previous option).
- Switch the only Teachers switch to indicate that this holiday affects only teachers and not the assignments that may be due.
- Add any comments related to the Holiday.
- Institute’s Time Zone: Here you can set the institutions clock to the time zone used in the country the institution operates in.
- Institute active days: Here you can choose the weekdays or weekend days the institution considers as active for offering its programs e.g., Monday – Friday.
- Enable Registry Category: By enabling this option, any Educational Program is also categorized by a new column. The user has the ability also to filter Subjects based on the chosen Student’s Registry Category..
- List full names as “Surname Name”: If this is checked then the student’s and Teachers full name will appear under the list ‘Surname Name’ e.g., Bailey Oliver. If not checked then the system will display ‘Name Surname’ e.g., Oliver Bailey.
- Entities editing at the same time: Here you can select if Classter is going to forbid or warn end users from modifying an entity when another user is also editing the same entity. The options are: (a) No Check (b) Warning , i.e. Classter will just warn the user if this happens but it will allow the end user to save any change (c) Forbid , i.e. Classter will not allow the end user to save the entity when this entity is already changed by another user at the same time.
- Keep Logging for the following processes: Here you can define what data changes to be logged by Classter. If you enable this option for one or more parts of Classter, then a Log blue button will be presented on the top right side of the form.
- Do not allow duplicate abbreviation / description for the following Entities: This option will not allow the creation of duplicate descriptions or abbreviations for certain entities that you choose in this option e.g., _Groups_, _Streams_, _Grades_,etc.
- Enable Subject filtering based on timetable categories: if this option is checked then, subjects will be filtered based on the timetable category.
- Public name for timetable categories filter:
- Address format type: Select the address format to be used.
Special Settings
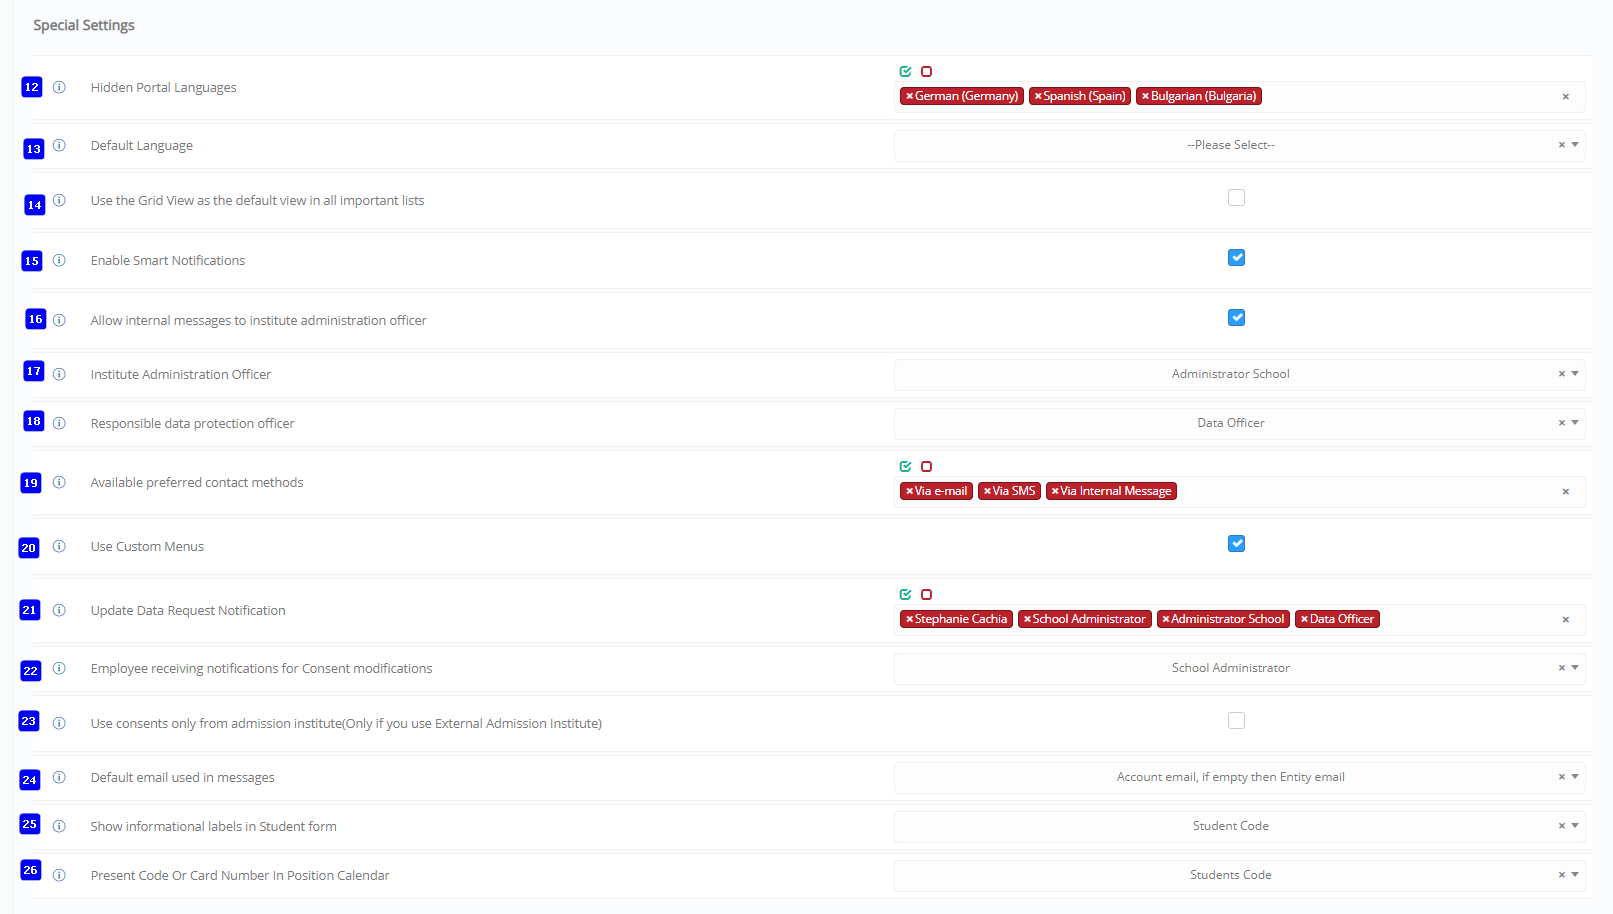 Figure 233
- Hidden Portal Languages: Here you can select one or more languages to hide from the language selector option. Thus, languages selected here will be disabled for the end users.
- Default Language: Choose the default language for the portal.
- Use the Grid View as the default view in all important lists: Selecting this option, you select the Grid view to be the default view in all lists. If not selected, then Card view will be the default. Note: End users may select another preferred view in their profile.
- Enable Smart Notifications: If this checkbox is ticked then you will enable Smart Notifications that operate as popup reminders of Announcements, Notifications or Warnings to remind you of things you must have in mind.
- Allow internal messages to institute administration officer: Here you enable the Institution administrator to receive messages by end users. You should define an administrator or employee account to receive the message.
- Institute Administration Officer: Here you can define who is the administrator officer for this institution.
- Responsible data protection officer: Here you can define who is the data protection officer for this institution.
- Available preferred contact methods: Here you can define the list of available preferred contact methods. Based on the values selected here end users may select their communication preference in their profile. You can de-select some of the options if you don’t want end users to select those options as their preferred communication method.
- Use Custom Menus: Here you can enable the use of custom menus. Custom menus are defined in the advanced configuration options. Custom menus can open custom web pages or external links and there presented underneath the normal menu presented to an end user.
- Update Data Request Notification: If selected, then Classter will send a notification message to an employee when an end user asks for a change in their personal data stored in Classter. Note: End users can go to their profile and modify some of their personal data. However, employees need to copy those changes to the normal entities’ card in order this change to take effect as an official change.
- Employee receiving notifications for Consent modifications: Here you define an employee account that is going to receive a notification when an end user changes a _Consent_.
- Use consents only from admission institute (Only if you use External Admission Institute): Select this option if: (1) You have a multi-institution installation. (2) One institution is for “Admission Only”. (3) You want any _Consent_ entered or taken to be saved only in the Institution defined as Admission Only type.
- Default email used in messages: You define if Classter is going to use account’s email or personal emails when Classter sends email to an end user. If you select Account email, then Classter will firstly check if the entity has an email in the user account. If so. Classter will use this email by default. If Classter finds no email in the account, then the personal email defined in the entity will be used instead. If the option here is personal email, then the personal email will take priority over the account email.
- Show informational labels in Student form: Select this option if you want to present info tooltip in the Student’ s profile form. The information presented here is defined in the personal data configurator option.
- Present Code or Card Number in Position Calendar: Select whether to use the student code or the card number from the position calendar.
Supervisor Mode
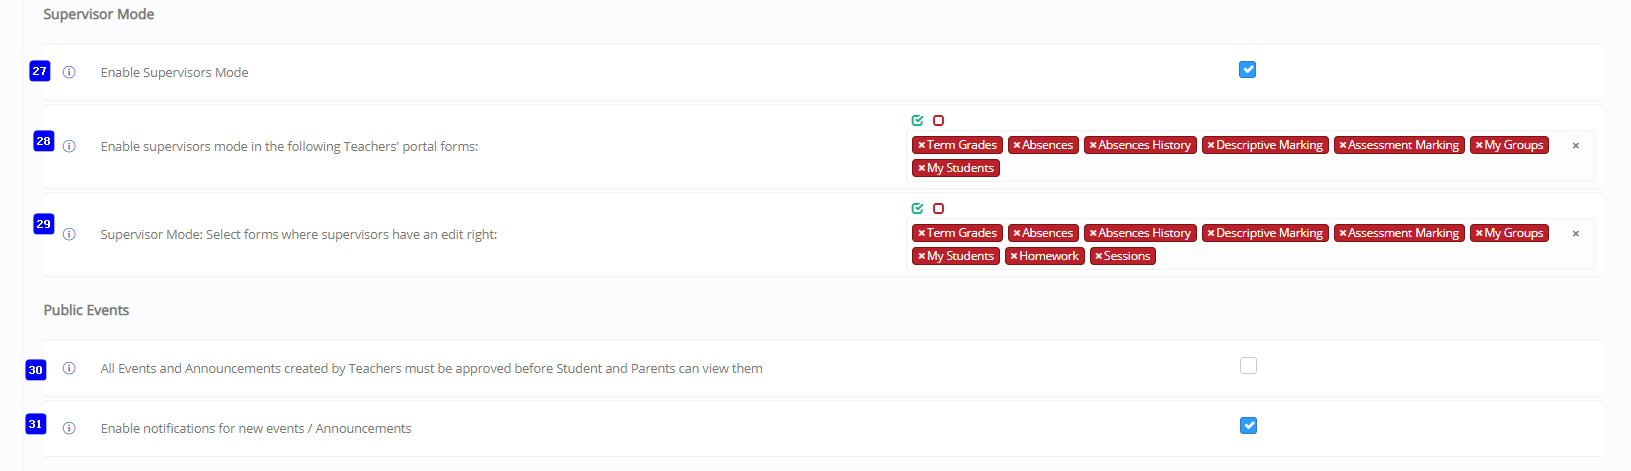 Figure 234
- Enable Supervisors Mode: Here you can enable the Supervisor mode in the Teachers’ portal. Supervisors are set in the following entities: _Grade_, _Group_ test, _Subject_ and _Location_. By enabling the Supervisors mode, supervisors can view or edit data of _Students_ that are taught by _Teachers_ who they supervise. This is true for several portal forms. You need to define these forms and the level of access in a following setting.
- Enable supervisor’s mode in the following Teachers’ portal forms: Here you can enable the Supervisor mode in the Teachers’ portal. Supervisors are set in the following entities: _Grade_, _Group_ test, Subject and _Location_. By enabling the Supervisors mode, supervisors can view or edit data of _Students_ that are taught by _Teachers_ who they supervise. This is true for several portal forms. You need to define these forms and the level of access in a following setting.
- Supervisor Mode: Select forms where supervisors have an edit right: Select one or more forms where a Supervisor _Teacher_ can edit data.
- All Events and Announcements created by Teachers must be approved before Student and Parents can view them: If checked this means that an employee or back office employee needs to approve all events or announcements created by _Teachers_ before those events or announcements are presented to parents or _Students_.
- Enable notifications for new events/Announcements:
Public Events
Card Settings
 Figure 235
- Set ID/Code type to be used in Student cards: Here we can define which ID or personal code type will be used in the _Students_ printed personal cards. This ID field will be used in quick search option also.
- Set ID/Code type to be used in Teacher cards: Here we can define which ID or personal code type will be used in the Teacher’s printed personal cards. This ID field will be used in quick search option also.
- Set ID/Code type to be used in Employees cards: Here we can define which ID or personal code type will be used in the Employee’s printed personal cards. This ID field will be used in quick search option also.
Notifications Service
- Enable Notification Service: If you select this option, Classter will be able to send bulk notifications using the notification service. This service runs regularly based on the configuration provided below. You should go to the advanced configuration to define there the notification rules applied.
- Notification Service Run Time: Here you define the time of the day you want the notification service to run.
- Notification Service Message Type: Here you define if you want the notification service to send messages or emails.
- Overwrite countable number per student based on this custom field: In essence this option may set a numbering system for _Students_ that overrides the default numbering system.
Click on Save button to save all your changes to the Basic Customization Settings.
Services Parameters
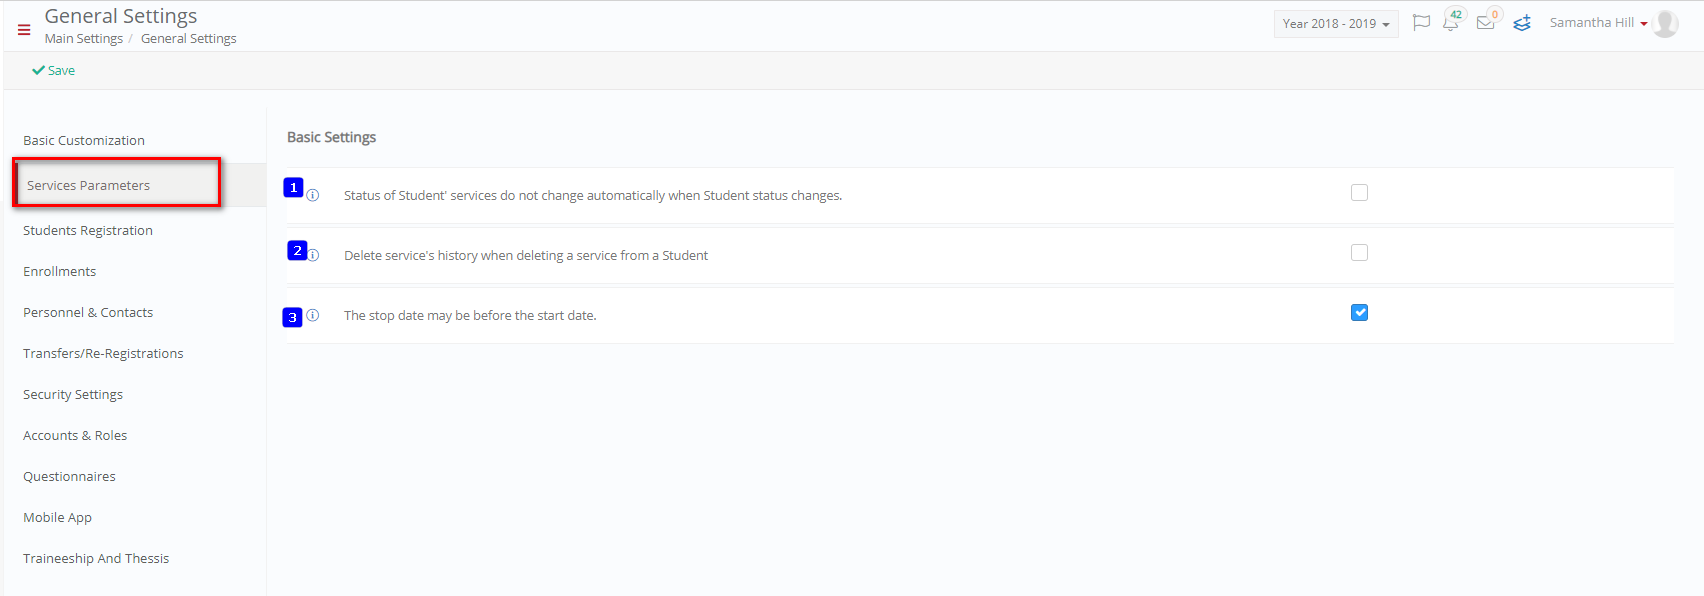 Figure 236
- Status of Student’ services do not change automatically when Student status changes: When a user changes the status of a _Student_ from registered to another status, Classter automatically also changes the enrollment status of all registered services to a stopped status. This function is disabled if you select this option. In this case, Classter will not make any changes to the Student’s enrolled services.
- Delete service’s history when deleting a service from a Student: When a user deletes a service from a _Student_, Classter will also delete the history of changes related to this service. If this is unchecked, then a history of deletion will be kept.
- The stop date may be before the start date: Enable this setting to allow the stop date to be before the start date.
Click on Save button to save all your changes to the Services Parameters Settings.
Student Registration
Basic Settings
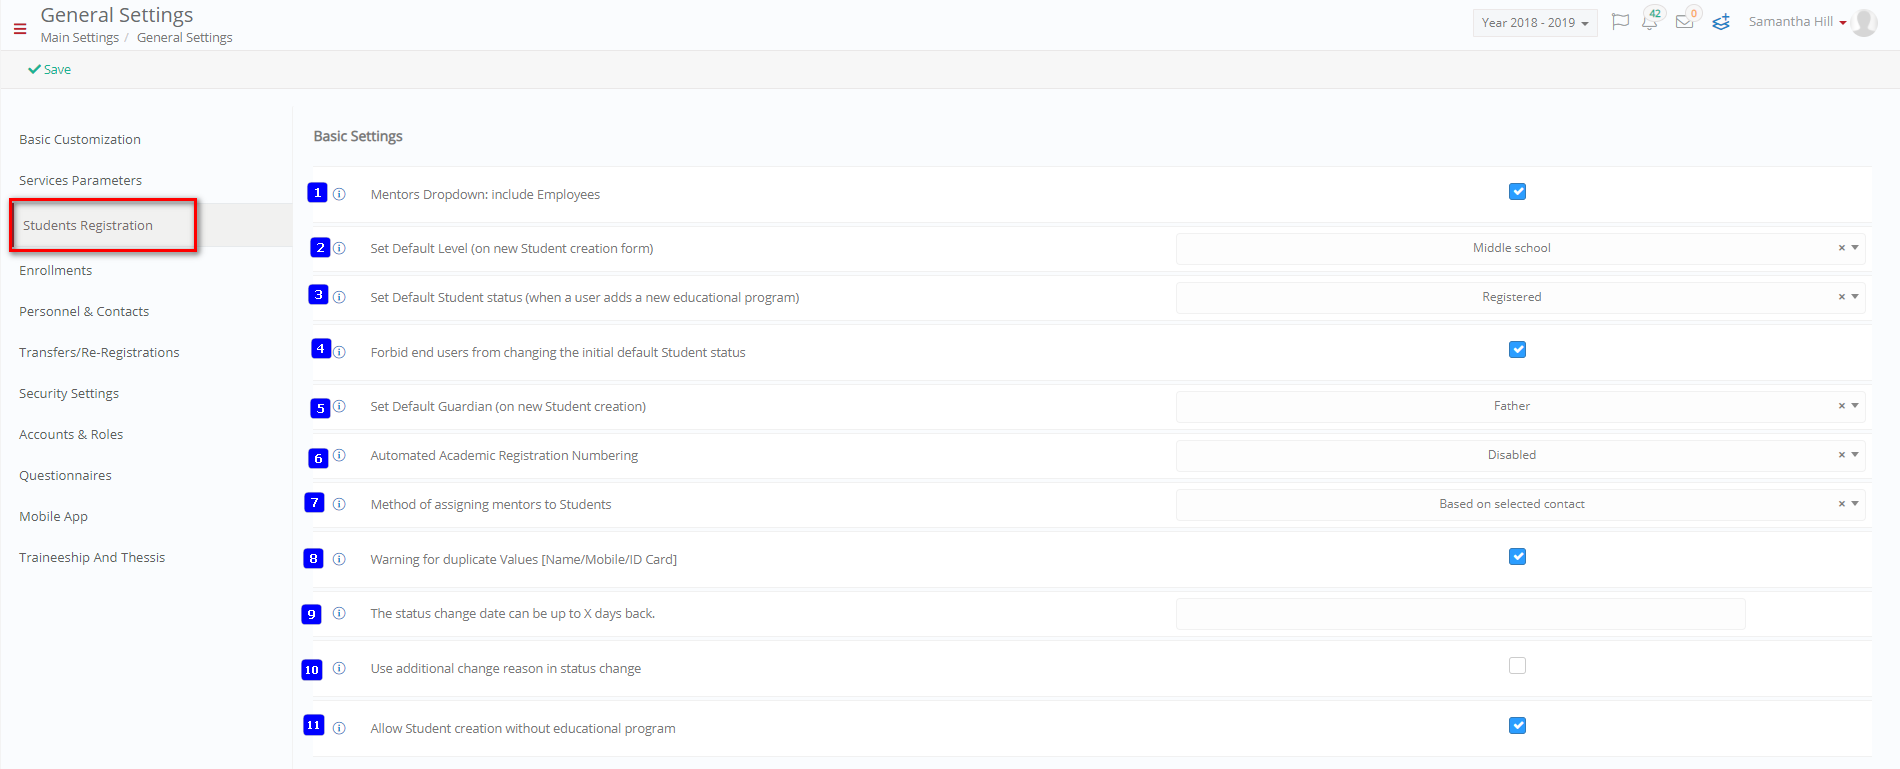 Figure 237
- Mentors Dropdown: include Employees: _Student_ Form – Main TAB: By not selecting this check, Classter will include only _Teachers_ in the Mentor’s drop-down list. If you select this check, then Classter will include both _Teachers_ and employees. However, note that a _Teacher_ or employee must be checked as a “Mentor” in their personal form to be included in this list.
- Set Default Level (on Student Creation Form): Here we define the default _Location_ that is preselected when we create a new _Student_. This may be affected by role settings where you can override this setting per role.
- Set Default Student status (when a user adds a new educational program): Here we define the default _Student_ status preselected by Classter when a new _Student_ is created. This status may be modified by the end user. When the end user adds new educational programs, the selected general status will also be the pre-selected status for all new educational programs. This option can set a default student status when the user adds an Educational Program.
- Forbid end users from changing the initial default Student status: If selected, then when a user creates a new Student , Classter will lock (disable) the Student status field. You should set a default initial status in the previous AppSetting in order to be able to save the Student.
- Set Default Guardian (on new Student creation): Here we define if the pre-selected guardian is father, mother, other or self (_Student_ him/herself, i.e. no guardian exists). The last option is used when a _Student_ is adult (e.g., for Higher Education configurations). When a user creates a new _Student_ and he/she adds a _Student_ relative, then Classter will automatically select the Guardian checkbox based on the setting defined here.
- Automated Academic Registration Numbering: This setting automates the academic registration number.
- Method of assigning mentors to Students: Classter provides 2 methods. It will either assign automatically the signed in user as a mentor for all _Students_ created by the user. Or it will ask the end user to select a mentor from a list of possible mentors. The list may contain _Teachers_ or employees based on your configuration settings. In any case, a _Teacher_ or employee must be set as an active mentor in order to be in the list of mentors.
- Warning for duplicate Values [Name/Mobile/ID Card]: if you enable this setting, during the creation of a new _Student_, Classter will check if the cell phone number or the name/last name of the _Student_ we are trying to input, already exists in the institute you are logged in. The check is done in all academic periods.
- The status change date can be up to X days back: When a user changes the _Student_ status, Classter will ask the user to set a change status date. Here we can define how many days back this date can be. The comparison is between the system current date and the date set by the end user.
- Use additional change reason in status change: If you select this option, then additional text fields are presented in the _Student_ change status form.
- Allow Student creation without educational program: If you select this option, then Classter will allow end users to save _Students_ without educational program. Note that a _Student_ with no educational program is not presented in the list of _Students_ because the _Student_ does not belong to an academic year. You can find the _Student_ only by searching the _Student_ using the quick search option.
Special Settings
 Figure 238
- Users must enter either ID Number or Passport Number before saving a Student: If this option is checked then users with rights to create students will be unable to do so if they do not enter an ID Number or Passport Number.
- Use custom post codes: If this option is selected, then Classter will allow end users to enter a postal code that is not included in the postal codes list.
- Allow a Relative to be connected multiple times to a Student: This option allows the same person to be connected to a _Student_ multiple times. When you enable this option, then a person may be related to a _Student_ with multiple relations. For example, Grandfather and Emergency contact. It is used in rare cases and we suggest that you don’t enable it. Note: Enabling this may result to errors such as a person being related to a _Student_ as a mother and a father at the same time.
- Coming of age: This setting is used in a multiple occasion. E.g., (1) Admission: Classter will use this field to decide if an applicant is a minor and thus, we need to receive guardian information. (2) Consents management: Classter will use this field to decide if _Consents_ are to be provided by the _Student_ or parents.
Educational Program Parameters
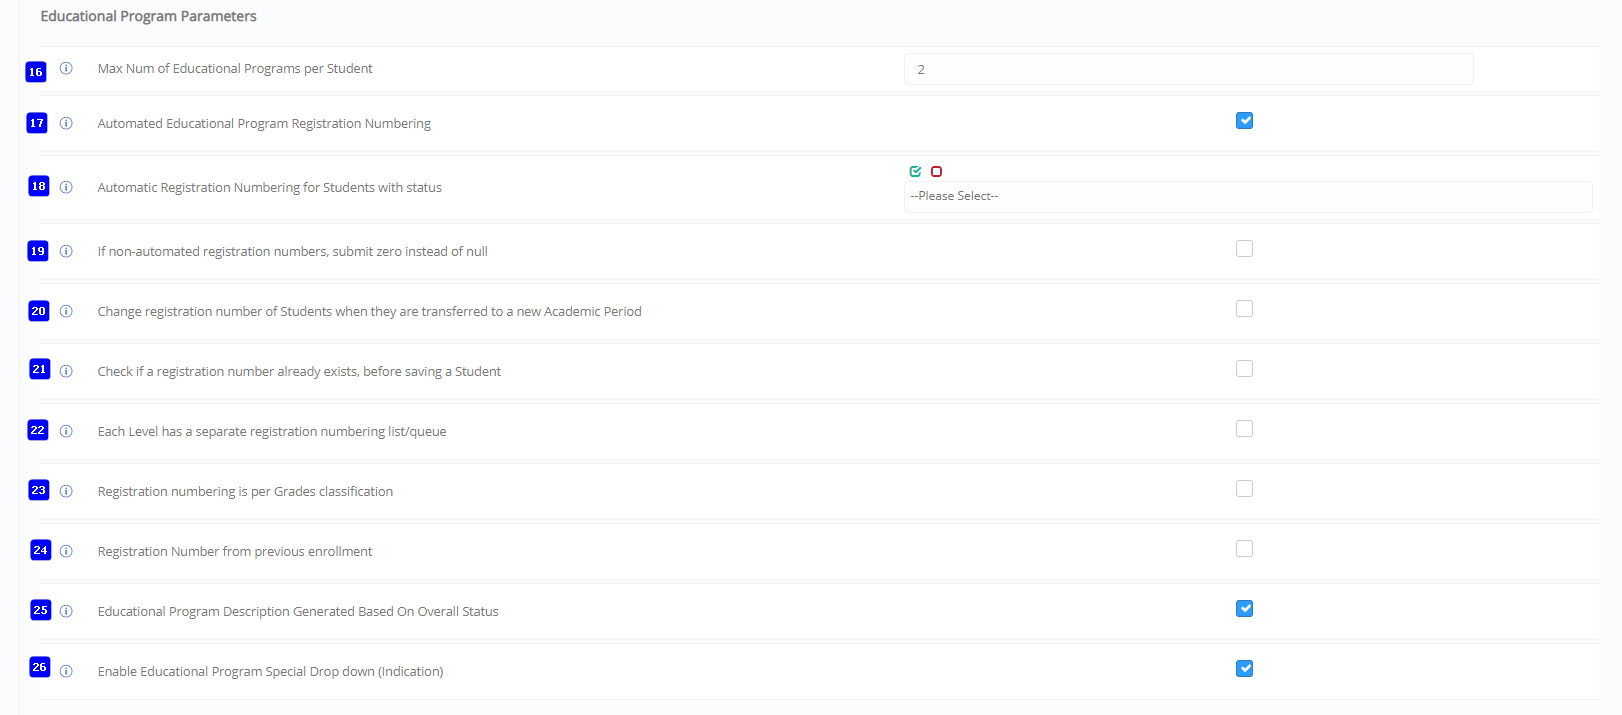 Figure 239
- Max Number of Educational Programs per Student: A _Student_ can have multiple Educational Programs. (e.g., English and French or 3rd _Grade_ of high school and Int. Bac.). In this field we define the maximum number of Educational Programs that a _Student_ could have. If we choose only 1 then the _Student_ cannot have multiple Educational Programs. If we choose 0 the a _Student_ can have unlimited Educational Programs.
- Automated Educational Program Registration Numbering: If we select this option, Classter will automatically calculate and set a registration number when a new educational program is added to a _Student_.
- Automatic Registration Numbering for Students with status: The automated registration numbering is set to work only on specific Students’ status. For all other statuses, automated numbering will not function.
- If non-automated registration numbers, submit zero instead of null: In case we have selected not to have an automated registration numbering for some (or all) Students’ statuses, then here we can select to have 0 as a pre-selected value (instead of null).
- Change registration number of Students when they are transferred to a new Academic Period: if we select this option, _Students_ get a new registration number when they are transferred from one Academic Period to the next. Otherwise, _Students_ will retain their old registration number.
- Check if a registration number already exists, before saving a Student: In case we select to enter _Student_ registry numbers manually (i.e. non automated registry numbering), then it is suggested to select this option also, so that Classter will warn end users if they enter the same registration number twice.
- Each Level has a separate registration numbering list/queue: Please note that this setting works only if you also enable the Automated Educational Program numbering. The auto-numbering for registry number related to educational programs use a different, unique queue of numbers per _Location_.
- Registration numbering is per Grades classification: Use this option if you want to have a separate registration numbering queue for several _Grades_. In order for this option to work, you need to go to the classifications options menu and create a number of classifications. You need to add _Grades_ in those classifications.
- Registration Number from previous enrollment: If this option is selected, then Classter will check if the _Student_ has already been assigned to a registration number (for each educational program) in a previous academic period. If so, then it will automatically suggest the same registration number.
- Educational Program Description Generated Based on Overall Status: if this option is checked the education program description will be based on the overall status of students.
- Enable Educational Program Special Dropdown (indication): This option will add one more configurable drop down in the educational program. This drop down is usually related to the way the Student is admitted to this educational program. It is used for statistical analysis purposes or other custom code.
–Parent Dashboard Entries
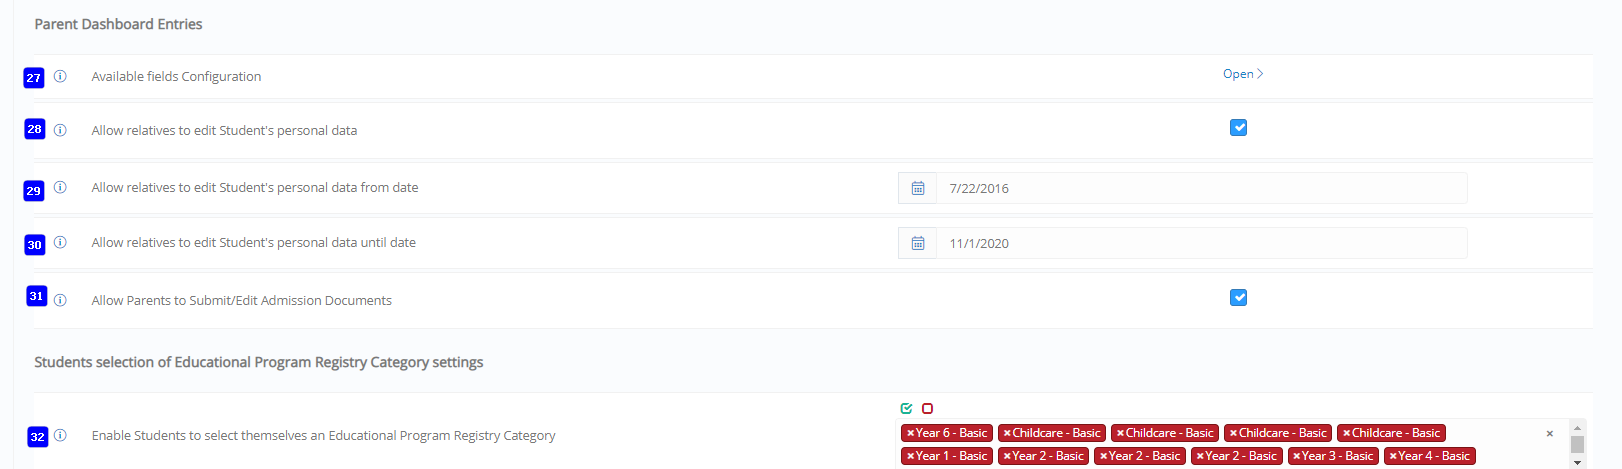 Figure 240
- Available fields Configuration: if you click on this button you will be taken to the available field’s configuration page. See Admissions Configuration Manual (Figure XX).
- Allow relatives to edit Student’s personal data: Selecting this option, enables a new link in the Parents Portal. The link will be presentable in the dashboard main page under the _Student_ name/photo. This link will open a student personal data form where the parent will be able to modify directly personal data of the student. (what fields can be modified is configurable in the admission settings / Personal Data Configuration – It is identical to the fields selected for the re-registration process). Note that this option allows parents to modify the student personal data. Alternatively, you can disable this option and parents can just modify their children profile data. In this case a back-office employee can be notified, and a copy process exist in the _Student_ form to access the new data from the student profile to the normal student card.
- Allow relatives to edit Student’s personal data from date: The start date for enabling relatives to modify the personal data of their children.
- Allow relatives to edit Student’s personal data until date: The end date for enabling relatives to modify the personal data of their children.
- Allow Parents to Submit/Edit Admission Documents checkbox:
Students selection of Educational Program Registry Category settings
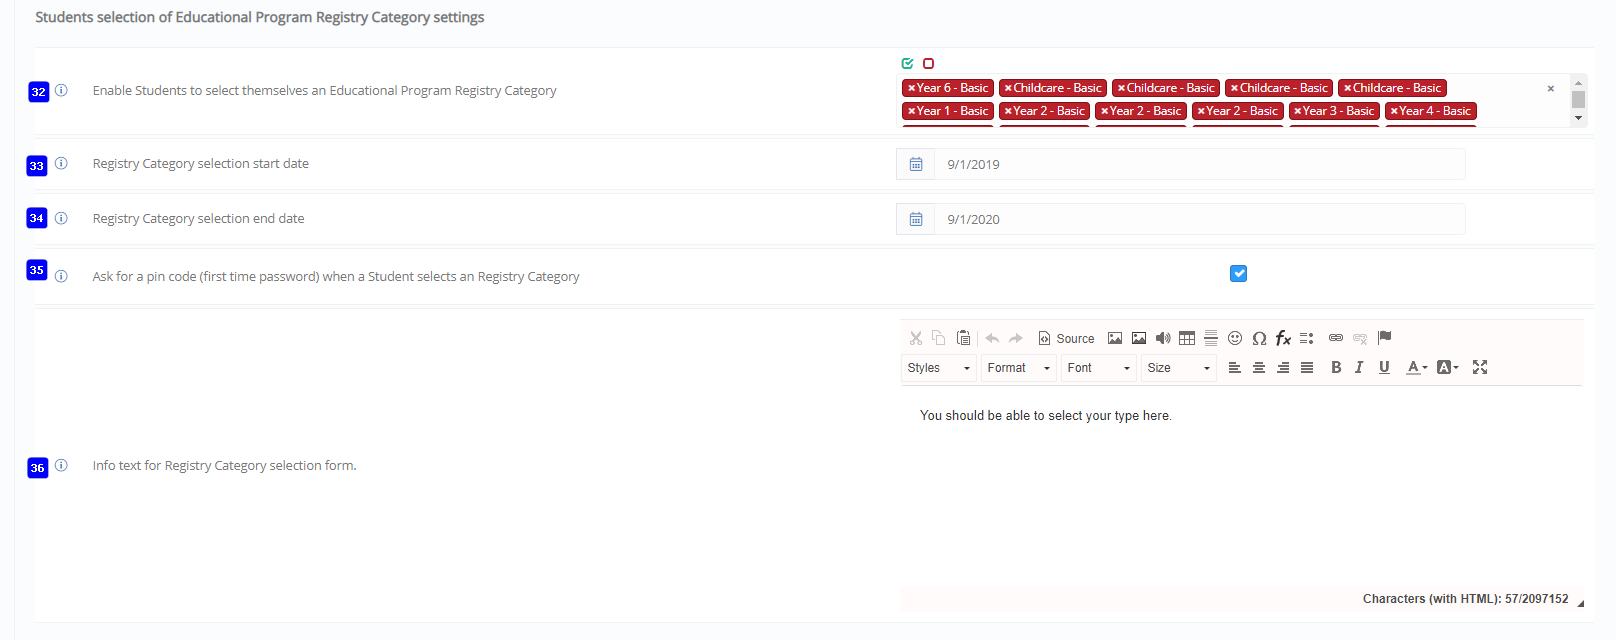 Figure 241
- Enable Students to select themselves an _Educational Program Category_: Enable this option for selected Educational programs if you want Students to be able to select themselves the _Educational Program Category_ of their active educational program.
- Registry Category selection start date: Specify here the start date for enabling the Registry Category selection option to _Students_.
- Registry Category selection end date: Specify here the end date for the Registry Category selection option to Students.
- Ask for a pin code (first time password) when a Student selects a Registry Category: When this is selected, Classter will ask the Student to enter her/his pin code before and upon saving. The _Student_ pin code is always identical to the first password specified in the user account.
- Info text for Registry Category selection form: Fill in here, the text you want to present to Student when they access the Registry Category form..
Enrollments
Basic Settings
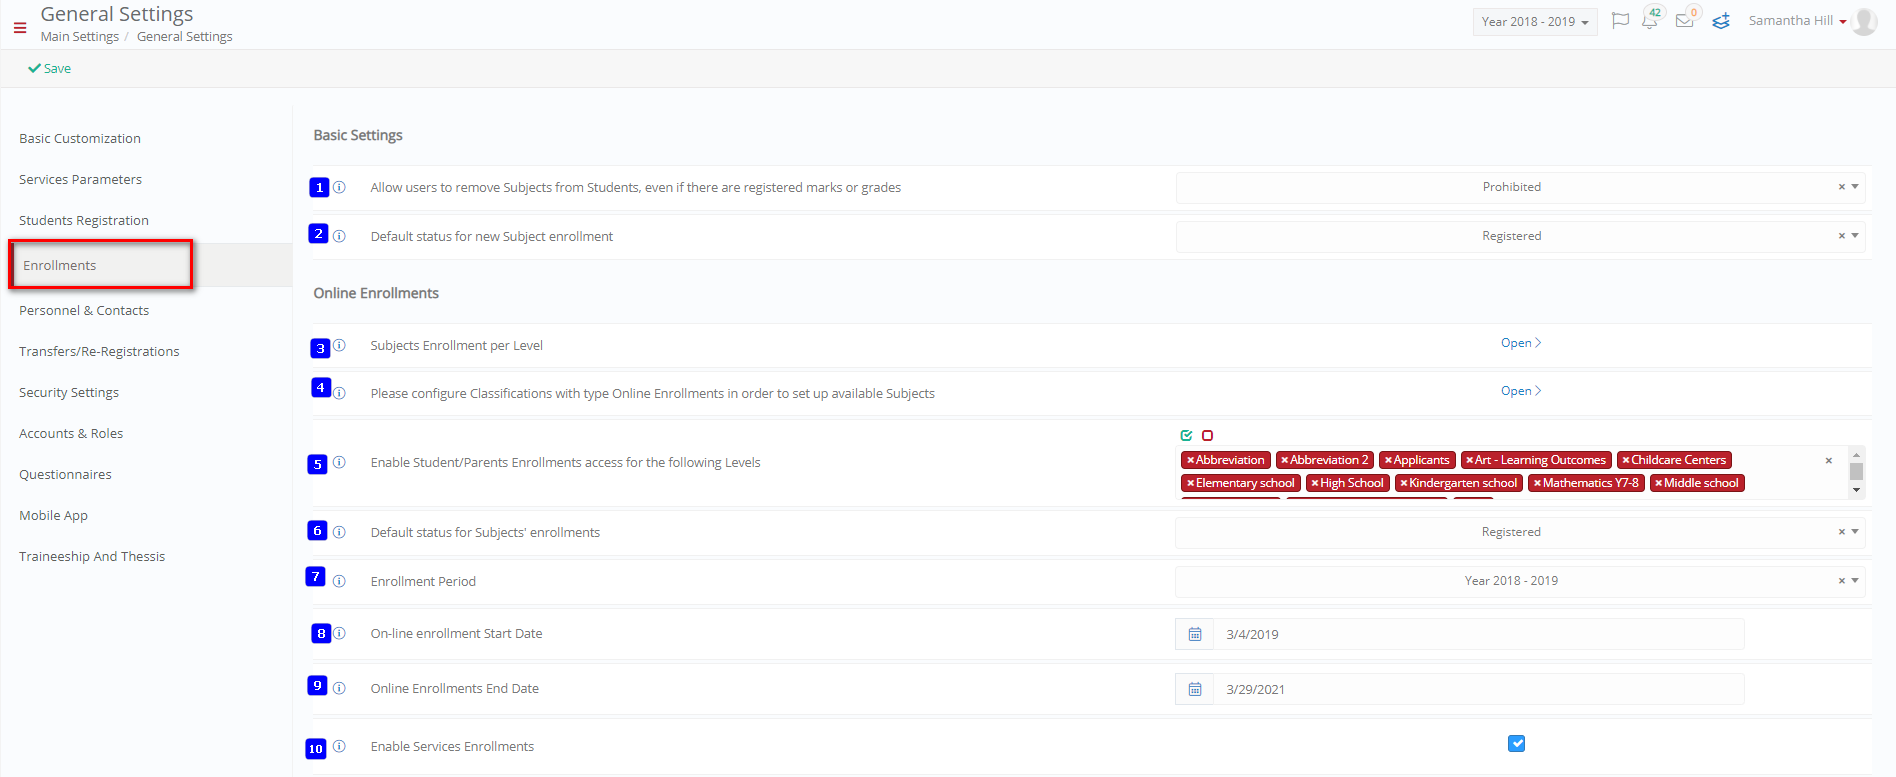 Figure 242
- Allow users to remove Subjects from Students, even if there are registered marks or grades: Here we select if Classter will raise a warning or prohibit message to the end user. when the end user tries to remove an already marked Subject from the Student’s list of enrolled _Subjects_. If you select the option “Permitted”, then Classter is not going to check if a Subject to be removed has any mark already entered in the current academic period.
- Default status for new Subject enrollment: Here we define the default Subject status given when a Subject is enrolled to a _Student_.
Online Enrollments
- Subjects Enrollment per Level:
- Please configure Classifications with type Online Enrollments in order to set up available Subjects:
- Enable Student/Parents Enrollments access for the following Levels: This option enables access for parents and students to specific institution levels e.g., Elementary School.
- Default status for Subjects’ enrolments: Here you can define the default status used when a _Student_ enrolls in a subject e.g., Registered.
- Enrollment Period: Here you can choose which academic period is available for enrollment.
- On-line enrollment Start Date: Enter the date when online enrollment will be available.
- Online Enrollments End Date: Enter the date online enrollment will no longer be accepted.
- Enable Services Enrollments: If this option is selected/ticked enrollment of services will be available to students.
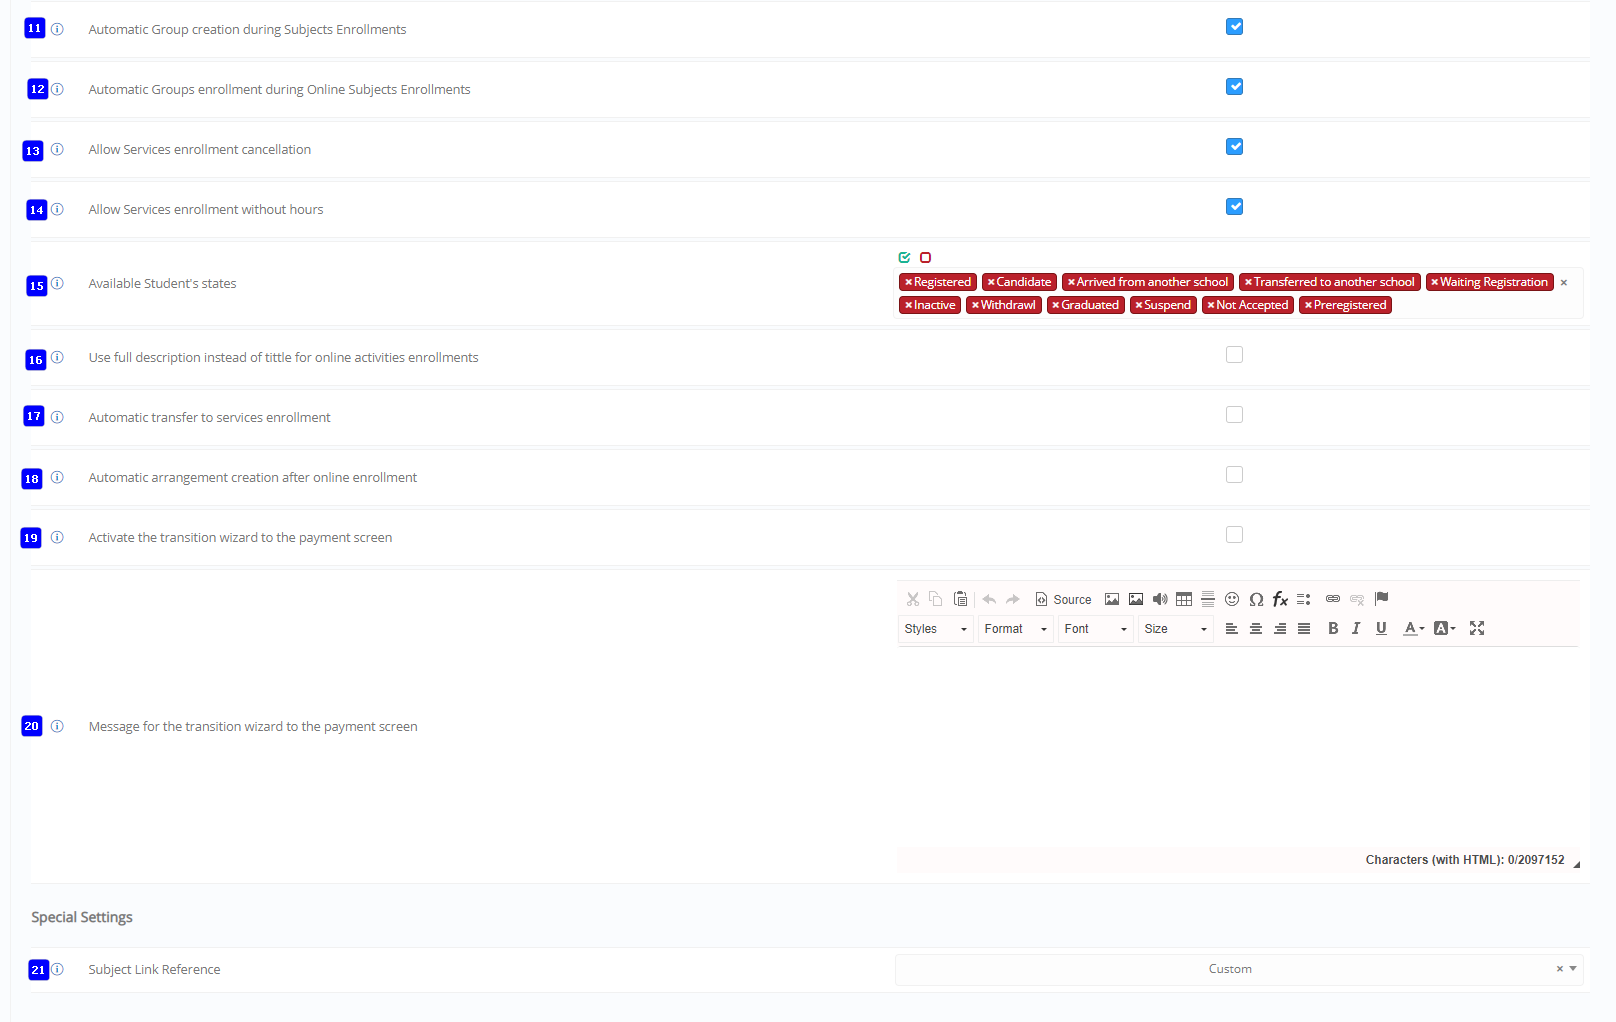 Figure 243
- Automatic Group creation during Subjects Enrollments: if selected, then when a _Student_ enrolls to a _Subject_ using the online enrollment option, Classter will check if a related _Group_ exists. If it does not exist, then Classter will create a new group, and it will add the selected subject} in this group.
- Automatic Group enrollment during Online Subjects Enrollments: if selected, then Classter will not only enroll the student to a _Subject_ but it will also enroll the student to an associated group automatically. If not selected, the end user should select the _Group_ manually.
- Allow Services enrollment cancellation: if this option is ticked then students may cancel a service if they already enrolled in the service.
- Allow Services enrollment without hours: This option when ticked allows _Students_ to enroll to services with no stated hours.
- Available Student’s states: Available Student’s states for online registration.
- Use full description instead of tittle for online activities enrollments
- Automatic transfer to services enrolment
- Automatic arrangement creation after online enrolment
- Activate the transition wizard to the payment screen
- Message for the transition wizard to the payment screen
- Subject Link Reference
Click on Save button to save all your changes to the Enrollment Settings.
Personnel & Contacts
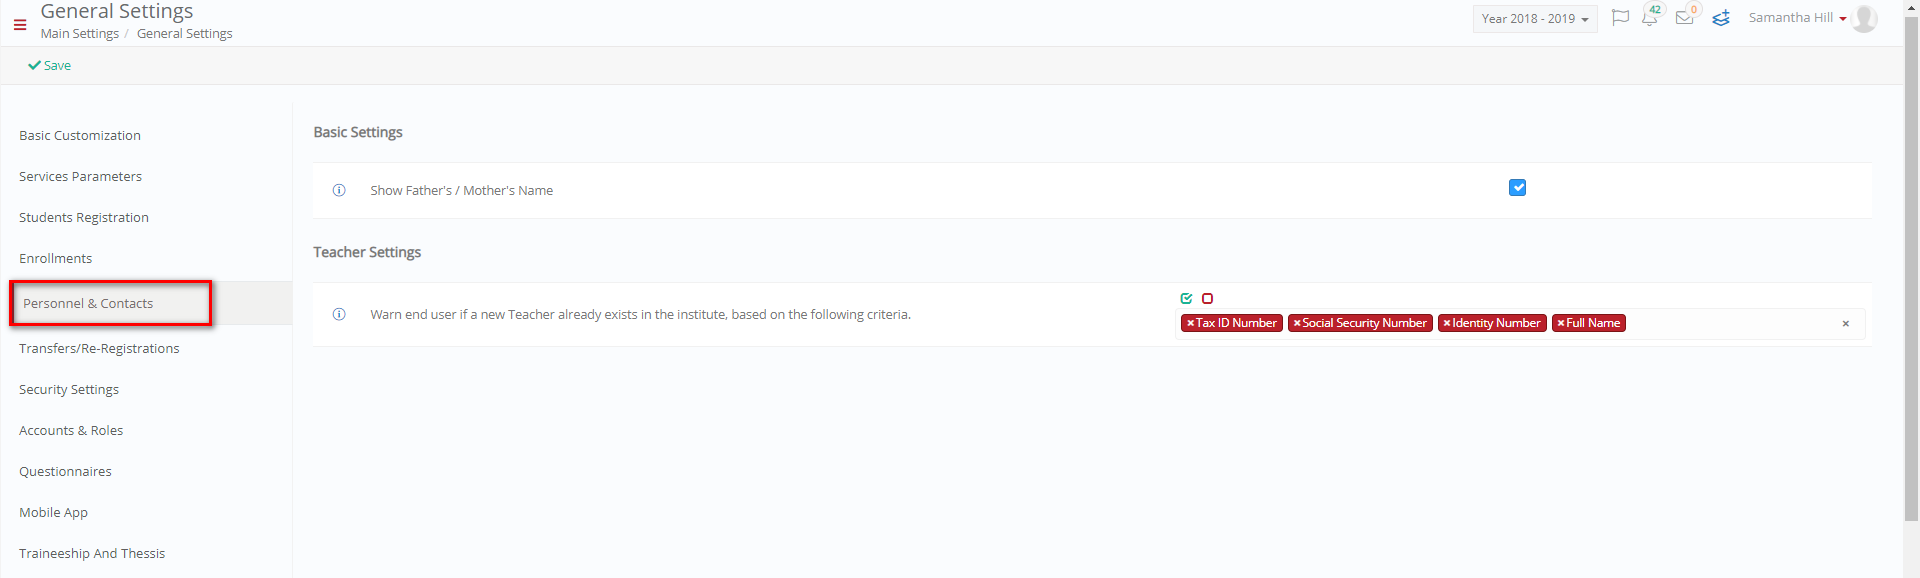 Figure 244
Basic Settings
- Show Father’s / Mother’s Name: Displays users Father and Mother Name in forms.
Teacher Settings
- Warn end user if a new Teacher already exists in the institute, based on the following criteria: Warn end user if a new Teacher already exists in the institute, based on the following criteria.
Click on Save button to save all your changes to the Personnel & Contacts Settings.
Transfers/ Re-Registrations
Basic Settings
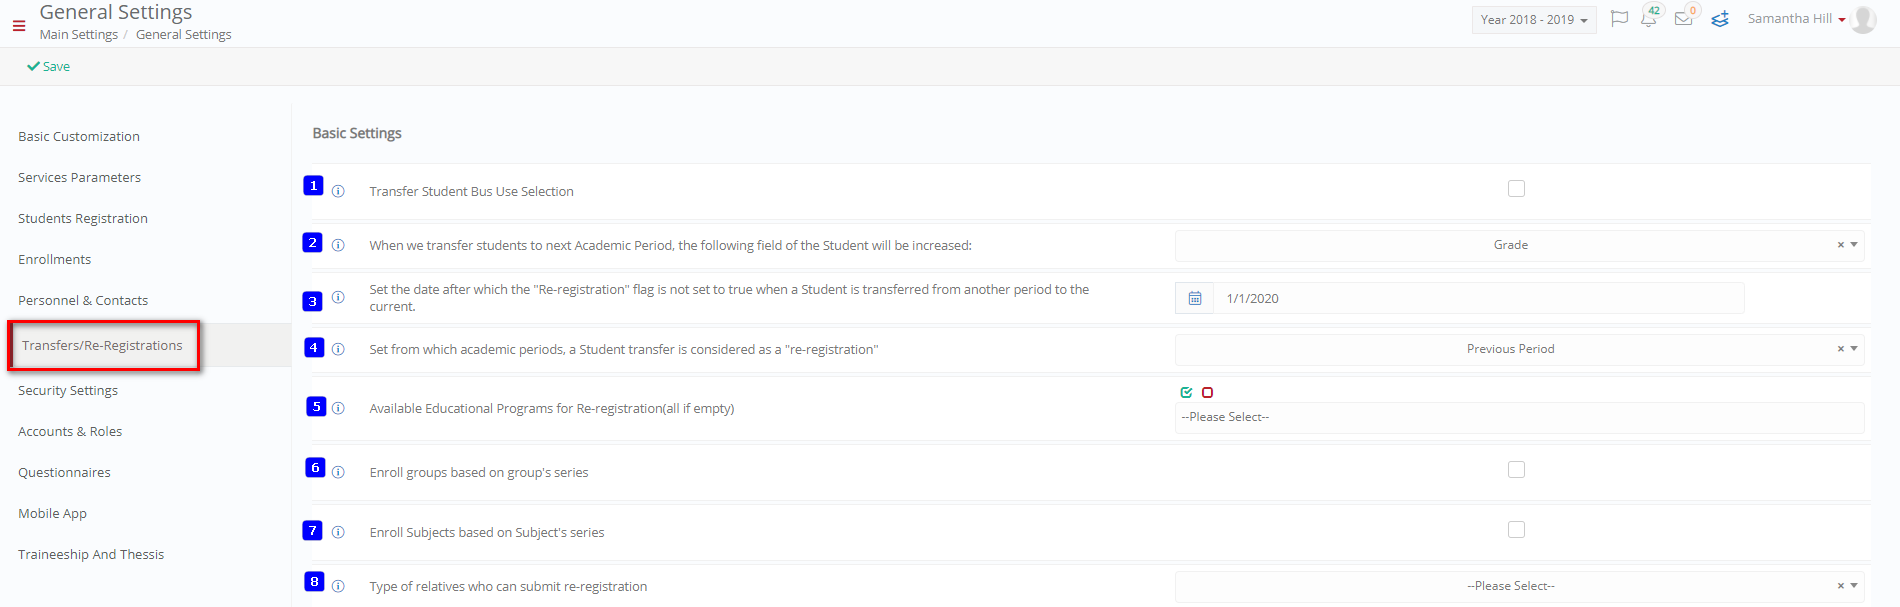 Figure 245
- Transfer Student Bus Use Selection: For _Students_ re-registering this option would retain the students initial bus selections (use or not use bus, pick up from address or stops etc.).
- When we transfer students to next Academic Period, the following field of the Student will be increased: When _Students_ are transferred from an academic period to another, Classter will automatically modify their educational program. Define here which field is modified (pre-selected option; the end user may change this option). You may select one of the following options: _Grade_, _Stream_ _Educational Program Category_. Based on the selected field here, Classter will choose a new Educational Program and it will assign this to the _Student_ as he/she is transferred to the new academic period. Note that the selected field is updated as follows: Classter gets the Position Order of the existing value and it finds the value that has the next position / order value. In practice this means that the Student will be assigned to the next value available in the drop down of the field we select here.
- Set the date after which the “Re-registration” flag is not set to true when a Student is transferred from another period to the current: Here we can define a date. If a Student is transferred to the current academic period from another academic period after this date, then Classter will not check as True the property “From re-registration”. This is used in the case we want to define a specific date after which all _Student_ transfers from a previous academic period are not any more considered to be re-registrations but on the contrary are considered statistically new registrations.
- Set from which academic periods, a Student transfer is considered as a “re-registration”: Here you can select if the transfer of a _Student_ from an academic period to the current is considered a “re-registration” instead of a new registration. Depending on the setting here, Classter will (or not) set as active the flag “re-registration”. You can select one of the following options:
- “All Periods”: In this case all transfers from all academic periods will be considered as “re-registrations”.
- “Previous Period”: In this case the setting “re-registration” will be set only if a Student is transferred to the current academic period from the previous academic period.
- “Previous two periods”: In this case the setting “re-registration” will be set only if a _Student_ is transferred to the current period from the previous 2 academic periods.
- Note: The definition of a previous academic period is based on the position order of the academic periods.
- Available Educational Programs for Re-registration (all if empty): Here you can define a set of educational programs that are enabled in the online re-registration process. (i.e. _Students_ or their parents can ask for a re-registration to the next academic period). If it is empty, then all educational programs are enabled for re-registration.
- Enroll groups based on group’s series: If you select this option, Classter will try to automatically enrol any _Student_ transferred to the next academic period to one or many _Groups_. This is done based on the following rule: Classter will retrieve all existing Student’s groups. For each _Group_, Classter will find if there is a next Group. If there is a next Group, then Classter will enroll the _Student_ to this group. Note: In any Group we can define the Previous Group. So, when Classter searches for a next Group, it actually searches for the first Group found with the existing group defined as a previous one.
- Enroll Subjects based on Subject’s series: If you select this option, Classter will try to automatically enroll any _Student_ transferred to the next academic period to one or many subjects. This is done based on the following rule: Classter will retrieve all existing Student’s _Subjects_. For each subject, Classter will find if there is a next Subject. If there is a next Subject, then Classter will enrol the student to this subject. Notes: (1) In any Subject we can define the Previous Subject. So, when Classter searches for a next Subject, it actually searches for the first Subject found with the existing group defined as a previous one. (2) This option works correctly in combination with the automated Groups enrolment. Subject and _Group_ combinations should exist so that a correct transfer of all their entities is done.
- Type of relatives who can submit re-registration:
Info Messages
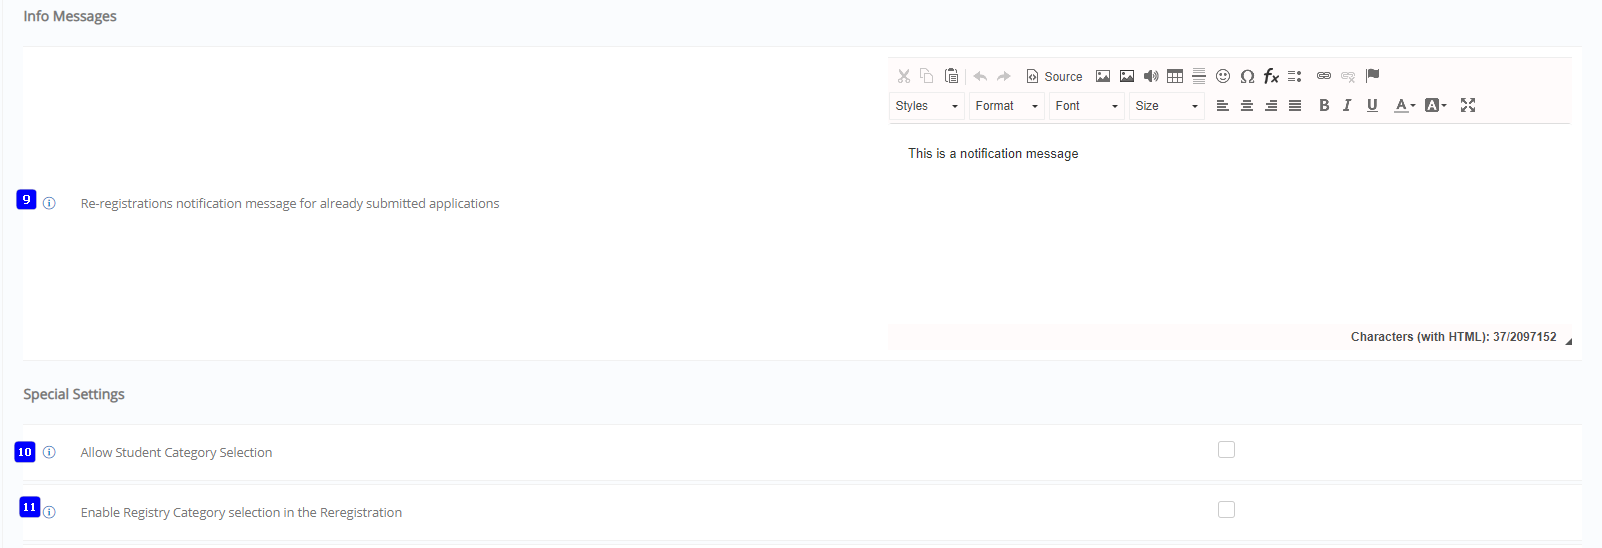 Figure 246
- Re-registrations notification message for already submitted applications: This is the message displayed to a user when she/he tries to re-register for a second time. (i.e., the user has already been re-registered and she/he tries again to re-register)
Special Settings
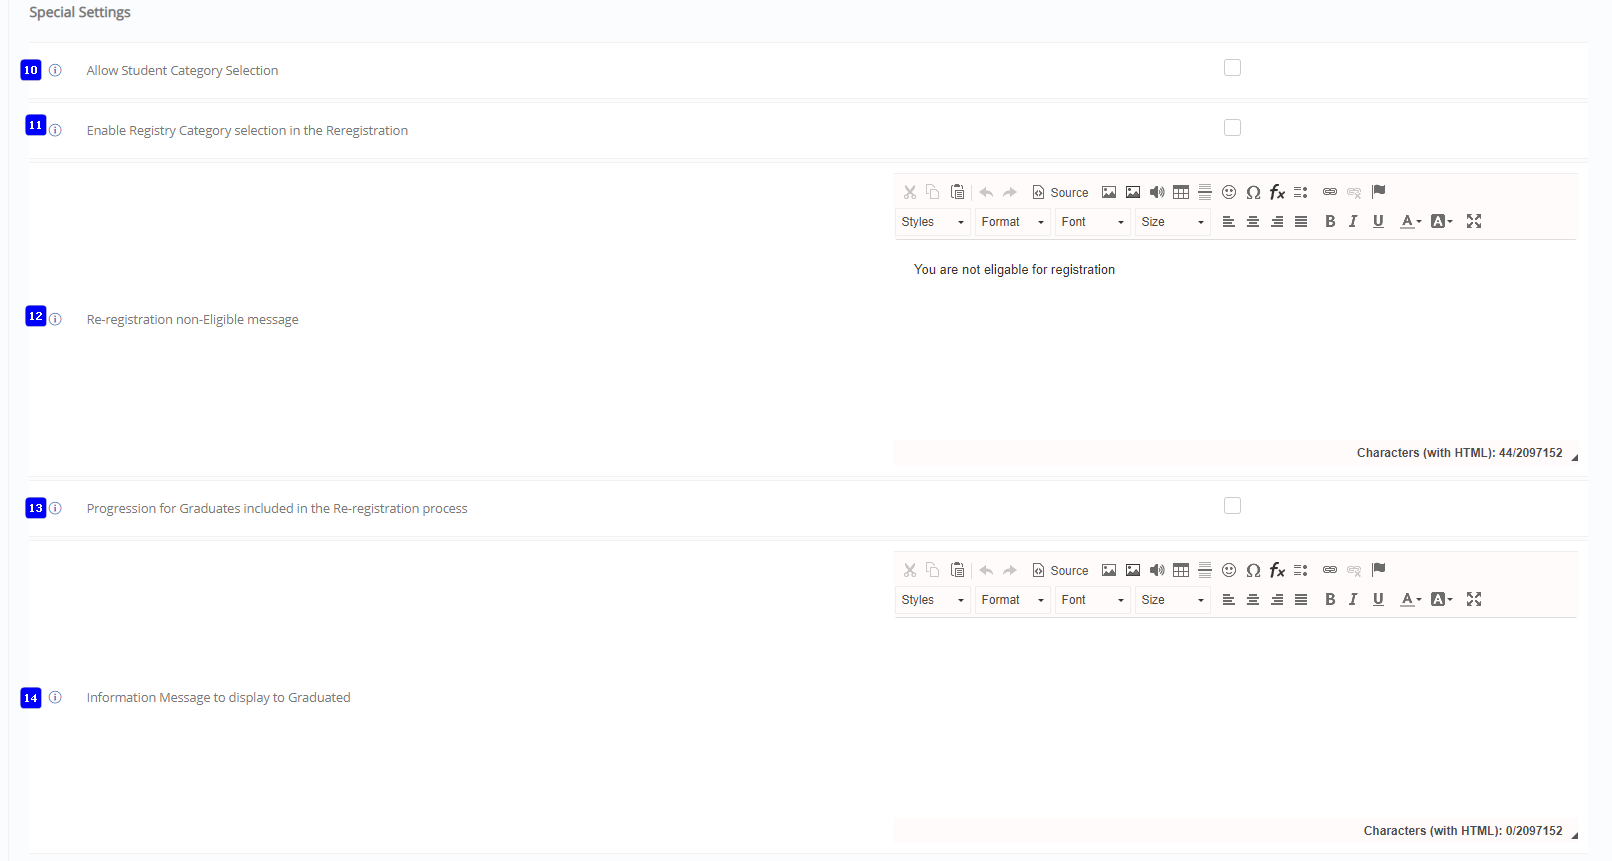 Figure 247
- Allow Student Category Selection: If selected, then the _Student_ category drop down will be visible in the re-registration form. This mean that a Student or a parent can modify the student category field during the re-registration.
- Enable Registry Category selection in the Reregistration: If selected, then the Registry Category will be visible and editable during the re-registration of a Student. This allows _Students_ or their parents to select the Registry Category when they re-register.
- Re-registration non-Eligible message: Write here the message you want to show to end users that are not eligible for re-registration. Note that non-eligibility is based on annual results.
- Progression for Graduates included in the Re-registration process: This option will enable re-registration even for Students with an annual result equal to Graduated. This option works only the Higher Education set-up and it allows Graduated Students to use the re-registration process to move from one _Grade_ to another. (instead of moving from year to year or semester to semester).
- Information Message to display to Graduated: Write here the text you want to present to _Students_ when they access the re-registration form, and their annual result is type of Graduation.
Online Re-registration
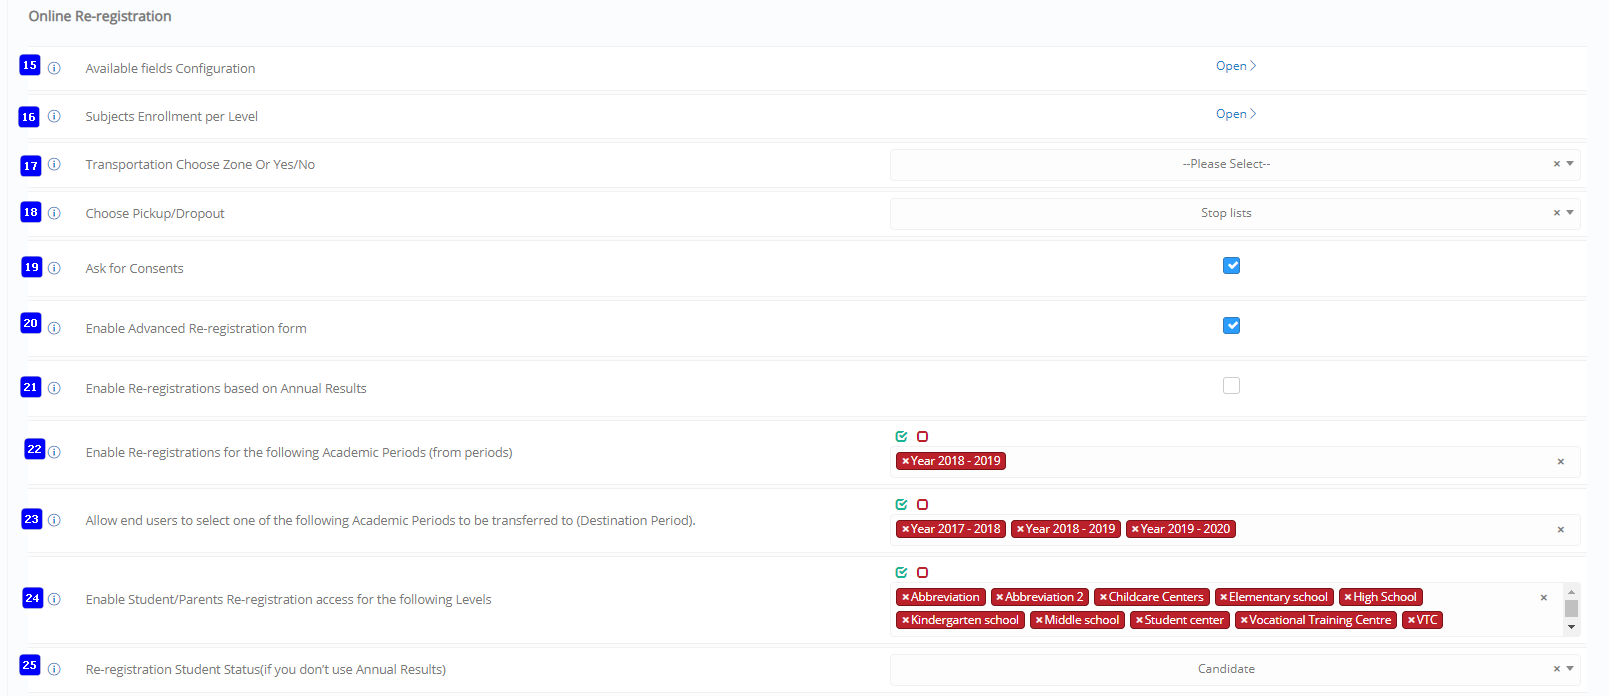 Figure 248
- Available fields Configuration: Configure personal data fields for the re-registration process. What information fields will be available, similar to the admissions process of configuring personal data fields.
- Subjects Enrollment per Level: configure the subject enrollment and availability for each _Location_ separately.
- Transportation Choose Zone or Yes/No: This option defines how you view transportation data. Based on the zone the student is in or based on the choice of the student.
- Choose Pickup/Dropout: Select the default pickup and drop-off of _Students_ based on a student’s address or based on a listed stop.
- Ask for Consents: If this option is selected, then Classter will ask the user to answer related _Consents_.
- Enable Advanced Re-registration form: WE RECOMMEND USING THIS FORM INSTEAD THE SIMPLE REREGISTRATION FORM. The advanced re-registration form allows admin to fully configure any personal data required during re-registration by end users. It consists of more steps, and it allows admins to ask for _Consents_, registration/admission documents. The advanced form also works with annual result (i.e. depending on the annual result of the Student, the process may be different including a different _Student_ registration status in the next academic period.
- Enable Re-registrations based on Annual Results: This setting is related to the re-registration function available to parents and/or Students portal. The re-registration process allows Students or their parents to self-transfer themselves to the new academic period. If this setting is enabled, then a Student can do so, only if he/she has a Success in the annual result. If there is no annual result or the result is not a success, re-registration will not be allowed for the _Student_.
- Enable Re-registrations for the following Academic Periods (from periods): You define here the academic periods that you want to enable re-registration for (i.e., the From academic periods, where the online re-registration option will be enabled).
- Allow end users to select one of the following Academic Periods to be transferred to (Destination Period): You define here the academic periods that the end user can select to be transferred to. Typically, should be just the next academic period. However, there are academic institutes with multiple academic periods per calendar period. In this case the end user should be able to select where he/she wants to be transferred (e.g., Summer period and next academic period).
- Enable Student/Parents Re-registration access for the following Levels
- Re-registration Student Status (if you don’t use Annual Results): Here you can set the status that the _Student_ will have in the next academic period when transferred via the re-registration process. In case that you select re-registration based on the annual result, then this setting is not used.
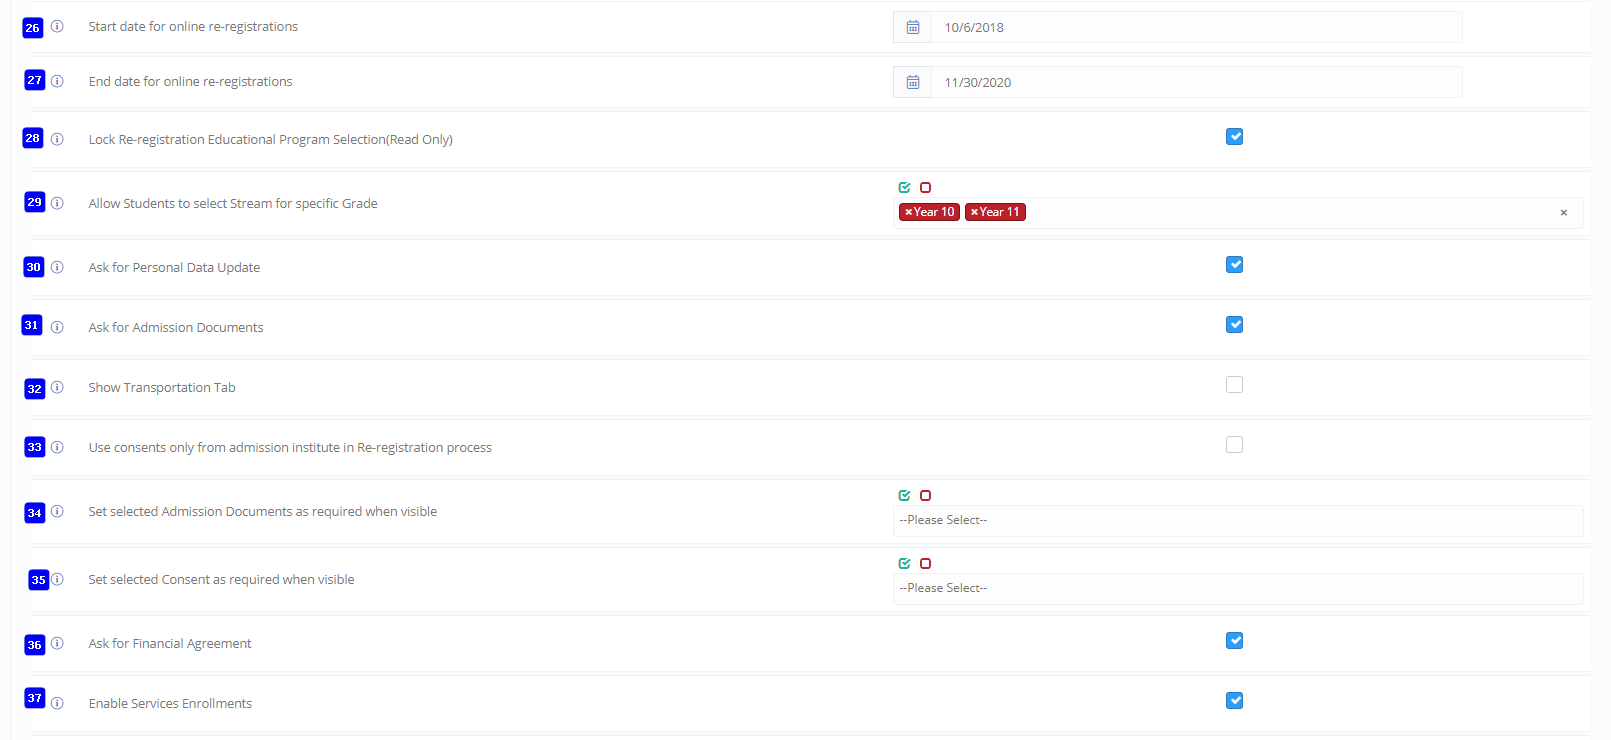
Figure 249
- Start date for online re-registrations: Select a Start Date. After this this date, re-registration option will be available to end users.
- End date for online re-registrations: Select an End Date. After this this date, re-registration option will not be available anymore to end users.
- Lock Re-registration Educational Program Selection (Read Only): If selected, then the end user will not be able to select educational program for the next academic period. Instead, Classter will auto select the educational program based on the transfer rules setup in Classter. The next educational program will be visible to the end user but in a read-only format.
- Allow Students to select Stream for specific _Grade_: Here you can define one or more Grades. If a Student is to be transferred to one of these selected Grades then Classter will ask for a _Stream_ selection. Example of usage: We want Classter to transfer _Students_ from Grade 1 to _Grade_ etc. However, when a Student is transferred from Grade 10 to Grade 11, then the Student must select a Stream. In this case, we add the value _Grade_ 11 in this setting.
- Ask for Personal Data Update: If this option is selected, then Classter will ask the user to update his/her or his/her child personal data.
- Ask for Admission Documents: If this option is selected, then Classter will ask the user to update his/her or his/her child admission/registration documents.
- Show Transportation Tab: Show the Transportation tab to re-registered _Students_.
- Use consents only from admission institute in Re-registration process: This is a special setting. If you have multiple institutes in your organization and one of the institutes is configured to be the admission entity / institution, then you may select this option. If you select it, then during the re-registration process in this institute, any _Consent_ asked and saved will be retrieved and saved in the main admission institute. This will work only there is only one admission institute in your installation.
- Set selected Admission Documents as required when visible: You can select here several admission documents or fields that will be set as mandatory fields in the re-registration form. Note that an admission document or field will be mandatory only if visible. This setting is not used for hidden fields.
- Set selected Consent as required when visible: You can select here several consents or fields that will be set as mandatory consents to be answered in the re-registration form. Note that a _Consent_ or question will be mandatory only if visible. This setting is not used for hidden consents.
- Αsk for Financial Agreement: If this option is selected, then Classter will ask the user to select a payment method and create a financial agreement.
- Enable Services Enrollments: If this option is selected, then Classter will ask the user to select one or more services based on online service enrollment configuration.
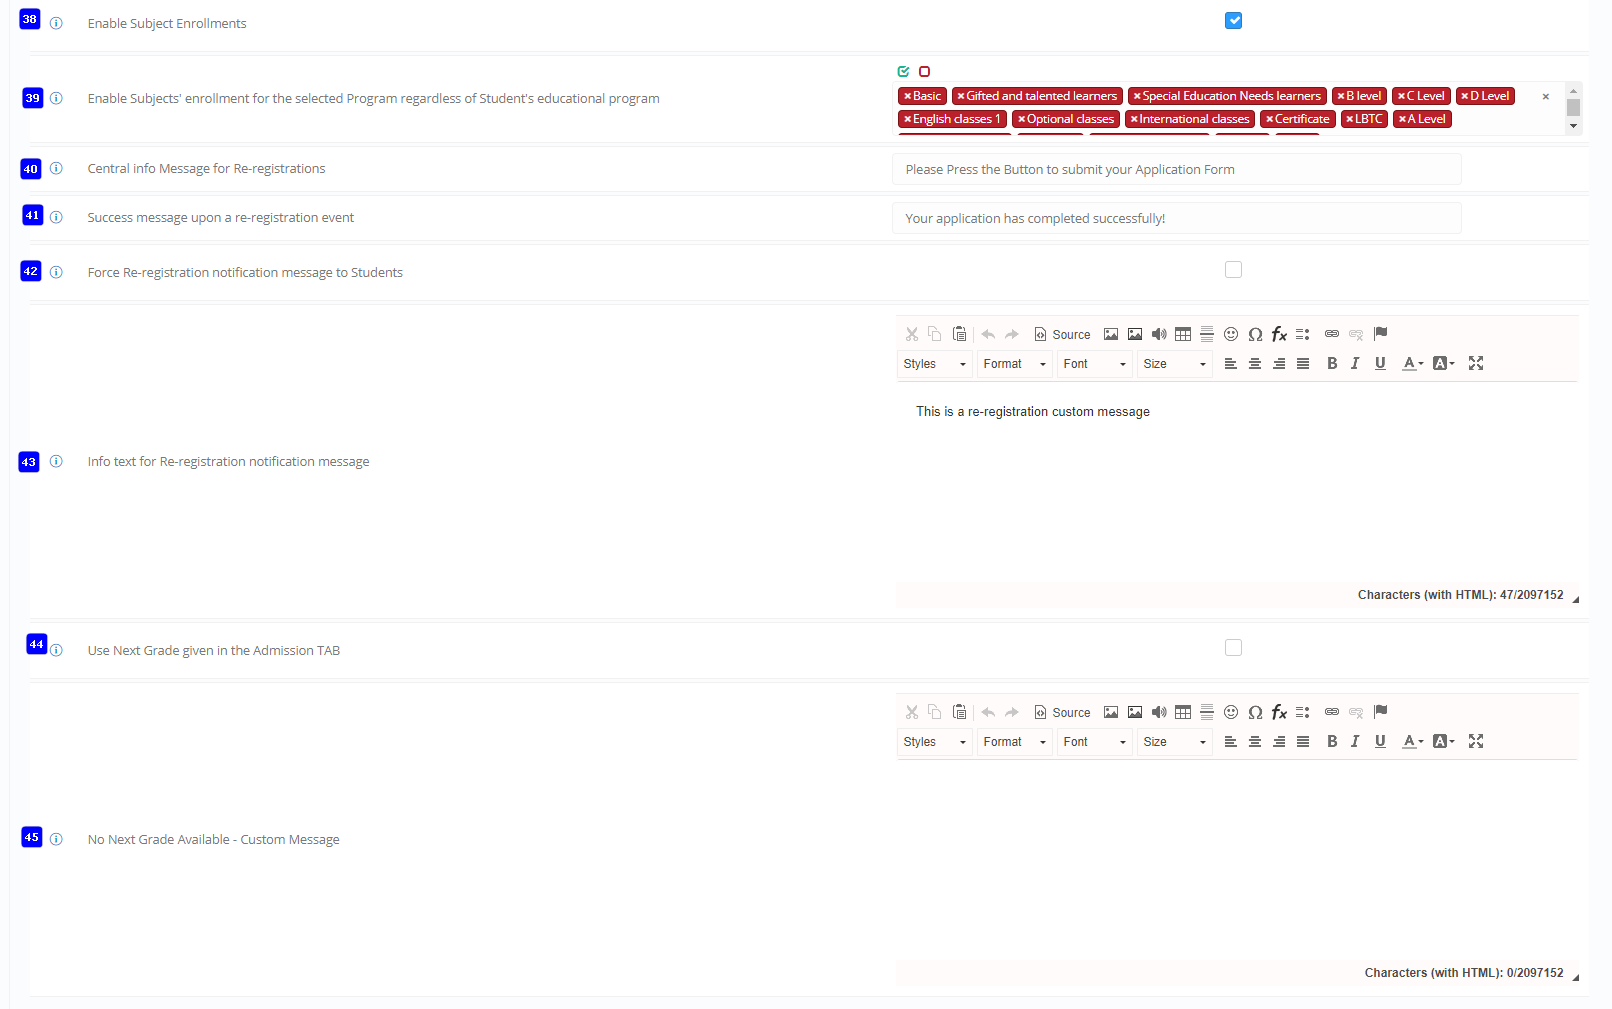 Figure 250
- Enable Subject Enrollments: If this option is selected, then Classter will ask the user to select one or more optional Subjects based on online Subjects enrollment configuration.
- Enable Subjects’ enrollment for the selected Program regardless of Student’s educational program: Make subjects available to all students regardless of their educational program, so _Students_ of a specific _Stream_ or _Grade_ will have access to subjects that are from other _Grades_ and _Streams_.
- Central info Message for Re-registrations: Write here a central message for the end user. This message will be visible in the top of the re-registration form.
- Success message upon a re-registration event: Write here the message displayed to a user, when a re-registration process is saved.
- Force Re-registration notification message to Students: _Students_ who have not re-registered will receive a re-registration notification message.
- Info text for Re-registration notification message: Write there the text to be sent to the end user as an internal message when a re-registration process is saved.
- Use Next Grade given in the Admission TAB: If a _Grade_ is unavailable then this would select the next available grade for registration.
- No Next Grade Available – Custom Message: Custom message that appears when there are no next _Grades_ to choose from in Admission tab.
Payments
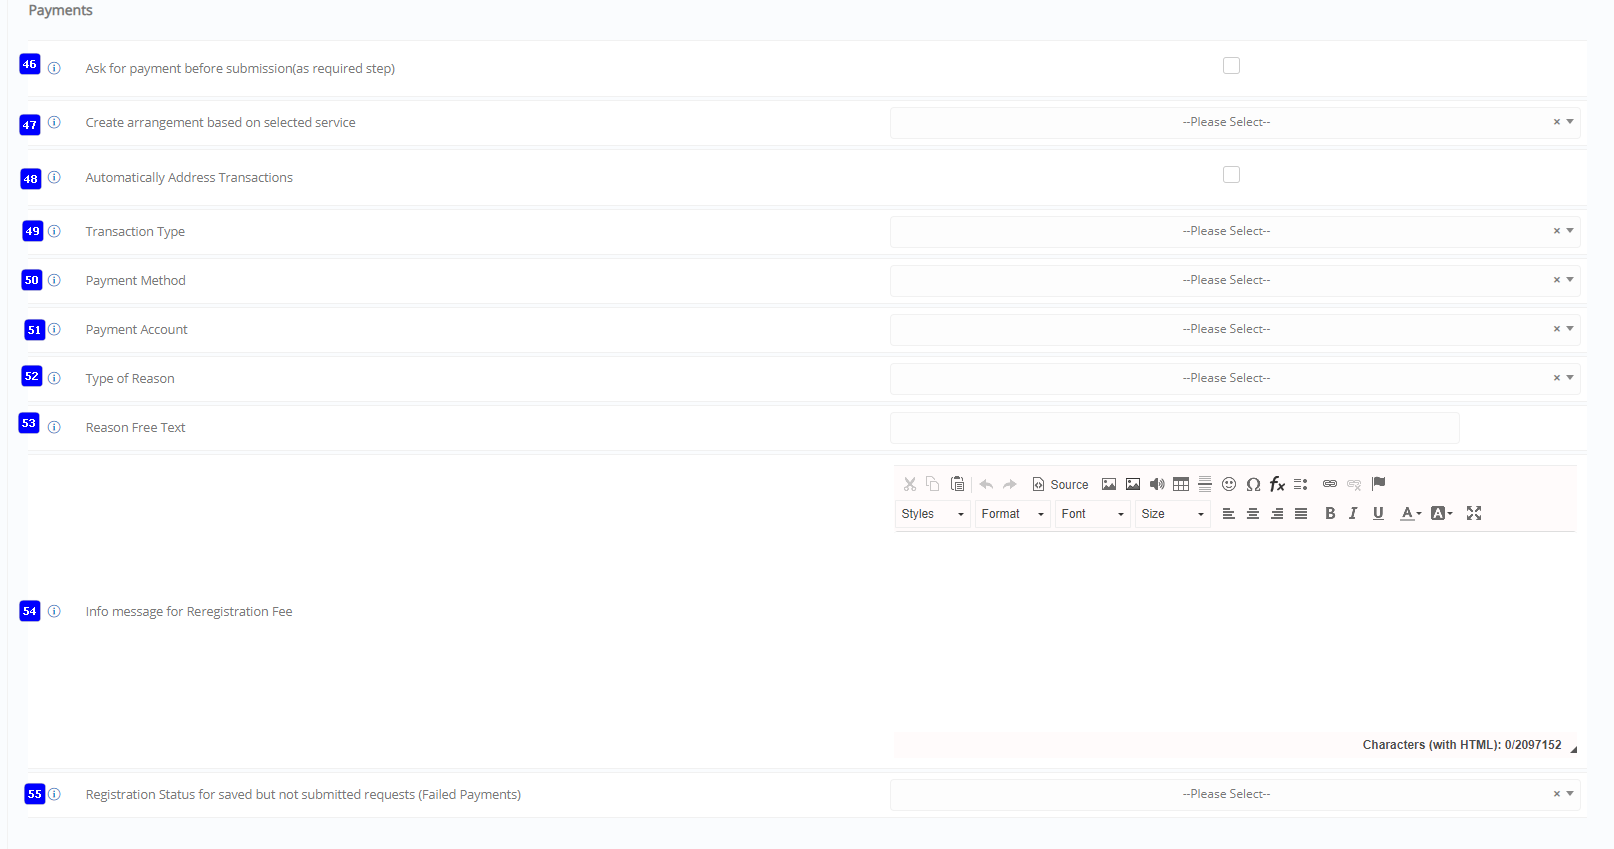 Figure 251
- Ask for payment before submission (as required step): This option will enable re-registration even for _Students_ with an annual result equal to {Graduated}. This option works only the Higher Education set-up and it allows {Graduated} _Students_ to use the re-registration process in order to move from one _Grade_ to another. (instead of moving from year to year or semester to semester}.
- Create arrangement based on selected service: Select a default service on which arrangements will be created e.g Application Fee.
- Automatically Address Transactions: Will the system automatically address transactions, or will this be done manually by employees?
- Transaction Type: Select the default transaction type e.g Invoices and Receipts.
- Payment Method: Choose a default payment method e.g Credit card.
- Payment Account: Enter the default payment account for the institution.
- Type of Reason: Default reasoning method for payments. Will invoices have a preset reason for the payment.
- Reason Free Text: Reason Free Text (only if the type of reason is configured to “FREE”).
- Info message for Reregistration Fee
- Registration Status for saved but not submitted requests (Failed Payments).
Security Settings
Basic Settings
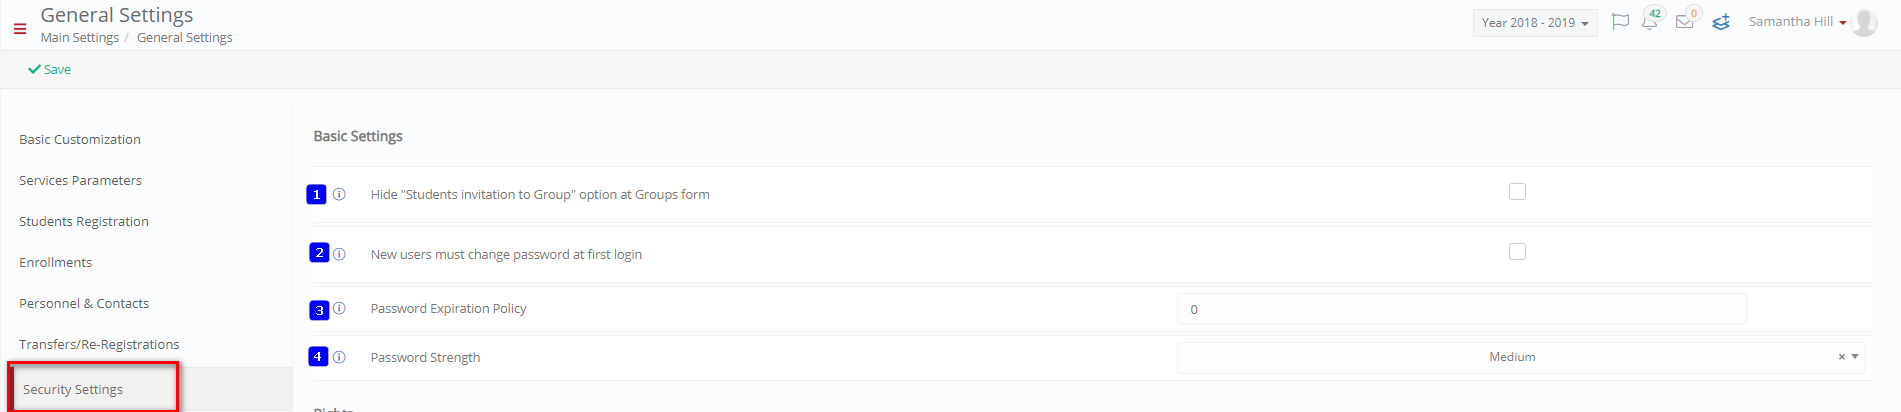 Figure 252
- Hide “Students invitation to Group” option at Groups form: If you select this setting, then Classter will hide the action “_Student_ invitation to _Group_”. This action allows the end user to enter all Student’ personal email. Classter will then send personal invitations for registration to Classter to all Students. Like that, Students can self-create their accounts in Classter and they register to a Group automatically.
- New users must change password at first login: If you select this option, then when a new user account is created, the account will be flagged with the option “Change password on next login”. This means that when the user logins first time, (and provided that the user accepts the Term & Conditions), the user will be asked to add a new password. The end user may cancel the process but every time that she/he logins, Classter will keep asking for a new password until the user changes the initial password.
- Password Expiration Policy: If you select this option, then when a new user account is created, the account will be flagged with the option “Change password on next login”. This means that when the user logins first time, (and provided that the user accepts the Term & Conditions), the user will be asked to add a new password. The end user may cancel the process but every time that she/he logins, Classter will keep asking for a new password until the user changes the initial password.
- Password Strength: When creating a password for your Classter account you must make sure to create a Strong Password. Bellow you will see how password strength is measured. Strength Description: Blank: No Password Protection, empty and/or space characters only. Very Weak: Either too short (less than 5 chars), one-case letters only or digits only. Example of Very Weak Strength Password: nick. Weak: At least 5 characters long, one strong condition met e.g., Capital letters or a Number or a Special Character. Example of Weak Strength Password: nick5. Medium: At least 5 characters long, two strong conditions met e.g., Capital letter or a Number or a Special Character. Example of Medium Strength Password: Nick5. Strong: At least 8 characters, three strong conditions met e.g., Capital letter or a Number or a Special Character. Example of Strong Strength Password: Nickolas5! It is very important to always enter Strong passwords for maximum security.
Rights
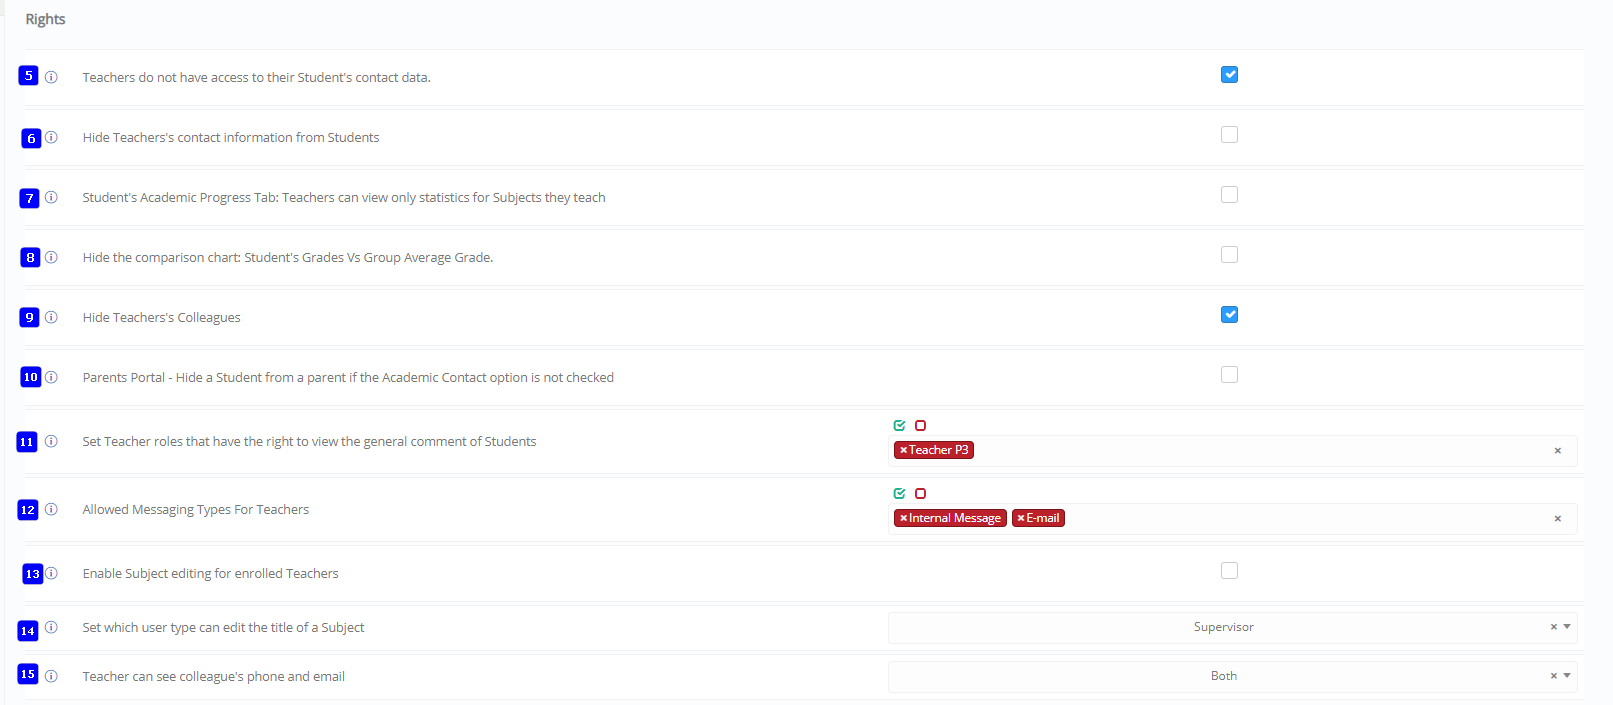 Figure 253
- Teachers do not have access to their Student’s contact data: If this is checked, then the personal _Student_ contact information is hidden from the Student Academic Progress tab in the Teachers portal.
- Hide Teacher’s contact information from Students: If you select this setting, then Students will not have access to their teachers’ contact data. (i.e., all teacher’s contact information will be hidden in _Student_ portal.
- Student’s Academic Progress Tab: Teachers can view only statistics for Subjects they teach: If this is selected, then in the form Student’s Academic Progress, _Teachers_ will be able to view marking and _Grades_ data related only to Subjects they teach. Data related to _Subjects_ that the Teacher does not teach will be hidden.
- Hide the comparison chart: Student’s Grades Vs Group Average Grade: If this setting is selected, then on the Student’s Academic Progress Tab, the marks comparison diagram will not contain a comparison with the average _Group_ mark.
- Hide Teachers’ Colleagues: If this setting is selected, then Teachers will not have access to their colleagues/Teachers list. (The list will be empty). Note: for the time being is used only in the _Teacher_ mobile App.
- Parents Portal – Hide a Student from a parent if the Academic Contact option is not checked
- Set Teacher roles that have the right to view the general comment of Students: Here you can define one or more Teacher roles that have the right to view the general comment of _Students_ in Teachers portal. Teachers that have no role selected here, will not be able to see a general comment of a Student
- Allowed Messaging Types For Teachers: Info Allowed Messaging Types For Teachers.
- Enable Subject editing for enrolled Teachers: This option will allow a teacher enrolled to a class to edit that class. If this is not selected then the teacher will remain unable to alter information regarding the subject.
- Set which user type can edit the title of a Subject: If Employees is selected only employees can change the info. If Supervisor is both supervisor and employees can edit the info. If Teachers is selected then Teacher, Supervisor and Employees can edit it.
- Teacher can see colleague’s phone and email: This option allows for the exchange of contact information between teachers. Will teachers be able to find contact details of their colleagues?
Portal Special Visibility Rights
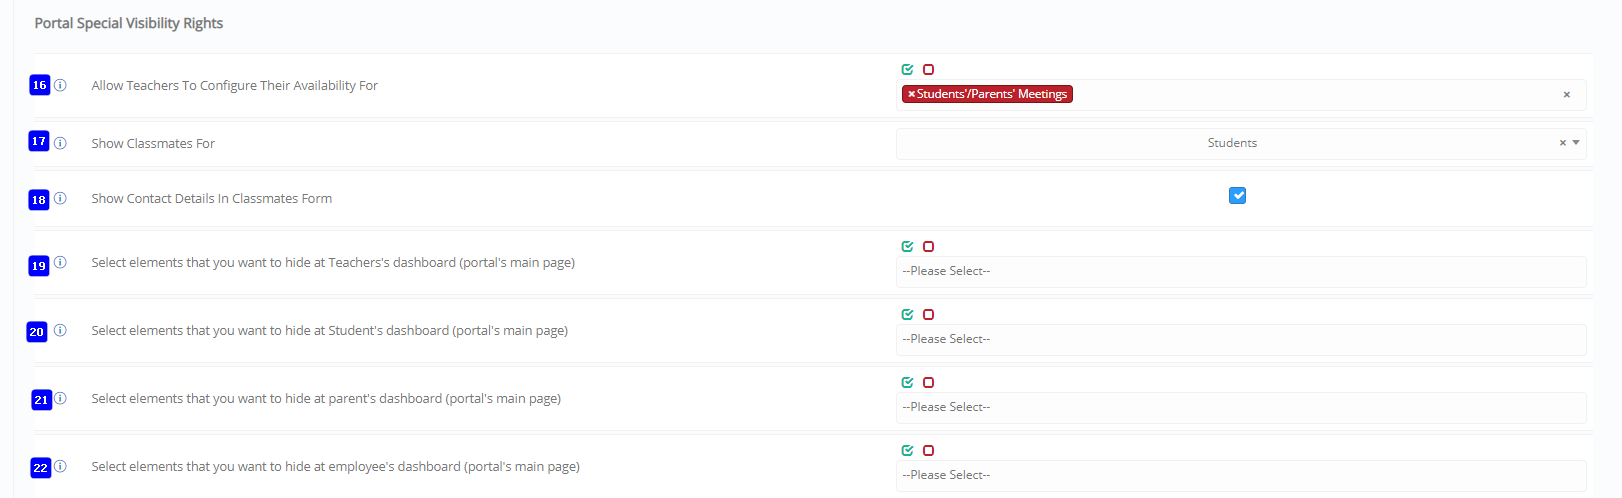 Figure 254
- Allow Teachers To Configure Their Availability For: Choose if you will allow teachers to set their own availability for meetings with parents and students as well as availability for other activities in the institution.
- Show Classmates For: You can allow students or parents to view classmates. Parents would be able to view the classmates of their children and contact their parents. _Students_ would be able to see their classmates for a given class and exchange messages or view contact info.
- Show Contact Details In Classmates Form: Info Show Contact Details In Classmates Form.
- Select elements that you want to hide at Teacher’s dashboard (portal’s main page): Here you can define one or more _Teacher_ roles that have the right to view the general comment of _Students_ in the Teachers portal. Teachers that have no role selected here, will not be able to see a general comment of a Student.
- Select elements that you want to hide at Student’s dashboard (portal’s main page): Here you can define one or more _Teacher_ roles that have the right to view the general comment of Students in the Teachers portal. Teachers that have no role selected here, will not be able to see a general comment of a _Student_.
- Select elements that you want to hide at Parent’s dashboard (portal’s main page): Select elements that you want to hide at parent’s dashboard (portal’s main page).
- Select elements that you want to hide at Employees’ dashboard (portal’s main page): Select elements that you want to hide at employee’s dashboard (portal’s main page).
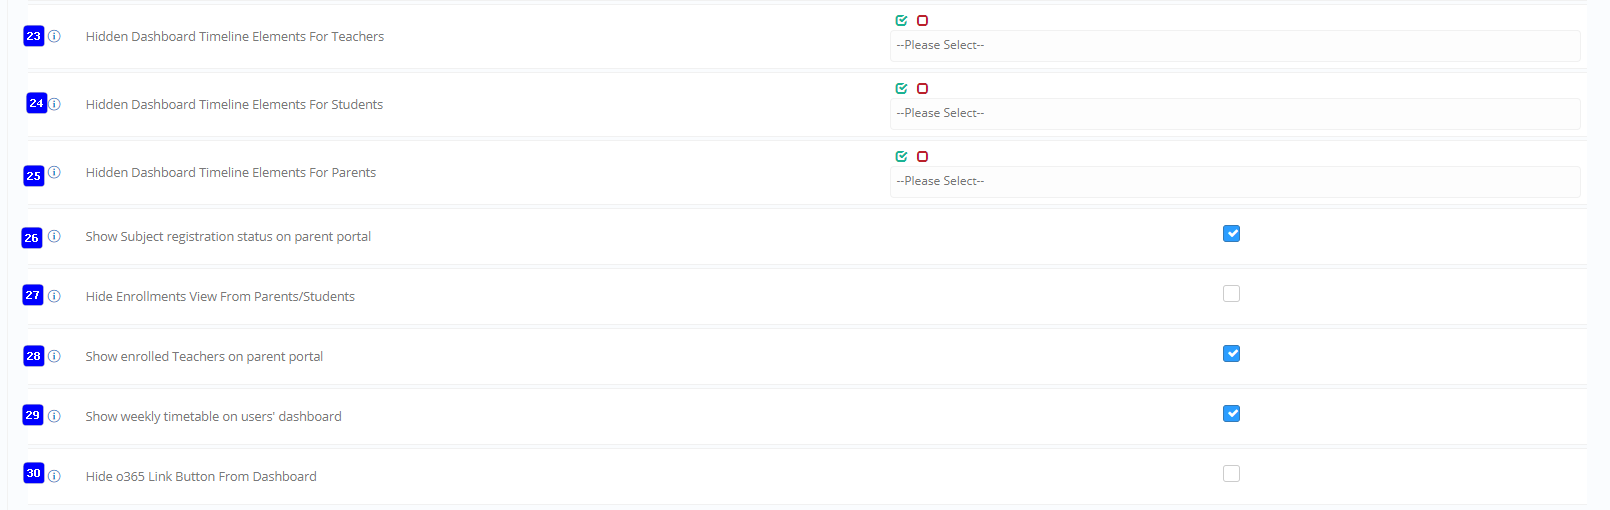 Figure 255
- Hidden Dashboard Timeline Elements for Teachers: Select the elements of the dashboard timeline you want to hide from Teachers.
- Hidden Dashboard Timeline Elements for Students: Select the elements of the dashboard timeline you want to hide from Students.
- Hidden Dashboard Timeline Elements for Parents: Select the elements of the dashboard timeline you want to hide from Teachers.
- Show Subject registration status on parent portal: Select if you want the registration status of subjects related to _Students_ to be visible to parents when looking at students’ subjects.
- Hide Enrollments View from Parents/Students: This option would hide Enrollments information from parents.
- Show enrolled Teachers on parent portal: This option defines if a parent will be able to view all the enrolled teacher in their portal dashboard page.
- Show weekly timetable on users’ dashboard: This option defines if users will be able to view their weekly timetable on the calendar in the dashboard page.
- Hide O365 Link Button from Dashboard: If the school is integrated with O365 they will be able to see link buttons in the user actions menu in the dashboard page. This option if checked will hide the links from users.
Special Settings
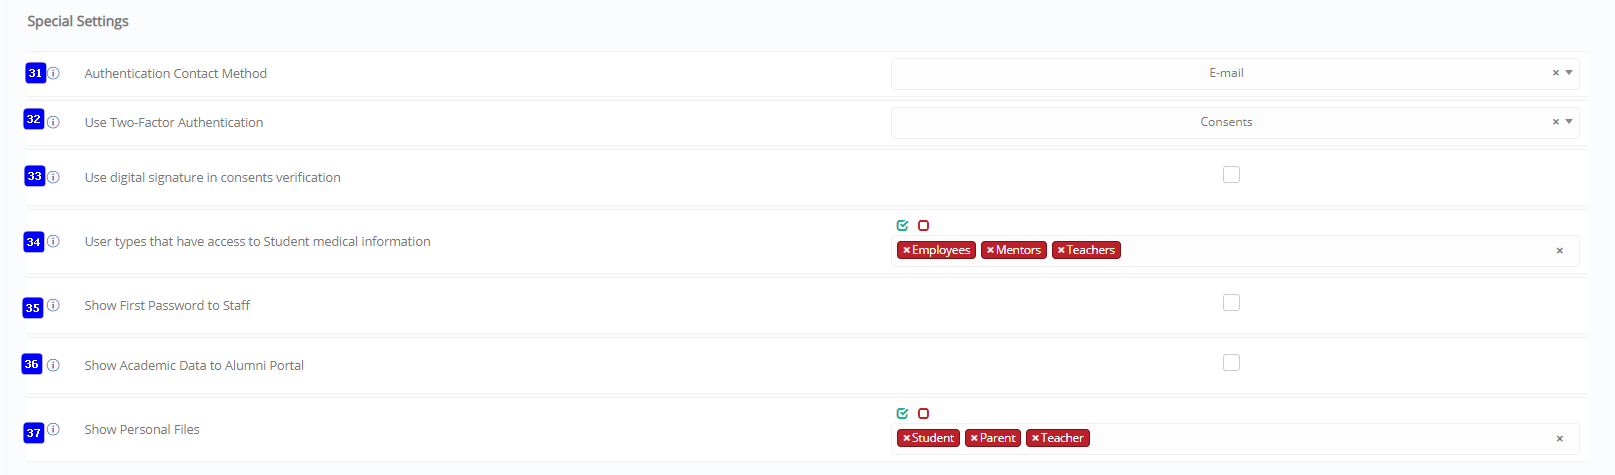 Figure 256
- Authentication Contact Method: If you specify a two-factor authentication, a message with one-time pass code is sent to the end user every time they try to logon. Here you can specify if this pass code is sent by email or by SMS. Note: You should select Email or SMS if you enable two-factor authentication. Otherwise, the end user will not be able to make sensitive updates.
- Use Two-Factor Authentication: Here you can select if you want to enable two factor authentication, for one of the following processes: Profile data updates and _Consents_. If enabled then when the end user saves profile data and/or consents a personal, one-time pin code is sent to the user. The user should enter this pin code in order to verify the save. It is important to setup the Authentication contact method in order to specify how the pin code is sent.
- Use digital signature in consents verification: If selected, then when a user answer mandatory _Consents_, a special draw box will be displayed at the bottom of the screen. This will allow the user to “hand-write” his/her signature.
- User types that have access to Student medical information: You can select the user types that have access to _Students_ medical information here. It can be:
- Employees (all employees of the system are subject to their role privilege),
- _Teachers_ of the _Student_ (i.e. teachers that teach a Student
- All teachers
- Mentors of a Student as defined in the mentor drop down field in the student profile data TAB.
- Show First Password to Staff: If you select this option, then Employees will be able to see the first password of any entity (Student, Teacher, parent, employee), if they have access to the account related info in the entity form. This information is presented as a blue key above the user account information in the main TAB of each entity.
- Show Academic Data to Alumni Portal: This option defines if Alumni users will have access to their academic performance data through their portal. This is the academic data that shows their performance as students (when they were students).
- Show Personal Files: This option defines which user types can have access to personal files. If a user type has this right then he will be able to see the my files button in the quick actions section of the dashboard as well as the files button in the users profile page.
Companies and Partners Dashboard
 Figure 257
- Allow login to companies and external partners: enable this setting if you like companies to have an external username and the ability to logon.
- Allow companies to register Apprenticeships: enable this setting if you would like to allow companies to register apprenticeships.
- Allow External Partners and Companies to update contact data: enable this setting to allow companies and partners update their contact information.
Click on Save button to save all your changes to the Security Settings.
Accounts & Roles
Basic Settings
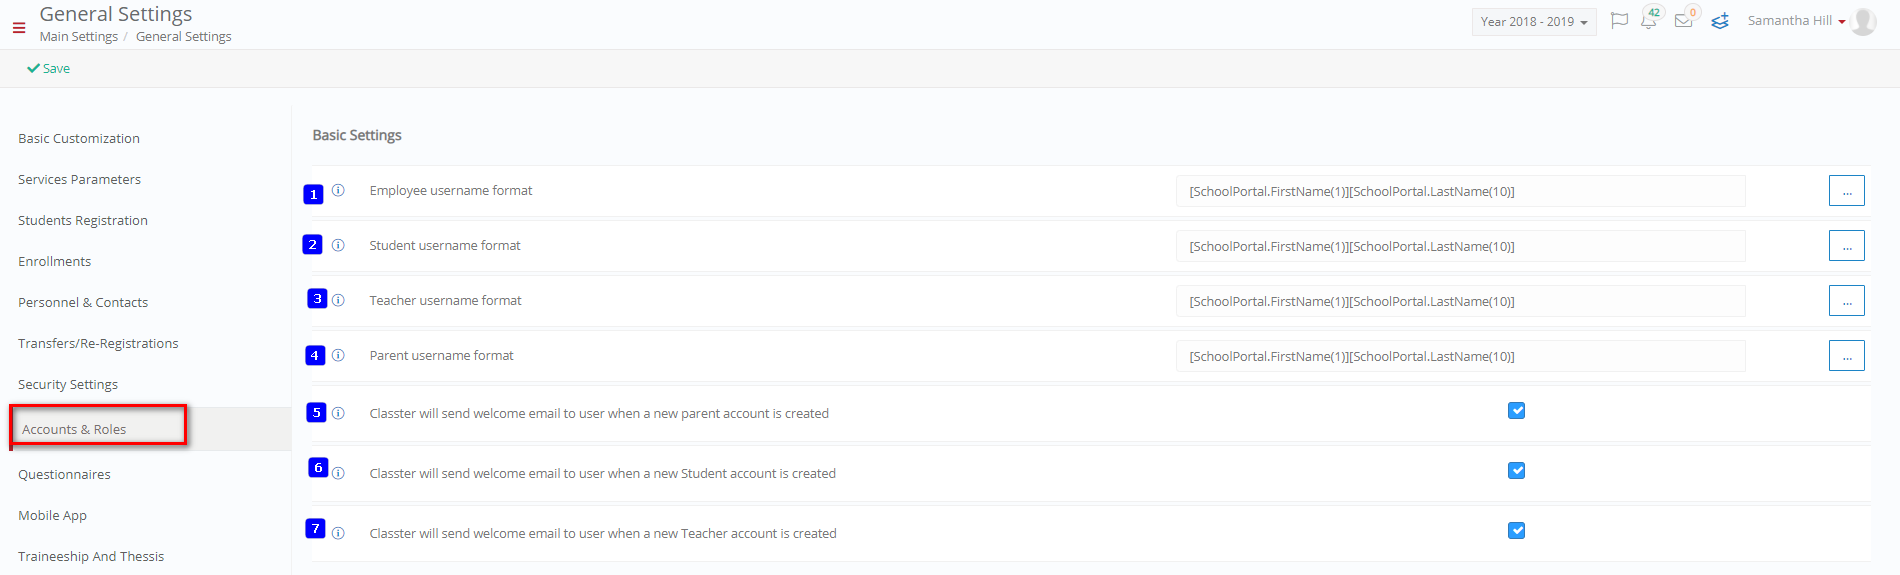 Figure 258
- Employee username format: Here we define the report used when a user cancels an invoice and a payment at the same time for a service billing operation. Here you define the format of account names for the employee’s entity. This format is used in Classter when a new employee is created. In this case, Classter will suggest a new account name based on the hereby provided format. By pressing the three dots button, you will be able to specify the format required. Special functions for character conversion apply. Please check the extra info given in the popup form. Note: if the suggest account name, already exists, Classter automatically adds an increasing integer at the end of the name e.g.,. sample.student1@myschool
- Student username format: Here you define the format of account names for the _Students_ entity. This format is used in Classter when a new student is created. In this case, Classter will suggest a new account name based on the hereby provided format. By pressing the three dots button, you will be able to specify the format required. Special functions for character conversion apply. Please check the extra info given in the popup form. Note: if the suggest account name, already exists, Classter automatically adds an increasing integer at the end of the name e.g., sample.student1@myschool .
- Teacher username format: Here you define the format of account names for the _Teachers_ entity. This format is used in Classter when a new _Teacher_ is created. In this case, Classter will suggest a new account name based on the hereby provided format. By pressing the three dots button, you will be able to specify the format required. Special functions for character conversion apply. Please check the extra info given in the popup form. Note: if the suggest account name, already exists, Classter automatically adds an increasing integer at the end of the name e.g., sample.student1@myschool .
- Parent username format: Here you define the format of account names for the parent’s entity. This format is used in Classter when a new parent is created. In this case, Classter will suggest a new account name based on the hereby provided format. By pressing the three dots button, you will be able to specify the format required. Special functions for character conversion apply. Please check the extra info given in the popup form. Note: if the suggest account name, already exists, Classter automatically adds an increasing integer at the end of the name e.g., sample.student1@myschool.
- Classter will send welcome email to user when a new parent account is created: When a new parent account is created, classter will automatically send a welcome email to the new user. The email is based on the “New User Creation with(out) account email” template. There are 2 templates there. One used when the user also gets an external provider account (such as O365 or G-Suite) and another one used when the user does not get external provider username.
- Classter will send welcome email to user when a new Student account is created: When a new _Student_ account is created, Classter will automatically send a welcome email to the new user. The email is based on the “New User Creation with(out) account email” template. There are 2 templates there. One used when the user also gets an external provider account (such as O365 or G-Suite) and another one used when the user does not get external provider username.
- Classter will send welcome email to user when a new Teacher account is created: When a new _Teacher_ account is created, Classter will automatically send a welcome email to the new user. The email is based on the “New User Creation with(out) account email” template. There are 2 templates there. One used when the user also gets an external provider account (such as O365 or G-Suite) and another one used when the user does not get external provider username.
Role Defaults
- Default Role for Teacher accounts: Here we define the default role that any new _Teacher_ gets in Classter when he/she is created. End users may change this role by using the Change Role option in the user accounts menu.
- Default Role for Student accounts: Here we define the default role that any new _Student_ gets in Classter when he/she is created. End users may change this role by using the Change Role option in the user accounts menu.
- Default Role for Parent accounts: Here we define the default role that any new parent gets in Classter when he/she is created. End users may change this role by using the Change Role option in the user accounts menu.
- Default Role for Employee accounts: Here we define the default role that any new employee gets in Classter when he/she is created. End users may change this role by using the Change Role option in the user accounts menu.
Special Settings
 Figure 259
- Append a suffix to the username account (usually used in multi-institutes configuration): In case of multiple institutes (e.g., a district or a group of schools) with one tenant (Classter single URL or single Office365 tenant or one Google App Domain), we may have the following problem: Two users from two different institutes may have the same username (e.g., m.thomson@schooldisctritname.classter.com). To avoid this common problem, we suggest the following username format: username.suffix@schooldisctritname.classter.com. It is common that the suffix is the name of the institute. For example, username.schoolname@myschool.classter.com However, in this setting you can freely set any suffix you prefer for the institute you configure.
- Sync user account data with external systems only on Creation (not on edit): if selected, then Classter will update the external provider only at the creation of the entity. Any change to the personal data done via an edit operation will not be reflected to the external provider account data.
Info Messages
Enable and custom messages using the options under the Info messages section.
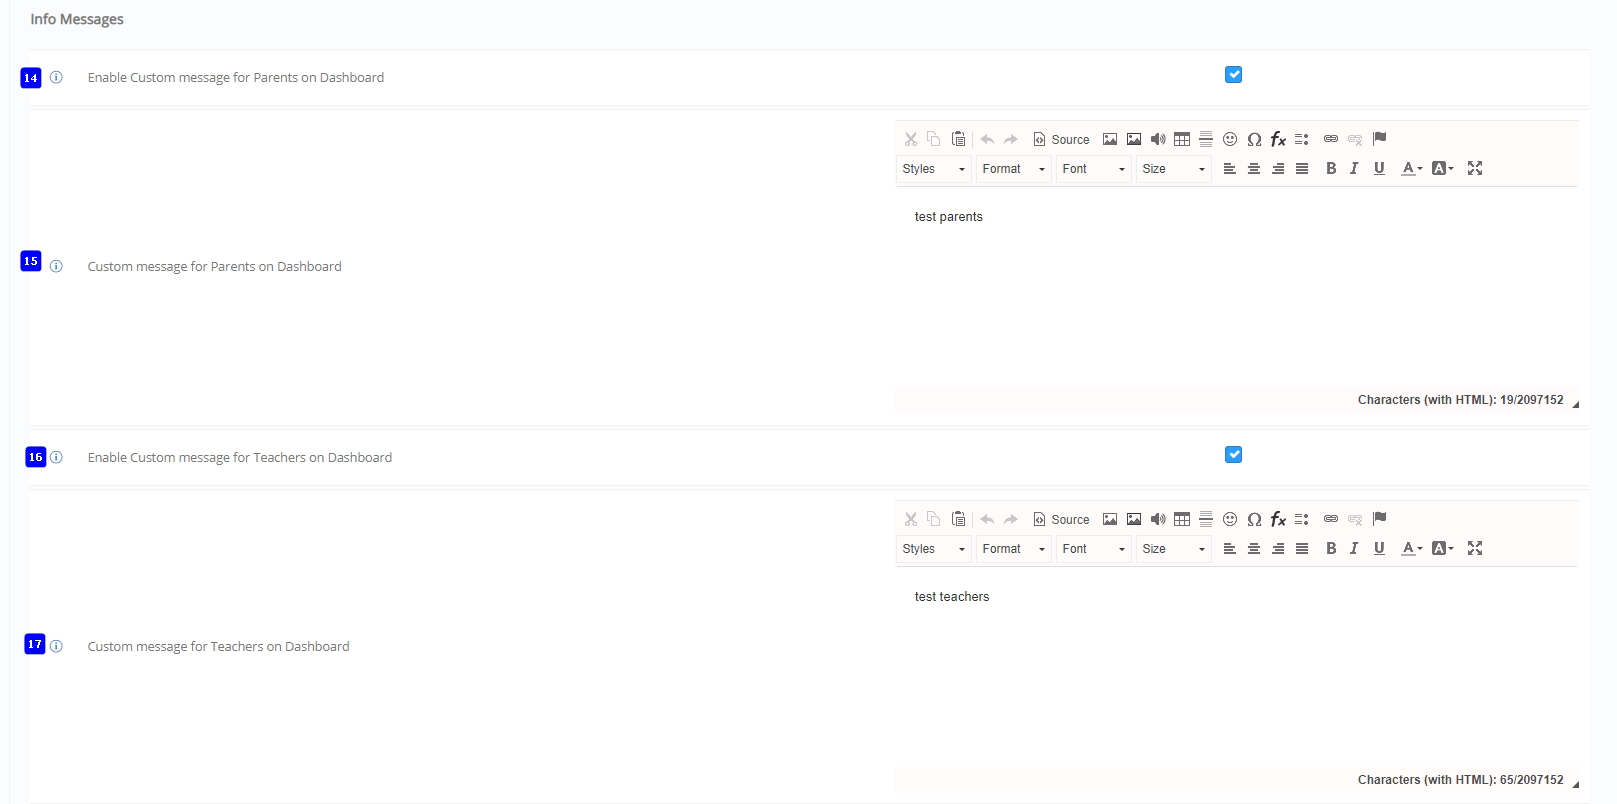 Figure 260
Click on Save button to save all your changes to the Personnel & Contacts Settings.
Questionnaires
Basic Settings
- Hide Anonymous Entries Check from Questionnaires: Hides the anonymous entries check when submitting a questionnaire
 Figure 261
Mobile App
Messaging
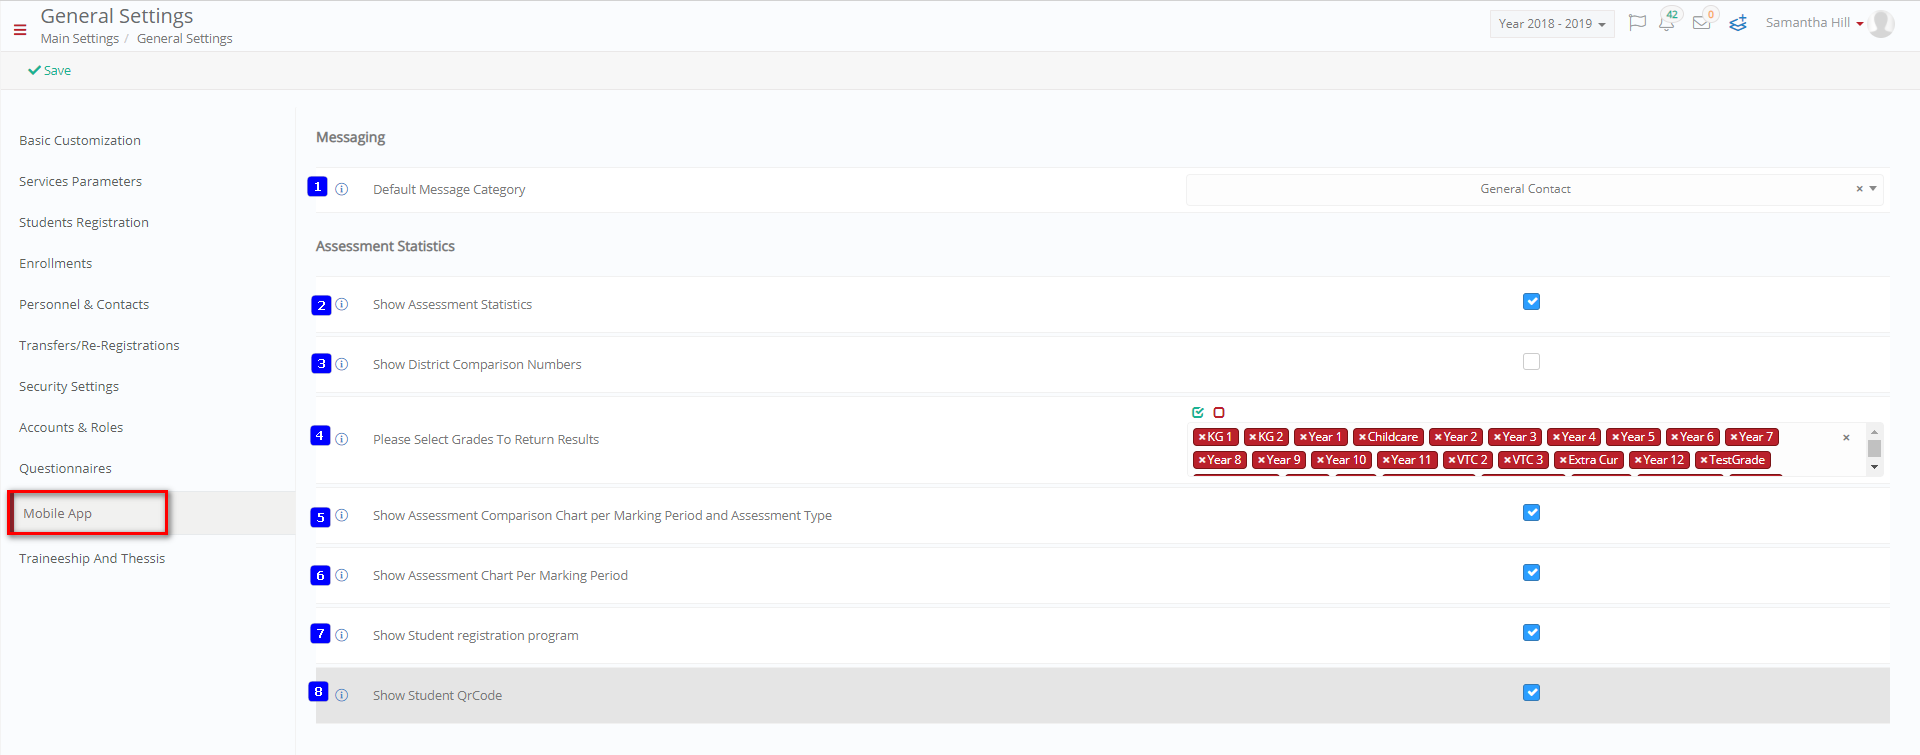 Figure 262
- Default Message Category: Choose the default message category to be used on the mobile app e.g., Academic Notifications.
- Show Assessment Statistics
- Show District Comparison Numbers
- Please Select _Grades_ To Return Results
- Show Assessment Comparison Chart per Marking Period and Assessment Type
- Show Assessment Chart Per Marking Period
- Show _Student_ registration program
- Show Student QrCode
Click on Save button to save all your changes.
Apprenticeships and Thesis
Apprenticeships and _Thesis_
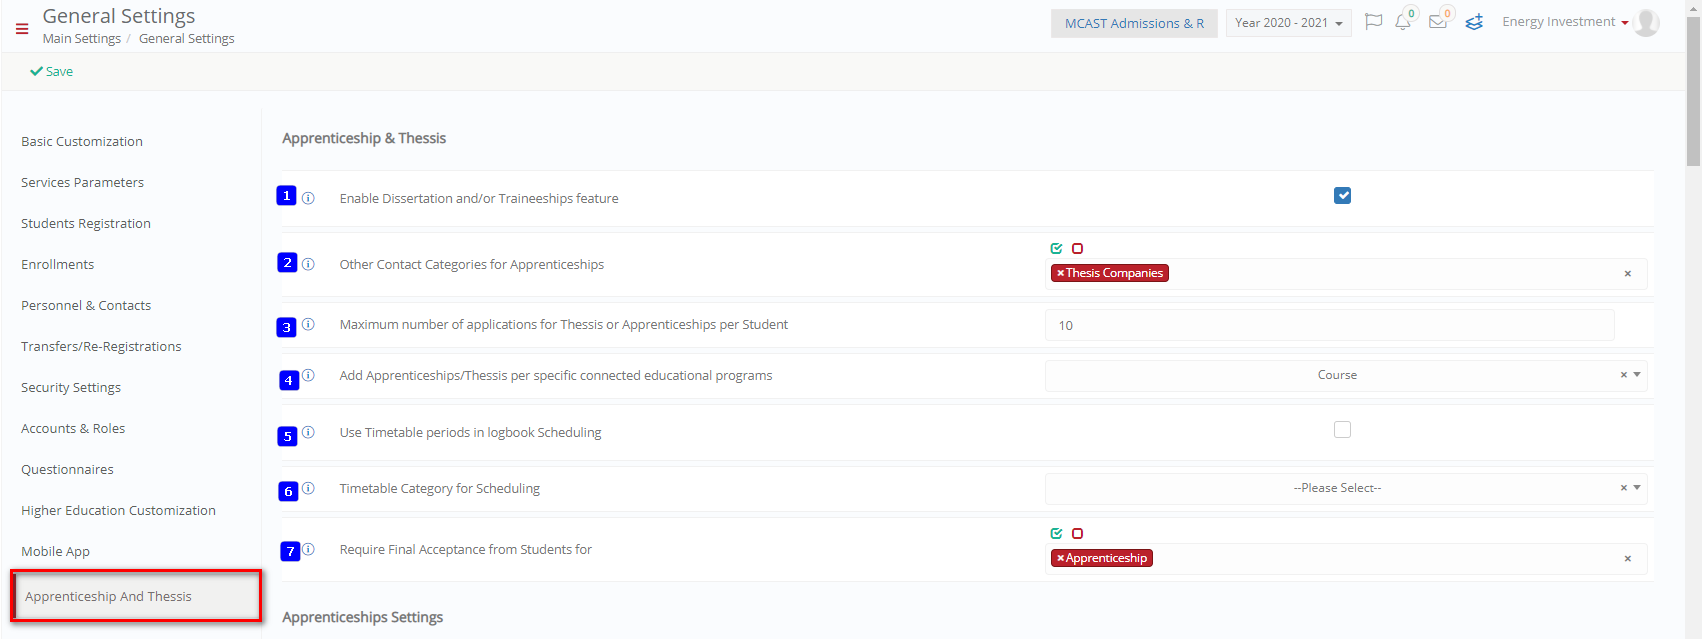 Figure 263
- Enable Dissertation and/or Traineeships feature: Enable the apprenticeship module for all users.
- Other Contact Categories for Traineeship: Configure which other product categories would be able to logon to access apprenticeships.
- Maximum number of applications for Thesis or Traineeship per Student: Set up the maximum number of applications per _Student_.
- Add Apprenticeships/_Thesis_ per specific connected educational programs: Specify if the apprenticeship is to be linked by _Grade_, _Stream_ etc.
- Use Timetable periods in logbook Scheduling: Enable this setting to link the attendance in the logbook to the timetable calendar periods.
- Timetable Category for Scheduling: Select the timetable category to be used for scheduling.
- Require Final Acceptance from Students for: In cases where students have multiple apprenticeship job offers, this setting is used to ensure that the students make a final choice and select one job offer.
_Internship_ Settings
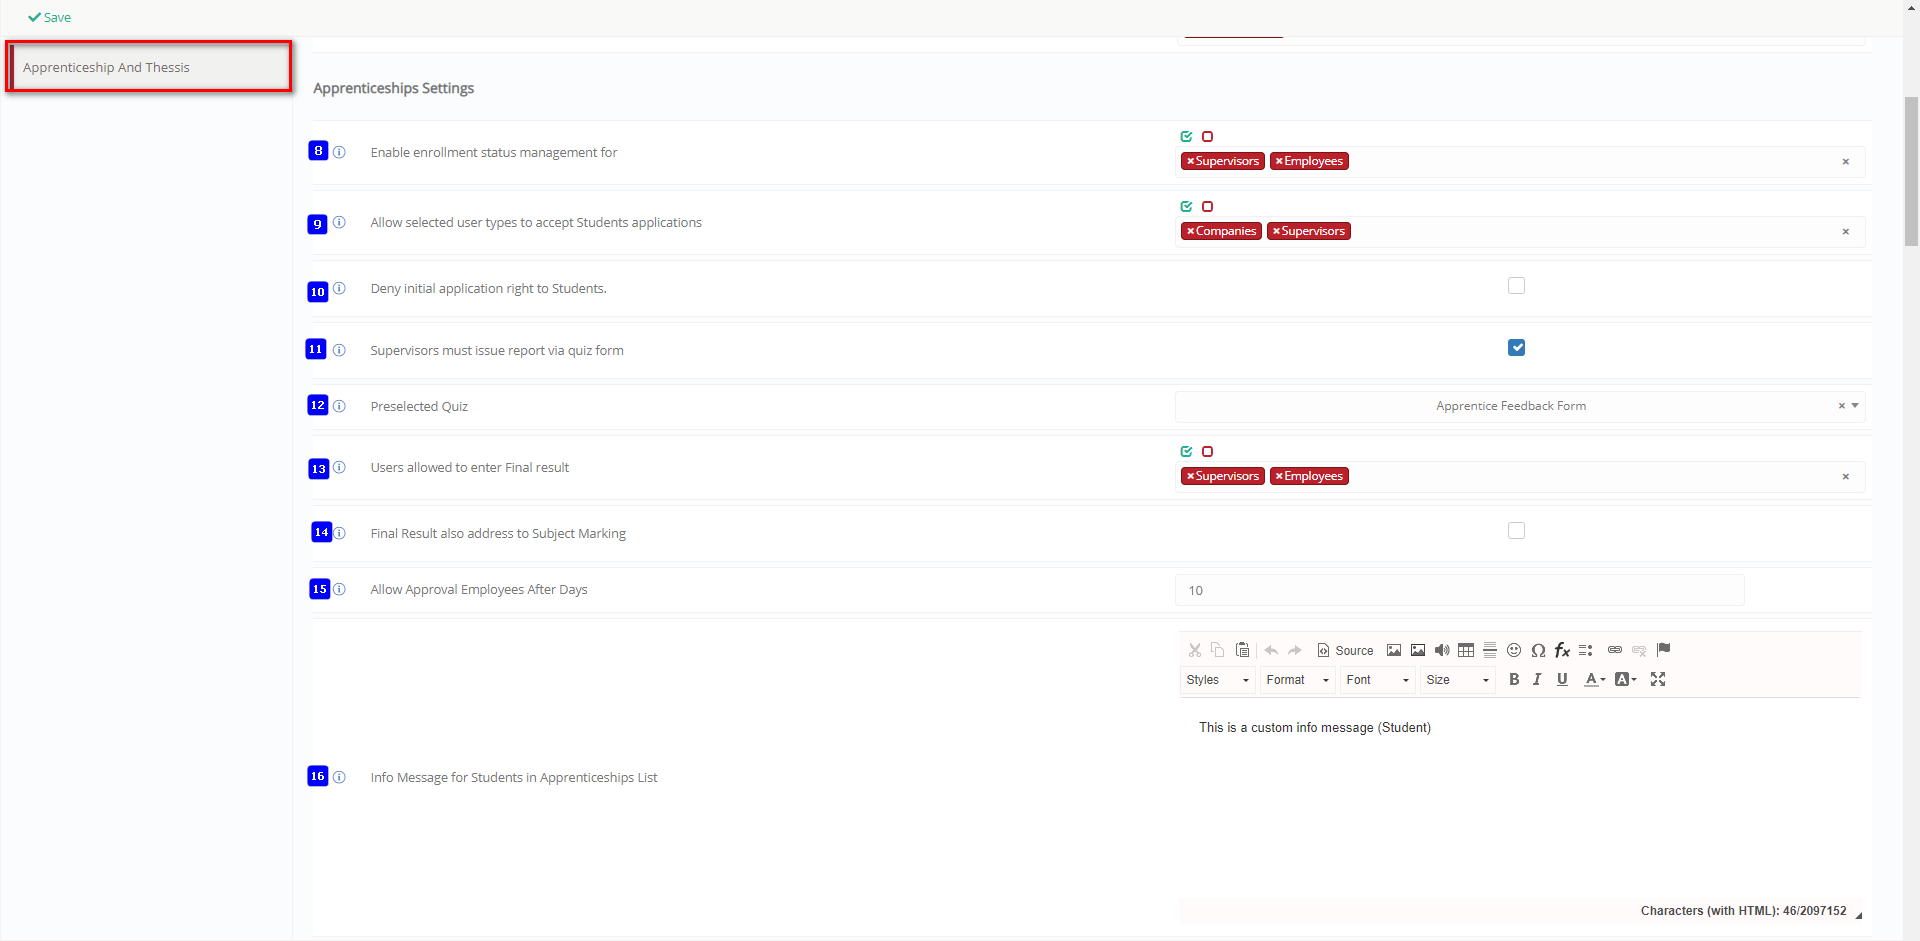 Figure 264
- Enable enrollment status management for: Use this setting to select which user groups can make changes/manage apprenticeship statuses e.g. supervisors, employees, etc.
- Allow selected user types to accept Students applications: Select the user groups allowed to accept student applications e.g. employers, supervisors, etc.
- Deny initial application right to Students: This is a special right used by the administrator to assign students to jobs instead of the _Students_ applying themselves.
- Supervisors must issue report via quiz form: The quiz module is used to create survey questions. Check this box if a supervisor must issue a report in a survey form. These can be used to evaluate the students or to evaluate the company.
- Preselected Quiz: Select which survey (quiz) will be presented to the supervisor.
- Users allowed to enter Final result: Select which user (supervisor, employees, and/or companies) can enter the final result for the students.
- Final Result also address to Subject Marking: Check this box if the final result can be marked directly from the apprenticeship and assigned as the final mark of the subject in the Gradebook.
- Allow Approval Employees After Days: Specify the number of days to wait before employees can approve attendance entries. E.g. if 10 is specified the employees would not have the function to approve the logbook or students’ entries until after 10 days. Only the employers (companies) would be able to approve in the first 10 days, and employees would be able approve after the 10 days have elapsed if not approved by the supervisor.
- Info Message for Students in List: Used to display relevant information to _Students_ in the apprenticeship list.
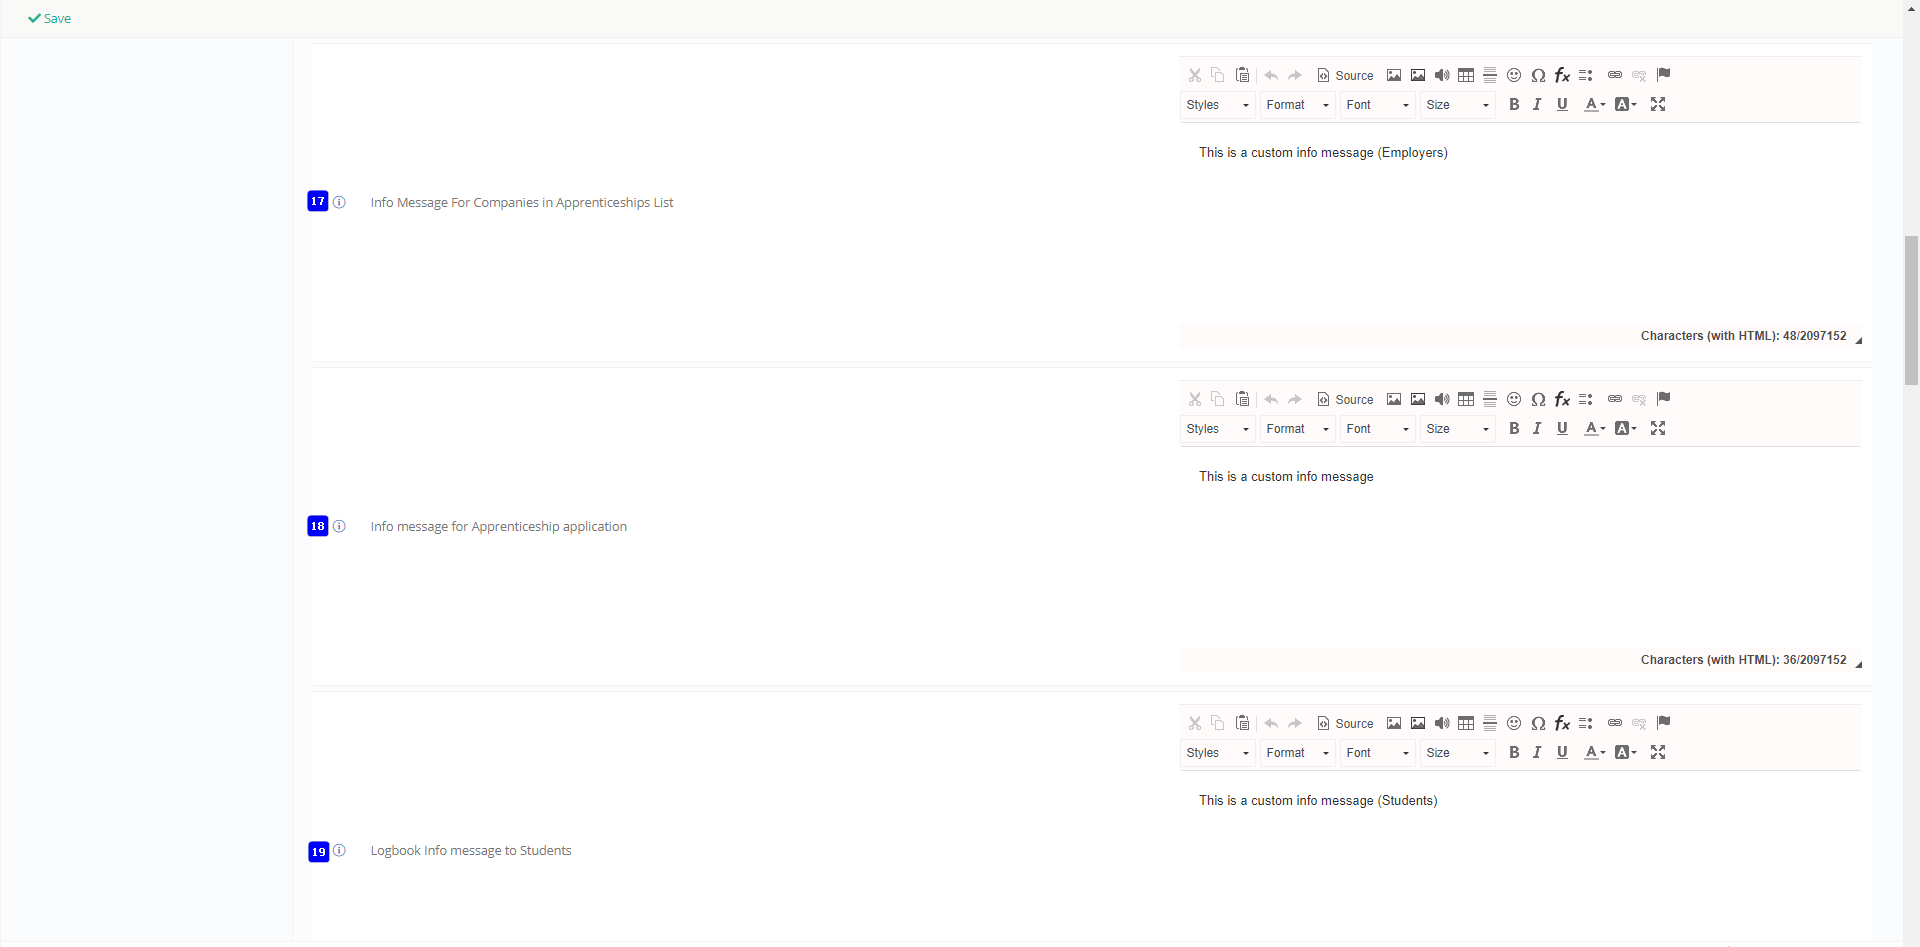 Figure 265
- Info Message for Companies in List: Used to display relevant information to companies (employers) offering apprenticeships.
- Info message for application: Used to display relevant information to _Students_ during apprenticeship application.
- Logbook Info message to Students: Used to display relevant information to students during logbook submission.
 Figure 266
- Logbook Info message to supervisors: Used to display relevant information to supervisors during logbook reviews.
- Default attendance status for logbook: This is used to set the default attendance status in the logbook. E.g. Presence.
- Allowed user types to create and manage contracts: Set which type of users can create and manage contract.
- Allowed user types to upload contract templates: Set which user type can upload contract templates.
- Show logbook plan from entity: This allows you set which timetable plan to use for the logbook entries.
- User types allowed to upload availability plan: These are the user types allowed to upload an availability plan during creation of the apprenticeship.
- Lock Logbook attendance submission: This locks attendance submission for selected users. E.g. Employees, Employer, Supervisor or _Student_.
Thesis Settings
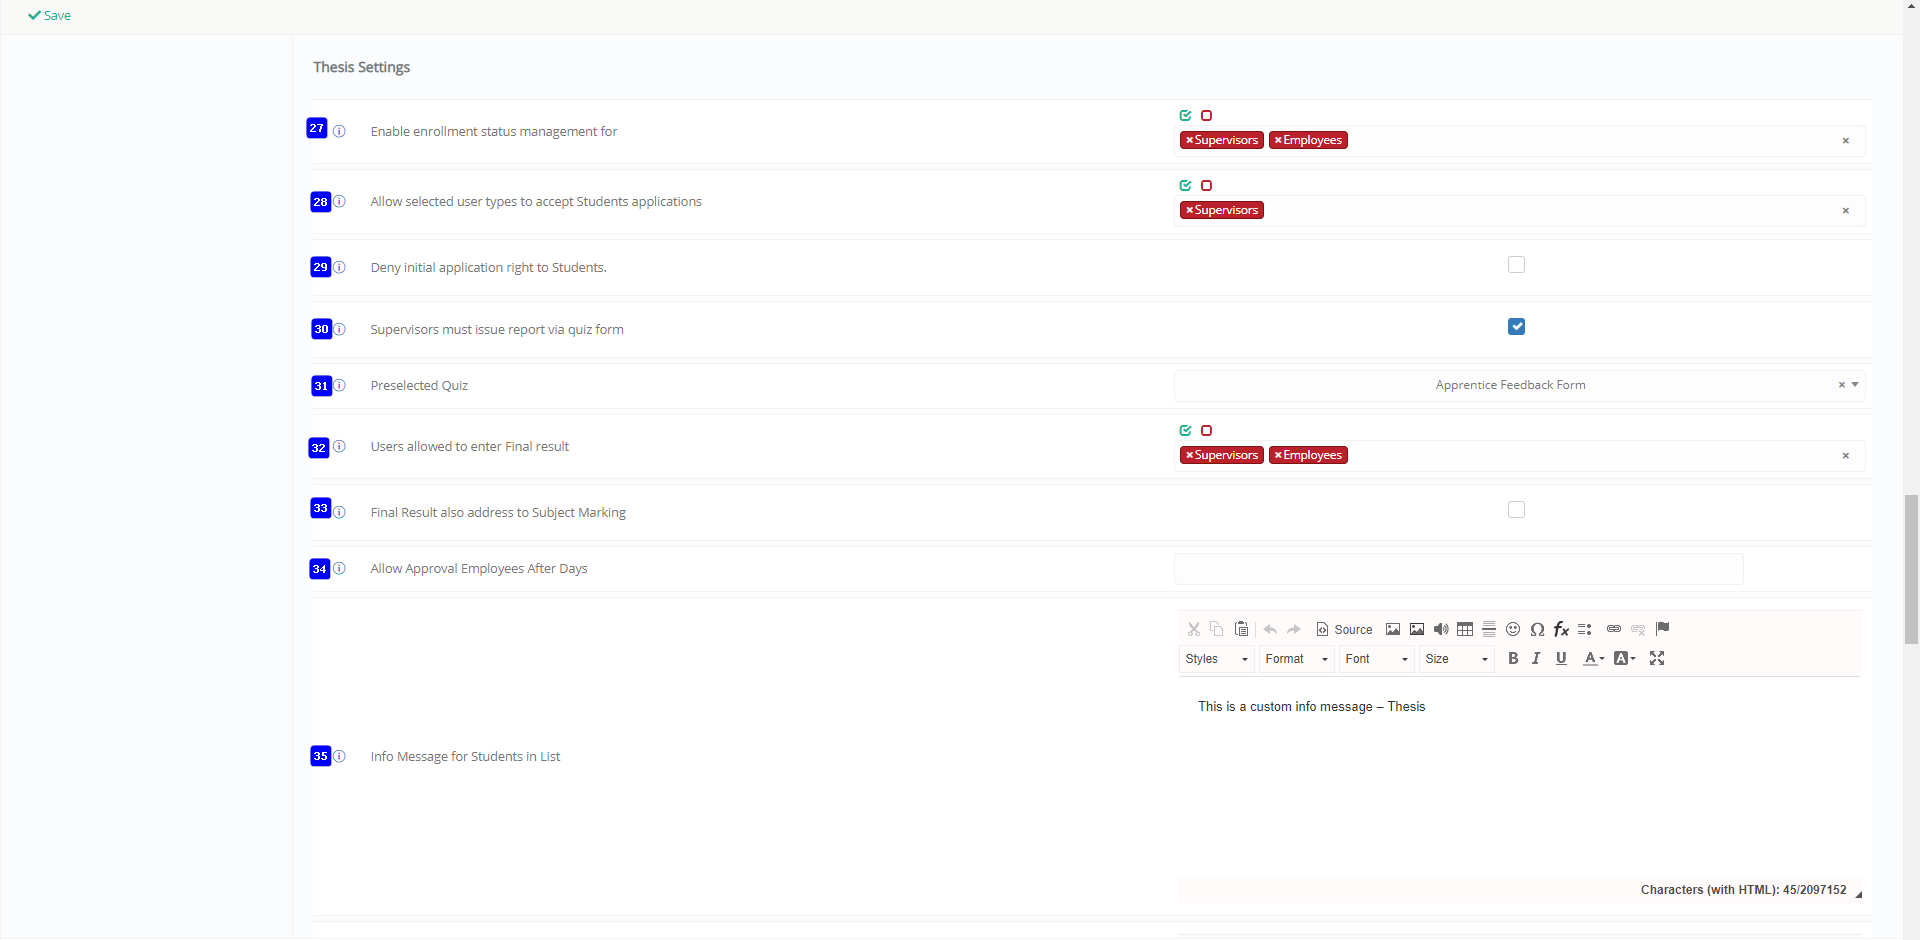 Figure 267
- Enable enrollment status management for: Users from the selected user group will be able to set the enrolment status for _Internships_.
- Allow selected user types to accept Students applications: This allows only the selected user group, e.g. supervisors, to accept student applications.
- Deny initial application right to Students: This option would deny the _Student_ the ability to apply for internships or _Thesis_.
- Supervisors must issue report via quiz form: Enabling this setting allows the supervisor to issue reports related to the apprenticeship form.
- Preselected Quiz: Selected the default quiz to be used in apprenticeship surveys.
- Users allowed to enter Final result: Select the users allowed to enter the final result the student obtained in the apprenticeship.
- Final Result also address to Subject Marking: This option would include the results of the student’s thesis or internship to a subject marking. This is if the _Internship_ or _Thesis_ is part of a subject’s criteria for completion.
- Allow Approval Employees After Days: Allows employees to approve attendance entries not approved by the employers after X days.
- Info Message for Students in List: Informational messages for _Students_.
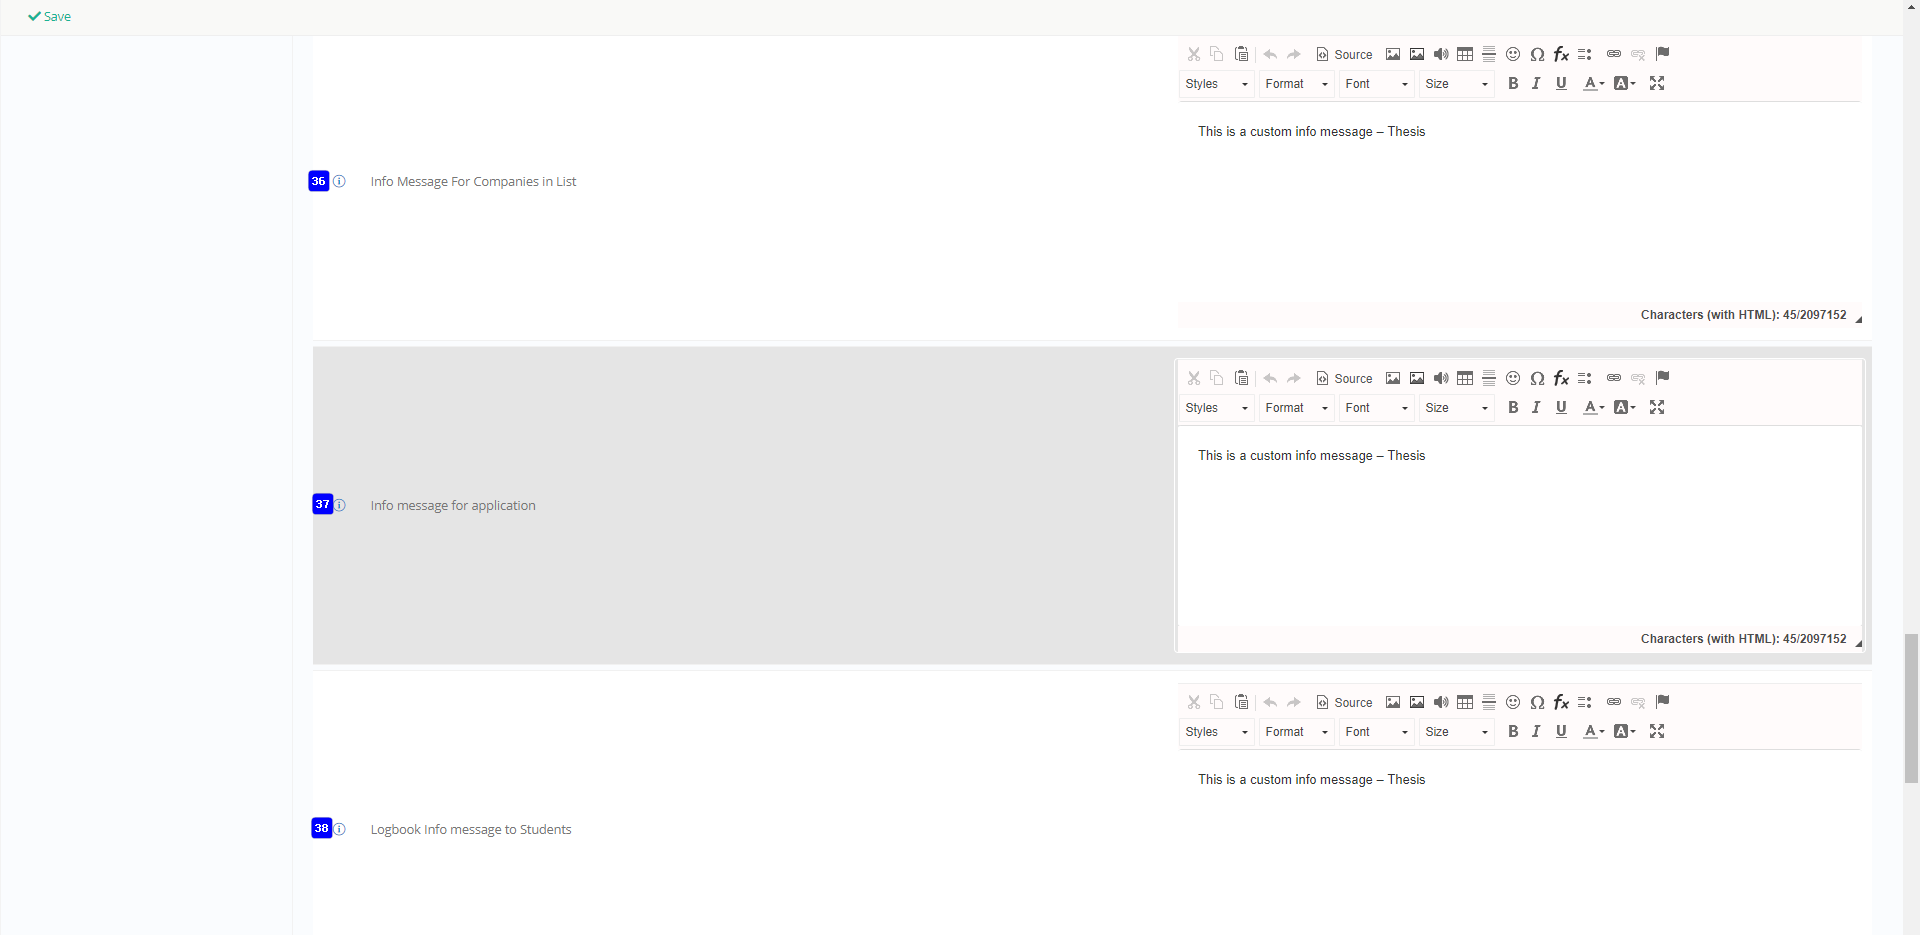 Figure 268
- Info Message for Companies in List: Informational messages for employers.
- Info message for application: Informational message to displayed during the application process.
- Logbook Info message to Students: informational message to be displayed to _Students_ when accessing the logbook.
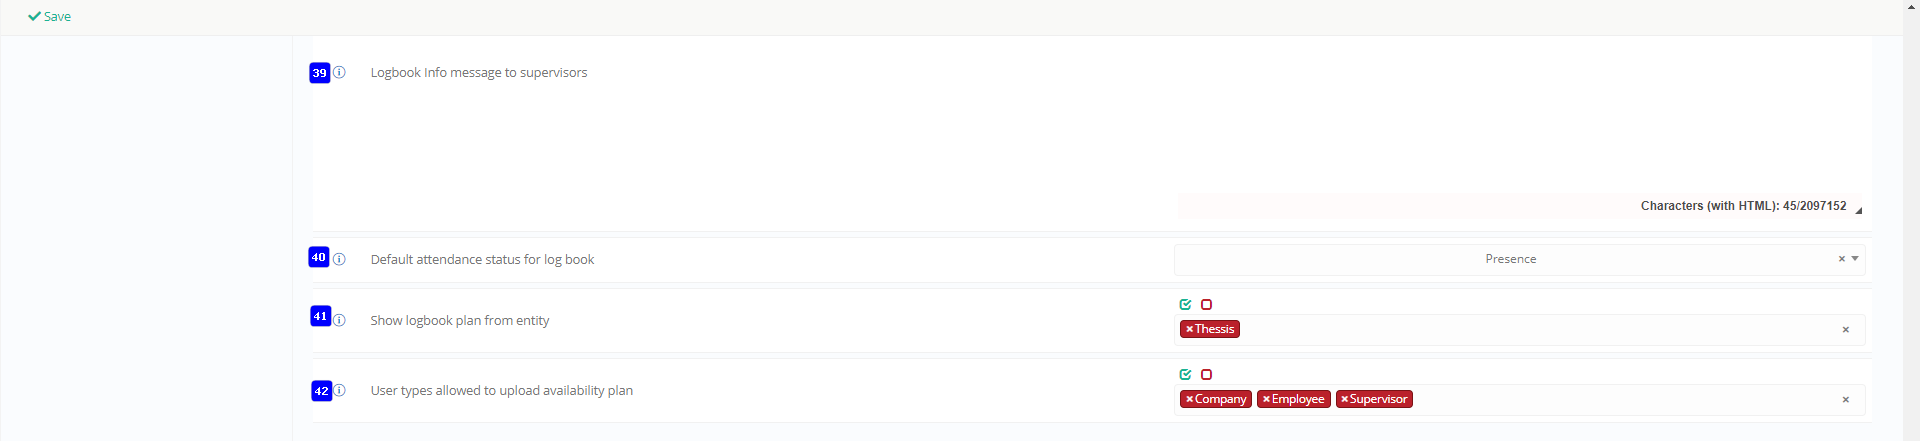 Figure 269
- Logbook Info message to supervisors: informational message to be displayed to supervisors when accessing the logbook.
- Default attendance status for logbook: default attendance status for students when they submit an attendance entry in the logbook.
- Show logbook plan from entity: Select the user types that will be able to see the Logbook for the _Student_ who is doing an internship; in the student form.
- User types allowed to upload availability plan: Select the user types that can upload availability plans for a students _Internship_ or _Thesis_.
Internship Notification Settings
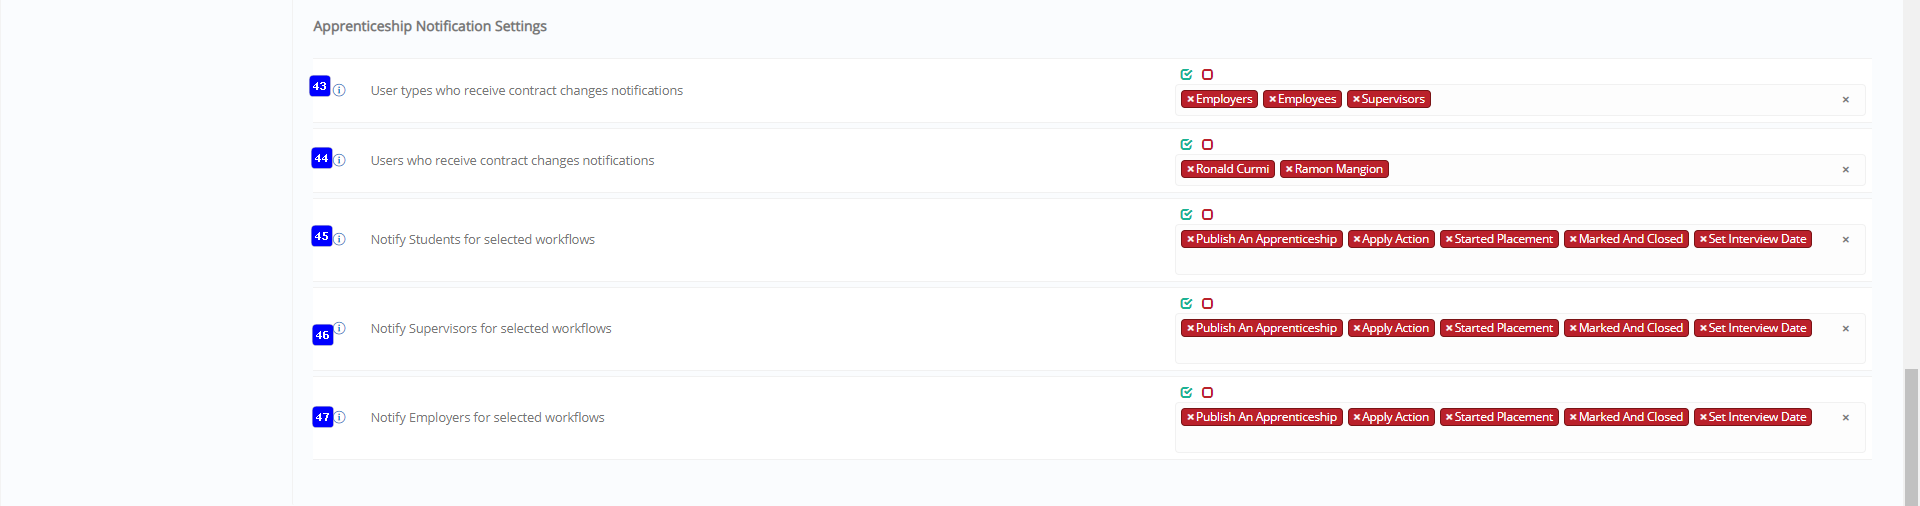 Figure 270
- User types who receive contract changes notifications: These are the user groups who receive notifications once there is an update to the contract.
- Users who receive contract changes notifications: These are the specific users who receive notifications once there is an update to the contract.
- Notify Students for selected workflows: Notifies _Students_ if the job/apprenticeship goes through any of the selected workflows. E.g. Started Placement, Set Interview Date.
- Notify Supervisors for selected workflows: Notifies supervisors if the job/apprenticeship goes through any of the selected workflows. E.g. Started Placement, Set Interview Date
- Notify Employers for selected workflows: Notifies employers if the job/apprenticeship goes through any of the selected workflows. E.g. Started Placement, Set Interview Date