

Classter’s Billing Module allows you to add interest in already settled arrangements. Whether it’s because of delays in payments or to match the inflation rate, an interest can be added in bulk with a few simple steps.
In this article, we will see the simple steps of configuration required for this to be possible, as well as the management actions that an employee must do.
Configuration
Step 1: Activate Interest Management for Students
The first thing you need to do is enable the functionality. This is achieved in CONFIGURATION > Financial Settings > General Settings in the Reductions, Discounts & Loans tab. (Figure 1)

Figure 1
Step 2: Create a Discount/Loan Category
The next thing that needs to be done is create a Category in CONFIGURATION > Financial Settings > Dropdown lists > Discount/Loan Categories (Figure 2)
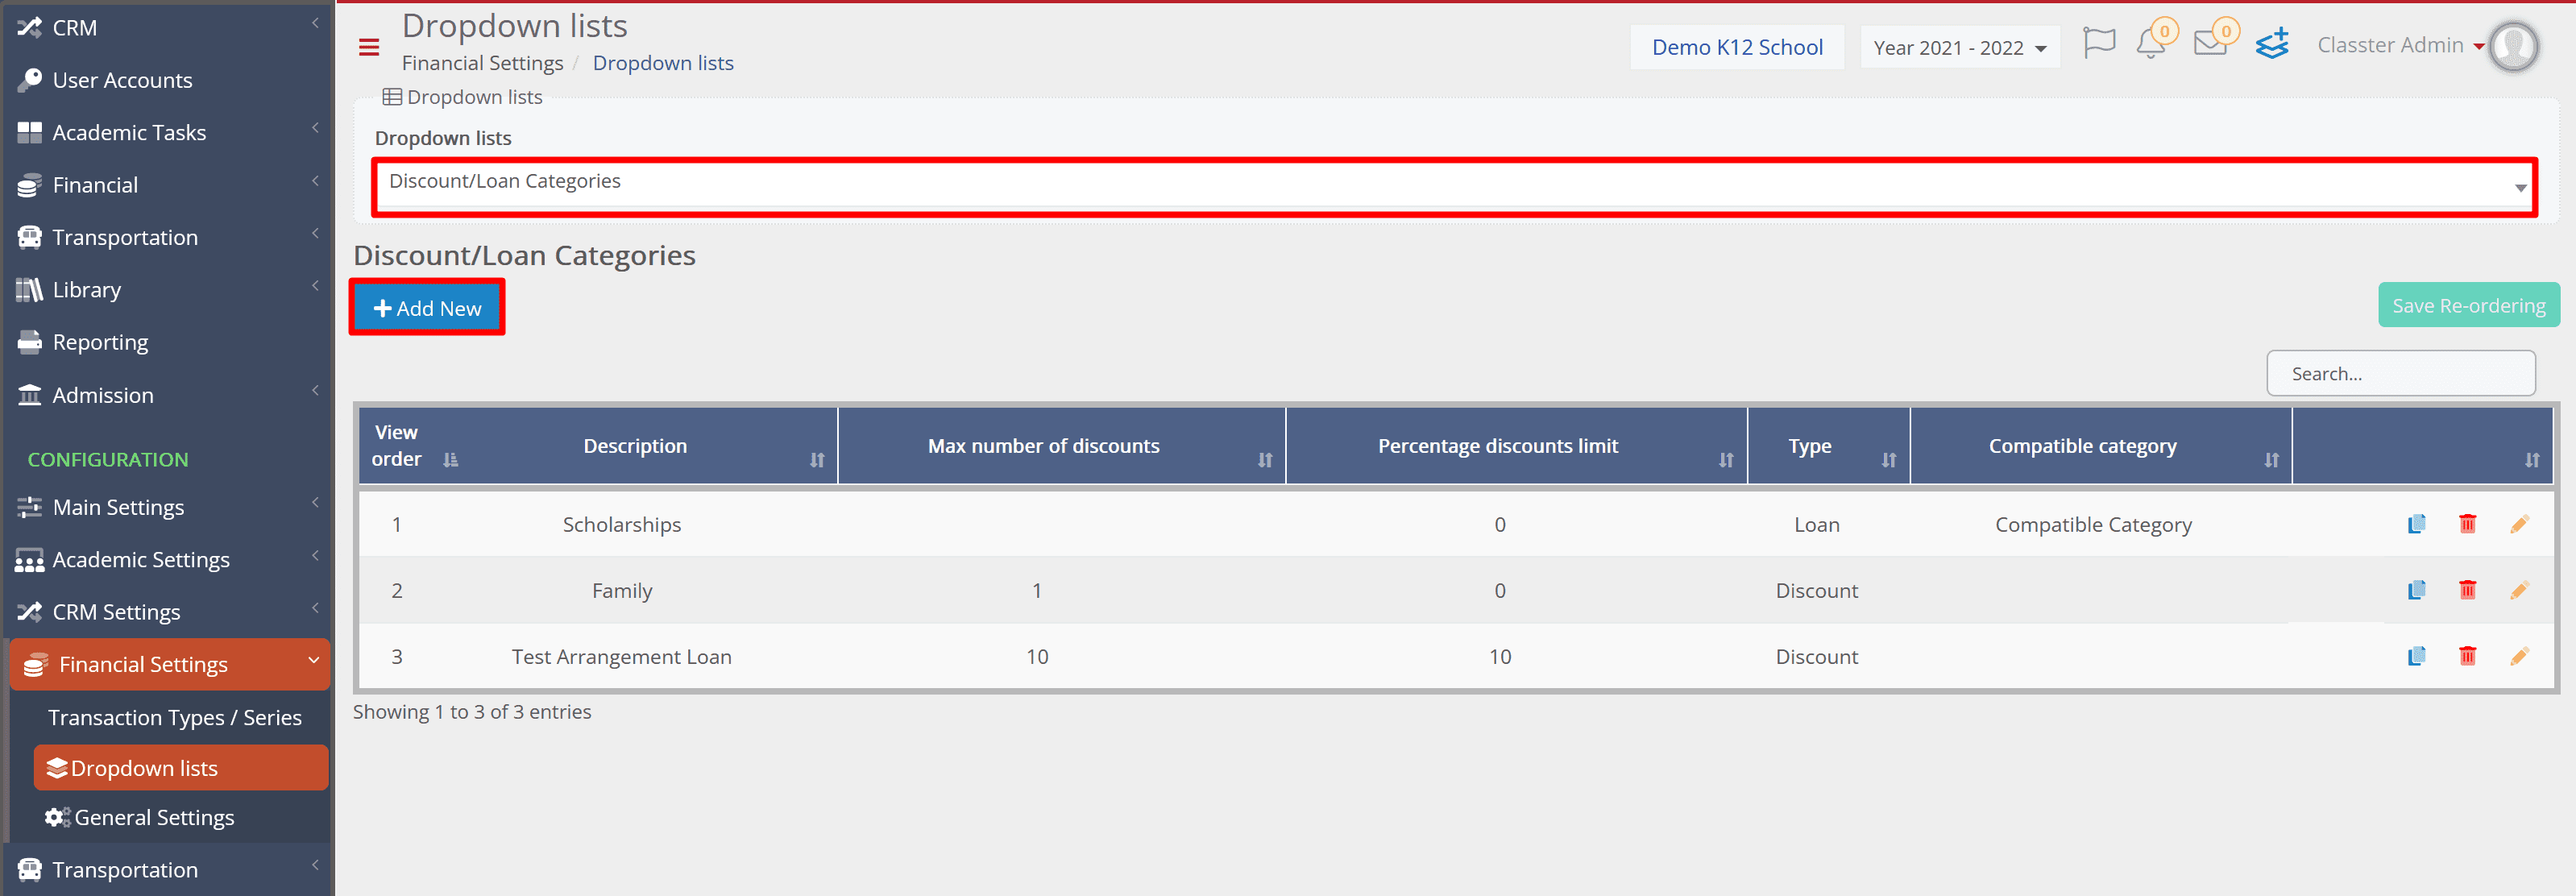
Figure 2
When creating a new category, we need to add a Description and select the Interest option in the Type field. (Figure 3)
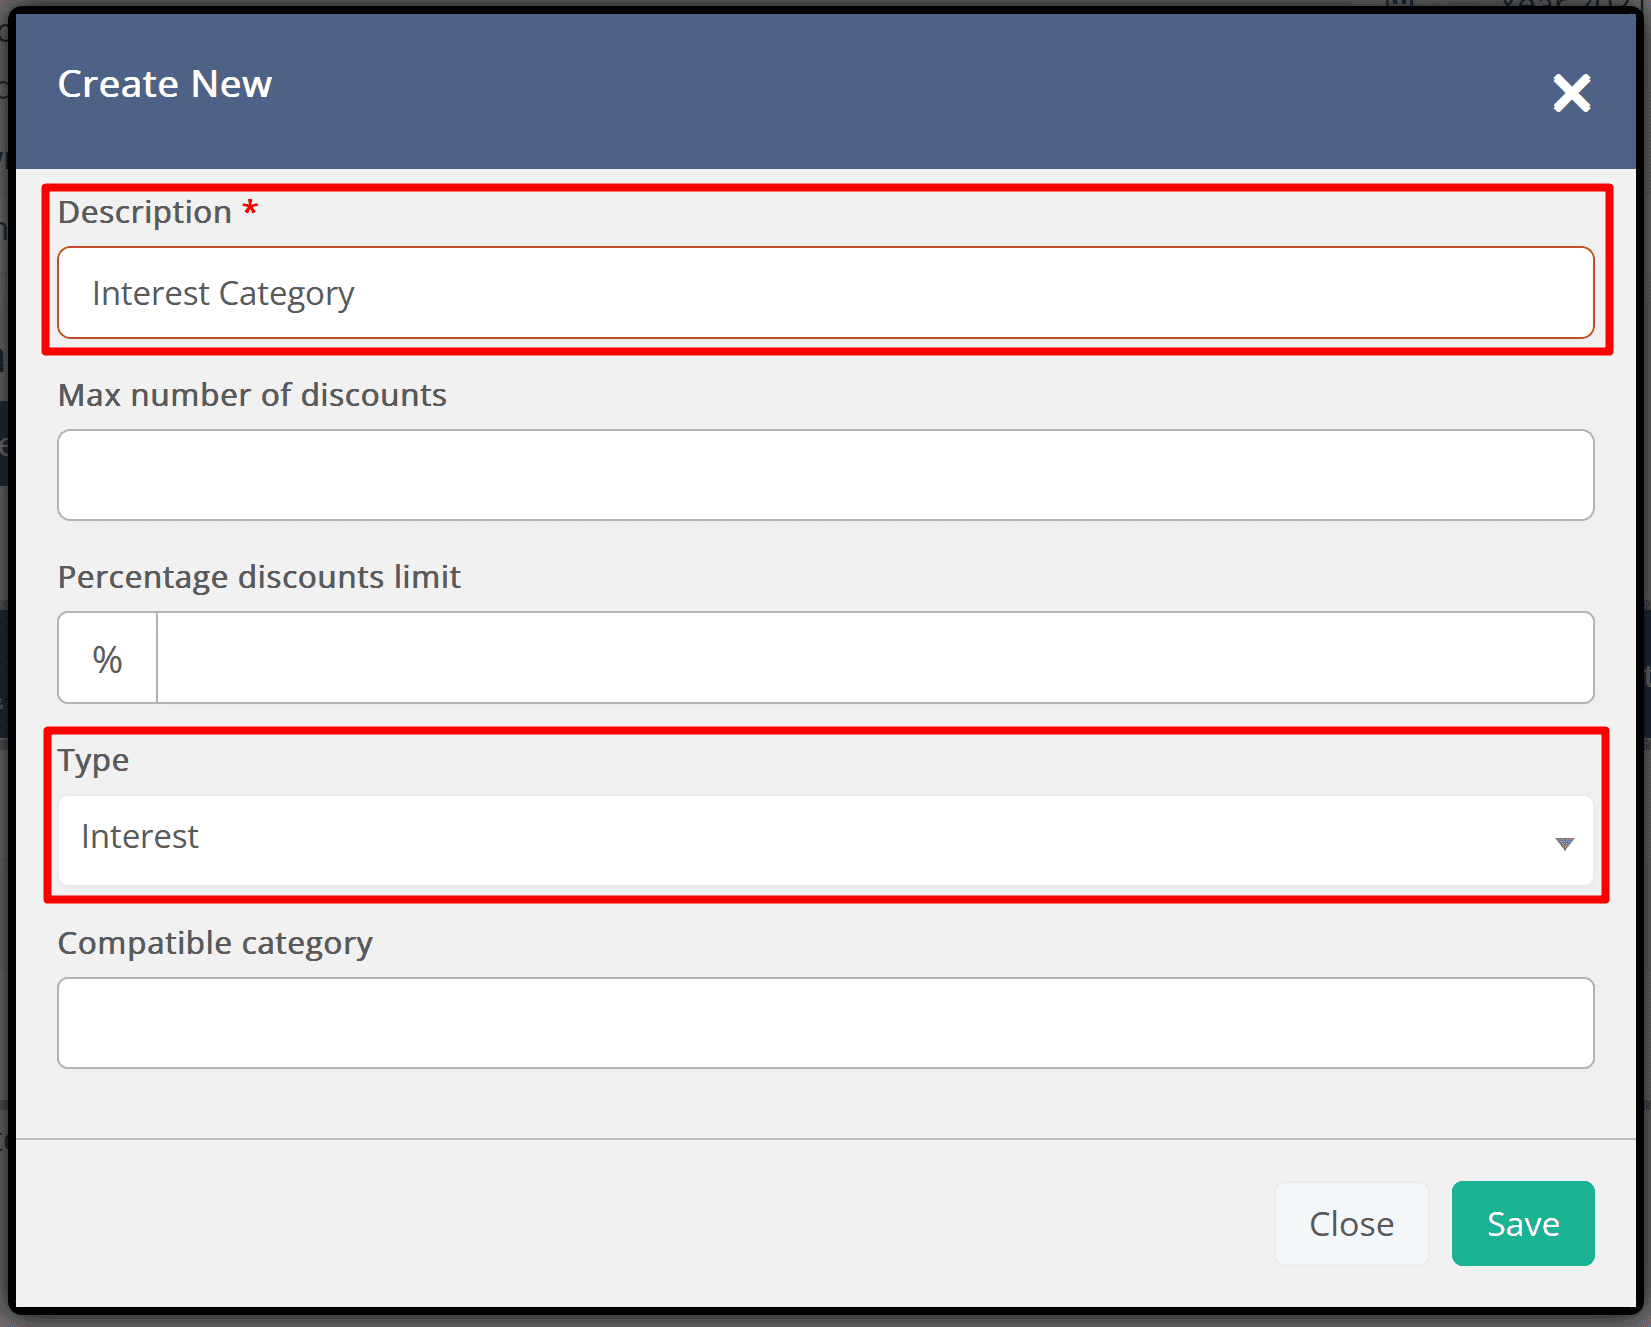
Figure 3
Step 3: Create the Discount/Loan Types
The next step is to create the interests that will be added to the students. This is done in CONFIGURATION > Financial Settings > Dropdown lists > Discount/Loan Types. (Figure 4)
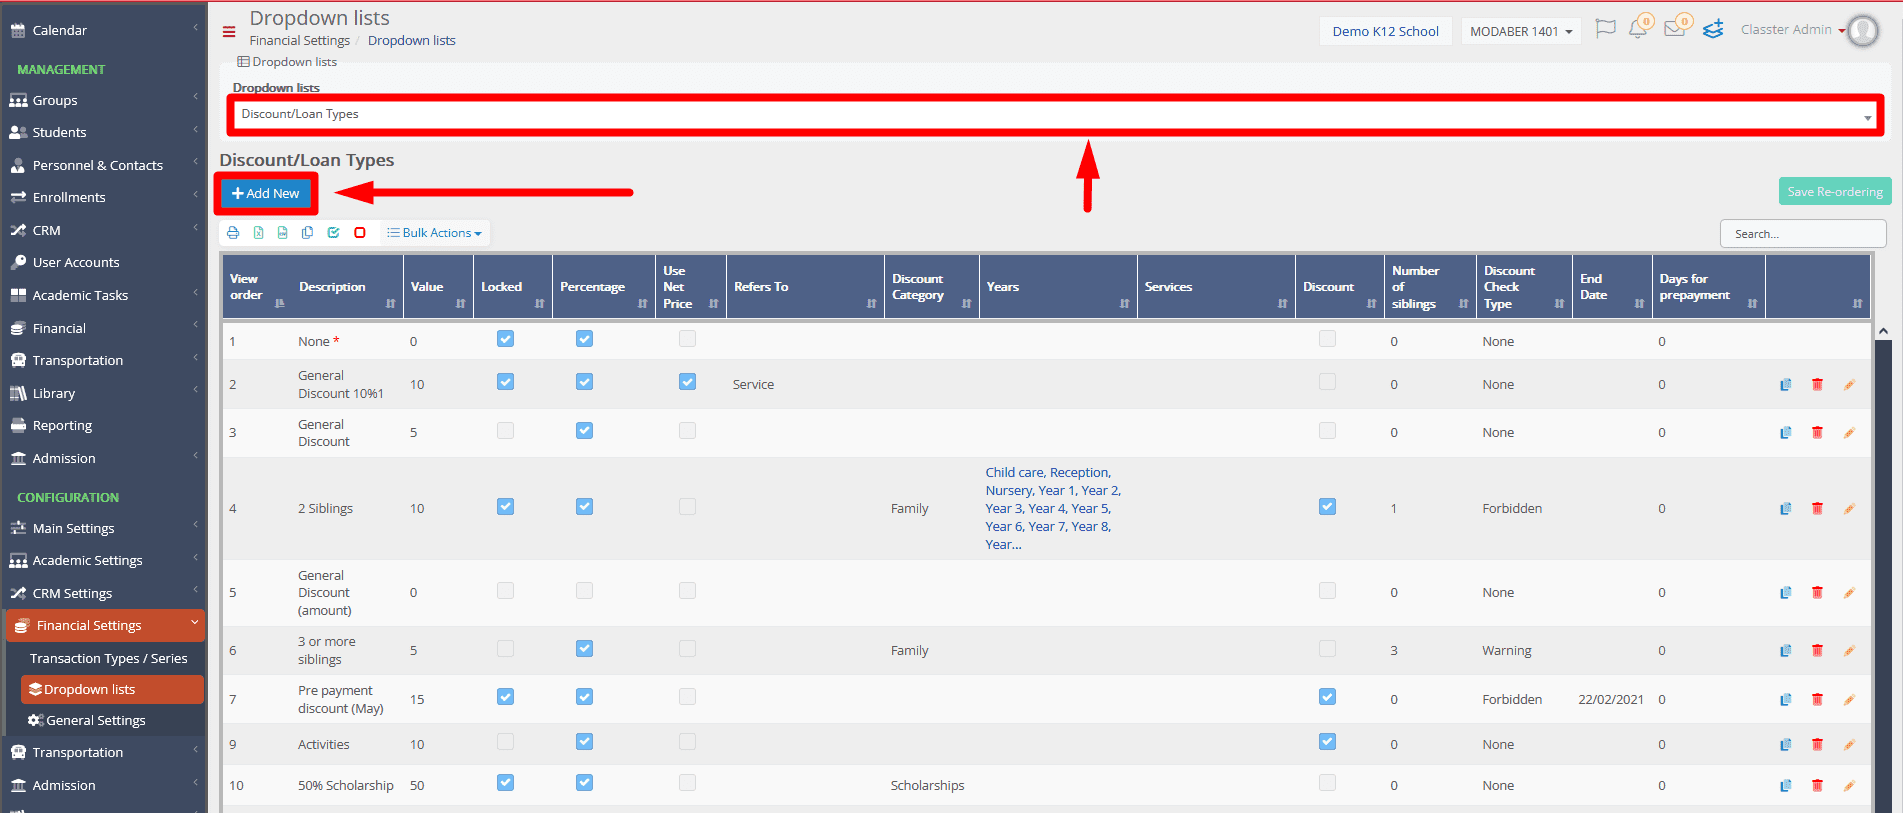
Figure 4
When creating those, you have to configure the following in the pop-up window:
- Add a description. Keep in mind that each type created here can only be applied once in an arrangement, so if you require adding interest multiple times in the same arrangement, then you will have to create a separate interest type for each one.
- Add a value. Now, if the interest is a percentage of the arrangement, add a value from 0-100. If you want it to be a flat amount, for example, 300 euros, then insert 300 in the Value field and keep the Percentage checkbox unchecked.
- Discount Category, select the one called “Interest Category”.
- Refers to, select the types of the arrangements for which you want to apply the interest to depending on the way your institute charges its students.
If you select Years/Programs and/or Services, then select the years and services for which you might need to apply the interest to in the Years and Services fields accordingly. Click on the Save button. (Figure 5)
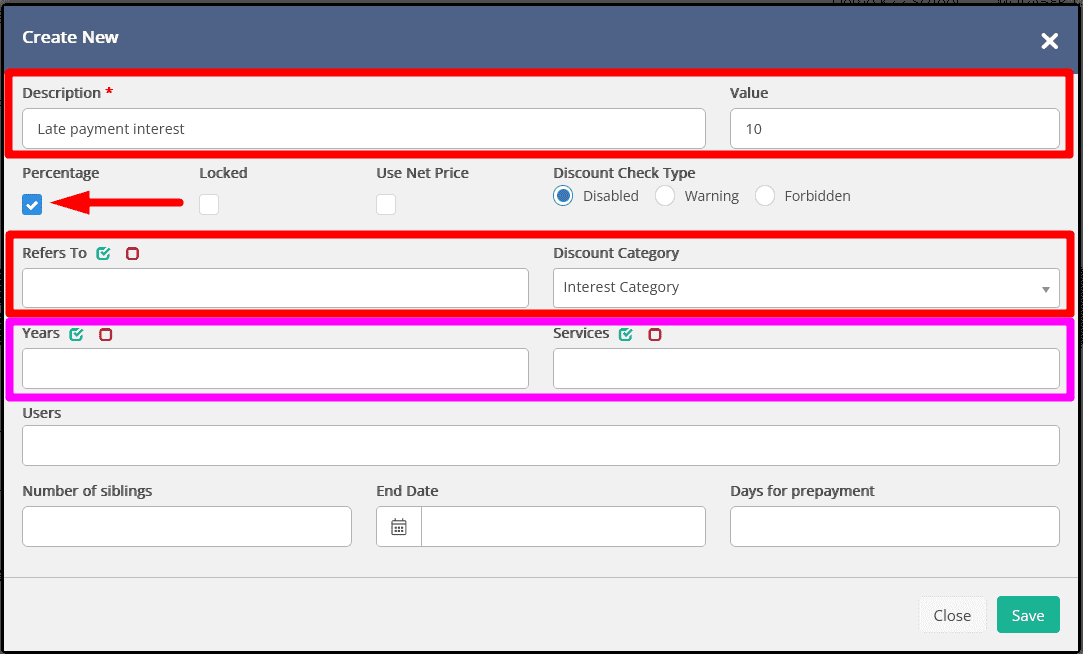
Figure 5
Up to this point, the configuration is finished. The following steps are in regard to the use of the interest and how it can be applied to the financial arrangements of your choice.
Step 4: Apply interest to the students that delayed a payment
Now, since we are talking about using the interests, let’s see how through an example.
Let’s say you want to apply interest to the students that haven’t paid a month’s installment.
To do that, you must go to the Financial Overview, select the View Type “Per Arrangement” and filter the students that haven’t paid for, let’s say October.
To do that, you need to switch in the “Per Arrangement” View Type, uncheck the “Regardless of date” checkbox, set the date filters to see only the arrangements with an installment payment date within October and select to see only outstanding payments. (Figure 6)

Figure 6
Now, when you click search, you will get the list of arrangements for which the payment is outstanding for October up to date.
If you want to apply the interest to people that have paid but did so after the 31st of October, then you need to select the 31st of October in the “Show Payments until” filter. (Figure 7)
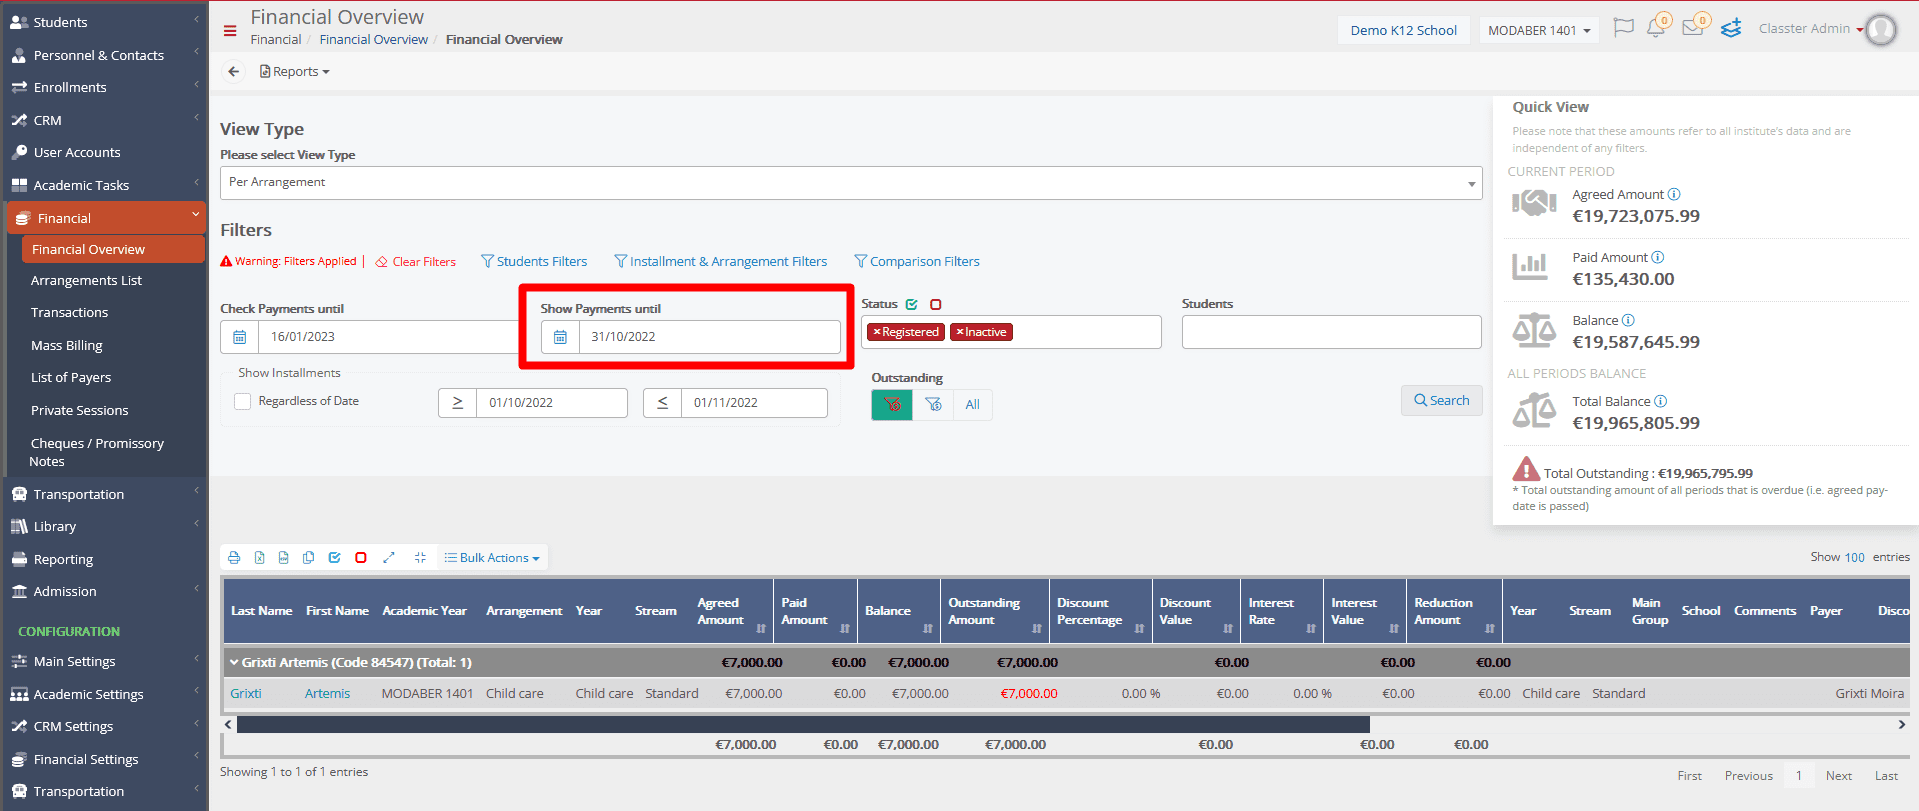
Figure 7
Now you will have the list of all the Arrangements that had an installment in October and were not paid until the 31st. (Figure 8)
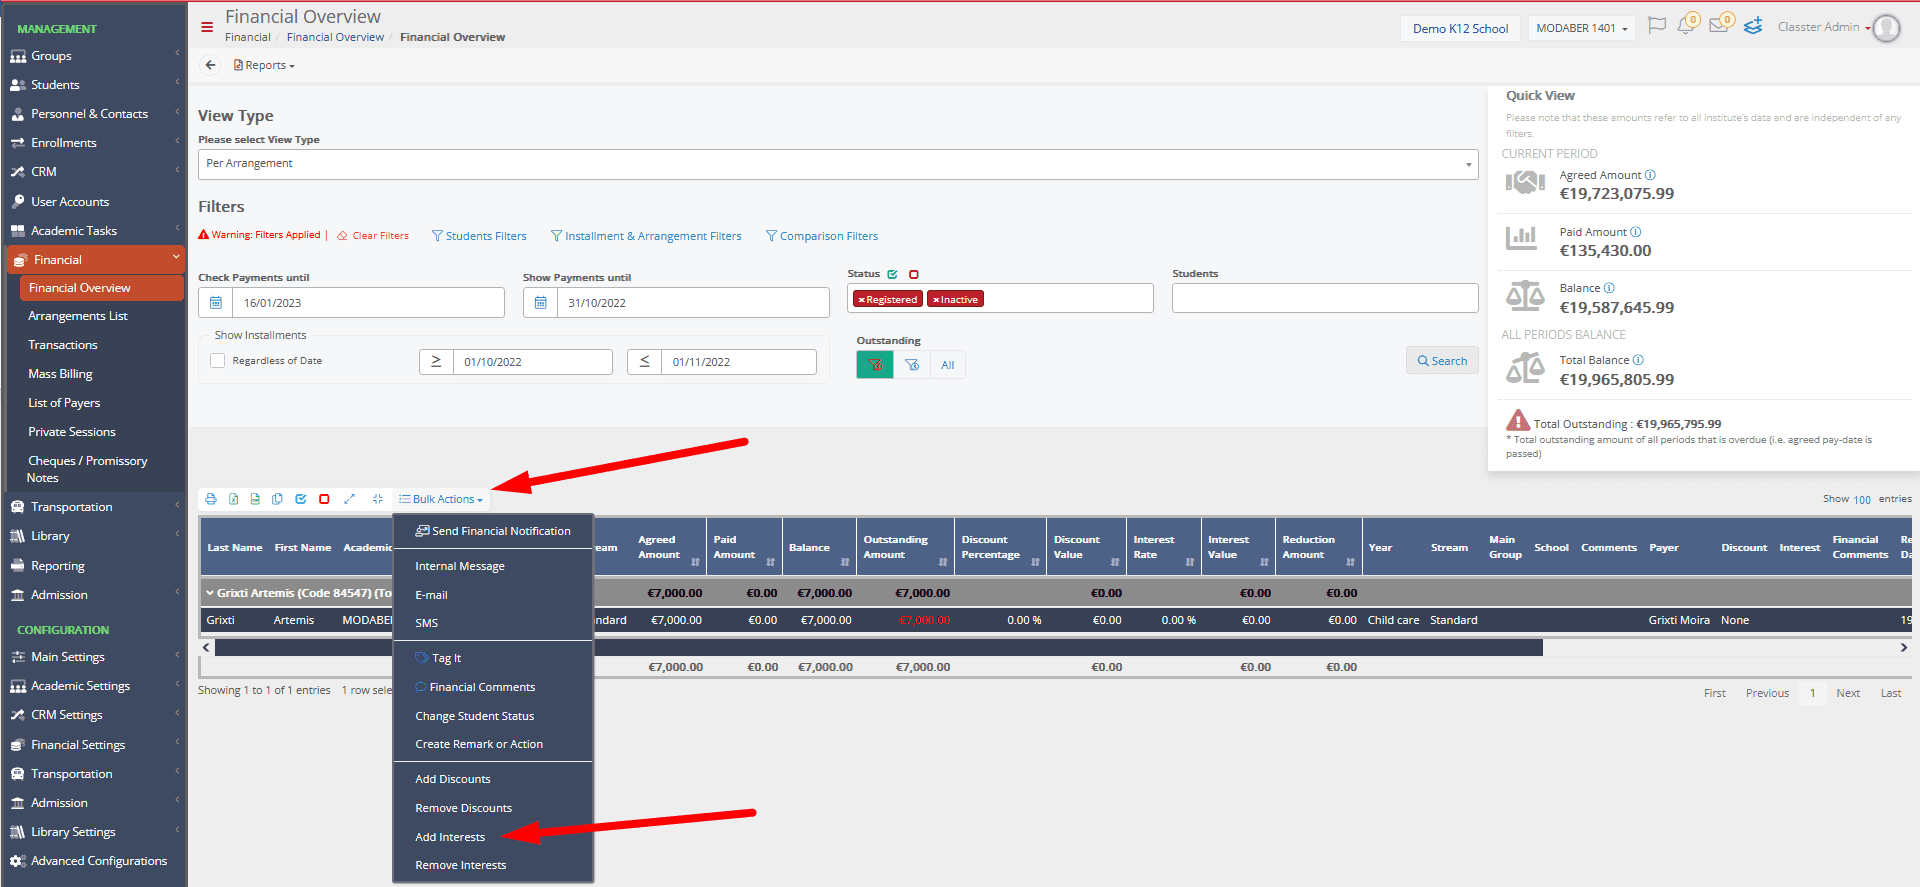
Figure 8
Select them and click “Add Interests” from the bulk actions.
In the pop-up window, the Late Payment Interest should be added. If more than one are to be added, it is important to select the order of the calculation with one of the three options:
- Value First and then Percentage
- Percentage first and then Value
- User selection (view order) (Figure 9)
 Figure 9
After the appropriate options about calculation, rounding and interest type used are selected, click on the Add button on the top to add as many interest types as needed.
Then click the bottom right Add button so that those are added to the arrangements. (Figure 10)

Figure 10
Step 5: Changing the payment date of the installments (optional)
If the interest added is in regard to the payment due dates, it is only natural that you might want to change that to a future date as well, after the interest is added.
You can change in bulk the payment due date of all the installments for which you added interest in selecting the “Per Installment” View Type in the Financial overview and have the filters set up the exact same way as you did in Step 3 so that you will get the exact same list.
Then, all the installments of the list must be selected, and from the bulk actions Edit the Pay Date. (Figure 11)
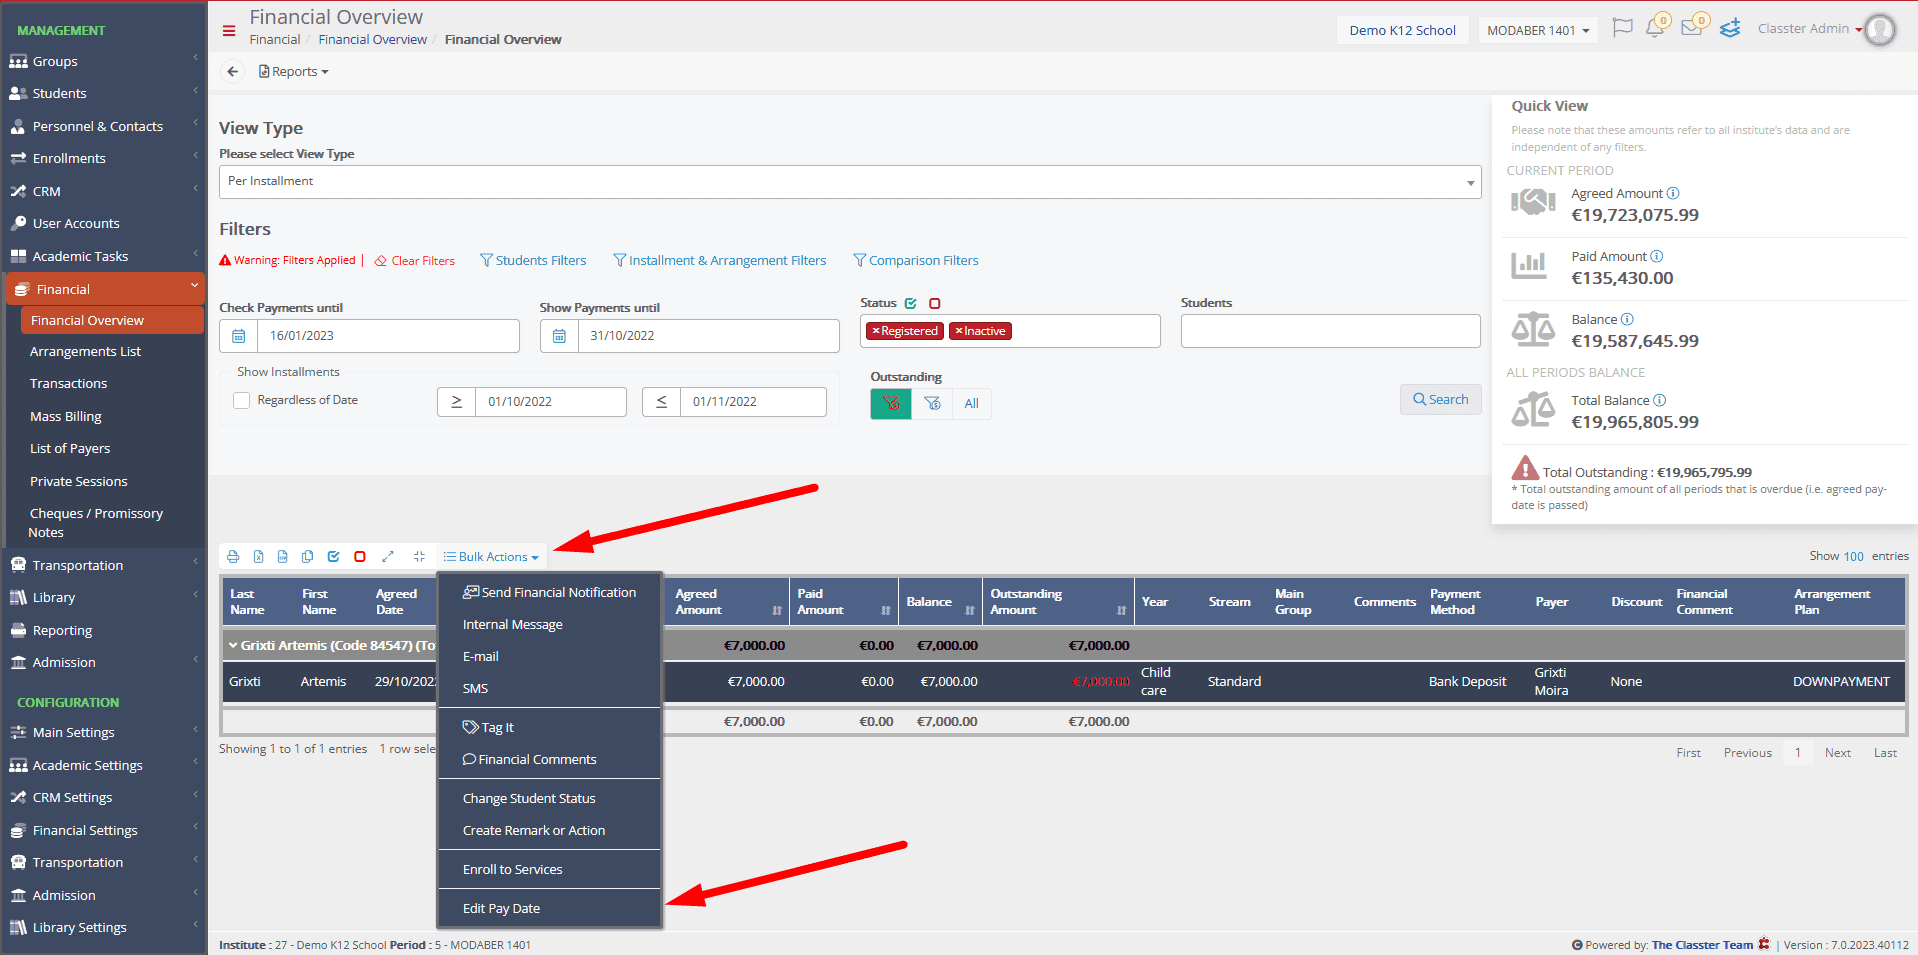
Figure 11
For more tips and tricks in Classter, become a member in our Community on Facebook and follow our Twitter page, or take a look at our how-to videos in our YouTube channel.